You do not have permission to edit this page, for the following reason:
You can view and copy the source of this page:
Return to Bulk Actions.
Users can perform bulk actions using the Bulk Actions tile on the Home page to create and update multiple entities directly within ICI. When uploaded, these entities become part of the ICI workflow and can be managed within ICI itself. You can also perform these actions using Excel Add-in. With this utility, the overhead of installing and updating ICI Excel Add-in periodically on your machine can be avoided, besides, reducing the time taken to create and/or update records in ICI.
Using Bulk Action you can:
Feature highlights:
You can enable the Bulk Actions tile through the Security Groups.
To enable the Bulk Actions tile:
The Bulk Actions tile enables you to:
To create a new Agreement:
1. Click Bulk Actions tile on the Home page. The Bulk Action Management page opens.
2. Click the Create New tile. The Create page opens with 2 tabs: Details and Attributes
3. In the Details section, select Create Agreement from the Bulk Upload Action drop-down.
11. Upload the Workbook with all the sheets as a zip file.
12. Click Add Batch. The Add Batch window opens.
13. Click Add. The batch file is displayed on the Bulk Action Management Index page with a statusAdded to Queue. The status changes toCompleted when the batch is successfully uploaded.
14. Click the arrow in the Action column of the batch to download the status file. The Download Status File window opens.
15. The Status File displays the status of the files that are uploaded successfully, partially or failed to upload. The Status column displays the status of the files and the reason for partial success or failure is displayed in the Reasons column. For example, if an Association fails but the Agreement is successfully uploaded, then it will be a partial success.
16. Click the Error File button on the Download Status File window to download the error processing file to understand the reason for failure.
1. Click Bulk Actions tile on the Home page. The Bulk Action Management page opens where you can update the existing entities by adding Amendments using the Update Existing tile.
2. Click Update Existing on the Bulk Action Management page. The Update page opens.
3. Perform the following actions on this page:
4.Click Next.
When adding an Amendment to an existing Agreement, select only the Attributes that you want to modify.
This page displays only Attributes related to Contract Type you have selected. You can select only the editable Attributes. If you select a dependent Attribute, the primary Attribute also gets selected by default. The Attributes selected on this page will be visible in the Workbook you generate. For example, Effective Date and Expiry Date.
To select any additional Attributes:
The Workbook that was generated in the previous step contains the Attributes you have selected as few additional system Attributes. You should see the following Attributes in this Workbook:
User must select this Attribute on the Attributes page to achieve the desired result as mentioned below:
You must create a batch to update existing Entities in ICI, such as new set of Amendments. Creating a new batch enables the system to upload all the changes you made to the workbook and process them. The number of records in the batch is indicated in the Batch Size column.
You can create a batch using the following steps:
</div>
The Batch that you added in the Adding a Batch section will be processed by ICI. Multiple users can create multiple batches at the same time. These batches would be queued and ICI would pick them up for processing from the queue. The status of the batch can be as follows:
While processing the Batch, every record is validated for:
Clicking the Bulk Actions tile navigates you to the Bulk Action Management page.
The following tasks can be performed here:
The following columns are displayed here:
The Download Status Files icon appears in the Actions column after the status of the batch changes to Completed. Any errors during the processing of the batch are displayed in the Failure column on the Bulk Action Management page.
After a batch is processed, a Download Status Files icon is displayed in the Actions column.
To view the files:
1. Select the Update Existing tile on the Bulk Action Management window. The Update page opens with the Details tab active.
2. Click the Bulk Upload Action drop-down. The following Bulk Upload Actions are available:
4. Select Saved Search. All saved searches that the user has access to get populated in the drop-down.
5. Select Contract Type Name. This list will be populated based on the selected Saved Search.
6. Select Association(s) that you want to update for this Agreement.
7. Click Next. The Attributes tab is active. You can now select the Attributes for the selected Agreement and the Associations.
8. Click Generate Workbook. The Workbook will contain the Agreement, Associations and the selected Attributes. You can make changes, upload the files to ICI and continue with the workflow.
To initiate bulk termination:
1. Click Bulk Actions on the Home page. The dropdown opens with the options for bulk actions.
2. Click Update Existing. The Update page opens.

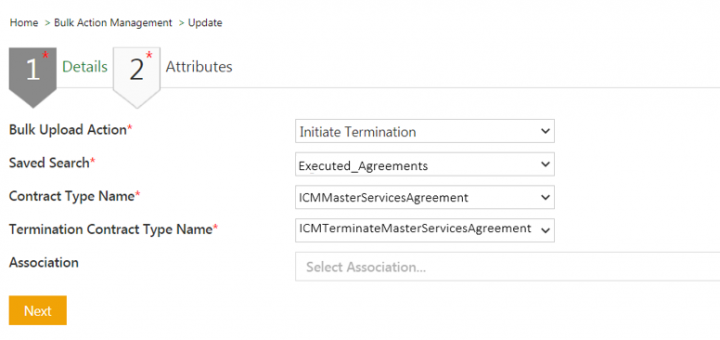
3. Select Initiate Termination in Bulk Upload Action field.
4. Select a Saved Search. For example, Executed_Agreements. Users need to create a saved search with executed agreements for which termination agreements can be created.
5. Select Contract Type Name. For example, ICMMasterServicesAgreement. The Contract Type Name field displays all the contract types from the selected saved search.

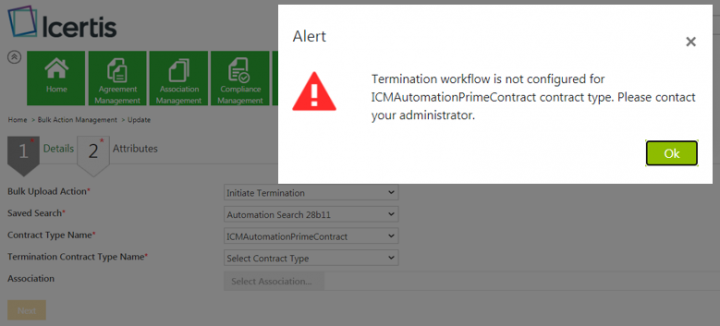
The Alert window with the error message is displayed if the user selects the contract type which does not have the required configuration and attributes configured for the termination process.
6. Select the Termination Contract Type Name. For example, ICMTerminateMasterServicesAgreement. The Termination Contract Type Name field displays all the contract types that can be used as termination agreement for the selected contract type name.
7. Select the Association if you want to update for the selected Termination Contract Type.

8. Click Next. The Attributes tab opens.
9. Select the desired attributes for the selected agreement and the associations.
10. Click Generate Workbook. The workbook is generated with the executed agreements from the Saved Search, Associations and the selected Attributes. For example, ICMTerminateMasterServicesAgreement_20201210143128.
The attributes which have enabled the inheritance, will have their values pre-populated from the parent agreement.


11. Edit and upload the workbook files to ICI following the standard ICI bulk update action workflow by adding and processing a batch.
Once the batch processing for the bulk action is successfully complete, the termination agreement is created in a Draft status and associated with the parent agreement. Users can then proceed with the standard agreement workflow and execute the termination agreement. The parent agreement then, will be terminated according to its termination date through the scheduled termination processes.
Related Topics: Agreement Management | Agreements | Add Amendment to an Agreement
You do not have permission to edit this page, for the following reason:
The action you have requested is limited to users in one of the groups: Users, User.
You can view and copy the source of this page:
Return to Bulk Actions.