(Created page with " = Dashboard Configuration = 1. '''Click''' on the “Admin” Tile. <div class="image-green-border">520px</div> <div class="image-green-borde...") |
|||
| Line 1: | Line 1: | ||
| + | |||
= Dashboard Configuration = | = Dashboard Configuration = | ||
| − | 1. '''Click''' | + | 1. '''Click''' the “Admin” Tile. |
| − | <div class="image-green-border">[[File:Dash | + | <div class="image-green-border">[[File:Dash Configu 1.png|420px]]</div> <div class="image-green-border"> </div> <div class="image-green-border">2. '''Click''' “Dashboard Configuration”. The “Dashboard Configuration” index page opens, displaying all the available dashboards created by user.</div> <div class="image-green-border"> </div> <div class="image-green-border">[[File:Dash Config 2.png|820px|Dash Config 2.png]]</div> <div class="image-green-border"> </div> <div class="image-green-border">3.'''Click''' the eye icon at right side of the “Dashboard Name” or '''click '''on three dots action button to view the dashboard.</div> <div class="image-green-border"> </div> <div class="note-box">'''Note: '''The green tick mark next to the eye icon denotes the dashboard is enabled, to disable the dashboard '''select '''“Disable Dashboard” option from the three dots menu.</div> <div class="image-green-border"> </div> <div class="image-green-border"> |
== To Create a New Dashboard == | == To Create a New Dashboard == | ||
| − | 1. | + | 1. C'''lick''' on “Create” button on the dashboard index page to create a new dashboard. The “Create Dashboard” page opens. |
| − | [[File:Dash Config 3.png|820px]] | + | [[File:Dash Config 3.png|820px|Dash Config 3.png]] |
2. '''Select''' the “Type of Dashboard” as “Main” or “Agreement”. | 2. '''Select''' the “Type of Dashboard” as “Main” or “Agreement”. | ||
| − | [[File:Dash Config 4.png|820px]] | + | [[File:Dash Config 4.png|820px|Dash Config 4.png]] |
3. In the “Type of Dashboard" dropdown if Admin selects “Main”, then the dashboard depending on the “Security Groups” can be created. For example, “Legal Group” is selected in “Security Group” then the configured dashboard will be visible for all the users under “Legal Group”. | 3. In the “Type of Dashboard" dropdown if Admin selects “Main”, then the dashboard depending on the “Security Groups” can be created. For example, “Legal Group” is selected in “Security Group” then the configured dashboard will be visible for all the users under “Legal Group”. | ||
| − | [[File:Dash Config 5.png|620px]] | + | [[File:Dash Config 5.png|620px|Dash Config 5.png]] |
| − | 4. In the “Type of Dashboard if Admin selects “Agreement”, then the dashboard depending on the “Contract Type” and “Role/Sub-Role” can be created. For example, “SFMSA” is selected in “Contract Type” and “Approver” is selected in “Role/Sub-Role” then the configured dashboard will be visible for all the “Approvers” for “SFMSA” contract type. | + | 4. In the “Type of Dashboard" dropdown if Admin selects “Agreement”, then the dashboard depending on the “Contract Type” and “Role/Sub-Role” can be created. For example, “SFMSA” is selected in “Contract Type” and “Approver” is selected in “Role/Sub-Role” then the configured dashboard will be visible for all the “Approvers” for “SFMSA” contract type. |
| − | [[File:Dash Config 6.png|620px]] | + | [[File:Dash Config 6.png|620px|Dash Config 6.png]] |
| − | 5. | + | 5. Toggle the “Is Enabled” flag to “Yes” if you want to enable the current dashboard for the user out of the other available dashboards. |
6. '''Enter''' the “Dashboard Name”. For Example, Default. | 6. '''Enter''' the “Dashboard Name”. For Example, Default. | ||
| Line 28: | Line 29: | ||
7.'''Set''' the “Priority”, if there are multiple dashboard options for a particular “Security Group” or “Contract Type”. | 7.'''Set''' the “Priority”, if there are multiple dashboard options for a particular “Security Group” or “Contract Type”. | ||
<div class="note-box">'''Note: '''Priority for each dashboard under same “Security Group” or “Contract Type” role should be unique and Priority =1 denotes the highest priority.</div> | <div class="note-box">'''Note: '''Priority for each dashboard under same “Security Group” or “Contract Type” role should be unique and Priority =1 denotes the highest priority.</div> | ||
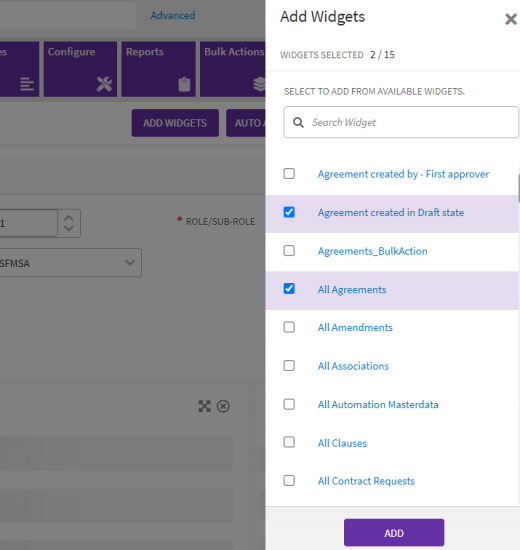
| − | 8.'''Click''' | + | 8.'''Click''' “Add Widgets”, the “Add Widget” drawer opens. Select the required widgets and click on “Add”. |
| − | [[File:Dash Config 7.png|520px]] | + | [[File:Dash Config 7.png|520px|Dash Config 7.png]] |
| − | 9. '''Click''' | + | 9. '''Click''' “Auto Arrange” to arrange the widgets in the best fit according to the widget size. |
| − | 10. '''Click ''' | + | 10. '''Click '''“Save” and the created dashboard will be visible on the “Dashboard Configuration” index page. |
== To Edit an Existing Dashboard == | == To Edit an Existing Dashboard == | ||
| Line 40: | Line 41: | ||
1. Navigate to “Dashboard Configuration” index page. | 1. Navigate to “Dashboard Configuration” index page. | ||
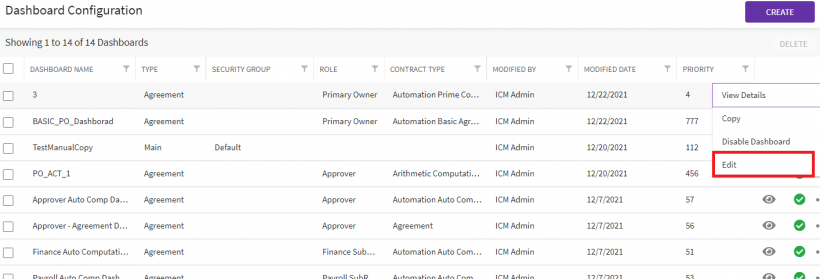
| − | 2. '''Click ''' | + | 2. '''Click''' the three dots action button present to the right of the Dashboard name. |
| − | + | ||
| − | + | ||
| − | + | [[File:Dash Config 8.png|820px|Dash Config 8.png]] | |
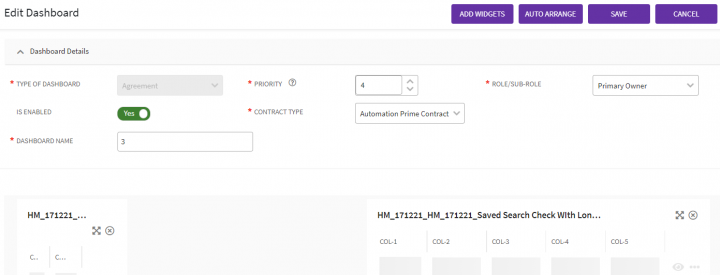
| − | + | 3. '''Click '''“Edit”. The “Edit Dashboard” page opens. | |
| − | [[File:Dash Config 9.png|720px]] | + | [[File:Dash Config 9.png|720px|Dash Config 9.png]] |
| − | + | 4. '''Click '''on “Save”, after making the required edits | |
6. A success message will pop up and user will be navigated to “Dashboard Configuration” index page. | 6. A success message will pop up and user will be navigated to “Dashboard Configuration” index page. | ||
| − | [[File:Dash Config 10.png|320px]] | + | [[File:Dash Config 10.png|320px|Dash Config 10.png]] |
== To Delete an Existing Dashboard == | == To Delete an Existing Dashboard == | ||
| Line 60: | Line 59: | ||
1. '''Select''' the checkbox present left to the Dashboard name you want to delete. As displayed in the screenshot below. | 1. '''Select''' the checkbox present left to the Dashboard name you want to delete. As displayed in the screenshot below. | ||
| − | [[File:Dash Config 11.png|820px]] | + | [[File:Dash Config 11.png|820px|Dash Config 11.png]] |
| − | 2. '''Click ''' | + | 2. '''Click '''“Delete”. |
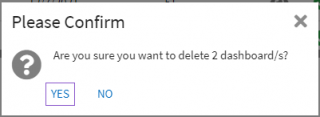
| − | 3. '''Click ''' | + | 3. '''Click '''“Yes” on the confirmation message displayed. |
| − | [[File:Dash Config 12.png|320px]] | + | [[File:Dash Config 12.png|320px|Dash Config 12.png]] |
</div> | </div> | ||
Revision as of 14:25, 22 December 2021
Contents
Dashboard Configuration
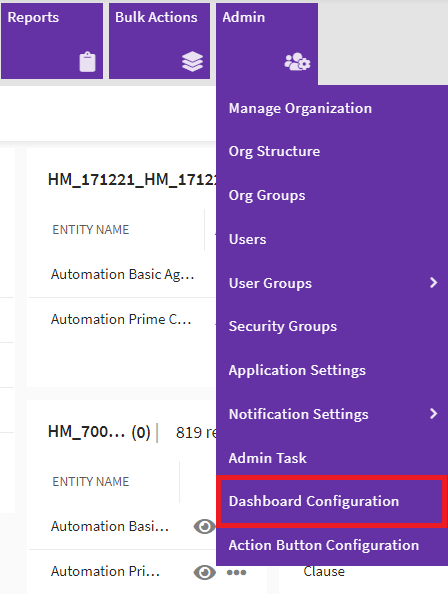
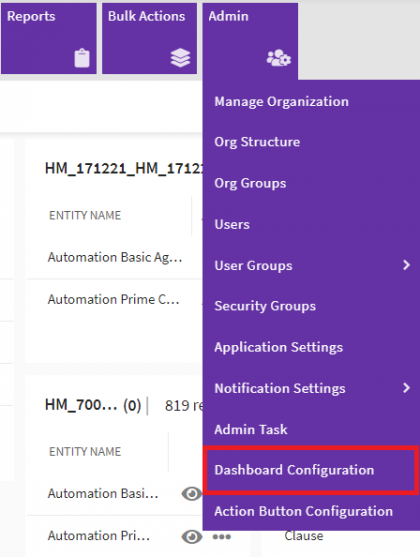
1. Click the “Admin” Tile.
To Create a New Dashboard
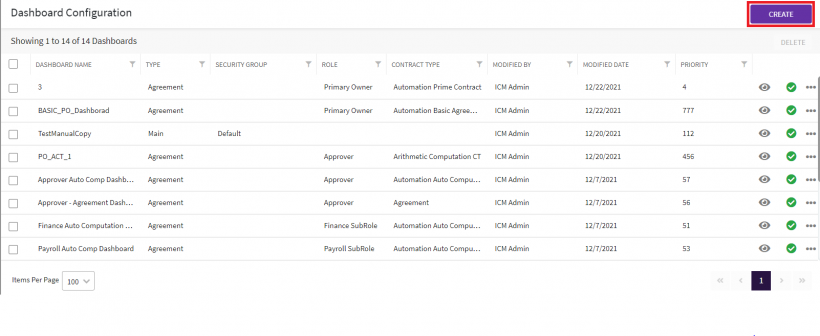
1. Click on “Create” button on the dashboard index page to create a new dashboard. The “Create Dashboard” page opens.
2. Select the “Type of Dashboard” as “Main” or “Agreement”.
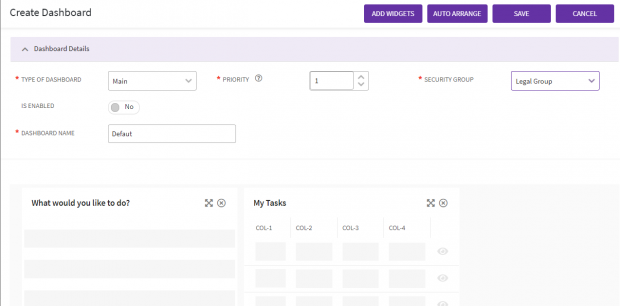
3. In the “Type of Dashboard" dropdown if Admin selects “Main”, then the dashboard depending on the “Security Groups” can be created. For example, “Legal Group” is selected in “Security Group” then the configured dashboard will be visible for all the users under “Legal Group”.
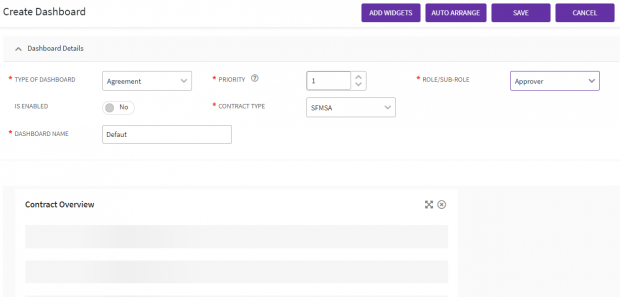
4. In the “Type of Dashboard" dropdown if Admin selects “Agreement”, then the dashboard depending on the “Contract Type” and “Role/Sub-Role” can be created. For example, “SFMSA” is selected in “Contract Type” and “Approver” is selected in “Role/Sub-Role” then the configured dashboard will be visible for all the “Approvers” for “SFMSA” contract type.
5. Toggle the “Is Enabled” flag to “Yes” if you want to enable the current dashboard for the user out of the other available dashboards.
6. Enter the “Dashboard Name”. For Example, Default.
7.Set the “Priority”, if there are multiple dashboard options for a particular “Security Group” or “Contract Type”.
8.Click “Add Widgets”, the “Add Widget” drawer opens. Select the required widgets and click on “Add”.
9. Click “Auto Arrange” to arrange the widgets in the best fit according to the widget size.
10. Click “Save” and the created dashboard will be visible on the “Dashboard Configuration” index page.
To Edit an Existing Dashboard
1. Navigate to “Dashboard Configuration” index page.
2. Click the three dots action button present to the right of the Dashboard name.
3. Click “Edit”. The “Edit Dashboard” page opens.
4. Click on “Save”, after making the required edits
6. A success message will pop up and user will be navigated to “Dashboard Configuration” index page.
To Delete an Existing Dashboard
1. Select the checkbox present left to the Dashboard name you want to delete. As displayed in the screenshot below.
2. Click “Delete”.
3. Click “Yes” on the confirmation message displayed.
