Shefali DK (Talk | contribs) |
|||
| (36 intermediate revisions by 7 users not shown) | |||
| Line 1: | Line 1: | ||
| − | = | + | = Managing Team Members = |
| − | + | Team members can be added from either the "Team" or the agreement "Details page. Approvers can be added to the team either manually or by creating an approver role. You can add, remove and arrange approvers in the order in which they should be approving, if you have the add/remove team privilege. These privileges are provided by the ICI Administrator. | |
| + | <div class="note-box">'''Note''': If you want that the logged-on user should not be able to add self for any roles in the team, then the Administrator can set ''No'' for “Allow adding self in the agreement team in any role”.</div> | ||
| − | + | == Adding Team Members == | |
| − | + | Follow these steps to add users manually: | |
| − | + | 1. '''Click''' the "Agreements" tile on the "Home" page. The "Agreements" page opens. | |
| − | + | 2. '''Click''' the "View Details" icon next to the Agreement you would like to manage the approvers for. | |
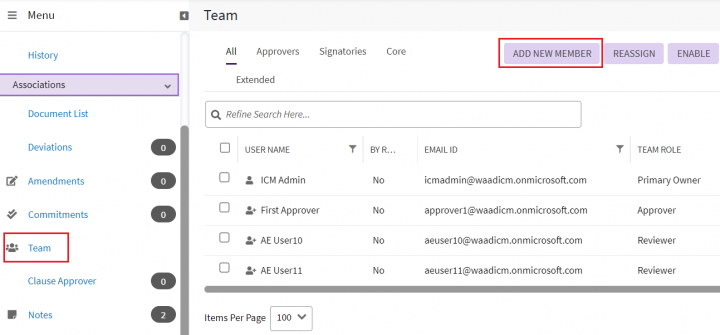
| − | + | 3. '''Click''' "Team" in the left pane. This displays all the existing team members for that Agreement on the right. | |
| − | < | + | 4. '''Click''' "Add New Member" on the top right. The "Add User" drawer opens. |
| + | <div class="image-green-border">[[File:Agreement-Team1.png|720px|Agreement-Team1.png]]</div> | ||
| + | 5. '''Select''' a user or user group. For example, Legal Approvers user group''. '' | ||
| − | + | 6. '''Select '''the role that the user should have. For example, Approver. | |
| − | + | You can add a single user or a user group at a time. The role can be one of the following: | |
| − | + | ||
| − | + | ||
| − | + | ||
| − | + | *Approver | |
| − | + | *Business Owner | |
| − | * | + | *Contract Admin |
| − | * | + | |
| − | * | + | |
*Contributor | *Contributor | ||
| + | *Document Owner | ||
| + | *External Reviewer | ||
| + | *Internal Signatory | ||
*Observer | *Observer | ||
*Secondary Owner | *Secondary Owner | ||
| − | *< | + | *Sales Approver |
| − | + | <div class="note-box">'''Note:''' A Secondary Owner can add another Secondary Owner to the Agreement Contract Type team, if required.</div> | |
| + | Selecting a role of an approver displays a step number field. This step number is mandatory and controls the sequence of approvals if there are multiple approvers. The approval flows sequentially according to the step number. | ||
| + | |||
| + | 7. '''Select '''a "Step Number". For example, 1. | ||
| + | |||
| + | 8. '''Type '''related comments in the "Add Note" box. These can be specific to the type of approvals that are expected from the selected user. | ||
| + | <div class="image-green-border">[[File:AddUserDetails.png|720px|AddUserDetails.png]]</div> | ||
| + | The "Send Notification" checkbox is selected by default, so users added as Approvers receive a notification to that effect. Uncselect it if you wish to disable the notifications. Note that only users that are manually added receive the notifications. | ||
| + | |||
| + | When you select the role which requires any kind of approval and user groups as approvers, the Next button is displayed to set further details of approval process for selected user groups. | ||
| − | + | 9. '''Click "'''Next". The "Add User"''window displays the details of the selected user groups and provides options to configure the number of required approvals.'' | |
| − | + | 10. '''Choose''' either "All"''or "Any"'' to select the number of users depending on your requirements in the "Need Approval From" column for each user group. The "Minimum Required" field is enabled when you select "Any" option.'' '' | |
| − | < | + | 11. '''Set''' the "Minimum Required"number of approvals from the total users in a group to move the entity to approved state. By default, the minimum value is 1, whereas the maximum limit will be the total number of users in the respective user group''.'' |
| + | <div class="note-box">Note: This configuration of required number of approvals is available for Agreement/amendment, contract request, association, masterdata, sub-roles and SDFC, MSCRM Integration. </div> | ||
| + | 12.'''Click''' "Add". The users just added are displayed under Team. | ||
| + | <div class="image-green-border">[[File:UserAddedtoTeam.png|720px|UserAddedtoTeam.png]]</div> <div class="note-box"> | ||
| + | '''Note:''' If you are adding a user: | ||
| − | + | *who is already added in the team, the system displays an error message stating that the user is already available. | |
| + | *who is disabled, then a popup is displayed with an error message and an option to ''Enable'' the user. | ||
| + | </div> | ||
| + | When multiple user groups are added as an ad-hoc approvers or reviewers to the agreement, then approval of the agreement is determined by the combined result of actions taken by users from each group following the minimum required approvals setting. | ||
| − | |||
| − | + | == Removing Team Members == | |
| − | + | You can only remove the users that were manually added. Users and approvers defined by a rule cannot be removed. Follow these steps to remove users manually: | |
| − | + | #'''Click''' "Agreements" tile on "Home" page. The "Agreements" Page opens. | |
| + | #'''Click''' the "View Details" icon next to the Agreement you would like to manage the approvers for. | ||
| + | #'''Click''' "Team" in the left pane. This displays all the existing team members for that Agreement. | ||
| + | #'''Click''' next to the Approver that you wish to remove. Note that you can remove only one user at a time. This opens a dialog box where you musty enter comments for why the user is being removed from the team. Type the required comments. | ||
| + | #The Send Notification checkbox is selected by default, so users that are removed receive a notification to that effect. Clear the checkbox if you wish to disable the notifications. | ||
| + | #'''Click''' "Submit"'' ''to remove the user. | ||
| − | + | | |
| − | + | | |
| − | + | | |
| − | + | | |
| − | + | ||
| − | + | ||
| − | + | ||
| − | + | '''Related Topics:''' [[Agreement_Details_Page|Agreement Details]] | [[Team|Team]] | |
Latest revision as of 15:35, 31 January 2022
Managing Team Members
Team members can be added from either the "Team" or the agreement "Details page. Approvers can be added to the team either manually or by creating an approver role. You can add, remove and arrange approvers in the order in which they should be approving, if you have the add/remove team privilege. These privileges are provided by the ICI Administrator.
Adding Team Members
Follow these steps to add users manually:
1. Click the "Agreements" tile on the "Home" page. The "Agreements" page opens.
2. Click the "View Details" icon next to the Agreement you would like to manage the approvers for.
3. Click "Team" in the left pane. This displays all the existing team members for that Agreement on the right.
4. Click "Add New Member" on the top right. The "Add User" drawer opens.
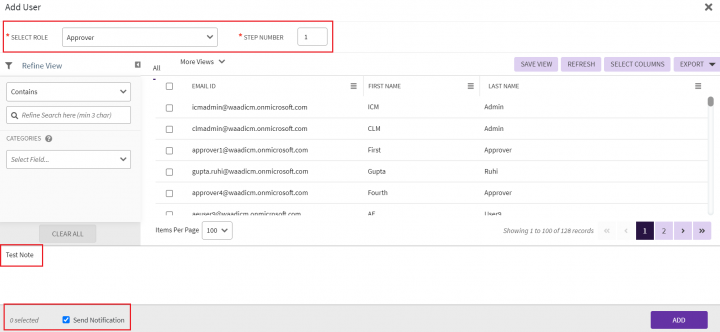
5. Select a user or user group. For example, Legal Approvers user group.
6. Select the role that the user should have. For example, Approver.
You can add a single user or a user group at a time. The role can be one of the following:
- Approver
- Business Owner
- Contract Admin
- Contributor
- Document Owner
- External Reviewer
- Internal Signatory
- Observer
- Secondary Owner
- Sales Approver
Selecting a role of an approver displays a step number field. This step number is mandatory and controls the sequence of approvals if there are multiple approvers. The approval flows sequentially according to the step number.
7. Select a "Step Number". For example, 1.
8. Type related comments in the "Add Note" box. These can be specific to the type of approvals that are expected from the selected user.
The "Send Notification" checkbox is selected by default, so users added as Approvers receive a notification to that effect. Uncselect it if you wish to disable the notifications. Note that only users that are manually added receive the notifications.
When you select the role which requires any kind of approval and user groups as approvers, the Next button is displayed to set further details of approval process for selected user groups.
9. Click "Next". The "Add User"window displays the details of the selected user groups and provides options to configure the number of required approvals.
10. Choose either "All"or "Any" to select the number of users depending on your requirements in the "Need Approval From" column for each user group. The "Minimum Required" field is enabled when you select "Any" option.
11. Set the "Minimum Required"number of approvals from the total users in a group to move the entity to approved state. By default, the minimum value is 1, whereas the maximum limit will be the total number of users in the respective user group.
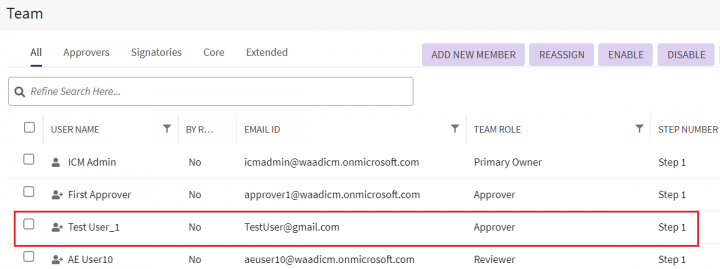
12.Click "Add". The users just added are displayed under Team.
Note: If you are adding a user:
- who is already added in the team, the system displays an error message stating that the user is already available.
- who is disabled, then a popup is displayed with an error message and an option to Enable the user.
When multiple user groups are added as an ad-hoc approvers or reviewers to the agreement, then approval of the agreement is determined by the combined result of actions taken by users from each group following the minimum required approvals setting.
Removing Team Members
You can only remove the users that were manually added. Users and approvers defined by a rule cannot be removed. Follow these steps to remove users manually:
- Click "Agreements" tile on "Home" page. The "Agreements" Page opens.
- Click the "View Details" icon next to the Agreement you would like to manage the approvers for.
- Click "Team" in the left pane. This displays all the existing team members for that Agreement.
- Click next to the Approver that you wish to remove. Note that you can remove only one user at a time. This opens a dialog box where you musty enter comments for why the user is being removed from the team. Type the required comments.
- The Send Notification checkbox is selected by default, so users that are removed receive a notification to that effect. Clear the checkbox if you wish to disable the notifications.
- Click "Submit" to remove the user.
Related Topics: Agreement Details | Team


