|
|
| (13 intermediate revisions by 4 users not shown) |
| Line 4: |
Line 4: |
| | == Creating Alias == | | == Creating Alias == |
| | | | |
| − | ICM provides an Alias for Masterdata using the ''AliasMaster'' entity so that all Masterdata values that are related can be linked and searched in one-go. You can create an alias on Global Attributes and Template variables (marked as global), not the Contract Type attributes.
| + | ICI provides an Alias for Masterdata using the AliasMaster entity so that all Masterdata values that are related can be linked and searched in one-go. You can create an alias on Global Attributes and Template variables (marked as global), not the Contract Type attributes. |
| | | | |
| − | If the Masterdata record is updated with a newer value, ICM retains the older value of the Masterdata and records containing either of these values (newer or older) must be searchable if there are Agreements having these values exist. It also allows you to get a consolidated search result for multiple Masterdata values that are related, instead of running multiple searches/Reports for the desired outcome. | + | If the Masterdata record is updated with a newer value, ICI retains the older value of the Masterdata and records containing either of these values (newer or older) must be searchable if there are Agreements having these values exist. It also allows you to get a consolidated search result for multiple Masterdata values that are related, instead of running multiple searches/Reports for the desired outcome. |
| − | | + | |
| − | This can be achieved through the ''Security Group Privileges'' with access restricted to the Admin users having Manage privileges.
| + | |
| − | <div class="image-green-border">[[File:Configuration Alias Master Create Alias Master Secuirty Group Details page.png|Create Alias Master from Configuration/Security Group Details/Privileges]]</div>
| + | |
| − |
| + | |
| | | | |
| | + | This can be achieved through the Security Group Privileges with access restricted to the Admin users having Manage privileges. |
| | + | <div class="image-green-border">[[File:8.0-Alias Master1.PNG|720px|8.0-Alias Master1.PNG]]</div> |
| | If you have View Privileges, user can just view the records, but will not be able to perform actions like Edit or Delete. | | If you have View Privileges, user can just view the records, but will not be able to perform actions like Edit or Delete. |
| | | | |
| − | The ''Alias Master'' tile within ''Configurations'' allows the authorized Admin user to define linkages which will generate a consolidated result of all records based on these aliases, irrespective of the value provided by the user. | + | The "Alias Master" tile within "Configure" tile allows the authorized Admin user to define linkages which will generate a consolidated result of all records based on these aliases, irrespective of the value provided by the user. |
| − | <div class="image-green-border">[[File:Dashboard-Alias Master Tile.png|Dashboard_Alias Master Tile]]</div>
| + | |
| | == Adding Alias == | | == Adding Alias == |
| | | | |
| − | '''Clicking''' the ''Alias Master'' tile displays the ''Attribute'', ''Key'' and ''Value'' (which is the alias) in the grid view. | + | '''Clicking''' the "Alias Master" option displays the Attribute, Key and Value (which is the alias) in the grid view. |
| − | <div class="image-green-border">[[File:Add alias Alias Master Index Page 7.8.PNG|1000px|RTENOTITLE]]</div> | + | <div class="image-green-border">[[File:8.0-Alias Master- Index Page.PNG|720px|8.0-Alias Master- Index Page.PNG]]</div> |
| − | The ''Alias ''and the ''Key ''can be searched using the ''Search'' facet. | + | The Alias and the Key can be searched using the Search facet. |
| | | | |
| − | You can add an alias using the ''Add Alias'' button, where you can select the ''Attribute'' from the drop-down and enter the ''Key'' and the ''Value'' (pipe separated value). Each of these fields are mandatory and on entering the data, the ''Alias'' gets added to the database. | + | You can add an alias using the "Create" button, where you can select the Attribute from the drop-down. Depending on the Attibute selected, enter the Key and the Value (pipe separated value). Each of these fields are mandatory and after entering the data, the Alias gets added to the database. |
| − | <div class="image-green-border">[[File:Add Alias Add Alias window 7.8.PNG|RTENOTITLE]]</div> | + | <div class="image-green-border">[[File:CreatingAnAlias.png|450px]]</div> |
| | == Editing Alias == | | == Editing Alias == |
| | | | |
| − | '''Click '''the ''Edit icon'' to edit and update the linked value. | + | '''Click '''the "Edit" option to edit and update the linked value. |
| − | <div class="image-green-border">[[File:Add Alias Edit icon 7.8.PNG|RTENOTITLE]]</div> | + | <div class="image-green-border">[[File:8.0-Alias Master2.PNG|720px|8.0-Alias Master2.PNG]]</div> |
| | You cannot change the Attribute or Value while editing the record; only the Linked Value(s) can be updated. | | You cannot change the Attribute or Value while editing the record; only the Linked Value(s) can be updated. |
| − | <div class="image-green-border">[[File:Add Alias Update Alias 7.8.PNG|RTENOTITLE]]</div> | + | <div class="image-green-border">[[File:8.0-Alias Master-Edit Alias.PNG|450px|8.0-Alias Master-Edit Alias.PNG]]</div> |
| − | On adding aliases, if there is a mismatch in the search count, a message ''There can be a difference between the count shown in filters and actual count of result, if alias values are defined'' will be displayed on the Agreement Management page. | + | On adding aliases, if there is a mismatch in the search count, a message "There can be a difference between the count shown in filters and actual count of result, if alias values are defined "will be displayed on the "Agreements" page. |
| − | <div class="image-green-border">[[File:Add alias Agreement Management page 7.8.PNG|RTENOTITLE]]</div>
| + | |
| | == Deleting Alias == | | == Deleting Alias == |
| | | | |
| − | You can also delete a record using the ''Delete'' icon for that row. A popup confirming that you want to delete the record will appear. | + | You can also delete a record using the Delete icon for that row. |
| − | <div class="image-green-border">[[File:Add Alias delete Alias 7.8.PNG|RTENOTITLE]]</div> | + | <div class="image-green-border">[[File:DeletingAnAlias.png|720px]]</div> |
| − | == Navigating in ICM ==
| + | A popup confirming that you want to delete the record will appear. |
| − | | + | <div class="image-green-border">[[File:ConfirmAliasDeletion.png|350px]]</div> |
| − | ICM offers some common features that make it easy to navigate the interface.
| + | '''Related Topics: '''[[Agreement_Management|Agreement Management]] '''| '''[[Configure|Configure]]''' |''' [[ICM_Overview|ICI Overview ]] |
| − | | + | |
| − | The following tiles are available on all pages:
| + | |
| − | | + | |
| − | *the ''Search'' tile launches the Advanced Search.
| + | |
| − | *the ''Alerts'' tile launches the Notifications Dashboard.
| + | |
| − | *the ''Help'' tile launches this online help system. Use the topics to the left or the full-text search at the top right to find the specific feature you need help on.
| + | |
| − | | + | |
| − | You can do the following on most pages (also refer to the figure below):
| + | |
| − | | + | |
| − | *Set your preferences for the time zone, time and date formats and the language of display. See Preferences below for details.
| + | |
| − | *Remove searches that are pinned as favorites. These searches appear in the ''Saved Searches'' drop down again.
| + | |
| − | *Add search to favorites: for easy access, you can pin up to 6 of your saved searches as favorites. The name of that search appears above the search results.
| + | |
| − | *Choose the columns to display: '''click''' the ''Select fields'' icon to add or remove the attributes to be displayed as columns. Add and remove what attributes to show or hide for the Agreements. You can add any number of columns and see them all using the vertical scroll bar. Including more attributes can be useful when exporting the list to Excel.
| + | |
| − | *Configure default columns and their sequence on the ''Search ''and ''Index'' pages throughout ICM for all the users (using the ICM configurator). The configuration can be done for each Entity as well as Contract Type thus offering complete flexibility to define columns as per your business needs.
| + | |
| − | *Refresh the page. If you expect to see results that you don't, click the icon to refresh the page you are on. When the screen is refreshed, automatically or manually, the ongoing tasks on the screen or bulk upload streams are not lost. The user can continue from the point where the refresh was initiated. The ''Refresh'' button can be technically configured to be hidden when a page is loading if an entity is in transitioning state. For example, when configured to be hiddent, the user ill not have to refresh the screen after clicking the ''Send for Approval'' button till the status of the entity changes to ''Waiting for Approval''. This applies to the ICM UI and the mobile app.
| + | |
| − | *Export to Excel: you can export the list of all the currently displayed records to Microsoft Excel. This allows you to manipulate the data using various features of Microsoft Excel. Note that you can export a maximum of 1000 rows. Try narrowing down the search to reduce the number of records displayed. See Searching Agreements and Requests or Advanced Search for details on using the search.
| + | |
| − | *Choose a view: select how you wish the agreements to be shown. You can choose between the Grid view (the default), Extended view or Tile view. Each view offers various details at a glance - choose one that you prefer.
| + | |
| − | *View details: '''click '''the ''View Record'' icon to see the details of the record, such as request, agreement, etc. that you may be on. The details are displayed on the details page, such as Agreement Details Page or the Request Details Page.
| + | |
| − | *Choose number of items to display: you can choose to display 8, 16 or 32 records on all pages. Choose from the drop down at the bottom of every page.
| + | |
| − | | + | |
| − | == Preferences ==
| + | |
| − | | + | |
| − | === Setting My Preferences ===
| + | |
| − | | + | |
| − | To set your preferences:
| + | |
| − | | + | |
| − | 1. Hover the mouse over the down arrow next to your user ID. In the drop-down menu, click '''Preferences.''' This ''My Preferences page ''opens.
| + | |
| − | | + | |
| − | 2. Select your preferred settings:
| + | |
| − | | + | |
| − | *Records Per Page Options (User Defined): the number of Agreements/records you wish to see on a page. For example: 8, 16, 32. 50, 100.
| + | |
| − | *Default Choice on Grid: the number of Agreements that will be displayed by default.
| + | |
| − | *Records Layout: how your want to view the records - ''Grid, Tile ''or ''Extended.''
| + | |
| − | *Search Panel Visibility: toggle between ''Yes'' or ''No'' based on your preference.
| + | |
| − | *Open every record in same browser tab: select if you would like to show the details of a record in the same window of the browser or a new window. For example, when you click the '''View Record '''icon, you can choose to open a new tab or show the display in the same window. If you frequently open several records simultaneously, it is advisable to select '''Yes'''.
| + | |
| − | *Theme Color: The ICM UI preferred color is selected by default.
| + | |
| − | <div class="image-green-border">[[File:SP7 My Preferences 1.PNG|SP7 My Preferences - My Settings]]</div> | + | |
| − | 3. '''Select''' your preferred Locale settings:
| + | |
| − | | + | |
| − | *Language: select the language for ICM user interface. Remember that changing the language affects both - the user interface elements and the values of the Masterdata Contract Type attributes. The contents of the actual Agreement, Clauses, etc. continue to be in the source language.
| + | |
| − | *Time Zone: select your (or preferred) timezone. The time of last refresh shown on the dashboard is based on the timezone selected here.
| + | |
| − | *Date Format / Time Format: set your formats for how you would like date and time to be displayed. Like the timezone, the date and time of the last refresh shown on the dashboard is based on the formats selected here.
| + | |
| − | <div class="image-green-border">[[File:SP7 My Preferences 2.PNG|SP7 My Preferences - Locale Settings]]</div>
| + | |
| − | === Auto Delegation ===
| + | |
| − | | + | |
| − | If you expect to be unavailable for a certain period of time, you can Delegate all your tasks to another user for that period. For Agreement Approver task, you also need to select a specific sub-role for the Agreement. Both you and the user receive the notifications for all your tasks that either you or the user can act upon. Set any number of delegations as long as the dates don't overlap. Edit or Delete your delegations using the appropriate icons.
| + | |
| − | <div class="note-box">'''Note: '''The sub-role field is displayed only when the Approvers sub-roles are configured in ICM.</div>
| + | |
| − |
| + | |
| − | <div class="image-green-border">[[File:SP7 My Preferences - Auto Delegation.PNG|SP7 My Preferences - Auto Delegation]]</div>
| + | |
| − | '''Login As'''
| + | |
| − | | + | |
| − | If you are an administrator, you can logon as another user. Hover your mouse over the down arrow next to your user ID. In the drop-down menu, click '''Login as''' and select from the list of users. You do not need their password to log into their account. This feature is useful when certain tasks have to be performed by people but they are not available.
| + | |
| − | | + | |
| − | == Log Off ==
| + | |
| − | | + | |
| − | Log off from the current ICM session.
| + | |
| − | | + | |
| − |
| + | |
| − | | + | |
| − |
| + | |
| − | | + | |
| − |
| + | |
| − | | + | |
| − | '''Related Topics: '''[[Agreement_Management|Agreement Management]]'''| '''[[Configuration|Configuration]]''' |''' [[ICM_Overview|ICM Overview ]] | [[My_Dashboard| My Dashboard ]] | + | |
ICI provides an Alias for Masterdata using the AliasMaster entity so that all Masterdata values that are related can be linked and searched in one-go. You can create an alias on Global Attributes and Template variables (marked as global), not the Contract Type attributes.
If the Masterdata record is updated with a newer value, ICI retains the older value of the Masterdata and records containing either of these values (newer or older) must be searchable if there are Agreements having these values exist. It also allows you to get a consolidated search result for multiple Masterdata values that are related, instead of running multiple searches/Reports for the desired outcome.
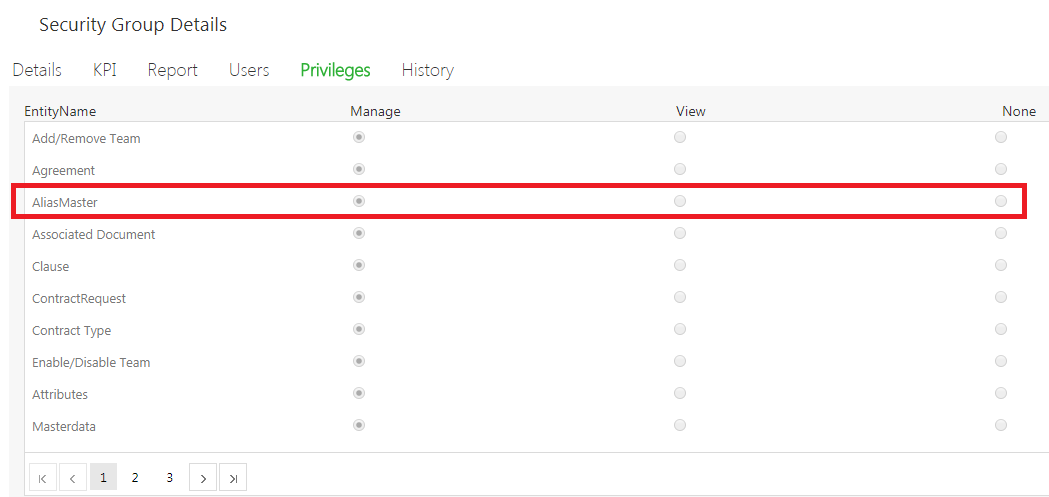
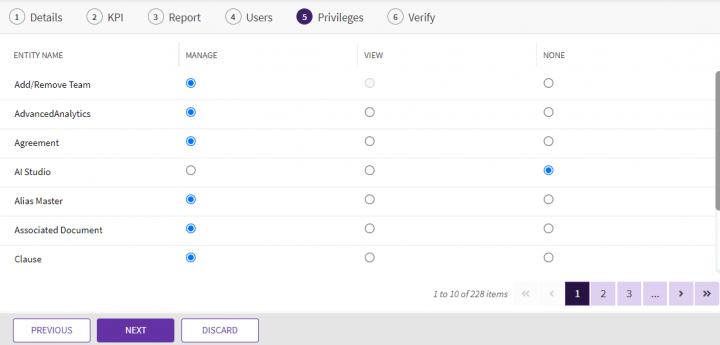
This can be achieved through the Security Group Privileges with access restricted to the Admin users having Manage privileges.
If you have View Privileges, user can just view the records, but will not be able to perform actions like Edit or Delete.
The "Alias Master" tile within "Configure" tile allows the authorized Admin user to define linkages which will generate a consolidated result of all records based on these aliases, irrespective of the value provided by the user.
The Alias and the Key can be searched using the Search facet.
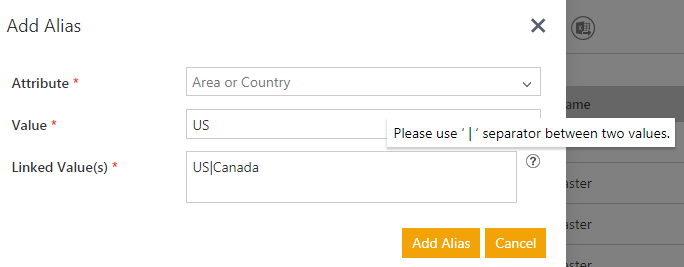
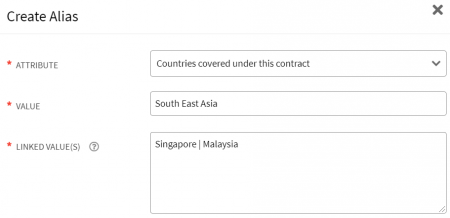
You can add an alias using the "Create" button, where you can select the Attribute from the drop-down. Depending on the Attibute selected, enter the Key and the Value (pipe separated value). Each of these fields are mandatory and after entering the data, the Alias gets added to the database.
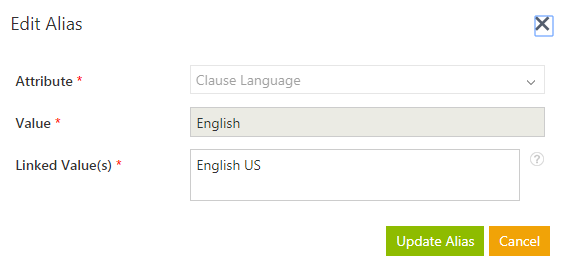
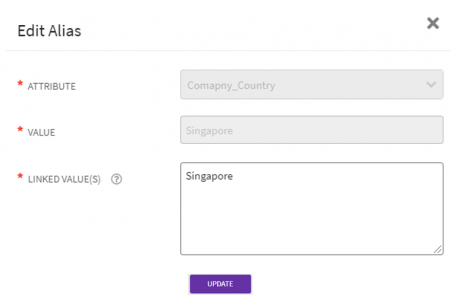
You cannot change the Attribute or Value while editing the record; only the Linked Value(s) can be updated.
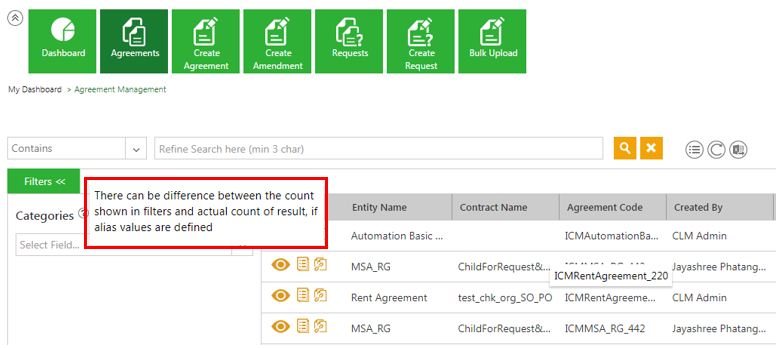
On adding aliases, if there is a mismatch in the search count, a message "There can be a difference between the count shown in filters and actual count of result, if alias values are defined "will be displayed on the "Agreements" page.
You can also delete a record using the Delete icon for that row.
A popup confirming that you want to delete the record will appear.
