| Line 20: | Line 20: | ||
1. In the To, Cc, and Bcc fields, you cannot type the names directly into the fields. C'''lick''' the ''Add User [[File:Add user icon 7.8.PNG|RTENOTITLE]]'' icon. The "Select User" drawer slides from the right. | 1. In the To, Cc, and Bcc fields, you cannot type the names directly into the fields. C'''lick''' the ''Add User [[File:Add user icon 7.8.PNG|RTENOTITLE]]'' icon. The "Select User" drawer slides from the right. | ||
<div class="image-green-border">[[File:8.0-Broadcast Page1.PNG|720px|8.0-Broadcast Page1.PNG]]</div> <div class="image-green-border"> </div> | <div class="image-green-border">[[File:8.0-Broadcast Page1.PNG|720px|8.0-Broadcast Page1.PNG]]</div> <div class="image-green-border"> </div> | ||
| − | *On the "Select User" drawer You can either search the desired user using the search bar or select the "Internal", "Third Party" users along with their "Roles" displayed under the respective tabs | + | *On the "Select User" drawer You can either search the desired user using the search bar or select the "Internal", "Third Party" users along with their "Roles" displayed under the respective tabs |
*The “Third Party” tab will display a search pane and a grid consisting of external users and external users with login privileges. It contains two buttons, the “Add” and the “Add External User”. | *The “Third Party” tab will display a search pane and a grid consisting of external users and external users with login privileges. It contains two buttons, the “Add” and the “Add External User”. | ||
*Clicking “Add External User”, the “Create External User” drawer opens to create a user. | *Clicking “Add External User”, the “Create External User” drawer opens to create a user. | ||
| Line 28: | Line 28: | ||
3. '''Select''' "Include agreement link in this message" to access the Request or Agreement directly from the Broadcast email, instead of logging into ICI and searching for that Request or Agreement. | 3. '''Select''' "Include agreement link in this message" to access the Request or Agreement directly from the Broadcast email, instead of logging into ICI and searching for that Request or Agreement. | ||
<div class="image-green-border"> </div> <div class="image-green-border">'''Attachments'''</div> | <div class="image-green-border"> </div> <div class="image-green-border">'''Attachments'''</div> | ||
| − | + | You can see a list of all the relevant documents with the related basic details displayed in a grid: | |
| − | <div class="image-green-border">[[File:8.0-Broadcast Page Attachments1.PNG|720px]]</div> | + | |
| + | *The details of the document displayed are Contract Type, Name, Version No, Document Format, Notes, and association Linkage Type (if technical configuration enabled). | ||
| + | * | ||
| + | The documents are listed with both “docx” and “pdf” file formats, for all versions. | ||
| + | |||
| + | * | ||
| + | The records listed are grouped based on the Contract Type. | ||
| + | |||
| + | * | ||
| + | The grid items can be filtered and sorted. | ||
| + | |||
| + | |||
| + | 4. '''Select '''the desired documents you wish to attach to the mail. | ||
| + | <div class="image-green-border">[[File:8.0-Broadcast Page Attachments1.PNG|720px|8.0-Broadcast Page Attachments1.PNG]]</div> | ||
5. '''Click '''''Broadcast''. A ''Broadcast Successful ''message is displayed. | 5. '''Click '''''Broadcast''. A ''Broadcast Successful ''message is displayed. | ||
6. '''Click '''''OK''. All the email notifications sent are saved in the ''Notes'' tab. | 6. '''Click '''''OK''. All the email notifications sent are saved in the ''Notes'' tab. | ||
<div class="image-green-border">[[File:Broadcast successful message 7.8.png|720px|RTENOTITLE]]</div> <div class="image-green-border"> </div> <div class="image-green-border"> </div> <div class="image-green-border"> </div> <div class="image-green-border">Related Topics: [[Agreements|Agreements]] | [[Agreement_Details_Page|Agreement Details Page]]<br/> </div> | <div class="image-green-border">[[File:Broadcast successful message 7.8.png|720px|RTENOTITLE]]</div> <div class="image-green-border"> </div> <div class="image-green-border"> </div> <div class="image-green-border"> </div> <div class="image-green-border">Related Topics: [[Agreements|Agreements]] | [[Agreement_Details_Page|Agreement Details Page]]<br/> </div> | ||
Revision as of 08:39, 20 November 2021
Broadcast
Broadcast feature is used to send messages about a certain Agreement or a Request to multiple stakeholders at the same time. You can attach the relevant documents to the message and also provide a link to the entity.
To broadcast a message:
1. Click "Agreements" on the navigation menu on the top. The "Agreements" index page opens displaying a list of Agreements.
2. Click the "View Details" eye icon in the far right of the listed agreement you want to broadcast. The "Agreements" details page opens.
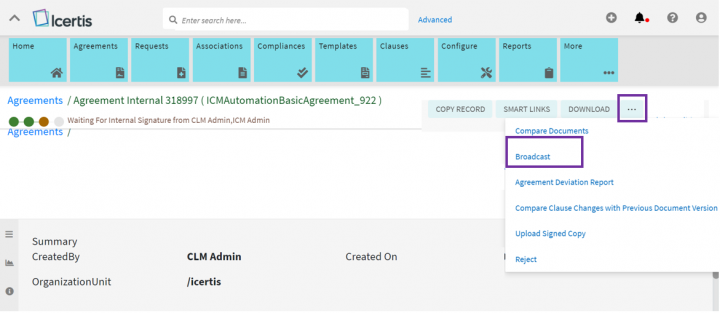
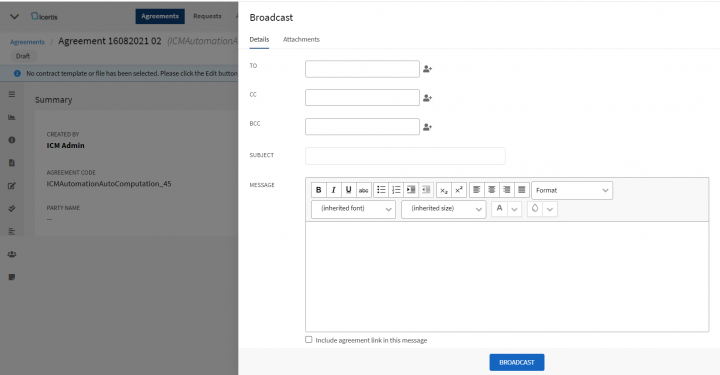
3. Click "Broadcast" among the functional buttons listed on the right of the details page. The "Broadcast" drawer slides from the right with two tabs of “Details” and “Attachments”.
If the number of the functional buttons displayed is more on a page, the broadcast button is shown under the more action’s submenu indicated by three dots (“…”). The “Broadcast” submenu is controlled through ICI “Role Action Mapping” functionality.
Details
Fill in the required details in the given fields:
1. In the To, Cc, and Bcc fields, you cannot type the names directly into the fields. Click the Add User icon. The "Select User" drawer slides from the right.
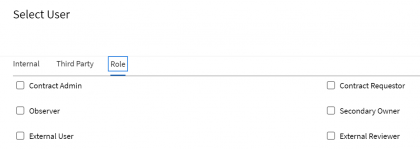
- On the "Select User" drawer You can either search the desired user using the search bar or select the "Internal", "Third Party" users along with their "Roles" displayed under the respective tabs
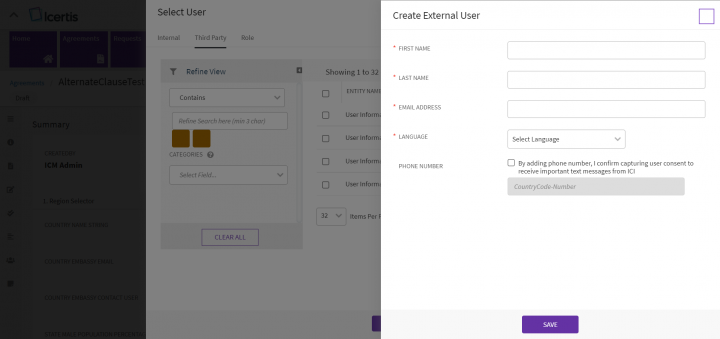
- The “Third Party” tab will display a search pane and a grid consisting of external users and external users with login privileges. It contains two buttons, the “Add” and the “Add External User”.
- Clicking “Add External User”, the “Create External User” drawer opens to create a user.
- The “Role” tab displays the user roles in a two-column layout.
3. Select "Include agreement link in this message" to access the Request or Agreement directly from the Broadcast email, instead of logging into ICI and searching for that Request or Agreement.
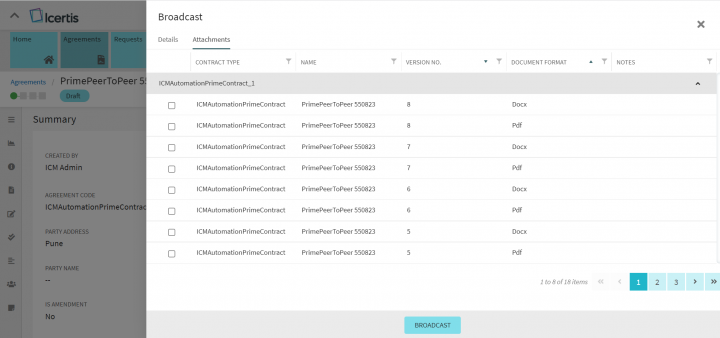
You can see a list of all the relevant documents with the related basic details displayed in a grid:
- The details of the document displayed are Contract Type, Name, Version No, Document Format, Notes, and association Linkage Type (if technical configuration enabled).
The documents are listed with both “docx” and “pdf” file formats, for all versions.
The records listed are grouped based on the Contract Type.
The grid items can be filtered and sorted.
4. Select the desired documents you wish to attach to the mail.
5. Click Broadcast. A Broadcast Successful message is displayed.
6. Click OK. All the email notifications sent are saved in the Notes tab.
