| Line 356: | Line 356: | ||
| | ||
| − | |||
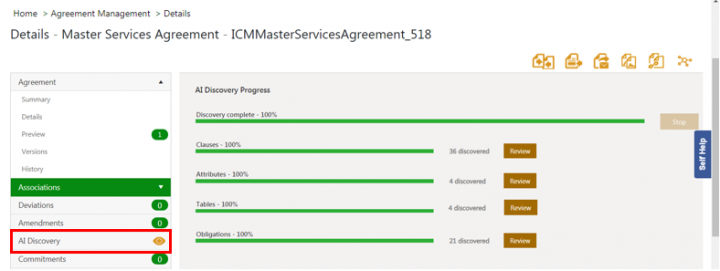
| − | Previously, contract negotiators had to periodically visit the AI discovery section to check for discovery completion. Then, they had to switch to the Document View in order to review the recommendations given by the AI algorithm.<br/> With this release, when contract negotiators trigger the discovery process, they can readily view the progress of AI discovery within the agreement details page. <br/> When the discovery for one of the entities is complete, contract negotiators will now have an option to launch an interface in a new window where the discovered clauses, attributes, tables and obligations are displayed alongside the agreement document. On clicking any of the discovered entities, the system automatically scrolls to the page where that entity is present in the document. | + | == Reviewing discovered entities == Previously, contract negotiators had to periodically visit the AI discovery section to check for discovery completion. Then, they had to switch to the Document View in order to review the recommendations given by the AI algorithm.<br/> With this release, when contract negotiators trigger the discovery process, they can readily view the progress of AI discovery within the agreement details page. <br/> When the discovery for one of the entities is complete, contract negotiators will now have an option to launch an interface in a new window where the discovered clauses, attributes, tables and obligations are displayed alongside the agreement document. On clicking any of the discovered entities, the system automatically scrolls to the page where that entity is present in the document. 1. '''Create '''an agreement in ICI. The discovery process is automatically triggered for the agreement and the agreement Details page is displayed. The "AI Discovery" tab shows an hourglass icon to indicate that the discovery is in progress. |
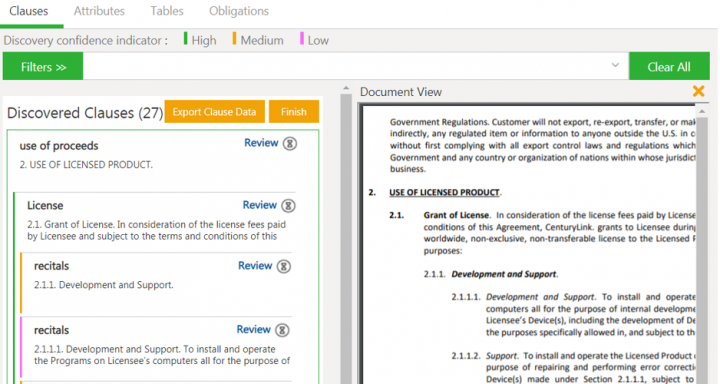
| − | + | <div class="note-box">Note: Discovery process for an agreement is triggered only for users with the AI license if the discovery is configured for a contract type.</div> <div class="image-green-border"> </div> <div class="image-green-border">2. '''Click '''"AI Discovery" tab in the left navigation pane. The "AI Discovery" tab shows an hourglass icon if the discovery is in progress.</div> <div class="image-green-border"> </div> <div class="image-green-border">[[File:7.15 539492 1.png|720px|7.15 539492 1.png]]</div> <div class="image-green-border"> </div> <div class="image-green-border">The AI Discovery Progress is displayed in the right pane which includes the overall discovery process, Clauses, Attributes and Tables discovery progress details.</div> <div class="image-green-border">Click Review next to the entity to diplay discovered Clauses, Attributes, Table and Obligations, with a parallel view of the agreement document for each entity. The Review button will be enabled when there is at least one discovered instance for each entity.</div> <div class="image-green-border">To review Discovered clauses:<br/> 3. '''Click '''"Review" button corresponding to the Clauses. The "Review" button will be enabled when there is at least one discovered clause.</div> <div class="image-green-border">A new page opens, displaying tabs for the discovered Clauses, Table and Obligations, with a parallel view of the agreement document for each entity. The ''Clauses'' tab is displayed first by default. </div> <div class="image-green-border">[[File:7.14 Clause hierarchy 01.png|720px|7.14 Clause hierarchy 01.png]]</div> <div class="image-green-border"> </div> <div class="image-green-border">To discover attributes, clauses, obligations and so on more accurately, the ICI Discover AI provides: *The discovered clauses are logically grouped together based on their hierarchy level and category and displayed in a delineated view to indicate the main section, sub-sections and so on, of each identified clause by default. *The various document objects which are in the agreement document but not necessarily a part of the clause text, such as table of content, titles, headers, footers, and multiple signature blocks, are identified separately and excluded from the actual clause discovery process. *The document’s title page is also discovered separately and its content is identified as a single clause. The title page is identified only for documents containing a Table of contents. *The DiscoverAI will also use a clause delineation logic based on the clause titles to identify up to one level of sub clause(s) in conjunction with the visual indentation based clause delineation logic. For example, while identifying the clause category, the entire text under title Introduction is identified as a clause. *The DiscoverAI will follow the clause delineation method that will be more suitable to the specific document file format to give more accurate clause identification. *The title-based delineation is only supported when working in English language.</div> <div class="image-green-border"> </div> <div class="image-green-border">The discovered clauses are displayed in a delineated view to indicate the main section, sub-sections and so on, of each identified clause by default.</div> <div class="image-green-border"> </div> <div class="image-green-border">[[File:7.15 539492 2.png|720px|7.15 539492 2.png]]</div> | |
| − | 1. '''Create '''an agreement in ICI. The discovery process is automatically triggered for the agreement and the agreement | + | You can filter clauses based on Action Status, Clause categories and Confidence.<br/> The level of confidence associated with ''Discovered Clauses'' is displayed using different color indicators to depict ''High'' (green), ''Medium'' (orange), ''Low'' (pink), ''Revised Manually'' (blue) and ''Library Clause'' (grey) confidence. All discovered clauses have the ''Review'' link next to them until you click it to take an action (such as ''Confirm, Confirm with Deviation, Ignore'' or ''Review'' ''Later''). In addition, clauses with obligations have the [[File:71.0 Out-of-the-Box Support for Attributes and Clauses 6.PNG|RTENOTITLE]] icon next to them. You can click the icon to view the obligations. 4. '''Click '''on the clause which you want to review. The Document View section displays the page of the document where this clause is present. |
| − | <div class="note-box">Note: Discovery process for an agreement is triggered only for users with the AI license if the discovery is configured for a contract type.</div> <div class="image-green-border"> </div> <div class="image-green-border">2. '''Click ''' | + | <div class="image-green-border"> </div> <div class="note-box">'''Note''': The additional languages currently supported for Clause Discovery are German, Spanish, Portuguese, French, Dutch, Norwegian, and Swedish.</div> |
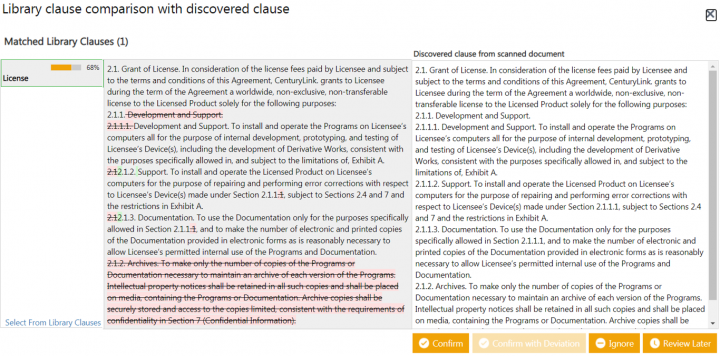
| − | To review Discovered clauses:<br/> 3. '''Click ''' | + | 5. '''Click '''"Review" on the clause you want to review, for example "Recitals". The Library clause comparison with discovered clause window opens. |
| − | </div> <div class="image-green-border">A new page opens, displaying tabs for the discovered | + | |
| − | To discover attributes, clauses, obligations and so on more accurately, the ICI Discover AI provides: | + | |
| − | + | ||
| − | *The discovered clauses are logically grouped together based on their hierarchy level and category and displayed in a delineated view to indicate the main section, sub-sections and so on, of each identified clause by default. | + | |
| − | *The various document objects which are in the agreement document but not necessarily a part of the clause text, such as table of content, titles, headers, footers, and multiple signature blocks, are identified separately and excluded from the actual clause discovery process. | + | |
| − | *The document’s title page is also discovered separately and its content is identified as a single clause. The title page is identified only for documents containing a Table of contents. | + | |
| − | *The DiscoverAI will also use a clause delineation logic based on the clause titles to identify up to one level of sub clause(s) in conjunction with the visual indentation based clause delineation logic. For example, while identifying the clause category, the entire text under title Introduction is identified as a clause. | + | |
| − | *The DiscoverAI will follow the clause delineation method that will be more suitable to the specific document file format to give more accurate clause identification. | + | |
| − | *The title-based delineation is only supported when working in English language. | + | |
| − | </div> <div class="image-green-border"> </div> <div class="image-green-border">The discovered clauses are displayed in a delineated view to indicate the main section, sub-sections and so on, of each identified clause by default.</div> <div class="image-green-border"> </div> <div class="image-green-border">[[File:7.15 539492 2.png|720px|7.15 539492 2.png]]</div> | + | |
| − | You can filter clauses based on | + | |
| − | + | ||
| − | <br/> The level of confidence associated with ''Discovered Clauses'' is displayed using different color indicators to depict ''High'' (green), ''Medium'' (orange), ''Low'' (pink), ''Revised Manually'' (blue) and ''Library Clause'' (grey) confidence. All discovered clauses have the ''Review'' link next to them until you click it to take an action (such as ''Confirm, Confirm with Deviation, Ignore'' or ''Review'' ''Later''). In addition, clauses with obligations have the [[File:71.0 Out-of-the-Box Support for Attributes and Clauses 6.PNG|RTENOTITLE]] icon next to them. You can click the icon to view the obligations. | + | |
| − | + | ||
| − | 4. '''Click '''on the clause which you want to review | + | |
| − | + | ||
| − | 5. '''Click ''' | + | |
<div class="image-green-border"> [[File:7.14 Clause hierarchy 03.png|720px|7.14 Clause hierarchy 03.png]]</div> | <div class="image-green-border"> [[File:7.14 Clause hierarchy 03.png|720px|7.14 Clause hierarchy 03.png]]</div> | ||
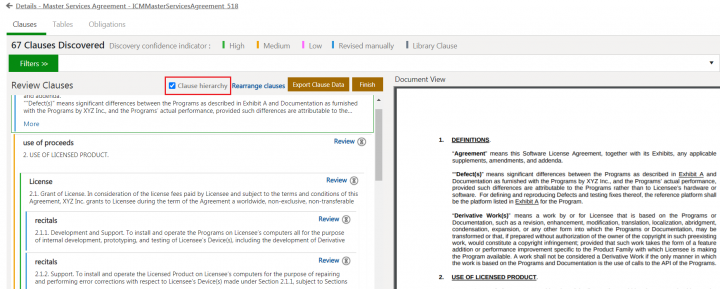
| − | You can review an entire section as a clause or review each sub-section separately and confirm each as a separate clause. | + | You can review an entire section as a clause or review each sub-section separately and confirm each as a separate clause. 6. '''Take '''actions (such as ''Confirm, Confirm with Deviation, Ignore ''and''Review Later'') on the discovered clauses. To enable or disable clause hierarchy view: 7. '''Uncheck''' the ''Clause hierarchy'' checkbox to view only the parent level clauses. |
| − | + | <div class="image-green-border">[[File:7.15 539492 4.png|720px|7.15 539492 4.png]]</div> <div class="image-green-border"> </div> <div class="image-green-border">[[File:7.15 539492 5.png|720px|7.15 539492 5.png]]</div> <div class="image-green-border"> </div> <div class="image-green-border">Sometimes, AI may identify the clause boundaries incorrectly. Users can review and rearrange boundaries for such clauses.</div> <div class="image-green-border">In rearrangement mode, users can: *Merge multiple discovered clauses into a single clause or split a large discovered clause into multiple clauses. *Identify a section of the discovered clause as its sub-clause. *Rearrange the clause hierarchy in case of misclassification by AI. Users can change clause hierarchy and identify a clause as a parent or child or peer of another clause(s). *Change the AI recommended category of a clause. *Choose to view only the parent clauses.</div> | |
| − | 6. '''Take '''actions (such as ''Confirm, Confirm with Deviation, Ignore ''and''Review Later'') on the discovered clauses. | + | To rearrange discovered clause boundaries: 8. '''Click '''''Rearrange clauses'' link if you want to rearrange clause boundaries. The discovered clauses open in an edit mode. |
| − | + | ||
| − | To enable or disable clause hierarchy view: | + | |
| − | + | ||
| − | 7. '''Uncheck''' the ''Clause hierarchy'' checkbox to view only the parent level clauses. | + | |
| − | <div class="image-green-border">[[File:7.15 539492 4.png|720px|7.15 539492 4.png]]</div> <div class="image-green-border"> </div> <div class="image-green-border">[[File:7.15 539492 5.png|720px|7.15 539492 5.png]]</div> <div class="image-green-border"> </div> <div class="image-green-border">Sometimes, AI may identify the clause boundaries incorrectly. Users can review and rearrange boundaries for such clauses.</div> <div class="image-green-border"> | + | |
| − | In rearrangement mode, users can: | + | |
| − | + | ||
| − | *Merge multiple discovered clauses into a single clause or split a large discovered clause into multiple clauses. | + | |
| − | *Identify a section of the discovered clause as its sub-clause. | + | |
| − | *Rearrange the clause hierarchy in case of misclassification by AI. Users can change clause hierarchy and identify a clause as a parent or child or peer of another clause(s). | + | |
| − | *Change the AI recommended category of a clause. | + | |
| − | *Choose to view only the parent clauses. | + | |
| − | </div> | + | |
| − | To rearrange discovered clause boundaries: | + | |
| − | + | ||
| − | 8. '''Click '''''Rearrange clauses'' link if you want to rearrange clause boundaries. The discovered clauses open in an edit mode. | + | |
<div class="image-green-border">[[File:7.15 539492 7.png|720px|7.15 539492 6.png]]</div> | <div class="image-green-border">[[File:7.15 539492 7.png|720px|7.15 539492 6.png]]</div> | ||
| − | Users can take following actions on the discovered clauses from the ''Rearrange'' ''clauses'' page. | + | Users can take following actions on the discovered clauses from the ''Rearrange'' ''clauses'' page. *Manage category: Users can change the category of discovered clauses using the ''Category'' drop down at the top of each discovered clause. For example, change the category of a clause from ''definition ''to ''confidential information''. Users can keep the clause category as blank if a text which is not part of any clause has been miscategorized as discovered clause. |
| − | + | ||
| − | *Manage category: Users can change the category of discovered clauses using the ''Category'' drop down at the top of each discovered clause. For example, change the category of a clause from ''definition ''to ''confidential information''. | + | |
| − | + | ||
| − | Users can keep the clause category as blank if a text which is not part of any clause has been miscategorized as discovered clause. | + | |
<div class="image-green-border">[[File:7.15 539492 8.png|720px|7.15 539492 8.png]]</div> | <div class="image-green-border">[[File:7.15 539492 8.png|720px|7.15 539492 8.png]]</div> | ||
| − | | + | *''Merge'': Users can merge two or more clauses using the ''Merge ''action. i. '''Select '''the text you want to merge as a single clause. For example, ''recitals ''sub clauses- ''2.1.1'' (from ''Purpose of''…), ''2.1.2'' and ''2.1.3''. The ''Merge'' button will be enabled. |
| − | + | ||
| − | *''Merge'': Users can merge two or more clauses using the ''Merge ''action. | + | |
| − | + | ||
| − | i. '''Select '''the text you want to merge as a single clause. For example, ''recitals ''sub clauses- ''2.1.1'' (from ''Purpose of''…), ''2.1.2'' and ''2.1.3''. The ''Merge'' button will be enabled. | + | |
<div class="image-green-border">[[File:7.15 539492 9.png|720px|7.15 539492 9.png]]</div> | <div class="image-green-border">[[File:7.15 539492 9.png|720px|7.15 539492 9.png]]</div> | ||
ii. '''Click '''''Merge''. The selected text spanning across multiple discovered clauses will be merged into a single clause. | ii. '''Click '''''Merge''. The selected text spanning across multiple discovered clauses will be merged into a single clause. | ||
<div class="image-green-border">[[File:7.15 539492 10.png|720px|7.15 539492 10.png]]</div> | <div class="image-green-border">[[File:7.15 539492 10.png|720px|7.15 539492 10.png]]</div> | ||
| − | Users can select clauses from same or different categories to merge by selecting the text. | + | Users can select clauses from same or different categories to merge by selecting the text. *''Split from existing'': Users can split a clause into two or more clauses using ''Split from existing ''action. i. '''Select '''the text in a clause you want to split into separate clause. For example, a section starting from ““''Defect(s)” means significant'' to ''for the Program''. The ''Split from existing'' button will be enabled. |
| − | + | ||
| − | *''Split from existing'': Users can split a clause into two or more clauses using ''Split from existing ''action. | + | |
| − | + | ||
| − | i. '''Select '''the text in a clause you want to split into separate clause. For example, a section starting from ““''Defect(s)” means significant'' to ''for the Program''. The ''Split from existing'' button will be enabled. | + | |
<div class="image-green-border">[[File:7.15 539492 11.png|720px|7.15 539492 11.png]]</div> | <div class="image-green-border">[[File:7.15 539492 11.png|720px|7.15 539492 11.png]]</div> | ||
ii. '''Click''' ''Split from existing''. The clause will be split into three parts- The selected text as one clause and previous and later unselected texts as two separate clauses. <br/> For example, three separate clauses are created for texts as:<br/> ''“Agreement” means'' to ''and addenda''.<br/> ''““Defect(s)” means significant'' to ''for the Program.''<br/> ''”Derivative Work(s)” means'' to ''of the Programs''. | ii. '''Click''' ''Split from existing''. The clause will be split into three parts- The selected text as one clause and previous and later unselected texts as two separate clauses. <br/> For example, three separate clauses are created for texts as:<br/> ''“Agreement” means'' to ''and addenda''.<br/> ''““Defect(s)” means significant'' to ''for the Program.''<br/> ''”Derivative Work(s)” means'' to ''of the Programs''. | ||
<div class="image-green-border">[[File:7.15 539492 12.png|720px|7.15 539492 12.png]]</div> | <div class="image-green-border">[[File:7.15 539492 12.png|720px|7.15 539492 12.png]]</div> | ||
| − | *''Create Sub Clause'': Users can create a sub clause within a clause using ''Create Sub Clause'' action. | + | *''Create Sub Clause'': Users can create a sub clause within a clause using ''Create Sub Clause'' action. i. '''Select '''the text in a clause you want to make as a sub clause. For example, ''“”Defect(s)” means'' to ''of the programs''. The ''Create Sub Clause'' button will be enabled. |
| − | + | ||
| − | i. '''Select '''the text in a clause you want to make as a sub clause. For example, ''“”Defect(s)” means'' to ''of the programs''. The ''Create Sub Clause'' button will be enabled. | + | |
<div class="image-green-border">[[File:7.15 539492 13.png|720px|7.15 539492 13.png]]</div> | <div class="image-green-border">[[File:7.15 539492 13.png|720px|7.15 539492 13.png]]</div> | ||
ii. '''Click''' ''Create Sub Clause''. The clause will be split into two clauses with the selected text as a child clause. For example, text from ''“Agreement” means'' to''and addenda'', will be marked as a parent clause and text from ''“”Defect(s)” means ''to ''of the programs'', will be marked as a sub clause. | ii. '''Click''' ''Create Sub Clause''. The clause will be split into two clauses with the selected text as a child clause. For example, text from ''“Agreement” means'' to''and addenda'', will be marked as a parent clause and text from ''“”Defect(s)” means ''to ''of the programs'', will be marked as a sub clause. | ||
<div class="image-green-border">[[File:7.15 539492 14.png|720px|7.15 539492 14.png]]</div> | <div class="image-green-border">[[File:7.15 539492 14.png|720px|7.15 539492 14.png]]</div> | ||
| − | *''Change Hierarchy'': Users can change the hierarchy levels of clauses using the ''Decrease Indent'' and ''Increase Indent'' actions. | + | *''Change Hierarchy'': Users can change the hierarchy levels of clauses using the ''Decrease Indent'' and ''Increase Indent'' actions. i. '''Click '''''Increase Indent ''button corresponding the clause you want to change level of. For example, ''Use of proceeds clause''. |
| − | + | ||
| − | i. '''Click '''''Increase Indent ''button corresponding the clause you want to change level of. For example, ''Use of proceeds clause''. | + | |
<div class="image-green-border">[[File:7.15 539492 15.png|720px|7.15 539492 15.png]]</div> | <div class="image-green-border">[[File:7.15 539492 15.png|720px|7.15 539492 15.png]]</div> | ||
The clause will move to a higher hierarchy. | The clause will move to a higher hierarchy. | ||
| Line 437: | Line 387: | ||
<br/> ii. '''Click '''''Decrease Indent'' button corresponding the clause you want to change level of. For example, ''Use of proceeds'' clause. The clause will move to a lower hierarchy. | <br/> ii. '''Click '''''Decrease Indent'' button corresponding the clause you want to change level of. For example, ''Use of proceeds'' clause. The clause will move to a lower hierarchy. | ||
<div class="image-green-border">[[File:7.15 539492 17.png|720px|7.15 539492 17.png]]</div> | <div class="image-green-border">[[File:7.15 539492 17.png|720px|7.15 539492 17.png]]</div> | ||
| − | The ''Confidence Indicator'' will change to blue for any change in a clause. | + | The ''Confidence Indicator'' will change to blue for any change in a clause.<br/> 9. '''Click''' ''Undo'' if you want to discard the changes.<br/> 10. '''Click '''''Save''. The changes will be saved to the discovered clauses and the Your data has been saved successfully message is displayed.. |
| − | + | ||
| − | <br/> 9. '''Click''' ''Undo'' if you want to discard the changes.<br/> 10. '''Click '''''Save''. The changes will be saved to the discovered clauses and the Your data has been saved successfully message is displayed.. | + | |
<div class="image-green-border">[[File:7.15 539492 18.png|720px|7.15 539492 18.png]]</div> | <div class="image-green-border">[[File:7.15 539492 18.png|720px|7.15 539492 18.png]]</div> | ||
| − | 11. '''Click '''''Ok''. | + | 11. '''Click '''''Ok''. To export discovered clauses: 12. '''Click '''''Export Clause Data'' if you want to export the clause which has been discovered. 13. '''Click '''''Finish ''to complete the review process. The ''Clause discovery progress saved'' message is displayed and the ''Discovered Clauses Status'' changes to ''Review Completed''. |
| − | + | ||
| − | To export discovered clauses: | + | |
| − | + | ||
| − | 12. '''Click '''''Export Clause Data'' if you want to export the clause which has been discovered. | + | |
| − | + | ||
| − | 13. '''Click '''''Finish ''to complete the review process. The ''Clause discovery progress saved'' message is displayed and the ''Discovered Clauses Status'' changes to ''Review Completed''. | + | |
<div class="image-green-border">[[File:7.12 AIML UX 5.png|720px|7.12 AIML UX 5.png]] </div> | <div class="image-green-border">[[File:7.12 AIML UX 5.png|720px|7.12 AIML UX 5.png]] </div> | ||
| − | 14. '''Click '''''Ok''. | + | 14. '''Click '''''Ok''. 15. '''Click''' ''Review ''button corresponding to the ''Tables''. The ''Review'' button will be enabled when there is at least one discovered Table. |
| − | + | ||
| − | 15. '''Click''' ''Review ''button corresponding to the ''Tables''. The ''Review'' button will be enabled when there is at least one discovered Table. | + | |
<div class="note-box">Note: Table and Obligation discovery tabs are only displayed if these are present in the agreement document.</div> | <div class="note-box">Note: Table and Obligation discovery tabs are only displayed if these are present in the agreement document.</div> | ||
Similar to clauses, the discovered tables and document are displayed in a parallel view. The ''Document View'' section displays the page of the document where the table is present. | Similar to clauses, the discovered tables and document are displayed in a parallel view. The ''Document View'' section displays the page of the document where the table is present. | ||
<div class="image-green-border">[[File:7.12 AIML UX 8.png|720px|7.12 AIML UX 8.png]] </div> | <div class="image-green-border">[[File:7.12 AIML UX 8.png|720px|7.12 AIML UX 8.png]] </div> | ||
| − | 16. '''Click '''the ''Edit Table Name'' icon next the table that you want to edit. For example, Table 1. | + | 16. '''Click '''the ''Edit Table Name'' icon next the table that you want to edit. For example, Table 1. 17. '''Toggle '''the ''Has Header'' flag to ''Yes ''if you want the table to have a header. |
| − | + | ||
| − | 17. '''Toggle '''the ''Has Header'' flag to ''Yes ''if you want the table to have a header. | + | |
<div class="image-green-border">[[File:7.12 AIML UX 9.png|720px|7.12 AIML UX 9.png]] </div> | <div class="image-green-border">[[File:7.12 AIML UX 9.png|720px|7.12 AIML UX 9.png]] </div> | ||
| − | 18. '''Click '''inside the header box to add the header name. For example, SKU Name, Service Name, etc. | + | 18. '''Click '''inside the header box to add the header name. For example, SKU Name, Service Name, etc. 19. '''Click '''inside each of the boxes to add data in the columns. For example, HCM (SKU), Human Capital Management (Service), etc. |
| − | + | ||
| − | 19. '''Click '''inside each of the boxes to add data in the columns. For example, HCM (SKU), Human Capital Management (Service), etc. | + | |
<div class="image-green-border">[[File:7.12 AIML UX 10.png|720px|7.12 AIML UX 10.png]] </div> | <div class="image-green-border">[[File:7.12 AIML UX 10.png|720px|7.12 AIML UX 10.png]] </div> | ||
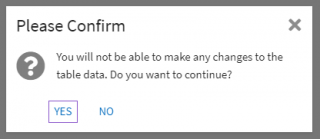
| − | 20. '''Select '''the checkbox for the rows and columns that you want to update. | + | 20. '''Select '''the checkbox for the rows and columns that you want to update. 21. '''Click '''''Save Changes ''to save changes if you want to review or edit them later. 22. '''Click '''''Finish''. A validation message is displayed informing you that you will not be able to make any changes to the table data after this. |
| − | + | ||
| − | 21. '''Click '''''Save Changes ''to save changes if you want to review or edit them later. | + | |
| − | + | ||
| − | 22. '''Click '''''Finish''. A validation message is displayed informing you that you will not be able to make any changes to the table data after this. | + | |
<div class="image-green-border">[[File:7.12 AIML UX 11.png|720px|7.12 AIML UX 11.png]] </div> | <div class="image-green-border">[[File:7.12 AIML UX 11.png|720px|7.12 AIML UX 11.png]] </div> | ||
| − | 23. '''Click '''''Yes ''if you are sure that you want to update the table and proceed. | + | 23. '''Click '''''Yes ''if you are sure that you want to update the table and proceed. 24.'''Click '''the ''Obligations ''tab. Similar to tables, the discovered obligations and document are displayed in a parallel view. The ''Document View'' section displays the page of the document where the obligations are present. |
| − | + | ||
| − | 24.'''Click '''the ''Obligations ''tab. Similar to tables, the discovered obligations and document are displayed in a parallel view. The ''Document View'' section displays the page of the document where the obligations are present. | + | |
<div class="image-green-border">[[File:7.12 AIML UX 12.png|720px|7.12 AIML UX 12.png]] </div> <div class="image-green-border"> </div> <div class="note-box">'''Note''': The additional languages currently supported are German, Spanish, Portuguese, French, Dutch, Norwegian, and Swedish.</div> | <div class="image-green-border">[[File:7.12 AIML UX 12.png|720px|7.12 AIML UX 12.png]] </div> <div class="image-green-border"> </div> <div class="note-box">'''Note''': The additional languages currently supported are German, Spanish, Portuguese, French, Dutch, Norwegian, and Swedish.</div> | ||
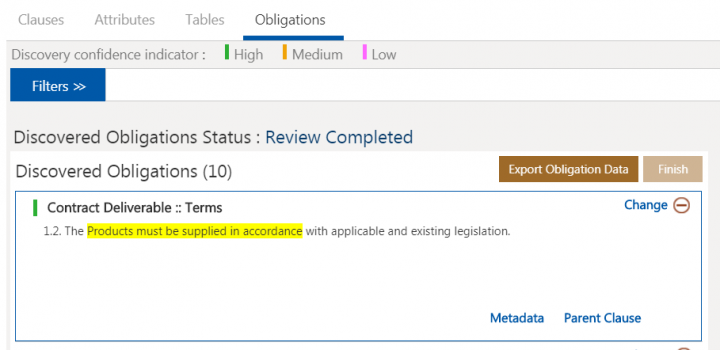
25.'''Click '''''Review ''on the obligation you want to review. The ''Library Obligation comparison with discovered Obligation'' window opens. | 25.'''Click '''''Review ''on the obligation you want to review. The ''Library Obligation comparison with discovered Obligation'' window opens. | ||
<div class="image-green-border">[[File:7.12 AIML UX 13.png|720px|7.12 AIML UX 13.png]] </div> | <div class="image-green-border">[[File:7.12 AIML UX 13.png|720px|7.12 AIML UX 13.png]] </div> | ||
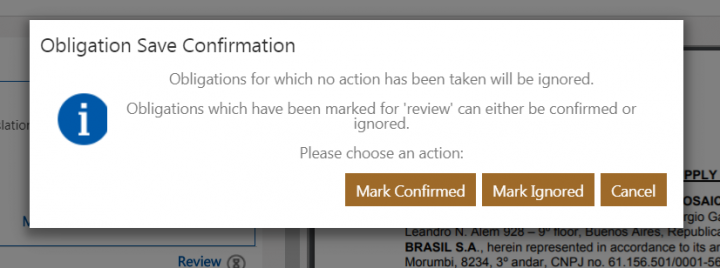
| − | The following actions can be taken on selected Obligation: | + | The following actions can be taken on selected Obligation: *'''Click '''''Confirm ''to confirm the Obligation. *'''Click '''''Review Later'' if you are unsure and want to review the Obligation later. *'''Click '''''Ignore ''to ignore the Obligation. 26. '''Click '''''Metadata ''to view all the discovered metadata. The number (for example, 10.10) indicates the number of Attributes that are discovered such as Email, Numbers, Date and Time, and so on. 27. '''Click '''''Parent Clause'' to see the parent Clause that the Obligation is linked to. 28. '''Click '''''Export Obligation Data'' to export the Obligation information to an Excel file. 29. '''Click '''''Finish ''to complete the review and continue with the workflow as expected. The ''Obligation Save Confirmation'' window opens. |
| − | + | ||
| − | *'''Click '''''Confirm ''to confirm the Obligation. | + | |
| − | *'''Click '''''Review Later'' if you are unsure and want to review the Obligation later. | + | |
| − | *'''Click '''''Ignore ''to ignore the Obligation. | + | |
| − | + | ||
| − | 26. '''Click '''''Metadata ''to view all the discovered metadata. The number (for example, 10.10) indicates the number of Attributes that are discovered such as Email, Numbers, Date and Time, and so on. | + | |
| − | + | ||
| − | 27. '''Click '''''Parent Clause'' to see the parent Clause that the Obligation is linked to. | + | |
| − | + | ||
| − | 28. '''Click '''''Export Obligation Data'' to export the Obligation information to an Excel file. | + | |
| − | + | ||
| − | 29. '''Click '''''Finish ''to complete the review and continue with the workflow as expected. The ''Obligation Save Confirmation'' window opens. | + | |
<div class="image-green-border">[[File:7.12 AIML UX 14.png|720px|7.12 AIML UX 14.png]] </div> | <div class="image-green-border">[[File:7.12 AIML UX 14.png|720px|7.12 AIML UX 14.png]] </div> | ||
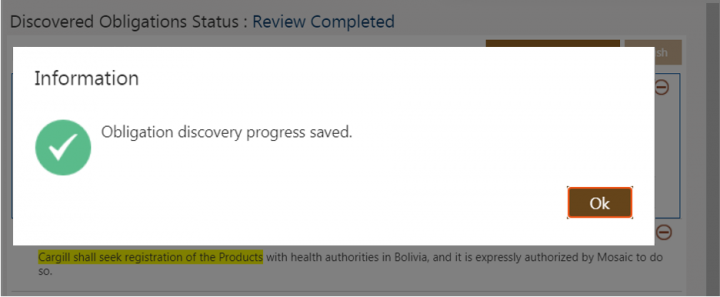
30. '''Click '''''Mark Confirmed, Mark Ignored'' or ''Cancel ''as required. The obligations are marked as ''Review Completed'' and the ''Obligation discovery progress saved'' message is displayed. | 30. '''Click '''''Mark Confirmed, Mark Ignored'' or ''Cancel ''as required. The obligations are marked as ''Review Completed'' and the ''Obligation discovery progress saved'' message is displayed. | ||
<div class="image-green-border"> [[File:7.12 AIML UX 15.png|720px|7.12 AIML UX 15.png]]</div> | <div class="image-green-border"> [[File:7.12 AIML UX 15.png|720px|7.12 AIML UX 15.png]]</div> | ||
| − | 31.'''Click '''''Ok''. | + | 31.'''Click '''''Ok''. 32.'''Click '''''Export Obligation Data'' to export the Obligation information to an Excel file. |
| − | + | ||
| − | 32.'''Click '''''Export Obligation Data'' to export the Obligation information to an Excel file. | + | |
<div class="image-green-border">[[File:7.12 AIML UX 16.png|720px|7.12 AIML UX 16.png]] </div> <div class="image-green-border"> </div> | <div class="image-green-border">[[File:7.12 AIML UX 16.png|720px|7.12 AIML UX 16.png]] </div> <div class="image-green-border"> </div> | ||
=== Using Filters === | === Using Filters === | ||
<div class="image-green-border"><br/> '''Click '''''Filters ''on the clauses tab. The ''Document View'' tab minimizes and the filters panel is displayed.</div> <div class="image-green-border"> </div> <div class="image-green-border">[[File:7.12 AIML UX 17.png|720px|7.12 AIML UX 17.png]]<br/> </div> | <div class="image-green-border"><br/> '''Click '''''Filters ''on the clauses tab. The ''Document View'' tab minimizes and the filters panel is displayed.</div> <div class="image-green-border"> </div> <div class="image-green-border">[[File:7.12 AIML UX 17.png|720px|7.12 AIML UX 17.png]]<br/> </div> | ||
| − | *You can filter clauses as well as obligations based on Clause/Obligation categories, Confidence and Review Status. | + | *You can filter clauses as well as obligations based on Clause/Obligation categories, Confidence and Review Status. *The level of confidence associated with Discovered Clauses/Obligations is displayed using different color indicators to depict High (green), Medium (orange) and Low (pink) confidence. All discovered clauses have the Review link next to them until you click it to take an action (such as Confirm, Confirm with Deviation, Ignore or Review Later). In addition, clauses with obligations have the icon next to them. You can click the icon to view the obligations. *Click the ''Finish ''button to complete the review process. |
| − | *The level of confidence associated with Discovered Clauses/Obligations is displayed using different color indicators to depict High (green), Medium (orange) and Low (pink) confidence. All discovered clauses have the Review link next to them until you click it to take an action (such as Confirm, Confirm with Deviation, Ignore or Review Later). In addition, clauses with obligations have the icon next to them. You can click the icon to view the obligations. | + | |
| − | *Click the ''Finish ''button to complete the review process. | + | |
<ol start="35"> | <ol start="35"> | ||
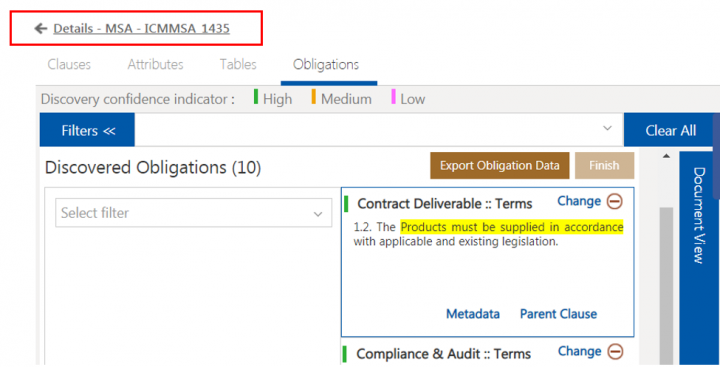
<li>'''Click '''the link above the tabs to go back to the agreement ''Details ''page.</li> | <li>'''Click '''the link above the tabs to go back to the agreement ''Details ''page.</li> | ||
Revision as of 07:35, 9 February 2022
Contents
- 1 DiscoverAI
- 2 Table Discovery
- 3 DiscoverAI - Support for Own Paper
- 4 Inbuilt Discovery of Attributes and Clauses
- 5 Automating integration of user feedback for document entities
- 6 The training mode in AI Discovery
- 7 Analyzing multiple documents in AI Studio
- 8 AI Studio for an agreement and related documents
- 9 Improved discovery performance for scanned pdfs
DiscoverAI
Contract Highlights
Whenever contracts are sent to CXOs, legal or finance teams for their approval or signatures, they are interested to know if a certain language is present or absent in the contract. This helps them to understand the nuances of the contracts, viewpoints of various stakeholders, etc. and they can quickly take an informed decision.
With this release,
- The "DiscoverAI" model can find the terms in documents and highlight them for business decision makers. Configurators can now specify the important words by the business so that the "DiscoverAI" model can find matching as well as similar terms in documents and highlight them for the intended audience.
- In case no phrases are specified, then ICI will identify the important sections in the contract based on learnings from historical data. The identified sections will also be ranked in order of importance.
- A configurator can also specify the maximum number of highlights to be extracted from the agreements. The AI algorithm would rank the findings and present only the top ranked highlights to the user.
- Configurators can configure the event to generate the contract highlight, for example agreement updated, etc. Using this configuration, when the specified event occurs, ICI will identify the important sections of the contract based on historical data and phrases specified by the configurator
To configure generating contract highlights from an agreement:
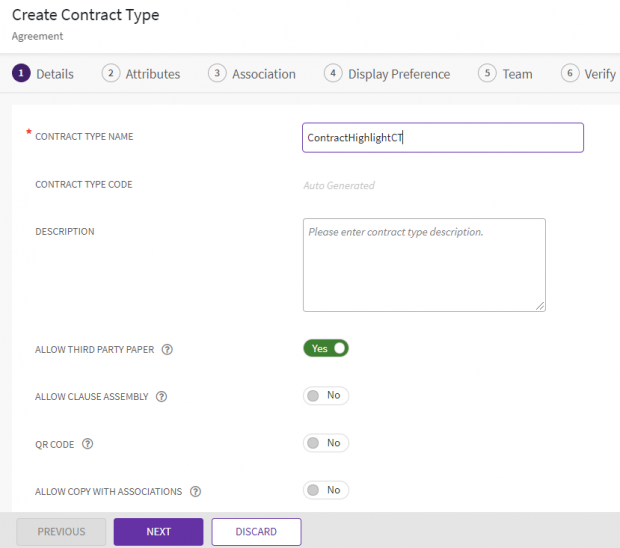
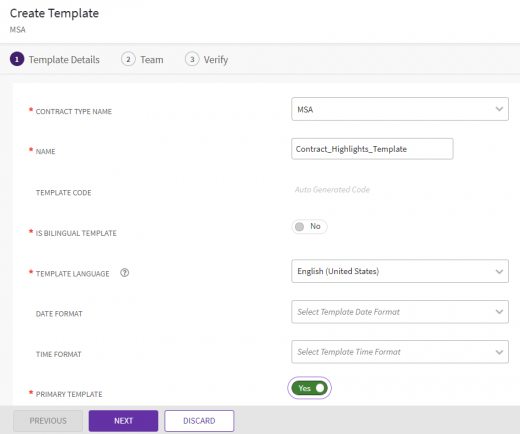
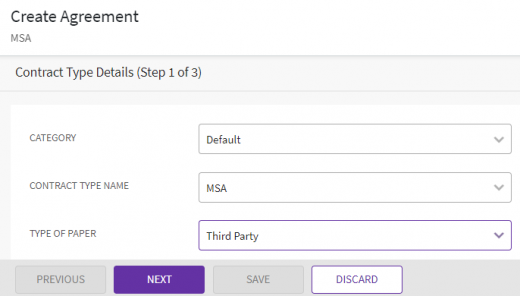
- Create an "Agreement Contract Type" using "Third Party Paper". You can use an existing "Agreement Contract Type" as well.
- Click "Next", the "Attributes" page opens.
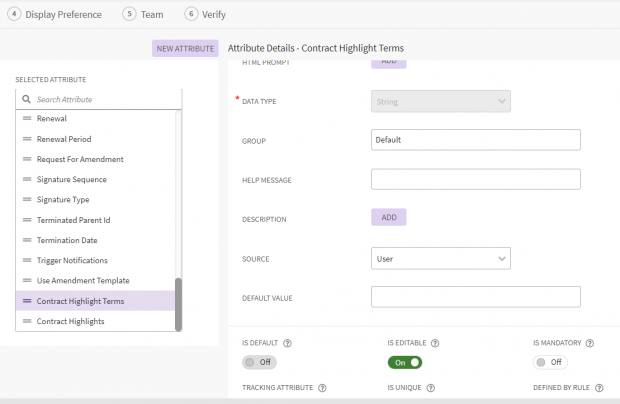
- To be able to generate contract highlights from an Agreement, include the following attributes in the Agreement Contract Type:
- Contract Highlight Terms: The "Data Type" must be selected as "String". In the "Default Value" attribute, enter the different terms or keywords expected in the highlight, separated by a pipe symbol. For example, Legal|Confidentiality|Liability|NoOfRecords:10.
- Contract Highlights: Here the "Data Type RichTextArea" must be selected.
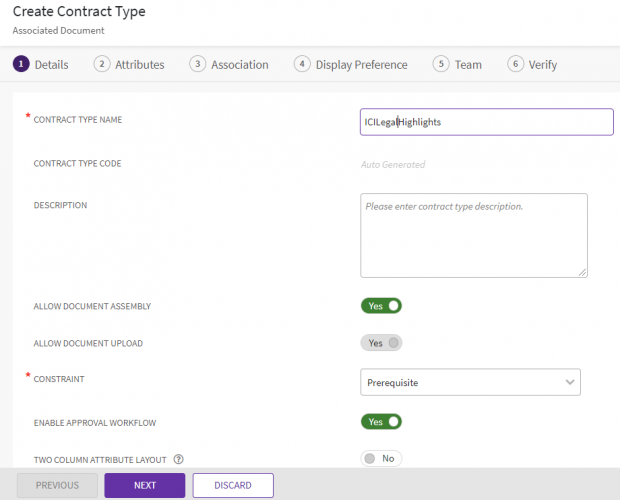
- Create an "Associated Document Contract Type", for example, "ICILegalHighlights" to generate contract highlights for your legal department.
- To add contract highlights in an "Associated Document", include the following attributes in the "Associated Document Contract Type".
- Contract Highlight Terms: The "Data Type" must be selected as "String". In the "Default Value" attribute, enter the different terms or keywords expected in the highlight, separated by a pipe symbol. For example, Legal|Confidentiality|Liability|NoOfRecords:10.
- Contract Highlights: Here the "Data Type RichTextArea" must be selected.
To add the created "Associated Document Contract Type" to the "Agreement Contract Type":
- On the "Contract Types" page, click the "Agreement Contract Type" created earlier. The "Details" page for that contract type opens.
- Click the "Edit" button. The "Edit Contract Type" wizard opens.
- Navigate to the "Association" tab by clicking "Next".
- Click the plus icon next to "Association".
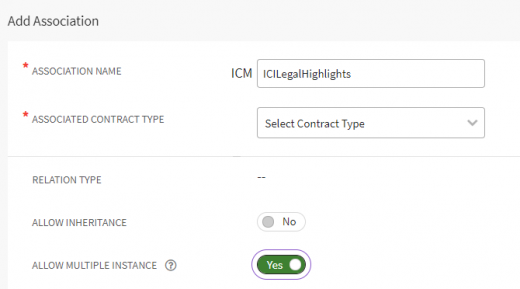
- Create an "Association" for the "Associated Document Contract Type".
- Select the created "Associated Document Contract Type". You can set the "Allow Multiple Instance" option to "Yes", to allow different contract highlight associated documents to be created for different departments, such as legal or finance.
- Create a template for the "Associated Document".
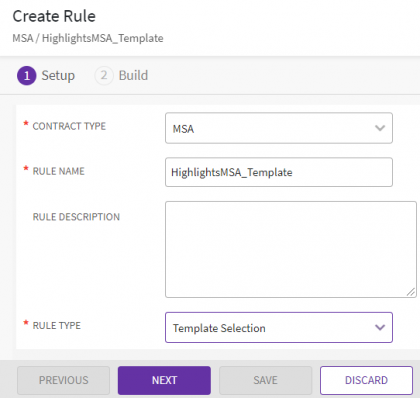
- Create a "Template Selection Rule" for the "Associated Document".
- Create an "Event Rule" with the action "AITriggerContractHighlights".
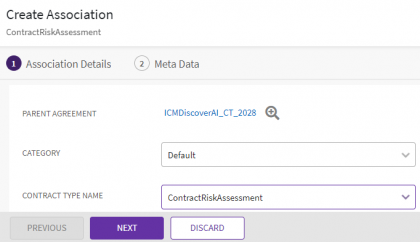
- To get the contract highlights in the "Associated Document", you need to create an "Association" with the "Parent Agreement".
- Click "Next". The "Meta Data" page opens.
- Enter the keywords in the Contract Highlight Terms. For example, CEO|Liabilities | Amount |Penalty |obligation| regulation| price| jurisdiction|NoOfRecords:10.
- Add NoOfRecords:n where 'n' denotes the number of contract highlights to be extracted. The default is NoOfRecords:20, if the value of n is not specified in the keywords.
- When an Agreement created using the selected Agreement Contract Type is published, the configured contract highlights will be extracted and compiled in the Associated Document.
Table Discovery
Along with clauses and metadata, ICI also extracts tables (including information such as SLAs, price list, etc.) in Agreements and displays them on the Tables tab (on the Details page). ICI tries to match the discovered table(s) with the Associated Contract Types of the Agreement. If a strong match is found, then the table is tagged with that Associated Contract Type, and the table columns are also matched with the Attributes of that Associated Contract Type.
You can then take relevant action such as creating new instances of the Associations. Automatically recognizing table data inside the Agreements saves a lot of manual labor of identifying and tagging the data correctly.
The table discovery allows you to:
- Identify and discover the table(s) in the Agreement Document
- Update the data in the discovered table as required
- Create new instances of the Associations for the uploaded Agreement
The table discovery in PDF agreements works well with:
- Tables with well-defined borders in text PDFs and high-quality scanned PDFs
- Tables that may be slightly skewed or tilted
- Table cells with light-colored backgrounds
The table discovery in PDF agreements may not work well with:
- Tables in low-quality scanned PDFs and those without borders
- Tables without well-defined borders or characters overlapping the table border, etc., due to certain OCR limitations
- Certain non-table elements, such as flowcharts and diagrams
- Tables with merged columns and rows
- Nested tables, which may be discovered as multiple tables
Discovering Tables in an Agreement
To discover tables in an Agreement:
1. Create an Agreement ("Third Party Type Of Paper").
2. Ensure that the Clause Discovery functionality is turned On and the Contract Type is enabled for table discovery.
3. Create and Publish the Agreement. ICI automatically queues the Agreement for table discovery.
Viewing Discovered Tables in an Agreement
You can view all the discovered tables in an Agreement, so that you can review them and take actions as needed (based on whether they meet the criteria for creating an associated document or not).
1. Click the Tables tab on the uploaded Agreement Details page.
2. ICI displays a list of the Discovered Tables for that Agreement Document.
Editing Table Data
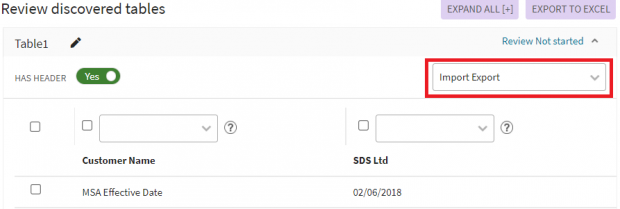
1. Click the Edit Table Name icon next the table that you want to edit. For example, Table 2.
2. Toggle the Has Header button to Yes if you want the table to have a header.
3. Click inside the header box to add the header name. For example, Customer Name, Results, etc.
4. Click inside each of the boxes to add data in the columns. For example, MSA Effective date, 2/06/18, etc.
5. Click "Save Changes" to save changes if you want to review or edit them later. The Table data saved message is displayed.
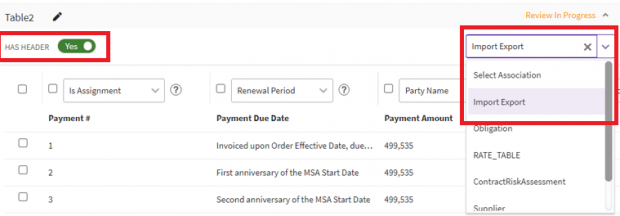
6. Select the Association for which you want to create this data from the Select Association drop-down. For example, "Import Export".
7. A validation message is displayed to check if you want to save the updated data. Click "Save" to update the data in the table, else click "Discard".
8. Select the checkbox for the rows and columns that you want to update.
9. Click "Finish". A validation message is displayed informing you that you will not be able to make any changes to the table data after this.
10. Click "Yes" if you are sure that you want to update the table and proceed.
11. A message is displayed indicating that the table data is saved and the Associations are being created. Click "Yes" if you are sure that you want to update the table and proceed, else click No.
12. You can view the associations on the Associations tab.
13. Click View Record to view the details of the individual records.
14. You can take further action as needed. For example, send it for Approval.
Selecting the Type of Table to be able to create Associations for it
You can create Associated Documents using the data in the discovered tables. You are basically discovering the Associated Document type and the columns associated with that document type.
To do so:
1. Click the Tables tab on the uploaded Agreement Details page.
2. In the Discovered Tables window when matching data is present, the exact Associations with that table are discovered. For example, the "Import Export" are discovered. These are associated and the names of the header are also discovered.
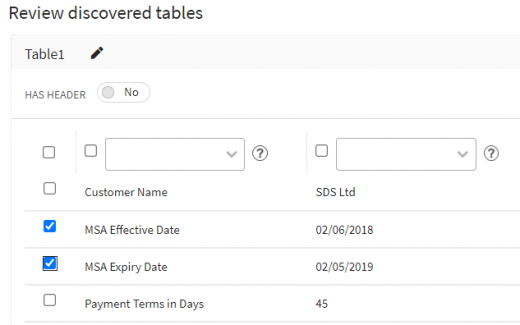
3. You can select whether the table should have a header or not by enabling the Has Header flag to "Yes".
By doing this, the first row of the table will be marked as the header and Associations will not be created for it. If there are 2 rows other than the header, then 2 Associations will be created. A green tick mark will be displayed next to them which means that they are successfully created in the Tables tab.
4. In the Discovered Tables window, make changes in the table as required. For example, select 3 rows and columns.
Saving the changes of the Table Discovery for the Agreement
You can save the interim progress of the Table Discovery for an Agreement, so that you can review it later by:
1. Click "Save Changes". The Table data saved message is displayed.
Finishing the Table Identification for an Agreement
You can complete the Table identification for an Agreement, so that the identified tables become part of the Agreement.
1. Click "Finish". A message will be displayed indicating that you will not be able to make any changes to the table data.
2. Click "Yes" if you are certain that you want to make the changes, else you can save changes and review them later.
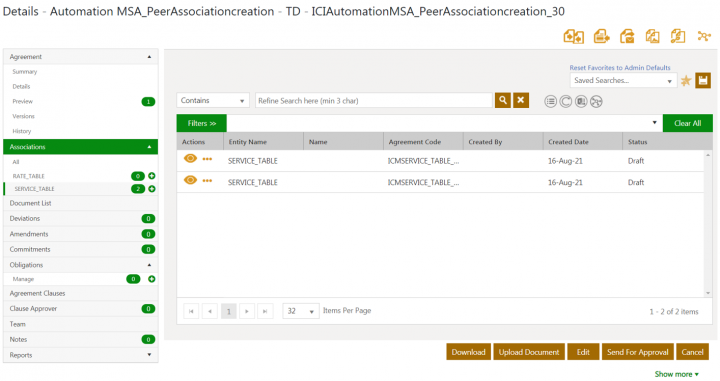
3. Clickthe Associations tab to see the Associations that are discovered, as shown in the screenshot below:
4. Click the Supplier association to view the details and send for approval.
5. Click "Export to Excel" if you want to export the table that has been discovered.
Note:
- Once the Associations are created, you cannot make any changes to the table. The table is disabled and the status changes to Review Completed.
- It is not necessary to match every table to one of the association contract type. You can still make changes to such tables and download them using ‘Export to excel’ functionality.
DiscoverAI - Support for Own Paper
ICI already leverages the DiscoverAI app to discover attributes, clauses, tables and obligations in agreements created using third party paper type.
Now, ICI has extended the support to discover attributes, clauses, tables and obligations in agreements created using own paper type, and tagging the attributes and clauses to the original agreement document. This helps convert unstructured documents into structured agreements, making it easier to manage and also increase compliance.
Note:
- Tagging is supported only in Word documents.
- The attributes and clauses that have been confirmed in ICI (even on the web UI) are tagged back in the agreement document.
Discovering Attributes, Clauses, Tables and Obligations
To discover attributes, clauses, tables and obligations using own type of paper:
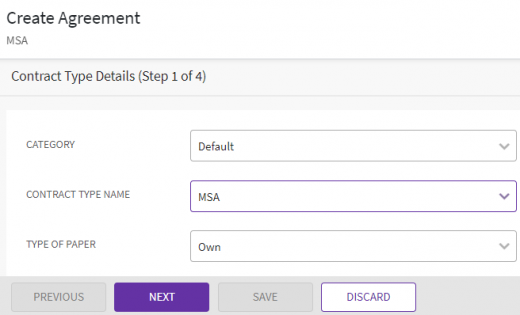
1. Create an agreement using Own Type of Paper.
2. Click "Next". The Attributes page opens.
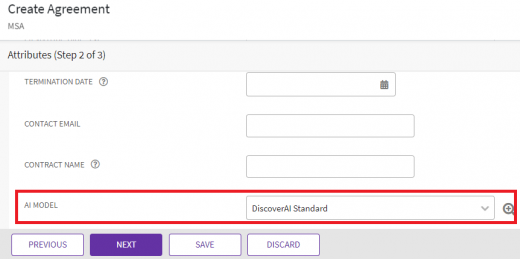
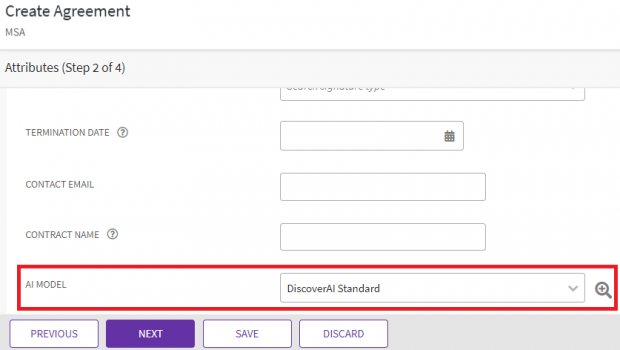
3. Select the seeded AI model- DiscoverAI Standard in the AI Model.
4. Click "Next". The "Select Template" page opens.
5. Select a template or upload a file.
6. Click "Next".
All non-tagged attributes, clauses, tables (if present in the agreement document) and obligations are discovered based on the DiscoverAI Standard model configuration .
Tagging Discovered Attributes
1. Click the "Attributes" tab.
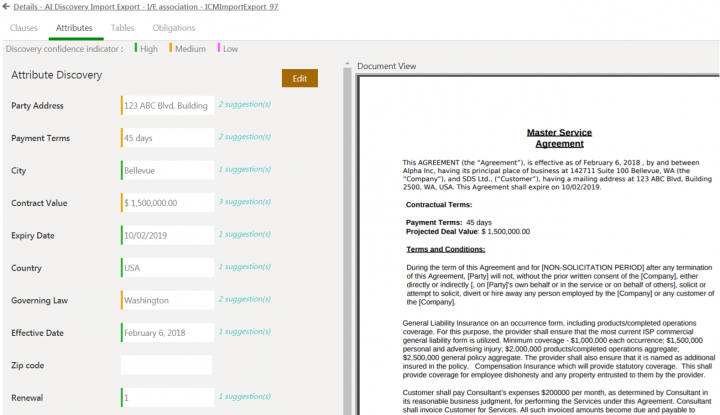
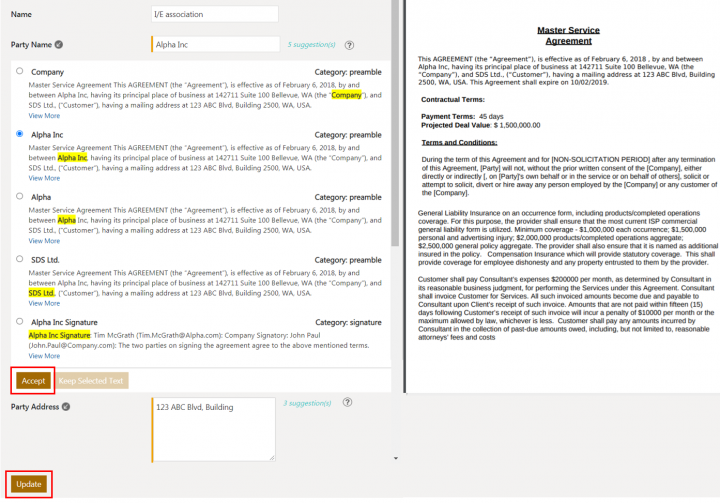
2. Click "Edit" to edit the attributes. You can also modify the discovered attribute values by clicking the View potential matching values icon and then Click "Update".
The AI model will learn and recommend values when:
- The discovered attribute value is incomplete, and the user selects the complete value, such as selecting the complete address line if the system has discovered only partial address
- Manual corrections are made to incorrectly identified attribute values, such as correction in vendor name
- A different attribute value is selected using the Keep selected text option
The newly learnt values will, from thereon, be presented as default to the user and any changes will continue to be learnt and recommended by the AI model.
4. Download the latest version of the agreement in Word format. The discovered attributes are tagged as ICI attributes in the agreement document, as shown in the screenshot below:
Tagging Discovered Clauses
1. Click the Clauses tab. The discovered clauses are displayed.
2. Take actions (such as Confirm, Confirm with Deviation, Ignore, Review Later) on the discovered clauses.
3. Click Finish to complete the review process, as shown in the screenshot below:
4. Click the Versions tab. A new version of the agreement is created in both Word and PDF formats.
5. Download the latest version. The confirmed clauses are tagged as ICI clauses in the agreement document.
Note:
- If you create a new agreement and upload the Word document that was downloaded in Step 5, the discovery will be triggered, however the clauses that were already confirmed and tagged as ICI clauses are not displayed.
- Only when the agreement is published, the clauses that you confirm on clicking Finish will be saved as ICI clauses and displayed in the Agreement Clauses tab on the Details page.
- A new agreement version is created each time you save the discovered attributes and confirm the clauses by clicking Finish.
Inbuilt Discovery of Attributes and Clauses
Previously, discovering attributes and clauses in customers’ agreement documents was time consuming as it required retraining of the algorithms from scratch, causing delay in deployment of services.
Now, ICI has an inbuilt discovery model that helps to automatically extract and discover the most common attributes and clauses in agreements besides enhancing clause delineation in third party contracts. It is a seeded, pre trained model named DiscoverAI Standard. This facilitates the prediction of accurate clause categories and capturing the right metadata within clauses. This improves contract turnaround time and quality of results, thus leading to improved user experience.
The inbuilt discovery model supports the discovery of the following predefined attributes and clauses in any MSA, NDA and SOW third party paper contract types:
- Attributes: Party Name, Party Address, Effective Date, Expiry Date, Contract Value, Contract Duration, Renewal, EverGreen, PaymentTerms, Jurisdiction, Governing Law, Notice Period For Termination, LiabilityType and ComplianceType
Note: The Contract Value attribute supports the following currencies - USD, CAD, EUR, INR and CAN
- Clauses: Amendment, Assignment, Audit, Confidential Information, Conflicts, Counterparts, Definitions, Dispute Resolution, Entire Agreement, Force Majeure, Governing Law, Indemnification, Insurance, Intellectual Property Rights, Limitation Of Liability, Non-Compete, Non-Solicitation, Notices, Payment Terms, Penalties/Remedies, Personnel, Preamble, Publicity, Relationship Of Parties, Representations, Warranties and Compliances, Severability, Signature, Survival, Taxes, Term, Termination, Waiver, Deemed Acceptance, Acceptance Criteria, Rejection Remedy, Cost of Living Adjustments, Most Favored Customer, Use of Third Party Software, Exclusivity, Subcontract, Technology Escrow, Governance Schedules, Termination Assistance, Change Control, Non Circumvention, Rebates and discounts, Fixed Liability, No Liability and Uncapped
The discovery support has been further extended for URL datatype attributes. DiscoverAI would be able to discover the URLs in contract and associate them with URL datatype attribute. Also, users now would be able to select and save multi-choice attributes as well as multi-choice lookup datatypes on the Attributes Discovery page.
With this release, identification of the following attributes in the document has additionally been introduced: City, State, Zip code, Country, Point of contact – Name, Point of contact – Title, Point of contact – Address, Point of contact – Email and Point of contact – Phone.
Users can manually trigger the attribute discovery on the Attributes page itself, while uploading a third-party document, during the agreement creation process. Discovered values will then be auto-filled in empty attributes and users can view additional potential options for the discovered attributes.
Users can:
• View the progress of the attribute discovery.
• Identify AI discoverable attributes on the “Attributes” page of the agreement creation wizard.
• View the values recommended by AI for discoverable attributes.
• View the agreement document on the “Attributes” page itself, for quick validation of AI recommended values for discoverable attributes as well as attributes values already tagged in the agreement document.
Discovering Common Attributes and Clauses
1. Create an agreement using "Third Party Type of Paper".
2. Click "Next". The Attributes page opens.
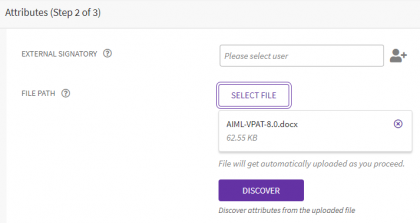
3. Select a document in the File Path field. For example, "ICMMasterServiecesAgreement.pdf". The "Discover" button will be displayed, using which user can trigger attribute discovery manually.
4. Click "Discover".
The discovery process starts in the background and the details are displayed on the Attributes page.
- The Document is displayed in a side by side view in a pdf format.
- The two-column attributes layout is converted to the single column layout to accommodate the agreement document view.
- The Discoverable Attributes are indicated with a grey bar as the Discovery confidence indicator and are disabled, notifying users that they don’t need to enter the values for these attributes. For example, attribute Effective Date.
- The discovery process progress bar is displayed at the bottom indicating the progress in percentage with a Stop button.
- The Attribute discovery is in progress is indicated for each discoverable attribute by three dots icon.
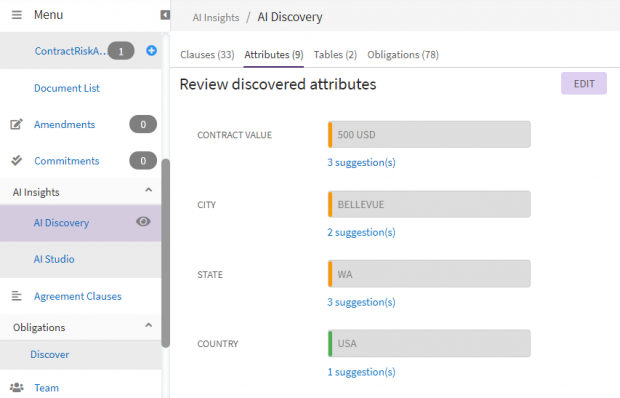
Once the discovery process is complete, the document presents the discovered attributes with all potential matching values as suggestions.
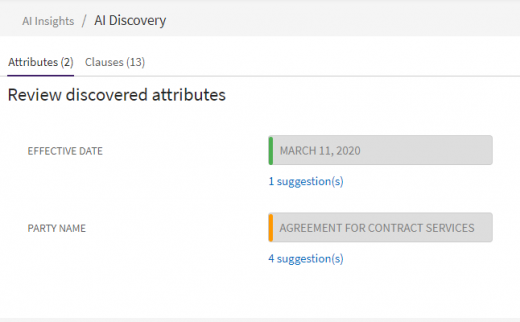
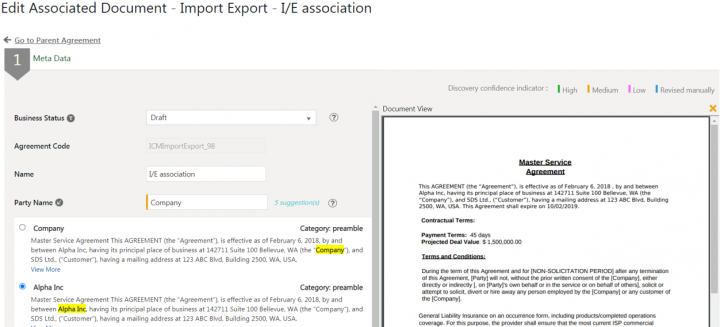
5.Click the View potential matching values icon corresponding to the discovered attribute to take actions on them such as Accept or Keep Selected Text. For example, "Party Name" has four suggestions.
The first value in the suggestions will be selected by default. For example, Agreement For Contract Services. Users can select any value from the presented suggestions.
The attribute values are normalized and displayed based on the defined rules. For example, the Effective Date is displayed in the ICI-supported format, as shown in the screenshot below:
Users will be navigated to the page in the document where the attribute is present, upon clicking on the attribute fields.
6. Click Next.
7. Create and publish the agreement following the standard ICI workflow. The agreement is created in Draft state.
Clauses: The most common clauses from the agreement document that you uploaded, are discovered and displayed in the Clauses tab.
A generalized framework to support additional languages in AI apps
ICI supports clause and obligation discovery for agreements in English, German, Spanish and Portuguese languages.
With this release, a language framework has been implemented for AI discovery which can support a large number of languages. Using this generalized framework, DiscoverAI, NegotiateAI, and DiscoverAI for legacy apps have been enhanced to support additional European languages – French, Dutch, Norwegian, and Swedish.
Along with the clause and obligation discovery support, AI models can now discover attributes too, in all the supported languages.
Supporting clause hierarchy in agreements in different file formats
In a contract each paragraph could be a part of a typical hierarchy where, for example, a clause might be a combination of multiple paragraphs forming one section.
ICI DiscoverAI identifies these different levels within a clause to give users a distinct visual representation of clauses with sub-sections of clauses displayed in a delineated view, during the clause discovery process. Clause discovery processor identifies sections and sub-sections in the supported document formats up to 3 levels. This hierarchical representation of clauses helps users to compare clause sections, sub-sections and so on.
The DiscoverAI will also use a clause delineation logic based on the clause titles to identify up to one level of sub clause(s) in conjunction with the visual indentation based clause delineation logic. For example, while identifying the clause category, the entire text under title Introduction is identified as a clause.
Further, any document objects which are in the agreement document but not necessarily a part of the clause text, such as table of content, titles, headers, footers, and multiple signature blocks, will now be identified separately and excluded from the actual clause discovery process.
The clause delineation in Discover AI supports Word documents, text PDF and mixed formatted .docx documents. It also supports Word documents that do not use any styles. The DiscoverAI will follow the clause delineation method that will be more suitable to the specific document file format to give more accurate clause identification.
The title-based delineation is only supported when working in English language.
This helps to get better clause delineation, eliminates a large number of incorrectly classified clauses, and allows users to review the parent clause and child clause individually.
Formatting-based clause delineation supports the Icertis Experience for Word to display the discovered clauses in a hierarchical format to the user.
Recommendation
Appropriate indentation should be followed as per clause level while designing the layout. Indentation of parent clauses must be lower than child clauses.
Below are the few examples where the clause delineation is supported:
List Levels added from the MS Word List Library are supported.
== Reviewing discovered entities == Previously, contract negotiators had to periodically visit the AI discovery section to check for discovery completion. Then, they had to switch to the Document View in order to review the recommendations given by the AI algorithm.
With this release, when contract negotiators trigger the discovery process, they can readily view the progress of AI discovery within the agreement details page.
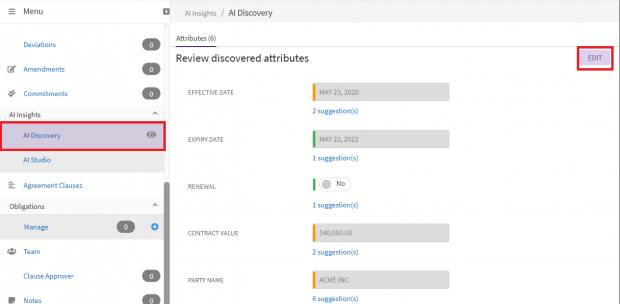
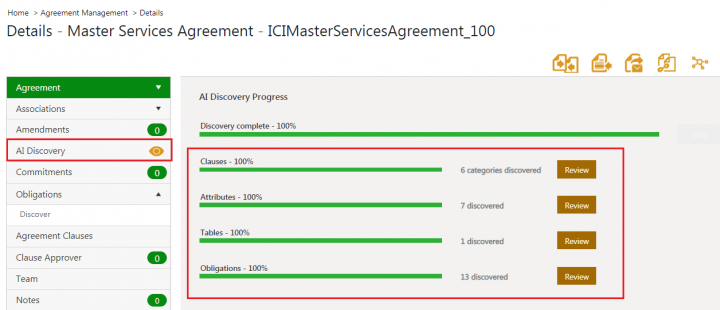
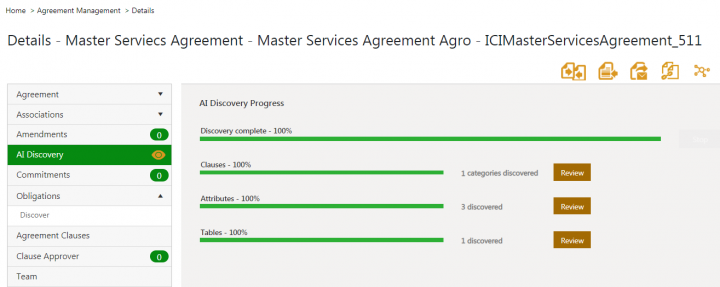
When the discovery for one of the entities is complete, contract negotiators will now have an option to launch an interface in a new window where the discovered clauses, attributes, tables and obligations are displayed alongside the agreement document. On clicking any of the discovered entities, the system automatically scrolls to the page where that entity is present in the document. 1. Create an agreement in ICI. The discovery process is automatically triggered for the agreement and the agreement Details page is displayed. The "AI Discovery" tab shows an hourglass icon to indicate that the discovery is in progress.
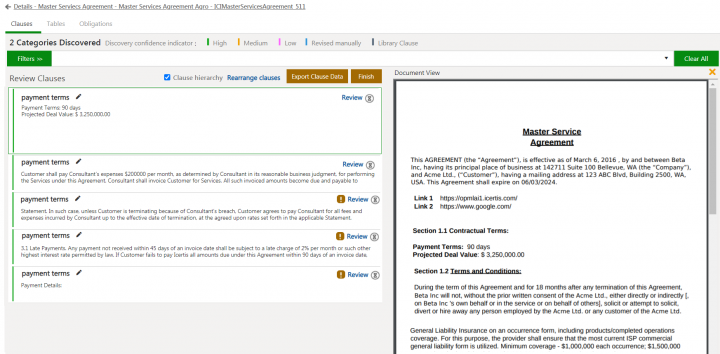
3. Click "Review" button corresponding to the Clauses. The "Review" button will be enabled when there is at least one discovered clause.
You can filter clauses based on Action Status, Clause categories and Confidence.
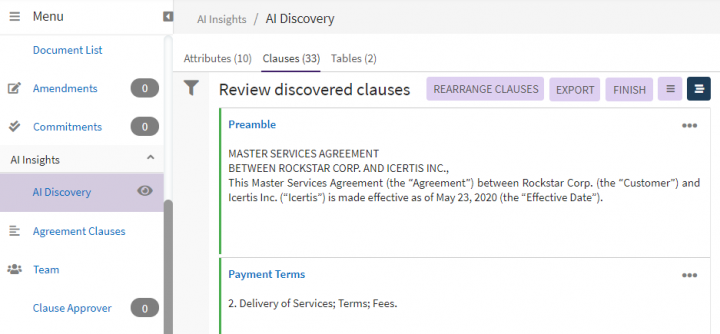
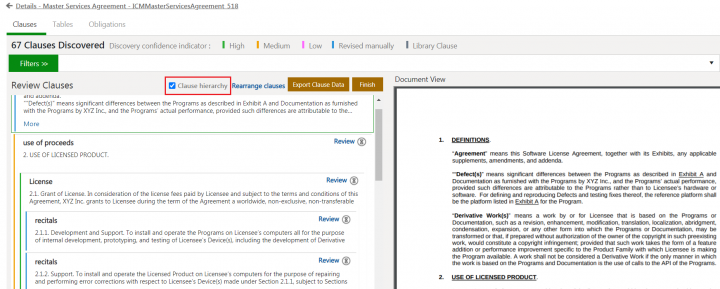
The level of confidence associated with Discovered Clauses is displayed using different color indicators to depict High (green), Medium (orange), Low (pink), Revised Manually (blue) and Library Clause (grey) confidence. All discovered clauses have the Review link next to them until you click it to take an action (such as Confirm, Confirm with Deviation, Ignore or Review Later). In addition, clauses with obligations have the icon next to them. You can click the icon to view the obligations. 4. Click on the clause which you want to review. The Document View section displays the page of the document where this clause is present.
5. Click "Review" on the clause you want to review, for example "Recitals". The Library clause comparison with discovered clause window opens.
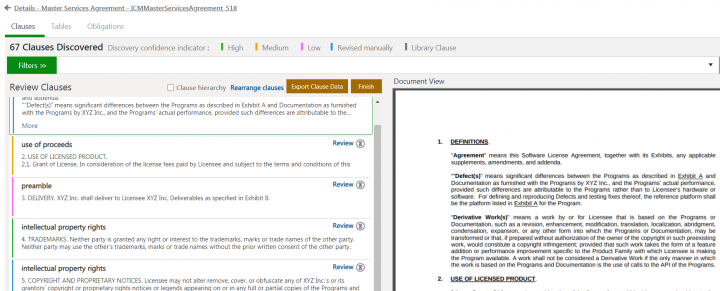
You can review an entire section as a clause or review each sub-section separately and confirm each as a separate clause. 6. Take actions (such as Confirm, Confirm with Deviation, Ignore andReview Later) on the discovered clauses. To enable or disable clause hierarchy view: 7. Uncheck the Clause hierarchy checkbox to view only the parent level clauses.
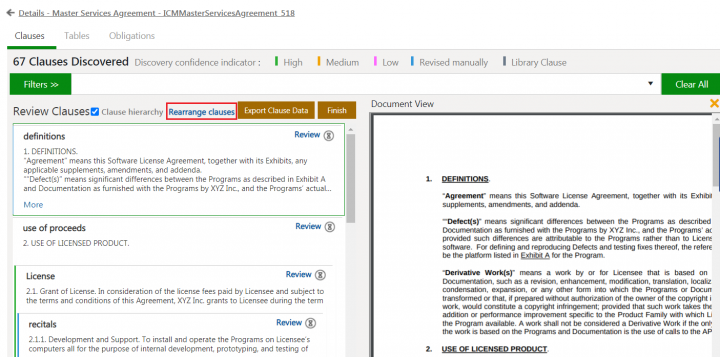
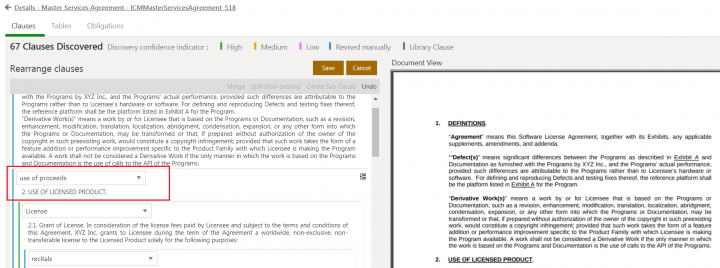
To rearrange discovered clause boundaries: 8. Click Rearrange clauses link if you want to rearrange clause boundaries. The discovered clauses open in an edit mode.
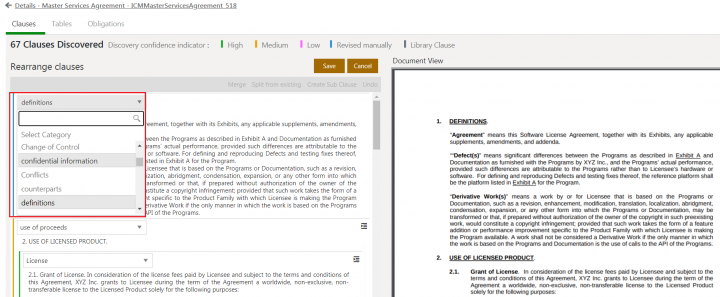
Users can take following actions on the discovered clauses from the Rearrange clauses page. *Manage category: Users can change the category of discovered clauses using the Category drop down at the top of each discovered clause. For example, change the category of a clause from definition to confidential information. Users can keep the clause category as blank if a text which is not part of any clause has been miscategorized as discovered clause.
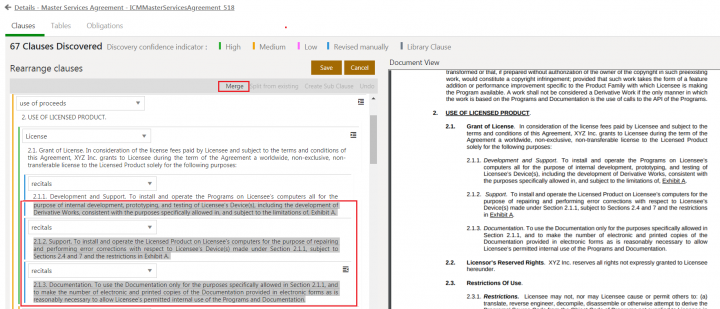
*Merge: Users can merge two or more clauses using the Merge action. i. Select the text you want to merge as a single clause. For example, recitals sub clauses- 2.1.1 (from Purpose of…), 2.1.2 and 2.1.3. The Merge button will be enabled.
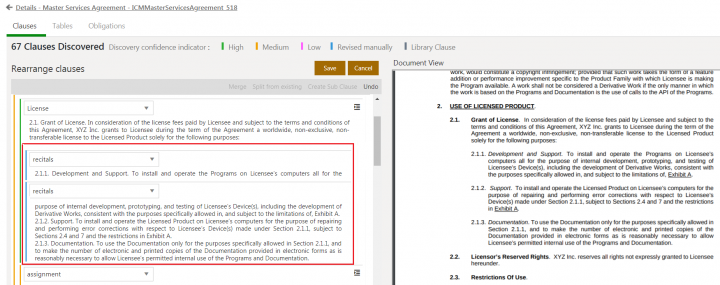
ii. Click Merge. The selected text spanning across multiple discovered clauses will be merged into a single clause.
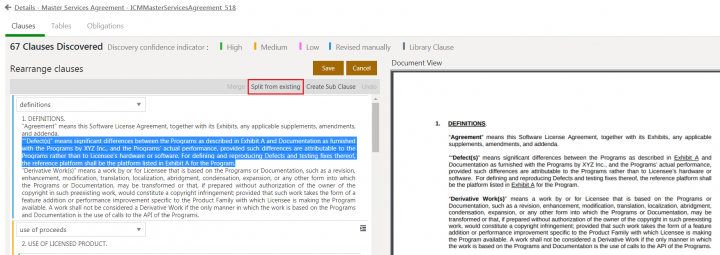
Users can select clauses from same or different categories to merge by selecting the text. *Split from existing: Users can split a clause into two or more clauses using Split from existing action. i. Select the text in a clause you want to split into separate clause. For example, a section starting from ““Defect(s)” means significant to for the Program. The Split from existing button will be enabled.
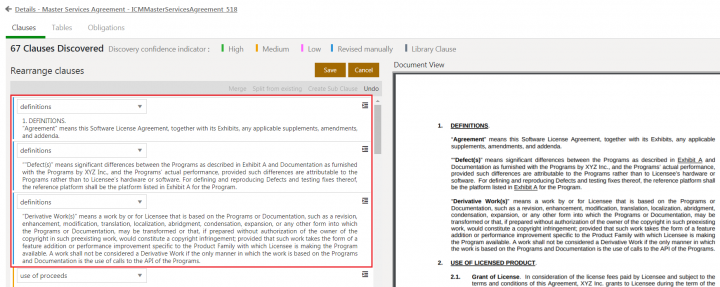
ii. Click Split from existing. The clause will be split into three parts- The selected text as one clause and previous and later unselected texts as two separate clauses.
For example, three separate clauses are created for texts as:
“Agreement” means to and addenda.
““Defect(s)” means significant to for the Program.
”Derivative Work(s)” means to of the Programs.
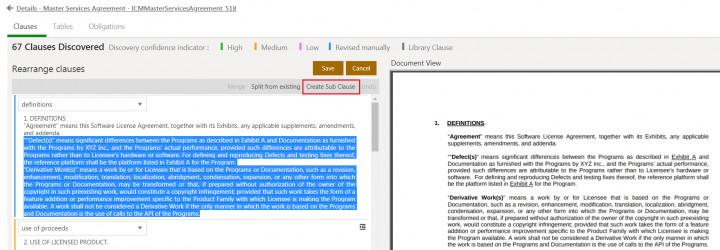
- Create Sub Clause: Users can create a sub clause within a clause using Create Sub Clause action. i. Select the text in a clause you want to make as a sub clause. For example, “”Defect(s)” means to of the programs. The Create Sub Clause button will be enabled.
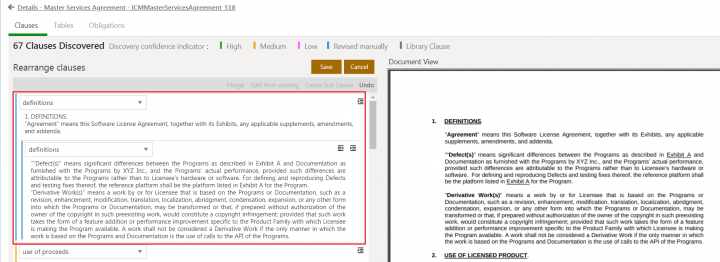
ii. Click Create Sub Clause. The clause will be split into two clauses with the selected text as a child clause. For example, text from “Agreement” means toand addenda, will be marked as a parent clause and text from “”Defect(s)” means to of the programs, will be marked as a sub clause.
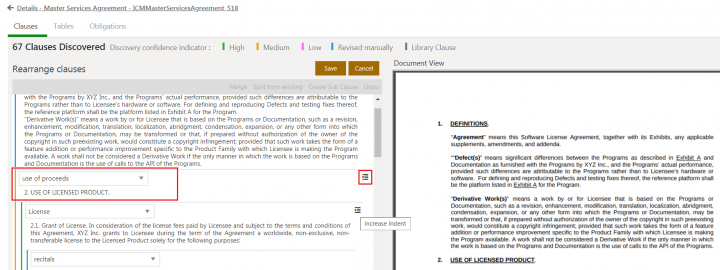
- Change Hierarchy: Users can change the hierarchy levels of clauses using the Decrease Indent and Increase Indent actions. i. Click Increase Indent button corresponding the clause you want to change level of. For example, Use of proceeds clause.
The clause will move to a higher hierarchy.
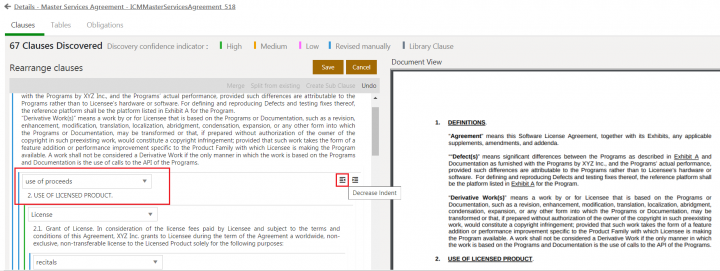
ii. Click Decrease Indent button corresponding the clause you want to change level of. For example, Use of proceeds clause. The clause will move to a lower hierarchy.
The Confidence Indicator will change to blue for any change in a clause.
9. Click Undo if you want to discard the changes.
10. Click Save. The changes will be saved to the discovered clauses and the Your data has been saved successfully message is displayed..
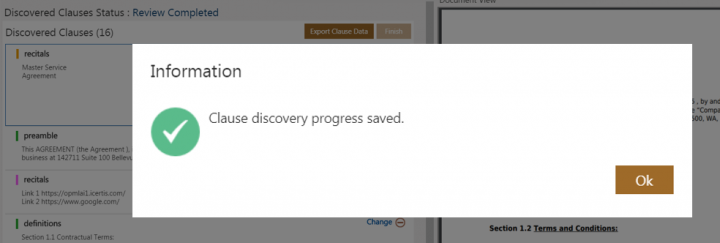
11. Click Ok. To export discovered clauses: 12. Click Export Clause Data if you want to export the clause which has been discovered. 13. Click Finish to complete the review process. The Clause discovery progress saved message is displayed and the Discovered Clauses Status changes to Review Completed.
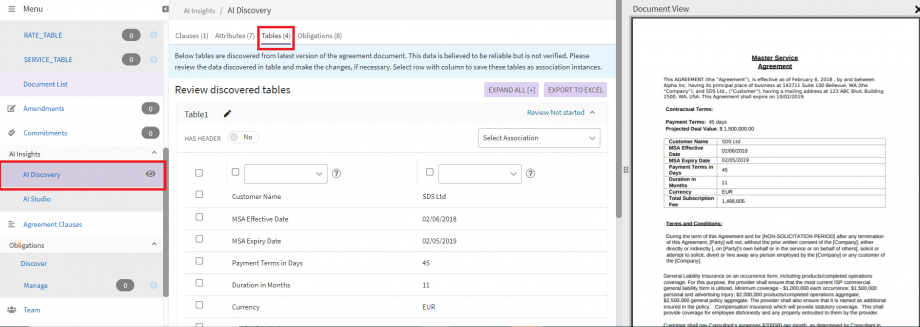
14. Click Ok. 15. Click Review button corresponding to the Tables. The Review button will be enabled when there is at least one discovered Table.
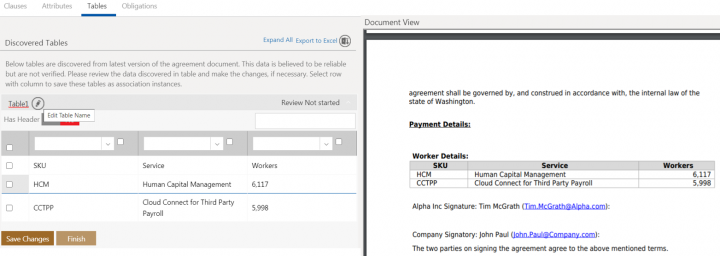
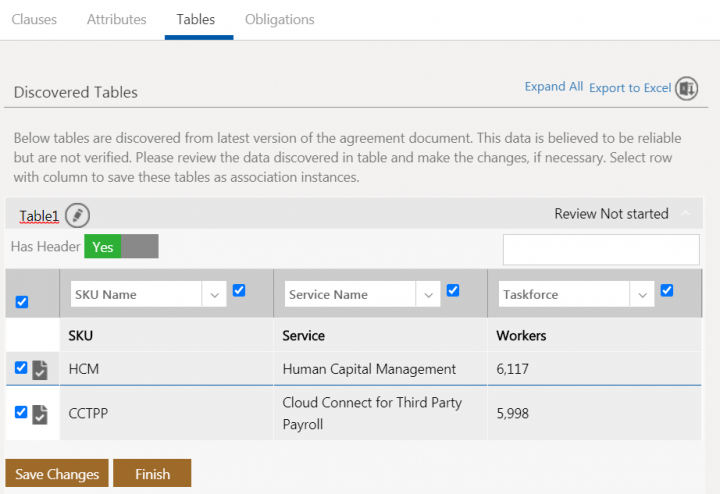
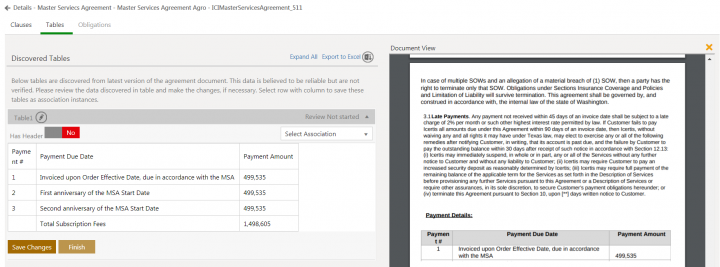
Similar to clauses, the discovered tables and document are displayed in a parallel view. The Document View section displays the page of the document where the table is present.
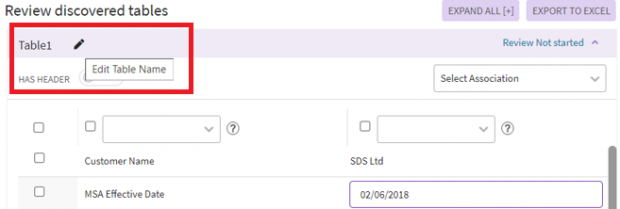
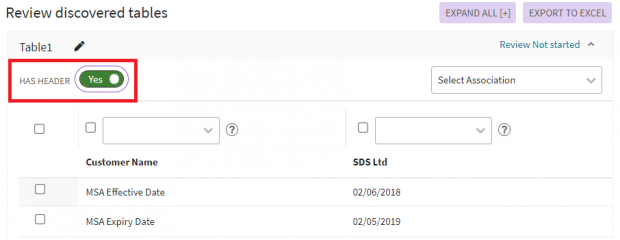
16. Click the Edit Table Name icon next the table that you want to edit. For example, Table 1. 17. Toggle the Has Header flag to Yes if you want the table to have a header.
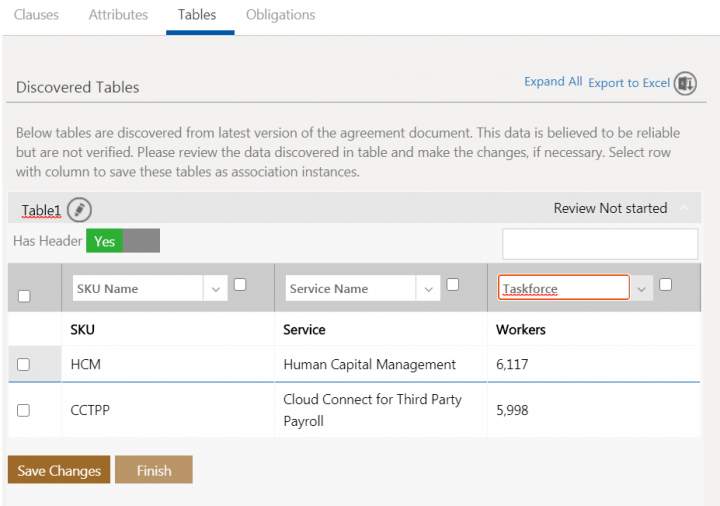
18. Click inside the header box to add the header name. For example, SKU Name, Service Name, etc. 19. Click inside each of the boxes to add data in the columns. For example, HCM (SKU), Human Capital Management (Service), etc.
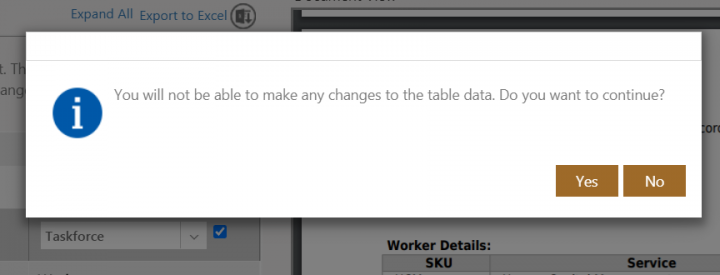
20. Select the checkbox for the rows and columns that you want to update. 21. Click Save Changes to save changes if you want to review or edit them later. 22. Click Finish. A validation message is displayed informing you that you will not be able to make any changes to the table data after this.
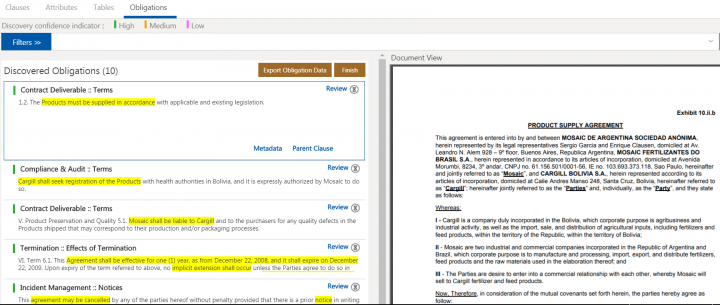
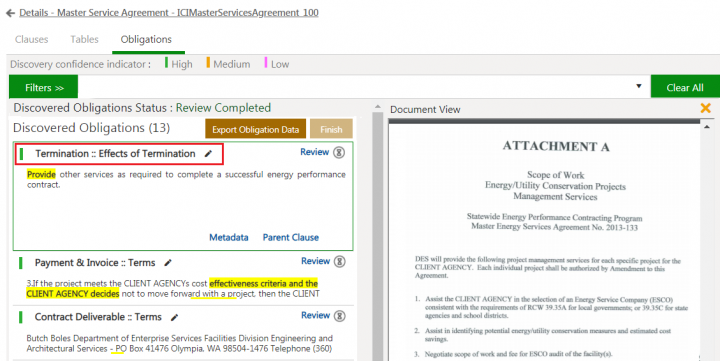
23. Click Yes if you are sure that you want to update the table and proceed. 24.Click the Obligations tab. Similar to tables, the discovered obligations and document are displayed in a parallel view. The Document View section displays the page of the document where the obligations are present.
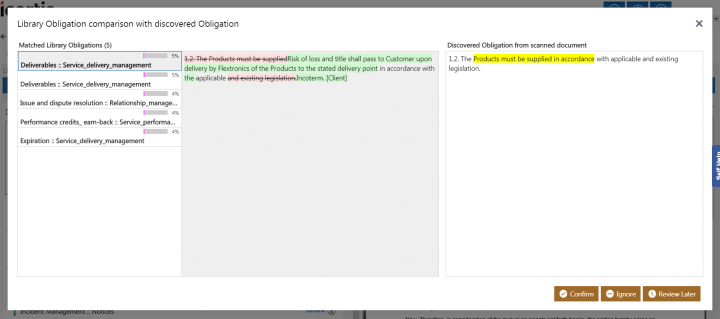
25.Click Review on the obligation you want to review. The Library Obligation comparison with discovered Obligation window opens.
The following actions can be taken on selected Obligation: *Click Confirm to confirm the Obligation. *Click Review Later if you are unsure and want to review the Obligation later. *Click Ignore to ignore the Obligation. 26. Click Metadata to view all the discovered metadata. The number (for example, 10.10) indicates the number of Attributes that are discovered such as Email, Numbers, Date and Time, and so on. 27. Click Parent Clause to see the parent Clause that the Obligation is linked to. 28. Click Export Obligation Data to export the Obligation information to an Excel file. 29. Click Finish to complete the review and continue with the workflow as expected. The Obligation Save Confirmation window opens.
30. Click Mark Confirmed, Mark Ignored or Cancel as required. The obligations are marked as Review Completed and the Obligation discovery progress saved message is displayed.
31.Click Ok. 32.Click Export Obligation Data to export the Obligation information to an Excel file.
Using Filters
Click Filters on the clauses tab. The Document View tab minimizes and the filters panel is displayed.
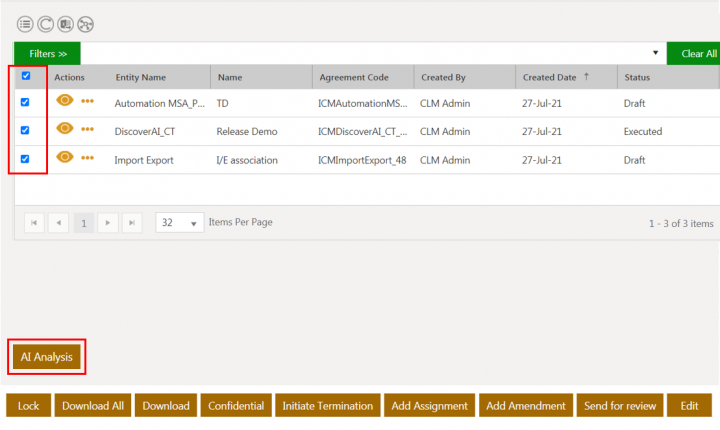
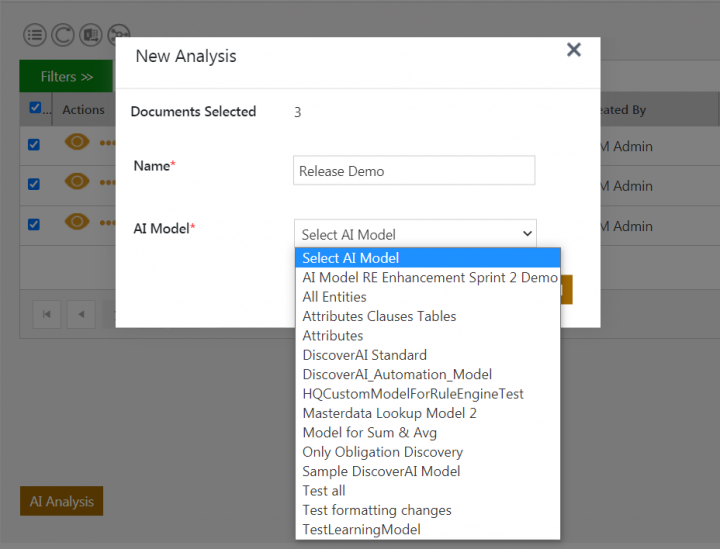
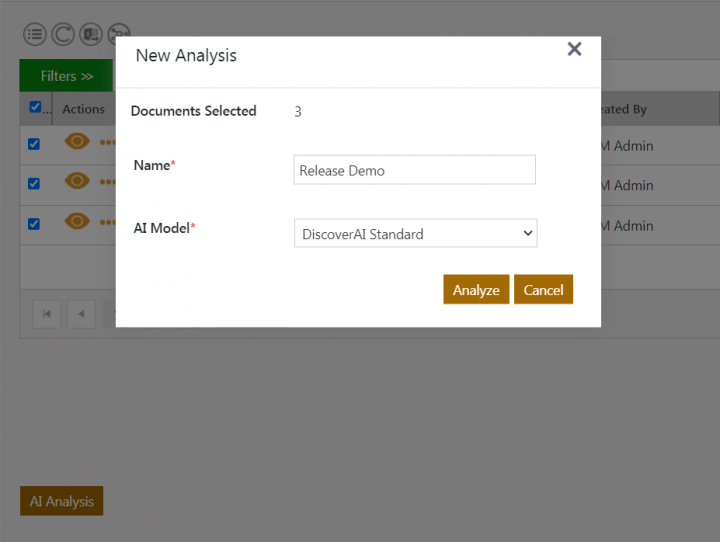
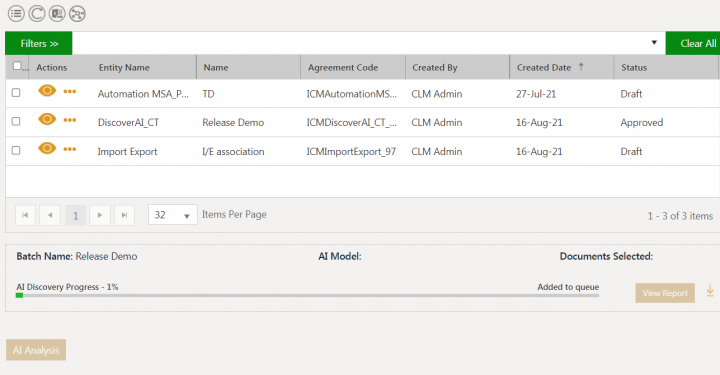
- You can filter clauses as well as obligations based on Clause/Obligation categories, Confidence and Review Status. *The level of confidence associated with Discovered Clauses/Obligations is displayed using different color indicators to depict High (green), Medium (orange) and Low (pink) confidence. All discovered clauses have the Review link next to them until you click it to take an action (such as Confirm, Confirm with Deviation, Ignore or Review Later). In addition, clauses with obligations have the icon next to them. You can click the icon to view the obligations. *Click the Finish button to complete the review process.
- Click the link above the tabs to go back to the agreement Details page.
Automating integration of user feedback for document entities
AI engine recommends discovered values to users and they select the correct values for attributes or clause or obligation category. ICI AI will now capture and learn from these user interactions and keep optimizing its discovery for derived attributes, clause categories, and obligation categories to get better recommendations in subsequent discoveries. This functionality is available automatically for users with the DiscoverAI license and no further configuration is required.
To review the discovered entities in a document:
1. Click Agreement Management > Agreements on the Home page. The agreement index page opens.
2. Click the View Record icon corresponding to the agreement for which you have run the discovery and now want to review. The agreement Details page opens.
3. Click the AI Discovery tab in the left navigation pane. The AI Discovery Progress page opens in the right pane.
You can review discovered Clauses, Attributes, Tables and Obligations by clicking the Review button corresponding to each entity. The Review button will be enabled when at least one instance of the entity is discovered in the agreement document.
To review discovered clauses:
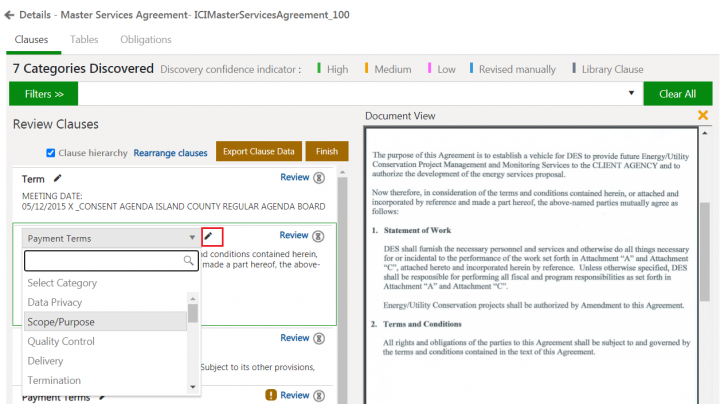
1. Click Review corresponding to Clauses. The Review Clauses page opens.
2. Click the Change Clause Category edit icon corresponding to the Clause whose Category you want to change.
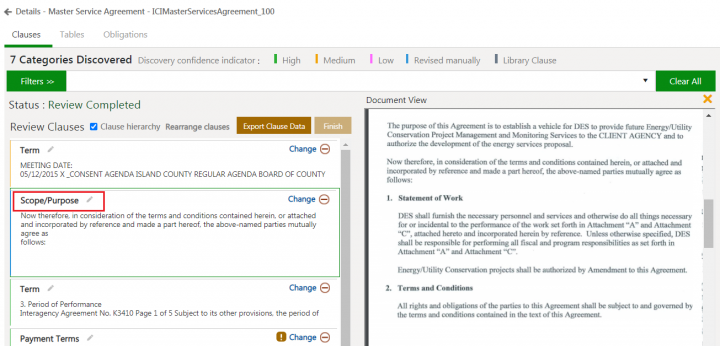
3. Select the correct Category which you know the Clause belongs to. For example, change the Category for discovered clause form Payment Terms to Scope/Purpose.
4. Click Finish. The Clause Save Confirmation window opens.
1. Click Review corresponding to Attributes. The Edit Agreement page opens.
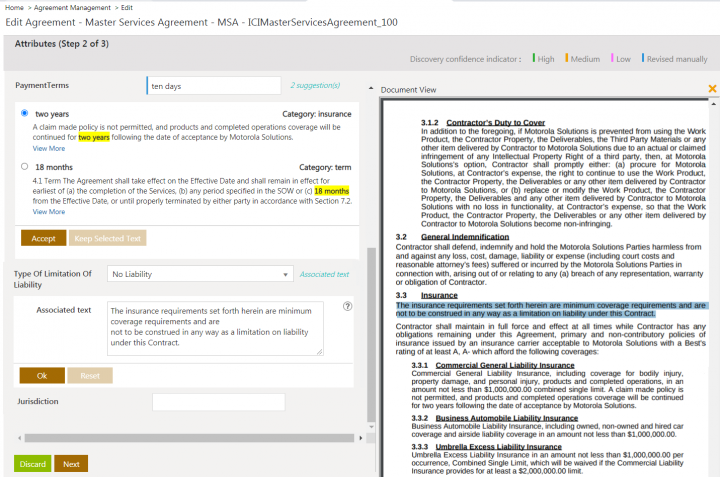
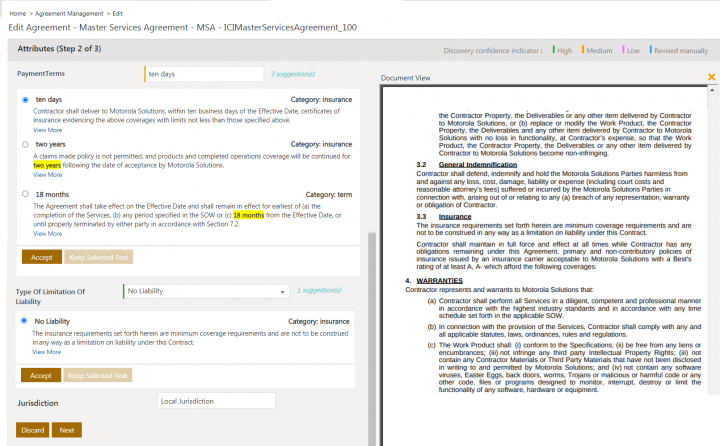
- One of the suggested options over the discovered value. For example, if user selects the option 18 months for Payment terms instead of discovered value two years.
- A value manually other than the discovered or suggested values. For example, if user enters the value ten days manually for Payment terms instead of discovered and suggested values.
- A value for attribute specified manually whose value is not discovered. For example, if user enters a value manually for attribute Jurisdiction as Local Jurisdiction.
- An option from predefined lookup attribute. For example, if user selects the predefined option No Liability from the dropdown of attribute Type Of Limitation Of Liability.
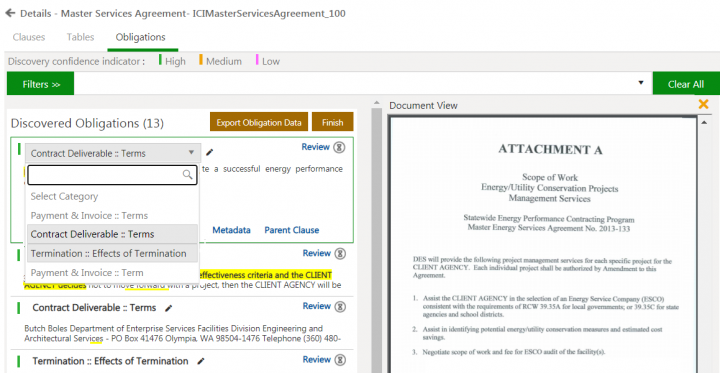
For such attributes, Configurator can enable the training mode and mandatory feedback field in the AI Attribute Discovery Master to ensure that business user will enter the suitable matching reference text from the agreement to back up that selected option in the attribute.
2. Click Accept or Ok respectively to select the modified value in Attributes.
3. Click Next and continue with the workflow to update the agreement.
These user actions on Attributes will be captured, stored and then utilized for self-learning by DiscoverAI.
The next time when user runs the discovery for the same agreement contract type against the same AI Model, these revised attribute values will be discovered and presented automatically.
Currently, only non-calculated values are supported for self-learning.
The attributes that do not hold specific value, such as Boolean attributes, are not supported for self-learning.
The training mode in AI Discovery
The Discover AI in ICI presents all the new opportunities where you can selectively discover attributes, clauses, obligations and tables and keep optimizing the discovery through continuous learning from user responses.
With this release, ICI launches the capability to create your own AI Models and define the discoverable entities in them.
With the introduction of an explicit training mode, it is possible for users to train the AI model by themselves.
Users can now:
- Define own AI Model –
- Configurators can create their own AI discovery models by specifying clauses, tables, attributes, obligations they want to discover in “AI Configuration Master”. Users now have the control over configuring only the necessary and exact entities to be discovered and keep their AI models uncluttered.
- Configurators can now add completely new attributes, clauses or obligations to be discovered that are not already part of the trained model.
- ICI DiscoverAI will continue to offer inbuilt AI model “DiscoverAI Standard” with pre-trained set of attributes, clauses, and obligations.
- Analyze agreements based on the AI Model –
- Users now have choice to apply different AI discovery models to agreements during creation process. When discovery is triggered for a document, DiscoverAI will discover attributes, clauses, obligations and tables based on the selected AI model and using the rulesets applied in that model.
- Train the AI Model –
- For new attributes, clauses and obligation added to the AI model, user can train the AI engine such that it discovers them automatically over a period. With training mode enabled, when a user specifies an attribute value, then the user will be asked to provide the associated text from the document where this attribute value is present.
- The DiscoverAI engine recognizes patterns from these user inputs and trains itself over a period of time to refine its discovery of entities.
- To help Administrators to monitor the DiscoverAI’s self-learning progress, a new AI model training performance report has been introduced for each AI model defined in ICI.
Defining your AI Model with AI Masters
ICI Discover AI introduces AI masters to store and maintain the discoverable document objects.
These AI masters are seeded and come with the pre-configured entries for attributes, clauses and obligations. You can add your own entities to these masters as per your business requirements.
The entities defined in these AI masters will then be available for configuring your AI Models.
To create an instance of AI masterdata to add new discoverable object:
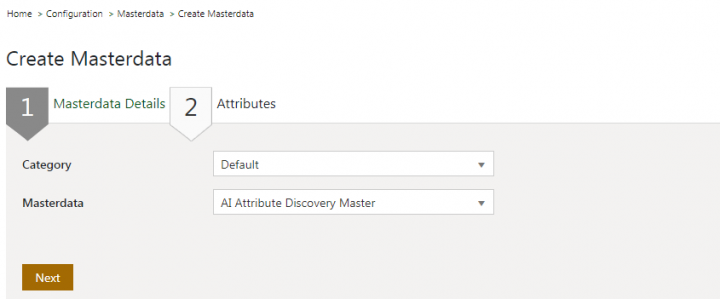
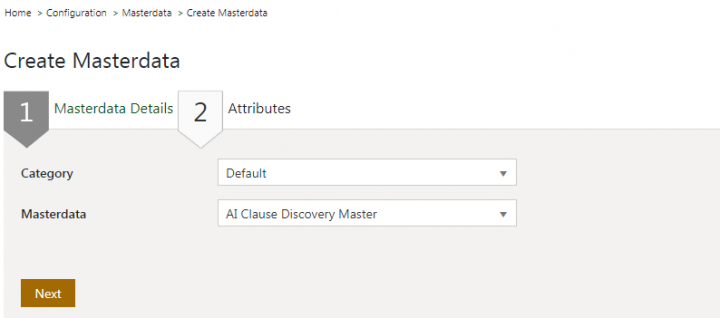
- Click Configuration > Masterdata > Create Masterdata on the Home page. The Create Masterdata page opens.
To add new discoverable attributes:
- Select the AI Attribute Discovery Master in the Masterdata field on the Masterdata Details tab. This masterdata serves as the repository for discoverable attributes.
- Click Next. The Attributes tab opens.
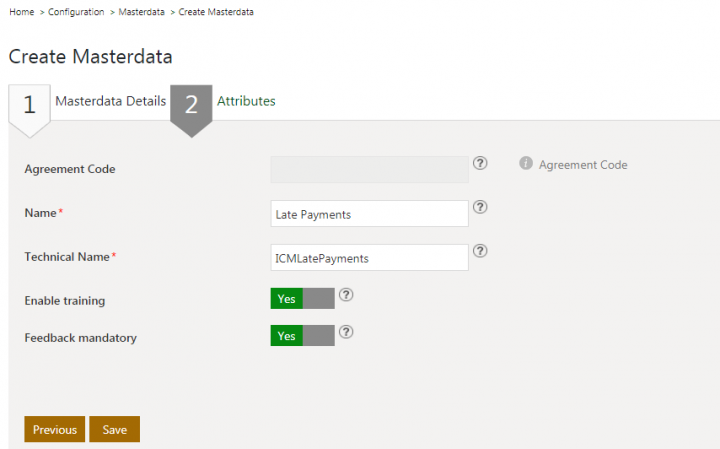
- Add a Name for your discoverable attribute. For example, Late Payment.
- Add a Technical Name for your discoverable attribute. For example, ICMLatePayment.
- Toggle the Enable training flag on to enable this attribute’s values to be learnt from the user responses during the training of AI models. Setting the Enable Training flag to Yes displays the Feedback mandatory field.
- Toggle the Feedback mandatory flag on to ensure that users would provide the feedback that could be utilized to train AI Models for this attribute discovery.
- Click Save. Your attribute will be added to the AI Attribute Discovery Master.
To add new discoverable clauses:
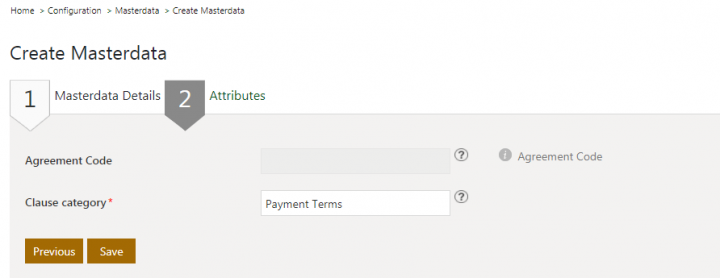
- Select the AI Clause Discovery Master in the Masterdata field on the Masterdata Details tab. This masterdata serves as the repository for discoverable clauses.
- Click Next. The Attributes tab opens.
- Select the Clause Category that you want to discover. For example, Payment Terms.
- Click Save. The Clause Category will be added to the AI Clause Discovery Master.
To add new discoverable obligation:
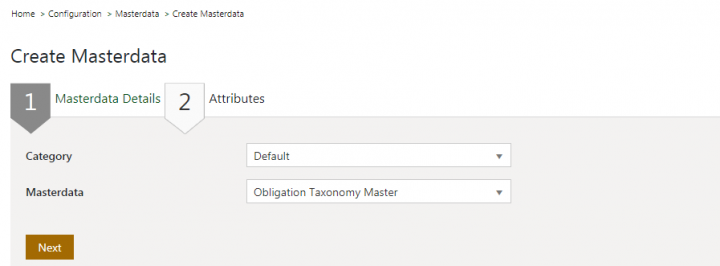
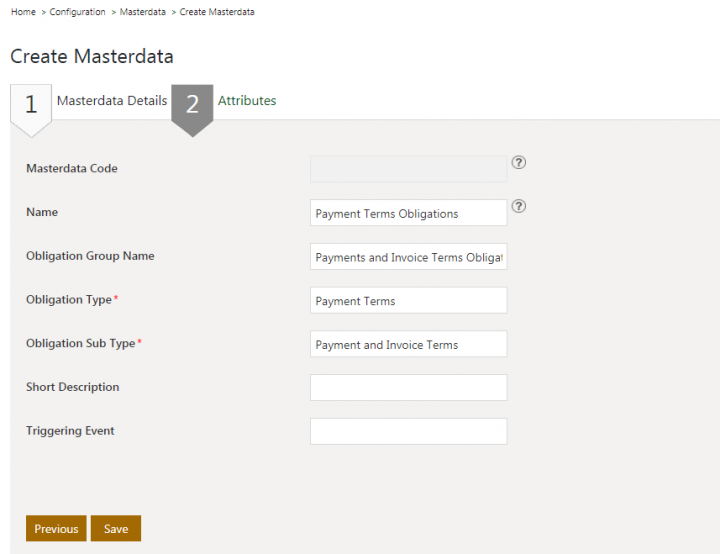
- Select the Obligation Taxonomy Master in the Masterdata field on the Masterdata Details tab. This masterdata serves as the repository for discoverable obligations.
- Click Next. The Attributes tab opens.
- Select the Obligation Type that you want to discover. For example, Payment Terms.
- Select the Obligation Sub Type that you want to discover. For example, Payment and Invoice Terms.
Refer the ICI Obligation Management page for further details on Obligation Taxonomy Master.
- Click Save. The Obligation Type and Obligation Sub Type will be added to the Obligation Taxonomy Master as a category details for obligations.
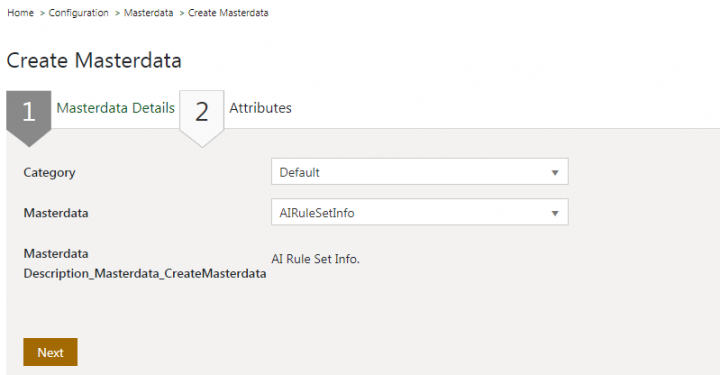
To configure a Ruleset:
Ruleset comprises the processing rules which the AI discovery engine would follow for discovering document objects in an agreement.
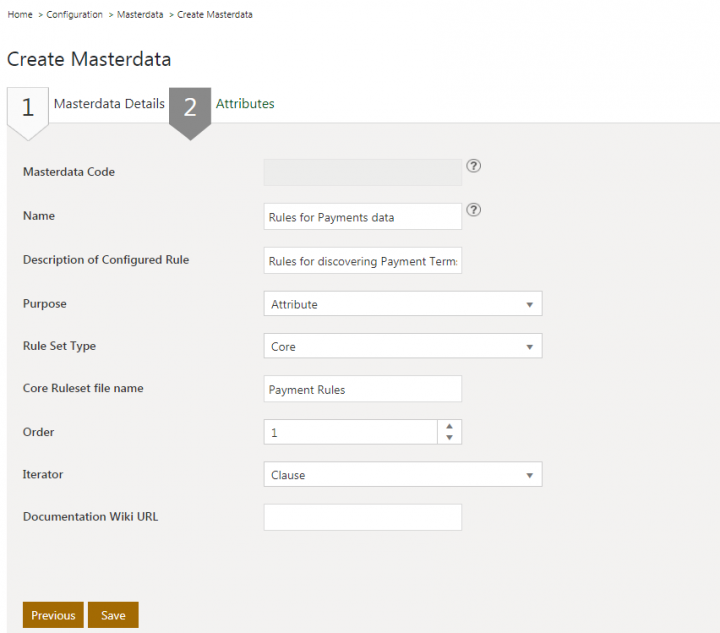
- Click Next. The Attributes tab opens.
- Type a name for the Ruleset. For example, Rules for Payments data.
- Type a Description of Configured Rule to explain further what the ruleset intends to do.
- Select the Purpose of this ruleset as which entity it is applicable to, from the options Obligations and Attribute.
- Select the Rule Set Type, whether it is applicable to Core or Extended entities.
- Enter the Core Ruleset file name.
- Select the Order.
- Select the Iterator which defines the entity level at which the discovery would be carried out. The options are Sentence, Clause or Document.
- Enter Documentation Wiki URL.
- Click Save. The Ruleset will be configured as per the set parameters.
To create AI Configurable master:
After the discoverable objects are defined in their respective AI Masters, you can configure your own AI model by creating an instance of the seeded AI Configuration Master and define its structure by selecting your own set of discoverable entities.
The ICI seeds a pre trained model named DiscoverAI Standard. Refer to the Inbuilt Discovery of Attributes and Clauses for further details.
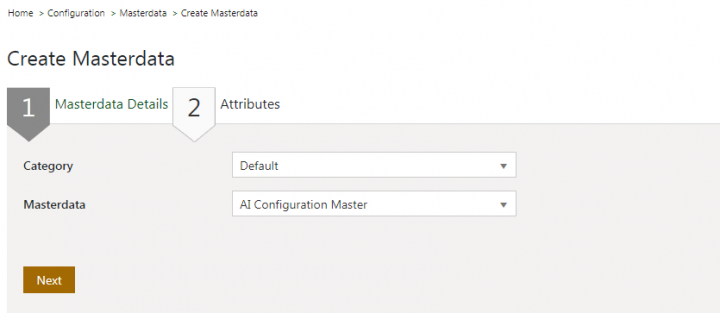
- Select the AI Configuration Master in the Masterdata field to create its instance record.
- Click Next. The Attributes tab opens.
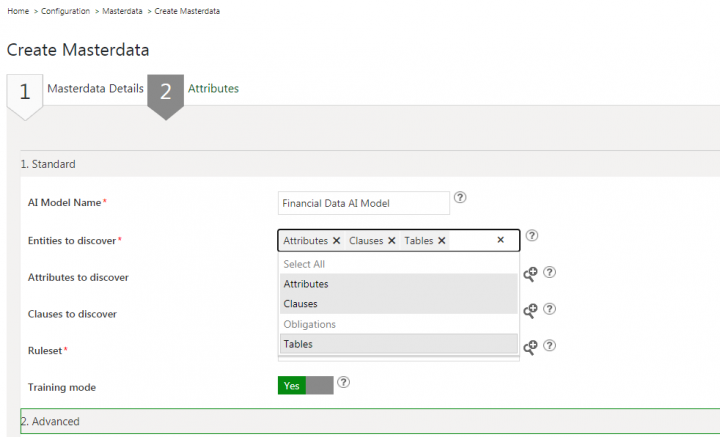
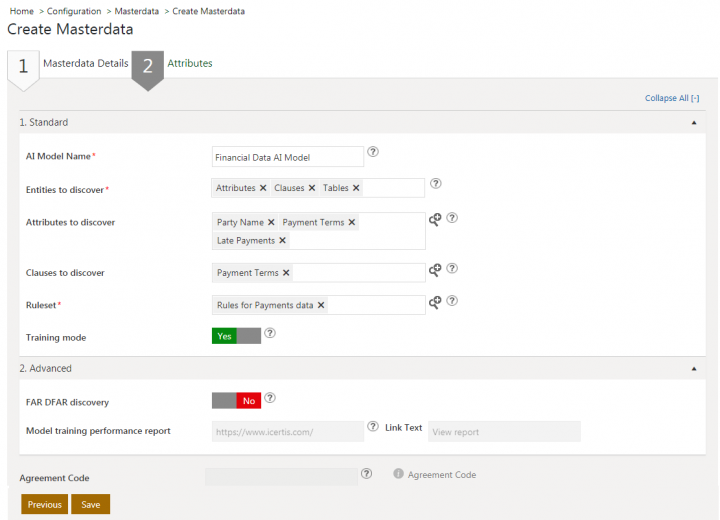
- Type a name for your AI model in the AI Model Name field. For example, Financial Data AI Model.
- Select the Entities to discover from Attributes, Clauses, Obligations and Tables. You can Select All or any of these entities based on your requirements. For example, select Attributes and Clauses.
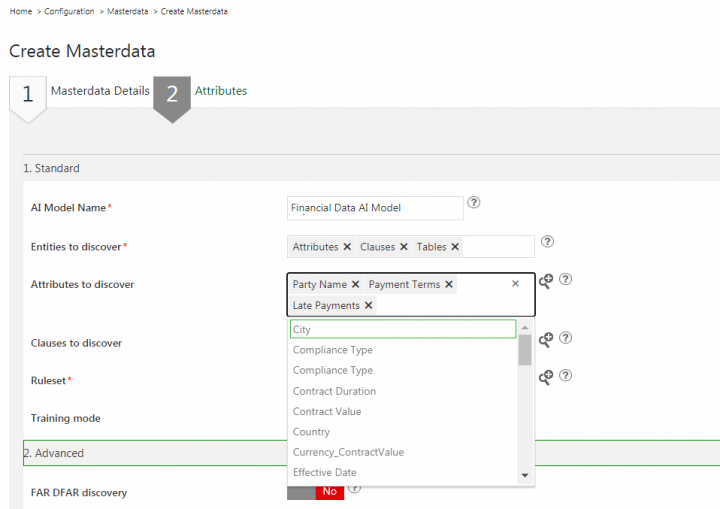
- Select the Attributes to discover using this AI model. This field displays all attributes configured in the AI Attribute Discovery Master. For example, select attributes Party Name, Payment Terms and Late Payments.
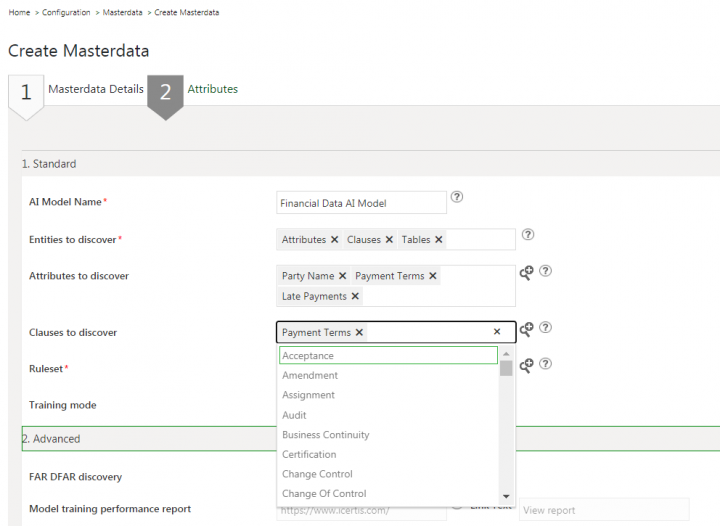
- Select the Clauses to discover using this AI model. This field displays all Clause Categories configured in the AI Clause Discovery Master. For example, Payment Terms.
As we have only selected Attributes and Clauses to be discovered using this AI model, the field to select Obligations will not be displayed.
When you select Obligations as well in the Entities to be discovered field, the Obligations to discover field will be available to select the obligations from the Obligation Taxonomy Master.
- Select the Rulset to apply to this AI model using which the AI Discovery engine will discover the selected entities. For example, Rules for Payments data.
The Rulset dropdown displays all rulesets from the AIRuleSetInfo master.
- Toggle the Training mode on if you want to train DiscoverAI though this AI model with the user responses. This will ask business user to provide a feedback when the user changes the discovered Attribute values while working with the agreement. Whether the feedback is mandatory depends on that Attributes configuration in the AI Attributes Discovery Master.
- Toggle the FAR DFAR discovery on if you want to set the clause discovery mode to DiscoverFR.
- Click on the Link Text for the Model training performance report to view the progress of the model training over the period of time.
If you want to generate the training report for AI Models to monitor their learning progress over the period, you can edit the AI Configuration Master Contract Type and add these attributes to generate and access the report.
- Click Save. The AI Configuration Master aka AI Model, will be configured as per the set parameters.
Configuring contract type to add AI Model Attribute
To select and apply the AI Model for discovering entities when creating agreement instance, you must add the seeded attribute AI Model to the agreement contract type as lookup to the AI Configuration Master. The attribute will display all AI Models configured in ICI as instances of the AI Configuration Master.
You can add the attribute to a contract type either when creating it or can add the attribute after creation by editing the contract type.
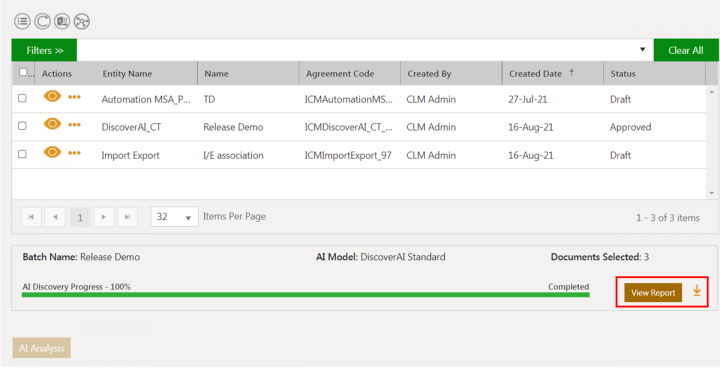
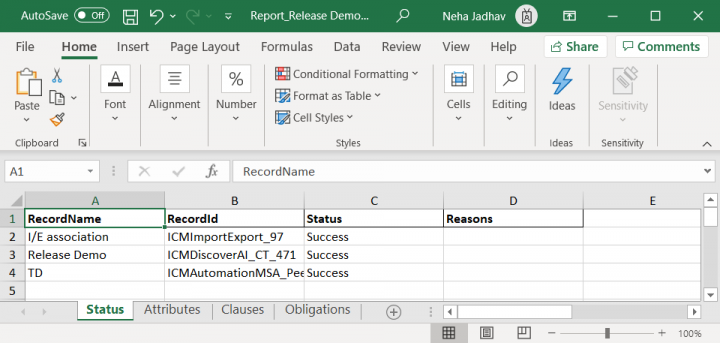
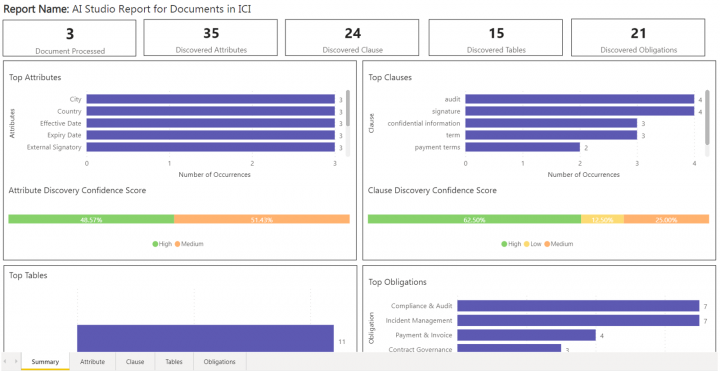
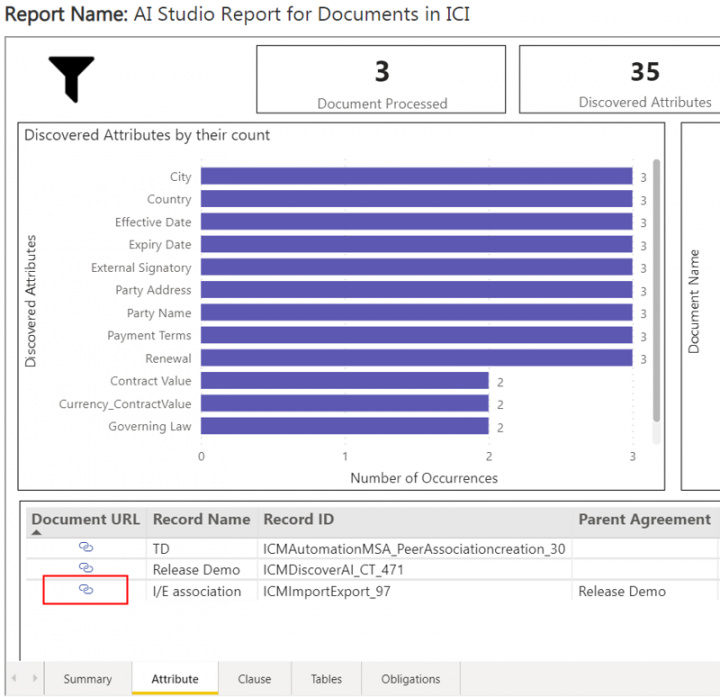
To edit and add attribute to contract type:
- Click Configuration > Contract Types on the Home page. The Contract Types page opens.
- Click the View Record icon corresponding to the contract type you want to add attribute to. For example, MasterServicesAgreement. The contract type Details page opens.
- Click Edit and go to Attributes tab.
- Select the AI Model attribute in the Available Attribute section and add to the Selected Attributes section using the action arrows.
- Toggle on the Is Lookup flag. The Lookup section to refer the masterdata and its attribute, is displayed at the bottom.
- Select the AI Configuration Master in the Select Contract Type field as the masterdata to look up to.
- Select the AI Model Name in the Select Attribute field as the attribute in the masterdata to refer to.
- Click Save. The Attribute is saved to the contract type.
- Click Next and complete the process to update, approve and publish the contract type following the standard ICI workflow.
Once added to the contract type, the attribute AI Model will be available while creating the instances of that contract type.
Applying AI model for selective discovery
While creating agreement, you can select your AI Model to apply for discovering document objects in the agreement. The discovery will happen according to the configuration for attributes, clauses, obligations and using ruleset defined in the selected AI model.
To apply AI model while creating agreement:
- Click the Agreement Management > Create Agreement on the Home page. The Create Agreement page opens.
- Select the Contract Type. For example, Master Services Agreement.
- Select the Type of Paper. For example, Third Party.
- Click Next. The Attributes page opens.
- Enter a Name for the agreement and select the agreement document in the File Path field.
- Select the AI Model from the dropdown that you want to apply to this agreement instance for discovering document objects within it. For example, Financial data AI Model. This AI Model dropdown will display all AI Models configured in the ICI DiscoverAI as the instances of the AI Configuration Master.
- Enter the remaining details on the Attributes page and continue the remaining workflow to create the agreement.
Training the AI Model
The discovery for entities will happen as per the applied AI model. While working on agreements, if user changes the discovered value and enters a new value other than the suggestions, the response will be captured and utilized for self- learning by DiscoverAI. The improved discovery will be apparent from the subsequent deliveries.
- Click the Agreement Management > Agreements on the Home page. The Agreement index page opens.
- Open the Agreement Details page of this just created agreement instance.
- Click the AI Discovery tab on the left navigation pane. The AI Discovery Progress page opens in the right pane. It displays the complete statistics of the AI Discovery for this agreement based on the selected AI Model.
Here, as per the applied AI Model- Financial data AI Model, one Clause Category, three Attributes and one Table are discovered in this agreement. The Obligations are not discovered as they are not configured to be discovered in the applied AI model.
You can click the Review button corresponding to each entity to review their discovery results separately.
To review discovered Attributes:
- Click the Review button corresponding to Attributes. The Edit Agreement -Attributes page opens.
Here, the selective discovery of attributes takes place, displaying the discovered values and Suggestion(s) if any, for only those attributes configured in the AI Model. For example, Late Payment Trigger.
- Correct the attribute value if required. For example, change the discovered value 45 days to new value as 30 days.
If this attribute has enabled training mode in the AI Attribute Discovery Master, Associated text box will appear to enter the reference text from the document, to back up the entered value, beside the Attribute.
- Enter the clause text from the document where the attribute value is appearing in the Associated Text in the document field. For example, Any payment not received within 45 days of an invoice date shall be subject to a late charge of 2% per month or such other highest interest rate permitted by law.
- Click Ok.
The system stores user specified attribute value and the associated text upon saving the agreement. Discover AI will further utilize these to learn and improve its discovery for this attribute in its subsequent discoveries.
- Continue with the remaining workflow to update the agreement.
When the attribute discovery is run for the same contract type using the same AI model, the Discover AI will discover and suggest the revised value.
Similarly, the DiscoverAI will learn by monitoring the user behavior for the Clause and Obligation Category to improve discovering clauses and obligations.
To review discovered clauses:
Click the Review button corresponding to Clauses. The Review Clauses page opens.
Here, the selective discovery of clauses takes place, displaying only the clauses for the clause category configured in the applied AI Model will be discovered. In this case, Payment Terms.
To review discovered Tables:
Click the Review button corresponding to Tables. The Discovered Tables page opens.
Here, the table is discovered in the agreement as the applied AI Model has configured Tables as entities to discover.
Similarly, when configured in the applied AI Model, Obligations will be discovered.
To help administrators to monitor the DiscoverAI’s self-learning progress, a new AI Model Training Performance Report has been introduced for each AI model defined in ICI. The report provides a check over the discovery performance for attributes and the need to train AI model with more examples.
Refer the AI Model Training Performance Report on the Reports page for deatils.
Analyzing multiple documents in AI Studio
The evolving business dynamics have necessitated the businesses to not only be aware of their contractual risk and obligations, but also gather the intelligence from the contracts, to monetize opportunities and accelerate business.
Introducing AI Studio to facilitate the processing of documents in bulk to identify and analyze a volume of data and derive the actionable insight to use for the business advantage. Users can process the agreement documents in the ICI platform as well as those outside of the ICI platform and apply desired AI model to get the insights.
A new AI Studio tile has been introduced on the ICI UI Home page, for authorized users to run a new analysis for a set of documents against specific AI model. The AI Studio analysis supports .docx, .pdf and .zip files as document source as well as a network path or a saved search with an option to include associations. You can also add additional file sources using the customization hooks.
The analysis results are available in a summarized report form. The report displays the summary of identified attributes, clauses, tables and obligations in an interactive chart. If a user wants to deep dive into a specific document, then the report provides an option where user can view the discovered entities alongside the original file.
The access privileges to the AI Studio is further controlled through Security Groups.
To edit AI Studio privileges:
- Click User Administration > Security Groups > Security Groups on the Home page. The Security Groups index page opens.
- Click the View Record icon corresponding to the Security Group you want to provide the access to the AI Studio. The Security Group Details page opens.
- Click Edit and go to the Privileges tab.
- Select the respective radio box to set the required access privileges for the AI Studio.
- Click Next and Update to save the changes to the Security Groups.
Analyzing a documents batch
To run a new Analysis:
- Click the AI Studio tile on the Home page. The AI Studio page opens.
The page displays the statistics for all previously analyzed batches with the option to run a new analysis batch.
- Click the
 New Analysis icon. The New Analysis window opens to specify the parameters for the Analysis.
 - Enter a name for new analysis in the Name field.
- Click Documents to Process to select the mode for accessing the set of documents to analyze.
You can select documents either in three ways:
- Upload File: Selecting this option will display the Choose Files button to browse and select files from your machine. You can only upload documents in pdf, docx and zip file format, however only pdf and docx files from a zip file will be processed and the rest will be ignored for processing. These ignored file formats will be mentioned as not supported formats in the downloaded Excel report.
The Upload File option enables you to analyze the non ICI documents in the AI Studio.
- Saved Search: Selecting this option will display the field to choose a Saved Search. A Saved Search must be created beforehand to group the desired documents beforehand.
Select the checkbox Include Associations if you want to process respective parent-child associations along with agreements present in the saved search. This options facilitates the complete coverage of an agreement.
- Network Path: Selecting this option will display the field to enter the UNC file location path over the network. The Network Path option enables you to analyze the non ICI documents in the AI Studio.
You can add additional file sources to the Documents to Process dropdown using the customizable hooks.
AI Studio can process up to 1000 documents at once and can be configured through backend technical configuration.
- Click the AI Model against which you want to run the analysis. For example, Payments Terms Data.
- Click Analyze. The new Analysis will be added to the task queue for processing.
The user initiated discovery for agreement would take precedence over the processing of AI Studio analysis batch.
Accessing the analysis results
The AI Studio page serves as the Analysis index page and displays the complete statistics of all the analysis batches that have been run.
The details on the index page include columns such as:
- Action: Available actions that can be taken on the Analysis batch.
</ul>
- Download Results: available when clicked on the three dots icon. Downloads the results in a MS Excel file displaying the Final status, Success/Failure, with reasons for each document along with the details of discovered Clauses, Obligations and Attributes in separate sheets.
- Batch Id: displays the auto generated Batch ID for the Analysis batch.
- Name: displays the name you gave for the analysis batch.
- AI Model: displays the AI Model against which the Analysis was carried out.
- Batch Status: displays the real time processing status of each Analysis batch. For example, Gathering documents, Processing 1 of 20 documents, Completed and so on.
- Total Count: displays the total number of uploaded files.
- Success: displays the number of successfully processed files.
- Failure: displays the number of failed files.
- Start Time: displays the date and time when the batch processing started.
- End Time: displays the date and time when the batch processing completed.
Viewing the AI Studio Report
Click the AI Studio tile on the ICI home page. The AI Studio index page is displayed.
Click the “View Results” icon in the “Action” column next to the AI Studio batch, for which you want to view the report.
The Report Summary page opens in a new tab and provides an overview of the documents processed, attributes, clauses, tables and obligations discovered along with confidence score.
Note: Similar to the other Power BI reports, access to the AI Studio report needs to be provided by administrators through the “Report” tab under “Security Groups”. Refer the Enabling access section for more details.
Attribute tab
Click the “Attribute” tab at the bottom of the “Summary” page to view the number and the attributes discovered.
Click the document under “Documents” chart. This displays the number of attributes processed from the document.
Click the filter icon on the report “Attribute” page. This allows to select specific attributes from the list.
Select the attribute(s) from the list. The visuals on the page will be displayed as per the selected attribute(s).
Click “Clear Selections” if you want to remove all the filters and view all the attributes and documents.
In the Document URL column, click the icon next to a document (for example, “Retail MSA 1.pdf”). The attribute discovery side-by-side view opens in a new tab in read-only mode.
Clause tab
The Clause tab displays the list of documents processed and the number of clauses discovered.

Follow the same process mentioned above for Attribute tab to filter and view the specific clause category, as well as to open the side-by-side view discovery by clicking the Document URL icon.
Tables tab
Follow the same process mentioned above for Attributes tab to filter and view the specific tables details, as well as to open the side-by-side discovery view by clicking the Document URL icon.
Obligations tab
The Obligations tab displays the list of documents processed and the number of obligations discovered.
Follow the same process mentioned above for Attributes tab to filter and view the obligations category, as well as to open the side-by-side discovery view by clicking the Document URL icon.
Along with the main agreement document, an agreement consists of several supporting documents such as rate tables, SLAs, product specifications, schedules, annexures and so on. Amendments help contract administrators to understand the in-force clauses at different points during the agreement execution journey. Thus, while analyzing an agreement, it is important to consider these additional documents too to get the holistic insights.
In this view, the AI Studio functionality has now been extended within the agreement to provide a holistic understanding of its different aspects. Users can now select all the peer, parent-child type of associations or amendments of agreement and run an AI Studio batch to derive results as a visual summary. The detailed analysis option within the results offers a deep dive into individual documents so as to understand them better.
ICI now provides the options to:
- List all document entities associated with an agreement at the agreement level.
- Manually trigger discovery on one or more selected documents
- View the discovered attributes, clauses, obligations and tables in the form of interactive advanced analytics dashboard with the actionable interface
- Save the discovered attributes values in respective agreement, associations, or amendments
- Create associations from the tables discovered in other associations or amendments.
Go to agreement Details page.
Click “Document List” tab on the left navigation pane. The Document List search grid opens. It will display the agreement along with its associations and amendments which contain documents.
Select the checkbox for one or more documents. The “AI Analysis” button is enabled.
Click the “AI Analysis” button. The “New Analysis” dialog box is displayed.
The agreement name is pre-populated by default in the batch “Name” field. Type a new name for the batch if required.
Select the “AI Model” from the dropdown. For example, “DiscoverAI Standard”.
Click “Analyze”. A new AI Studio batch will be created the analysis will start, and the AI Discovery Progress will be displayed.
Once the Discovery is completed, the “View Report” and “Download” icons will be enabled.
Click on the “Download” icon to download the discovery result in Excel format.
The downloaded Excel displays different sheets:
- Status: Displays overall discovery status for the agreement.
- Attributes: Displays all attributes that have been discovered from the document. For example, Record Name, Record ID, Parent Agreement and so on.
- Clauses: Displays details of all clauses such as Clause Name and Clause Text.
- Obligations: Displays details of obligations such as Obligation Category and Obligation Text.
Click “View Report”. The “AI Studio Report for Documents in ICI” for the discovered results opens in a new tab.
The report displays different sections for all discovered entities.
Similar to steps mentioned in “Viewing the AI Studio Report”, users can apply filters for each of the discoveries.
Users can click on “Document URL” link for each of the entities to navigate to the ICI side-by-side view and review the discovered entity details.
Editing Attributes
Click on the link for the “I/E association” record. The attributes discovered for that association are displayed.
Click “Edit”. The side-by-side discovery view for the attributes discovered in the associated document opens in a new page.
Review the attribute values from the suggestions as desired. For example, select “Alpha Inc” to replace the discovered value “Company”.
Editing Table Discovery
Click the “Tables” tab. The table(s) discovered for the associated document are displayed.
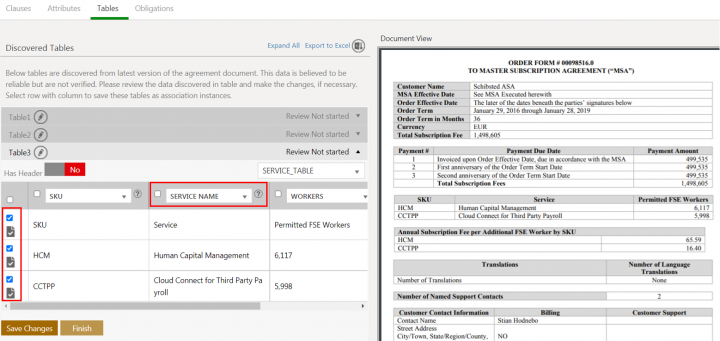
Make changes as required. For example, select the desired values and type column names.
Click “Save Changes”.
Once all changes are saved, click “Finish”. A success message is displayed.
Improved discovery performance for scanned pdfs
DiscoverAI performance for scanned pdf documents was not optimal. It was time-consuming, had less than accurate OCR output for tilted pages and did not recognize handwritten text, which was a concern for users.
Discover AI now adopts an improved OCR technology. It has improved the time taken to complete the discovery for scanned pdfs significantly. In some cases, the time taken was just 1/10 of time taken previously. Additionally, with this technology, the content in the slightly tilted scanned images can be recognized correctly. Moreover, it can now identify the handwritten text in English language.
Related Topics: Agreement Management | Obligation Management | Managing US Federal Contracts using ICI | Contract Digitalization | NegotiateAI | ObligationAI | VisualizeAI
