You do not have permission to edit this page, for the following reason:
You can view and copy the source of this page:
Return to Salesforce.
When creating Contracts, Contract Requests and Amendments from Salesforce, Administrators can now configure whether the users should be redirected to the ICM Contract details page or the Salesforce Record page from where creation process was initiated. This can be configured by selecting the Allow Redirect checkbox on the ICM Endpoint Configuration page. By default, the checkbox is unchecked. When checked, the user is redirected to the Salesforce Record page, else to the ICM Contract detail page.
The purpose of this guide is to document the process of:
Configuring ICM in Salesforce.
The guide also describes the process of using the ICM Salesforce connector for standard scenarios.
The document is primarily intended for:
ICM Salesforce Connector is a native Salesforce application that allows you to access the full suite of ICM functionality from Salesforce, including the following capabilities:
ICM and Salesforce integration is required to port data from ICM to Salesforce. This integration avoids the need for re-entering the data manually in Salesforce which you have already created in ICM.
To use ICM from within Salesforce:
ICM Salesforce contains the following key concepts:
After integrating ICM with Salesforce, you can do the following contract management tasks in Salesforce:
ICM is compatible with the following editions of Salesforce:
For more information about the different editions of Salesforce, refer to:
[https://help.salesforce.com/articleView?id=overview_edition.htm&type=0
https://help.salesforce.com/articleView?id=overview_edition.htm&type=0 ]
To install ICM in Salesforce:
1. Log on to Salesforce.
2. Open a new browser instance and go to Salesforce AppExchange to download the ICM application.
Follow these steps to create a Canvas App:
1. In Salesforce, under Setup, search for Apps in the Quick Find box and select Apps.
1. In Salesforce, under Setup, search for Connected Apps in the Quick Find box and then select the option for managing Connected Apps.
4. Click Save.
You can perform ICM EndPoint Configuration only after you have installed Salesforce ICM from AppExchange.
| ICM URL | This field is auto-populated on the ICM Endpoint Configuration page when you create a canvas application through Salesforce ICM. Note that depending on the ICM API URL, you will have to change this URL. Typically, API URL follows below convention, https://sfdcdev-api.icertis.com |
| Canvas App Name Resource URI | This field is auto-populated on the ICM Endpoint Configuration page when you create the canvas application through Salesforce ICM. You can also add or edit the Canvas App Name manually from the ICM Endpoint Configuration page |
| Resource URI | This field is auto-populated when you create the canvas application through Salesforce. You must create a Saved Search in ICM for the Resource URI value to get displayed in Salesforce |
| Enable Reverse Integration | Select this check box to enable reverse integration. This causes the data created in ICM to be displayed in the Salesforce entities (from where the contract creation process was initiated) |
| Enable Quick Contract | Select this checkbox to enable creating the Contract for all Salesforce entities with a single click from Salesforce. |
| Enable Iframe | If the Iframe is disabled from the IDP, then select this checkbox to enable the Iframe in Salesforce to open the ICM page in Salesforce in a new tab for creating new Agreements and Requests. |
| Entity Name | Select the entity name from the drop-down. The Entity Name denotes the Salesforce entities that are synced with ICM. |
| Contract Saved Search URI | This denotes the Saved Search created in ICM to map the data between ICM and Salesforce. It is the Contract Saved Search for the corresponding Salesforce entity. |
| CT Saved Search Field | Select the field name which filters the Contracts based on the Saved Search in ICM. |
| CR Saved Search URI | This denotes the Saved Search created in ICM to map the data between ICM and Salesforce. It is the Contract Request Saved Search for the corresponding Salesforce entity. |
| CR Saved Search Field | Select the field name, which filters the Contract Requests based on the Saved Search in ICM. |
| Related Entities | Click the Related Entities textbox corresponding to the Account or Opportunity in Salesforce. The Related Entities dialog box appears. Select the Related Entities records as Associations to the ICM Agreement through Salesforce. You can also configure the conditions by clicking the Add Condition button on the Related Entities window for that specific Related Entity. The entities in this field are auto-populated based on the entity name you selected earlier. |
| Button Label | This is the Text, which will appear as Button Label on UI. |
| Button Type | This button type can be Contract or Contract Request. It is a read-only field, jut to specify the button type. |
| Active | This checkbox Shows Enable state for the button, if it is unchecked then Button will be hidden from UI. |
| Conditional Visibility | This text area will define the conditional visibility criteria of the button. |
| Field | Description |
|---|---|
| Remote Site Name | Type the Remote Site Name. Adding a Remote Site Name allows tracking the external sites added in Salesforce. |
| Remote Site URL | Type the Remote Site URL. Adding a Remote Site URL allows accessing external sites from Salesforce. |
| Disable Protocol Security | Select this checkbox to allow s-controls to access the remote site regardless of HTTP or HTTPS session security. S-Controls allow adding the functionality of your application to your Salesforce organization. |
| Description | Type the description for the remote site. The description should typically contain relevant important information that helps in finding the remote site from the list easily. |
| Active | Select the checkbox to make the remote site active in Salesforce as soon as you create it. |
To Enable ICM sections on the added entity (as per the ICM Configuration section) you need to add the ICM custom pages into page layouts. By using the Page Layout Configuration, Admin assigns user access to Contract or Contract Request Related Sections. For example, if you have enabled the ICM Configuration for Opportunity in Salesforce, you need to enable ICM custom pages in Opportunity Layout:
1. You can Edit your existing Page layout (Opportunity Layout) and add two Visualforce pages inside the page layout as follows:
2. On the Opportunity Layout page, click Edit to edit the page layout where you want to add Visualforce pages.
Once the Contract and Contract Request is created from Salesforce, the data is synced to ICM entities. If the Salesforce entity is edited or changed, user need to update mapped fields in ICM. Ideally, this process is automated. The system should automatically sync the data in the background, without user intervention.
To enable this feature in Salesforce, ICM Service User Authentication Token should be configured and create a process in Process Builder for specific entities. Selected entities will have Data sync functionality. To know more about the Process Builder, visit: https://help.salesforce.com/articleView?id=process_overview.htm&type=0
To configure Service User Token in Salesforce, follow these steps:
1. In Salesforce, under Setup, search Installed Packages in the Quick Find box and select Installed Packages.
4. Click Save.
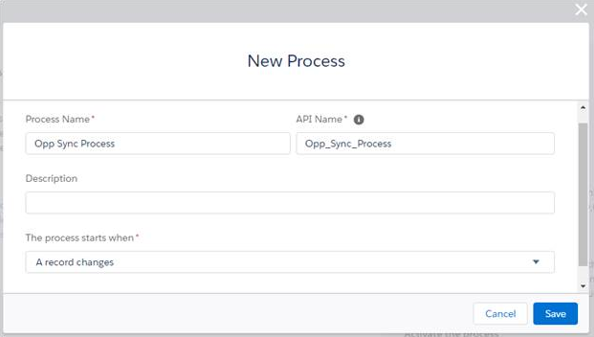
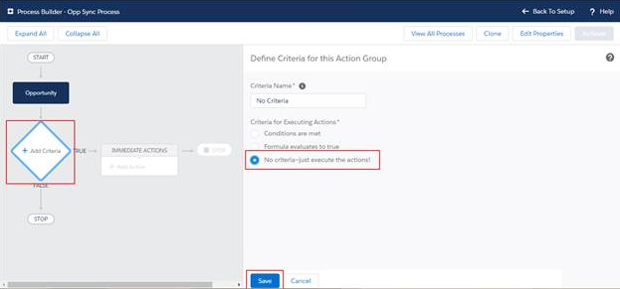
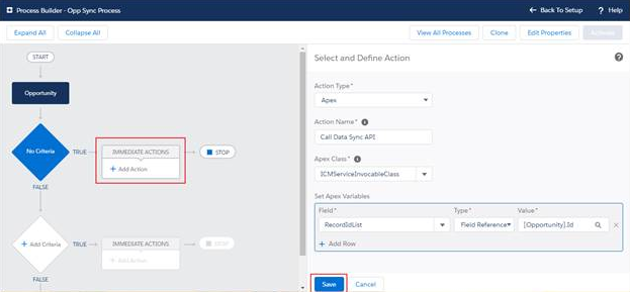
Process Builder configuration is an entity-specific configuration. To configure Process Builder in Salesforce, go through the following steps. In this case, the Opportunity entity will be configured.
1. In Salesforce, under Setup, search for Process Builder in the Quick Find box and select Process Builder.


 [edit]
8. Click Activate to complete the process.
Use the Configuration tile in the ICM application to specify the mapping details between Salesforce and ICM by creating Masterdata records for mapping entities.
Creating Client App Cross Reference Mapping
1. Log on to the ICM application.
2. Click Configuration on ICM Dashboard. The Configuration page appears.
3. Click Masterdata on the Configuration page. The Masterdata page appears.
4. Click Create Masterdata. Create Masterdata page appears.
5. Provide relevant information in the respective fields:
6. Click Next. The Attributes page appears.
You can create a Masterdata record for the Contract Type Masterdata that you created earlier. This helps in mapping the entities between Salesforce and ICM. ICM allows mapping this data from any Salesforce entities like opportunity, account, or quote to a Contract Request or agreement by creating the Masterdata record in ICM.
To create a Masterdata record:
1. Click Configuration on My Dashboard. The Configuration page appears.
You do not have permission to edit this page, for the following reason:
The action you have requested is limited to users in one of the groups: Users, User.
You can view and copy the source of this page:
Return to Salesforce.