| Line 27: | Line 27: | ||
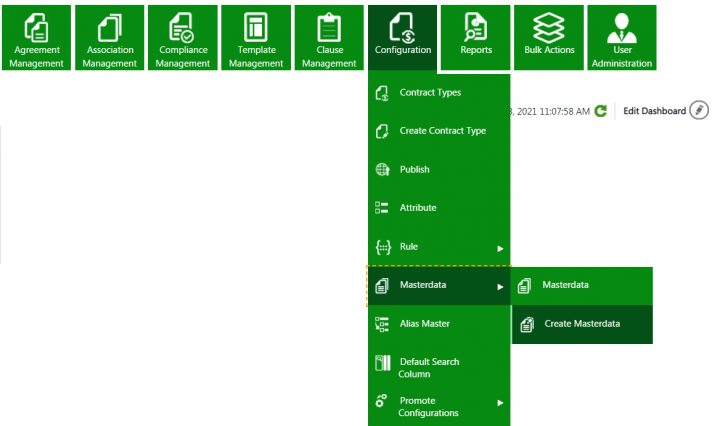
The ICI Proposal Management provides seeded masterdata “Key Requirements” to capture the essential contents of an RFx that would help in winning the bid proposal. <br/> Users can create masterdata instances as per the business requirements. <br/> To create a masterdata instance: <br/> 1. '''Click''' “Configuration” > “Masterdata” > “Create Masterdata” on the “Home” page. The “Create Masterdata” page opens. | The ICI Proposal Management provides seeded masterdata “Key Requirements” to capture the essential contents of an RFx that would help in winning the bid proposal. <br/> Users can create masterdata instances as per the business requirements. <br/> To create a masterdata instance: <br/> 1. '''Click''' “Configuration” > “Masterdata” > “Create Masterdata” on the “Home” page. The “Create Masterdata” page opens. | ||
| − | <div class="image-green-border">[[File:7.15 PMApp 1.png|720px]]<br/> <br/> 2. On the “Masterdata Details” tab, select values in the following fields:</div> | + | <div class="image-green-border">[[File:7.15 PMApp 1.png|720px|7.15 PMApp 1.png]]<br/> <br/> 2. On the “Masterdata Details” tab, select values in the following fields:</div> |
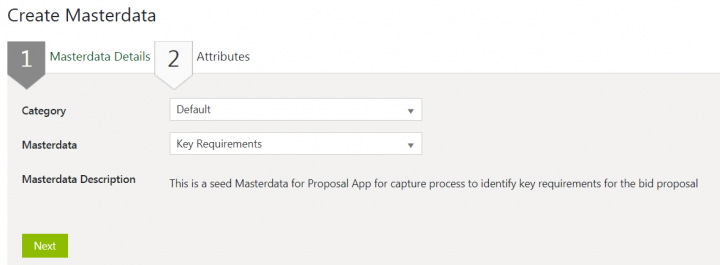
*Category: For example, Default. | *Category: For example, Default. | ||
*Masterdata (contract type): For example, Key requirements. | *Masterdata (contract type): For example, Key requirements. | ||
| − | <div class="image-green-border"> </div> <div class="image-green-border">[[File:7.15 PMApp 2.png|720px]]<br/> <br/> 3. '''Click '''“Next”. The “Attributes” tab opens. <br/> 4. '''Enter '''or select the values in the following fields:</div> | + | <div class="image-green-border"> </div> <div class="image-green-border">[[File:7.15 PMApp 2.png|720px|7.15 PMApp 2.png]]<br/> <br/> 3. '''Click '''“Next”. The “Attributes” tab opens. <br/> 4. '''Enter '''or select the values in the following fields:</div> |
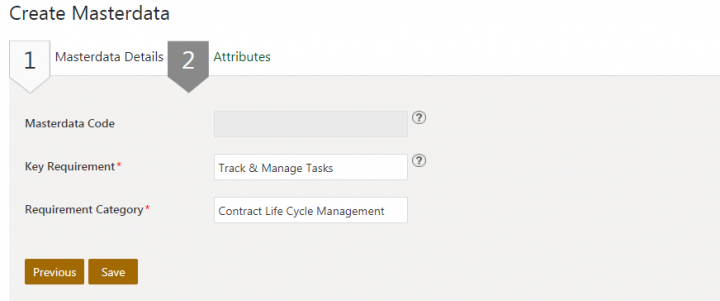
*Key Requirement: For example, Track & Manage Tasks. | *Key Requirement: For example, Track & Manage Tasks. | ||
*Requirement Category: For example, Contract Life Cycle Management. | *Requirement Category: For example, Contract Life Cycle Management. | ||
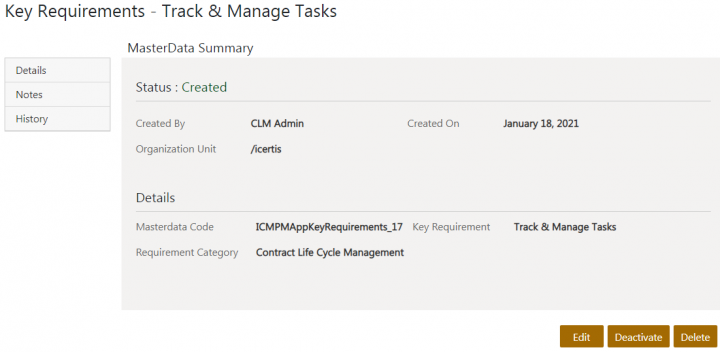
| − | <div class="image-green-border"> </div> <div class="image-green-border">[[File:7.15 PMApp 3.png|720px]]<br/> <br/> 5. '''Click '''“Save”. The masterdata instance is created. You can edit, deactivate or delete the created masterdata, as required.<br/> <br/> [[File:7.15 PMApp 4.png|720px]]<br/> </div> | + | <div class="image-green-border"> </div> <div class="image-green-border">[[File:7.15 PMApp 3.png|720px|7.15 PMApp 3.png]]<br/> <br/> 5. '''Click '''“Save”. The masterdata instance is created. You can edit, deactivate or delete the created masterdata, as required.<br/> <br/> [[File:7.15 PMApp 4.png|720px|7.15 PMApp 4.png]]<br/> </div> |
=== <br/> Working with Sell Side RFx === | === <br/> Working with Sell Side RFx === | ||
==== <br/> Creating Sell Side RFx ==== | ==== <br/> Creating Sell Side RFx ==== | ||
| − | |||
==== <br/> Accessing Sell Side RFx ==== | ==== <br/> Accessing Sell Side RFx ==== | ||
| Line 48: | Line 47: | ||
==== <br/> Creating Associations for Sell Side RFx ==== | ==== <br/> Creating Associations for Sell Side RFx ==== | ||
| − | |||
==== <br/> Editing Sell Side RFx ==== | ==== <br/> Editing Sell Side RFx ==== | ||
| Line 54: | Line 52: | ||
You can modify the sell side RFx as per business requirements:<br/> 1. Click “Edit” on the sell side RFx “Details” page. The “Edit Agreement for Sell Side RFx” page opens.<br/> Screen 1 <br/> 2. Make the required changes and click “Next”. The “Verify” page opens.<br/> screen<br/> 3. Verify the changes made to the RFx and click “Update”. <br/> screen<br/> The RFx will save the updates made. | You can modify the sell side RFx as per business requirements:<br/> 1. Click “Edit” on the sell side RFx “Details” page. The “Edit Agreement for Sell Side RFx” page opens.<br/> Screen 1 <br/> 2. Make the required changes and click “Next”. The “Verify” page opens.<br/> screen<br/> 3. Verify the changes made to the RFx and click “Update”. <br/> screen<br/> The RFx will save the updates made. | ||
| + | | ||
==== <br/> Canceling Sell Side RFx ==== | ==== <br/> Canceling Sell Side RFx ==== | ||
| Line 72: | Line 71: | ||
=== <br/> Making a Bid Decision === | === <br/> Making a Bid Decision === | ||
| + | |||
| + | Based on the company’s objectives, the Sell Side RFx is qualified for a decision to bid or not to bid. The sales team of the organization can mention the Bid Decision details for a Sell Side RFx in an “Awaiting Qualification” status by creating an RFx Qualification association. There can be only one RFx qualification for a Sell Side RFx. | ||
| + | |||
| + | The creation of an RFx Qualification Association invokes the Approver rule and workflows and moves the corresponding Sell Side RFx to the status according to the bid decision, upon RFx qualification approval. | ||
| + | |||
| + | Users can set Bid Decision using the following options: | ||
| + | |||
| + | *'''Bid:''' Allows user to place a bid based on the RFx received if the RFx meets the company’s objectives. For an approved Sell Side RFx, when the bid decision is set as Bid, the status of the Sell Side RFx moves to “Bid” once the RFx qualification is approved. | ||
| + | *'''No Bid: '''Allows user to avoid placing a bid based on the RFx received if the RFx does not meet the company’s objectives. For an approved Sell Side RFx, when the bid decision is set as No Bid, the status of the Sell Side RFx moves to “No Bid” once the RFx qualification is approved. | ||
| + | *'''Hold:''' Allows user to keep the bid on hold if the buyer organization communicates that the RFx is put on hold. For an approved Sell Side RFx, when the bid decision is set as Hold, the status of the Sell Side RFx moves to “No Bid” once the RFx qualification is approved. | ||
| + | *'''Awaiting Qualification:''' The default status of the Sell Side RFx till a bid decision is made based on the company’s objectives. | ||
==== <br/> Creating RFx Qualification ==== | ==== <br/> Creating RFx Qualification ==== | ||
| + | After the Sell Side RFx capture is complete, an RFx Qualification captures the outcome of the Bid/No Bid decision. | ||
| + | |||
| + | 1. '''Click '''the plus + icon next to RFx Qualification in the “Associations” section, on Sell Side RFx “Details” page. The “Create Association” page opens. | ||
| + | |||
| + | scrren 1 | ||
| + | |||
| + | 2. '''Select '''or enter values for the following fields in the “Bid Decision” section: | ||
| + | |||
| + | *Name: The name of the RFx Qualification. For example, “Qualification Enterprise CLM”. | ||
| + | *Bid Decision: The bid decision for the Approved Sell Side RFx which has options- Bid, No Bid, Hold, and Awaiting Qualification. | ||
| + | *Bid Decision Owner: The owner who will make the decision if the RFx qualifies for a bid or not. | ||
| + | *Bid Decision Method: The method used to arrive at a go or no-go decision for the bid. For example, Decision Matrix. | ||
| + | *Bid Decision Capture Date: The date and time at which the bid decision is taken. | ||
| + | *Rationale: The reason behind taking a specific decision to bid or not, or keep the bid on hold. | ||
| + | *Agreement Code: An automatically generated code after the RFx qualification is generated. | ||
| + | *File Path: Any document to capture rationale for decision taken. For example, a questionnaire in an Excel format. | ||
| + | |||
| + | 3. '''Click''' “Create”. The RFx Qualification is created in a “Draft” state. | ||
| + | |||
| + | screen 2 | ||
| + | <div class="note-box">Notes: <br/> You can add only one RFx Qualification to a Sell Side RFx. <br/> Audit History of all actions taken on RFx qualification is captured and displayed under History section. </div> | ||
==== <br/> Accessing RFx Qualification ==== | ==== <br/> Accessing RFx Qualification ==== | ||
Revision as of 06:15, 16 February 2021
Contents
- 1 ICI Proposal Management App
- 1.1 Purpose of the Document
- 1.2 Prerequisites
- 1.3 ICI Proposal Management Application
- 1.4 The Proposal Management Process
- 1.4.1 Setting masterdata values
- 1.4.2 Working with Sell Side RFx
- 1.4.2.1 Creating Sell Side RFx
- 1.4.2.2 Accessing Sell Side RFx
- 1.4.2.3 Creating Associations for Sell Side RFx
- 1.4.2.4 Editing Sell Side RFx
- 1.4.2.5 Canceling Sell Side RFx
- 1.4.2.6 Deleting Sell Side RFx
- 1.4.2.7 Sending Sell Side RFx for Approval
- 1.4.2.8 Approving Sell Side RFx
- 1.4.2.9 Rejecting Sell Side RFx
- 1.4.2.10 Expiring of Sell Side RFx
- 1.4.3 Making a Bid Decision
- 1.4.4 Working with Bid Proposal
- 1.4.4.1 Creating the Bid Proposal
- 1.4.4.2 Accessing Bid proposal
- 1.4.4.3 Managing Bid Proposal using Commitments
- 1.4.4.4 Sending bid proposal for approval
- 1.4.4.5 Reviewing bid proposal
- 1.4.4.6 Approving Bid Proposal
- 1.4.4.7 Rejecting Bid proposal
- 1.4.4.8 Executing bid proposal
- 1.4.4.9 Capturing Bid Outcome
- 1.4.4.10 Expiring of Bid Proposal
- 1.4.4.11 Adding Amendments to Bid Proposal
ICI Proposal Management App
Purpose of the Document
Prerequisites
ICI Proposal Management Application
Overview
The Terminology
The Challenge
The Opportunity
The Solution Framework
The Users
The Proposal Management Process
Setting masterdata values
The ICI Proposal Management provides seeded masterdata “Key Requirements” to capture the essential contents of an RFx that would help in winning the bid proposal.
Users can create masterdata instances as per the business requirements.
To create a masterdata instance:
1. Click “Configuration” > “Masterdata” > “Create Masterdata” on the “Home” page. The “Create Masterdata” page opens.
- Category: For example, Default.
- Masterdata (contract type): For example, Key requirements.
- Key Requirement: For example, Track & Manage Tasks.
- Requirement Category: For example, Contract Life Cycle Management.

5. Click “Save”. The masterdata instance is created. You can edit, deactivate or delete the created masterdata, as required.

Working with Sell Side RFx
Creating Sell Side RFx
Accessing Sell Side RFx
You can view existing sell side RFx from the “Proposal Management” tile.
To view the created sell side RFx:
1. Click “Proposal Management” >” Sell Side RFx” on the “Home” page.
screen 1
The saved search result page opens displaying all available sell side RFx records. Users can refine the search result by applying filters, options and keywords.
screen 2
2. Click “View Record” icon corresponding to the sell side RFx record you want to open. For example, Enterprise CLM. The sell side RFx “Details” page opens.
Suppliers can view the current status of the sell side RFx on the “Details” page. Suppliers can also perform a variety of actions based on the current state of the sell side RFx.
Creating Associations for Sell Side RFx
Editing Sell Side RFx
You can modify the sell side RFx as per business requirements:
1. Click “Edit” on the sell side RFx “Details” page. The “Edit Agreement for Sell Side RFx” page opens.
Screen 1
2. Make the required changes and click “Next”. The “Verify” page opens.
screen
3. Verify the changes made to the RFx and click “Update”.
screen
The RFx will save the updates made.
Canceling Sell Side RFx
You can cancel a sell side RFx as per business requirements.
To cancel a sell side RFx:
1. Click “Cancel” on the sell side RFx “Details” page. The “Please Confirm” window opens.
screen 1
2. Click “Yes” if you are sure that the RFx should be cancelled. The “Add Note” window opens.
screen 2
3. Enter a note such as the reason for cancellation and select the reason code.
4. Click “Add”. The status of sell side RFx changes to “Cancelled”.
screen 3
Deleting Sell Side RFx
Sending Sell Side RFx for Approval
Approving Sell Side RFx
Rejecting Sell Side RFx
Expiring of Sell Side RFx
Making a Bid Decision
Based on the company’s objectives, the Sell Side RFx is qualified for a decision to bid or not to bid. The sales team of the organization can mention the Bid Decision details for a Sell Side RFx in an “Awaiting Qualification” status by creating an RFx Qualification association. There can be only one RFx qualification for a Sell Side RFx.
The creation of an RFx Qualification Association invokes the Approver rule and workflows and moves the corresponding Sell Side RFx to the status according to the bid decision, upon RFx qualification approval.
Users can set Bid Decision using the following options:
- Bid: Allows user to place a bid based on the RFx received if the RFx meets the company’s objectives. For an approved Sell Side RFx, when the bid decision is set as Bid, the status of the Sell Side RFx moves to “Bid” once the RFx qualification is approved.
- No Bid: Allows user to avoid placing a bid based on the RFx received if the RFx does not meet the company’s objectives. For an approved Sell Side RFx, when the bid decision is set as No Bid, the status of the Sell Side RFx moves to “No Bid” once the RFx qualification is approved.
- Hold: Allows user to keep the bid on hold if the buyer organization communicates that the RFx is put on hold. For an approved Sell Side RFx, when the bid decision is set as Hold, the status of the Sell Side RFx moves to “No Bid” once the RFx qualification is approved.
- Awaiting Qualification: The default status of the Sell Side RFx till a bid decision is made based on the company’s objectives.
Creating RFx Qualification
After the Sell Side RFx capture is complete, an RFx Qualification captures the outcome of the Bid/No Bid decision.
1. Click the plus + icon next to RFx Qualification in the “Associations” section, on Sell Side RFx “Details” page. The “Create Association” page opens.
scrren 1
2. Select or enter values for the following fields in the “Bid Decision” section:
- Name: The name of the RFx Qualification. For example, “Qualification Enterprise CLM”.
- Bid Decision: The bid decision for the Approved Sell Side RFx which has options- Bid, No Bid, Hold, and Awaiting Qualification.
- Bid Decision Owner: The owner who will make the decision if the RFx qualifies for a bid or not.
- Bid Decision Method: The method used to arrive at a go or no-go decision for the bid. For example, Decision Matrix.
- Bid Decision Capture Date: The date and time at which the bid decision is taken.
- Rationale: The reason behind taking a specific decision to bid or not, or keep the bid on hold.
- Agreement Code: An automatically generated code after the RFx qualification is generated.
- File Path: Any document to capture rationale for decision taken. For example, a questionnaire in an Excel format.
3. Click “Create”. The RFx Qualification is created in a “Draft” state.
screen 2
You can add only one RFx Qualification to a Sell Side RFx.
Audit History of all actions taken on RFx qualification is captured and displayed under History section.
Accessing RFx Qualification
Sending RFx Qualification for approval
Approving RFx Qualification
Rejecting RFX Qualification
Deleting RFx Qualification
Working with Bid Proposal
Creating the Bid Proposal
Accessing Bid proposal
Managing Bid Proposal using Commitments
Sending bid proposal for approval
Reviewing bid proposal
Approving Bid Proposal
Rejecting Bid proposal
Executing bid proposal
Capturing Bid Outcome
Expiring of Bid Proposal
Adding Amendments to Bid Proposal
Related Topics: Agreement Management | Icertis Business Apps | Biz Apps Release Notes

