| (75 intermediate revisions by 2 users not shown) | |||
| Line 1: | Line 1: | ||
| − | = Working with RFI | + | = Working with RFI Instances = |
A Request for Information (RFI) is a set of questions shared with potential suppliers to assess their ability to fulfil certain requirements to provide goods or services. The purpose of an RFI is to solicit information from potential suppliers for buying goods or services. This is done in the form of a questionnaire with specific and general answers. The information provided by prospective suppliers are used for judging their technical capabilities, financial stability, cultural compatibility and suitability for the buying requirements of the organization. It is recommended to have specific qualification criteria for prospective supplier to compete for a business requirement of the buyer. For example, Company size in terms of revenue, technical certifications, locations and so on. An RFI does not solicit any specific proposal for any purchase or pricing information. The outcome of an RFI is a rating given to the supplier based on qualification criteria set by the buyer and not awarding of business. | A Request for Information (RFI) is a set of questions shared with potential suppliers to assess their ability to fulfil certain requirements to provide goods or services. The purpose of an RFI is to solicit information from potential suppliers for buying goods or services. This is done in the form of a questionnaire with specific and general answers. The information provided by prospective suppliers are used for judging their technical capabilities, financial stability, cultural compatibility and suitability for the buying requirements of the organization. It is recommended to have specific qualification criteria for prospective supplier to compete for a business requirement of the buyer. For example, Company size in terms of revenue, technical certifications, locations and so on. An RFI does not solicit any specific proposal for any purchase or pricing information. The outcome of an RFI is a rating given to the supplier based on qualification criteria set by the buyer and not awarding of business. | ||
| − | + | | |
| + | |||
| − | + | == Creating the RFI Instances == | |
| − | + | ||
| − | + | ||
| − | + | ||
| − | + | ||
| − | + | ||
| − | + | ||
| + | 1. '''Click''' the "Sourcing" tile from the "Home" page. The "Sourcing" page opens. A list of all the RFx instances is displayed. | ||
| + | <div class="image-green-border">[[File:8.0 Source 1.PNG|600px|8.0 Source 1.PNG]]</div> <div class="image-green-border"> </div> <div class="image-green-border">2. '''Click''' the "Create RFx" on the top right corner of "Sourcing" page. The Create RFx page opens.</div> <div class="image-green-border"> </div> <div class="image-green-border">[[File:8.0-Create RFx-RFI.PNG|720px|8.0-Create RFx-RFI.PNG]]</div> | ||
| + | 3. '''Select''' a Sourcing Entity from the "Select Sourcing Entity" drop-down in the "Contract Type Details" (Step 1 of 4) section. The contract type is configured in the system with default Attributes. | ||
| + | <div class="image-green-border">[[File:Working with RFI.PNG|720px|Working with RFI.PNG]]</div> <div class="image-green-border"> </div> <div class="image-green-border">4. '''Click''' "Next". The "Attributes" (Step 2 of 4) page opens. The attributes are grouped under various categories. For example, "RFI Information", "RFI Configuration", etc.</div> | ||
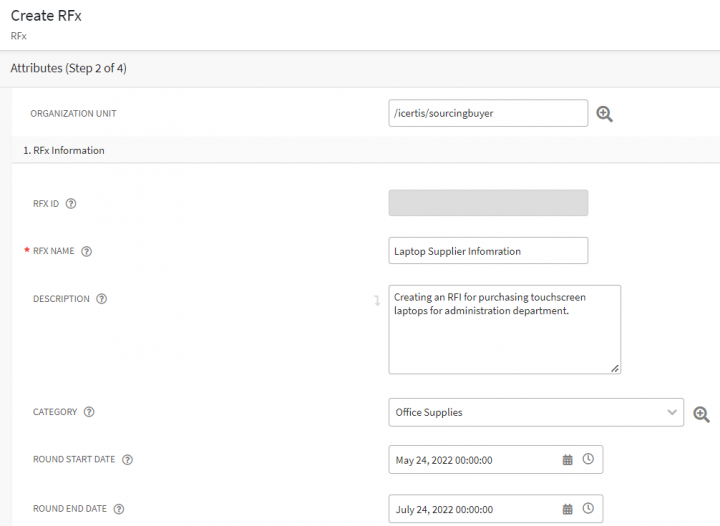
5. '''Select '''or '''enter '''the values for all the required Attributes in the RFI Information group: | 5. '''Select '''or '''enter '''the values for all the required Attributes in the RFI Information group: | ||
| − | *Enter the RFI Name. For example, | + | *Enter the RFI Name. For example, "Laptop Supplier Information". |
| − | *Enter the information of the RFI instance in the | + | *Enter the information of the RFI instance in the "Description" field. |
| − | *'''Select '''the | + | *'''Select '''the "Round One Start Date" and "Round One End Date". When you enter the dates, a round is created automatically as soon as the RFI instance is approved. If the round start and end dates are not provided, the round will not be created for the RFI instance. |
| − | <div class="image-green-border">[[File: | + | <div class="image-green-border">[[File:8.0-CreateRFI1.PNG|720px|8.0-CreateRFI1.PNG]]</div> <div class="image-green-border"> </div> <div class="image-green-border"> </div> <div class="image-green-border">6. '''Select''' appropriate values and settings under the "RFI Configuration" group.</div> |
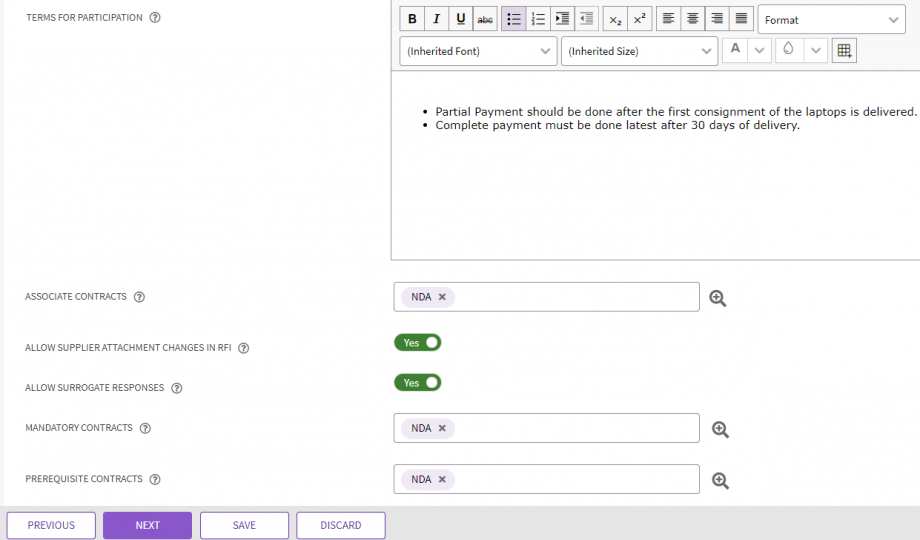
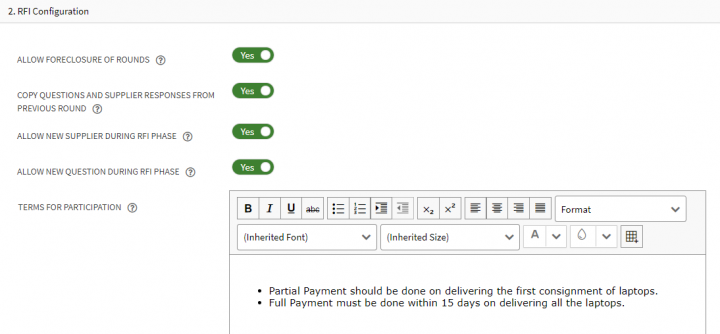
| − | 6. '''Select''' appropriate values and settings under the '' | + | *'''Select''' "Yes" or "No" for the following Configuration settings as per your requirement: |
| + | **Allow Foreclosure of Rounds: '''Select''' "Yes" if you want to allow closing the round before the selected round end date. This displays the Close Round button on the Round Details page to close the round manually before scheduled Round end date and time.If you select "No", then the round will be closed automatically at the selected round end date and time. The default value for this option is set to "Yes". | ||
| + | **Copy Questions and Supplier Responses from previous Round: '''Select''' "Yes" if you want to allow copying questions and supplier responses from previous rounds to the new round. The default value for this option is set to Yes. | ||
| + | **Allow new supplier during RFI phase: '''Select''' "Yes" if you want to allow adding a new supplier(s) during the entire RFI lifecycle. However, the newly added supplier(s) can participate in a new round only, not in an ongoing round. The default value for this option is set to Yes. | ||
| + | **Allow new question during RFI phase: '''Select''' "Yes" if you want to allow adding a new question during the RFI lifecycle. However the newly added question (s) can be part of the round only before it starts and not in an ongoing round. The default value for this option is set to Yes. | ||
| + | **Allow Surrgoate Responses: '''Select '''"Yes" if you want to allow buyers submitting responses on behalf of the suppliers. The default value for this option is set to "No". | ||
| + | <div class="image-green-border"> </div> <div class="image-green-border"> </div> <div class="image-green-border">[[File:8.0-CreateRFI-RFIConfiguration.PNG|720px|8.0-CreateRFI-RFIConfiguration.PNG]]</div> <div class="image-green-border"> </div> <div class="image-green-border">'''Enter''' the "Terms For Participation" in the given field. This window will be visible to the suppliers only if the buyer adds the terms for participation when creating the RFI. The suppliers should accept the Terms before they can respond to the questions asked by the buyer. The Supplier can access the RFI instance only after it is in Approved state. After the Round is started, a "Terms for Participation" window is displayed to the supplier with an option to accept or decline. For example, if a supplier has multiple contacts and if one of the contacts accepts the terms for participation, then other contacts are not required to take any action on that and the Terms for Participation will not be displayed to the remaining contacts.</div> | ||
| + | *'''Select''' the following contracts (if applicable) by clicking the drop-down arrow or the Lookup Search icon: | ||
| + | **Associate Contracts: Sourcing app allows the buyers to create contracts such as NDA, for all the suppliers selected when creating RFI. A separate contract will be created for each supplier. | ||
| + | **Mandatory Contracts: The value in this option will be populated automatically based on the value selected in the earlier option. You cannot select any value in this option if you don’t select anything in the Associate Contracts option. | ||
| + | **Prerequisite Contracts: The Supplier can access the RFI instance only after it is in Approved state. After the Round is started, a Terms for Participation window is displayed to the supplier with an option to accept or decline. The Suppliers can access the RFI only after they sign the Prerequisite Contract after accepting the terms for participation. If the Suppliers do not sign the contracts a message is displayed by ICI, along with a list of documents asking the suppliers to complete the documents before accessing the RFI.The values selected in these fields are populated on the RFI Details page under the Agreements tab. | ||
| − | + | The values selected in these fields are populated on the RFI "Details" page under "Agreements" tab. | |
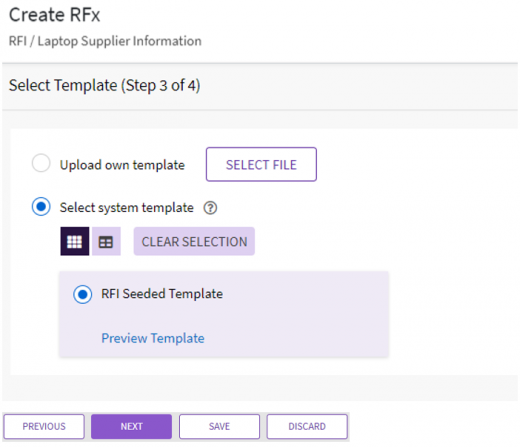
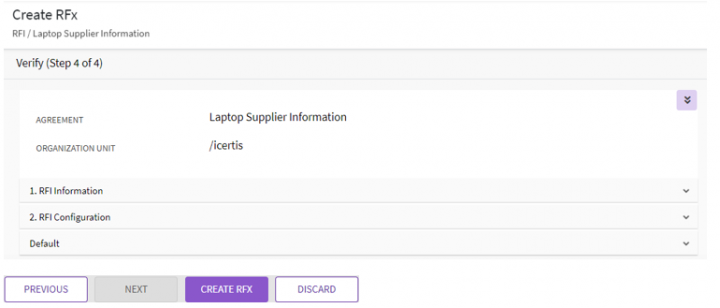
| − | + | <div class="image-green-border">[[File:8.0-CreateRFI-Terms.PNG|920px|8.0-CreateRFI-Terms.PNG]]</div> <div class="image-green-border"> </div> <div class="image-green-border"> </div> <div class="note-box">'''Note''': Selecting an Associate Contract automatically populates the values in Mandatory Contracts and Prerequisite Contracts. If you do not select any values in any of the contracts, these values will be displayed as blank when you create the RFI. This will not allow you to create Bulk Agreements. </div> <div class="image-green-border"> </div> <div class="image-green-border">7. '''Click''' "Next". The "Select Template" (Step 3 of 4) page opens. This is an optional step depending upon how the application is configured. Usually there would be only one template associated with the RFI that is selected automatically. However, multiple templates can be configured in ICI as per the business requirement. </div> <div class="image-green-border"> </div> <div class="note-box">'''Note''': You can also upload your own template as per the business requirement by clicking Select File under Upload Template section and uploading the file from your computer. </div> <div class="image-green-border"> </div> <div class="image-green-border">[[File:8.0-CreateRFI-Template.PNG|520px|8.0-CreateRFI-Template.PNG]]</div> <div class="image-green-border"> </div> <div class="image-green-border"> </div> <div class="image-green-border">8. '''Click''' "Next". The "Verify" (Step 4 of 4) page opens. Verify all the information you have just entered.</div> <div class="image-green-border"> </div> <div class="image-green-border">9. '''Click''' the "Create RFx" button. The RFI "Details" page opens.</div> <div class="image-green-border"> </div> <div class="image-green-border">[[File:8.0-CreateRFI2.PNG|720px|8.0-CreateRFI2.PNG]]</div> <div class="image-green-border"> </div> <div class="image-green-border"> </div> <div class="image-green-border"> </div> | |
| − | + | ||
| − | + | ||
| − | + | ||
| − | + | ||
| − | + | ||
| − | + | ||
| − | + | ||
| − | + | ||
| − | |||
| − | |||
== RFI Details page == | == RFI Details page == | ||
| Line 44: | Line 43: | ||
**Summary: Displays the name of the RFI instance (that is added while creating) and who created it, and RFI instance details. | **Summary: Displays the name of the RFI instance (that is added while creating) and who created it, and RFI instance details. | ||
**Details: Displays the details specified while creating the RFI instance. | **Details: Displays the details specified while creating the RFI instance. | ||
| − | **Preview: Displays how the RFI document would actually look. '''Click''' the | + | **Preview: Displays how the RFI document would actually look. '''Click''' the click here in To see full document click here to download and view the full document in pdf format. |
*RFI Package: This section displays the following details. | *RFI Package: This section displays the following details. | ||
| − | **Questionnaire: '''Click''' this option to view the list of questionnaires associated with the RFI. '''Click''' the plus icon next to | + | **Questionnaire: '''Click''' this option to view the list of questionnaires associated with the RFI. '''Click''' the plus icon next to Questionnaire on RFI Details page to add a new questionnaire. You can select or remove questionnaire from the available list of questionnaires. It is mandatory to add a questionnaire along with questions to the RFI before sending the RFI for approval. |
**Question: '''Click''' this option to view the list of questions associated with the questionnaire and RFI. | **Question: '''Click''' this option to view the list of questions associated with the questionnaire and RFI. | ||
**Internal Attachments: Displays the list of existing internal attachments associated with the RFI. Internal attachments are associated documents uploaded by the buyers and only available to the buyer team. '''Click''' the plus icon next to internal attachments to add new to the list. | **Internal Attachments: Displays the list of existing internal attachments associated with the RFI. Internal attachments are associated documents uploaded by the buyers and only available to the buyer team. '''Click''' the plus icon next to internal attachments to add new to the list. | ||
**External Attachments: Displays the list of existing external attachments associated with the RFI. External attachments are associated documents uploaded by the buyers and available to both buyers and suppliers. '''Click''' the plus icon next to external attachments to add new to the list. For example, the bulk agreements such as NDA and Warranty agreements are displayed under this section. | **External Attachments: Displays the list of existing external attachments associated with the RFI. External attachments are associated documents uploaded by the buyers and available to both buyers and suppliers. '''Click''' the plus icon next to external attachments to add new to the list. For example, the bulk agreements such as NDA and Warranty agreements are displayed under this section. | ||
*Supplier Information: Displays the list of existing suppliers and allows buyers to add new suppliers along with their contact information. | *Supplier Information: Displays the list of existing suppliers and allows buyers to add new suppliers along with their contact information. | ||
| − | **Suppliers: Displays the list of suppliers added to the RFI created by the buyer. '''Click '''the plus icon next to | + | **Suppliers: Displays the list of suppliers added to the RFI created by the buyer. '''Click '''the plus icon next to Suppliers to add a new supplier. |
**Supplier Contacts: Displays the list of relevant supplier contacts that are populated automatically after you select the suppliers in the previous step. | **Supplier Contacts: Displays the list of relevant supplier contacts that are populated automatically after you select the suppliers in the previous step. | ||
*Agreements: Displays all the agreements that were selected initially when creating the RFI. | *Agreements: Displays all the agreements that were selected initially when creating the RFI. | ||
| Line 58: | Line 57: | ||
*Team: Displays the members added to the team for this RFI instance. '''Click''' the plus icon to add new team members to the RFI. | *Team: Displays the members added to the team for this RFI instance. '''Click''' the plus icon to add new team members to the RFI. | ||
*Notes: Displays the additional information about the RFI if it is added. | *Notes: Displays the additional information about the RFI if it is added. | ||
| − | *History: Displays how the RFI has progressed till now. The actions performed | + | *History: Displays how the RFI has progressed till now. The actions performed on the RFI instance are displayed under History in the left navigation pane on RFI "Details" page. |
| − | Buyers can perform the following actions from the RFI Details page: | + | Buyers can perform the following actions from the RFI "Details" page: |
| − | *Download RFI Document: '''Click''' this button to download the RFI document | + | *Download RFI Document: '''Click''' this button to download the RFI document. The downloaded document is based on the template selected while creating the RFI instance. |
*Edit: '''Click''' this button to go back and make changes to the RFI that you created. | *Edit: '''Click''' this button to go back and make changes to the RFI that you created. | ||
*Send for Approval: '''Click''' this button to send the RFI instance for approval. | *Send for Approval: '''Click''' this button to send the RFI instance for approval. | ||
*Download Package: '''Click''' this button to download the RFI instance along with all its associations. You can select specific associations that you want to download or select the RFI instance checkbox to download the RFI package. RFI package is downloaded as a zip file that contains all the attachments relevant to the RFI. When the zip file is exported on user’s local machine, a folder structure is created that resembles the RFI structure, and the files are located in the respective locations. | *Download Package: '''Click''' this button to download the RFI instance along with all its associations. You can select specific associations that you want to download or select the RFI instance checkbox to download the RFI package. RFI package is downloaded as a zip file that contains all the attachments relevant to the RFI. When the zip file is exported on user’s local machine, a folder structure is created that resembles the RFI structure, and the files are located in the respective locations. | ||
| − | *Delete: '''Click''' this button to delete the RFI instance. After deleting the RFI instance, the | + | *Delete: '''Click''' this button to delete the RFI instance. After deleting the RFI instance, the Sourcing page opens and the deleted RFI will not be available on the user interface. |
| + | |||
| + | |||
| + | |||
== Adding Questionnaires == | == Adding Questionnaires == | ||
You can add questionnaires at any stage of the RFI instance depending upon RFI configuration settings. Questionnaires are a set of questions that the buyer shares with potential suppliers who can fulfil the requirement of providing goods or services to the buyers. When you create the RFI instance, the RFI Details page opens with the RFI status displayed as Draft. You can use the left navigation pane to add one or more questionnaires. | You can add questionnaires at any stage of the RFI instance depending upon RFI configuration settings. Questionnaires are a set of questions that the buyer shares with potential suppliers who can fulfil the requirement of providing goods or services to the buyers. When you create the RFI instance, the RFI Details page opens with the RFI status displayed as Draft. You can use the left navigation pane to add one or more questionnaires. | ||
| − | + | <div class="image-green-border">[[File:8.0-RFIDetailsPage.PNG|720px|8.0-RFIDetailsPage.PNG]]</div> <div class="image-green-border"> </div> | |
| − | | + | |
| − | + | ||
To add questionnaires: | To add questionnaires: | ||
| − | 1. '''Click''' the plus button next to | + | 1. '''Click''' the plus button next to Questionnaire under the RFI Package tab. The "Questionnaires" window opens. |
| − | + | <div class="image-green-border">[[File:8.0-RFI-AddQuestionnaire.PNG|720px|8.0-RFI-AddQuestionnaire.PNG]]</div> <div class="image-green-border"> </div> <div class="image-green-border">2. '''Search''' for the desired questionnaire (s) or '''select''' the questionnaire from the displayed list under the "Questionnaires" tab.</div> <div class="image-green-border"> </div> <div class="image-green-border">[[File:8.0-RFI-AddQuestionnaire7.PNG|720px]]</div> | |
| − | 2. '''Search''' for the desired questionnaire (s) or '''select''' the questionnaire from the displayed list under the | + | 3. '''Click''' "Next". The "Questions" tab opens displaying the list of questions associated with the questionnaire. |
| − | + | <div class="image-green-border">[[File:8.0-RFI-AddQuestionnaire2.PNG|720px|8.0-RFI-AddQuestionnaire2.PNG]]</div> | |
| − | 3. '''Click''' | + | 4. '''Click''' the View Details icon next to the Question to view the question information. |
| − | + | <div class="image-green-border">[[File:8.0-RFI-ViewQuestion.PNG|720px|8.0-RFI-ViewQuestion.PNG]]</div> <div class="image-green-border"> </div> <div class="image-green-border">5. '''Select '''the desired question. </div> | |
| − | 4. '''Click''' the | + | 6. '''Click''' "Save". The selected questionnaire and question (s) are added to the RFI instance. The count is updated under the "RFI Package" tab. |
| − | + | <div class="image-green-border">[[File:8.0-RFI-ViewQuestionnaire.PNG|720px|8.0-RFI-ViewQuestionnaire.PNG]]</div> <div class="image-green-border"> </div> | |
| − | 5. '''Select '''the desired question. | + | |
| − | + | ||
| − | 6. '''Click''' | + | |
== Creating Bulk Agreements == | == Creating Bulk Agreements == | ||
| − | The Sourcing App offers you a convenient way of creating bulk agreements with the suppliers, without having to move out of | + | The Sourcing App offers you a convenient way of creating bulk agreements with the suppliers, without having to move out of RFI instance that you are working on. The agreements must be already configured in ICI. These agreements may be made mandatory for the supplier to sign before the supplier can participate in the RFI. The RFI displays all the agreements created from the RFI and they have all the agreement information. This allows the buyer to conveniently navigate between the RFI and the agreement associated with the RFI. |
To create an agreement: | To create an agreement: | ||
| − | 1. '''Click''' the | + | 1. '''Click''' the "Create Association" icon next to the agreements in the left navigation pane on the RFI Details page. For example, NDA, "Warranty Agreement". |
| − | <div class="image-green-border">[[File: | + | <div class="image-green-border">[[File:8.0-RFIDetailsPage-CreateAgreement.PNG|720px|8.0-RFIDetailsPage-CreateAgreement.PNG]]</div> <div> </div> <div class="image-green-border">2. The "Attributes (Step 2 of 4)" page opens in the new browser tab.</div> <div class="image-green-border"> </div> <div class="image-green-border">[[File:8.0-RFI- Creating Bulk Agreements1.PNG|550px|8.0-RFI- Creating Bulk Agreements1.PNG]]</div> |
| − | 2. The | + | |
| − | <div class="image-green-border">[[File: | + | |
3. '''Enter''' values for all the attributes, some of which may be mandatory. | 3. '''Enter''' values for all the attributes, some of which may be mandatory. | ||
| − | 4. '''Click '''the | + | 4. '''Click '''the Select Multiple Suppliers icon next to Suppliers and Agreement Details. The "Suppliers" page opens. |
| − | <div class="image-green-border">[[File: | + | <div class="image-green-border">[[File:8.0-RFI- Creating Bulk Agreements2.PNG|550px|8.0-RFI- Creating Bulk Agreements2.PNG]]</div> |
| − | 5. Repeat steps 2 to 6 from the | + | 5. Repeat steps 2 to 6 from the Selecting Suppliers section to add a supplier. |
| − | 6. '''Click | + | 6. '''Click "'''Next". The "Select Template (Step 3 of 4)" page opens. |
| − | <div class="image-green-border">[[File: | + | <div class="image-green-border">[[File:8.0-RFI-BulkAgreements-SelectSuppliers.PNG|720px|8.0-RFI-BulkAgreements-SelectSuppliers.PNG]]</div> |
7. '''Select''' a Template. | 7. '''Select''' a Template. | ||
| − | <div class="image-green-border">[[File: | + | <div class="image-green-border">[[File:8.0-RFI- Creating Bulk Agreements3.PNG|450px|8.0-RFI- Creating Bulk Agreements3.PNG]]</div> |
| − | 8. '''Click ''' | + | 8. '''Click '''"Next". The "Verify" page opens. Verify all the information you have entered. |
| − | <div class="image-green-border"> | + | <div class="image-green-border">9. '''Click''' the "Create Bulk Agreement" button. The agreement is created.</div> <div class="image-green-border"> </div> <div class="image-green-border">[[File:8.0-RFI- Creating Bulk Agreements4.PNG|450px|8.0-RFI- Creating Bulk Agreements4.PNG]]</div> |
| − | 9. '''Click''' the | + | 10. '''Click''' the "NDA" icon on the RFI Details page to view the list of NDA agreements relevant to the RFI. |
| − | <div class="image-green-border">[[File: | + | |
| − | 10. '''Click''' the | + | 11. '''Click '''the "View Details" icon next to the NDA. The NDA’s "Details" page opens with the NDA in the "Draft" state. |
| − | <div class="note-box">'''Note''': The number of instances of the selected NDA Agreement created matches with the number of suppliers selected while creating the | + | <div class="note-box">'''Note''': The number of instances of the selected NDA Agreement created matches with the number of suppliers selected while creating the RFI.</div> <div> </div> <div class="image-green-border">[[File:8.0-RFI-View Association.PNG|720px|8.0-RFI-View Association.PNG]]</div> <div class="image-green-border"> </div> <div class="image-green-border">After the Agreement is created for a supplier, you can proceed with the agreement workflow as configured. For example, you can send the agreement for approval.</div> <div class="image-green-border"> </div> <div class="image-green-border">[[File:8.0-RFI-AssociationApproval.PNG|720px|8.0-RFI-AssociationApproval.PNG]]</div> |
| − | After the Agreement is created for a supplier, you can proceed with the agreement workflow as configured. For example, you can send the agreement for approval. | + | 11. '''Click''' the "Send For External Signature" button on the Details page. The agreement is sent to the supplier(s) for signatures. The status of the agreement changes to "Executed" when all the suppliers sign the NDA. |
| − | <div class="image-green-border">[[File: | + | <div class="image-green-border">[[File:8.0-RFI-ExternalSignature.PNG|720px|8.0-RFI-ExternalSignature.PNG]]</div> <div class="image-green-border"> </div> |
| − | 11. '''Click''' the | + | |
| − | <div class="image-green-border"> | + | |
== Adding Team members in RFI == | == Adding Team members in RFI == | ||
| Line 124: | Line 119: | ||
To add team members: | To add team members: | ||
| − | 1. '''Click''' the | + | 1. '''Click''' the "Team" tab on the RFI Details page. The "Team" page opens in the right pane. |
| − | + | <div class="image-green-border">[[File:8.0-RFI-Team.PNG|720px|8.0-RFI-Team.PNG]]</div> | |
| − | 2. '''Click''' the | + | 2. '''Click''' the "Add New Member" icon. The "Add User" window opens. |
| − | + | <div class="image-green-border">The "Add User" window now displays the following options: </div> | |
| − | + | *Save View: Allows creating a saved search from the list of users. | |
| + | *Refresh: Allows refreshing the list of users on the "Add User" window. | ||
| + | *Select Columns: Allows selecting specific columns to be displayed on the "Add User" window. | ||
| + | *Export: Allows exporting the list of users in Excel or CSV format. | ||
| + | 3. '''Enter''' the search term in the Search User field to search for a desired user. | ||
| + | <div class="image-green-border">4. '''Select''' a User from the displayed user tiles.<br/> 5. '''Select''' a Role. For example, Approver, Business Owner, Observer, etc. <br/> 6. '''Select''' or enter the Step Number if you select Approver in the Select Role field.<br/> 7. '''Enter''' a comment in the Add Note field (optional). You can see this comment under the Notes tab.<br/> 8. '''Select''' the Send Notification checkbox if you want to the user to receive a notification of the task.<br/> 9. '''Click''' "Add". The User has been added successfully message is displayed.</div> <div class="image-green-border"> </div> <div class="image-green-border">[[File:8.0-RFI-AddUser.PNG|720px|8.0-RFI-AddUser.PNG]]</div> | ||
== Sending the RFI instance for internal approval == | == Sending the RFI instance for internal approval == | ||
The RFI instance must be in Approved state before a round is created automatically and the RFI workflow can be completed. | The RFI instance must be in Approved state before a round is created automatically and the RFI workflow can be completed. | ||
| − | 1. '''Click''' the | + | 1. '''Click''' the "Send For Approval" button on the RFI Details page. The RFI instance is sent for approval to the approver(s) you have selected in the Team. |
| − | The status changes to | + | The status changes to Waiting for Approval. A task is created for each approver. |
| − | When all the approvers approve the RFI instance, the status changes to Approved. After the RFI is approved, the first round is created automatically only when the round start and end date is provided. | + | When all the approvers approve the RFI instance, the status changes to "Approved". After the RFI is approved, the first round is created automatically only when the round start and end date is provided. |
| + | <div class="image-green-border">[[File:8.0-RFI-SendforApproval.PNG|720px|8.0-RFI-SendforApproval.PNG]]</div> <div class="image-green-border"> </div> | ||
| + | == Modifying RFI == | ||
| + | <div class="image-green-border"> | ||
| + | When RFI is "In Modification", buyers can: | ||
| + | <ul style="list-style-type:circle;"> | ||
| + | <li>Add new questionnaires for rounds in any status except Closed, Evaluation Started and Evaluation Closed statuses.</li> | ||
| + | <li>Add new questions to existing questionnaire for rounds in any status except Closed, Evaluation Started and Evaluation Closed statuses.</li> | ||
| + | </ul> | ||
| − | + | The buyer can add question / questionnaires to the RFI, when the "Allow New Question During RFIphase" flag is toggled to "Yes". | |
| − | + | [[File:8.0-RFI-Modify.PNG|720px|8.0-RFI-Modify.PNG]] | |
| − | + | '''Prerequisite:''' | |
| − | + | RFI is created and is in "Approved" or any later status with suppliers added. | |
| − | + | Rounds are created. For example, a round is created with status such as "On Hold". | |
| − | + | [[File:8.0-RFI-ViewRound.PNG|720px|8.0-RFI-ViewRound.PNG]] | |
| − | + | ||
| − | + | ||
| − | + | The modification changes will be reflected in rounds which are in "Draft", "Waiting For Approval", "Approved", and "Open" status. The "Closed" round will remain unchanged. The table below indicates this with example. | |
| − | + | ||
| − | + | ||
| − | + | [[File:Q3.png|720px|Q3.png]] | |
| − | |||
| − | + | === Adding a new questionnaire === | |
| − | + | 1.'''Click '''"Modify RFx" button. The RFxstatus changes to "In Modification". | |
| + | <div class="image-green-border">[[File:8.0-RFI-Modify1.PNG|720px|8.0-RFI-Modify1.PNG]]</div> | ||
| + | 2.'''Click '''+ icon next to "Questionnaire" on left navigation pane on RFI Details page. The "Add Questionnaire" page opens. | ||
| + | <div class="image-green-border">[[File:8.0-RFI-InModification.PNG|720px|8.0-RFI-InModification.PNG]]</div> | ||
| + | 4. '''Select''' the "Questionnaire Name" that you want to add. For example, "Company Information". ''' ''' | ||
| + | <div class="image-green-border">[[File:8.0-RFI-AddQuestionnaire7.PNG|720px]]</div> | ||
| + | 5.'''Click''' "Next". The "Questions" Tab opens. | ||
| + | <div class="image-green-border">[[File:8.0-RFI-AddQuestionnaire4.PNG|720px|8.0-RFI-AddQuestionnaire4.PNG]]</div> | ||
| + | 6.'''Select''' the questions that you want to add, for example, "What is name of company CEO?", "Company Size?" | ||
| − | + | 7.'''Click''' "Save". The questions will be saved and the RFI Details page opens. | |
| − | + | Note that count is updated for Questionnaire and Questions. | |
| + | <div class="image-green-border">[[File:8.0-RFI-ViewQuestionnaire1.PNG|720px|8.0-RFI-ViewQuestionnaire1.PNG]]</div> | ||
| − | |||
| − | + | === Adding questions to existing questionnaire === | |
| − | + | ||
| − | + | ||
| − | + | You can add new questions to the existing questionnaire. | |
| − | + | '''To add new questions''' | |
| − | + | 1.'''Click '''the plus icon next to "Questionnaire" on left navigation pane on RFI Details page. The "Add Questionnaire" page opens. | |
| + | <div class="image-green-border">[[File:8.0-RFI-AddQuestions.PNG|720px|8.0-RFI-AddQuestions.PNG]]</div> | ||
| + | 2. '''Select''' the "Questionnaire Name" for which you want to add further questions. For example, "Company Information". | ||
| + | <div class="image-green-border">[[File:8.0-RFI-AddQuestionnaire7.PNG|720px]] </div> | ||
| + | 3.'''Click''' "Next". The "Questions" Tab opens. | ||
| + | <div class="image-green-border">[[File:8.0-RFI-AddQuestionnaire5.PNG|720px|8.0-RFI-AddQuestionnaire5.PNG]]</div> | ||
| + | 4.'''Select''' the questions that you want to add, for example, "Company Size" are the new questions selected. The previously added questions are: "Current Customer Count? " "Annual Revenue"? | ||
| − | + | 5.'''Click''' "Save". The questions will be saved and the RFI Details page opens. | |
| − | + | Once the Questionnaire and questions are added, the RFI is send for approval. | |
| − | + | 6.'''Click''' "Send For Approval" on RFI "Details"page and approve the RFI. | |
| − | + | [[File:8.0-RFI-SendforApproval1.PNG|720px|8.0-RFI-SendforApproval1.PNG]] | |
| − | + | 7.'''Click '''"Round" tab on RFI Details page. The round relevant to the RFI is displayed. | |
| + | <div class="image-green-border">[[File:8.0-RFI-ViewRound1.PNG|720px|8.0-RFI-ViewRound1.PNG]]</div> | ||
| + | 8.'''Click''' the View Details icon next to a round in "Draft" Status. For example, "Round One for RFI Laptop Supplier Information". The round Details page opens. | ||
| + | <div class="image-green-border">[[File:8.0-RFI-ViewRound2.PNG|720px|8.0-RFI-ViewRound2.PNG]]</div> | ||
| + | Note that count of questionnaire and questions is updated. The newly added list of questionnaire and questions are available for a round that is in "Draft" status. | ||
| + | <div class="image-green-border">[[File:8.0-RFI-ViewRound3.PNG|720px|8.0-RFI-ViewRound3.PNG]]</div> | ||
| + | Similarly, the rounds in "Waiting for Approval", "Approved", "Open" status, the newly added Questionnaire and questions are updated and available. (Except "Closed" round) | ||
| + | <div class="image-green-border">[[File:8.0-RFI-Round-WaitingforApproval.PNG|720px|8.0-RFI-Round-WaitingforApproval.PNG]]</div> | ||
| + | The count of Questionnaire and questions is updated for round in "Approved" status. | ||
| − | + | Similarly, the count of Questionnaire and questions is updated for round in Open status. | |
| + | <div class="image-green-border">[[File:8.0-RFI-ViewRound4.PNG|720px|8.0-RFI-ViewRound4.PNG]]</div> | ||
| + | Note that newly added questionnaire and questions is not updated for the round in Closed status and it remains unchanged. | ||
| + | <div class="image-green-border">[[File:8.0-RFI-ViewRound5.PNG|720px|8.0-RFI-ViewRound5.PNG]] </div> | ||
| − | + | == Working with Rounds == | |
| − | + | One cycle of seeking responses from suppliers and evaluating them is referred to as a round. A complete Sourcing event may comprise of multiple rounds. The first round is created automatically (if the start and end dates are entered) as soon as the RFI instance is approved. You can see the round on the RFI Details page. You must open the round instance and fill in additional details. There can be multiple rounds for a single RFI instance. | |
| − | + | === Starting the scheduled Rounds === | |
| − | + | You can schedule a round by entering the Round Start Date and End Date when creating the RFI instance. The buyer must '''click''' the "Initiate Round" button on the Round Details page to start the round. | |
| − | + | To start the round: | |
| − | + | 1. '''Click '''"Round" on the RFI Details page. The auto created round instance is displayed. | |
| + | <div class="note-box">'''Note''': Only the first round is created automatically. The buyers must create the other rounds manually as required. </div> <div class="image-green-border">[[File:8.0-StartRound.PNG|800px|8.0-StartRound.PNG]]</div> <div class="image-green-border"> </div> <div class="image-green-border">2. '''Click''' the View Details icon. The Round’s Details page opens with the round in "Draft" state.</div> | ||
| + | 3. '''Click''' the "Initiate Round" button to start the Round. The status of RFI changes to Round(s) Ongoing after the round is approved and published. | ||
| + | <div class="image-green-border">[[File:8.0-RFI-InitiateRound.PNG|720px|8.0-RFI-InitiateRound.PNG]]</div> <div class="image-green-border"> </div> <div class="note-box">'''Note''': When the round is approved the status changes to Approved and Scheduled. When the current date and time is equal to start date of the round, the status changes to Published.</div> | ||
| − | + | === Creating Rounds === | |
| − | + | The buyer can also create a round manually if they need to conduct multiple rounds with the supplier. The buyer can create the round manually only if the RFI instance is in Approved, Round(s) Ongoing and Round (s) Closed state. | |
| − | + | To create a round (manually): | |
| − | + | 1. '''Click''' the plus icon under the "Round" tab on the RFI Details page. The "Create Agreement RFI Round" page opens. | |
| + | <div class="image-green-border">[[File:8.0-RFI-CreateRound.PNG|720px|8.0-RFI-CreateRound.PNG]]</div> <div class="image-green-border"> </div> <div class="image-green-border">2. '''Click''' the "Organization Unit" icon to select the Organization Unit.</div> | ||
| + | 3. '''Enter''' an appropriate name for the round. | ||
| − | + | 4. '''Enter''' relevant details in the "Description" field. | |
| − | + | 5. '''Select''' a "Round Start" Date. This field is already populated with the current date. You can select a different date and time if required. | |
| − | + | ||
| − | ''' | + | 6. '''Select '''a "Round End Date" and time. |
| + | <div class="note-box">'''Note''': The date and time is displayed based on the user’s locale settings. When the user with different locale views the RFI, the date and time are converted to their locale.</div> <div class="image-green-border"> </div> <div class="image-green-border">[[File:8.0-RFI-CreateRound1.PNG|550px|8.0-RFI-CreateRound1.PNG]]</div> <div class="image-green-border"> </div> <div class="image-green-border">7. '''Click''' "Next". The "Select Template" page opens.</div> | ||
| + | 8. '''Select''' the Template from the available list or upload a new template from your computer and '''click''' "Next". The "Verify" page opens. Verify all the information. | ||
| + | <div class="image-green-border">[[File:8.0-RFI-CreateRound2.PNG|450px|8.0-RFI-CreateRound2.PNG]]</div> <div class="image-green-border"> </div> <div class="image-green-border">9. '''Click''' the "Create Round" button. The Round’s Details page opens. The round is now created in Draft state.</div> <div class="image-green-border"> </div> <div class="image-green-border">[[File:8.0-RFI-CreateRound3.PNG|450px|8.0-RFI-CreateRound3.PNG]]</div> <div class="image-green-border"> </div> <div class="image-green-border">10. '''Click''' the "Open" button to begin the Round. The status of the round changes to "Open". </div> | ||
| + | | ||
| − | + | == Working with Questions == | |
| − | + | A question is the information asked by buyers about the products or services that they want to buy to the prospective suppliers before purchasing them. The supplier can view the questions that were submitted in the previous rounds if the buyer selects Yes in the Copy Questions and Supplier Responses option when creating the RFI. <br/> Depending upon how the RFI instance is configured in the organization, suppliers must sign all the prerequisite agreements before submitting the responses to the questions asked by buyers. The suppliers won’t be able to view the RFI instance until the prerequisite agreement is in Executed state.<br/> | |
| − | + | === Submitting Responses === | |
| − | + | Supplier can upload, edit and then submit the responses for the questions. | |
| − | + | To submit responses: | |
| − | 5. '''Click''' '' | + | 1. '''Click''' the "Sourcing" tile from the "Home" page after logging on to ICI. The "Sourcing" page opens. This page displays a list of all the RFI instances that the supplier is a part of. |
| + | <div class="image-green-border">[[File:8.0-RFI-SupplierSide.PNG|720px|8.0-RFI-SupplierSide.PNG]]</div> <div class="image-green-border"> </div> <div class="image-green-border">2. '''Click''' the View Details icon next to the questionnaire that you want to respond to. The "Terms For Participation" window opens where the supplier must accept or decline them. </div> <div class="image-green-border"> </div> <div class="note-box">'''Note''': The supplier must accept the terms and conditions to participate in the RFI and provide response to buyers if they are added by the buyer when creating the RFI.</div> | ||
| + | | ||
| + | <div class="image-green-border">[[File:8.0-RFI-SupplierSide1.PNG|720px|8.0-RFI-SupplierSide1.PNG]]</div> | ||
| + | 3. '''Click''' "Accept" on "Terms For Participation" window. The RFI Details page opens with the RFI in Round(s) Ongoing state. | ||
| + | <div class="image-green-border">[[File:8.0-RFI-Terms of Participation.PNG|450px|8.0-RFI-Terms of Participation.PNG]]</div> | ||
| + | 4. '''Click''' "Round" under Round tab. The list of Rounds are displayed in the grid along with its details such as "Round Name", "Round Code" etc. | ||
| + | <div class="image-green-border">[[File:8.0-RFI-Round-SupplierSide.PNG|720px|8.0-RFI-Round-SupplierSide.PNG]]</div> <div class="image-green-border"> </div> <div class="image-green-border">5. '''Click''' the View Details icon. The Round Details window opens. It displays the information of the questionnaire and questions given by the buyer. </div> <div class="image-green-border"> </div> <div class="image-green-border">[[File:8.0-RFI-Round-SupplierSide.PNG|720px|8.0-RFI-Round-SupplierSide.PNG]]</div> <div class="image-green-border"> </div> <div class="image-green-border">6. '''Click''' "Responses" on Round Details page. The list of responses is displayed.</div> | ||
| + | 7. '''Click''' the View Details icon next to the RFI Response. The "RFI Response" page opens. | ||
| + | <div class="image-green-border">[[File:8.0-RFI-RoundResponse.PNG|720px|8.0-RFI-RoundResponse.PNG]]</div> | ||
| + | 8. '''Click''' plus icon next to Supplier Documents if you want to add any supporting documents when responding to the RFI. The "Create Association" page opens. | ||
| + | <div class="image-green-border">[[File:8.0-RFI-RoundResponse-Documents.PNG|720px|8.0-RFI-RoundResponse-Documents.PNG]]</div> | ||
| + | 9. '''Enter''' the information on Create Association page and then '''select''' the file from your computer. | ||
| − | + | 10. '''Click''' "Create". The count of Supplier Documents is displayed in the left navigation pane on RFI Details page of the supplier. | |
| − | <div class=" | + | <div class="image-green-border">[[File:8.0-RFI Response-CreateAssociation.PNG|550px|8.0-RFI Response-CreateAssociation.PNG]]</div> |
| − | + | 11. '''Click''' "Question Response". The list of questions asked by the buyer is displayed. | |
| + | <div class="image-green-border">[[File:8.0-RFI-View Supplier Response.PNG|720px|8.0-RFI-View Supplier Response.PNG]]</div> <div class="image-green-border"> </div> <div class="image-green-border">You can respond to questions asked by the buyer in the following way:</div> | ||
| + | *Using Microsoft Excel | ||
| + | *Using ICI | ||
| − | + | '''Using Microsoft Excel''' | |
| − | + | To submit responses using Excel: | |
| − | + | 1. '''Click '''the three dots icon > "Export" > "Excel" on the page that shows the list of questions to download the questions in an Excel sheet. | |
| + | <div class="image-green-border">[[File:8.0-RFI-Response-Export To Excel.PNG|720px|8.0-RFI-Response-Export To Excel.PNG]]</div> <div class="image-green-border"> </div> <div class="image-green-border">[[File:8.0-RFI-SubmitResponses Using Excel.PNG|720px|8.0-RFI-SubmitResponses Using Excel.PNG]]</div> <div class="image-green-border"> </div> <div class="image-green-border">2. '''Click''' "Enable Editing" to add the response in the Excel sheet.</div> | ||
| + | 3. '''Enter''' the responses in the Response column and save the Excel sheet. | ||
| − | After submitting responses, suppliers cannot edit them. To edit the responses, suppliers must '''click''' | + | 4. '''Click '''the three dots icon > "Upload Template". The "Upload Document" window opens. |
| + | <div class="image-green-border">[[File:8.0-RFI-UploadResponse.PNG|720px|8.0-RFI-UploadResponse.PNG]]</div> <div class="image-green-border"> </div> <div class="image-green-border">5. '''Click''' "Select File" to select the file from your computer.</div> | ||
| + | 6. '''Click''' "Upload File" to upload the file. The Upload Summary is displayed showing the number of records that were processed successfully, deleted and failed records. | ||
| + | <div class="note-box">'''Note''': You can also download the log file to check the errors if any by clicking the Click here to download the log file. </div> | ||
| + | 7. '''Click''' Close icon on the "Upload Document" window. The RFI Response page opens. | ||
| + | |||
| + | 8. '''Click''' "Submit". The "Please Confirm" window opens. | ||
| + | <div class="note-box">'''Note''': You should click on submit only after you have entered values for all items. </div> <div class="image-green-border"> </div> <div class="image-green-border">[[File:8.0-RFI-Submit Response.PNG|720px|8.0-RFI-Submit Response.PNG]]</div> <div class="image-green-border"> </div> <div class="image-green-border">9. '''Click''' "Yes". The status of RFI response changes to Submitted.</div> <div class="image-green-border"> </div> <div class="image-green-border">[[File:8.0-RFI-Submit Response-Confirmation.PNG|300px|8.0-RFI-Submit Response-Confirmation.PNG]]</div> <div class="image-green-border"> </div> <div class="image-green-border">[[File:8.0-RFI Response-Submitted.PNG|720px|8.0-RFI Response-Submitted.PNG]]</div> | ||
| + | After submitting responses, suppliers cannot edit them. To edit the responses, suppliers must '''click''' "Withdraw". This changes the status of the Questionnaire to Withdrawn. Suppliers can revert withdrawal by clicking Revert Withdrawal. | ||
To withdraw the response: | To withdraw the response: | ||
| − | 1. '''Click''' | + | 1. '''Click''' "Recall Response" on the RFI Response Details page. The status of the RFI Response changes to "Draft". |
| − | + | <div class="image-green-border">[[File:8.0-RFI-WithdrawResponse.PNG|720px|8.0-RFI-WithdrawResponse.PNG]]</div> <div class="image-green-border"> </div> <div class="image-green-border">The status of RFI Response changes to "Draft".</div> <div class="image-green-border"> </div> <div class="image-green-border">[[File:8.0-RFI-WithdrawnResponse.PNG|720px|8.0-RFI-WithdrawnResponse.PNG]]</div> <div class="image-green-border"> </div> <div class="image-green-border">You can revert withdrawal by clicking "Submit". The status of the RFI Response changes to "Submitted".</div> <div class="image-green-border"> </div> | |
| − | + | '''Using ICI''' | |
| − | + | ||
| − | + | ||
| − | + | ||
| − | The status of RFI Response changes to | + | |
| − | + | ||
| − | You can revert withdrawal by clicking | + | |
| − | + | ||
| − | + | ||
| − | + | ||
| − | + | ||
| − | + | ||
| − | + | ||
| − | + | ||
| − | + | ||
| − | + | To submit responses using ICI: | |
| − | + | 1. '''Click''' "RFI Question Response" on RFI Response Details page. The list of questions are displayed in the right pane of the page. | |
| + | <div class="image-green-border">2. '''Click''' "View Details" icon next to the question for which you want to respond. The page displaying the question and response you want to provide opens.</div> <div class="image-green-border"> </div> <div class="image-green-border">[[File:8.0-RFI-WithdrawnResponse.PNG|720px|8.0-RFI-WithdrawnResponse.PNG]]</div> | ||
| + | 3. '''Click '''"Edit" on the RFI Response Details page to open the "Edit Associated Document"- RFI Question Response page. | ||
| − | + | 4. '''Enter''' the response in "Question Response" field and '''click''' "Update". The RFI Question Response Details opens. | |
| + | <div class="image-green-border">[[File:8.0-RFI-SubmitResponses Using ICI.PNG|520px|8.0-RFI-SubmitResponses Using ICI.PNG]]</div> | ||
| + | 4. '''Click''' "Submit" on the RFI Response Details page. Repeat the same steps from Using Microsoft Excel section to submit and withdraw the responses. | ||
| + | <div class="image-green-border">[[File:8.0-RFI-Submit Response.PNG|720px|8.0-RFI-Submit Response.PNG]]</div> <div class="image-green-border"> </div> | ||
=== Response Analysis === | === Response Analysis === | ||
| Line 277: | Line 327: | ||
To analyze supplier response: | To analyze supplier response: | ||
| − | 1. '''Click''' the | + | 1. '''Click''' the "Download Response Analysis" button on the RFI Details page. An excel sheet containing the question responses is downloaded. |
| − | 2. '''Open''' the excel sheet. You can view the all the data collected from the supplier responses such as | + | 2. '''Open''' the excel sheet. You can view the all the data collected from the supplier responses such as Supplier ID, Item Name, Item Description, etc. |
| + | <div class="image-green-border">[[File:7.10-ViewResponsesinExcel.png|720px|7.10-ViewResponsesinExcel.png]]</div> <div class="image-green-border"> </div> <div class="image-green-border"> </div> <div class="image-green-border"> </div> <div class="image-green-border"> </div> <div class="image-green-border"> </div> <div class="image-green-border"> </div> <div class="image-green-border">'''Related Topics''': [[Agreement_Management|Agreement Management]] | [[ICI_Sourcing_App|ICI Sourcing App]] | [[Working_with_RFx|Working with RFx]] </div> <div class="image-green-border"> </div> | ||
Latest revision as of 18:35, 23 May 2022
Contents
Working with RFI Instances
A Request for Information (RFI) is a set of questions shared with potential suppliers to assess their ability to fulfil certain requirements to provide goods or services. The purpose of an RFI is to solicit information from potential suppliers for buying goods or services. This is done in the form of a questionnaire with specific and general answers. The information provided by prospective suppliers are used for judging their technical capabilities, financial stability, cultural compatibility and suitability for the buying requirements of the organization. It is recommended to have specific qualification criteria for prospective supplier to compete for a business requirement of the buyer. For example, Company size in terms of revenue, technical certifications, locations and so on. An RFI does not solicit any specific proposal for any purchase or pricing information. The outcome of an RFI is a rating given to the supplier based on qualification criteria set by the buyer and not awarding of business.
Creating the RFI Instances
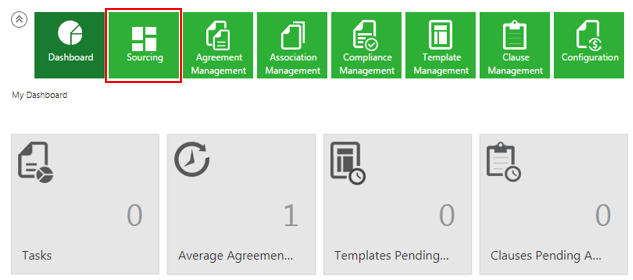
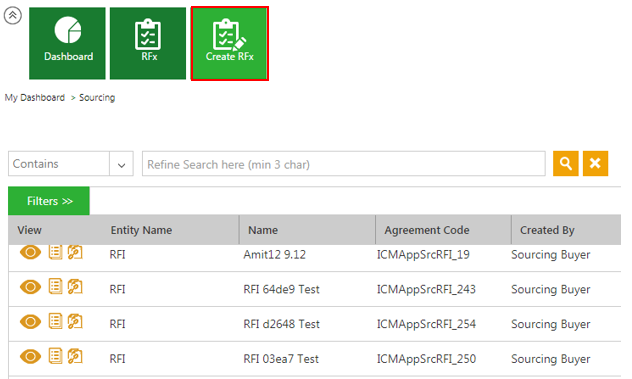
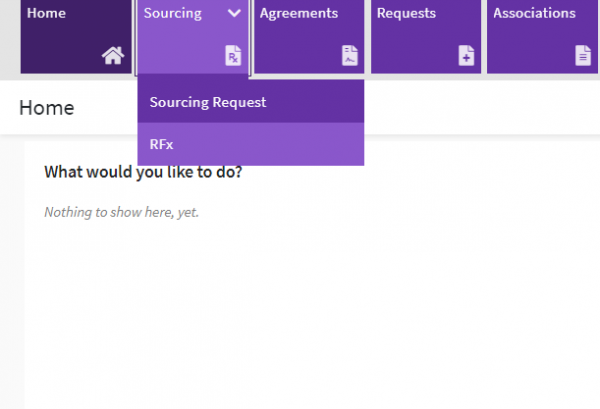
1. Click the "Sourcing" tile from the "Home" page. The "Sourcing" page opens. A list of all the RFx instances is displayed.
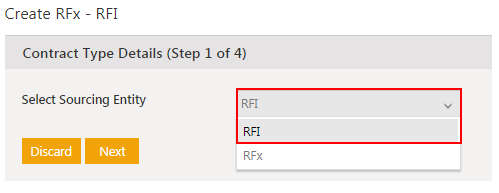
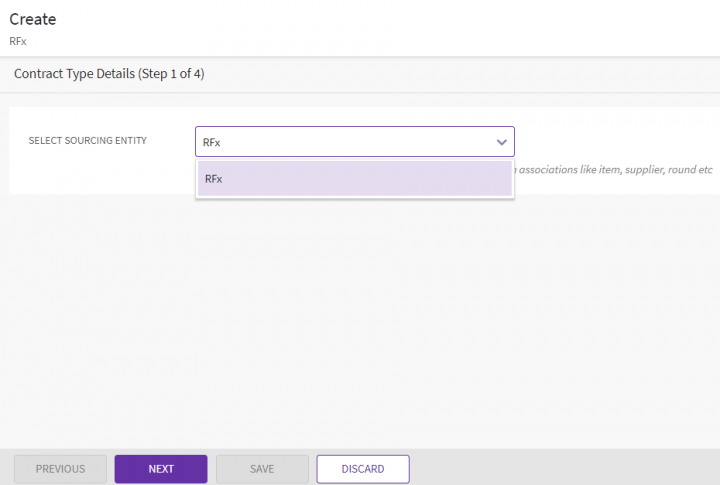
3. Select a Sourcing Entity from the "Select Sourcing Entity" drop-down in the "Contract Type Details" (Step 1 of 4) section. The contract type is configured in the system with default Attributes.
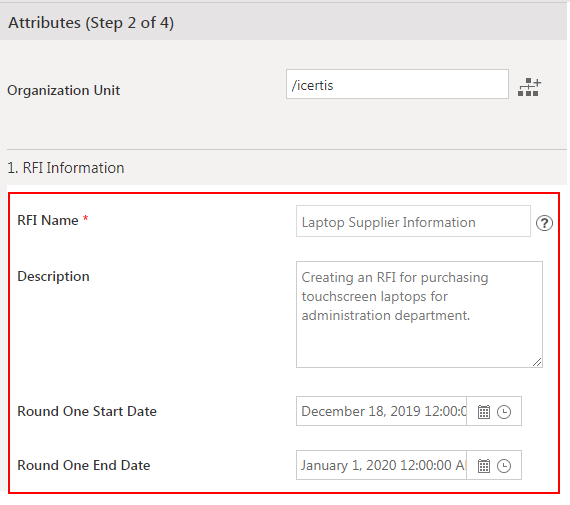
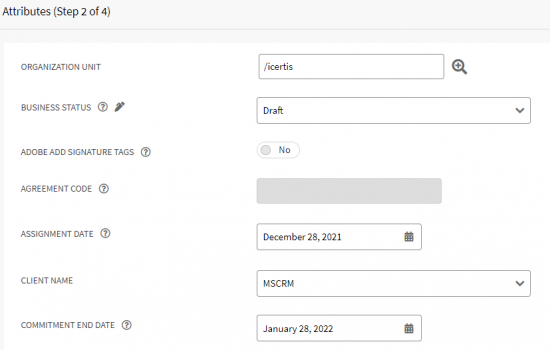
5. Select or enter the values for all the required Attributes in the RFI Information group:
- Enter the RFI Name. For example, "Laptop Supplier Information".
- Enter the information of the RFI instance in the "Description" field.
- Select the "Round One Start Date" and "Round One End Date". When you enter the dates, a round is created automatically as soon as the RFI instance is approved. If the round start and end dates are not provided, the round will not be created for the RFI instance.
- Select "Yes" or "No" for the following Configuration settings as per your requirement:
- Allow Foreclosure of Rounds: Select "Yes" if you want to allow closing the round before the selected round end date. This displays the Close Round button on the Round Details page to close the round manually before scheduled Round end date and time.If you select "No", then the round will be closed automatically at the selected round end date and time. The default value for this option is set to "Yes".
- Copy Questions and Supplier Responses from previous Round: Select "Yes" if you want to allow copying questions and supplier responses from previous rounds to the new round. The default value for this option is set to Yes.
- Allow new supplier during RFI phase: Select "Yes" if you want to allow adding a new supplier(s) during the entire RFI lifecycle. However, the newly added supplier(s) can participate in a new round only, not in an ongoing round. The default value for this option is set to Yes.
- Allow new question during RFI phase: Select "Yes" if you want to allow adding a new question during the RFI lifecycle. However the newly added question (s) can be part of the round only before it starts and not in an ongoing round. The default value for this option is set to Yes.
- Allow Surrgoate Responses: Select "Yes" if you want to allow buyers submitting responses on behalf of the suppliers. The default value for this option is set to "No".
- Select the following contracts (if applicable) by clicking the drop-down arrow or the Lookup Search icon:
- Associate Contracts: Sourcing app allows the buyers to create contracts such as NDA, for all the suppliers selected when creating RFI. A separate contract will be created for each supplier.
- Mandatory Contracts: The value in this option will be populated automatically based on the value selected in the earlier option. You cannot select any value in this option if you don’t select anything in the Associate Contracts option.
- Prerequisite Contracts: The Supplier can access the RFI instance only after it is in Approved state. After the Round is started, a Terms for Participation window is displayed to the supplier with an option to accept or decline. The Suppliers can access the RFI only after they sign the Prerequisite Contract after accepting the terms for participation. If the Suppliers do not sign the contracts a message is displayed by ICI, along with a list of documents asking the suppliers to complete the documents before accessing the RFI.The values selected in these fields are populated on the RFI Details page under the Agreements tab.
The values selected in these fields are populated on the RFI "Details" page under "Agreements" tab.
RFI Details page
Buyers can view the current status and details of the RFI. Buyers can also perform a variety of actions based on the current state of the RFI.
Here is a brief description of the options in the left navigation pane of RFI Details page.
- RFI Information: This section displays the basic details of the current RFI instance. It has the following sub-sections.
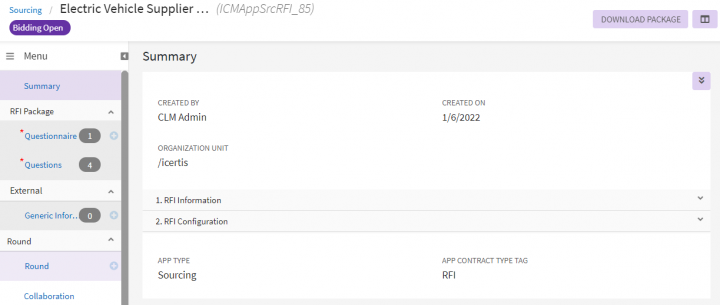
- Summary: Displays the name of the RFI instance (that is added while creating) and who created it, and RFI instance details.
- Details: Displays the details specified while creating the RFI instance.
- Preview: Displays how the RFI document would actually look. Click the click here in To see full document click here to download and view the full document in pdf format.
- RFI Package: This section displays the following details.
- Questionnaire: Click this option to view the list of questionnaires associated with the RFI. Click the plus icon next to Questionnaire on RFI Details page to add a new questionnaire. You can select or remove questionnaire from the available list of questionnaires. It is mandatory to add a questionnaire along with questions to the RFI before sending the RFI for approval.
- Question: Click this option to view the list of questions associated with the questionnaire and RFI.
- Internal Attachments: Displays the list of existing internal attachments associated with the RFI. Internal attachments are associated documents uploaded by the buyers and only available to the buyer team. Click the plus icon next to internal attachments to add new to the list.
- External Attachments: Displays the list of existing external attachments associated with the RFI. External attachments are associated documents uploaded by the buyers and available to both buyers and suppliers. Click the plus icon next to external attachments to add new to the list. For example, the bulk agreements such as NDA and Warranty agreements are displayed under this section.
- Supplier Information: Displays the list of existing suppliers and allows buyers to add new suppliers along with their contact information.
- Suppliers: Displays the list of suppliers added to the RFI created by the buyer. Click the plus icon next to Suppliers to add a new supplier.
- Supplier Contacts: Displays the list of relevant supplier contacts that are populated automatically after you select the suppliers in the previous step.
- Agreements: Displays all the agreements that were selected initially when creating the RFI.
- Collaboration: Allows the internal or external team members to communicate with other internal or external team members by creating topics and posting messages in it.
- Round: Displays the list of rounds (automatic and manual) associated with the RFI along with their current state. Click the plus icon next to Round to add a new round.
- Team: Displays the members added to the team for this RFI instance. Click the plus icon to add new team members to the RFI.
- Notes: Displays the additional information about the RFI if it is added.
- History: Displays how the RFI has progressed till now. The actions performed on the RFI instance are displayed under History in the left navigation pane on RFI "Details" page.
Buyers can perform the following actions from the RFI "Details" page:
- Download RFI Document: Click this button to download the RFI document. The downloaded document is based on the template selected while creating the RFI instance.
- Edit: Click this button to go back and make changes to the RFI that you created.
- Send for Approval: Click this button to send the RFI instance for approval.
- Download Package: Click this button to download the RFI instance along with all its associations. You can select specific associations that you want to download or select the RFI instance checkbox to download the RFI package. RFI package is downloaded as a zip file that contains all the attachments relevant to the RFI. When the zip file is exported on user’s local machine, a folder structure is created that resembles the RFI structure, and the files are located in the respective locations.
- Delete: Click this button to delete the RFI instance. After deleting the RFI instance, the Sourcing page opens and the deleted RFI will not be available on the user interface.
Adding Questionnaires
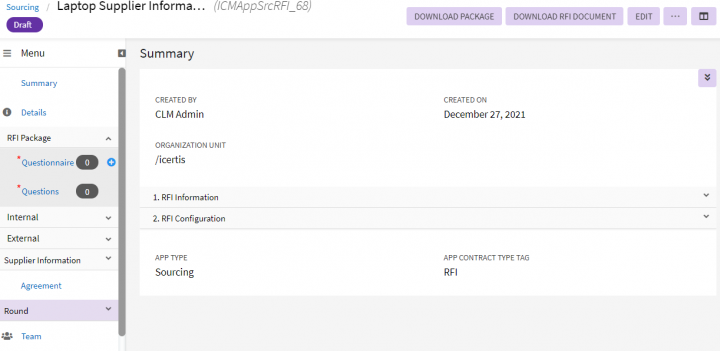
You can add questionnaires at any stage of the RFI instance depending upon RFI configuration settings. Questionnaires are a set of questions that the buyer shares with potential suppliers who can fulfil the requirement of providing goods or services to the buyers. When you create the RFI instance, the RFI Details page opens with the RFI status displayed as Draft. You can use the left navigation pane to add one or more questionnaires.
To add questionnaires:
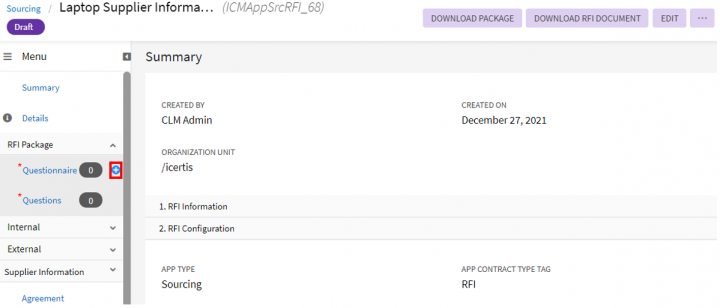
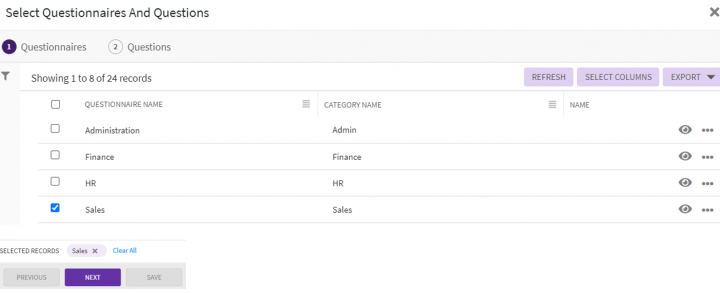
1. Click the plus button next to Questionnaire under the RFI Package tab. The "Questionnaires" window opens.
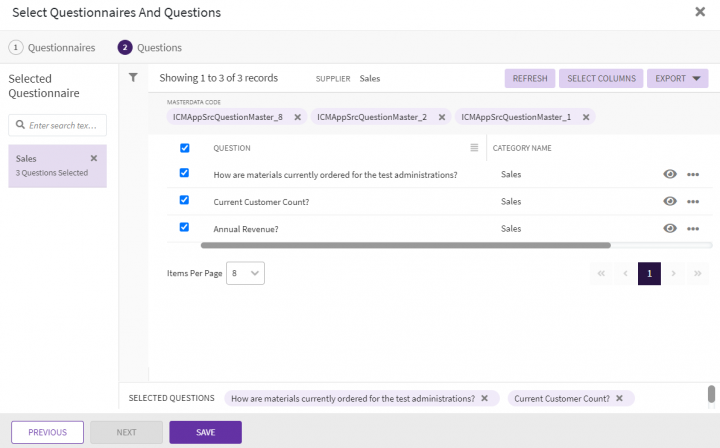
3. Click "Next". The "Questions" tab opens displaying the list of questions associated with the questionnaire.
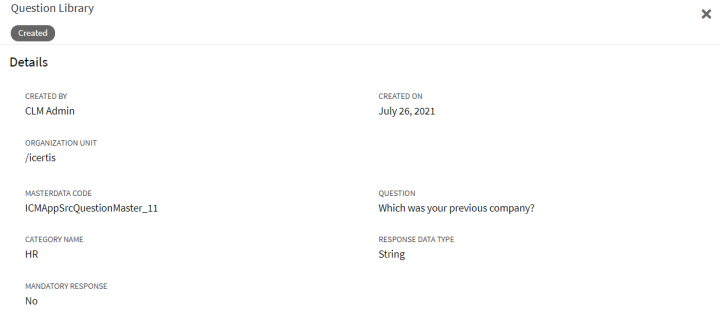
4. Click the View Details icon next to the Question to view the question information.
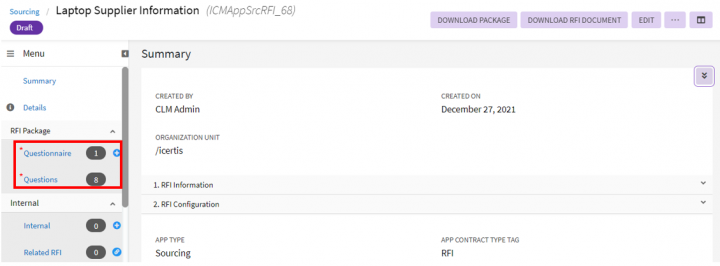
6. Click "Save". The selected questionnaire and question (s) are added to the RFI instance. The count is updated under the "RFI Package" tab.
Creating Bulk Agreements
The Sourcing App offers you a convenient way of creating bulk agreements with the suppliers, without having to move out of RFI instance that you are working on. The agreements must be already configured in ICI. These agreements may be made mandatory for the supplier to sign before the supplier can participate in the RFI. The RFI displays all the agreements created from the RFI and they have all the agreement information. This allows the buyer to conveniently navigate between the RFI and the agreement associated with the RFI.
To create an agreement:
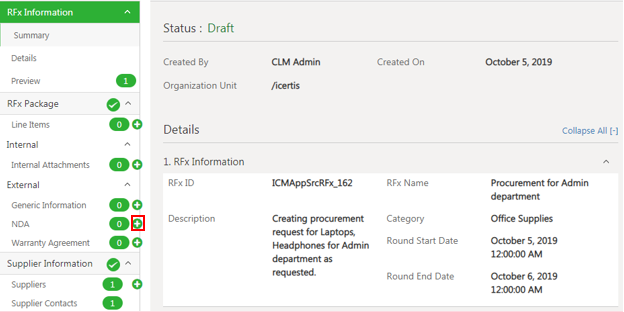
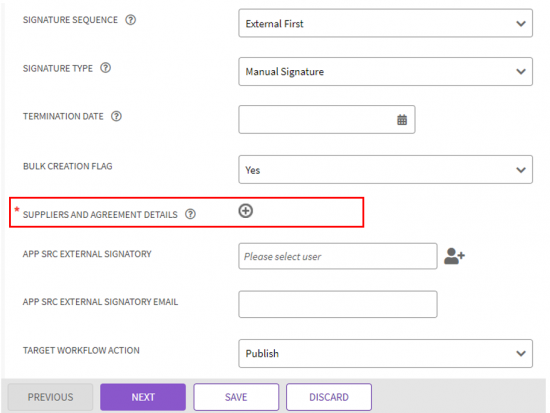
1. Click the "Create Association" icon next to the agreements in the left navigation pane on the RFI Details page. For example, NDA, "Warranty Agreement".
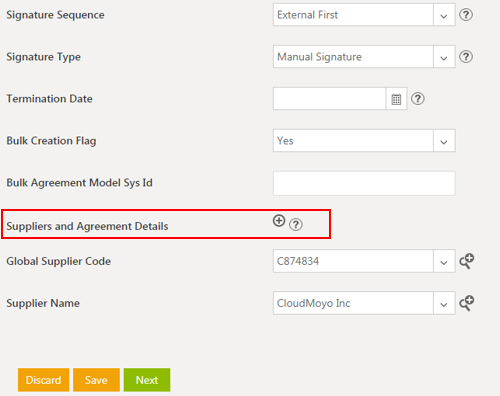
3. Enter values for all the attributes, some of which may be mandatory.
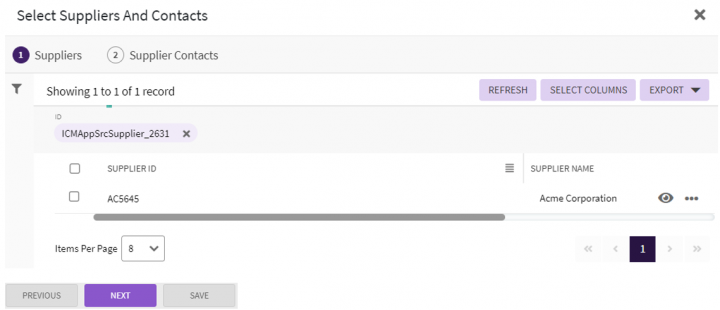
4. Click the Select Multiple Suppliers icon next to Suppliers and Agreement Details. The "Suppliers" page opens.
5. Repeat steps 2 to 6 from the Selecting Suppliers section to add a supplier.
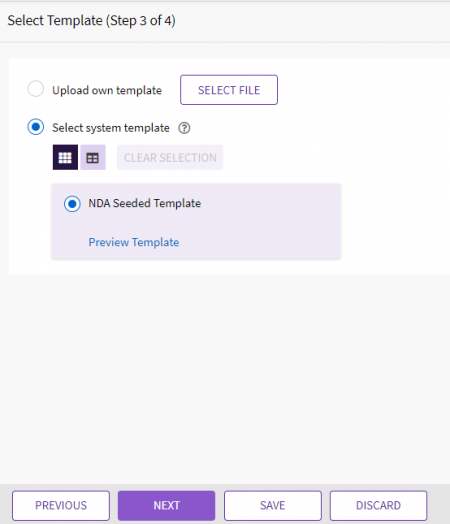
6. Click "Next". The "Select Template (Step 3 of 4)" page opens.
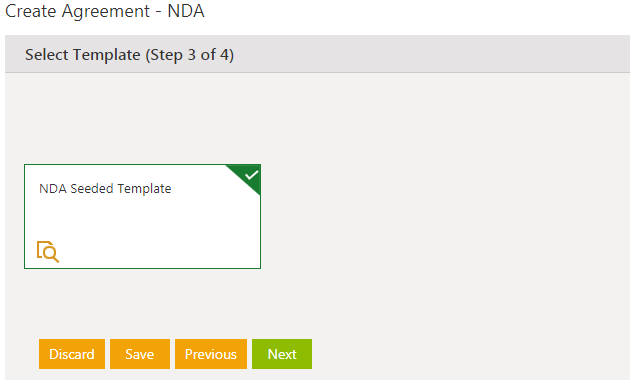
7. Select a Template.
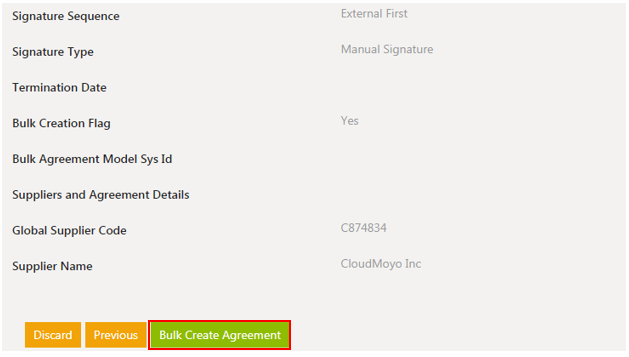
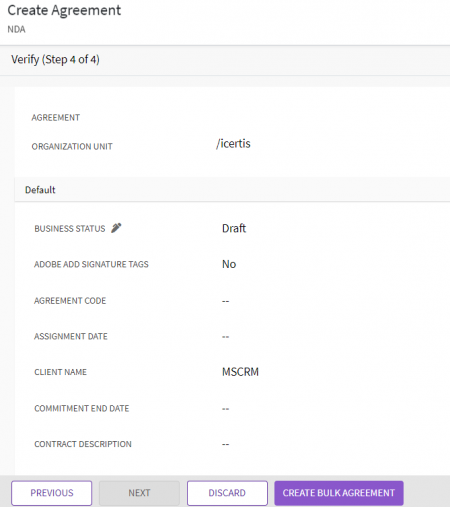
8. Click "Next". The "Verify" page opens. Verify all the information you have entered.
10. Click the "NDA" icon on the RFI Details page to view the list of NDA agreements relevant to the RFI.
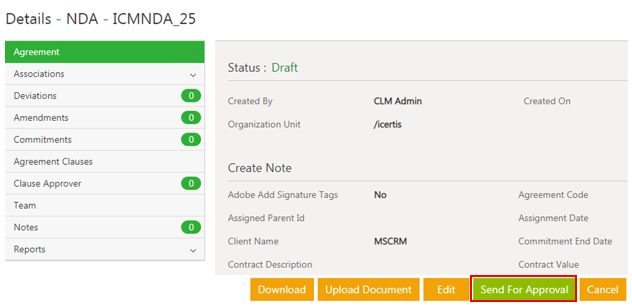
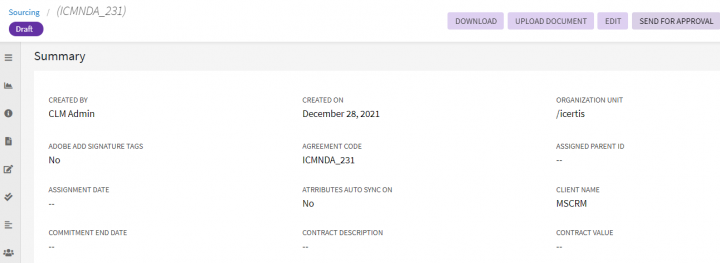
11. Click the "View Details" icon next to the NDA. The NDA’s "Details" page opens with the NDA in the "Draft" state.
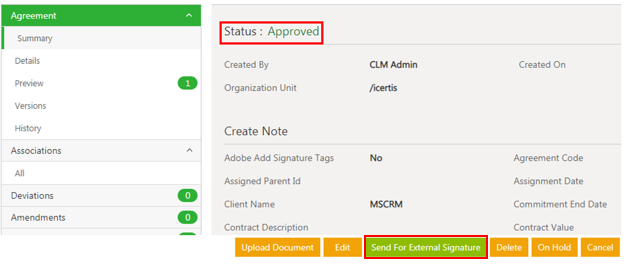
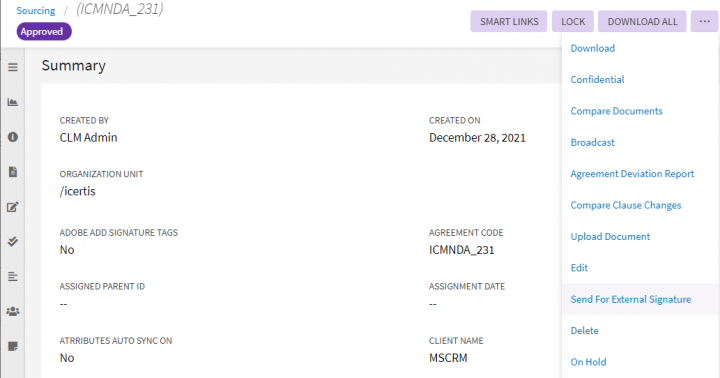
11. Click the "Send For External Signature" button on the Details page. The agreement is sent to the supplier(s) for signatures. The status of the agreement changes to "Executed" when all the suppliers sign the NDA.
Adding Team members in RFI
A team of Approvers, Reviewers, and Observers can be added to the RFI instance for completing the workflow.
To add team members:
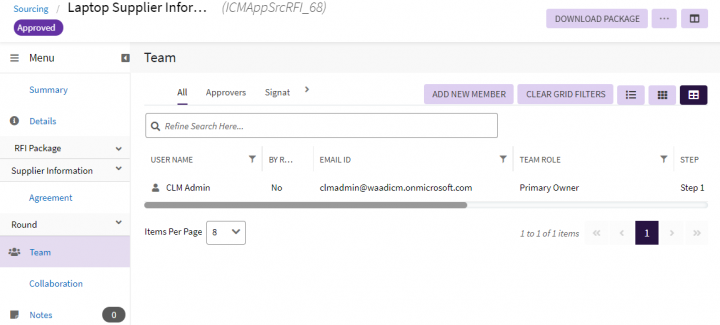
1. Click the "Team" tab on the RFI Details page. The "Team" page opens in the right pane.
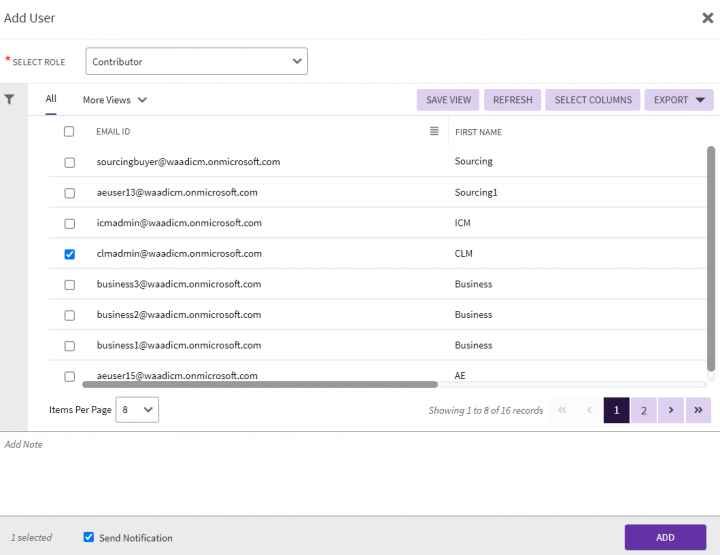
2. Click the "Add New Member" icon. The "Add User" window opens.
- Save View: Allows creating a saved search from the list of users.
- Refresh: Allows refreshing the list of users on the "Add User" window.
- Select Columns: Allows selecting specific columns to be displayed on the "Add User" window.
- Export: Allows exporting the list of users in Excel or CSV format.
3. Enter the search term in the Search User field to search for a desired user.
5. Select a Role. For example, Approver, Business Owner, Observer, etc.
6. Select or enter the Step Number if you select Approver in the Select Role field.
7. Enter a comment in the Add Note field (optional). You can see this comment under the Notes tab.
8. Select the Send Notification checkbox if you want to the user to receive a notification of the task.
9. Click "Add". The User has been added successfully message is displayed.
Sending the RFI instance for internal approval
The RFI instance must be in Approved state before a round is created automatically and the RFI workflow can be completed.
1. Click the "Send For Approval" button on the RFI Details page. The RFI instance is sent for approval to the approver(s) you have selected in the Team.
The status changes to Waiting for Approval. A task is created for each approver.
When all the approvers approve the RFI instance, the status changes to "Approved". After the RFI is approved, the first round is created automatically only when the round start and end date is provided.
Modifying RFI
When RFI is "In Modification", buyers can:
- Add new questionnaires for rounds in any status except Closed, Evaluation Started and Evaluation Closed statuses.
- Add new questions to existing questionnaire for rounds in any status except Closed, Evaluation Started and Evaluation Closed statuses.
The buyer can add question / questionnaires to the RFI, when the "Allow New Question During RFIphase" flag is toggled to "Yes".
Prerequisite:
RFI is created and is in "Approved" or any later status with suppliers added.
Rounds are created. For example, a round is created with status such as "On Hold".
The modification changes will be reflected in rounds which are in "Draft", "Waiting For Approval", "Approved", and "Open" status. The "Closed" round will remain unchanged. The table below indicates this with example.
Adding a new questionnaire
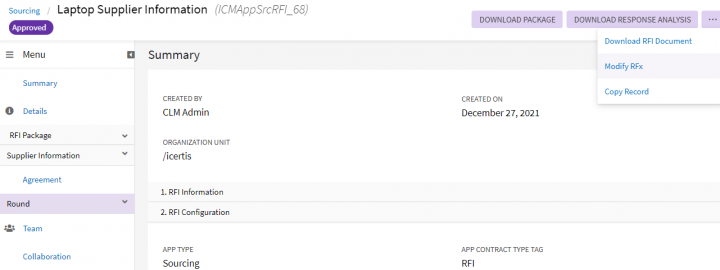
1.Click "Modify RFx" button. The RFxstatus changes to "In Modification".
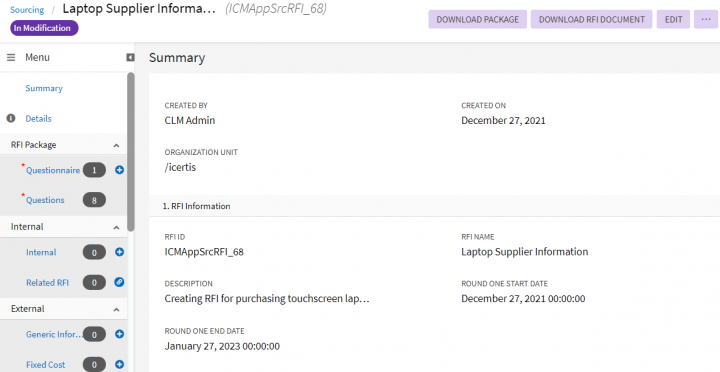
2.Click + icon next to "Questionnaire" on left navigation pane on RFI Details page. The "Add Questionnaire" page opens.
4. Select the "Questionnaire Name" that you want to add. For example, "Company Information".
5.Click "Next". The "Questions" Tab opens.
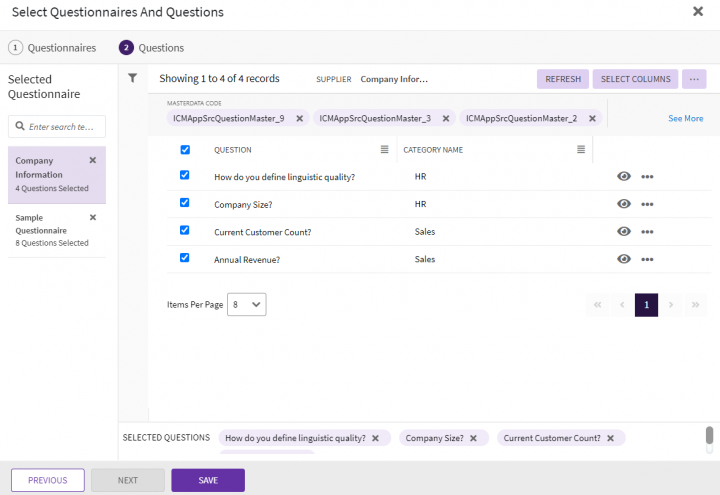
6.Select the questions that you want to add, for example, "What is name of company CEO?", "Company Size?"
7.Click "Save". The questions will be saved and the RFI Details page opens.
Note that count is updated for Questionnaire and Questions.
Adding questions to existing questionnaire
You can add new questions to the existing questionnaire.
To add new questions
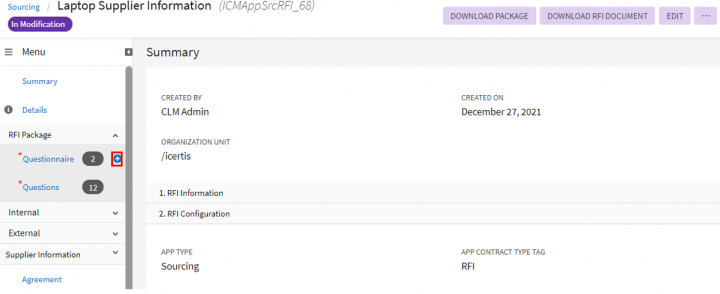
1.Click the plus icon next to "Questionnaire" on left navigation pane on RFI Details page. The "Add Questionnaire" page opens.
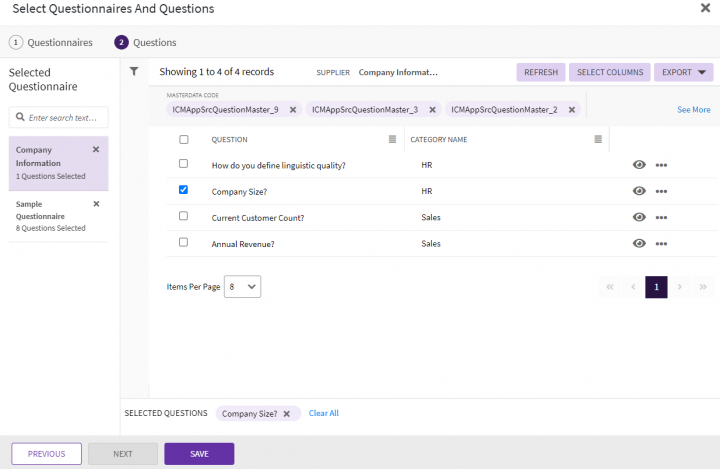
2. Select the "Questionnaire Name" for which you want to add further questions. For example, "Company Information".
3.Click "Next". The "Questions" Tab opens.
4.Select the questions that you want to add, for example, "Company Size" are the new questions selected. The previously added questions are: "Current Customer Count? " "Annual Revenue"?
5.Click "Save". The questions will be saved and the RFI Details page opens.
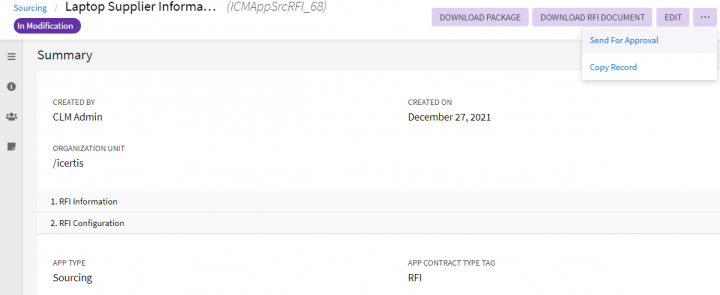
Once the Questionnaire and questions are added, the RFI is send for approval.
6.Click "Send For Approval" on RFI "Details"page and approve the RFI.
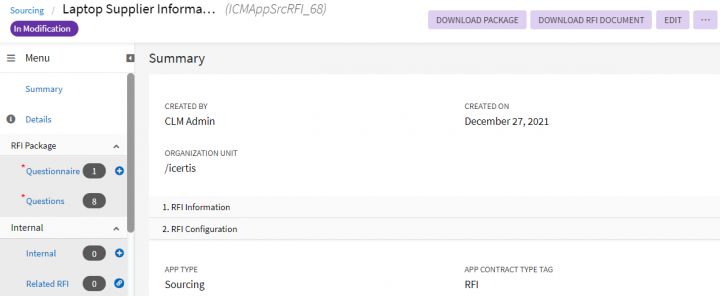
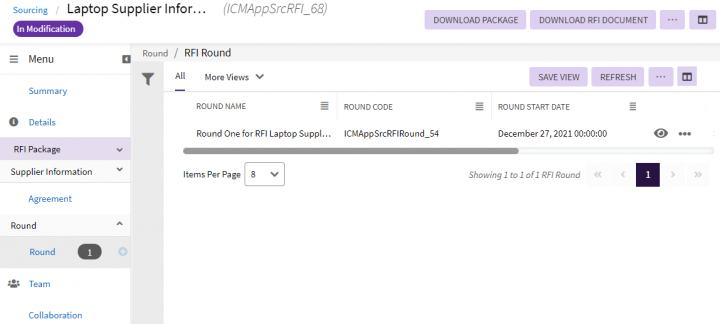
7.Click "Round" tab on RFI Details page. The round relevant to the RFI is displayed.
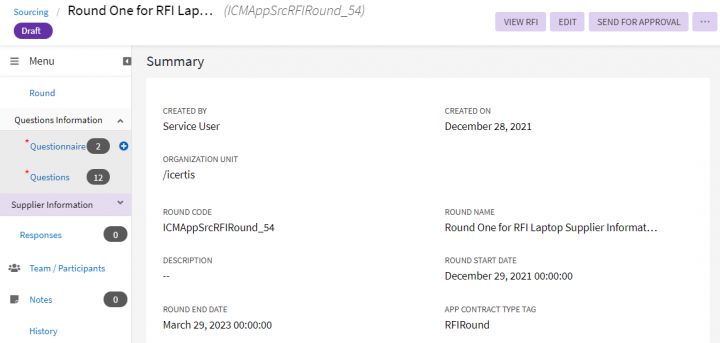
8.Click the View Details icon next to a round in "Draft" Status. For example, "Round One for RFI Laptop Supplier Information". The round Details page opens.
Note that count of questionnaire and questions is updated. The newly added list of questionnaire and questions are available for a round that is in "Draft" status.
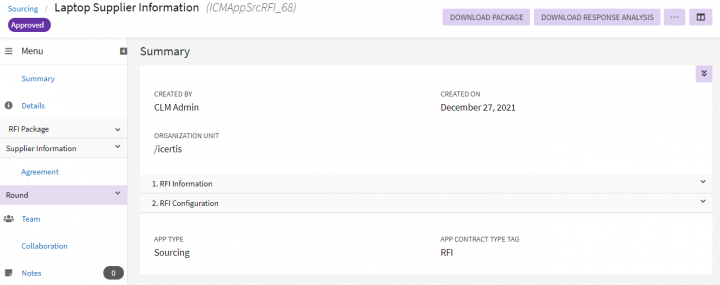
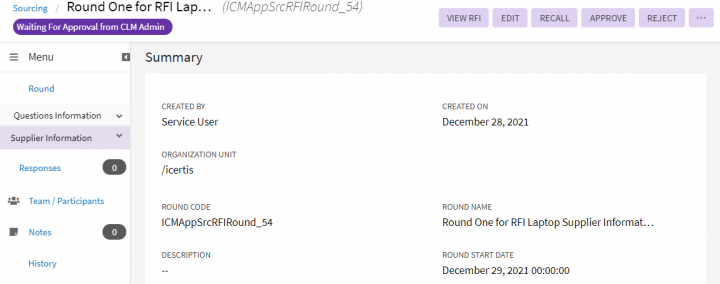
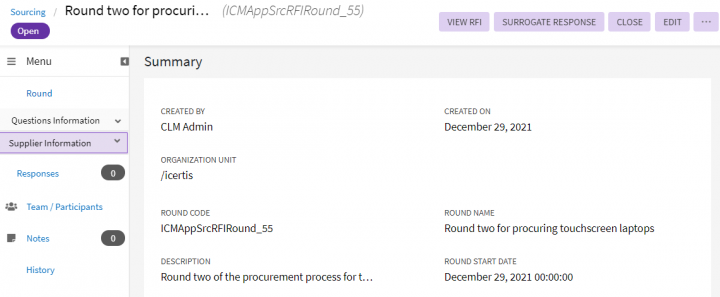
Similarly, the rounds in "Waiting for Approval", "Approved", "Open" status, the newly added Questionnaire and questions are updated and available. (Except "Closed" round)
The count of Questionnaire and questions is updated for round in "Approved" status.
Similarly, the count of Questionnaire and questions is updated for round in Open status.
Note that newly added questionnaire and questions is not updated for the round in Closed status and it remains unchanged.
Working with Rounds
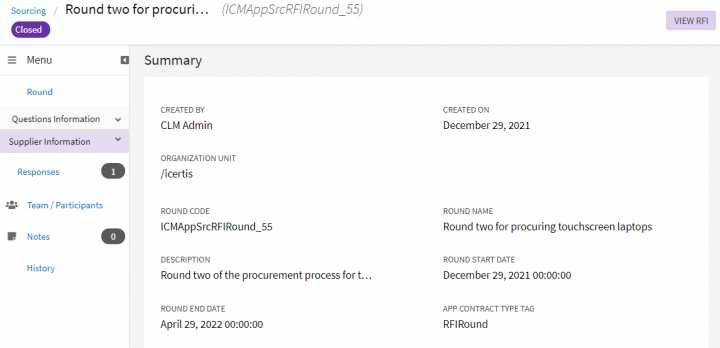
One cycle of seeking responses from suppliers and evaluating them is referred to as a round. A complete Sourcing event may comprise of multiple rounds. The first round is created automatically (if the start and end dates are entered) as soon as the RFI instance is approved. You can see the round on the RFI Details page. You must open the round instance and fill in additional details. There can be multiple rounds for a single RFI instance.
Starting the scheduled Rounds
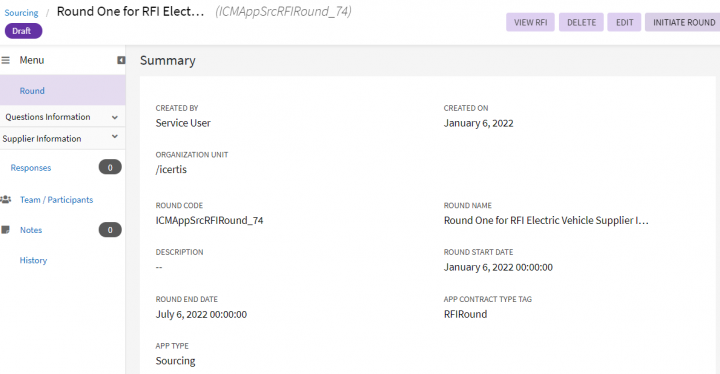
You can schedule a round by entering the Round Start Date and End Date when creating the RFI instance. The buyer must click the "Initiate Round" button on the Round Details page to start the round.
To start the round:
1. Click "Round" on the RFI Details page. The auto created round instance is displayed.
3. Click the "Initiate Round" button to start the Round. The status of RFI changes to Round(s) Ongoing after the round is approved and published.
Creating Rounds
The buyer can also create a round manually if they need to conduct multiple rounds with the supplier. The buyer can create the round manually only if the RFI instance is in Approved, Round(s) Ongoing and Round (s) Closed state.
To create a round (manually):
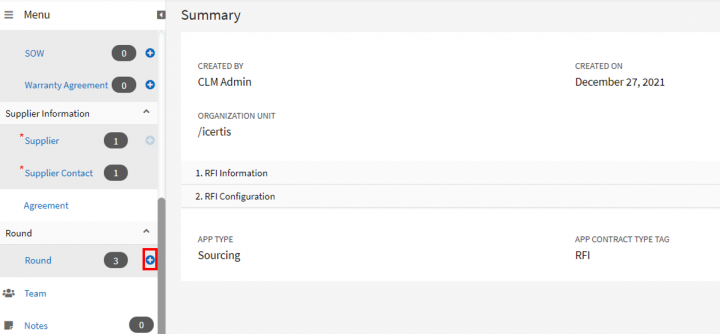
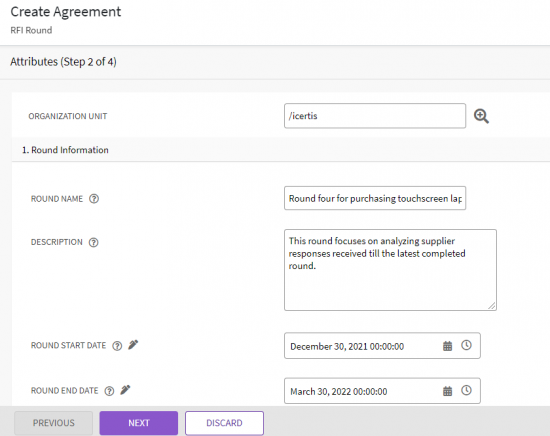
1. Click the plus icon under the "Round" tab on the RFI Details page. The "Create Agreement RFI Round" page opens.
3. Enter an appropriate name for the round.
4. Enter relevant details in the "Description" field.
5. Select a "Round Start" Date. This field is already populated with the current date. You can select a different date and time if required.
6. Select a "Round End Date" and time.
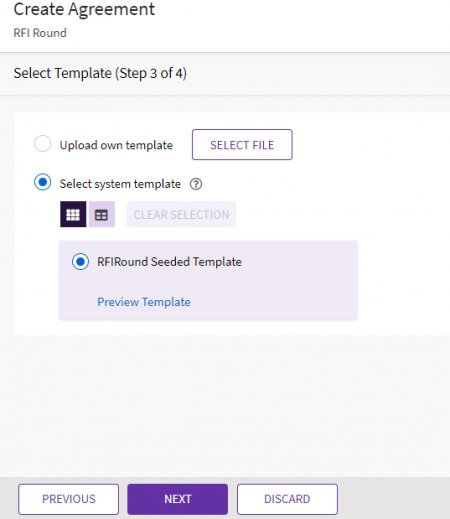
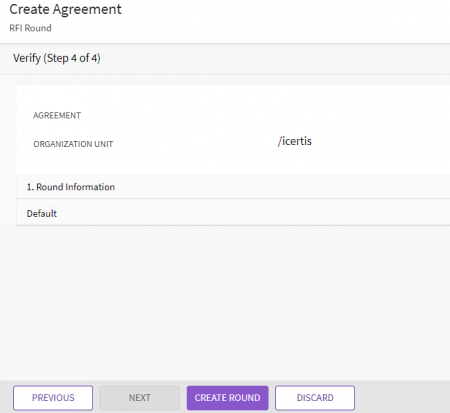
8. Select the Template from the available list or upload a new template from your computer and click "Next". The "Verify" page opens. Verify all the information.
Working with Questions
A question is the information asked by buyers about the products or services that they want to buy to the prospective suppliers before purchasing them. The supplier can view the questions that were submitted in the previous rounds if the buyer selects Yes in the Copy Questions and Supplier Responses option when creating the RFI.
Depending upon how the RFI instance is configured in the organization, suppliers must sign all the prerequisite agreements before submitting the responses to the questions asked by buyers. The suppliers won’t be able to view the RFI instance until the prerequisite agreement is in Executed state.
Submitting Responses
Supplier can upload, edit and then submit the responses for the questions.
To submit responses:
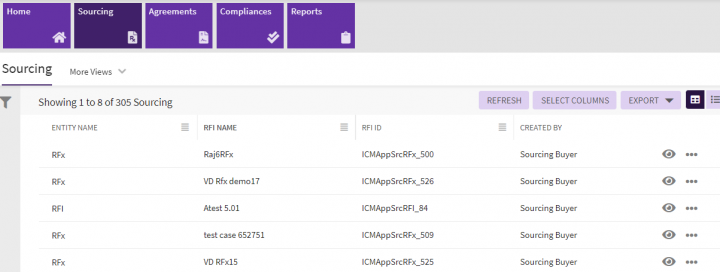
1. Click the "Sourcing" tile from the "Home" page after logging on to ICI. The "Sourcing" page opens. This page displays a list of all the RFI instances that the supplier is a part of.
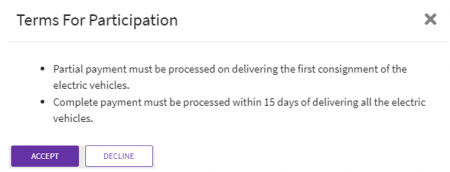
3. Click "Accept" on "Terms For Participation" window. The RFI Details page opens with the RFI in Round(s) Ongoing state.
4. Click "Round" under Round tab. The list of Rounds are displayed in the grid along with its details such as "Round Name", "Round Code" etc.
7. Click the View Details icon next to the RFI Response. The "RFI Response" page opens.
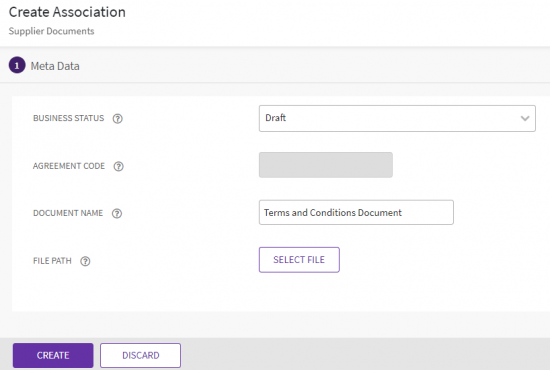
8. Click plus icon next to Supplier Documents if you want to add any supporting documents when responding to the RFI. The "Create Association" page opens.
9. Enter the information on Create Association page and then select the file from your computer.
10. Click "Create". The count of Supplier Documents is displayed in the left navigation pane on RFI Details page of the supplier.
11. Click "Question Response". The list of questions asked by the buyer is displayed.
- Using Microsoft Excel
- Using ICI
Using Microsoft Excel
To submit responses using Excel:
1. Click the three dots icon > "Export" > "Excel" on the page that shows the list of questions to download the questions in an Excel sheet.
3. Enter the responses in the Response column and save the Excel sheet.
4. Click the three dots icon > "Upload Template". The "Upload Document" window opens.
6. Click "Upload File" to upload the file. The Upload Summary is displayed showing the number of records that were processed successfully, deleted and failed records.
7. Click Close icon on the "Upload Document" window. The RFI Response page opens.
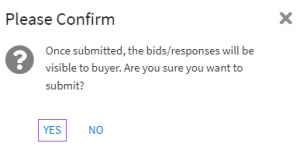
8. Click "Submit". The "Please Confirm" window opens.
After submitting responses, suppliers cannot edit them. To edit the responses, suppliers must click "Withdraw". This changes the status of the Questionnaire to Withdrawn. Suppliers can revert withdrawal by clicking Revert Withdrawal.
To withdraw the response:
1. Click "Recall Response" on the RFI Response Details page. The status of the RFI Response changes to "Draft".
Using ICI
To submit responses using ICI:
1. Click "RFI Question Response" on RFI Response Details page. The list of questions are displayed in the right pane of the page.
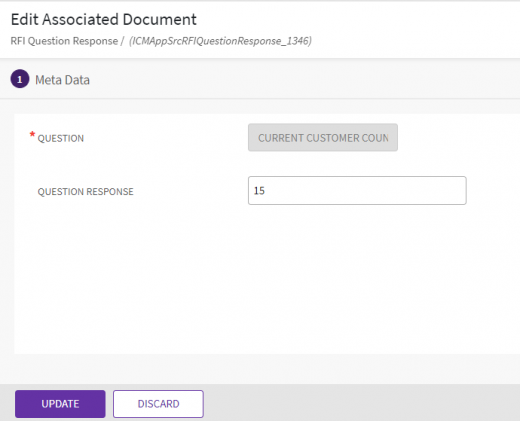
3. Click "Edit" on the RFI Response Details page to open the "Edit Associated Document"- RFI Question Response page.
4. Enter the response in "Question Response" field and click "Update". The RFI Question Response Details opens.
4. Click "Submit" on the RFI Response Details page. Repeat the same steps from Using Microsoft Excel section to submit and withdraw the responses.
Response Analysis
It is the process of analyzing supplier responses with an intent to compare one against the others along the evaluation criteria. When all the desired Responses are received, you can view and analyze all the responses to be able to take informed decision.
At least one round should be completed for conducting response analysis, otherwise the user gets an error message indicating that the round must be started to download response analysis.
To analyze supplier response:
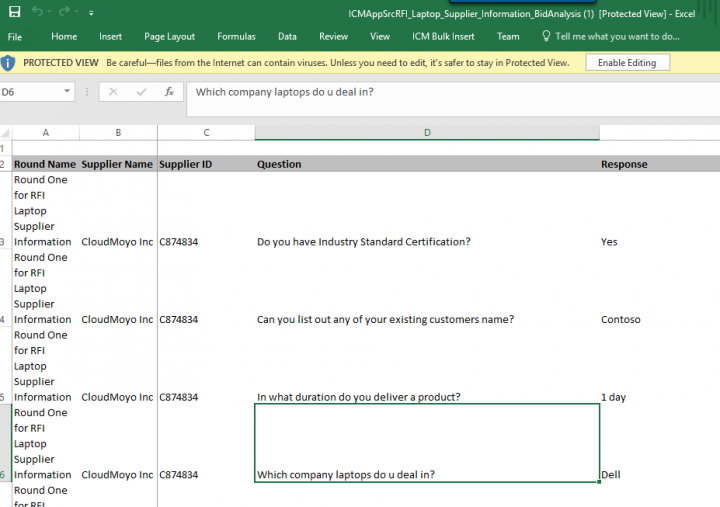
1. Click the "Download Response Analysis" button on the RFI Details page. An excel sheet containing the question responses is downloaded.
2. Open the excel sheet. You can view the all the data collected from the supplier responses such as Supplier ID, Item Name, Item Description, etc.
