| (17 intermediate revisions by 4 users not shown) | |||
| Line 1: | Line 1: | ||
| + | |||
| + | | ||
| + | |||
| + | | ||
= Outlook Add-in = | = Outlook Add-in = | ||
| − | + | A .JS version of the ICI Outlook Plugin is available in ICI. The overall turnaround time for the author is reduced as he no longer needs to download the documents received over email to the local machine, then switch applications and log in to ICI, search the Agreement and then upload the documents.<br/> The provisioned user can now: | |
*Upload the next version of the Agreement document received over an Email to the Agreement | *Upload the next version of the Agreement document received over an Email to the Agreement | ||
| Line 15: | Line 19: | ||
*For Windows 10: it is tested and verified on Microsoft Office Professional Plus 2013 (15.0.5007.1000) and 2016 (16.0.4849.1000) 64-bit and above. | *For Windows 10: it is tested and verified on Microsoft Office Professional Plus 2013 (15.0.5007.1000) and 2016 (16.0.4849.1000) 64-bit and above. | ||
| − | | + | To know how to install ICI Outlook Add-in in Microsoft Outlook on Windows click [https://docs.microsoft.com/en-us/office/dev/add-ins/outlook/sideload-outlook-add-ins-for-testing here] and on Mac click [https://docs.microsoft.com/en-us/office/dev/add-ins/outlook/compare-outlook-add-in-support-in-outlook-for-mac here]. |
| + | |||
| + | == Pinning the Pane == | ||
| + | |||
| + | To pin the ICI Outlook Add-in pane on the interface, click the pin icon. | ||
| + | <div class="image-green-border">[[File:Outlook Add-in.png|420px]]</div> | ||
| + | == Searching Agreements == | ||
| + | |||
| + | To search an agreement, use the Saved Search dropdown or start typing the name of the agreement in the Search Agreements search box. | ||
| + | <div class="image-green-border">[[File:8.1 Outlook 1.png|420px]]</div> <div class="image-green-border"> </div> | ||
| + | == Previewing Agreements == | ||
| + | |||
| + | To preview an agreement or association when composing an email, click the '''Eye''' icon. | ||
| + | <div class="image-green-border">[[File:8.1 Outlook 2.png|420px]]</div> <div class="image-green-border"> </div> | ||
| + | == Adding Emails as Associations == | ||
| + | |||
| + | To add emails as associated documents, select the emails, and drag-and-drop them under the association name. | ||
| + | <div class="image-green-border">[[File:8.1 Outlook 3.png|720px]]</div> <div class="image-green-border"> </div> | ||
| + | == Adding Email Attachments as Associations or New Agreement Versions == | ||
| + | |||
| + | To add email attachments as associations or as new agreement versions, do the following: | ||
| + | |||
| + | 1. Open the required email, click the Advanced Add Options icon, The “Advanced: Add to ICI” pane opens. | ||
| + | <div class="image-green-border">[[File:8.1 Outlook 4.png|520px]]</div> <div class="image-green-border"> </div> <div class="image-green-border">2. Select the attachment you want to add, from the '''Add to Location''' dropdown, select the association name or “Agreement (new version)” option, depending upon your choice. Select whether the attachment will be added as a “New document” or it will “Replace existing” document. Click the '''Add to ICI''' button.</div> <div class="image-green-border"> </div> <div class="image-green-border">[[File:8.1 Outlook 5.png|320px]]</div> <div class="image-green-border"> </div> | ||
| + | == Emailing Agreements and Associated Documents == | ||
| + | |||
| + | To send an agreement or associated document as an email attachment, select the agreement or associated document and click the '''Attach Document To Email''' button. | ||
| + | |||
| + | [[File:8.1 Outlook 6.png|320px]] | ||
== Uploading the next version of an Agreement received over MS Outlook Email == | == Uploading the next version of an Agreement received over MS Outlook Email == | ||
| − | To add the the next version of the Agreement received over Outlook Email:<br/> 1. '''Open''' the Email with the next version of the Agreement.<br/> 2. '''Open''' the | + | To add the the next version of the Agreement received over Outlook Email:<br/> 1. '''Open''' the Email with the next version of the Agreement.<br/> 2. '''Open''' the ICI Outlook Add-in.<br/> 3. On the ''Details ''tab, '''click '''''Select ICI Agreement / Association'' to look for the Agreement that you want to upload as the next version. |
<div class="image-green-border">[[File:Email Outlook Plugin 1.png|820px|Email Outlook Plugin 1]]</div> | <div class="image-green-border">[[File:Email Outlook Plugin 1.png|820px|Email Outlook Plugin 1]]</div> | ||
4. '''Click''' ''Select Email Attachment'' that you want to upload from the drop-down.<br/> 5. '''Click''' ''Upload''. The ''File(s) uploaded successfully ''message is displayed. If the Agreement fails to be attached, then a message will be displayed indicating that you can retry sending the Attachment. | 4. '''Click''' ''Select Email Attachment'' that you want to upload from the drop-down.<br/> 5. '''Click''' ''Upload''. The ''File(s) uploaded successfully ''message is displayed. If the Agreement fails to be attached, then a message will be displayed indicating that you can retry sending the Attachment. | ||
<div class="image-green-border">[[File:Email Outlook Plugin 2.png|820px|Email Outlook Plugin 2]]</div> | <div class="image-green-border">[[File:Email Outlook Plugin 2.png|820px|Email Outlook Plugin 2]]</div> | ||
| − | You can ''Preview'' the Agreement in the | + | You can ''Preview'' the Agreement in the ICI application on the Agreement ''Details ''page. |
| − | <div class="image-green-border">[[File: | + | <div class="image-green-border">[[File:Outlook 1.PNG|620px|Outlook 1.PNG]]</div> |
| + | | ||
| + | |||
| | ||
== Adding the next version of the Associated Document received over MS Outlook Email to the Agreement == | == Adding the next version of the Associated Document received over MS Outlook Email to the Agreement == | ||
| − | <br/> To add the next version of the Associated Document received over Outlook Email to the Agreement :<br/> 1. '''Open '''the Email with the Associated Documents.<br/> 2. '''Open '''the | + | <br/> To add the next version of the Associated Document received over Outlook Email to the Agreement :<br/> 1. '''Open '''the Email with the Associated Documents.<br/> 2. '''Open '''the ICI Outlook Add-in. |
| − | 3. On the ''Details'' tab,'''click''' ''Select | + | 3. On the ''Details'' tab,'''click''' ''Select ICI Agreement / Association'' to add the next version of the Association. For example, ''Payment Details''. |
| − | <div class="image-green-border">[[File:Email Outlook Plugin 4.png|820px|Email Outlook Plugin 4]]</div> <div class="image-green-border"> </div> <div class="image-green-border">4. '''Click''' ''Select Email Attachment'' that you want to upload from the drop-down.<br/> 5. '''Click''' ''Upload''. The ''File(s) uploaded successfully ''message is displayed.</div> <div class="image-green-border"> </div> <div class="image-green-border">[[File: | + | <div class="image-green-border">[[File:Email Outlook Plugin 4.png|820px|Email Outlook Plugin 4]]</div> <div class="image-green-border"> </div> <div class="image-green-border">4. '''Click''' ''Select Email Attachment'' that you want to upload from the drop-down.<br/> 5. '''Click''' ''Upload''. The ''File(s) uploaded successfully ''message is displayed.</div> <div class="image-green-border"> </div> <div class="image-green-border">[[File:Outlook 2.PNG|720px|Outlook 2.PNG]]</div> |
6. '''Click''' the ''View Record'' icon to view the Attachment details. | 6. '''Click''' the ''View Record'' icon to view the Attachment details. | ||
| − | <div class="image-green-border"> | + | <div class="image-green-border">7. '''Click '''the ''Preview'' icon to view the Attachment. </div> <div class="image-green-border">[[File:Email Outlook Plugin 7.png|820px|Email Outlook Plugin 7]]</div> |
| − | 7. '''Click '''the ''Preview'' icon to view the Attachment. | + | |
| − | <div class="image-green-border">[[File:Email Outlook Plugin 7.png|820px|Email Outlook Plugin 7]]</div> | + | |
| | ||
== Creating a new instance of an Association and adding an Associated Document received over MS Outlook Email == | == Creating a new instance of an Association and adding an Associated Document received over MS Outlook Email == | ||
| − | To create a new instance of an Association and add the Associated Document received over Outlook Email to the Agreement:<br/> 1. On the ''Details'' tab,'''click''' ''Select | + | To create a new instance of an Association and add the Associated Document received over Outlook Email to the Agreement:<br/> 1. On the ''Details'' tab,'''click''' ''Select ICI Agreement / Association ''to create a new instance of the Association. For example, adding an Association to the''Payment Details A''ssociation.<br/> 2. Enter a name for the new instance of the Association.<br/> 3. '''Click''' the ''Add Association'' button to add the new instance of the Association. |
| − | <div class="image-green-border">[[File:Email Outlook Plugin 8.png|820px|Email Outlook Plugin 8]]</div> <div class="image-green-border"><br/> 4. '''Click '''the ''Select Email Attachment'' field to select the document that you want to attach to the newly created instance.</div> <div class="image-green-border"> </div> <div class="image-green-border">[[File:Email Outlook Plugin 9.png|820px|Email Outlook Plugin 9]]</div> <div class="image-green-border"><br/> 5.'''Click''' ''Upload''. The document is now attached to the newly created instance. The ''File(s) uploaded successfully'' message is displayed.</div> <div class="image-green-border"> </div> <div class="note-box">'''Note: '''The Association is only created with the name. The remaining mandatory fields need to be entered in the | + | <div class="image-green-border">[[File:Email Outlook Plugin 8.png|820px|Email Outlook Plugin 8]]</div> <div class="image-green-border"><br/> 4. '''Click '''the ''Select Email Attachment'' field to select the document that you want to attach to the newly created instance.</div> <div class="image-green-border"> </div> <div class="image-green-border">[[File:Email Outlook Plugin 9.png|820px|Email Outlook Plugin 9]]</div> <div class="image-green-border"><br/> 5.'''Click''' ''Upload''. The document is now attached to the newly created instance. The ''File(s) uploaded successfully'' message is displayed.</div> <div class="image-green-border"> </div> <div class="note-box">'''Note: '''The Association is only created with the name. The remaining mandatory fields need to be entered in the ICI application. </div> <div class="image-green-border"> </div> <div class="image-green-border"> </div> <div class="image-green-border">[[File:Email Outlook Plugin 10.png|820px|Email Outlook Plugin 10]]</div> |
| − | 6. The document is now available on the ''Associations'' tab in the | + | 6. The document is now available on the ''Associations'' tab in the ICI application as the next version. |
| + | == Adding an email as an associated document to an existing association == | ||
| + | |||
| + | To upload an email conversation by creating a new instance of association in .docx and .msg formats: | ||
| + | |||
| + | 1. On the Agreement Details page of the Outlook add-in, '''click '''on the association instance, for example Supplier Communication. | ||
| + | <div class="image-green-border">[[File:7.14 Outlook email as association 01.png|720px|7.14 Outlook email as association 01.png]]</div> <div class="image-green-border"> </div> <div class="image-green-border">2. '''Click '''''Add Association''. A text field is displayed.</div> <div class="image-green-border"> </div> <div class="image-green-border">[[File:7.14 Outlook email as association 02.png|720px|7.14 Outlook email as association 02.png]]</div> | ||
| + | 3. '''Enter '''a name for the new associated document, for example PriceList for August 2020. | ||
| + | |||
| + | 4. '''Click '''the plus icon next to the text field. The association instance gets created and it appears as an option in the ''Select ICM Agreement/Association'' drop-down. | ||
| + | |||
| + | 5. In the ''Select ICM Agreement/Association'' drop-down '''select '''the association created in Step 4. | ||
| + | <div class="image-green-border">[[File:7.14 Outlook email as association 03.png|720px|7.14 Outlook email as association 03.png]]</div> | ||
| + | 6. '''Click '''the ''Select Email Attachment'' drop down. The following options are displayed: | ||
| + | |||
| + | *''Email as Outlook format (.msg)'': Use this option to upload the email thread to the association as is. | ||
| + | *''Email as document (.docx)'': Use this option to upload the email thread to the association as a Word document. | ||
| + | |||
| + | 7. '''Select''', for example, Email as document. The selected file name is displayed in the ''Mapping Result(s)'' section. | ||
| + | <div class="image-green-border">[[File:7.14 Outlook email as association 04.png|720px|7.14 Outlook email as association 04.png]]</div> | ||
| + | 8. '''Click '''''Upload''. The selected email gets uploaded and the ''File(s) uploaded successfully'' message is displayed.<br/> The uploaded email appears in .docx format on ICM Web and is displayed as an Association instance against the PriceList association. | ||
| + | |||
| + | 9. On the agreement ''Details'' page, '''click''' the ''Association'' tab. In this example ''Supplier Communication'' is the association for the agreement. The associated document ''PriceList for August 2020'' uploaded using the Outlook add-in is displayed in the list of instances. | ||
| + | <div class="image-green-border">10. '''Click '''the ''View ''icon for the created associated document instance ''PriceList for August 2020''. The associated document ''Details ''page opens.</div> <div class="image-green-border"> </div> <div class="image-green-border">11. '''Click '''the ''Versions ''tab. The uploaded email thread is displayed and is available to download in PDF and in Word formats.</div> <div class="image-green-border"> </div> <div class="image-green-border">12. '''Click '''an icon below the ''Document ''column, for example Word icon. A .docx file will be downloaded.</div> | ||
| + | '''Note''': If you have selected the option to upload ''Email as Outlook format'', the email thread is indicated with an Outlook Message icon in Step 11, clicking which downloads the email thread in .msg format in Step 12. | ||
| + | <div class="image-green-border">13. Open the downloaded file. The uploaded email thread content will be displayed in the file contents. In this example, the .docx file displays the email uploaded as an association.</div> <div class="image-green-border">[[File:7.14 Outlook email as association 10.png|720px|7.14 Outlook email as association 10.png]]</div> | ||
| | ||
| | ||
| − | '''Related Topics:''' | + | == Adding an email as a new version of an associated document using Outlook Add-in == |
| + | |||
| + | 1. '''Click '''''Select ICM Agreement / Association'' on the ''Details ''tab on the Outlook add-in. A drop down is displayed. | ||
| + | <div class="image-green-border">[[File:7.14 Outlook email as association 11.png|720px|7.14 Outlook email as association 11.png]]</div> | ||
| + | 2. '''Select''' the Association instance for which you want to add the current email as an association attachment (for example, ''PriceList for August 2020''). | ||
| + | |||
| + | 3. '''Click '''''Upload''. The File(s) uploaded successfully message will be displayed. | ||
| + | |||
| + | The uploaded email (in .docx or in .msg format) gets uploaded on ICM Web as a version of the Association selected in Step 2, and is displayed as an Association instance against the ''PriceList'' association. | ||
| + | <div class="image-green-border"> </div> | ||
| + | '''Related Topics:''' '''Related Topics:''' [[Agreement_Management|Agreement Management]] | [[Association_Management|Association Management]] | [[Compliance_Management|Compliance Management]] | [[Template_Management|Template Management]] | [[Clause_Management|Clause Management]] | [[Configuration|Configuration]] | [[Reports|Reports]] | [[Power_BI_Integration_with_ICM|Advanced Analytics]] | [[User_Administration|User Administration]] | [[ICI_Add-ins|ICI Add-ins]] | [http://int-wiki.cloudapp.net:8085/ICMHelp7.12/index.php?title=Icertis_Experience_for_Word Icertis Experience for Word] | [[Release_Notes|Release Notes]] | | ||
Latest revision as of 06:38, 24 May 2022
Contents
- 1 Outlook Add-in
- 1.1 Pinning the Pane
- 1.2 Searching Agreements
- 1.3 Previewing Agreements
- 1.4 Adding Emails as Associations
- 1.5 Adding Email Attachments as Associations or New Agreement Versions
- 1.6 Emailing Agreements and Associated Documents
- 1.7 Uploading the next version of an Agreement received over MS Outlook Email
- 1.8 Adding the next version of the Associated Document received over MS Outlook Email to the Agreement
- 1.9 Creating a new instance of an Association and adding an Associated Document received over MS Outlook Email
- 1.10 Adding an email as an associated document to an existing association
- 1.11 Adding an email as a new version of an associated document using Outlook Add-in
Outlook Add-in
A .JS version of the ICI Outlook Plugin is available in ICI. The overall turnaround time for the author is reduced as he no longer needs to download the documents received over email to the local machine, then switch applications and log in to ICI, search the Agreement and then upload the documents.
The provisioned user can now:
- Upload the next version of the Agreement document received over an Email to the Agreement
- Upload the next version of the Associated document (supporting Attachments) received over an Email to the Agreement
- Create a new Association instance and then upload the Associated Document received over an Email to the Agreement
The configuration of the Outlook Add-in is driven by the Masterdata, whereas the list of Agreements and their details are configured by the Saved Searches. You can configure multiple saved searches.
The Outlook Add-in (.JS version) is supported on 2 different platforms:
- For MAC OS (Mojave): it is tested and verified on Microsoft Office 365 (2016 and above).
- For Windows 10: it is tested and verified on Microsoft Office Professional Plus 2013 (15.0.5007.1000) and 2016 (16.0.4849.1000) 64-bit and above.
To know how to install ICI Outlook Add-in in Microsoft Outlook on Windows click here and on Mac click here.
Pinning the Pane
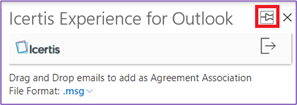
To pin the ICI Outlook Add-in pane on the interface, click the pin icon.
Searching Agreements
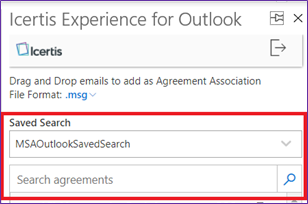
To search an agreement, use the Saved Search dropdown or start typing the name of the agreement in the Search Agreements search box.
Previewing Agreements
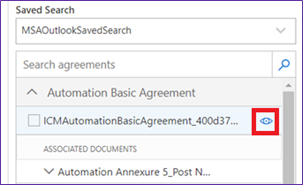
To preview an agreement or association when composing an email, click the Eye icon.
Adding Emails as Associations
To add emails as associated documents, select the emails, and drag-and-drop them under the association name.
Adding Email Attachments as Associations or New Agreement Versions
To add email attachments as associations or as new agreement versions, do the following:
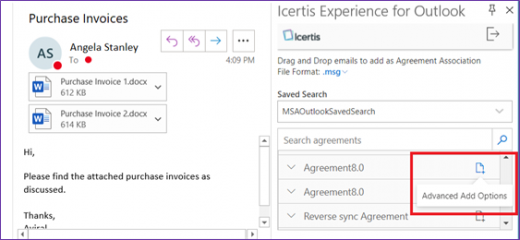
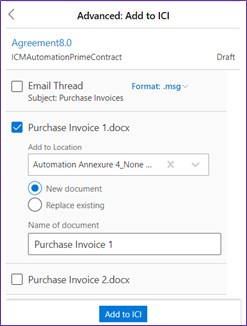
1. Open the required email, click the Advanced Add Options icon, The “Advanced: Add to ICI” pane opens.
Emailing Agreements and Associated Documents
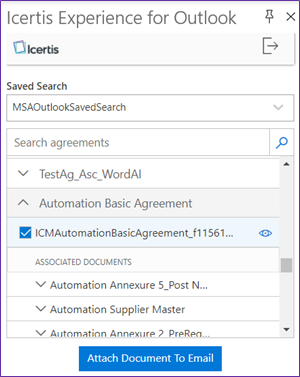
To send an agreement or associated document as an email attachment, select the agreement or associated document and click the Attach Document To Email button.
Uploading the next version of an Agreement received over MS Outlook Email
To add the the next version of the Agreement received over Outlook Email:
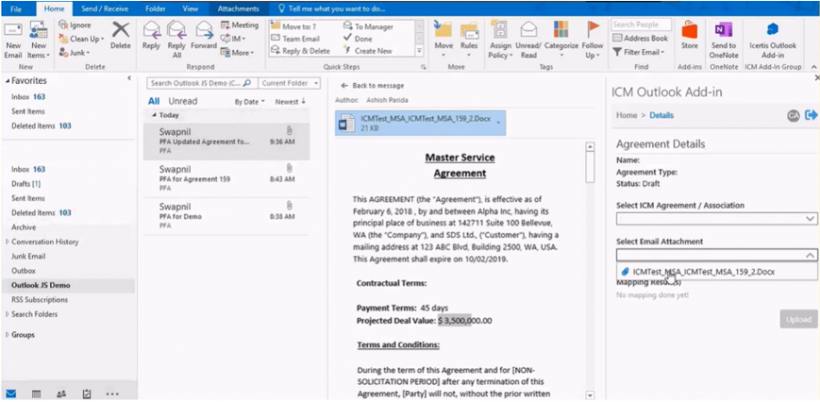
1. Open the Email with the next version of the Agreement.
2. Open the ICI Outlook Add-in.
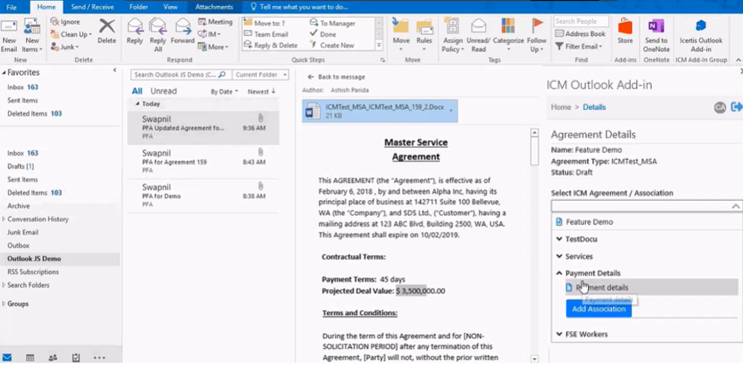
3. On the Details tab, click Select ICI Agreement / Association to look for the Agreement that you want to upload as the next version.
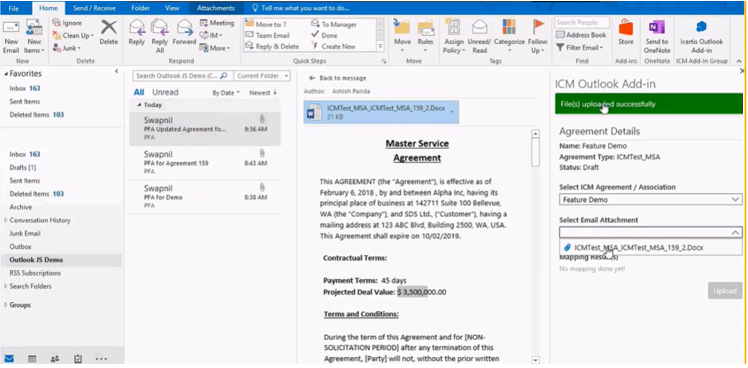
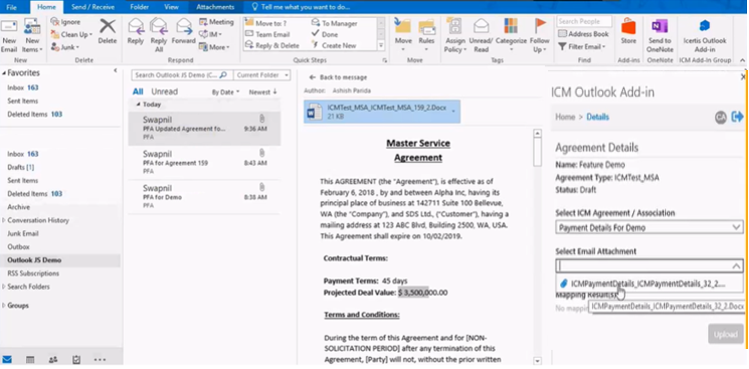
4. Click Select Email Attachment that you want to upload from the drop-down.
5. Click Upload. The File(s) uploaded successfully message is displayed. If the Agreement fails to be attached, then a message will be displayed indicating that you can retry sending the Attachment.
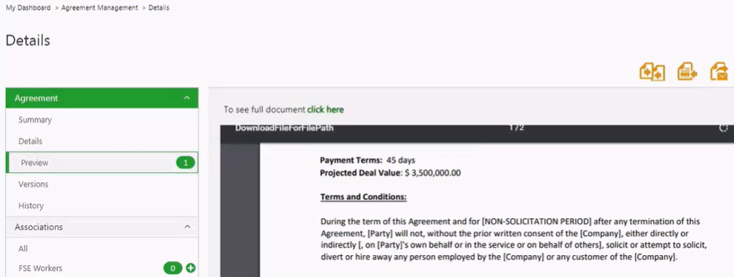
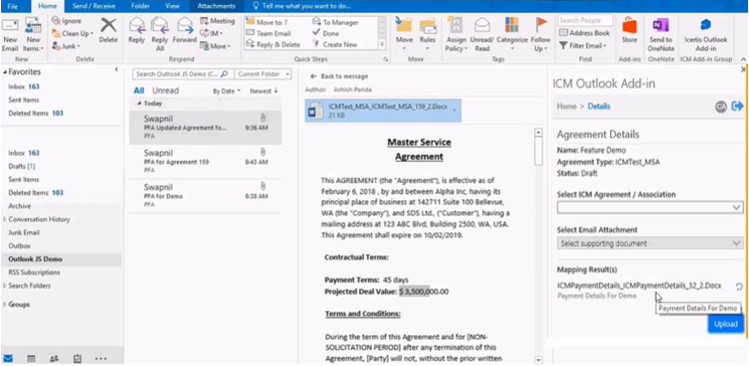
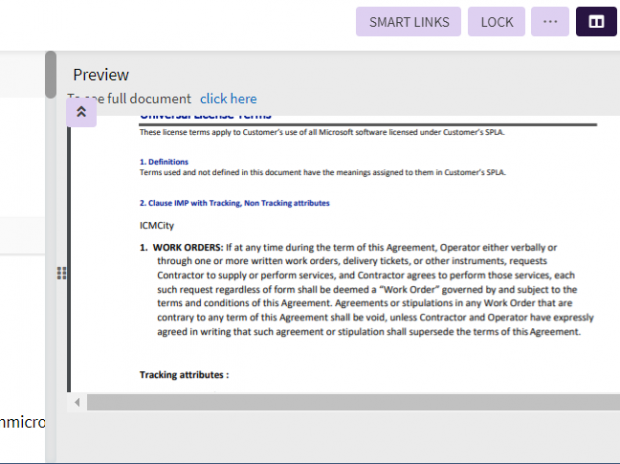
You can Preview the Agreement in the ICI application on the Agreement Details page.
Adding the next version of the Associated Document received over MS Outlook Email to the Agreement
To add the next version of the Associated Document received over Outlook Email to the Agreement :
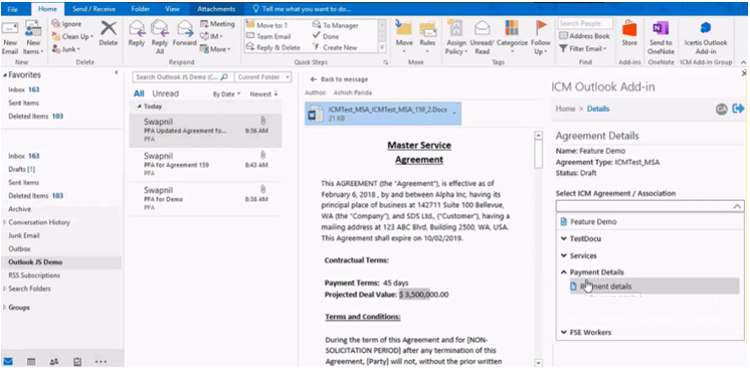
1. Open the Email with the Associated Documents.
2. Open the ICI Outlook Add-in.
3. On the Details tab,click Select ICI Agreement / Association to add the next version of the Association. For example, Payment Details.
5. Click Upload. The File(s) uploaded successfully message is displayed.
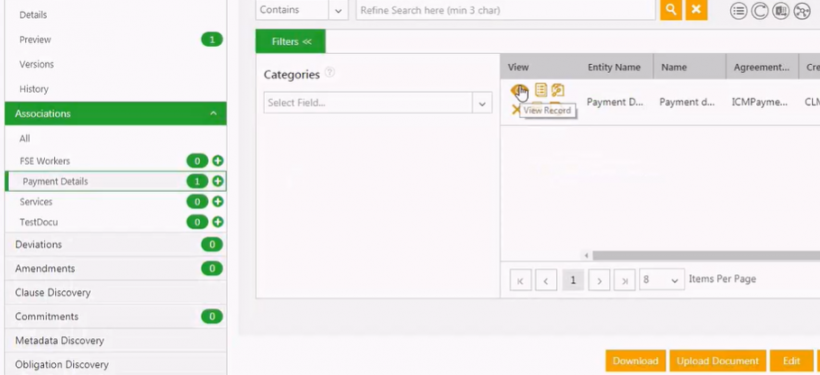
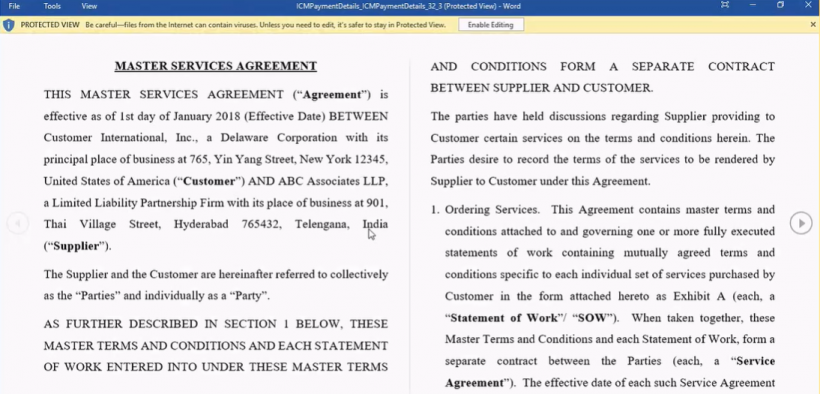
6. Click the View Record icon to view the Attachment details.
Creating a new instance of an Association and adding an Associated Document received over MS Outlook Email
To create a new instance of an Association and add the Associated Document received over Outlook Email to the Agreement:
1. On the Details tab,click Select ICI Agreement / Association to create a new instance of the Association. For example, adding an Association to thePayment Details Association.
2. Enter a name for the new instance of the Association.
3. Click the Add Association button to add the new instance of the Association.
4. Click the Select Email Attachment field to select the document that you want to attach to the newly created instance.
5.Click Upload. The document is now attached to the newly created instance. The File(s) uploaded successfully message is displayed.
6. The document is now available on the Associations tab in the ICI application as the next version.
Adding an email as an associated document to an existing association
To upload an email conversation by creating a new instance of association in .docx and .msg formats:
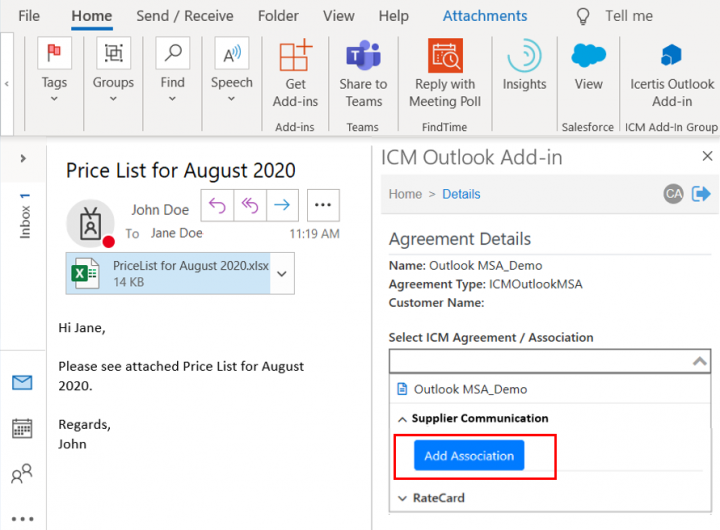
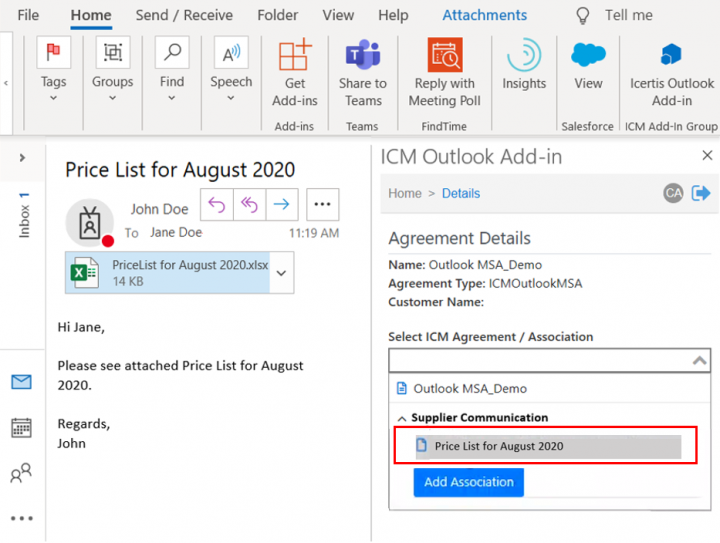
1. On the Agreement Details page of the Outlook add-in, click on the association instance, for example Supplier Communication.
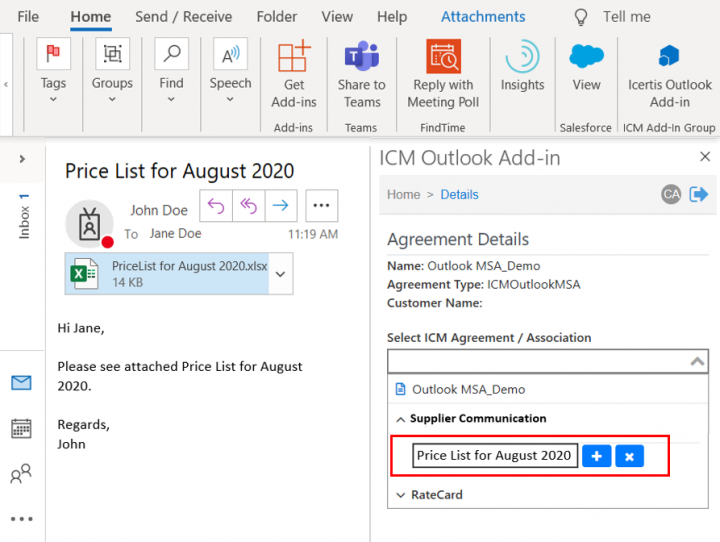
3. Enter a name for the new associated document, for example PriceList for August 2020.
4. Click the plus icon next to the text field. The association instance gets created and it appears as an option in the Select ICM Agreement/Association drop-down.
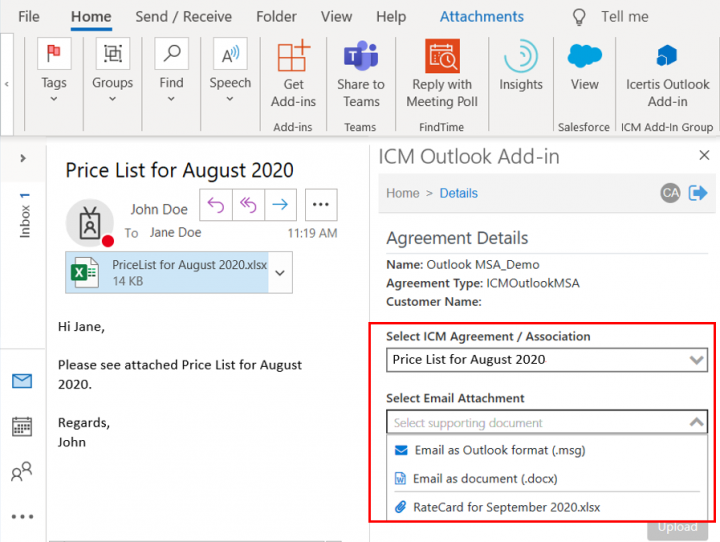
5. In the Select ICM Agreement/Association drop-down select the association created in Step 4.
6. Click the Select Email Attachment drop down. The following options are displayed:
- Email as Outlook format (.msg): Use this option to upload the email thread to the association as is.
- Email as document (.docx): Use this option to upload the email thread to the association as a Word document.
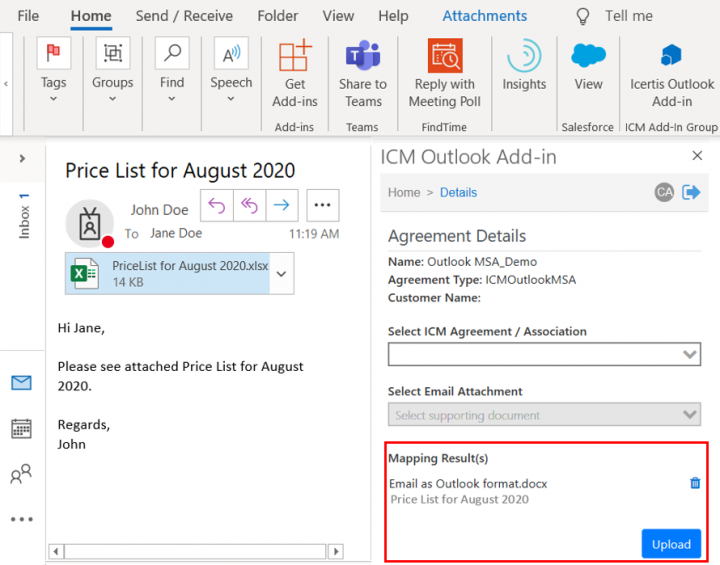
7. Select, for example, Email as document. The selected file name is displayed in the Mapping Result(s) section.
8. Click Upload. The selected email gets uploaded and the File(s) uploaded successfully message is displayed.
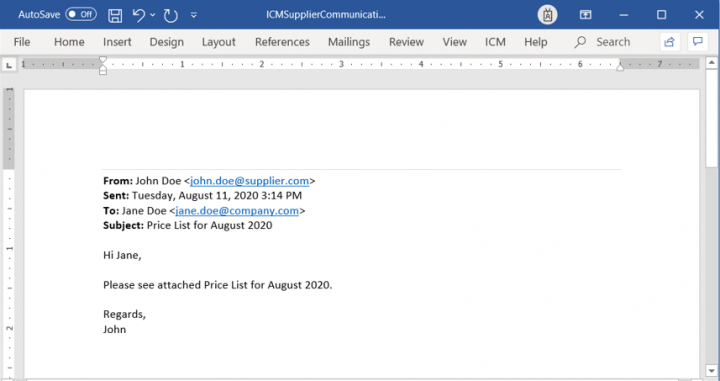
The uploaded email appears in .docx format on ICM Web and is displayed as an Association instance against the PriceList association.
9. On the agreement Details page, click the Association tab. In this example Supplier Communication is the association for the agreement. The associated document PriceList for August 2020 uploaded using the Outlook add-in is displayed in the list of instances.
Note: If you have selected the option to upload Email as Outlook format, the email thread is indicated with an Outlook Message icon in Step 11, clicking which downloads the email thread in .msg format in Step 12.
Adding an email as a new version of an associated document using Outlook Add-in
1. Click Select ICM Agreement / Association on the Details tab on the Outlook add-in. A drop down is displayed.
2. Select the Association instance for which you want to add the current email as an association attachment (for example, PriceList for August 2020).
3. Click Upload. The File(s) uploaded successfully message will be displayed.
The uploaded email (in .docx or in .msg format) gets uploaded on ICM Web as a version of the Association selected in Step 2, and is displayed as an Association instance against the PriceList association.
Related Topics: Related Topics: Agreement Management | Association Management | Compliance Management | Template Management | Clause Management | Configuration | Reports | Advanced Analytics | User Administration | ICI Add-ins | Icertis Experience for Word | Release Notes |
