| (10 intermediate revisions by 2 users not shown) | |||
| Line 2: | Line 2: | ||
= System for Cross Domain Identity Management (SCIM) = | = System for Cross Domain Identity Management (SCIM) = | ||
| − | + | ICI is now providing support for System for Cross-domain Identity Management (SCIM), which is an open standard protocol to automate the provisioning and deprovisioning of users. This framework allows exchange of user identity and user group information between identity providers (such as OKTA) and service providers (such as ICI – SaaS-based application). As a single system is used to manage permissions and groups, and data is transferred automatically, the risk of error is considerably reduced. This makes user management simpler and easier for customers. | |
| − | OKTA integrates various applications into its service, and you simply deploy these pre-integrated applications to your users as necessary. For example, OKTA uses the SCIM application to provision users or user groups in | + | OKTA integrates various applications into its service, and you simply deploy these pre-integrated applications to your users as necessary. For example, OKTA uses the SCIM application to provision users or user groups in ICI. |
| − | To provision or deprovision | + | To provision or deprovision ICI users, the OKTA Administrator first needs to create and configure an application which supports the SCIM protocol. |
| − | <div class="note-box">'''Note: ''' | + | <div class="note-box">'''Note: '''ICI only supports SCIM 2.0 version.</div> |
| | ||
<div class="image-green-border">[[File:7.10 SCIM 1.png|720px|7.10 SCIM 1.png]]</div> | <div class="image-green-border">[[File:7.10 SCIM 1.png|720px|7.10 SCIM 1.png]]</div> | ||
| Line 14: | Line 14: | ||
The OKTA Administrator uses the OKTA Dashboard to configure the SCIM application. | The OKTA Administrator uses the OKTA Dashboard to configure the SCIM application. | ||
<div class="image-green-border">[[File:7.10 SCIM 2.png|720px|7.10 SCIM 2.png]]</div> | <div class="image-green-border">[[File:7.10 SCIM 2.png|720px|7.10 SCIM 2.png]]</div> | ||
| − | 1. '''Click''' the | + | 1. '''Click''' the "Applications" tab. |
| − | 2. '''Select ''' | + | 2. '''Select '''"Applications" from the drop-down. The Applications page opens. |
| − | <div class="image-green-border">[[File:7.10 SCIM 3.png|720px|7.10 SCIM 3.png]]</div> <div class="image-green-border"> </div> <div class="image-green-border">3. '''Click ''' | + | <div class="image-green-border">[[File:7.10 SCIM 3.png|720px|7.10 SCIM 3.png]]</div> <div class="image-green-border"> </div> <div class="image-green-border">3. '''Click '''"Add Application".</div> <div class="image-green-border"> </div> <div class="image-green-border">[[File:7.10 SCIM 4.png|720px|7.10 SCIM 4.png]]</div> |
| − | 4. '''Enter ''' | + | 4. '''Enter '''"scim" in the search field to search applications that are supporting SCIM. |
| − | <div class="image-green-border">[[File:7.10 SCIM 5.png|720px|7.10 SCIM 5.png]]</div> <div class="image-green-border"> </div> <div class="note-box">'''Note:''' | + | <div class="image-green-border">[[File:7.10 SCIM 5.png|720px|7.10 SCIM 5.png]]</div> <div class="image-green-border"> </div> <div class="note-box">'''Note:''' ICI supports the SCIM 2.0 App (Header Auth)''version to provision and deprovision users through OKTA.</div> |
| − | 5. '''Select''' the application created by the OKTA Administrator using | + | 5. '''Select''' the application created by the OKTA Administrator using SCIM 2.0 App (Header Auth) for SCIM protocol. For example, "SCIM to ICI" application (as shown in the screenshot below): |
<div class="image-green-border">[[File:7.10 SCIM 6.png|720px|7.10 SCIM 6.png]]</div> | <div class="image-green-border">[[File:7.10 SCIM 6.png|720px|7.10 SCIM 6.png]]</div> | ||
| − | To configure SCIM to | + | To configure SCIM to ICI application, the OKTA Administrator performs the following steps: |
| − | 1. '''Click '''the | + | 1. '''Click '''the "Provisioning" tab. |
| − | 2. '''Click '''the | + | 2. '''Click '''the "Integration" tab. |
| − | 3. '''Enter''' the | + | 3. '''Enter''' the Base URL''and API Token as provided by ICI Administrator. |
<div class="note-box">'''Note: '''Ensure that the ''Enable API Integration'' box is checked.</div> | <div class="note-box">'''Note: '''Ensure that the ''Enable API Integration'' box is checked.</div> | ||
| | ||
<div class="image-green-border">[[File:7.10 SCIM 7.png|720px|7.10 SCIM 7.png]]</div> | <div class="image-green-border">[[File:7.10 SCIM 7.png|720px|7.10 SCIM 7.png]]</div> | ||
| − | 4. '''Click''' the | + | 4. '''Click''' the "Test API Credentials" button to validate the credentials (ICI Base URL''and API Token). A validation message will be displayed on entering incorrect credentials indicating that an authentication error has occurred. |
<div class="image-green-border">[[File:7.10 SCIM 8.png|720px|7.10 SCIM 8.png]]</div> | <div class="image-green-border">[[File:7.10 SCIM 8.png|720px|7.10 SCIM 8.png]]</div> | ||
| − | To allow Provisioning of SCIM application i.e. from OKTA to SCIM, the Administrator enables functionalities such as ''Create Users'', ''Update User Attributes'', and ''Deactivate Users''. After enabling the functionalities, you can provision/deprovision users in | + | To allow Provisioning of SCIM application i.e. from OKTA to SCIM, the Administrator enables functionalities such as ''Create Users'', ''Update User Attributes'', and ''Deactivate Users''. After enabling the functionalities, you can provision/deprovision users in ICI from OKTA using the SCIM protocol (for example, ''SCIM to ICI'' application as mentioned in Step 5). |
| | ||
| Line 42: | Line 42: | ||
To add a user in OKTA: | To add a user in OKTA: | ||
| − | 1. '''Click ''' | + | 1. '''Click '''"Users" menu on the Dashboard. |
| − | 2. '''Click ''' | + | 2. '''Click '''"People". |
<div class="image-green-border">[[File:7.10 SCIM 9.png|720px|7.10 SCIM 9.png]]</div> | <div class="image-green-border">[[File:7.10 SCIM 9.png|720px|7.10 SCIM 9.png]]</div> | ||
| − | 3. '''Click ''' | + | 3. '''Click '''"Add Person". The Add Person window opens. |
<div class="image-green-border">[[File:7.10 SCIM 10.png|720px|7.10 SCIM 10.png]]</div> | <div class="image-green-border">[[File:7.10 SCIM 10.png|720px|7.10 SCIM 10.png]]</div> | ||
| − | 4. '''Enter '''details such as | + | 4. '''Enter '''details such as First name, Last name, Username and Primary email. For example, add user - Michael Smith. |
<div class="image-green-border">[[File:7.10 SCIM 11.png|720px|7.10 SCIM 11.png]]</div> | <div class="image-green-border">[[File:7.10 SCIM 11.png|720px|7.10 SCIM 11.png]]</div> | ||
| − | 5. '''Click ''' | + | 5. '''Click '''"Save". The user Michael Smith is added to the application SCIM to ICI. |
<div class="image-green-border">[[File:7.10 SCIM 12.png|720px|7.10 SCIM 12.png]]</div> | <div class="image-green-border">[[File:7.10 SCIM 12.png|720px|7.10 SCIM 12.png]]</div> | ||
| − | 6. The user | + | 6. The user Michael Smith''can now be provisioned to ICI using Assignments tab. |
| | ||
| Line 58: | Line 58: | ||
== Provisioning users == | == Provisioning users == | ||
| − | You can provision users by adding users individually or by user group in | + | You can provision users by adding users individually or by user group in ICI: |
| − | 1. '''Click''' the | + | 1. '''Click''' the "Assignments" tab. |
| − | 2. '''Click ''' | + | 2. '''Click '''"Assign" drop-down. |
| − | 3. '''Select''' | + | 3. '''Select''' "Assign to People" to select an individual user or select "Assign to Groups"''to select a user group. |
| − | <div class="note-box">'''Note: '''A user needs to be added to the OKTA global directory to be provisioned in | + | <div class="note-box">'''Note: '''A user needs to be added to the OKTA global directory to be provisioned in ICI.</div> |
| | ||
<div class="image-green-border">[[File:7.10 SCIM 13.png|720px|7.10 SCIM 13.png]]</div> | <div class="image-green-border">[[File:7.10 SCIM 13.png|720px|7.10 SCIM 13.png]]</div> | ||
| + | | ||
| + | |||
| | ||
=== Provisioning users using assignment === | === Provisioning users using assignment === | ||
| − | To add a user to | + | To add a user to SCIM to ICI Assignments: |
| − | 1. '''Click '''the | + | 1. '''Click '''the "Assignments" tab in the Applications menu. |
| − | 2. '''Click '''the | + | 2. '''Click '''the "Assign" drop-down. |
<div class="image-green-border">[[File:7.10 SCIM 14.png|720px|7.10 SCIM 14.png]]</div> | <div class="image-green-border">[[File:7.10 SCIM 14.png|720px|7.10 SCIM 14.png]]</div> | ||
| − | 3. '''Click''' | + | 3. '''Click''' "Assign to People". The Assign SCIM to ICI to People window opens. |
| − | 4. '''Search '''for a user in the search tab. For example, | + | 4. '''Search '''for a user in the search tab. For example, Morita Akemi. |
| − | 5. '''Click ''' | + | 5. '''Click '''"Assign". |
| − | <div class="note-box">'''Note: '''As per the | + | <div class="note-box">'''Note: '''As per the ICI SCIM implementation, when a user gets provisioned, ICI first verifies if the user is already present or not.</div> |
| − | *If the user is not present, | + | *If the user is not present, ICI creates a new user. |
| − | *If the user is present, but in the deprovisioned state, then | + | *If the user is present, but in the deprovisioned state, then ICI reprovisions the user only if the External identifier value in ICI is matching with the value of SCIM External identifier. |
<div class="image-green-border">[[File:7.10 SCIM 42.png|720px|7.10 SCIM 42.png]]</div> | <div class="image-green-border">[[File:7.10 SCIM 42.png|720px|7.10 SCIM 42.png]]</div> | ||
| − | 6. '''Click ''' | + | 6. '''Click '''"Save and Go Back". |
<div class="image-green-border">[[File:7.10 SCIM 16.png|720px|7.10 SCIM 16.png]]</div> | <div class="image-green-border">[[File:7.10 SCIM 16.png|720px|7.10 SCIM 16.png]]</div> | ||
| − | 7. '''Click ''' | + | 7. '''Click '''"Done". |
<div class="image-green-border">[[File:7.10 SCIM 17.png|720px|7.10 SCIM 17.png]]</div> | <div class="image-green-border">[[File:7.10 SCIM 17.png|720px|7.10 SCIM 17.png]]</div> | ||
| − | The user is assigned and provisioned in | + | The user is assigned and provisioned in ICI. |
| − | <div class="image-green-border">[[File: | + | <div class="image-green-border">[[File:8.0SCIM27.PNG|720px|8.0SCIM27.PNG]]</div> |
| | ||
=== Provisioning users using group assignment === | === Provisioning users using group assignment === | ||
| − | Group assignment in SCIM is a convenient way to get multiple assignments. Using SCIM Group, users are provisioned to | + | Group assignment in SCIM is a convenient way to get multiple assignments. Using SCIM Group, users are provisioned to ICI in one go. You can create User Groups in ICI using Add Group functionality of SCIM. |
| − | You can provision multiple users in | + | You can provision multiple users in ICI by using a group assignment provided they are already assigned and displayed in the Assignments tab. |
| − | <div class="note-box">'''Note:''' Do not use the same group for | + | <div class="note-box">'''Note:''' Do not use the same group for Assignment and Push Groups.</div> |
| − | To add already assigned members to a group | + | To add already assigned members to a group SCIM to ICI group: |
| − | 1. '''Click ''' | + | 1. '''Click '''"SCIM to ICI group". |
| − | 2. '''Click | + | 2. '''Click "'''Manage People"'''.''' |
<div class="image-green-border">[[File:7.10 SCIM 19.png|720px|7.10 SCIM 19.png]]</div> | <div class="image-green-border">[[File:7.10 SCIM 19.png|720px|7.10 SCIM 19.png]]</div> | ||
| − | 3. '''Search '''a user'''. '''For example''', '''Michael Smith should already be provisioned in | + | 3. '''Search '''a user'''. '''For example''', '''Michael Smith should already be provisioned in ICI through an individual or group assignment. |
<div class="image-green-border">[[File:7.10 SCIM 20.png|720px|7.10 SCIM 20.png]]</div> | <div class="image-green-border">[[File:7.10 SCIM 20.png|720px|7.10 SCIM 20.png]]</div> | ||
| − | 4. '''Click '''the | + | 4. '''Click '''the Add icon. |
| − | 5. '''Click | + | 5. '''Click '''Save. The user Michael Smith is added to the group SCIM to ICI group. |
| | ||
| − | |||
| − | To map | + | === Mapping ICI attributes with SCIM attributes === |
| + | |||
| + | To map ICI attributes with SCIM attributes, you must create the Client App Entity Mapping. | ||
==== Client App Entity Mapping ==== | ==== Client App Entity Mapping ==== | ||
| − | 1. '''Click''' the | + | 1. '''Click''' "Configure" > "Masterdata" on the Home page. The Masterdata index page opens. |
| + | <div class="image-green-border">[[File:8.0SCIM21.PNG|720px|8.0SCIM21.PNG]]</div> | ||
| + | 2. '''Click''' "Create". The "Create Masterdata" page opens. | ||
| + | <div class="image-green-border">[[File:8.0SCIM22.PNG|720px|8.0SCIM22.PNG]]</div> | ||
| + | The Create Masterdata page contains the following tabs: | ||
| − | + | a. Masterdata Details | |
| − | + | b. Attributes | |
| − | + | <div class="image-green-border">[[File:8.0SCIM23.PNG|620px|8.0SCIM23.PNG]]</div> | |
| − | + | ||
| − | + | ||
| − | + | ||
| − | + | ||
| − | + | ||
| − | <div class="image-green-border"> | + | |
a. '''Masterdata Details''' | a. '''Masterdata Details''' | ||
| − | 1. '''Select '''the | + | 1. '''Select '''the Category from the drop-down. For example, Default. |
2. '''Select''' the Masterdata Contract Type. | 2. '''Select''' the Masterdata Contract Type. | ||
| − | <div class="note-box">'''Note: '''In order to map the SCIM attribute name with | + | <div class="note-box">'''Note: '''In order to map the SCIM attribute name with ICI attribute name''', '''you must select Client App Entity Mapping from the drop-down.</div> |
| − | 3. '''Click | + | 3. '''Click '''Next. The Attributes page opens. |
b. '''Attributes''' | b. '''Attributes''' | ||
| − | <div class="image-green-border">[[File: | + | <div class="image-green-border">[[File:8.0SCIM24.PNG|620px|8.0SCIM24.PNG]]</div> |
| − | Provide relevant attribute values in the respective fields | + | Provide relevant attribute values in the respective fields. For example: |
| − | + | ||
| − | + | ||
| − | *It is mandatory to create the Client App Entity Mapping for the attribute | + | *'''Client Name''': Select the client name from the drop-down. Here, it must be SCIM. |
| − | *Repeat the steps under Client App Entity Mapping to map other attributes such as | + | *'''Name''': Enter the Masterdata name. For example, External UPN. |
| + | *'''ICI Entity Name''': Enter the ICI Entity Name. For example, UserInformation. | ||
| + | *'''ICI Attribute Name''': Enter the ICI attribute name, which is mapped with the attribute name in SCIM. For example, ExternalUPN. | ||
| + | *'''Client Entity Name''': Enter the SCIM entity name. For example, SCIM Request. | ||
| + | *'''Client Attribute Name''': Enter the SCIM attribute name. For example, userName. | ||
| + | *'''Data Flow Type''': Select the data flow type to map the data from SCIM to ICI. For example, Client to ICI. | ||
| + | *'''Enable Sync''': Set "Enable Sync" to "Yes" to synchronize data mapping of ICI attributes with SCIM attributes. | ||
| + | <div class="image-green-border">'''Note''':</div> | ||
| + | *It is mandatory to create the Client App Entity Mapping for the attribute ExternalUPN. | ||
| + | *Repeat the steps under Client App Entity Mapping to map other attributes such as Phone Number from SCIM to ICI. | ||
The Client App Entity Mapping created is displayed as shown in the screenshot below: | The Client App Entity Mapping created is displayed as shown in the screenshot below: | ||
| − | <div class="image-green-border">[[File: | + | <div class="image-green-border">[[File:8.0SCIM25.PNG|720px|8.0SCIM25.PNG]]</div> |
| − | The value of the SCIM attribute name (for example, | + | The value of the SCIM attribute name (for example, userName) is mapped with ICI attribute name (for example, ExternalUPN) as shown in the screenshot below: |
| − | <div class="image-green-border">[[File: | + | <div class="image-green-border">[[File:8.0SCIM26.PNG|720px|8.0SCIM26.PNG]]</div> <div class="image-green-border"> </div> <div class="note-box">'''Note''': To map attributes such as Organization Unit Id, Organization Path Id or SharedOrgPathId, apart from the Client App Entity Mapping masterdata, you must create the Org Path Mapping masterdata, and map with the Client Attribute Name specified in Client App Entity Mapping. The Org Path Mapping masterdata is used to map the value of the Client Attribute Name with the respective Organization using the Organization Unit Path value.</div> |
| | ||
| − | <div class="image-green-border">[[File: | + | <div class="image-green-border">[[File:8.0SCIM28 .PNG|720px|8.0SCIM28 .PNG]]</div> |
| − | In this example, the value of | + | In this example, the value of Client Attribute Name as shown in the above screenshot is mapped to the Org Path Mapping masterdata. |
| − | <div class="image-green-border">[[File: | + | <div class="image-green-border">[[File:8.0SCIM29 .PNG|720px|8.0SCIM29 .PNG]]</div> <div class="image-green-border"> </div> <div class="image-green-border">In the above screenshot, name (for example, north) is the value of Client Attribute Name (for example, bCGHomeOfficeCode) in Client App Entity Mapping and Organization Unit Path is the org path.</div> <div class="image-green-border"> |
| − | Using the | + | Using the Client App Entity Mapping for attributes such as OrganizationUnitId, OrgPathId or SharedOrgPathId, the Org Path Mapping will be used to map the respective Org of a user. |
</div> | </div> | ||
| | ||
| Line 164: | Line 172: | ||
== Deprovisioning users == | == Deprovisioning users == | ||
| − | You can deprovision users in | + | You can deprovision users in ICI using the Assignments tab. |
| + | |||
| + | | ||
=== Deprovisioning user from assignment === | === Deprovisioning user from assignment === | ||
| Line 171: | Line 181: | ||
To deprovision an assigned user from SCIM: | To deprovision an assigned user from SCIM: | ||
| − | <div class="image-green-border">1. '''Click''' the [[File:7.10 SCIM 44.png|RTENOTITLE]] icon to unassign a user from OKTA. The | + | <div class="image-green-border">1. '''Click''' the [[File:7.10 SCIM 44.png|RTENOTITLE]] icon to unassign a user from OKTA. The Unassign User window opens.</div> |
| − | 2. '''Select''' the user to be unassigned from the displayed records. For example, | + | 2. '''Select''' the user to be unassigned from the displayed records. For example, Michael Smith. |
<div class="image-green-border">[[File:7.10 SCIM 26.png|720px|7.10 SCIM 26.png]]</div> | <div class="image-green-border">[[File:7.10 SCIM 26.png|720px|7.10 SCIM 26.png]]</div> | ||
| − | 3. '''Click ''' | + | 3. '''Click '''"OK". |
<div class="image-green-border">[[File:7.10 SCIM 27.png|720px|7.10 SCIM 27.png]]</div> | <div class="image-green-border">[[File:7.10 SCIM 27.png|720px|7.10 SCIM 27.png]]</div> | ||
| − | The user | + | The user Michael Smith is unassigned from SCIM to ICI and subsequently deprovisioned from ICI. |
| − | <div class="image-green-border">[[File: | + | <div class="image-green-border">[[File:8.0SCIM30 .PNG|720px|8.0SCIM30 .PNG]]</div> <div class="image-green-border"> </div> <div class="note-box">'''Note:''' You can reprovision the user only in ICI only if the External identifier value in ICI is matching with the value of SCIM External identifier.</div> |
| | ||
| − | == Creating User Groups in | + | == Creating User Groups in ICI using SCIM == |
| − | To create user groups in | + | To create user groups in ICI using SCIM, you must create the SCIM Groups Mapping masterdata. |
| − | The | + | The SCIM Groups Mapping masterdata is created to define the mapping before pushing the group from SCIM to ICI, for example, to push the Group SCIM Admins from SCIM to ICI as Local Admins. If the mapping is not present, the Group SCIM Admins will be created as Group SCIM Admins in ICI, and a masterdata record will also be created in SCIM Groups Mapping masterdata if the masterdata Contract Type is available. |
<div class="note-box">'''Note: '''The ''SCIM Groups Mapping'' masterdata is optional.</div> | <div class="note-box">'''Note: '''The ''SCIM Groups Mapping'' masterdata is optional.</div> | ||
==== SCIM Groups Mapping ==== | ==== SCIM Groups Mapping ==== | ||
| − | 1. '''Click''' the | + | 1. '''Click''' "Configure" > "Masterdata" on the Home page. The Masterdata index page opens. |
| − | 2. '''Click''' | + | 2. '''Click''' "Create". The "Create Masterdata" page opens. |
| − | + | ||
| − | + | ||
The ''Create Masterdata'' page contains the following tabs: | The ''Create Masterdata'' page contains the following tabs: | ||
| Line 199: | Line 207: | ||
''b. Attributes'' | ''b. Attributes'' | ||
| − | <div class="image-green-border">[[File: | + | <div class="image-green-border">[[File:8.0SCIM31 .PNG|520px]]</div> |
a. '''Masterdata Details''' | a. '''Masterdata Details''' | ||
| − | 1. '''Select '''the | + | 1. '''Select '''the "Category" from the drop-down. For example, Default. |
2. '''Select''' the Masterdata Contract Type. | 2. '''Select''' the Masterdata Contract Type. | ||
| − | <div class="note-box">'''Note: '''In order to create user groups in | + | <div class="note-box">'''Note: '''In order to create user groups in ICI using SCIM''', '''you must select SCIM Groups Mapping''from the drop-down.</div> |
| − | 3. '''Click | + | 3. '''Click '''"Next". The Attributes page opens. |
b. '''Attributes''' | b. '''Attributes''' | ||
| − | <div class="image-green-border">[[File: | + | <div class="image-green-border">[[File:8.0SCIM32 .PNG|520px]]</div> |
| − | *'''Enter''' the masterdata | + | *'''Enter''' the masterdata Name (such as SCIM to ICI group) and the SCIM Group Name (such as SCIM to ICI group). |
| − | *'''Click | + | *'''Click''' Save. |
| − | The SCIM Groups Mapping created | + | The SCIM Groups Mapping is created. |
| − | <div class="image-green-border"> | + | <div class="image-green-border"> </div> |
| − | To create | + | To create User Group using SCIM: |
| − | 1. '''Click '''the | + | 1. '''Click '''the "Users" tab on the OKTA Dashboard. |
| − | 2. '''Select ''' | + | 2. '''Select '''"Groups" from the drop-down menu. The Groups page opens. |
| − | 3. '''Click ''' | + | 3. '''Click '''"Add Group". |
| − | 4. '''Enter ''' | + | 4. '''Enter '''"Name". For example, SCIM to ICI group. |
<div class="image-green-border">[[File:7.10 SCIM 32.png|720px|7.10 SCIM 32.png]]</div> | <div class="image-green-border">[[File:7.10 SCIM 32.png|720px|7.10 SCIM 32.png]]</div> | ||
| − | 5. '''Click | + | 5. '''Click '''Add Group. The group is added in SCIM. |
'''Push Groups:''' | '''Push Groups:''' | ||
| − | Push Group is used to create User Groups in | + | Push Group is used to create User Groups in ICI. You can push groups with members, but the member should have already been provisioned in ICI using ''Assignment'' either individually or group assignment. |
| − | 6. '''Click '''the | + | 6. '''Click '''the "Push Groups" tab''.'' |
| − | 7. '''Click '''the | + | 7. '''Click '''the "Push Groups"''drop-down''.'' |
<div class="image-green-border">[[File:7.10 SCIM 33.png|720px|7.10 SCIM 33.png]]</div> | <div class="image-green-border">[[File:7.10 SCIM 33.png|720px|7.10 SCIM 33.png]]</div> | ||
| − | 8. '''Search '''a group using the search field''.'' For example, | + | 8. '''Search '''a group using the search field''.'' For example, SCIM to ICI group. |
9. '''Select '''the desired group from the displayed records. | 9. '''Select '''the desired group from the displayed records. | ||
| − | 10. '''Click ''' | + | 10. '''Click '''"Save". The SCIM to ICI group is now pushed to ICI. |
| − | <div class="image-green-border">[[File:7.10 SCIM 34.png|720px|7.10 SCIM 34.png]]</div> <div class="image-green-border"> </div> <div class="note-box">'''Note:''' The difference between | + | <div class="image-green-border">[[File:7.10 SCIM 34.png|720px|7.10 SCIM 34.png]]</div> <div class="image-green-border"> </div> <div class="note-box">'''Note:''' The difference between Groups and Push Groups is that Groups need to be assigned using Assignments, whereas Push Groups is only meant to push users (part of the selected group) to be provisioned in ICI in one go. These groups are not assigned in the Assignments tab.</div> |
| | ||
<div class="image-green-border">[[File:7.10 SCIM 35.png|720px|7.10 SCIM 35.png]]</div> | <div class="image-green-border">[[File:7.10 SCIM 35.png|720px|7.10 SCIM 35.png]]</div> | ||
| − | 11. The members of the group | + | 11. The members of the group SCIM to ICI group are pushed to ICI. For example, the user of the group SCIM to ICI group Michael Smith is pushed to ICI. |
| − | <div class="note-box">'''Note: '''Users need to be assigned through assignment to be pushed by | + | <div class="note-box">'''Note: '''Users need to be assigned through assignment to be pushed by Push Groups.</div> |
| | ||
| − | <div class="image-green-border">[[File: | + | <div class="image-green-border">[[File:8.0SCIM34 .PNG|520px]]</div> <div class="image-green-border"> </div> <div class="image-green-border">[[File:8.0SCIM33 .PNG|520px]]</div> |
| − | + | ||
| − | |||
| − | + | == Managing ICI User Group members using SCIM == | |
| − | + | To deprovision a user using SCIM, you first need to remove the user from the ''Push Groups. ''For example, let us remove the user ''Michael Smith'' from Push Groups''SCIM to ICI group''. | |
| + | |||
| + | 1. Go to the "Push Groups" tab. | ||
| + | |||
| + | 2. '''Click '''the "Push Groups". For example, SCIM to ICI group. | ||
<div class="image-green-border">[[File:7.10 SCIM 38.png|720px|7.10 SCIM 38.png]]</div> | <div class="image-green-border">[[File:7.10 SCIM 38.png|720px|7.10 SCIM 38.png]]</div> | ||
| − | 3. '''Click ''' | + | 3. '''Click '''"Manage People". The SCIM to ICI group opens. |
<div class="image-green-border">[[File:7.10 SCIM 39.png|720px|7.10 SCIM 39.png]]</div> | <div class="image-green-border">[[File:7.10 SCIM 39.png|720px|7.10 SCIM 39.png]]</div> | ||
4. '''Click '''the remove icon for the user to be removed. For example, ''Michael Smith''. | 4. '''Click '''the remove icon for the user to be removed. For example, ''Michael Smith''. | ||
<div class="image-green-border">[[File:7.10 SCIM 40.png|720px|7.10 SCIM 40.png]]</div> | <div class="image-green-border">[[File:7.10 SCIM 40.png|720px|7.10 SCIM 40.png]]</div> | ||
| − | 5. '''Click | + | 5. '''Click '''Save. The user is removed from the Push Group - SCIM to ICI group and consequently gets deprovisioned from the User Groups in ICI. |
| − | <div class="image-green-border"> | + | |
| + | | ||
| + | |||
| + | | ||
| + | |||
| + | '''Related Topics:''' [[Salesforce|Salesforce]] | [[Microsoft_Dynamics_CRM|Microsoft Dynamics CRM]] | [[Icertis_Experience_for_Workday|Icertis Experience for Workday]] | ||
| + | <div class="image-green-border"> </div> | ||
Latest revision as of 10:07, 20 December 2021
Contents
System for Cross Domain Identity Management (SCIM)
ICI is now providing support for System for Cross-domain Identity Management (SCIM), which is an open standard protocol to automate the provisioning and deprovisioning of users. This framework allows exchange of user identity and user group information between identity providers (such as OKTA) and service providers (such as ICI – SaaS-based application). As a single system is used to manage permissions and groups, and data is transferred automatically, the risk of error is considerably reduced. This makes user management simpler and easier for customers.
OKTA integrates various applications into its service, and you simply deploy these pre-integrated applications to your users as necessary. For example, OKTA uses the SCIM application to provision users or user groups in ICI.
To provision or deprovision ICI users, the OKTA Administrator first needs to create and configure an application which supports the SCIM protocol.
Configuring the SCIM Application
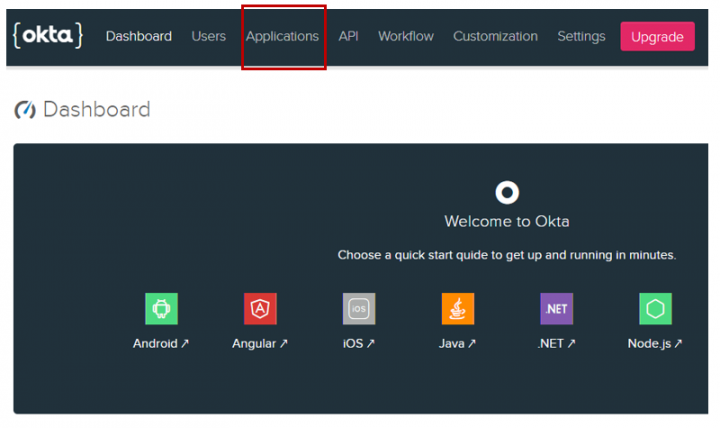
The OKTA Administrator uses the OKTA Dashboard to configure the SCIM application.
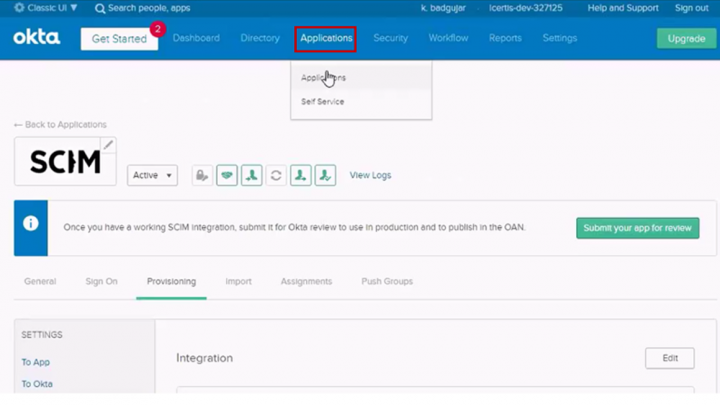
1. Click the "Applications" tab.
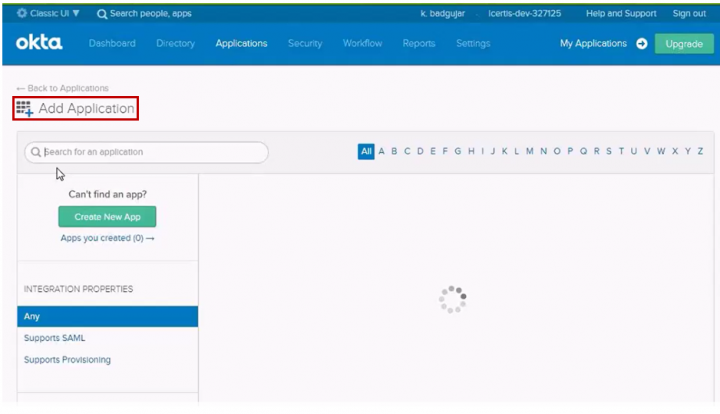
2. Select "Applications" from the drop-down. The Applications page opens.
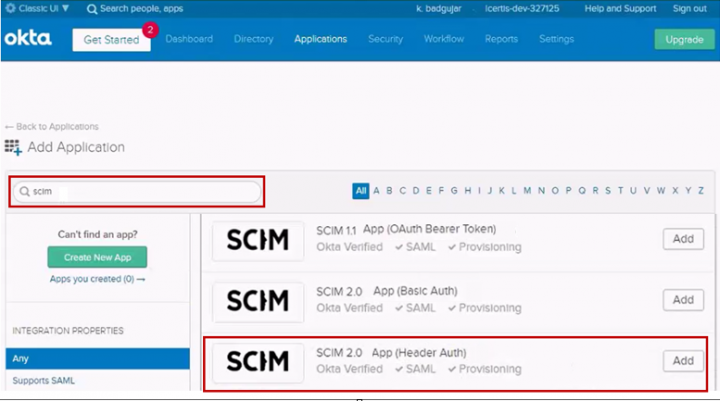
4. Enter "scim" in the search field to search applications that are supporting SCIM.
5. Select the application created by the OKTA Administrator using SCIM 2.0 App (Header Auth) for SCIM protocol. For example, "SCIM to ICI" application (as shown in the screenshot below):
To configure SCIM to ICI application, the OKTA Administrator performs the following steps:
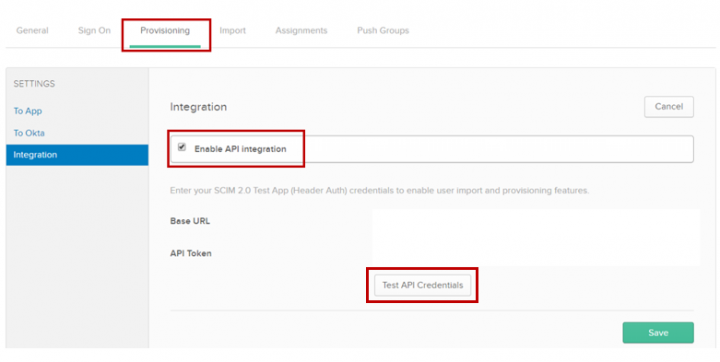
1. Click the "Provisioning" tab.
2. Click the "Integration" tab.
3. Enter the Base URLand API Token as provided by ICI Administrator.
4. Click the "Test API Credentials" button to validate the credentials (ICI Base URLand API Token). A validation message will be displayed on entering incorrect credentials indicating that an authentication error has occurred.
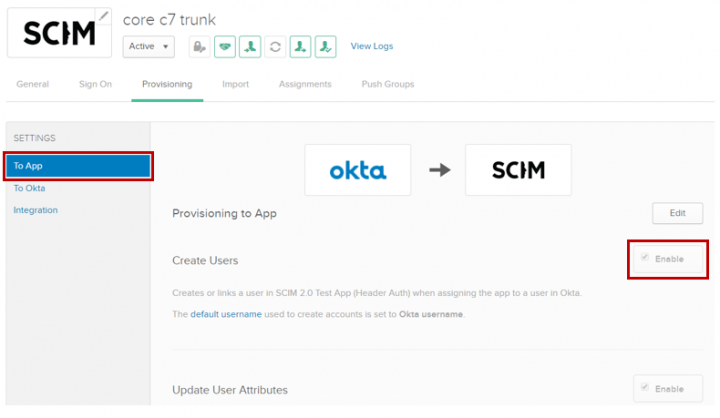
To allow Provisioning of SCIM application i.e. from OKTA to SCIM, the Administrator enables functionalities such as Create Users, Update User Attributes, and Deactivate Users. After enabling the functionalities, you can provision/deprovision users in ICI from OKTA using the SCIM protocol (for example, SCIM to ICI application as mentioned in Step 5).
Adding a user in OKTA
To add a user in OKTA:
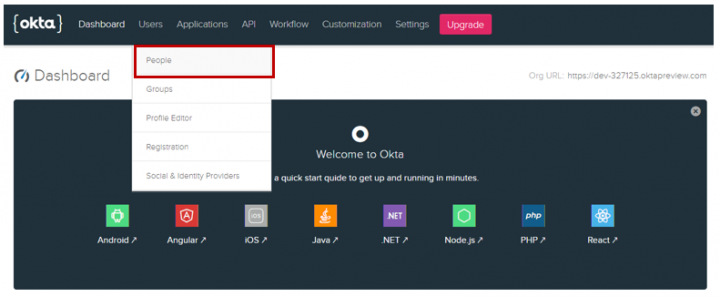
1. Click "Users" menu on the Dashboard.
2. Click "People".
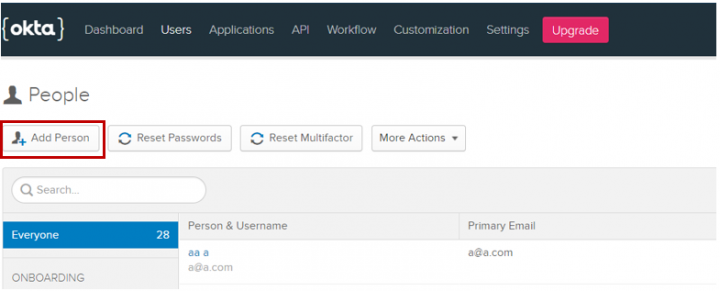
3. Click "Add Person". The Add Person window opens.
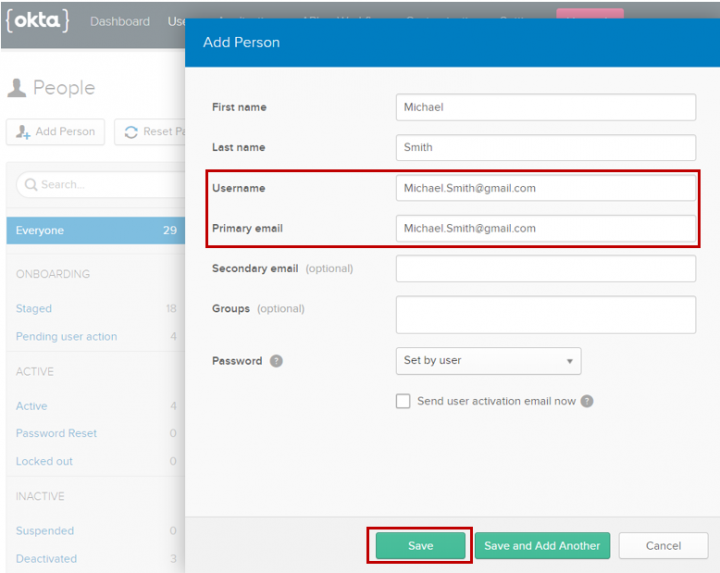
4. Enter details such as First name, Last name, Username and Primary email. For example, add user - Michael Smith.
5. Click "Save". The user Michael Smith is added to the application SCIM to ICI.
6. The user Michael Smithcan now be provisioned to ICI using Assignments tab.
Provisioning users
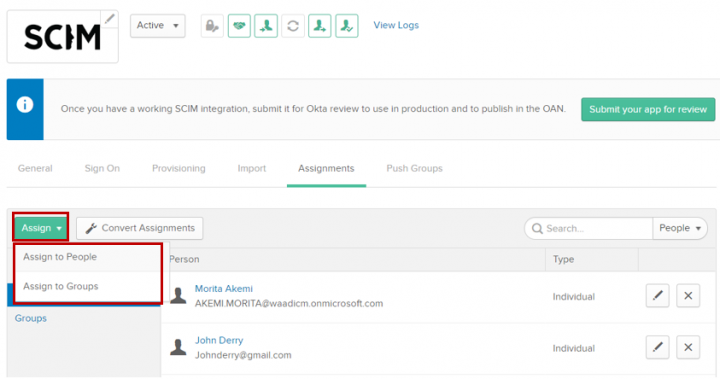
You can provision users by adding users individually or by user group in ICI:
1. Click the "Assignments" tab.
2. Click "Assign" drop-down.
3. Select "Assign to People" to select an individual user or select "Assign to Groups"to select a user group.
Provisioning users using assignment
To add a user to SCIM to ICI Assignments:
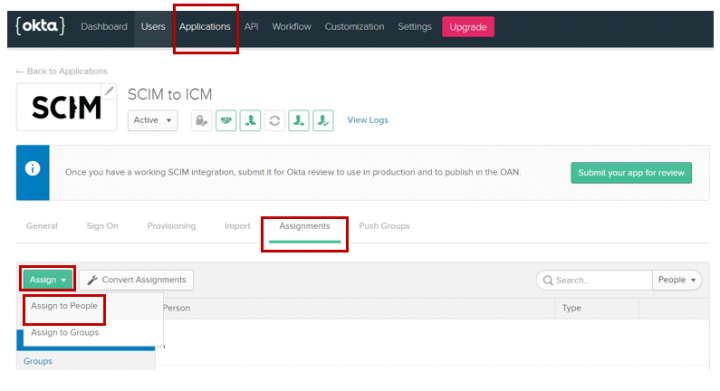
1. Click the "Assignments" tab in the Applications menu.
2. Click the "Assign" drop-down.
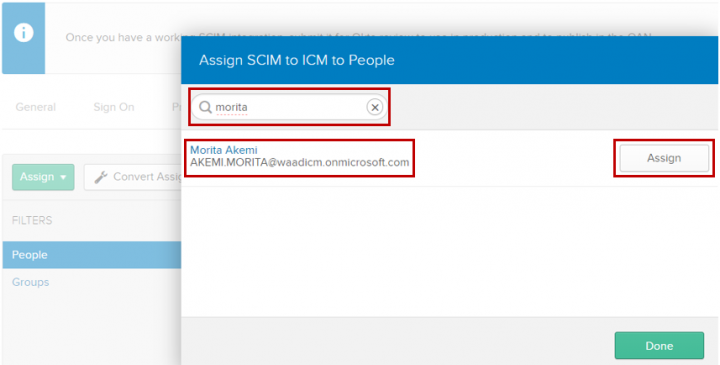
3. Click "Assign to People". The Assign SCIM to ICI to People window opens.
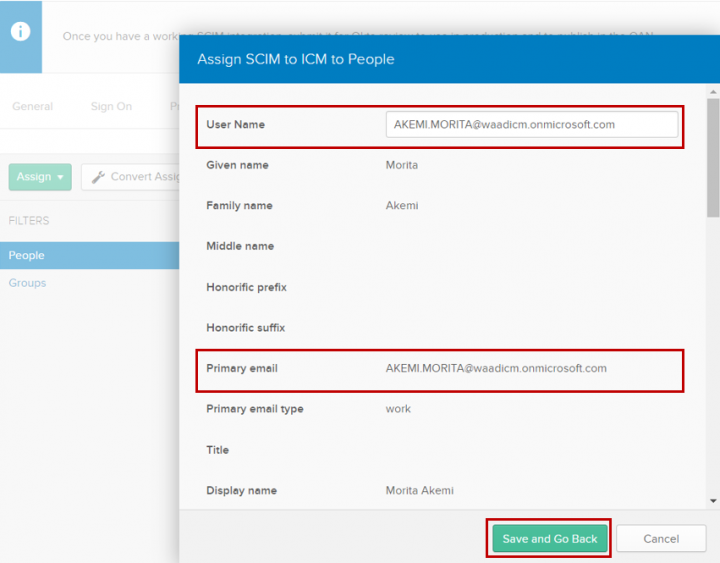
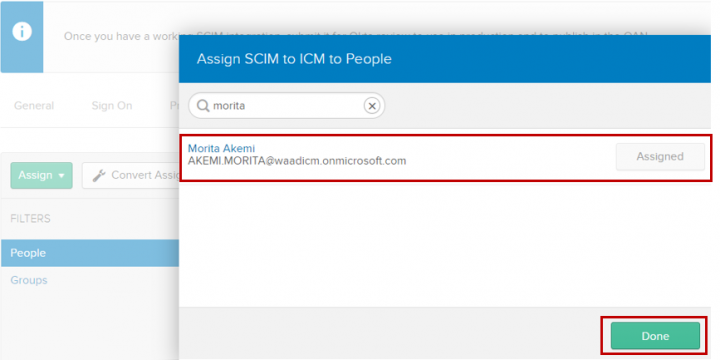
4. Search for a user in the search tab. For example, Morita Akemi.
5. Click "Assign".
- If the user is not present, ICI creates a new user.
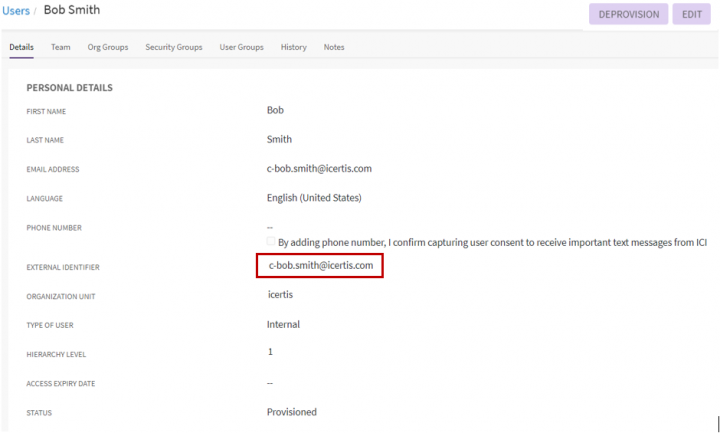
- If the user is present, but in the deprovisioned state, then ICI reprovisions the user only if the External identifier value in ICI is matching with the value of SCIM External identifier.
6. Click "Save and Go Back".
7. Click "Done".
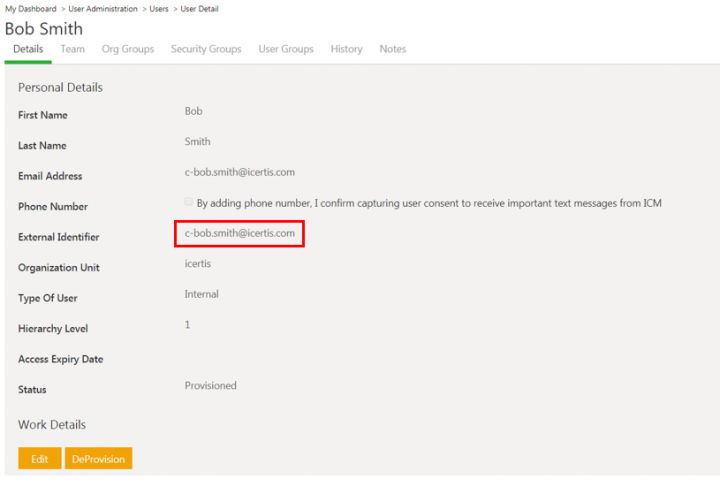
The user is assigned and provisioned in ICI.
Provisioning users using group assignment
Group assignment in SCIM is a convenient way to get multiple assignments. Using SCIM Group, users are provisioned to ICI in one go. You can create User Groups in ICI using Add Group functionality of SCIM.
You can provision multiple users in ICI by using a group assignment provided they are already assigned and displayed in the Assignments tab.
To add already assigned members to a group SCIM to ICI group:
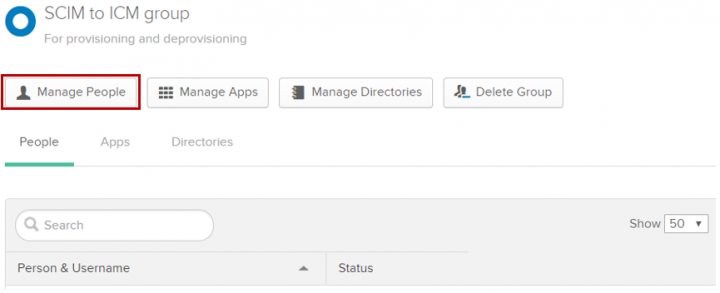
1. Click "SCIM to ICI group".
2. Click "Manage People".
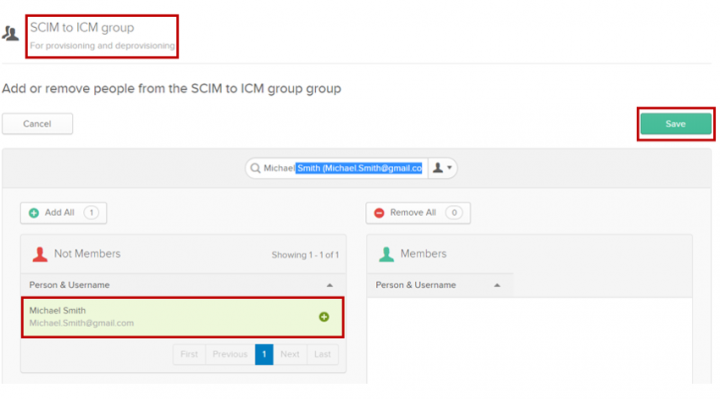
3. Search a user. For example, Michael Smith should already be provisioned in ICI through an individual or group assignment.
4. Click the Add icon.
5. Click Save. The user Michael Smith is added to the group SCIM to ICI group.
Mapping ICI attributes with SCIM attributes
To map ICI attributes with SCIM attributes, you must create the Client App Entity Mapping.
Client App Entity Mapping
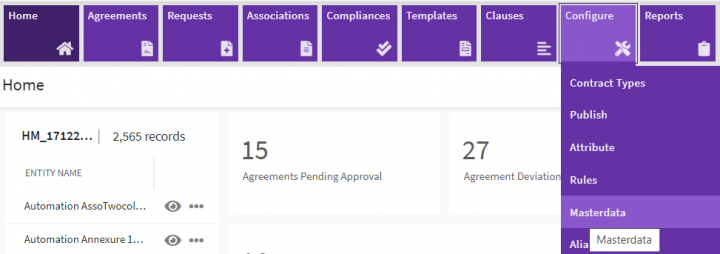
1. Click "Configure" > "Masterdata" on the Home page. The Masterdata index page opens.
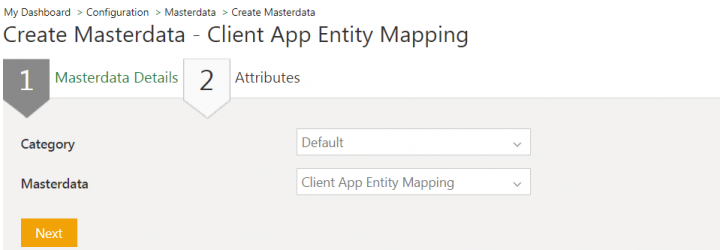
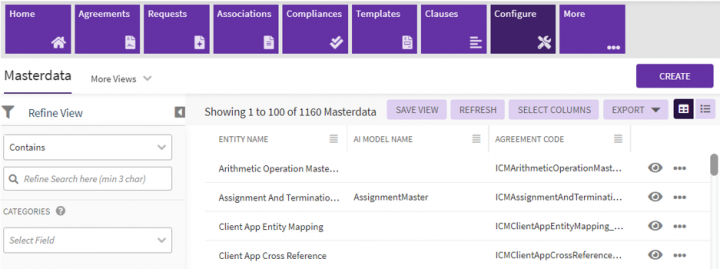
2. Click "Create". The "Create Masterdata" page opens.
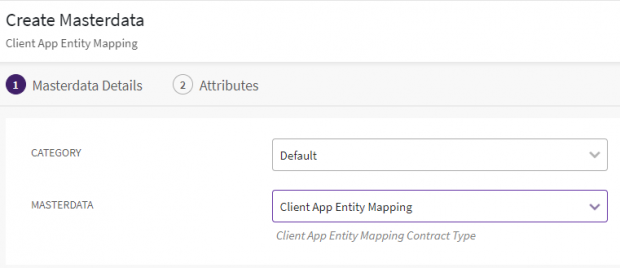
The Create Masterdata page contains the following tabs:
a. Masterdata Details
b. Attributes
a. Masterdata Details
1. Select the Category from the drop-down. For example, Default.
2. Select the Masterdata Contract Type.
3. Click Next. The Attributes page opens.
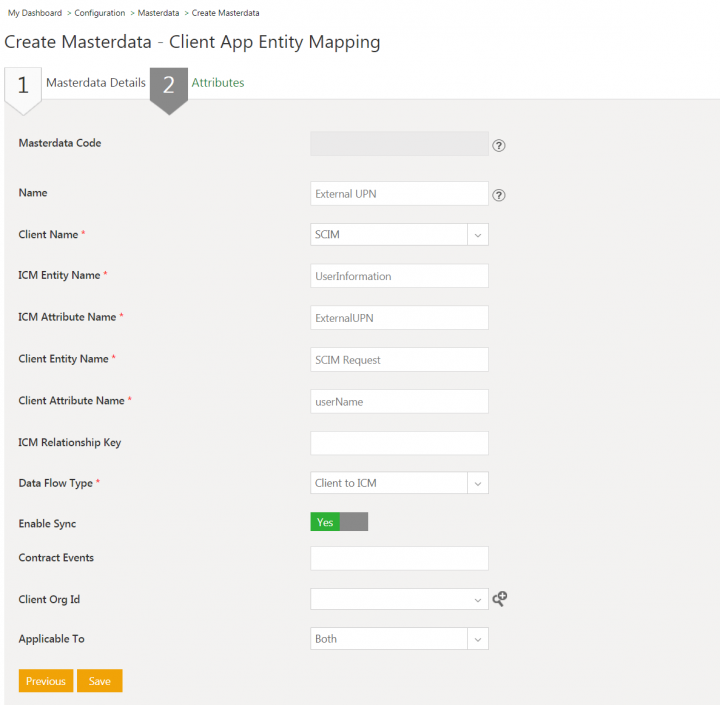
b. Attributes
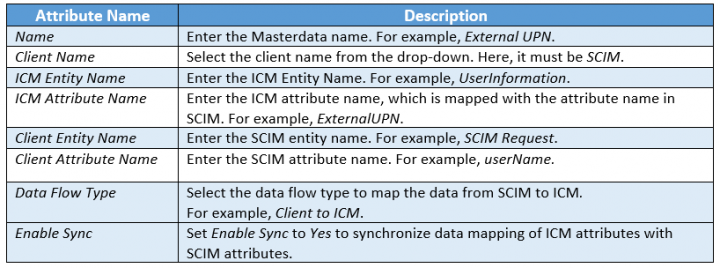
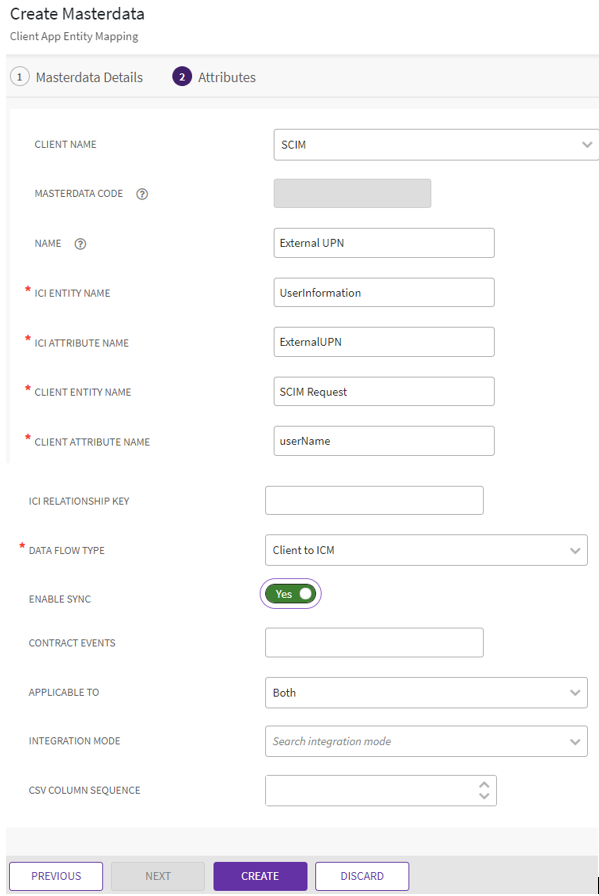
Provide relevant attribute values in the respective fields. For example:
- Client Name: Select the client name from the drop-down. Here, it must be SCIM.
- Name: Enter the Masterdata name. For example, External UPN.
- ICI Entity Name: Enter the ICI Entity Name. For example, UserInformation.
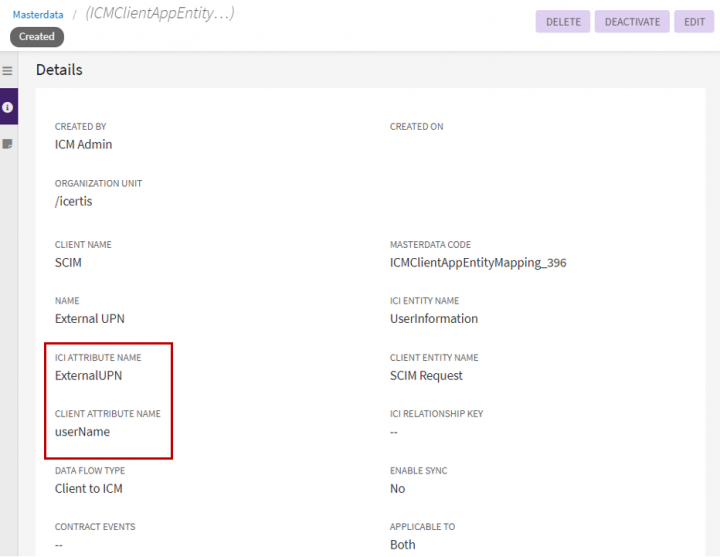
- ICI Attribute Name: Enter the ICI attribute name, which is mapped with the attribute name in SCIM. For example, ExternalUPN.
- Client Entity Name: Enter the SCIM entity name. For example, SCIM Request.
- Client Attribute Name: Enter the SCIM attribute name. For example, userName.
- Data Flow Type: Select the data flow type to map the data from SCIM to ICI. For example, Client to ICI.
- Enable Sync: Set "Enable Sync" to "Yes" to synchronize data mapping of ICI attributes with SCIM attributes.
- It is mandatory to create the Client App Entity Mapping for the attribute ExternalUPN.
- Repeat the steps under Client App Entity Mapping to map other attributes such as Phone Number from SCIM to ICI.
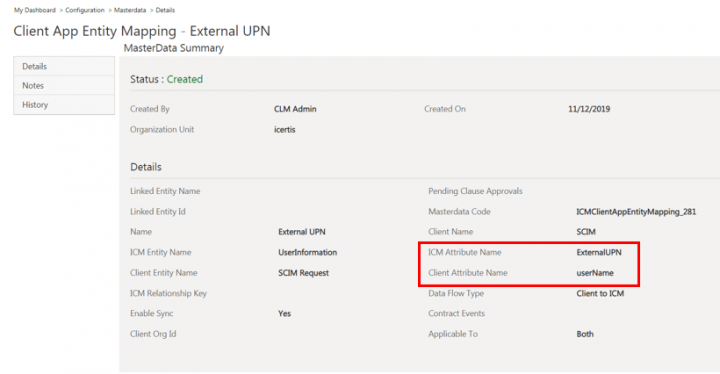
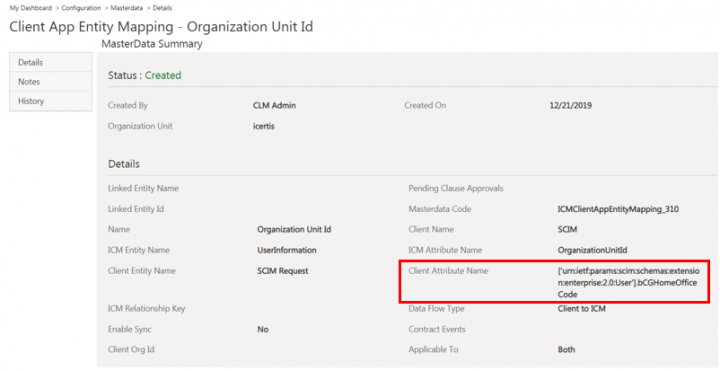
The Client App Entity Mapping created is displayed as shown in the screenshot below:
The value of the SCIM attribute name (for example, userName) is mapped with ICI attribute name (for example, ExternalUPN) as shown in the screenshot below:
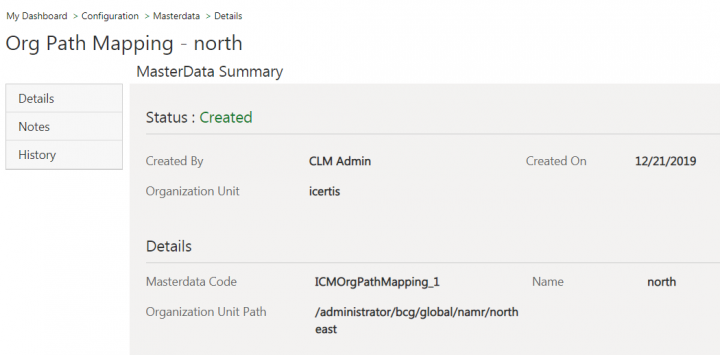
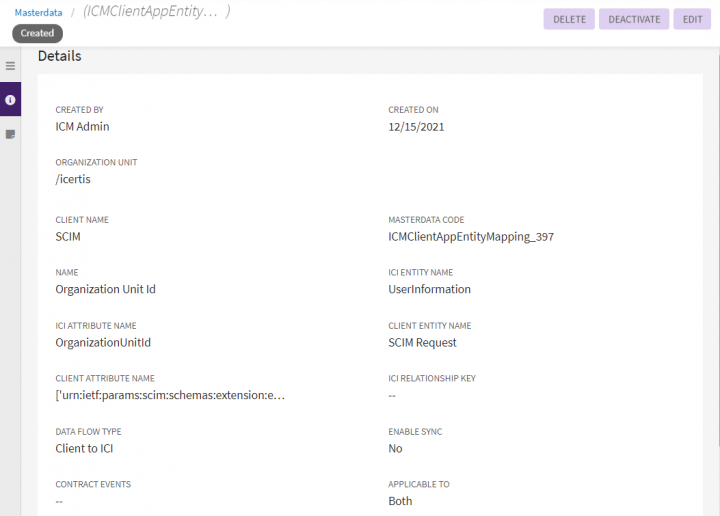
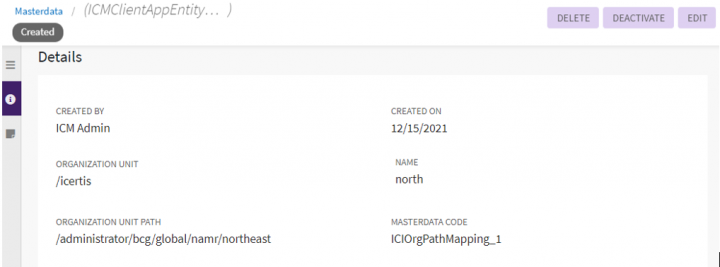
In this example, the value of Client Attribute Name as shown in the above screenshot is mapped to the Org Path Mapping masterdata.
Using the Client App Entity Mapping for attributes such as OrganizationUnitId, OrgPathId or SharedOrgPathId, the Org Path Mapping will be used to map the respective Org of a user.
Deprovisioning users
You can deprovision users in ICI using the Assignments tab.
Deprovisioning user from assignment
You can deprovision user either individually or by removing the user from the group which was used as assignment.
To deprovision an assigned user from SCIM:
2. Select the user to be unassigned from the displayed records. For example, Michael Smith.
3. Click "OK".
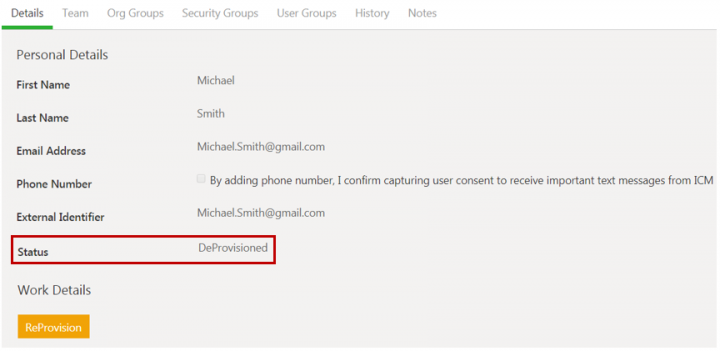
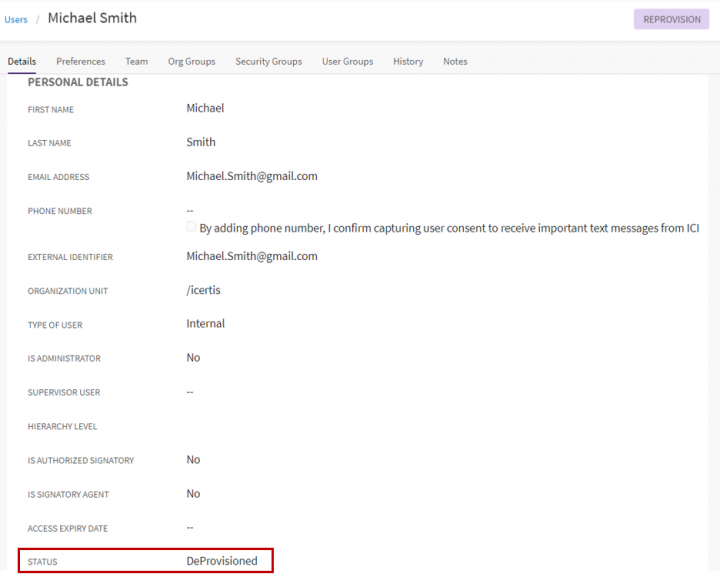
The user Michael Smith is unassigned from SCIM to ICI and subsequently deprovisioned from ICI.
Creating User Groups in ICI using SCIM
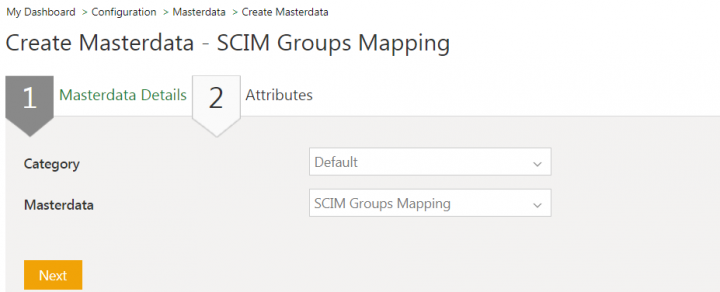
To create user groups in ICI using SCIM, you must create the SCIM Groups Mapping masterdata.
The SCIM Groups Mapping masterdata is created to define the mapping before pushing the group from SCIM to ICI, for example, to push the Group SCIM Admins from SCIM to ICI as Local Admins. If the mapping is not present, the Group SCIM Admins will be created as Group SCIM Admins in ICI, and a masterdata record will also be created in SCIM Groups Mapping masterdata if the masterdata Contract Type is available.
SCIM Groups Mapping
1. Click "Configure" > "Masterdata" on the Home page. The Masterdata index page opens.
2. Click "Create". The "Create Masterdata" page opens.
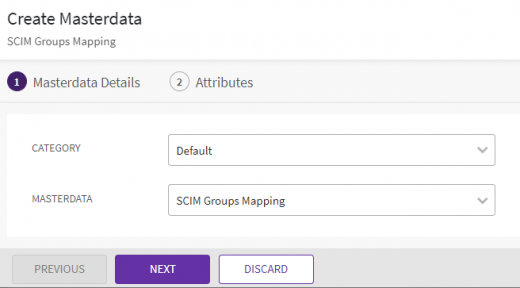
The Create Masterdata page contains the following tabs:
a. Masterdata Details
b. Attributes
a. Masterdata Details
1. Select the "Category" from the drop-down. For example, Default.
2. Select the Masterdata Contract Type.
3. Click "Next". The Attributes page opens.
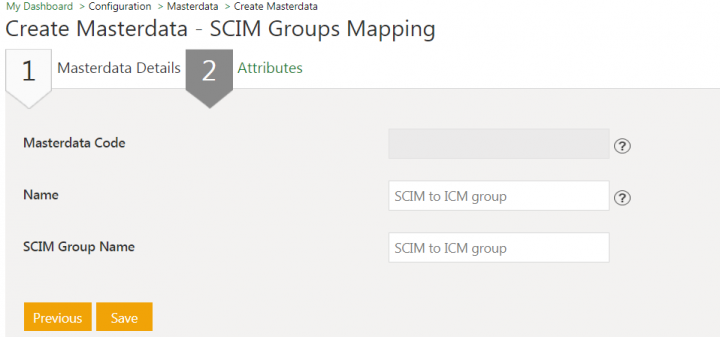
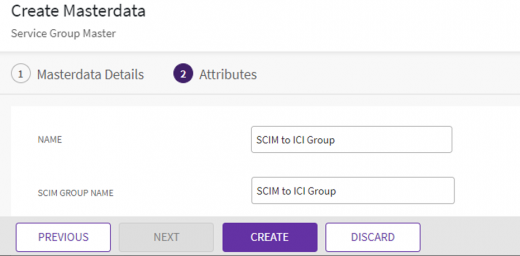
b. Attributes
- Enter the masterdata Name (such as SCIM to ICI group) and the SCIM Group Name (such as SCIM to ICI group).
- Click Save.
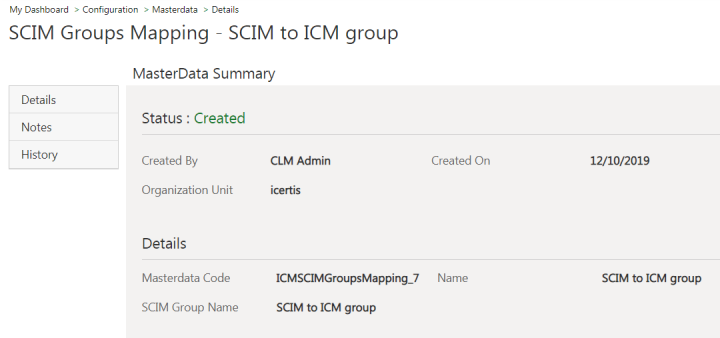
The SCIM Groups Mapping is created.
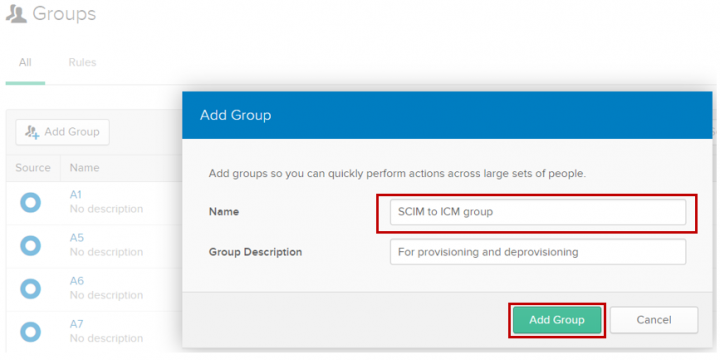
To create User Group using SCIM:
1. Click the "Users" tab on the OKTA Dashboard.
2. Select "Groups" from the drop-down menu. The Groups page opens.
3. Click "Add Group".
4. Enter "Name". For example, SCIM to ICI group.
5. Click Add Group. The group is added in SCIM.
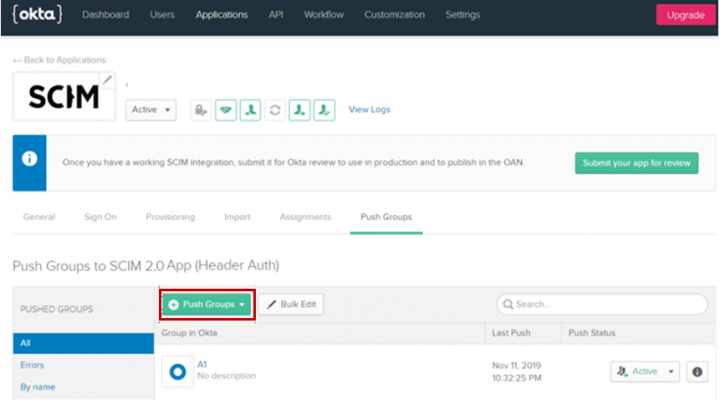
Push Groups:
Push Group is used to create User Groups in ICI. You can push groups with members, but the member should have already been provisioned in ICI using Assignment either individually or group assignment.
6. Click the "Push Groups" tab.
7. Click the "Push Groups"drop-down.
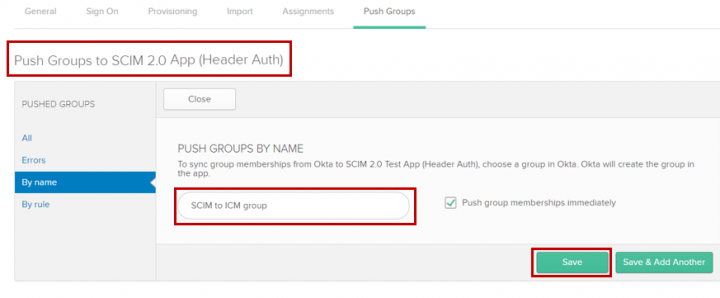
8. Search a group using the search field. For example, SCIM to ICI group.
9. Select the desired group from the displayed records.
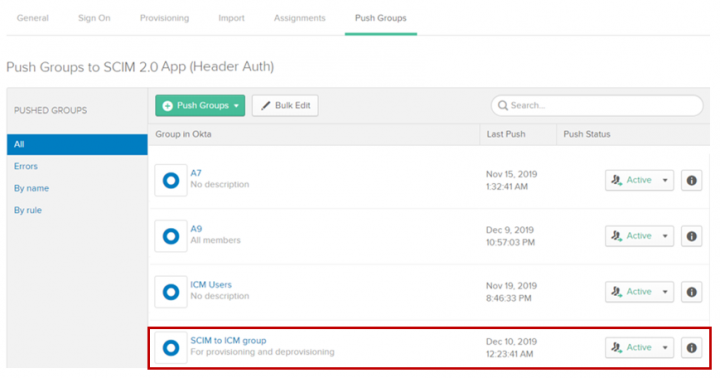
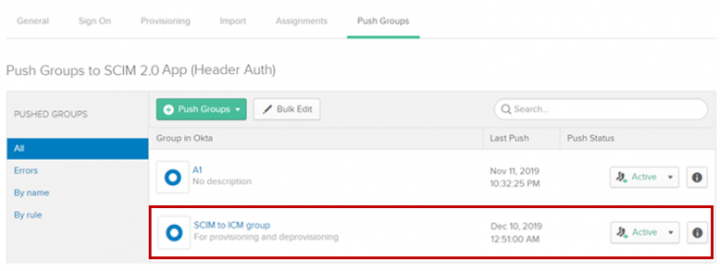
10. Click "Save". The SCIM to ICI group is now pushed to ICI.
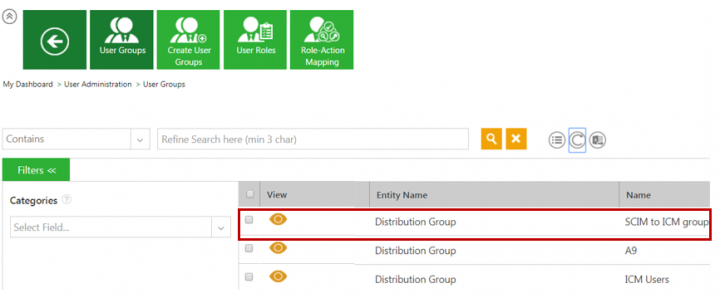
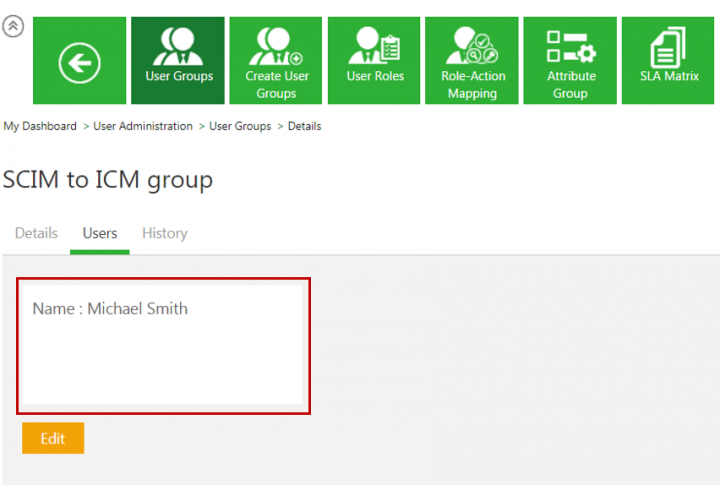
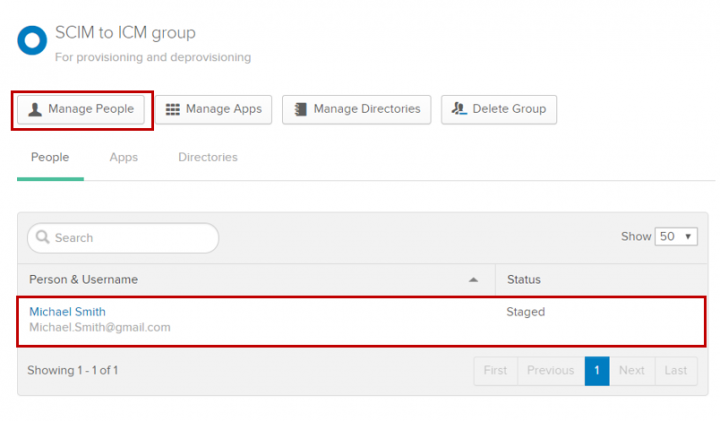
11. The members of the group SCIM to ICI group are pushed to ICI. For example, the user of the group SCIM to ICI group Michael Smith is pushed to ICI.
Managing ICI User Group members using SCIM
To deprovision a user using SCIM, you first need to remove the user from the Push Groups. For example, let us remove the user Michael Smith from Push GroupsSCIM to ICI group.
1. Go to the "Push Groups" tab.
2. Click the "Push Groups". For example, SCIM to ICI group.
3. Click "Manage People". The SCIM to ICI group opens.
4. Click the remove icon for the user to be removed. For example, Michael Smith.
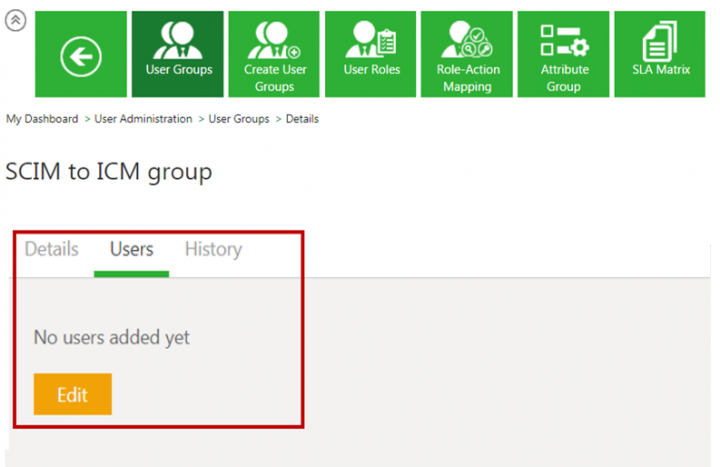
5. Click Save. The user is removed from the Push Group - SCIM to ICI group and consequently gets deprovisioned from the User Groups in ICI.
Related Topics: Salesforce | Microsoft Dynamics CRM | Icertis Experience for Workday

