| (39 intermediate revisions by 3 users not shown) | |||
| Line 2: | Line 2: | ||
= Reasons = | = Reasons = | ||
| − | + | When you send an Agreement or Contract Type, Template or Clause, and so on for approval, the approver can reject it for various reasons. From this page, users can add the reason codes for rejection, search and modify the existing ones in the system. | |
== Searching a Reason == | == Searching a Reason == | ||
| − | In ICI, you can search a specific reason for which an agreement or contract type is being rejected using various options given below, including the dynamic search feature.<br/> Users can search a reason code in a specific language | + | In ICI, you can search for a specific reason for which an agreement or contract type is being rejected using various options given below, including the dynamic search feature.<br/> Users can search a reason code in a specific language for all entities through respective Index Page – Search Categories. The "Translations Editor" tool supports adding Localized values for the "Reason Code" for different languages in ICI.<br/> |
| − | To search a reason:<br/> 1. | + | To search for a reason:<br/> 1. '''Click '''the "Configure" navigation menu on the top and '''click '''"Reasons" under it. |
| − | <div class="image-green-border">[[File:Reasons | + | <div class="image-green-border">[[File:8.0-Reasons-menu.png|220px|8.0-Reasons-menu.png]]</div> <div class="image-green-border"> </div> <div class="image-green-border"> The "Reasons" index page opens.</div> <div class="image-green-border">[[File:8.0-Reasons-1-Index-page.png|720px|8.0-Reasons-1-Index-page.png]]</div> <div class="image-green-border"><br/> 2. '''Select '''the "Reason Code" in the left collapsible "Refine View" pane under " the Categories" drop-down used for filtering records. A list of all reason codes is displayed below the Search Reason Code field. Alternatively, you can type the search keyword in the search box below the "Categories" dropdown. For example, the "Legal" keyword.<br/> 3. '''Select '''the desired reason code values from the list displayed below the search text box. For example, "Legal Approval Required" and "Date Changes Required" ('''Note: '''Use ctrl-key and select multiple reason codes from the list displayed).<br/> 4. '''Click '''"More Options" and '''enter'''''<b> </b>''a''' '''specific value in the "Custom keyword" field and '''click "'''Apply" to filter your search further. For example, "Approval". Only Reason Codes containing the "Legal" keyword and further "Approval" within those are only displayed. </div> <div class="image-green-border">5. '''Click '''"Clear All" to clear all search keywords.</div> <div class="image-green-border"> </div> <div class="image-green-border">''[[File:8.0-Reasons-2-Index-page-search.png|220px|8.0-Reasons-2-Index-page-search.png]]''</div> |
| − | Alternatively, type the keywords in the | + | Alternatively, type the keywords in the "Refine Search here"'' ''field. A list of relevant reasons is displayed. |
== Creating a Reason == | == Creating a Reason == | ||
| − | Users can create | + | Users can create "Reasons" to track a particular rejection involved in the clause, template, attributes, and so on. |
| + | |||
| + | To create a reason:<br/> 1. '''Click '''the "Configure" navigation menu on the top and '''click '''"Reasons" under it. The "Reasons" index page opens. | ||
| + | <div class="image-green-border">[[File:8.0-Reasons-Create-page-Highlighted.png|720px|8.0-Reasons-Create-page-Highlighted.png]]</div> | ||
| + | '''2. Click '''"Create" in the far top-right corner in the title bar. The "Create Reason" page opens with two numbered tabs.<br/> 3. '''Enter '''the reason code in the "Code" field on the "Details" tab''. ''<br/> 4.'' '''''Enter '''the reason heading in the "Heading" field.'' '' | ||
| + | <div class="image-green-border">'''[[File:8.0-Reasons-Create-page.png|480px|8.0-Reasons-Create-page.png]]'''</div> <div class="image-green-border"> </div> | ||
| + | 4. '''Click '''"Next". The "Verify" page opens. Alternatively, you can click the number of the tab on the top in the numbered navigation bar to open the next page.<br/> 5. '''Verify '''the entered details and '''click '''"Create" to save the data or "Discard" to discard the data. The "Reason" is created. | ||
| + | <div class="image-green-border">''' [[File:8.0-Reasons-Create-page-Verify.png|480px|8.0-Reasons-Create-page-Verify.png]]'''</div> | ||
| − | |||
| − | |||
| − | |||
| − | |||
== Editing a Reason == | == Editing a Reason == | ||
| − | Users can edit the existing Reasons involved in rejecting a clause, template, attribute and so on. | + | Users can edit the existing Reasons involved in rejecting a clause, template, attribute, and so on. |
| − | To edit a reason:<br/> 1. | + | To edit a reason:<br/> 1. '''Click '''the "Configure" navigation menu on the top and '''click '''"Reasons" under it. The "Reasons" index page opens. <br/> 2. '''Click '''the "View Details" eye icon next for the "Reason"'' ''you want to open. For example, "Legal Approval Required". The "Reasons" Details page opens. |
| − | <div class="image-green-border">[[File:Reasons | + | <div class="image-green-border">[[File:8.0-Reasons-Index-Eye.png|720px|8.0-Reasons-Index-Eye.png]]</div> |
| − | 3. '''Click | + | 3. '''Click "'''Edit" on the top right. The "Edit Reason"''page opens.'' |
| − | <div class="image-green-border">[[File:Reasons | + | <div class="image-green-border">[[File:8.0-Reasons-Edit-page-Highlighted.png|720px|8.0-Reasons-Edit-page-Highlighted.png]]</div> |
| − | 5. '''Modify '''the fields as required on the | + | 5. '''Modify '''the fields as required on the "Details" tab.<br/> 6. '''Click "'''Next". The "Verify" tab opens.<br/> 7. '''Verify '''the entered details and '''click '''"Update". The Reason is updated. |
| − | <div class="image-green-border">[[File:Reasons | + | <div class="image-green-border">[[File:8.0-Reasons-Edit-page-Verify.png|420px|8.0-Reasons-Edit-page-Verify.png]]<br/> </div> <div class="image-green-border"> </div> <div class="image-green-border"> </div> <div class="image-green-border"> </div> |
| | ||
| | ||
| − | '''Related Topics: '''[[Agreement_Management|Agreement Management]] | [[Managing_Organization|Managing Organization]] | [[Managing_Users|Managing Users]] | [[Managing_User_Groups|Managing User Groups]] | [[Managing_Security_Groups|Managing Security Groups]] | [[Application_Settings|Application Settings]] | [[Notification_Settings|Notification Settings]] | [[Currencies|Currencies]] | + | '''Related Topics: '''[[Agreement_Management|Agreement Management]] | [[Managing_Organization|Managing Organization]] | [[Managing_Users|Managing Users]] | [[Managing_User_Groups|Managing User Groups]] | [[Managing_Security_Groups|Managing Security Groups]] | [[Application_Settings|Application Settings]] | [[Notification_Settings|Notification Settings]] | [[Currencies|Currencies]] | [[Search_Sync|Search Sync]] | [[Legacy_Upload|Legacy Upload]] |
Latest revision as of 10:23, 9 June 2022
Reasons
When you send an Agreement or Contract Type, Template or Clause, and so on for approval, the approver can reject it for various reasons. From this page, users can add the reason codes for rejection, search and modify the existing ones in the system.
Searching a Reason
In ICI, you can search for a specific reason for which an agreement or contract type is being rejected using various options given below, including the dynamic search feature.
Users can search a reason code in a specific language for all entities through respective Index Page – Search Categories. The "Translations Editor" tool supports adding Localized values for the "Reason Code" for different languages in ICI.
To search for a reason:
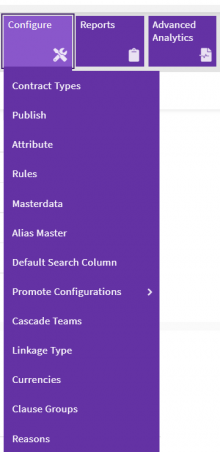
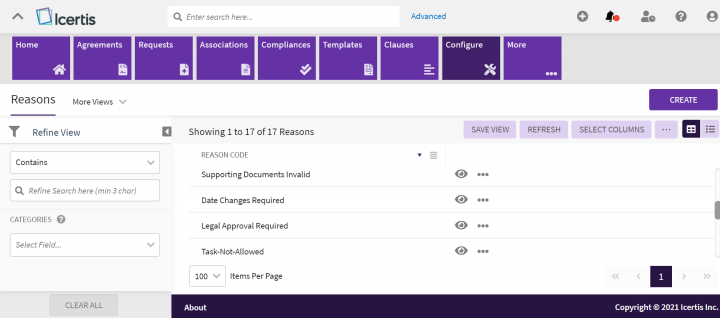
1. Click the "Configure" navigation menu on the top and click "Reasons" under it.
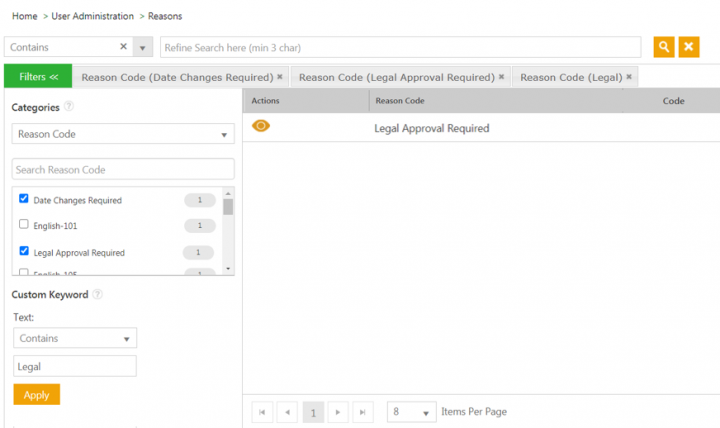
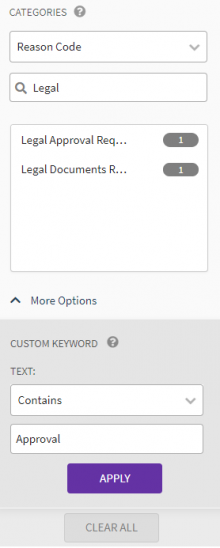
2. Select the "Reason Code" in the left collapsible "Refine View" pane under " the Categories" drop-down used for filtering records. A list of all reason codes is displayed below the Search Reason Code field. Alternatively, you can type the search keyword in the search box below the "Categories" dropdown. For example, the "Legal" keyword.
3. Select the desired reason code values from the list displayed below the search text box. For example, "Legal Approval Required" and "Date Changes Required" (Note: Use ctrl-key and select multiple reason codes from the list displayed).
4. Click "More Options" and enter a specific value in the "Custom keyword" field and click "Apply" to filter your search further. For example, "Approval". Only Reason Codes containing the "Legal" keyword and further "Approval" within those are only displayed.
Alternatively, type the keywords in the "Refine Search here" field. A list of relevant reasons is displayed.
Creating a Reason
Users can create "Reasons" to track a particular rejection involved in the clause, template, attributes, and so on.
To create a reason:
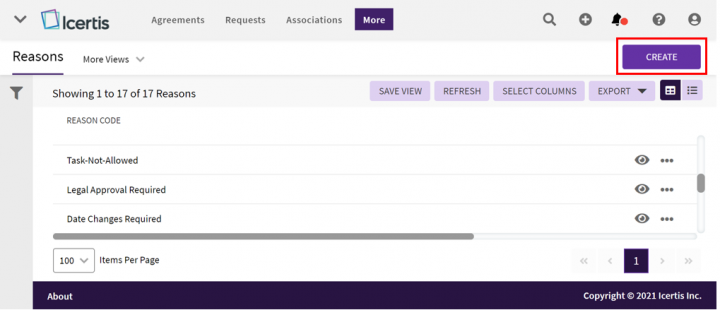
1. Click the "Configure" navigation menu on the top and click "Reasons" under it. The "Reasons" index page opens.
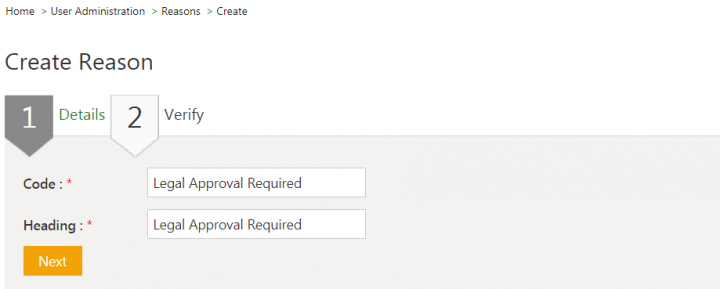
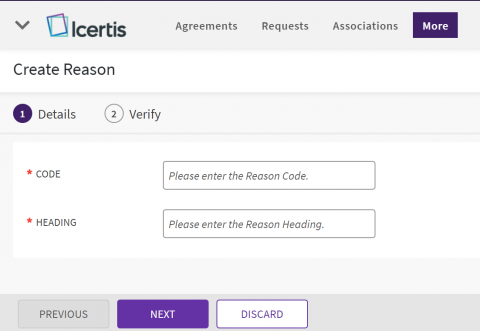
2. Click "Create" in the far top-right corner in the title bar. The "Create Reason" page opens with two numbered tabs.
3. Enter the reason code in the "Code" field on the "Details" tab.
4. Enter the reason heading in the "Heading" field.
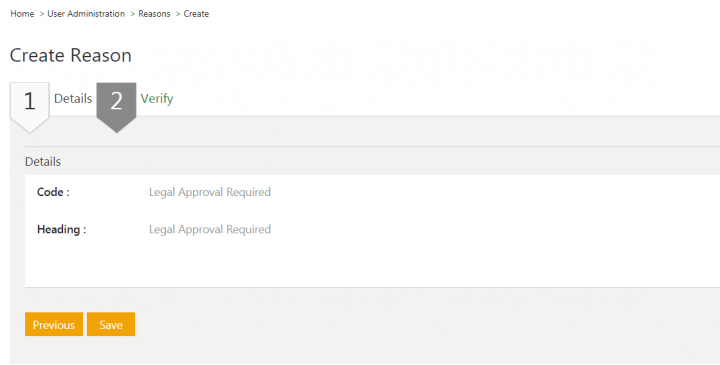
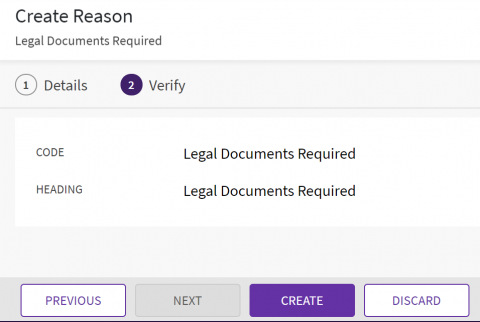
4. Click "Next". The "Verify" page opens. Alternatively, you can click the number of the tab on the top in the numbered navigation bar to open the next page.
5. Verify the entered details and click "Create" to save the data or "Discard" to discard the data. The "Reason" is created.
Editing a Reason
Users can edit the existing Reasons involved in rejecting a clause, template, attribute, and so on.
To edit a reason:
1. Click the "Configure" navigation menu on the top and click "Reasons" under it. The "Reasons" index page opens.
2. Click the "View Details" eye icon next for the "Reason" you want to open. For example, "Legal Approval Required". The "Reasons" Details page opens.
3. Click "Edit" on the top right. The "Edit Reason"page opens.
5. Modify the fields as required on the "Details" tab.
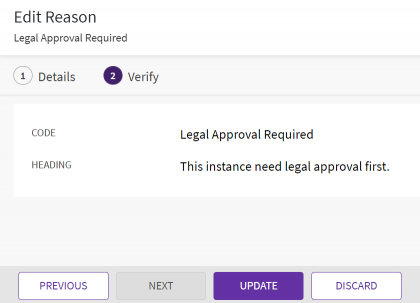
6. Click "Next". The "Verify" tab opens.
7. Verify the entered details and click "Update". The Reason is updated.
Related Topics: Agreement Management | Managing Organization | Managing Users | Managing User Groups | Managing Security Groups | Application Settings | Notification Settings | Currencies | Search Sync | Legacy Upload
