| (9 intermediate revisions by 2 users not shown) | |||
| Line 86: | Line 86: | ||
You can use the ''Advanced Search'' option to search for existing entities. You can save these searches and pin them as ''Favorites ''for easy access. Saved searches can be opened for easy access to the search results. | You can use the ''Advanced Search'' option to search for existing entities. You can save these searches and pin them as ''Favorites ''for easy access. Saved searches can be opened for easy access to the search results. | ||
| + | |||
| + | | ||
=== Performing a Search to Save === | === Performing a Search to Save === | ||
| − | 1. '''Click''' the '' | + | 1. '''Click''' the ''Advanced ''button at the right of the search toolbar ''My Dashboard'' page. The ''Advanced Search'' page opens. <br/> 2. In the ''Please select Entities to Search field'', '''enter''' or '''select''' appropriate entities from the list and '''type''' the keywords to search in the ''Refine Search here'' field. |
| − | <div class="image-green-border"> </div> <div class="image-green-border"> [[File: | + | <div class="image-green-border"> </div> <div class="image-green-border"> [[File:SF 12.PNG|720px|SF 12.PNG]]</div> <div class="image-green-border"> </div> <div class="image-green-border">3. '''Select''' from each of the following options: </div> |
*''Metadata'': the search is performed in the metadata of the selected Agreement. | *''Metadata'': the search is performed in the metadata of the selected Agreement. | ||
*''Full Text'': the search is performed within the contents of the document of the selected Agreement. | *''Full Text'': the search is performed within the contents of the document of the selected Agreement. | ||
| − | <div class="image-green-border">4. After selecting either of the above options, '''click '''the ''Search'' | + | <div class="image-green-border">4. After selecting either of the above options, '''click '''the ''Search'' button. The list of search results is displayed. </div> <div class="image-green-border">5. To refine your search further, navigate to the ''Search'' For field. '''Click''' ''Select Field'' and '''select''' an option from the list displayed. The number in the bracket indicates the number of items available containing that search term. You can select multiple options. For example, '''selecting '''the field ''Status'' displays the number of Agreements that have the ''Status as Draft'', ''Approved'', ''Terminated'', ''Superseded'' and so on. If you select the status as ''Draft'' (select the checkbox next to Draft), all Agreements in ''Draft'' state are displayed.<br/> 6. A list of these Agreements is displayed as the search result in a tabular format. Enhance your search using wild cards as follows:<br/> • Type a search term in between the star characters *...*. It displays the existing items which include the respective search term.<br/> • Type *...Prefix* to a search term. It displays the existing items which end with this term.<br/> • Type *...Suffix * to a search term. It displays the existing items which start with this term.<br/> • Type a search term in double quotes "...". It displays the existing items which include the search term.<br/> • Type...(space)... multiple search terms with a space in between. It displays the existing items which include the search terms.</div> |
| | ||
| Line 129: | Line 131: | ||
*This enables creating an Agreement in CRM with attachments added in the Notes section. | *This enables creating an Agreement in CRM with attachments added in the Notes section. | ||
*When you add an attachment to an Agreement created in CRM, it must be mapped with the appropriate Association added to the Agreement in ICI. The files in the Notes section are mapped to the File Selection Attribute in Agreement. | *When you add an attachment to an Agreement created in CRM, it must be mapped with the appropriate Association added to the Agreement in ICI. The files in the Notes section are mapped to the File Selection Attribute in Agreement. | ||
| + | |||
| + | | ||
| | ||
| Line 134: | Line 138: | ||
== Creating a Masterdata Contract Type == | == Creating a Masterdata Contract Type == | ||
| − | 1. '''Log on''' to the ICI application. <br/> 2. '''Click''' '' | + | 1. '''Log on''' to the ICI application. <br/> 2. '''Click''' ''Configure'' > ''Contract Type > Create'' on ICI Dashboard. |
| − | <div class="image-green-border">[[File: | + | <div class="image-green-border">[[File:MSCRM 1.png|620px|MSCRM 1.png]]</div> |
The ''Select Contract Type'' page opens displaying the following options: | The ''Select Contract Type'' page opens displaying the following options: | ||
| Line 192: | Line 196: | ||
*Enable Sync | *Enable Sync | ||
*Contract Events | *Contract Events | ||
| − | <div class="image-green-border">[[File: | + | <div class="image-green-border">[[File:MSCRM 2.PNG|520px|MSCRM 2.PNG]]<br/> </div> <div class="image-green-border">'''Team'''</div> <div class="image-green-border">9. Click the plus icon to add an approver to the Contract Type Masterdata team. </div> <div class="image-green-border"><br/> </div> <div class="image-green-border">'''Verify'''<br/> 10. '''Verify''' the information you entered. '''Click''' ''Create''.<br/> 11. Send the Contract Type for approval. <br/> 12. After the Masterdata is approved, '''publish''' the Masterdata Contract Type to make it available for Agreement creation. </div> <div class="image-green-border"> </div> |
| − | + | | |
| − | + | ||
| − | + | ||
| − | + | ||
| − | + | ||
| − | + | ||
== Creating Masterdata for Mapping the Entities == | == Creating Masterdata for Mapping the Entities == | ||
You can create a Masterdata record for the Contract Type Masterdata that you created earlier. This helps in mapping the entities between CRM and ICI. ICI allows mapping this data from any CRM entity such as Opportunity, Account, or Quote to a Contract Request or Agreement by creating the Masterdata record in ICI. To create the Masterdata record: | You can create a Masterdata record for the Contract Type Masterdata that you created earlier. This helps in mapping the entities between CRM and ICI. ICI allows mapping this data from any CRM entity such as Opportunity, Account, or Quote to a Contract Request or Agreement by creating the Masterdata record in ICI. To create the Masterdata record: | ||
| − | <div class="image-green-border">1. '''Click''' ''Configuration on My Dashboard''. The ''Configuration'' page opens.</div> <div class="image-green-border"> </div> <div class="image-green-border">[[File: | + | <div class="image-green-border">1. '''Click''' ''Configuration on My Dashboard''. The ''Configuration'' page opens.</div> <div class="image-green-border"> </div> <div class="image-green-border">[[File:MSCRM 3.png|720px|MSCRM 3.png]]</div> <div class="image-green-border"><br/> 2. '''Click''' ''Masterdata'' on the ''Configuration'' page. The ''Masterdata'' index page opens.</div> <div class="image-green-border"> </div> <div class="image-green-border">[[File:SF 7.png|720px|SF 7.png]] </div> <div class="image-green-border"><br/> 3. '''Click''' ''Create''. The ''Create Masterdata'' page opens.</div> <div class="image-green-border"><br/> 4. '''Complete''' the information in the following sections:</div> |
*Masterdata Details | *Masterdata Details | ||
*Attributes | *Attributes | ||
5. '''Click '''''Next'' at the end of ''Masterdata Details'' section to go to the ''Attributes'' section and complete creating the Masterdata record. '''Masterdata Details '''<br/> 6. '''Select''' the ''Category ''from the drop-down list. <br/> 7. '''Select''' the Contract Type Masterdata that you created earlier. For the purpose of mapping the data between ICI and CRM, '''select '''''Client App Entity Mapping''. | 5. '''Click '''''Next'' at the end of ''Masterdata Details'' section to go to the ''Attributes'' section and complete creating the Masterdata record. '''Masterdata Details '''<br/> 6. '''Select''' the ''Category ''from the drop-down list. <br/> 7. '''Select''' the Contract Type Masterdata that you created earlier. For the purpose of mapping the data between ICI and CRM, '''select '''''Client App Entity Mapping''. | ||
| − | <div class="image-green-border">[[File: | + | <div class="image-green-border">[[File:MSCRM 4.PNG|520px|MSCRM 4.PNG]]</div> <div class="image-green-border"><br/> 8. '''Click''' ''Next''. The ''Attributes'' page opens. <br/> 9. '''Click''' the plus icon or select the following Attributes from the ''Available Attributes''. </div> |
*Client Name | *Client Name | ||
*ICI Entity Name | *ICI Entity Name | ||
| Line 233: | Line 232: | ||
11. '''Click''' ''Save'' to save the Masterdata record and enable mapping between ICI and CRM. | 11. '''Click''' ''Save'' to save the Masterdata record and enable mapping between ICI and CRM. | ||
| + | |||
| + | | ||
== Creating a Contract Request from an Opportunity == | == Creating a Contract Request from an Opportunity == | ||
| Line 249: | Line 250: | ||
<div class="image-green-border">[[File:CRMD365 09.png|720px|CRMD365 09.png]] </div> | <div class="image-green-border">[[File:CRMD365 09.png|720px|CRMD365 09.png]] </div> | ||
<br/> 6. On the ''Opportunity Summary'' page, '''click''' the ''ICI'' tab. | <br/> 6. On the ''Opportunity Summary'' page, '''click''' the ''ICI'' tab. | ||
| − | <div class="image-green-border">[[File: | + | <div class="image-green-border">[[File:MSCRM 5.PNG|720px|MSCRM 5.PNG]]</div> <div class="image-green-border">7. '''Click''' the ''New Request'' button from the Contract section. The ''Create Contract Request'' page opens in Microsoft Dynamics CRM connector.<br/> 8. '''Select''' the ''Category'' and ''Request Type'' based on the Request you are creating and '''click '''''Next''.</div> <div class="image-green-border"> </div> <div class="image-green-border">[[File:MSCRM 6.png|420px|MSCRM 6.png]]</div> <div class="image-green-border"> </div> <div class="image-green-border">9. '''Specify''' the details of the Request on various sections of this page. The following table describes the fields that are typically found on this page:</div> <div class="image-green-border"> </div> <div class="image-caption">[[File:Creating a Contract Request from an Opportunity-5.PNG|720px|RTENOTITLE]]</div> <div class="image-caption"> </div> <div class="image-green-border">[[File:Creating a Contract Request from an Opportunity-6.png|360px|RTENOTITLE]]</div> <div class="image-green-border"> </div> <div class="image-green-border"> 10. '''Click''' ''Next''. The ''Request Summary'' page opens. You can '''click '''Save if you want to save the changes and create the Request later.</div> <div class="image-green-border"> </div> <div class="image-green-border">[[File:MSCRM 7.png|520px|MSCRM 7.png]]</div> <div class="image-green-border"><br/> 11. '''Click''' ''Create Request''. The ''Opportunity Summary'' page opens.<br/> 12. '''Click''' ''ICI'' on the top navigation bar. Then, '''click '''''Contract Requests''. The ''Contract Request'' page opens showing the list of available Requests.<br/> 13. '''Click''' ''View'' next to the Request you created. The ''Request Details'' page opens.<br/> 14. Use the buttons in the table below to perform a desired action:</div> <div class="image-green-border">[[File:Creating a Contract Request from an Opportunity-8.PNG|720px|RTENOTITLE]] </div> <div class="image-green-border"> </div> <div class="image-green-border">[[File:MSCRM 8.PNG|720px|MSCRM 8.PNG]]</div> |
| + | | ||
| + | |||
== Creating a Contract from Opportunity == | == Creating a Contract from Opportunity == | ||
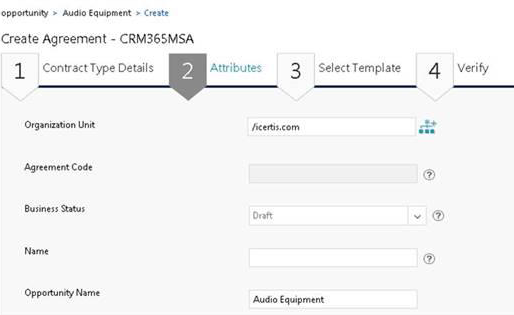
| − | <div class="image-green-border">The process of creating a contract from ICI in Microsoft Dynamics CRM Connector is dependent on the workflow implemented in your organization.<br/> To create a Contract from an Opportunity:<br/> <br/> 1. '''Log on''' to Microsoft Dynamics CRM. The Dynamics CRM 365 home page opens. </div> <div class="image-green-border"><br/> 2. '''Click''' the ''CRM Hub'' tile. The ''My Activities'' page opens.</div> <div class="image-green-border"><br/> 3. '''Click''' ''Dashboards'' in the ''My Work'' section on the left navigation pane. The ''Sales Overview Dashboard'' page opens. </div> <div class="image-green-border"> </div> <div class="image-green-border">[[File:CRMD365 07.png|720px|CRMD365 07.png]]</div> <div class="image-green-border"><br/> 4. On the ''My Open Opportunities'' widget,'''click'''''View Record ''from the ''More Commands'' option. The ''My Open Opportunities'' page opens. </div> <div class="image-green-border"> </div> <div class="image-green-border">[[File:CRMD365 08.png|720px|CRMD365 08.png]]</div> <div class="image-green-border"><br/> 5. '''Select''' the Opportunity for which you want to create a Request. The ''Opportunity Summary'' page opens. </div> <div class="image-green-border"> </div> <div class="image-green-border">[[File:CRMD365 09.png|720px|CRMD365 09.png]] </div> <div class="image-green-border"><br/> 6. On the ''Opportunity Summary'' page, '''click''' the ''ICI'' tab. </div> <div class="image-green-border"> </div> <div class="image-green-border">[[File: | + | <div class="image-green-border">The process of creating a contract from ICI in Microsoft Dynamics CRM Connector is dependent on the workflow implemented in your organization.<br/> To create a Contract from an Opportunity:<br/> <br/> 1. '''Log on''' to Microsoft Dynamics CRM. The Dynamics CRM 365 home page opens. </div> <div class="image-green-border"><br/> 2. '''Click''' the ''CRM Hub'' tile. The ''My Activities'' page opens.</div> <div class="image-green-border"><br/> 3. '''Click''' ''Dashboards'' in the ''My Work'' section on the left navigation pane. The ''Sales Overview Dashboard'' page opens. </div> <div class="image-green-border"> </div> <div class="image-green-border">[[File:CRMD365 07.png|720px|CRMD365 07.png]]</div> <div class="image-green-border"><br/> 4. On the ''My Open Opportunities'' widget,'''click'''''View Record ''from the ''More Commands'' option. The ''My Open Opportunities'' page opens. </div> <div class="image-green-border"> </div> <div class="image-green-border">[[File:CRMD365 08.png|720px|CRMD365 08.png]]</div> <div class="image-green-border"><br/> 5. '''Select''' the Opportunity for which you want to create a Request. The ''Opportunity Summary'' page opens. </div> <div class="image-green-border"> </div> <div class="image-green-border">[[File:CRMD365 09.png|720px|CRMD365 09.png]] </div> <div class="image-green-border"><br/> 6. On the ''Opportunity Summary'' page, '''click''' the ''ICI'' tab. </div> <div class="image-green-border"> </div> <div class="image-green-border">[[File:MSCRM 5.PNG|720px|MSCRM 5.PNG]]</div> <div class="image-green-border"><br/> 7. '''Click''' the ''New Contract'' button from the Contract section. The ''Create Agreement'' page opens in Microsoft Dynamics CRM connector. A new Agreement can now be created.</div> <div class="image-green-border">[[File:MSCRM 9.png|520px|MSCRM 9.png]]</div> |
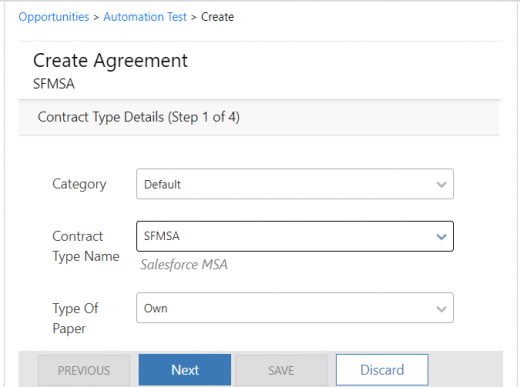
'''Contract Type Details '''<br/> 8. Enter the following information in this section: | '''Contract Type Details '''<br/> 8. Enter the following information in this section: | ||
[[File:Creating a Contract from Opportunity-7.PNG|720px|RTENOTITLE]] | [[File:Creating a Contract from Opportunity-7.PNG|720px|RTENOTITLE]] | ||
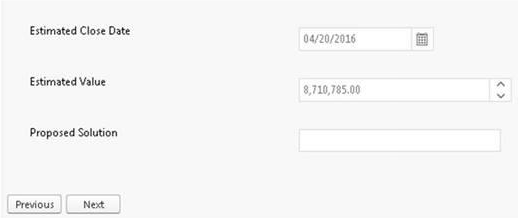
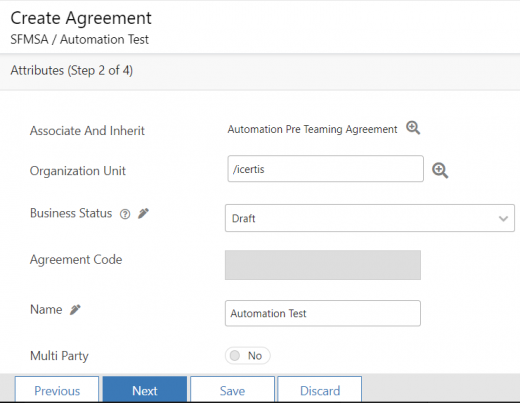
| − | <div class="image-green-border">'''Attributes'''<br/> This section contains the attributes that the primary owner selected while creating the Contract Type for the Agreement. Now, you are creating a contract using the same Contract Type. You can also save the details at any stage and return to this page to complete the Agreement later. The attributes displayed in this section vary based on the Contract Type you select.</div> <div class="image-green-border"> </div> <div class="image-green-border">[[File: | + | <div class="image-green-border">'''Attributes'''<br/> This section contains the attributes that the primary owner selected while creating the Contract Type for the Agreement. Now, you are creating a contract using the same Contract Type. You can also save the details at any stage and return to this page to complete the Agreement later. The attributes displayed in this section vary based on the Contract Type you select.</div> <div class="image-green-border"> </div> <div class="image-green-border">[[File:MSCRM 10.PNG|520px|MSCRM 10.PNG]]</div> |
Some Attributes are described here: | Some Attributes are described here: | ||
| Line 261: | Line 264: | ||
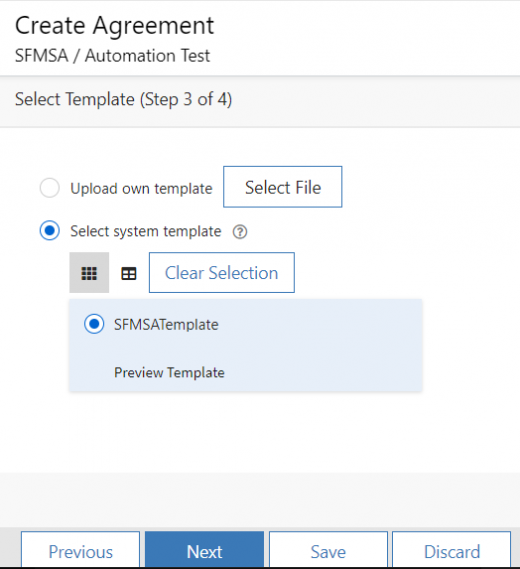
'''Template Name'''<br/> This section displays the Templates that you created for the selected Contract Type. This section opens only if you select ''Own ''type of paper to create the Agreement. '''Select '''the Template from the list. | '''Template Name'''<br/> This section displays the Templates that you created for the selected Contract Type. This section opens only if you select ''Own ''type of paper to create the Agreement. '''Select '''the Template from the list. | ||
| − | <div class="image-green-border">[[File: | + | <div class="image-green-border">[[File:MSCRM 11.PNG|520px|MSCRM 11.PNG]]<br/> <br/> '''Verify'''</div> <div class="image-green-border">This is the last step in the Agreement creation process. The details in this section appear based on the Attributes and sections you used to create this Agreement. You can perform the following actions on this page:</div> |
*'''Click''' ''Previous'' to go back and make any changes to the Agreement. ''Click ''Next to return to this section after making the required changes. | *'''Click''' ''Previous'' to go back and make any changes to the Agreement. ''Click ''Next to return to this section after making the required changes. | ||
*'''Click''' ''Create ''to create the Agreement in Microsoft Dynamics CRM Connector. After you create the Agreement, it is not visible to all users until it is published by its Primary Owner. | *'''Click''' ''Create ''to create the Agreement in Microsoft Dynamics CRM Connector. After you create the Agreement, it is not visible to all users until it is published by its Primary Owner. | ||
*'''Click''' ''Create and Publish'' to create and publish the Agreement. After the Agreement is published, it becomes visible to other users and a Draft watermark opens on the Agreement in all states until it is approved by designated approver. | *'''Click''' ''Create and Publish'' to create and publish the Agreement. After the Agreement is published, it becomes visible to other users and a Draft watermark opens on the Agreement in all states until it is approved by designated approver. | ||
*'''Click''' ''Create and Send'' for Approval to create and send the Agreement for approval. The Agreement is sent to the approvers that are set by rule for the Contract Type selected for this Agreement. | *'''Click''' ''Create and Send'' for Approval to create and send the Agreement for approval. The Agreement is sent to the approvers that are set by rule for the Contract Type selected for this Agreement. | ||
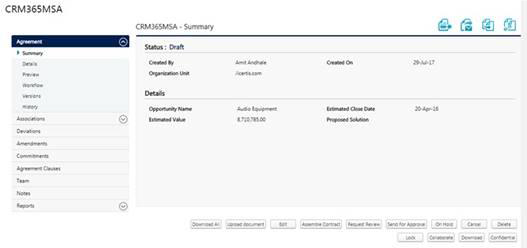
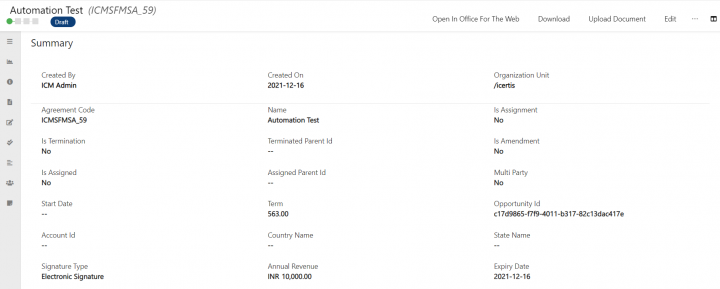
| − | <div class="image-green-border">[[File: | + | <div class="image-green-border">[[File:MSCRM 12.PNG|720px|MSCRM 12.PNG]] <br/> <br/> 9. After you create the Agreement, the ''Summary ''page opens. You can perform the following actions on the ''Summary ''page:</div> |
*'''Click '''''Download All'' to download and save the Agreement and all its Associated Documents on your local computer. | *'''Click '''''Download All'' to download and save the Agreement and all its Associated Documents on your local computer. | ||
*'''Click '''''Download ''to save the Agreement on your local computer. | *'''Click '''''Download ''to save the Agreement on your local computer. | ||
| Line 279: | Line 282: | ||
*'''Click '''''Request Review'' to send the Agreement for review. You can send the ''Agreement ''for review to an internal or external (third party) reviewer. | *'''Click '''''Request Review'' to send the Agreement for review. You can send the ''Agreement ''for review to an internal or external (third party) reviewer. | ||
*'''Click '''''Send for Approval'' to send the Agreement for approval. The Agreement is sent to the approvers that are set by rule for the Contract Type selected for this Agreement. If there is no approver in the Agreement team, the status of the Agreement changes to ''Approved ''automatically. | *'''Click '''''Send for Approval'' to send the Agreement for approval. The Agreement is sent to the approvers that are set by rule for the Contract Type selected for this Agreement. If there is no approver in the Agreement team, the status of the Agreement changes to ''Approved ''automatically. | ||
| − | <div class="image-green-border"> [[File: | + | <div class="image-green-border"> [[File:MSCRM 13.PNG|720px|MSCRM 13.PNG]] </div> <div class="image-green-border"><br/> After the Agreement is created in Microsoft Dynamics CRM Connector it is available in ICI in the Draft state. You can send the Agreement for approval through Microsoft Dynamics CRM Connector, however, approve and reject actions on the Agreement can only happen through ICI.</div> |
== Single-click creation of ICI Contracts and Contract Requests from within Microsoft Dynamics CRM == | == Single-click creation of ICI Contracts and Contract Requests from within Microsoft Dynamics CRM == | ||
| Line 291: | Line 294: | ||
With this release, Microsoft Dynamics CRM administrator can configure the list of Contracts and Contract Requests displayed in Microsoft Dynamics CRM entities like Opportunity, Accounts etc., on the basis of other custom attributes, for example, Region, Country etc., rather than the Microsoft Dynamics CRM system ID. If a specific criterion is not provided, the list of Contracts or Contract Requests will be filtered on the basis of Microsoft Dynamics CRM system ID by default. | With this release, Microsoft Dynamics CRM administrator can configure the list of Contracts and Contract Requests displayed in Microsoft Dynamics CRM entities like Opportunity, Accounts etc., on the basis of other custom attributes, for example, Region, Country etc., rather than the Microsoft Dynamics CRM system ID. If a specific criterion is not provided, the list of Contracts or Contract Requests will be filtered on the basis of Microsoft Dynamics CRM system ID by default. | ||
| + | |||
| + | | ||
=== Configuration for allowing user to start or stop redirecting to ICI iframe in CRM === | === Configuration for allowing user to start or stop redirecting to ICI iframe in CRM === | ||
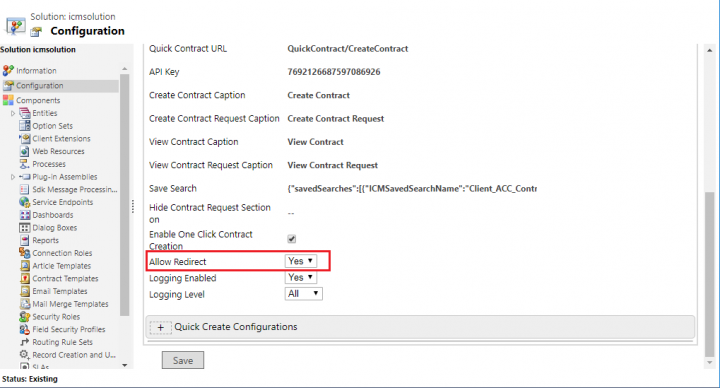
With this release, CRM administrator can now allow the user to stay on the Agreement Details page in CRM after creating the Agreement. This enables the user in avoiding to navigate through the CRM user interface to access the Agreement that was created. The CRM administrator can configure the Allow Redirect field on the Configuration page in CRM. | With this release, CRM administrator can now allow the user to stay on the Agreement Details page in CRM after creating the Agreement. This enables the user in avoiding to navigate through the CRM user interface to access the Agreement that was created. The CRM administrator can configure the Allow Redirect field on the Configuration page in CRM. | ||
| − | <div class="image-green-border"> </div> <div class="image-green-border">[[File:Allow Redirect SP7.png|720px|RTENOTITLE]]</div> <div class="image-green-border"> </div> <div class="image-green-border"> </div> <div class="image-green-border"> </div> <div class="image-green-border"> </div> <div class="image-green-border"> </div> <div class="image-green-border"> </div> <div class="image-green-border"> </div> <div class="image-green-border">'''Related Topics: '''[[Agreement_Management|Agreement Management]]''' | '''[[Configuration|Configuration]] | [[Integrations|Integrations]]</div> | + | <div class="image-green-border"> </div> <div class="image-green-border">[[File:Allow Redirect SP7.png|720px|RTENOTITLE]]</div> <div class="image-green-border"> </div> |
| + | == Enabling/disabling entity configurations == | ||
| + | |||
| + | To enable/disable entity configurations: | ||
| + | |||
| + | 1. '''Click '''the Settings drop-down and navigate to Solutions. | ||
| + | |||
| + | 2. '''Click '''ICISolution on All Solutions page. The ICI Solution Components page opens in a new window. | ||
| + | |||
| + | 3. '''Click '''Configuration from the left navigation pane. The ICI Setting page opens. | ||
| + | |||
| + | 4. '''Click '''the + plus icon next to “Entity Configurations” section. The expanded section is displayed. | ||
| + | |||
| + | The following changes have been introduced to the configuration: | ||
| + | |||
| + | You can now disable the “New Contract”, “New Request” buttons by unselecting the checkbox under “Entity Configurations” on the “ICI Setting” page. This ensures that the “New Contract” and “New Request” buttons are not displayed on the “Opportunity” page. | ||
| + | <div class="image-green-border">[[File:7.16 MSCRM Enhancement 01.png|720px|7.16 MSCRM Enhancement 01.png]] </div> <div class="image-green-border"><br/> You can now update labels for the “New Contract” and “New Request” buttons. In case you want to enable them then the checkbox next to them under “Active” column should be selected. This ensures that the “New Contract and “New Request” buttons are displayed with the label you have provided, for the Account / any other entity page.</div> <div class="image-green-border"> <br/> For example, you can rename the New Contract button to “New AC Contract” then the button will start appearing with the updated label.</div> <div class="image-green-border"> </div> <div class="image-green-border">[[File:7.16 MSCRM Enhancement 02.png|720px|7.16 MSCRM Enhancement 02.png]]<br/> <br/> You can add new configurations for any other entity by clicking “Click to add entity configuration” under “Entity Configurations” on “ICI Setting” page. </div> <div class="image-green-border"> </div> | ||
| + | == Adding/deleting entity configurations == | ||
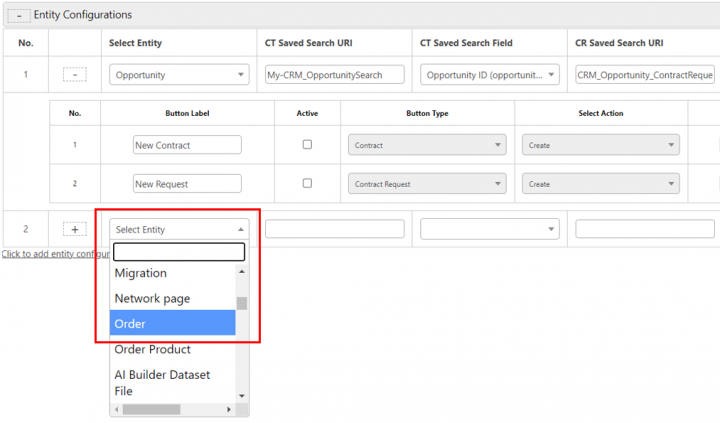
| + | <div class="image-green-border">To add entity configuration for a new entity: </div> <div class="image-green-border"> </div> <div class="image-green-border">1. '''Select '''the entity from the “Select Entity” dropdown list. For example, select “Order”. The Order ID is selected by default.</div> <div class="image-green-border"> </div> <div class="image-green-border">[[File:7.16 MSCRM Enhancement 04.png|720px|7.16 MSCRM Enhancement 04.png]]</div> <div class="image-green-border"> </div> <div class="image-green-border">2. '''Enter '''a value in CT Saved Search URI. For example, CRM_OS_Contract. You can add the value for CR Saved Search URI.</div> <div class="image-green-border"> </div> <div class="image-green-border">By default, the Id attribute of that entity is selected for the CT Saved Search and CR Saved Search fields. You can change the attribute as per your requirement. Ensure that the attribute you are setting here is a unique identifier for the entity records.</div> <div class="image-green-border"> </div> <div class="note-box">'''Note''': Prior to ICI version 7.16, saved searches were to be configured as a Json string. Post upgrade to 7.16, any saved search configurations need to be updated in the Entity Configurations section.</div> <div class="image-green-border"> </div> <div class="image-green-border">3. '''Select '''or unselect the checkboxes next to “New Contract”, “New Request” options to enable or disable the buttons on the “Order” page, respectively. </div> <div class="image-green-border"> </div> <div class="note-box">'''Note''': You can remove any of the entities by clicking “Delete” next to that entity. </div> <div class="image-green-border"> </div> <div class="image-green-border">After making necessary changes to the configuration, '''click '''“Save”. </div> <div class="image-green-border"> </div> <div class="image-green-border">This saves the changes made to the configuration. </div> <div class="image-green-border"> </div> <div class="image-green-border"> </div> <div class="image-green-border"> </div> <div class="image-green-border">'''Related Topics: '''[[Agreement_Management|Agreement Management]]''' | '''[[Configuration|Configuration]] | [[Integrations|Integrations]]</div> | ||
Latest revision as of 17:17, 16 December 2021
Contents
- 1 Microsoft Dynamics CRM
- 1.1 Purpose
- 1.2 Overview of Microsoft Dynamics CRM Connector
- 1.3 Setting up ICI in Microsoft Dynamics
- 1.4 Configuring ICI Solution
- 1.4.1 Configuring the ICI Solution
- 1.4.2 Quick Create Configurations
- 1.4.3 Enabling Single Sign-On
- 1.4.4 Working with Saved Searches
- 1.4.5 Performing a Search to Save
- 1.4.6 Saving a Search
- 1.4.7 Updating Saved Search Configuration
- 1.4.8 Mapping Data between ICI and Microsoft Dynamics CRM Connector
- 1.4.9 Support for different Attribute Types
- 1.5 Creating a Masterdata Contract Type
- 1.6 Creating Masterdata for Mapping the Entities
- 1.7 Creating a Contract Request from an Opportunity
- 1.8 Creating a Contract from Opportunity
- 1.9 Single-click creation of ICI Contracts and Contract Requests from within Microsoft Dynamics CRM
- 1.10 Support for synchronizing additional Attributes in ICI
- 1.11 Enabling/disabling entity configurations
- 1.12 Adding/deleting entity configurations
Microsoft Dynamics CRM
Purpose
The purpose of this guide is to document the process of:
- Configuring ICI with Microsoft Dynamics CRM Connector.
- Mapping data entities and saved searches from ICI to Microsoft Dynamics CRM Connector. The guide also describes how to use Microsoft Dynamics CRM Connector for standard scenarios.
The document is primarily intended for:
- Administrators, who configure ICI and Microsoft Dynamics Connector
- Other users who work with Agreements in ICI
Overview of Microsoft Dynamics CRM Connector
Microsoft Dynamics CRM Connector allows you to access the full suite of ICI functionality within Microsoft Dynamics CRM Connector.
With the Microsoft Dynamics CRM Connector, you can integrate data between Microsoft Dynamics CRM and other enterprise applications, Web Services, XML data sources, legacy systems and simple and complex flat- tiles. Whether your connection is with cloud, mobile or on premise software applications, you will be able to integrate quickly with a wizard-driven interface.
Setting up ICI in Microsoft Dynamics
Prerequisites
- Microsoft Dynamics CRM Organization
- System Administrator privileges to install and configure the Microsoft Dynamics CRM Connector
- Respective ICI instance should be configured on the system
Configuring CRM Dynamics 365 in ICI
To integrate ICI with Microsoft Dynamics CRM 365:
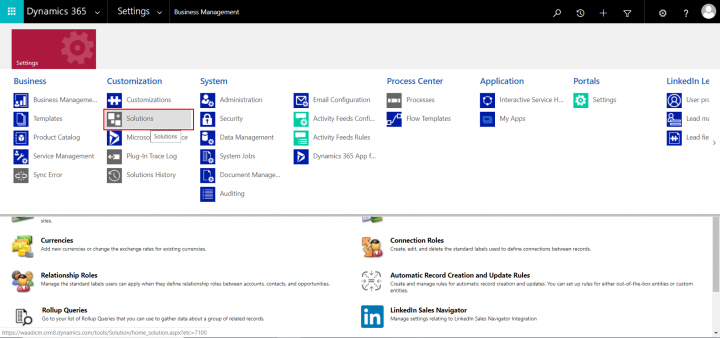
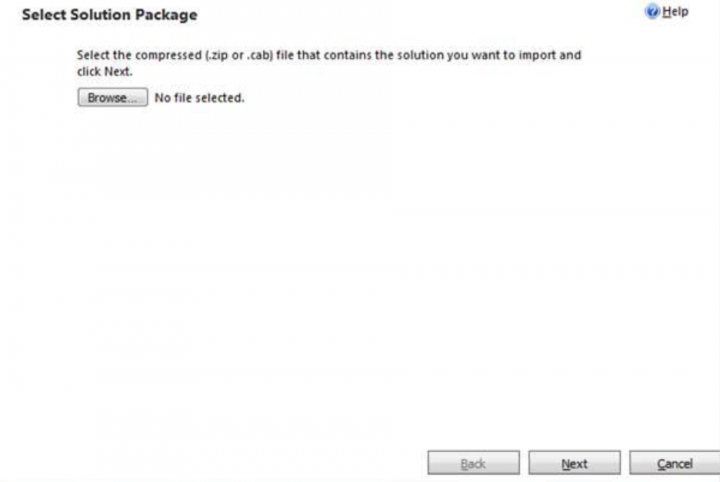
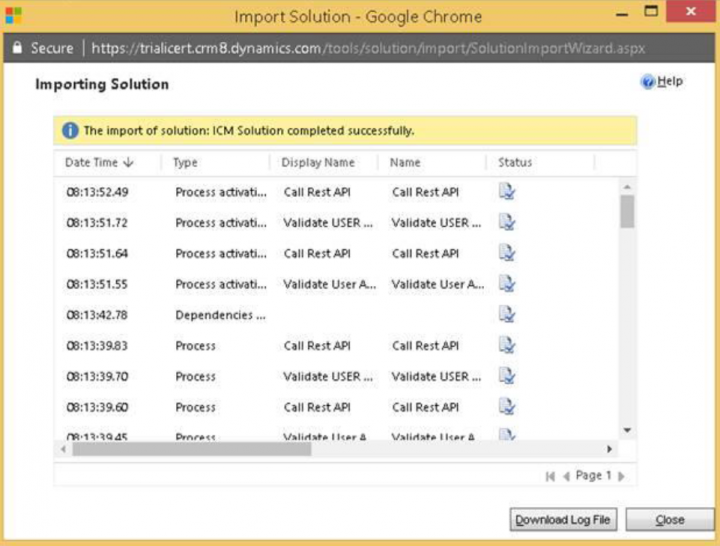
6. Click the Import icon. The Import Solution window opens.
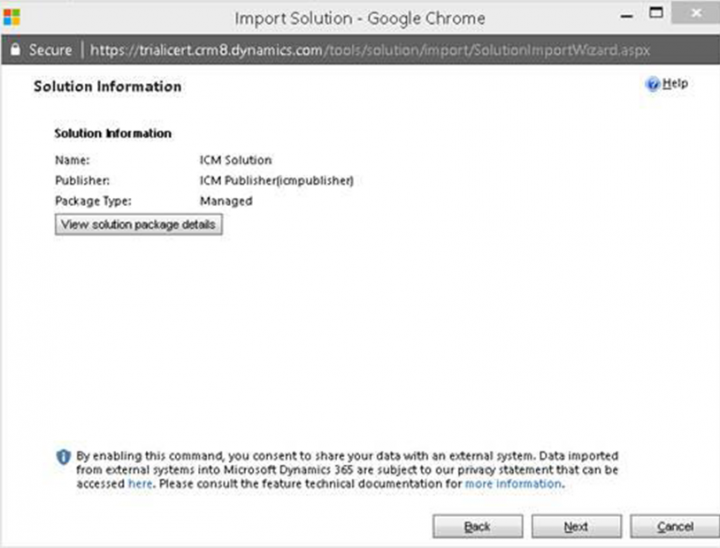
7. Click Next.
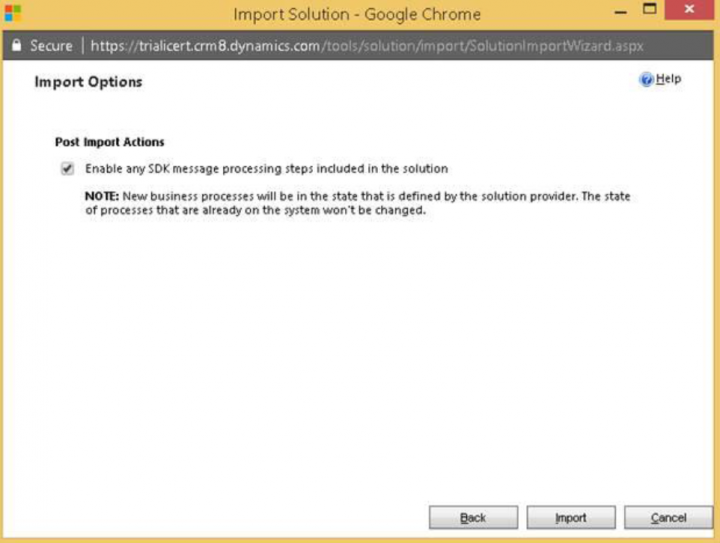
8. Click Import. The Import Options page opens.
9. After the Importing process is complete, the Import Solution page opens. The imported solution is visible on the All Solutions page.
10. Click Close to close the Import Solution page.
12. After all customizations are published successfully, ICI Solution opens in the list of solutions on All Solutions page in Microsoft Dynamics CRM Connector.
Configuring ICI Solution
You can configure ICI Solution only after you have installed Microsoft Dynamics CRM Connector. For more information about ICI App installation in Microsoft Dynamics CRM Connector, see Configuring CRM Dynamics 365 in ICI.
Configuring the ICI Solution
To configure the ICI Solution:
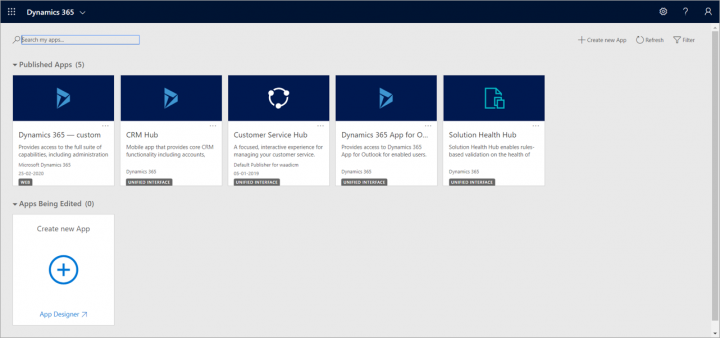
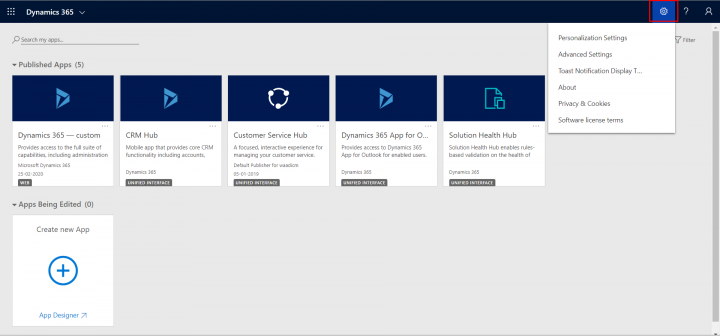
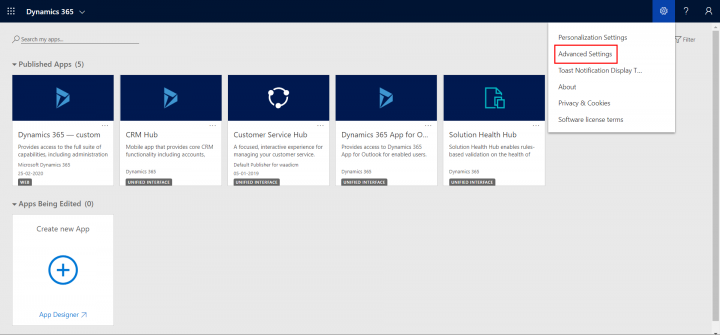
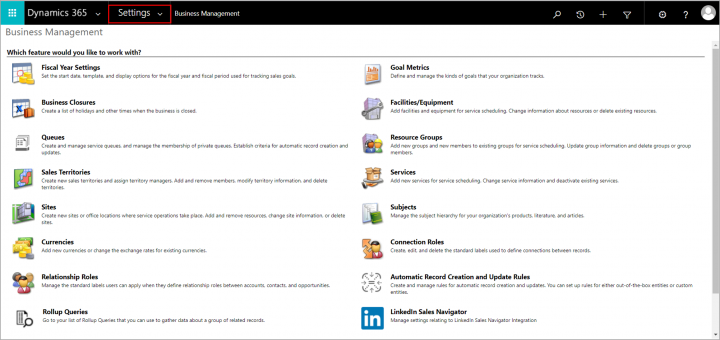
1. Click the Settings icon in the top-right corner and navigate to Solutions.
2. Click ICISolution on All Solutions page. The ICI Solution Components page opens.
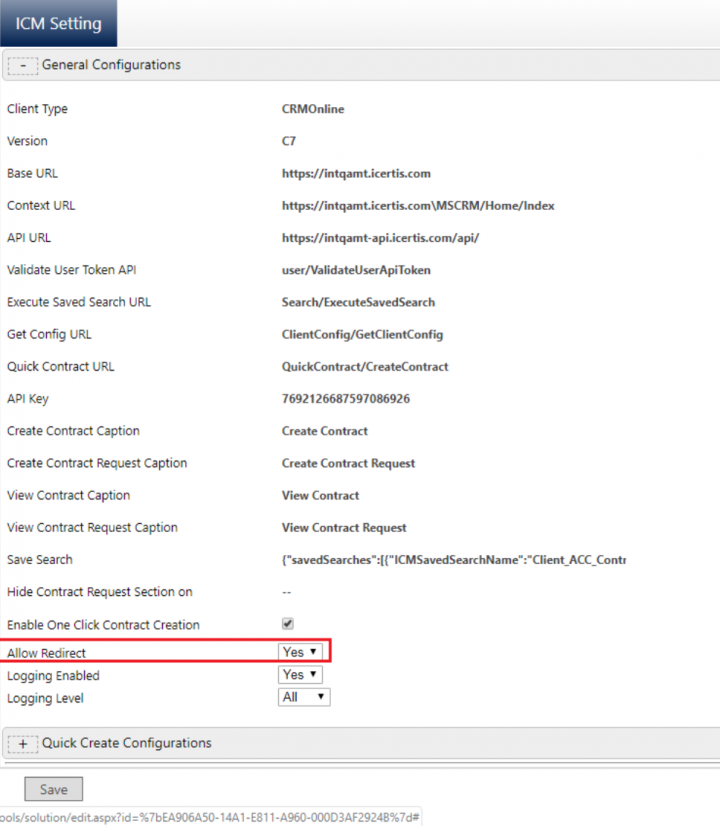
3. Click Configuration from the left navigation pane. The ICI Setting page opens.
4. The following text boxes are available on this page, which can be set as per the requirement:
- Client Type: It is the name of the client that will be mapped with ICI. This value does not require any changes. *Version: It is the ICI version mapped with CRM. *Base URL: It is the URL of the ICI instance that is mapped with CRM. *Context URL: It is the specific URL of the ICI instance using which ICI application can be accessed through CRM. This URL is used to display the ICI user interface in CRM. *API URL: It is the specific URL of the ICI API.
- Validate User Token API
- Execute Saved Search URL
- Get Config URL
- Quick Contract URL
- API Key
- Create Contract Caption: This field defines the title/header of the Create Contract page in CRM.
- Create Contract Request Caption: This field defines the title/header of the Create Contract Request page in CRM.
- View Contract Caption: This field defines the title/header of the View Contract page.
- View Contract Request: This field defines the title/header of the View Contract Request page.
- Saved Search: It is the unique name of the saved search created in ICI. Replace the appropriate value of ICISavedSearchName in this field that contains the existing JSON.
- Hide Contract Request Section On: Type the comma separated unique names CRM entities for which you want to hide the Contract Request section.
- Enable One Click Contract Creation: Select this checkbox to enable creating a Contract from CRM with a single-click.
- Allow Redirect: Select Yes or No to enable or disable the logging. Enabling the logging helps tracking the errors occurring on any environment for which logging is enabled.
- Logging Level: Select the logging level from Info, Error or All from the drop-down.
- Info: Selecting this option logs basic information and data about the processes occurring at the back-end.
- Error: Selecting this option logs the errors thrown by the system if any.
- All: Selecting this option logs all the information as well as the errors thrown by the system.
Quick Create Configurations
- Button Label: Type the text that you want to view as the button label in Contract or Contract Request sections when creating a Contract or Contract Request with a single-click.
- Active: Select this checkbox to enable the button in the Contract or Contract Request section. Only the buttons selected as Active will be available in the ICI section on the CRM user interface.
- Button Type: Select Contract or Contract Type from this drop-down based on your requirement. This is a drop-down just to specify the button type.
- Select Entities: Type and select the entities from this field where you want to make this button available.
- Select Action: Select the action you want the system to perform after clicking Quick Contract.
You can select one of the following actions:- Create: Select this option to only create the Contract. The Contract is not visible to anyone until it is published. You (primary owner) can only make necessary changes to the Contract. If you have selected button type as Contract Request you can only create it and not perform any other action.
- Create and Publish: Select this option to create and publish the Contract. After publishing, other users with adequate privileges can take actions on the Contract.
- Create and Send for Approval: Select this option to create and send the Contract for Approval.
- Contract Type: It is the unique name of the Contract Type in ICI that you want to create with a single-click.
- Delete: Select this button to delete the row from this page which also removes the button from the user interface.
Enabling Single Sign-On
You need to setup single sign-on for CRM to work seamlessly with ICI. For more information about setting up single sign-on refer to:
https://community.dynamics.com/crm/b/microsoftdynamicscrmsolutions/archive/2016/11/11/sso-configuration-for-crm-portal
Working with Saved Searches
You can use the Advanced Search option to search for existing entities. You can save these searches and pin them as Favorites for easy access. Saved searches can be opened for easy access to the search results.
Performing a Search to Save
1. Click the Advanced button at the right of the search toolbar My Dashboard page. The Advanced Search page opens.
2. In the Please select Entities to Search field, enter or select appropriate entities from the list and type the keywords to search in the Refine Search here field.
- Metadata: the search is performed in the metadata of the selected Agreement.
- Full Text: the search is performed within the contents of the document of the selected Agreement.
6. A list of these Agreements is displayed as the search result in a tabular format. Enhance your search using wild cards as follows:
• Type a search term in between the star characters *...*. It displays the existing items which include the respective search term.
• Type *...Prefix* to a search term. It displays the existing items which end with this term.
• Type *...Suffix * to a search term. It displays the existing items which start with this term.
• Type a search term in double quotes "...". It displays the existing items which include the search term.
• Type...(space)... multiple search terms with a space in between. It displays the existing items which include the search terms.
Saving a Search
If you have the search criteria defined and need to use it repeatedly, it is recommended to save the search. To configure Saved Search, we need some Data mapping which includes CRM Account and Opportunity ID (which is 18 digit of alphanumeric reference value). Hence, when defining the mapping of a CRM Opportunity with Contract Request, create a field/Attribute in that Contract Request that will hold the CRM Opportunity Id. You can similarly create an Attribute for the Account ID reference. After creating these required mappings, you can use the Saved Search. To save the search: 1. Click the Save icon. This opens the Save Search window. Set the parameters for this Saved Search.
2. Type the name for the search. Use a name that you can easily associate with this search.
3. Click Yes to make it a global search. This allows all users of the selected Security Groups and Organization units to view it. Select No to save this search locally so that it will only be visible to the person creating it.
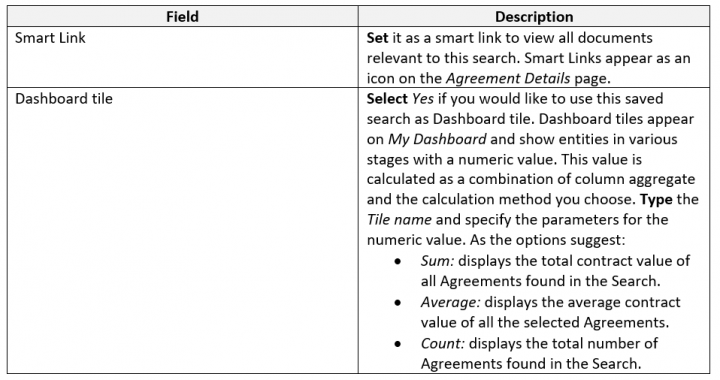
4. Specify the Advanced Parameters as follows:
• A search defined as a Smart Link cannot be set as a Dashboard tile.
• For a global search, the Administrator needs to create a Security Group and give access to the specific users. Only those users can see that Saved Search in the list and add it as a Dashboard tile.
Updating Saved Search Configuration
With this feature, the CRM Administrator can map any of the entity level or parent level Attribute for executing Saved Search provided the Saved Search is created in ICI as per the Attribute configured in CRM.
If you do not configure the Attribute in CRM, the Saved Search is executed based on the CRM record System ID. The Contracts or Contract Requests will be retrieved from ICI to CRM provided the saved search in ICI is configured.
Mapping Data between ICI and Microsoft Dynamics CRM Connector
Use the Configuration tile in the ICI application to specify the mapping details between CRM and ICI. Data Mapping involves the following two primary tasks:
- Creating Masterdata Contract Type
- Creating Masterdata records for mapping entities
Support for different Attribute Types
Multi-Select Attribute
- This enables in creating an Agreement in CRM that contains multi-select Attributes.
- When you select multiple attributes in CRM for the Contract, it must be mapped with the multi-select fields in ICI.
Lookup Attribute
- This enables creating an Agreement in CRM that contains Lookup Attributes.
- When you select lookup attributes in CRM for the Contract, it must be mapped with the appropriate Masterdata record in ICI.
File Attachment
- This enables creating an Agreement in CRM with attachments added in the Notes section.
- When you add an attachment to an Agreement created in CRM, it must be mapped with the appropriate Association added to the Agreement in ICI. The files in the Notes section are mapped to the File Selection Attribute in Agreement.
Creating a Masterdata Contract Type
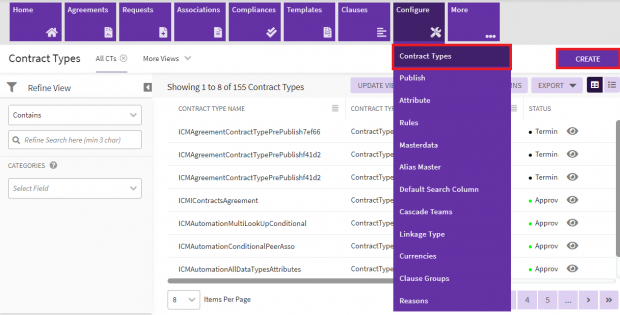
1. Log on to the ICI application.
2. Click Configure > Contract Type > Create on ICI Dashboard.
The Select Contract Type page opens displaying the following options:
- Agreement
- Associated Document
- Masterdata
- Contract Request
4. Select Masterdata on the Select Contract Type page and click Next. The Create Contract Type page opens displaying the following five sections:
- Details
- Attributes
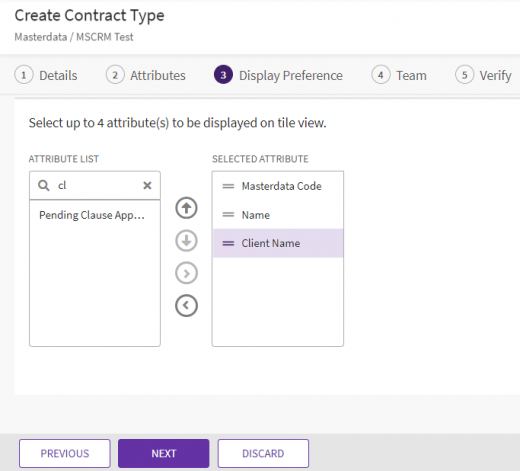
- Display Preference
- Team
- Verify Details
Enter the following information on this page:
- Contract Type Name: Type the name in this field as Client App Entity Mapping. This Contract Type is used for mapping entities between ICI and CRM.
- Contract Type Code: Every Contract Type is assigned a unique ID known as the Contract Type code. It is auto-generated when you create the Contract Type.
- Enable Approval Workflow: Select Yes to enable the approval workflow.
- Two Column Attribute Layout: Select Yes to enable a two-column Attribute layout. Attributes
5. Click the plus icon and create the following Attributes in ICI because the integration between CRM and ICI is restricted to the use of these Attributes only.
- Name
- ICI Entity Name
- Client Entity Name
- ICI Attribute Name
- Client Attribute Name
6. When creating each of the above Attributes, ensure that you retain the following default settings:
- Data Type: String
- Is Default: Off
- Is Editable: On
- Is Mandatory: Off
- Tracking Attribute: Off
- Is Unique: Off
- Defined by Rule: Off
- Is Inherit: Off
- Is Searchable: On
- Is Conditional: Off
- Is Lookup: Off
- Is Localized: Off Display Preference
7. Select any four attributes that you want to display on the agreement tile view.
8. Click the plus icon or select the following attributes from the Available Attributes and click Next.
The Team section is displayed.
- Client Name
- ICI Entity Name
- ICI Attribute Name
- Client Entity Name
- Client Attribute Name
- ICI Relationship Key
- Data Flow Type
- Enable Sync
- Contract Events
10. Verify the information you entered. Click Create.
11. Send the Contract Type for approval.
12. After the Masterdata is approved, publish the Masterdata Contract Type to make it available for Agreement creation.
Creating Masterdata for Mapping the Entities
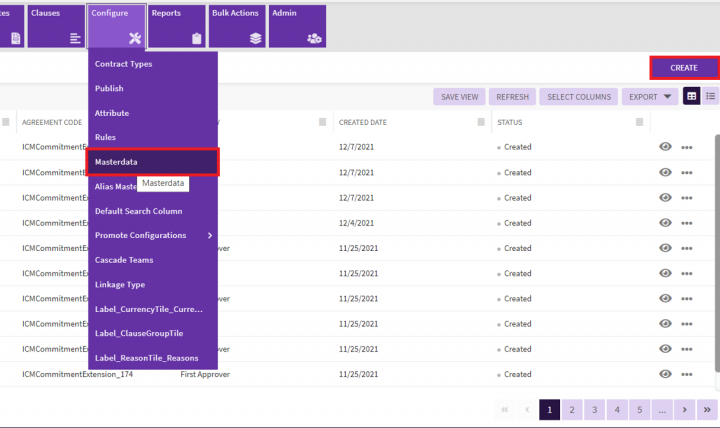
You can create a Masterdata record for the Contract Type Masterdata that you created earlier. This helps in mapping the entities between CRM and ICI. ICI allows mapping this data from any CRM entity such as Opportunity, Account, or Quote to a Contract Request or Agreement by creating the Masterdata record in ICI. To create the Masterdata record:
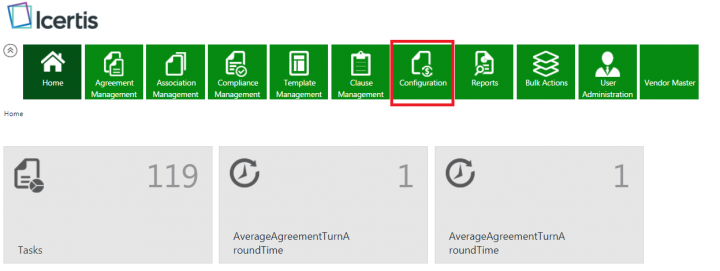
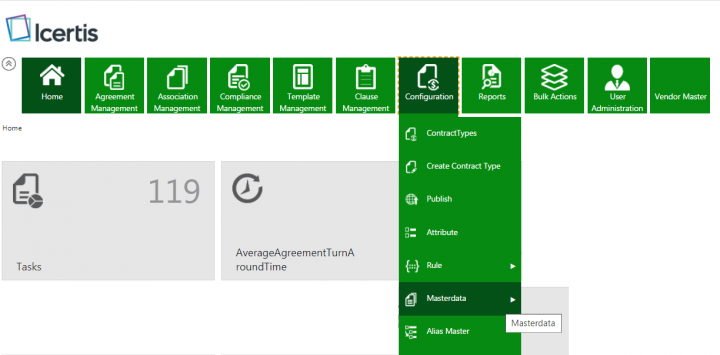
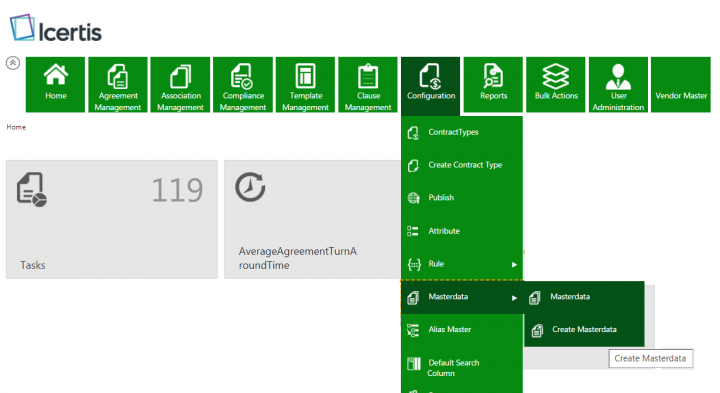
2. Click Masterdata on the Configuration page. The Masterdata index page opens.
3. Click Create. The Create Masterdata page opens.
4. Complete the information in the following sections:
- Masterdata Details
- Attributes
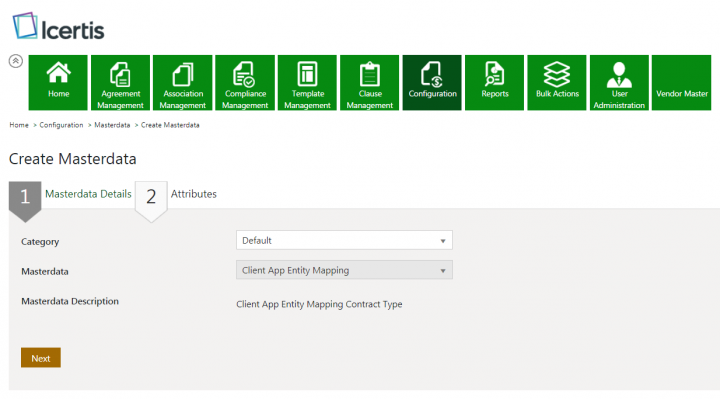
5. Click Next at the end of Masterdata Details section to go to the Attributes section and complete creating the Masterdata record. Masterdata Details
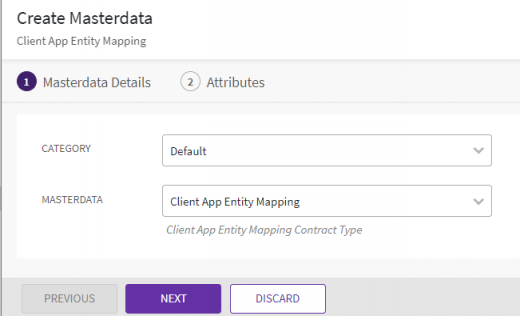
6. Select the Category from the drop-down list.
7. Select the Contract Type Masterdata that you created earlier. For the purpose of mapping the data between ICI and CRM, select Client App Entity Mapping.
8. Click Next. The Attributes page opens.
9. Click the plus icon or select the following Attributes from the Available Attributes.
- Client Name
- ICI Entity Name
- Client Entity Name
- ICI Reference Key
- Client Reference Key
Attributes
10. This section displays the Attributes that you created when creating the Contract Type Masterdata. Complete the following details on this page:
- Masterdata Code: Each Masterdata you create is assigned a unique ID. It is auto-generated when you create the Masterdata.
- Name: Type the name of the Masterdata record you are creating for mapping with ICI.
- Ensure that the name you give to the Masterdata record is unique and can be identified easily. For example, you can use the following name for mapping: CRM_Acct_Agr_AccountName. This example clearly states that you are creating a mapping for an Agreement with a CRM Account (CRM Acct) entity and the Attribute that you are mapping is the Account Name on Agreement.
- Client Name: This helps in defining the mapping with the external system. For example, add CRM in the Client Name field to define the mapping between ICI and CRM.
- ICI Entity Name: Type the ICI Agreement Contract Type for which you are creating this mapping.
- ICI Attribute Name: Type the ICI Attribute Name of the Contract Type Masterdata that you created earlier where the CRM data will appear.
- Client Entity Name: This is the CRM side entity name (technical name) for which you are defining the mapping between ICI and CRM.
- Client Attribute Name: Type the CRM side Attribute name (technical name). It is the CRM side Attribute name (technical name) for the client entity name that you mapped.
- Data Flow Type: This defines the direction of mapping for the data flow. You can select from any of the following data flow types:
- Client to ICI: Select this option if you want the data mapping from CRM to ICI. If you create the Agreement from CRM, the respective CRM entity value will populate in the ICI attribute. When you want to create or update the data from CRM to ICI, ensure that you select the flow as Client to ICI.
- ICI to Client: Select this option if you want the data mapping to happen from ICI to CRM.
- Both: Select this option if you want to use the same mapping for data flow from ICI to CRM and CRM to ICI.
- Enable Sync: Select Yes if you want the data mapping to synchronize the data from CRM to ICI. This option works only if you select the data flow as Client to ICI.
- Contract Events: It is used to synchronize data from ICI to CRM. You can enter the events that happen in the Contract lifecycle such as Created, Approved, and Executed.
11. Click Save to save the Masterdata record and enable mapping between ICI and CRM.
Creating a Contract Request from an Opportunity
You can create a Contract Request if your organization does not provide the privileges to create a contract directly.
To create a Contract Request from an Opportunity:
1. Log on to Microsoft Dynamics CRM. The Dynamics CRM 365 home page opens.
2. Click the CRM Hub tile. The My Activities page opens.
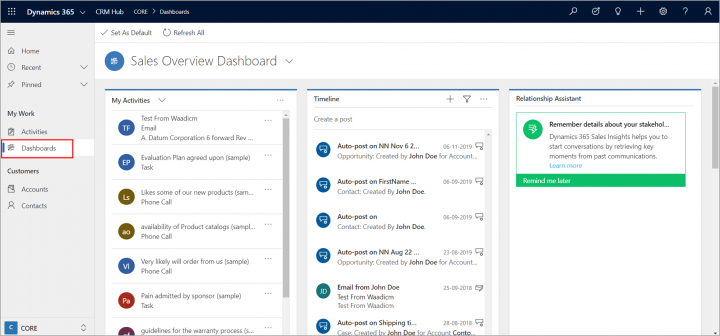
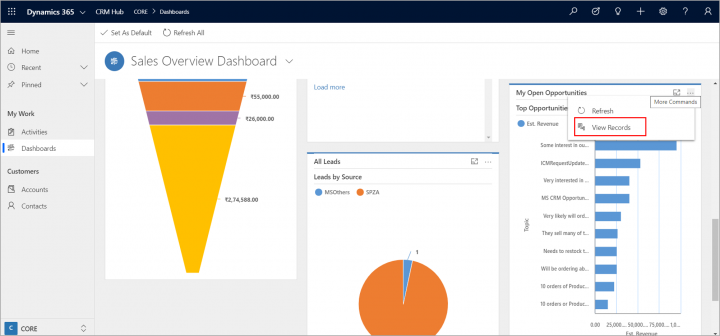
3. Click Dashboards in the My Work section on the left navigation pane. The Sales Overview Dashboard page opens.
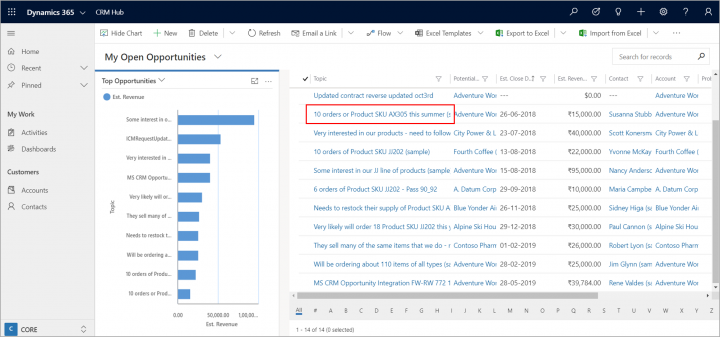
4. On the My Open Opportunities widget,click View Record from the More Commands option. The My Open Opportunities page opens.
5. Select the Opportunity for which you want to create a Request. The Opportunity Summary page opens.
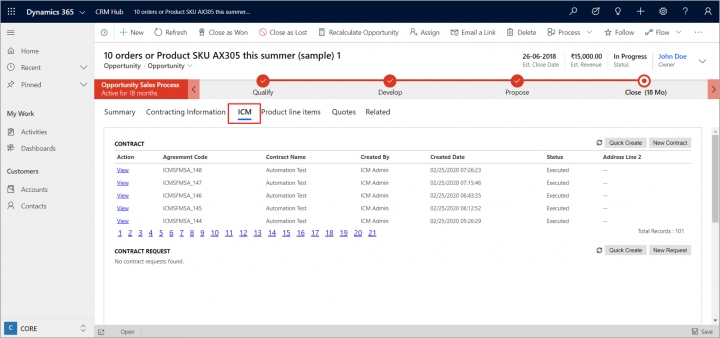
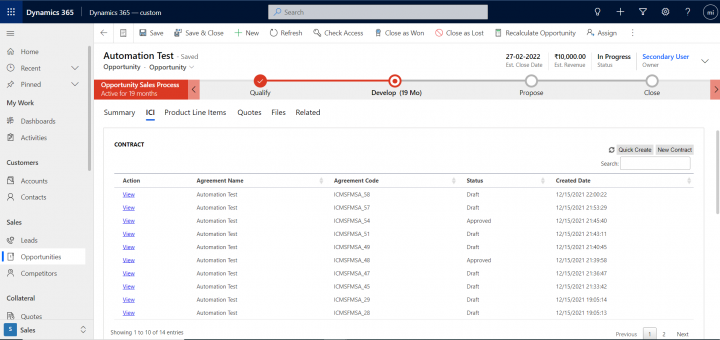
6. On the Opportunity Summary page, click the ICI tab.
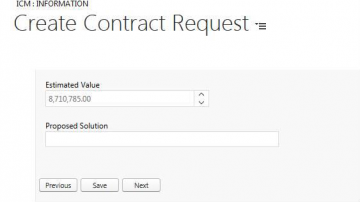
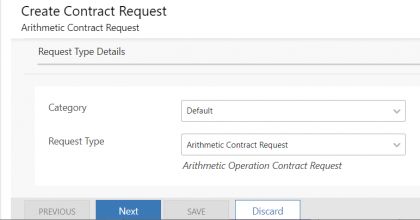
8. Select the Category and Request Type based on the Request you are creating and click Next.
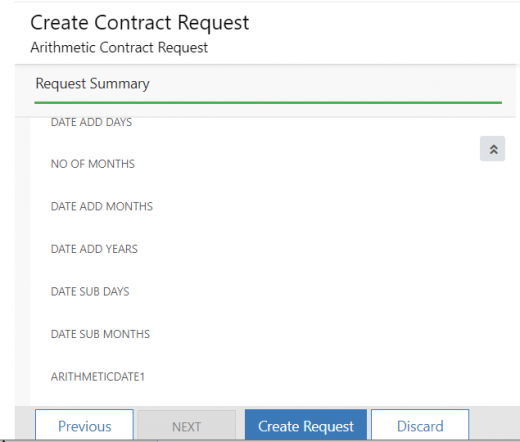
11. Click Create Request. The Opportunity Summary page opens.
12. Click ICI on the top navigation bar. Then, click Contract Requests. The Contract Request page opens showing the list of available Requests.
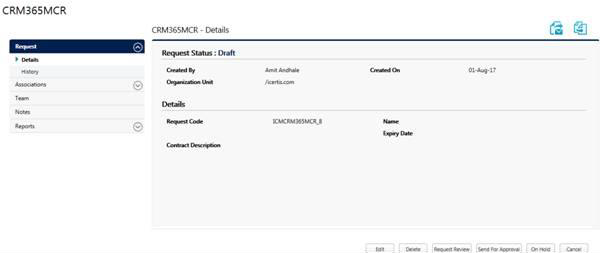
13. Click View next to the Request you created. The Request Details page opens.
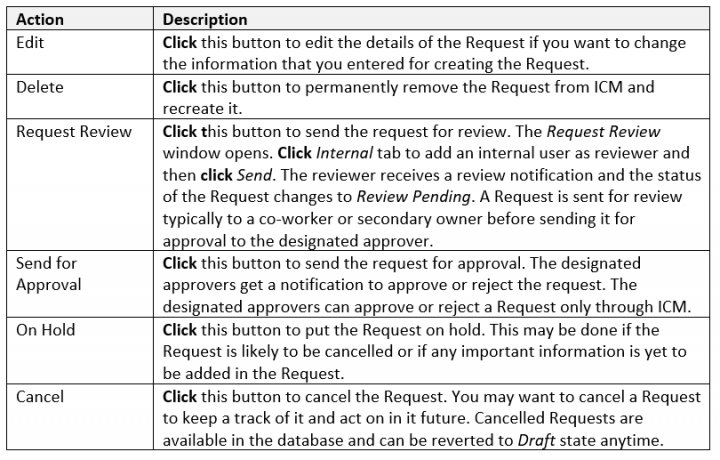
14. Use the buttons in the table below to perform a desired action:
Creating a Contract from Opportunity
To create a Contract from an Opportunity:
1. Log on to Microsoft Dynamics CRM. The Dynamics CRM 365 home page opens.
2. Click the CRM Hub tile. The My Activities page opens.
3. Click Dashboards in the My Work section on the left navigation pane. The Sales Overview Dashboard page opens.
4. On the My Open Opportunities widget,clickView Record from the More Commands option. The My Open Opportunities page opens.
5. Select the Opportunity for which you want to create a Request. The Opportunity Summary page opens.
6. On the Opportunity Summary page, click the ICI tab.
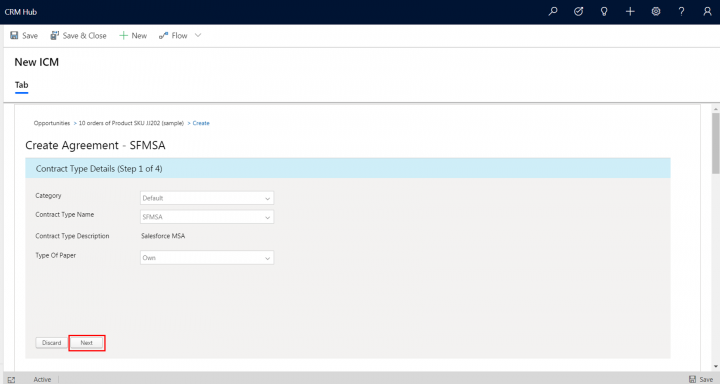
7. Click the New Contract button from the Contract section. The Create Agreement page opens in Microsoft Dynamics CRM connector. A new Agreement can now be created.
Contract Type Details
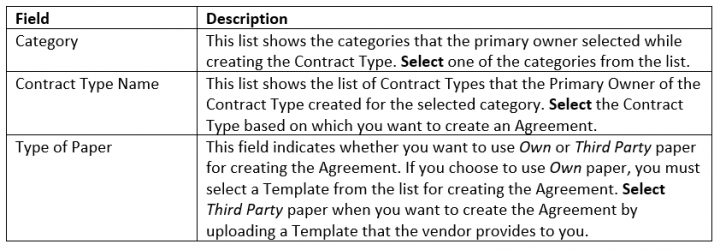
8. Enter the following information in this section:
This section contains the attributes that the primary owner selected while creating the Contract Type for the Agreement. Now, you are creating a contract using the same Contract Type. You can also save the details at any stage and return to this page to complete the Agreement later. The attributes displayed in this section vary based on the Contract Type you select.
Some Attributes are described here:
Template Name
This section displays the Templates that you created for the selected Contract Type. This section opens only if you select Own type of paper to create the Agreement. Select the Template from the list.
- Click Previous to go back and make any changes to the Agreement. Click Next to return to this section after making the required changes.
- Click Create to create the Agreement in Microsoft Dynamics CRM Connector. After you create the Agreement, it is not visible to all users until it is published by its Primary Owner.
- Click Create and Publish to create and publish the Agreement. After the Agreement is published, it becomes visible to other users and a Draft watermark opens on the Agreement in all states until it is approved by designated approver.
- Click Create and Send for Approval to create and send the Agreement for approval. The Agreement is sent to the approvers that are set by rule for the Contract Type selected for this Agreement.
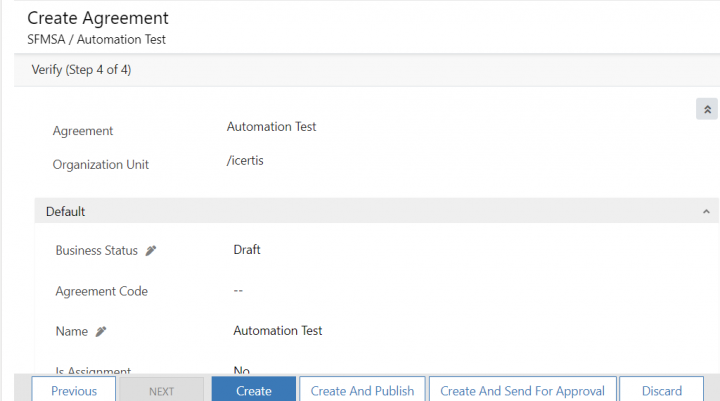
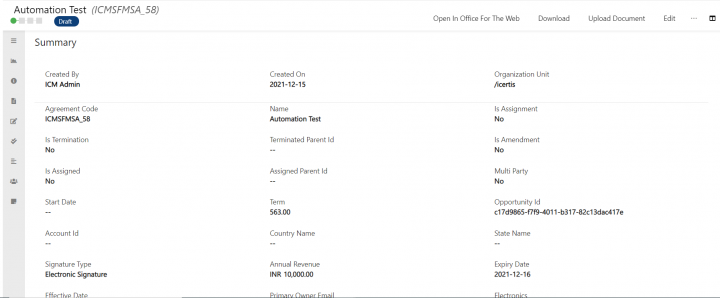
9. After you create the Agreement, the Summary page opens. You can perform the following actions on the Summary page:
- Click Download All to download and save the Agreement and all its Associated Documents on your local computer.
- Click Download to save the Agreement on your local computer.
- Click Upload Document to upload the document in ICI application.
- Click Confidential to move the Agreement to a confidential Organization Unit.
- Click Edit to go back and make changes to the Agreement.
- Click Delete to delete the Agreement from ICI application.
- Click Cancel to cancel the process of creating Agreement.
- Click Lock to restrict any other user from taking action on the Agreement.
- Click Collaborate to share the Agreement with External users.
- Click Assemble Contract to include the Associated Documents with the Agreement.
- Click Request Review to send the Agreement for review. You can send the Agreement for review to an internal or external (third party) reviewer.
- Click Send for Approval to send the Agreement for approval. The Agreement is sent to the approvers that are set by rule for the Contract Type selected for this Agreement. If there is no approver in the Agreement team, the status of the Agreement changes to Approved automatically.
After the Agreement is created in Microsoft Dynamics CRM Connector it is available in ICI in the Draft state. You can send the Agreement for approval through Microsoft Dynamics CRM Connector, however, approve and reject actions on the Agreement can only happen through ICI.
Single-click creation of ICI Contracts and Contract Requests from within Microsoft Dynamics CRM
ICI integration with Microsoft Dynamics CRM now enables creating an ICI Contract through Microsoft Dynamics CRM with a single-click. Till now, when creating an ICI Contract in Microsoft Dynamics CRM, the user was required to go through the entire New Contract creation wizard even if all the form values were pre-filled based on the existing CRM data. With this enhancement, you can now configure and enable the Quick Create button on the Microsoft Dynamics CRM interface to create an ICI Contract without having to navigate through multiple form pages. A similar single-click creation capability has also been added to the ICI Contract Request in Microsoft Dynamics CRM integration.
Support for synchronizing additional Attributes in ICI
ICI integration with Microsoft Dynamics CRM is now enhanced with support for the following entities, provided the appropriate mapping configuration is present in ICI: *Multi-select and Lookup Attributes: When a user is required to select multiple or lookup values for a particular field in Microsoft Dynamics CRM, they are mapped and synchronized to the corresponding multi-select or lookup fields in ICI. *File Attachment: Now, user has the ability of synchronizing the documents (in all ICI supported file formats) from the Notes section of Microsoft Dynamics CRM to ICI, on creation of a Contract from Microsoft Dynamics CRM. This can be achieved by creating appropriate mapping to the available file type attributes in ICI.
Increased flexibility to configure ICI Contract and Contract Request lists within Microsoft Dynamics CRM entities
With this release, Microsoft Dynamics CRM administrator can configure the list of Contracts and Contract Requests displayed in Microsoft Dynamics CRM entities like Opportunity, Accounts etc., on the basis of other custom attributes, for example, Region, Country etc., rather than the Microsoft Dynamics CRM system ID. If a specific criterion is not provided, the list of Contracts or Contract Requests will be filtered on the basis of Microsoft Dynamics CRM system ID by default.
Configuration for allowing user to start or stop redirecting to ICI iframe in CRM
With this release, CRM administrator can now allow the user to stay on the Agreement Details page in CRM after creating the Agreement. This enables the user in avoiding to navigate through the CRM user interface to access the Agreement that was created. The CRM administrator can configure the Allow Redirect field on the Configuration page in CRM.
Enabling/disabling entity configurations
To enable/disable entity configurations:
1. Click the Settings drop-down and navigate to Solutions.
2. Click ICISolution on All Solutions page. The ICI Solution Components page opens in a new window.
3. Click Configuration from the left navigation pane. The ICI Setting page opens.
4. Click the + plus icon next to “Entity Configurations” section. The expanded section is displayed.
The following changes have been introduced to the configuration:
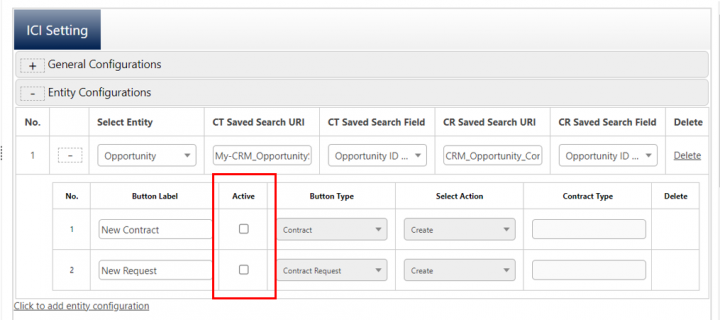
You can now disable the “New Contract”, “New Request” buttons by unselecting the checkbox under “Entity Configurations” on the “ICI Setting” page. This ensures that the “New Contract” and “New Request” buttons are not displayed on the “Opportunity” page.
You can now update labels for the “New Contract” and “New Request” buttons. In case you want to enable them then the checkbox next to them under “Active” column should be selected. This ensures that the “New Contract and “New Request” buttons are displayed with the label you have provided, for the Account / any other entity page.
For example, you can rename the New Contract button to “New AC Contract” then the button will start appearing with the updated label.
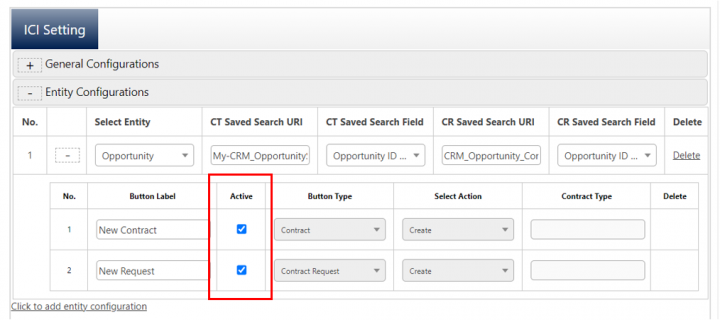
You can add new configurations for any other entity by clicking “Click to add entity configuration” under “Entity Configurations” on “ICI Setting” page.
