Shefali DK (Talk | contribs) |
Shefali DK (Talk | contribs) |
||
| (16 intermediate revisions by the same user not shown) | |||
| Line 2: | Line 2: | ||
= Notes = | = Notes = | ||
<div> | <div> | ||
| − | The "Notes" tab displays the comments that are added to the Agreement either when an action is taken or directly through the " | + | The "Notes" tab displays the comments that are added to the Agreement either when an action is taken such as "Agreement Approver Added" or directly through the "Notes" tab. It displays the comments for the complete lifecycle of the Agreement. |
Internal users can communicate more efficiently with both internal and external sources through "Notes" across all phases of an Agreement. While adding them, internal users have the choice of making their Notes visible to all users (internal and external) or to internal users only. ICI handles the validation of users and displays Notes based on their visibility settings. | Internal users can communicate more efficiently with both internal and external sources through "Notes" across all phases of an Agreement. While adding them, internal users have the choice of making their Notes visible to all users (internal and external) or to internal users only. ICI handles the validation of users and displays Notes based on their visibility settings. | ||
| Line 11: | Line 11: | ||
*Notes added by external users are visible to all. | *Notes added by external users are visible to all. | ||
| − | + | Notes can be viewed either using the "Grid" or "List" view. By default, the "Grid"'' ''view is selected. The grid columns get auto-fit with the collapsing and expanding of the left navigation pane. | |
| − | <div class="image-green-border">[[File:8.0-Notes- | + | <div class="image-green-border">[[File:8.0-Notes-Main-Screen1.PNG|720px|8.0-Notes-Main-Screen1.PNG]]</div> |
To add notes using the "Notes" tab: | To add notes using the "Notes" tab: | ||
1. '''Click the '''"Agreements" navigation menu on the top''.'' This opens the Agreements Index page listing all agreements in a grid by default. | 1. '''Click the '''"Agreements" navigation menu on the top''.'' This opens the Agreements Index page listing all agreements in a grid by default. | ||
| − | 2. '''Click''' the "View Details" eye icon in the last grid column of the agreement for which you want to view the notes. The Agreement Details page opens. | + | 2. '''Click''' the "View Details" [[File:Eye-icon.PNG|20px|Eye-icon.PNG]]eye icon in the last grid column of the agreement for which you want to view the notes. The Agreement Details page opens. |
| − | 3. '''Click''' "Notes" on the left pane to view notes in a grid view by default ('''Note:''' The "Notes" tab is visible in collapsed left pane if configured else expand the left pane to see the tab) | + | 3. '''Click''' "Notes" on the left pane to view notes in a grid view by default ('''Note:''' The "Notes" tab is visible in collapsed left pane if configured else expand the left pane to see the tab). |
| − | + | ||
| − | + | ||
| − | + | ||
| − | + | ||
| + | If no notes are available for an agreement, an image and a message depicting “no records” are displayed in the grid area. | ||
| + | <div class="image-green-border">[[File:8.0-Notes-No.PNG|720px|8.0-Notes-No.PNG]]</div> <div class="image-green-border"> </div> <div class="image-green-border">4. '''Click '''the "Add Note" on the right above the grid. This opens the "Add Note" drawer slides from the right.</div> | ||
5. '''Enter''' your comments. | 5. '''Enter''' your comments. | ||
6. '''Click '''"Add". The added comment is listed on the grid. | 6. '''Click '''"Add". The added comment is listed on the grid. | ||
| − | <div class="note-box">'''Note''': The comments can be in form of a table and you can also use special characters such as characters for Korean language. The comments can also be formatted using the '''Rich Text editor''' toolbar provided to make the text bold or italics, underline the text, change the font color, and so on. You can now also use tables within the message body. A table can be inserted using the "Create Table" icon in the toolbar.</div> <div class="image-green-border"> </div> <div class="image-green-border">[[File:8.0- | + | <div class="note-box">'''Note''': The comments can be in form of a table and you can also use special characters such as characters for Korean language. The comments can also be formatted using the '''Rich Text editor''' toolbar provided to make the text bold or italics, underline the text, change the font color, and so on. You can now also use tables within the message body. A table can be inserted using the "Create Table" icon in the toolbar.</div> <div class="image-green-border"> </div> <div class="image-green-border">[[File:8.0-Add-Note-drawer.PNG|720px|8.0-Add-Note-drawer.PNG]]</div> |
| − | + | ||
| − | + | ||
| − | + | ||
| − | + | ||
Let’s go through each view in detail: | Let’s go through each view in detail: | ||
| Line 38: | Line 32: | ||
Grid view dramatically reduces the time required to go through the complete list of logs to find a specific one. Through this view, you can easily refine your search for any specific log. The search results are displayed in tabular form. | Grid view dramatically reduces the time required to go through the complete list of logs to find a specific one. Through this view, you can easily refine your search for any specific log. The search results are displayed in tabular form. | ||
| − | <div class="image-green-border">Follow these steps to search the | + | <div class="image-green-border">Follow these steps to search the notes:</div> |
1. You can refine your search by selecting the provided categories in tabs: | 1. You can refine your search by selecting the provided categories in tabs: | ||
: | : | ||
| − | :*All: displays the logs added directly through the Notes tab and while taking any action on the Agreement. | + | :*'''All:''' displays the logs added directly through the Notes tab and while taking any action on the Agreement. |
| − | :*Workflow: displays the logs added while taking any action on the Agreement. | + | :*'''Workflow:''' displays the logs added while taking any action on the Agreement. |
For example, | For example, | ||
| − | In the screenshot below, | + | In the screenshot below, all notes are displayed under the "All" tab. |
| − | + | The note in the first row is created while the "Agreement Rejected" event with a Reason code is displayed under the "Reason Code" column. | |
| − | + | <div class="image-green-border">[[File:8.0-Notes-Reason-Code.PNG|720px|8.0-Notes-Reason-Code.PNG]]</div> <div class="image-green-border"> </div> <div class="image-green-border">The second row is the note created from when the broadcast message is sent from the "[[Broadcast|Broadcast]]" page. This note has a "TO-email address" format under the "Note" column. </div> <div class="image-green-border"> </div> <div class="image-green-border">[[File:8.0-Notes-Broadcast.PNG|720px|8.0-Notes-Broadcast.PNG]]</div> | |
| − | : | + | 2. Refine your search further using the "Refine Search Here" searchbox provided below the tabs. For example, you can either type the initials of the User Name who created the Agreement or type initials of the Event and click the search icon in the extreme right. This filters the results to display only those records that match your search. |
| − | + | ||
| − | + | ||
| − | 2. Refine your search further using the "Refine Search Here" | + | |
| − | 3. You can sort and filter your search results further by clicking the sort or on the column heading and the "Filter" [[File:Filter. | + | 3. You can sort and filter your search results further by clicking the sort or on the column heading and the "Filter" icon [[File:Filter-icon.PNG|20px|Filter-icon.PNG]]provided at the right of each column heading. |
Each column filter has these elements: | Each column filter has these elements: | ||
| − | *A dropdown to choose the desired operator, for example: “Is equal to”, “is not null”, “Is before” (for “Date and Time” column) etc. | + | *A dropdown to choose the desired operator, for example: “Is equal to”, “is not null”, “Is before” (for “Date and Time” column), etc. |
*A field to enter a value, like a keyword text or date (for “Date and Time”). | *A field to enter a value, like a keyword text or date (for “Date and Time”). | ||
*A dropdown to choose filters logic for the additional value and operator, for example – “And”, “Or”. | *A dropdown to choose filters logic for the additional value and operator, for example – “And”, “Or”. | ||
*Fields to enter an additional set of values and operator. | *Fields to enter an additional set of values and operator. | ||
| − | <div class="image-green-border"></div> | + | |
| + | The applied filters can be cleared using the "Clear Grid Filters" button on the right above the grid beside the view buttons. | ||
| + | <div class="image-green-border">[[File:8.0-Notes-Filters.PNG|320px|8.0-Notes-Filters.PNG]]</div> | ||
| + | | ||
| + | |||
'''List View''' | '''List View''' | ||
| − | The List view displays the complete list of comments available similar to the grid but in card format. You can refine your search by selecting either "All" or "Workflow" tabs. | + | The List view displays the complete list of comments available similar to the grid but in card format. You can refine your search by selecting either "All" or "Workflow" tabs. |
| + | |||
| + | To view records in List view | ||
| + | |||
| + | '''Click '''"List View" on the extreme right on top of the grid to change the view from the grid to the list. | ||
<div class="image-green-border">[[File:8.0-Notes-List-View.PNG|720px|8.0-Notes-List-View.PNG]]<br/> <br/> </div> <div class="image-green-border"> </div> <div class="image-green-border"> </div> <div class="image-green-border"> </div> <div class="image-green-border"> </div> | <div class="image-green-border">[[File:8.0-Notes-List-View.PNG|720px|8.0-Notes-List-View.PNG]]<br/> <br/> </div> <div class="image-green-border"> </div> <div class="image-green-border"> </div> <div class="image-green-border"> </div> <div class="image-green-border"> </div> | ||
| − | '''Related Topics:''' [[Agreement_Management|Agreement Management]] | [[Agreements|Agreements]] | [[Requests|Requests]] | [[Agreement_Details_Page|Agreement Details Page]] | [[Broadcas|Broadcas]][[Broadcast|t]] | [[Application_Settings|Application Settings]] | + | '''Related Topics:''' [[Agreement_Management|Agreement Management]] | [[Agreements|Agreements]] | [[Requests|Requests]] | [[Agreement_Details_Page|Agreement Details Page]] | [[Broadcas|Broadcas]][[Broadcast|t]] | [[Application_Settings|Application Settings]] |[[History|History]]| [[Versions|Versions]] |
</div> | </div> | ||
Latest revision as of 10:18, 19 December 2021
Notes
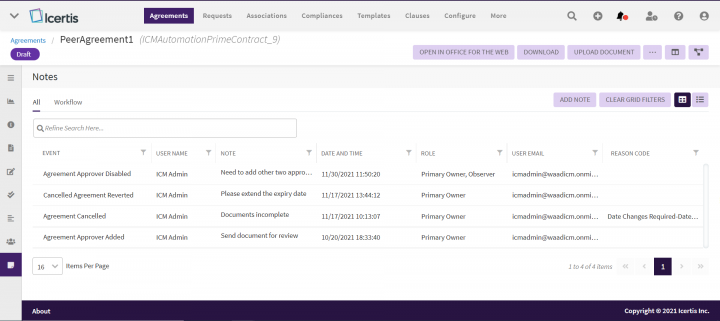
The "Notes" tab displays the comments that are added to the Agreement either when an action is taken such as "Agreement Approver Added" or directly through the "Notes" tab. It displays the comments for the complete lifecycle of the Agreement.
Internal users can communicate more efficiently with both internal and external sources through "Notes" across all phases of an Agreement. While adding them, internal users have the choice of making their Notes visible to all users (internal and external) or to internal users only. ICI handles the validation of users and displays Notes based on their visibility settings.
By default:
- Notes added by internal users are visible only internally.
- Notes added by external users are visible to all.
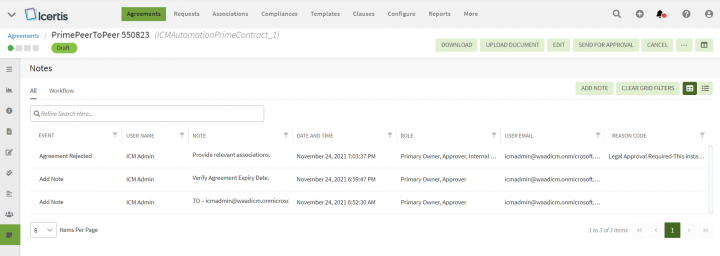
Notes can be viewed either using the "Grid" or "List" view. By default, the "Grid" view is selected. The grid columns get auto-fit with the collapsing and expanding of the left navigation pane.
To add notes using the "Notes" tab:
1. Click the "Agreements" navigation menu on the top. This opens the Agreements Index page listing all agreements in a grid by default.
2. Click the "View Details" eye icon in the last grid column of the agreement for which you want to view the notes. The Agreement Details page opens.
3. Click "Notes" on the left pane to view notes in a grid view by default (Note: The "Notes" tab is visible in collapsed left pane if configured else expand the left pane to see the tab).
If no notes are available for an agreement, an image and a message depicting “no records” are displayed in the grid area.
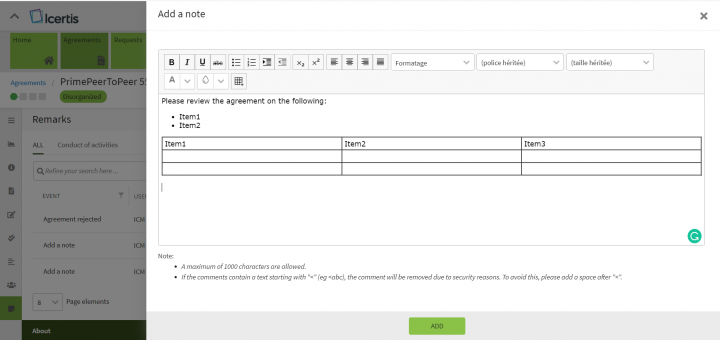
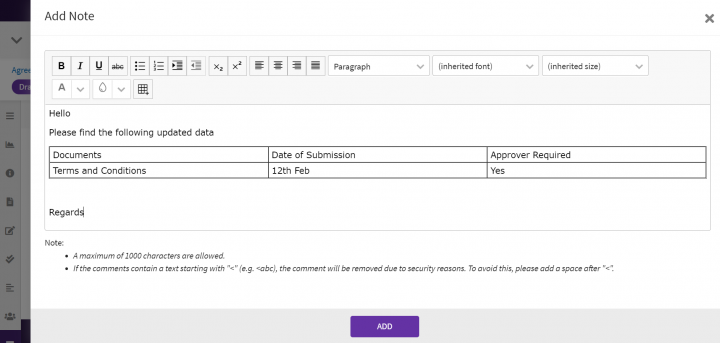
5. Enter your comments.
6. Click "Add". The added comment is listed on the grid.
Let’s go through each view in detail:
Grid View
Grid view dramatically reduces the time required to go through the complete list of logs to find a specific one. Through this view, you can easily refine your search for any specific log. The search results are displayed in tabular form.
1. You can refine your search by selecting the provided categories in tabs:
-
- All: displays the logs added directly through the Notes tab and while taking any action on the Agreement.
- Workflow: displays the logs added while taking any action on the Agreement.
For example,
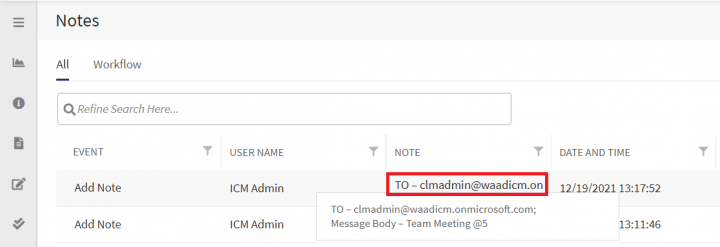
In the screenshot below, all notes are displayed under the "All" tab.
The note in the first row is created while the "Agreement Rejected" event with a Reason code is displayed under the "Reason Code" column.
2. Refine your search further using the "Refine Search Here" searchbox provided below the tabs. For example, you can either type the initials of the User Name who created the Agreement or type initials of the Event and click the search icon in the extreme right. This filters the results to display only those records that match your search.
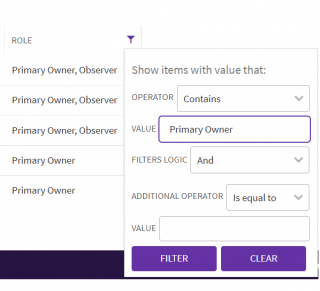
3. You can sort and filter your search results further by clicking the sort or on the column heading and the "Filter" icon provided at the right of each column heading.
Each column filter has these elements:
- A dropdown to choose the desired operator, for example: “Is equal to”, “is not null”, “Is before” (for “Date and Time” column), etc.
- A field to enter a value, like a keyword text or date (for “Date and Time”).
- A dropdown to choose filters logic for the additional value and operator, for example – “And”, “Or”.
- Fields to enter an additional set of values and operator.
The applied filters can be cleared using the "Clear Grid Filters" button on the right above the grid beside the view buttons.
List View
The List view displays the complete list of comments available similar to the grid but in card format. You can refine your search by selecting either "All" or "Workflow" tabs.
To view records in List view
Click "List View" on the extreme right on top of the grid to change the view from the grid to the list.
Related Topics: Agreement Management | Agreements | Requests | Agreement Details Page | Broadcast | Application Settings |History| Versions
