Shefali DK (Talk | contribs) |
|||
| (13 intermediate revisions by 4 users not shown) | |||
| Line 1: | Line 1: | ||
= Admin Task = | = Admin Task = | ||
| − | |||
| − | |||
| − | |||
| − | |||
| − | |||
| − | |||
| − | |||
| − | |||
| − | |||
| − | |||
| − | |||
| − | |||
| − | |||
| − | |||
| − | |||
| − | |||
| − | |||
| − | |||
| − | |||
| − | |||
| − | |||
== Search Sync == | == Search Sync == | ||
| − | The Search Sync tool gets data from Icertis Search for a given instance’s | + | The Search Sync tool gets data from Icertis Search for a given instance’s "Sys Id" and synchronizes it, if required. Using the fetched ES value, the tool validates if the Sys Id is the latest for the respective instance or if a sync is required. The Administrator can access this option from the "Admin Task" on the "Admin" tile. |
If the key exists, the latest value from ES will be displayed. If the key does not exist, the system displays an error message indicating that the value could not be fetched for the provided Sys Id. The Sys Id can be provided as input CSV file or as comma separated. Either comma separated Sys Ids can be entered or a CSV file can be uploaded. | If the key exists, the latest value from ES will be displayed. If the key does not exist, the system displays an error message indicating that the value could not be fetched for the provided Sys Id. The Sys Id can be provided as input CSV file or as comma separated. Either comma separated Sys Ids can be entered or a CSV file can be uploaded. | ||
This helps to make the entity search more streamlined and efficient. Users can quickly refer to related agreements at the time of deals or audits. | This helps to make the entity search more streamlined and efficient. Users can quickly refer to related agreements at the time of deals or audits. | ||
| − | <div class="note-box">'''Note''': Data can be fetched from only one instance at a time. A dedicated key must exist for ES sync to work with | + | <div class="note-box">'''Note''': Data can be fetched from only one instance at a time. A dedicated key must exist for ES sync to work with "Sys ID".</div> |
You can search the documents that an Agreement is linked to. | You can search the documents that an Agreement is linked to. | ||
To use the Search Sync Tool: | To use the Search Sync Tool: | ||
| − | 1. '''Click''' Home | + | 1. '''Click''' Admin tile on the Home page and then '''click''' "Admin Task". |
| − | <div class="image-green-border">[[File: | + | <div class="image-green-border">[[File:Admin Task Menu Access.png|450px]]</div> <div class="image-green-border"> </div> <div class="image-green-border">The Admin Task page opens.</div> |
| − | 2. '''Click''' | + | 2. '''Click''' "Search Sync"'' ''menu from the left pane. |
| − | <div class="image-green-border">[[File: | + | <div class="image-green-border">[[File:Admin Task Landing Page.png|500px]]</div> <div class="image-green-border"><div class="image-green-border"> |
| − | + | 3. '''Select''' the “Entity Type” from the drop-down to sync data to the Icertis Search. For example, Agreement. | |
| − | + | 4. '''Select''' the “Contract Type” from the drop-down''.'' | |
| − | + | To get the “Sys Ids”'','' you can either use the “Upload CSV” feature to upload the .CSV Agreement or enter the Sys Id using comma separated values in the box. | |
| − | + | [[File:Entity Type1.png|720px|Entity Type.png]] | |
| − | + | </div> </div> | |
| − | + | 5. '''Click''' the “Upload CSV” button to upload the CSV document. The “Upload Document” window opens. | |
| − | + | ||
| − | + | ||
| − | + | 6. '''Click''' the “Select File” button to upload a CSV file and add a note, if required. | |
| − | + | <div class="image-green-border">[[File:UploadSysID File1.png|720px|Upload Sys ID File.png]]</div> <div class="image-green-border"> </div> | |
| − | + | 7. '''Click''' the "Upload" button. The file is uploaded to the "File Path" displayed''.'' | |
| − | <div class="image-green-border">[[File: | + | |
| − | + | ||
| − | + | '' '' If the uploaded file format is incorrect, an alert message is displayed. The supported file formats will be also be displayed. | |
| + | <div class="image-green-border">[[File:Search Sync File Error1.png|720px|Search Sync File Error1.png]]</div> | ||
| + | 8. '''Click''' the "Sync" button. The "Sync Request Accepted" message is displayed. | ||
| + | <div class="image-green-border">[[File:Search Sync Accepted.png|720px|Search Sync Accepted.png]]</div> | ||
| + | 9. Users can now get data from ES for a given instance’s SysId and can check if it has the latest value or if sync is needed. | ||
| − | + | 10. '''Select''' "Get ES Value". | |
| − | ''' | + | 11. Enter the SysId and '''click''' the "Go". If the key exists, the latest value from ES will be displayed. If the key does not exist, an error message, "Please enter valid SysId" is displayed. |
| − | + | <div class="image-green-border">[[File:8.0-Search-Sync-GET-ES.PNG|720px|8.0-Search-Sync-GET-ES.PNG]]</div> | |
| − | + | | |
| − | + | <div class="note-box">'''Note''': Data can be fetched from only one instance at a time.</div> | |
| − | + | ||
| − | + | ||
| − | + | ||
| − | <div class="image-green-border">[[File:Search Sync ES. | + | |
== Legacy Upload == | == Legacy Upload == | ||
| Line 90: | Line 65: | ||
*User details | *User details | ||
| − | + | Refer to the [[Legacy_Upload|Legacy Upload]] page or link for more details. | |
== Translations Editor == | == Translations Editor == | ||
| Line 96: | Line 71: | ||
The ICI platform is available in different languages and different languages label text are available for localization. However, to make any changes to the localization values, users had to reach out to the Solutions Engineering or Database teams. Sometimes, these changes were minor and of low complexity, but the turnaround time was substantial. | The ICI platform is available in different languages and different languages label text are available for localization. However, to make any changes to the localization values, users had to reach out to the Solutions Engineering or Database teams. Sometimes, these changes were minor and of low complexity, but the turnaround time was substantial. | ||
| − | Hence, a self-service | + | Hence, a self-service "Translations Editor" tool has been introduced that contains all strings that are localized. |
Users can now download all keys and their localization values as an Excel file, modify multiple values, and upload the modified changes to ICI. Once the values are updated in ICI, the caches are updated automatically to avoid the cache flush and server restart. This has significantly enhanced productivity as the turnaround time to update the Resource Key values has been eradicated. | Users can now download all keys and their localization values as an Excel file, modify multiple values, and upload the modified changes to ICI. Once the values are updated in ICI, the caches are updated automatically to avoid the cache flush and server restart. This has significantly enhanced productivity as the turnaround time to update the Resource Key values has been eradicated. | ||
| Line 106: | Line 81: | ||
*Download and upload the localization key values using Microsoft Excel. | *Download and upload the localization key values using Microsoft Excel. | ||
*View the modified values in the ICI instance immediately. | *View the modified values in the ICI instance immediately. | ||
| − | </div | + | </div> |
To use the Translations Editor Tool: | To use the Translations Editor Tool: | ||
| − | 1. ''' | + | 1. C'''lick''' Admin tile on the Home page and then '''click''' "Admin Task". The "Admin Task" page opens. |
| − | 2 | + | 2. '''Select''' the "Translation Editor"task from the left pane''.'' |
| − | + | ||
| − | + | ||
| − | + | ||
| − | + | ||
| − | + | ||
| − | + | ||
Users can update translations in the following ways: | Users can update translations in the following ways: | ||
| − | + | *For selective editing, select a language and a resource key to update the translations. | |
| − | + | *For bulk editing and updation of multiple languages and resource keys, use the Download / Upload option to download an MS Excel sheet. | |
| − | + | ||
| − | + | ||
| − | + | ||
===== Selective Editing to Update Translations ===== | ===== Selective Editing to Update Translations ===== | ||
| Line 131: | Line 97: | ||
For editing Resource Key values selectively: | For editing Resource Key values selectively: | ||
| − | 1. From the | + | 1. From the "Select Language" drop-down, select a language in which you want to edit the labels. For example, français (French). |
| − | + | <div class="image-green-border">[[File:Select Language1.png|720px|Select Language.png]]</div> | |
| − | [[File: | + | |
| − | + | ||
The Resource Key and respective values of the selected language are displayed. | The Resource Key and respective values of the selected language are displayed. | ||
| − | + | <div class="image-green-border">[[File:Resource Key List1.png|720px|Resource Key List.png]]</div> | |
| − | [[File: | + | 2. '''Ente'''r a "ResourceKey" value in the "Search" field to edit. For example, default. All ResourceKey(s) with the "Par défaut (default)" values from the French language are displayed. |
| − | + | ||
| − | 2. '''Ente'''r a | + | |
<div class="note-box">'''Note:''' ResourceKey is a unique key by which the application gets its label text for different languages.</div> | <div class="note-box">'''Note:''' ResourceKey is a unique key by which the application gets its label text for different languages.</div> | ||
| − | + | 3. '''Click '''the "Edit this Resource Key for the Multiple Languages"'' ''icon [[File:Edit Resource Key Icon.png|20px|Edit Resource Key Icon.png]] in the "Actions" column on the right. | |
| − | + | <div class="image-green-border"> | |
| − | 3. '''Click '''the | + | You can change the key for a single language or for multiple languages as required. For example, change "Par défaut to défaut" in French or "Predeterminado" in Español (Spanish) to "Defecto". |
| − | + | [[File:Edit Resource Key1.png|600px|Edit Resource Key.png]] | |
| − | + | 4. '''Click''' the "Update" button. | |
| − | + | 5. After the "Resources Updated Successfully" message is displayed. | |
| − | + | ||
| − | 5. | + | |
| − | + | ||
| − | + | ||
You can select the respective languages (French or Spanish) to verify that the resources have been successfully updated. | You can select the respective languages (French or Spanish) to verify that the resources have been successfully updated. | ||
| − | |||
| − | |||
</div> | </div> | ||
===== Bulk Editing in Multiple Languages ===== | ===== Bulk Editing in Multiple Languages ===== | ||
| Line 163: | Line 119: | ||
For editing Resource Key values of multiple languages in bulk: | For editing Resource Key values of multiple languages in bulk: | ||
| − | 1. '''Click''' | + | 1. '''Click''' the "Download File" button. A Microsoft Excel file (named BulkActionWorkBookStringResource) that contains all the Resource keys and values for all supported languages in ICI is downloaded. |
| − | <div class="image-green-border">[[File: | + | <div class="image-green-border">[[File:Translations Bulk Upload1.png|720px|Translations Bulk Upload1.png]]</div> |
2. '''Open''' the downloaded Microsoft Excel file. | 2. '''Open''' the downloaded Microsoft Excel file. | ||
| − | 3. '''Click''' | + | 3. '''Click''' "Enable Editing". All ICI supported language Resource keys and their respective values are displayed. |
4. '''Edit''' the ResouceKey of multiple languages as required. | 4. '''Edit''' the ResouceKey of multiple languages as required. | ||
| Line 173: | Line 129: | ||
5. '''Save''' the Excel file. | 5. '''Save''' the Excel file. | ||
| − | 6. '''Click''' | + | 6. '''Click''' the "Upload File" button. The "Upload Translations" window opens. |
| − | 7. '''Click | + | 7. '''Click "'''SelectFile". The "Open"''window opens.'' |
8. '''Select''' the updated Excel file. | 8. '''Select''' the updated Excel file. | ||
| − | 9. '''Click''' | + | 9. '''Click''' "Open". A warning window opens indicating that this is a heavy operation and can potentially affect overall application performance. |
| − | 10. '''Click''' | + | 10. '''Click''' "Ok". The "Upload Summary" displays the number ''of "''Records Uploaded", "Records Processed", and "Records Updated Successfully"''values.'' |
| − | 11. '''Click''' | + | 11. '''Click''' "Close". The label translations have been achieved for multiple languages in bulk. |
| − | + | == Data Management == | |
| − | + | ||
| − | == Data Management | + | |
Moving one step ahead in the self-service, ICI now allows performing data management activities for entities in all workflow stages. | Moving one step ahead in the self-service, ICI now allows performing data management activities for entities in all workflow stages. | ||
| − | The data management activities introduced with this release update and delete operations for Agreements, Associated Documents, Contract Requests, User Information, Files and Attributes. These self-serve data management operations will empower administrative users to troubleshoot data inconsistency issues on their own. | + | The data management activities introduced with this release are update and delete operations for Agreements, Associated Documents, Contract Requests, User Information, Files and Attributes. These self-serve data management operations will empower administrative users to troubleshoot data inconsistency issues on their own. |
| − | However, users are advised to execute these operations cautiously as the data fix does not go through necessary business validations and are performed directly in the database itself. Furthermore, updating or deleting data through the data management tool cannot be undone and will not trigger any underlying rules, workflows, notifications, triggers or integrations. Therefore, it is recommended to follow standard ICI workflows for any major or entity state modifications. | + | However, users are advised to execute these operations cautiously as the data fix does not go through necessary business validations and are performed directly in the database itself. Furthermore, updating or deleting data through the data management tool cannot be undone and will not trigger any underlying rules, workflows, notifications, triggers, or integrations. Therefore, it is recommended to follow standard ICI workflows for any major or entity state modifications. |
| − | <div class="note-box">'''Note:''' The type of attributes such as Expressions, Conditional, Multi-select Lookup, Script, and System will remain | + | <div class="note-box">'''Note:''' The type of attributes such as Expressions, Conditional, Multi-select Lookup, Script, and System will remain non-editable and cannot be updated through the data management tool.</div> |
By default, the Data Management utility is enabled and can be controlled through the technical configuration. | By default, the Data Management utility is enabled and can be controlled through the technical configuration. | ||
| − | Administrators can perform the | + | Administrators can perform the following actions from the Data Management page: |
*Replace User | *Replace User | ||
| Line 203: | Line 157: | ||
*Update Entity | *Update Entity | ||
| − | + | A data management notification will be sent to a user who performs any data fix action along with primary owner, secondary owner and contract manager upon the data fix task completion with the details of the entity and modified data. | |
| − | + | ||
| − | + | ||
| − | + | ||
| − | + | ||
| − | + | ||
| − | + | ||
| − | + | ||
| − | + | ||
| − | + | ||
| − | + | ||
| − | + | ||
| − | + | ||
| − | + | ||
| − | + | ||
| − | Please refer "Notifications Dashboard" page for notification details. | + | Please refer [[Notifications_Dashboard|"Notifications Dashboard"]] page for notification details. |
| − | <div class="note-box">'''Note:''' Data Management tools do not support updating data for any add-in applications. The validations will not be performed for any data fixed through Data Management tools. | + | <div class="note-box">'''Note:''' Data Management tools do not support updating data for any add-in applications. The validations will not be performed for any data fixed through Data Management tools.</div> |
=== Replacing a user with multiple users === | === Replacing a user with multiple users === | ||
| Line 232: | Line 172: | ||
This capability is available across ICI for contract requests, agreements, associations, masterdata, template and clause teams, user groups, and rules. A separate data management user interface is provided for these admin actions. | This capability is available across ICI for contract requests, agreements, associations, masterdata, template and clause teams, user groups, and rules. A separate data management user interface is provided for these admin actions. | ||
| + | <div class="note-box">'''Note:''' Data Management tools do not support updating data for any add-in applications. The validations will not be performed for any data fixed through Data Management tools.</div> | ||
| + | To replace user: | ||
| − | + | 1. '''Navigate''' to the "Data Management" page. | |
2. '''Select '''"Replace User" in the "Action" field. The fields to enter details such as user to be replaced, user to be assigned, replacement criteria, and entity are displayed. | 2. '''Select '''"Replace User" in the "Action" field. The fields to enter details such as user to be replaced, user to be assigned, replacement criteria, and entity are displayed. | ||
| − | + | ||
| + | 3. '''Click '''Add User icon corresponding to the "Replace User" field. The "Search User" drawer opens. | ||
| + | <div class="image-green-border">[[File:Replace User 3.png|720px]]<br/> ''' '''<br/> 4''. '''''Search '''and '''select '''a user you want to replace.</div> <div class="image-green-border">[[File:Select User to Replace.png|720px]]</div> <div class="image-green-border"><br/> 5. '''Click '''"Add". The user will be entered in the "Replace User" field.</div> | ||
| + | 6. '''Search '''and '''Add '''the "Assign To" user with whom you want to replace the user. | ||
| + | <div class="image-green-border">[[File:Assign Replace User.png|720px|Assign Replace User.png]]<br/> <br/> 7. '''Select '''"Replace Based On" criteria from options:</div> | ||
*Saved Search | *Saved Search | ||
*Contract Type | *Contract Type | ||
*All Instances For Selected Entities | *All Instances For Selected Entities | ||
| − | |||
| − | |||
| + | '''Saved Search'''<br/> Administrators can replace a user in selective instances of an entity with different users by selecting a relevant Saved Search configured for that entity and user. | ||
| + | |||
| + | For example, user John Watson is added to the Teams of agreements from India and US regions. He can be replaced by multiple users by splitting agreements under his name in subsets using Saved Searches, one for agreements for the India region and the other for agreements in the US region. A saved search "JonhWatson_India_Agreements" can be created for John Watson's’s India region agreements and assigned to a user Johne Doel. A saved search "JonhWatson_US_Agreements" for his US region agreements can be created and assigned to another user, for example, Prajakta. | ||
| + | <div class="note-box">'''Note: '''You can create "Saved Search" for Agreements from the Agreement Index page. Filter the records from "Refine View" in the left and "Save View". Then can update the view if required by selecting it under "More Views" in the title bar.</div> | ||
| + | 7.1 '''Select '''"Saved Search". The "Entity" and "Saved Search" fields are displayed. | ||
| + | |||
| + | '''Select '''the Entity for which you want to replace the user in its instances "Team". For example, "Agreement Team". | ||
| + | |||
| + | '''Select '''the "Saved Search". For example, "John_Watson_India_Agreements". Users need to create a saved search on the entity for which they want to replace a user in its instances team. | ||
| + | |||
| + | '''Click '''"Submit". The success message flashes displaying a "Replace User action is submitted successfully".''' ''' | ||
| + | |||
| + | '''Contract Type'''<br/> This option replaces a user added in "Rules" actions configured on the selected "Contract Type" by the "Assign To" user. | ||
| + | |||
| + | 7.2 '''Select '''"Contract Type". The "Entity" and "Contract Type" fields are displayed. | ||
| + | |||
| + | '''Select '''the "Entity" as "Rules". | ||
| + | |||
| + | '''Select '''"Contract Types". For example, "Standard Document Master". | ||
| + | |||
| + | '''Click '''"Submit". The success message flashes displaying a "Replace User action is submitted successfully". | ||
| + | <div class="image-green-border">[[File:Replace User Contract Type.png|720px]]</div> | ||
| + | '''All Instances For Selected Entities''' | ||
| + | |||
| + | This option replaces a user in the Team of all instances of the selected entity by the "Assign To" user. | ||
| + | |||
| + | 7.3 '''Select '''"All Instances For Selected Entities". The Entity field is displayed. | ||
| + | |||
| + | '''Select ''''Entity". For example, "Agreement Team". | ||
| + | |||
| + | '''Click '''"Submit". The success message flashes displaying a "Replace User action is submitted successfully". | ||
| + | <div class="image-green-border">[[File:All Instances For Selected Entities.png|720px|All Instances For Selected Entities.png]]</div> | ||
| + | The task is submitted and will be scheduled and processed according to the "Time zone" set in "User Preferences". The audit details are captured and displayed in the Agreement History tab. | ||
| + | |||
| + | Users can access the notifications in the "Data Management" category from the "Notifications Dashboard" from the bell icon on the top right. The notification contains a link to view the summary of the Replace User task. | ||
| + | <div class="image-green-border">[[File:Data Management Notifications Dashboard1.png|600px|Data Management Notifications Dashboard1.png]]</div> | ||
=== Deleting an Entity === | === Deleting an Entity === | ||
When you want to remove certain records as a part of data clearance process, Administrators can mark the entity instances as deleted for you using Data Management tools. | When you want to remove certain records as a part of data clearance process, Administrators can mark the entity instances as deleted for you using Data Management tools. | ||
<div class="note-box">Note: Deleting data this way, through data management tools, will not trigger any rules, events or integrations configured on concerned entities.</div> | <div class="note-box">Note: Deleting data this way, through data management tools, will not trigger any rules, events or integrations configured on concerned entities.</div> | ||
| − | When the entity instance is deleted, its linked child records will also be marked as deleted as per the standard behavior and will not be accessible. | + | When the entity instance is deleted, its linked child records will also be marked as deleted as per the standard behavior and will not be accessible. Administrators can delete instances of agreement, amendment, contract request and associated document entities in any workflow states. |
| − | + | ||
| − | Administrators can delete instances of agreement, amendment, contract request and associated document entities in any workflow states. | + | |
To delete an entity instance: | To delete an entity instance: | ||
| Line 258: | Line 236: | ||
<div class="image-green-border">3. '''Select '''the "Entity" which you want to delete. For example, "Agreement".</div> | <div class="image-green-border">3. '''Select '''the "Entity" which you want to delete. For example, "Agreement".</div> | ||
4. '''Click '''the Search icon corresponding to the "Entity Instance" field to select an instance of that entity to be deleted. The Lookup Search "Select Agreement" drawer for the selected entity opens. | 4. '''Click '''the Search icon corresponding to the "Entity Instance" field to select an instance of that entity to be deleted. The Lookup Search "Select Agreement" drawer for the selected entity opens. | ||
| + | <div class="image-green-border">[[File:Select Instance Entity1.png|720px|8.0-Data-fix-tools-Deleting.PNG]]</div> | ||
| + | 5. '''Choose '''an instance and '''click "'''Select". | ||
| − | |||
| − | |||
6. '''Click "'''Submit". The confirmation window appears'''.''' | 6. '''Click "'''Submit". The confirmation window appears'''.''' | ||
7. '''Click '''"Yes". The selected entity instance will no longer be accessible. | 7. '''Click '''"Yes". The selected entity instance will no longer be accessible. | ||
| − | + | <div class="note-box">'''Note: '''When you delete an entity instance, its linked associations will also be marked as deleted as per the standard behavior.</div> | |
| − | + | ||
| − | <div class="note-box">'''Note: '''When you delete an entity instance, its linked associations will also be marked as deleted as per the standard behavior.</div> | + | |
| − | + | ||
| − | + | ||
| − | + | ||
=== Updating an Entity === | === Updating an Entity === | ||
There may be a business requirement to update selective data as a data maintenance and management process without processing any underlying actions associated with the update. Also, there may be a case, where a user does not have required access privileges to modify specific data. In such cases, Administrators can update data for you using Data Management tools. | There may be a business requirement to update selective data as a data maintenance and management process without processing any underlying actions associated with the update. Also, there may be a case, where a user does not have required access privileges to modify specific data. In such cases, Administrators can update data for you using Data Management tools. | ||
| − | <div class="note-box">Note: Updating data through data management tools will not trigger any rules, events, workflows or integrations configured on concerned entities.</div> | + | <div class="note-box">'''Note:''' Updating data through data management tools will not trigger any rules, events, workflows or integrations configured on concerned entities.</div> |
Administrators can update instances of agreement, amendment, contract request, associated document, masterdata, user information and commitment entities. Business users can view the data modifications done for a specific record in the audit logs from the History tab on the entity details page. | Administrators can update instances of agreement, amendment, contract request, associated document, masterdata, user information and commitment entities. Business users can view the data modifications done for a specific record in the audit logs from the History tab on the entity details page. | ||
| Line 287: | Line 260: | ||
4. '''Click '''the Search icon corresponding to the "Entity Instance" field to select an instance of the entity that you want to update. The Lookup Search "Select MasterData" drawer for the selected entity opens. | 4. '''Click '''the Search icon corresponding to the "Entity Instance" field to select an instance of the entity that you want to update. The Lookup Search "Select MasterData" drawer for the selected entity opens. | ||
| − | 5. '''Select '''an instance. | + | 5. '''Select '''an instance. All supported attributes from the selected entity are displayed in the Attribute dropdown field. |
| − | + | ||
| − | 6. '''Select '''the "Attribute" whose value you want to modify. For example, " | + | 6. '''Select '''the "Attribute" whose value you want to modify. For example, "Name". The attribute’s value from the selected instance is displayed for a user to edit. |
| − | <div class="image-green-border">7. '''Edit '''the attribute value as per the requirements. For example, enter a value for | + | <div class="image-green-border">7. '''Edit '''the attribute value as per the requirements. For example, enter a value for Name''.''</div> <div class="image-green-border">''[[File:Select Attribute.png|720px|Select Attribute.png]]''</div> |
8. '''Click '''"Submit". The confirmation window opens. | 8. '''Click '''"Submit". The confirmation window opens. | ||
| − | 9. '''Click '''"Yes" to proceed. | + | 9. '''Click '''"Yes" to proceed. The attribute of the entity instance will be updated with the new value. |
| − | + | <div class="note-box">'''Note:''' The Commitment attributes such as Commitment Code, Recurring Commitment, Commitment Frequency, Commitment type, Business Owner, Start Date and End date cannot be updated using Data Management actions.</div> <div><div><div> </div> <div id="_com_1">'''Related Topics: '''''[[Agreement_Management|Agreement Management]] | [[Managing_Organization|Managing Organization]] | [[Managing_Users|Managing Users]] | [[Managing_User_Groups|Managing User Groups]] | [[Managing_Security_Groups|Managing Security Groups]] | [[Application_Settings|Application Settings]] | [[Notification_Settings|Notification Settings]] | [[Currencies|Currencies]] | [[Reasons|Reasons]] |[[Legacy_Upload|Legacy Upload ]]| [[Notifications_Dashboard|Notifications Dashboard]]''</div> </div> </div> | |
| − | + | ||
| − | <div class="note-box">Note: The Commitment attributes such as Commitment Code, Recurring Commitment, Commitment Frequency, Commitment type, Business Owner, Start Date and End date cannot be updated using Data Management actions.</div> <div><div><div | + | |
| − | ''' ''' | + | |
| − | + | ||
| − | '' | + | |
| − | + | ||
| − | + | ||
Latest revision as of 10:22, 9 June 2022
Contents
Admin Task
Search Sync
The Search Sync tool gets data from Icertis Search for a given instance’s "Sys Id" and synchronizes it, if required. Using the fetched ES value, the tool validates if the Sys Id is the latest for the respective instance or if a sync is required. The Administrator can access this option from the "Admin Task" on the "Admin" tile.
If the key exists, the latest value from ES will be displayed. If the key does not exist, the system displays an error message indicating that the value could not be fetched for the provided Sys Id. The Sys Id can be provided as input CSV file or as comma separated. Either comma separated Sys Ids can be entered or a CSV file can be uploaded.
This helps to make the entity search more streamlined and efficient. Users can quickly refer to related agreements at the time of deals or audits.
You can search the documents that an Agreement is linked to.
To use the Search Sync Tool:
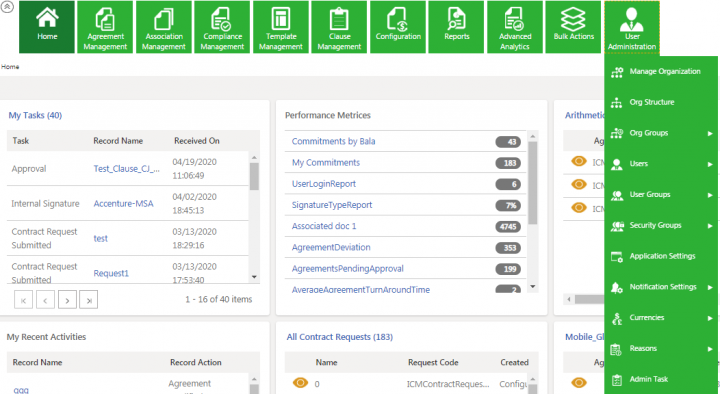
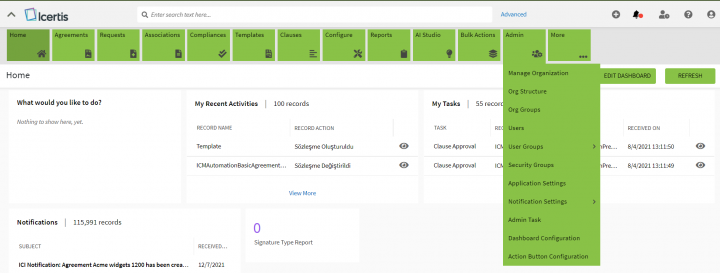
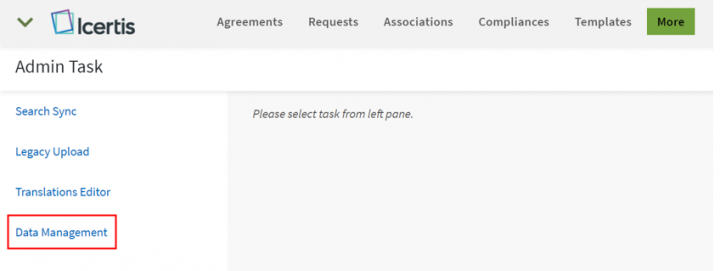
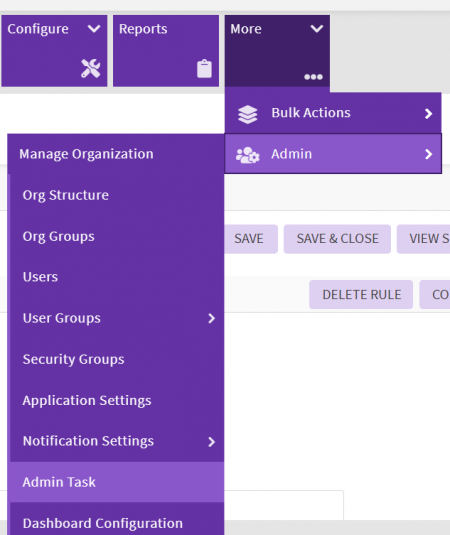
1. Click Admin tile on the Home page and then click "Admin Task".
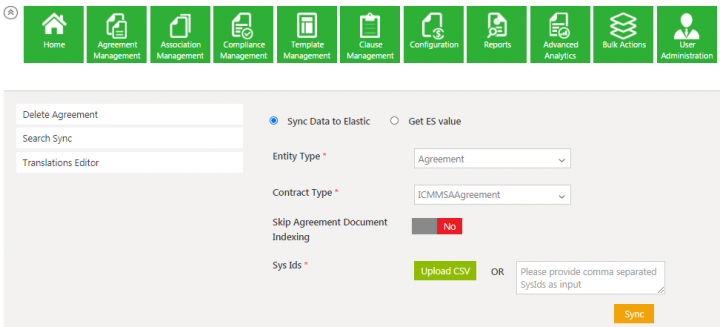
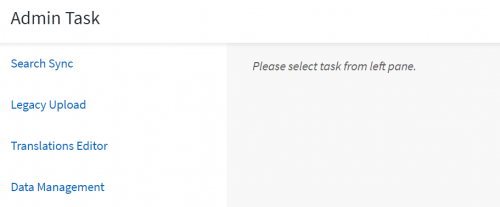
2. Click "Search Sync" menu from the left pane.
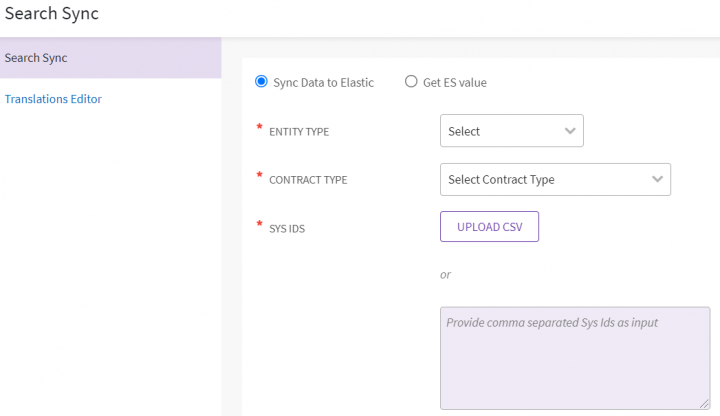
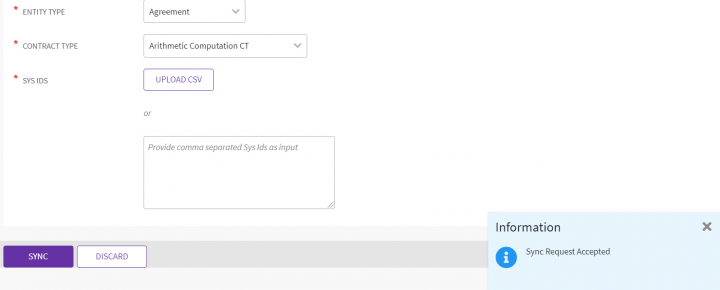
3. Select the “Entity Type” from the drop-down to sync data to the Icertis Search. For example, Agreement.
4. Select the “Contract Type” from the drop-down.
To get the “Sys Ids”, you can either use the “Upload CSV” feature to upload the .CSV Agreement or enter the Sys Id using comma separated values in the box.
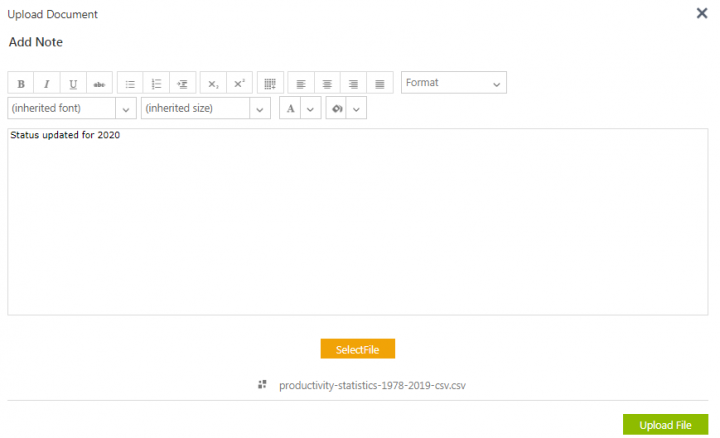
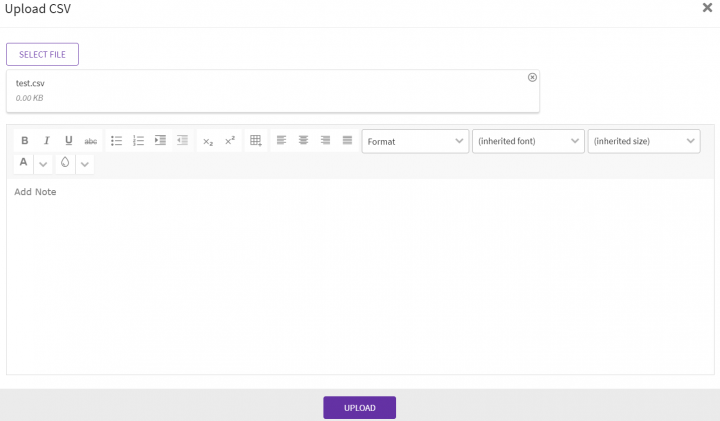
5. Click the “Upload CSV” button to upload the CSV document. The “Upload Document” window opens.
6. Click the “Select File” button to upload a CSV file and add a note, if required.
7. Click the "Upload" button. The file is uploaded to the "File Path" displayed.
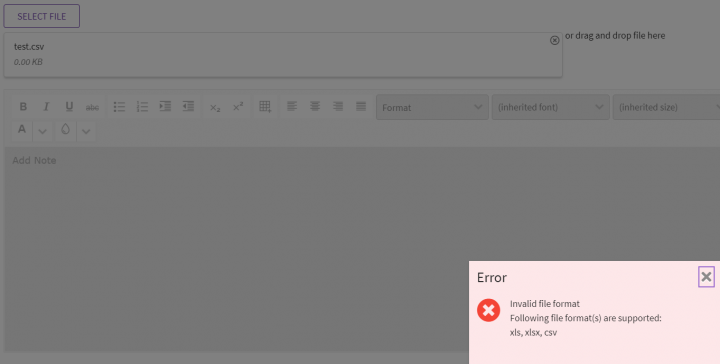
If the uploaded file format is incorrect, an alert message is displayed. The supported file formats will be also be displayed.
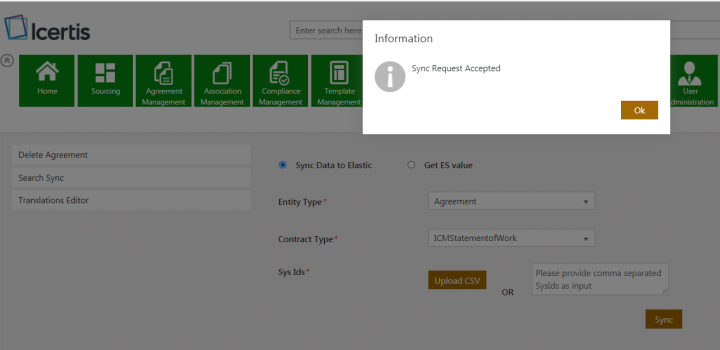
8. Click the "Sync" button. The "Sync Request Accepted" message is displayed.
9. Users can now get data from ES for a given instance’s SysId and can check if it has the latest value or if sync is needed.
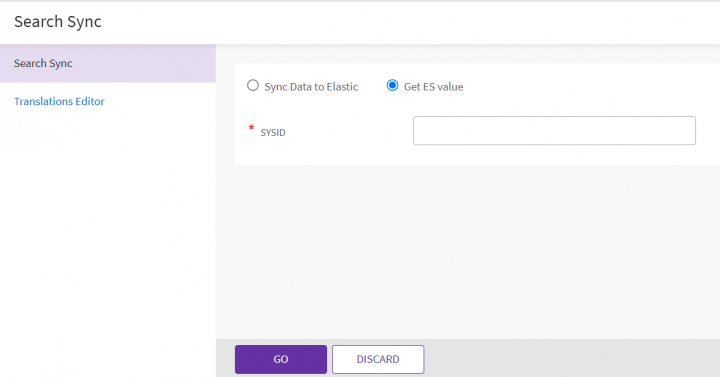
10. Select "Get ES Value".
11. Enter the SysId and click the "Go". If the key exists, the latest value from ES will be displayed. If the key does not exist, an error message, "Please enter valid SysId" is displayed.
Legacy Upload
Organizations may have a large number of existing Agreements that are created outside of ICI platform. These are henceforth referred to as Legacy Agreements. Organizations may want to import these Agreements to ICI to leverage its vast capabilities and manage all Agreements within a single platform.
The Legacy Upload feature enables ICI Administrator to easily upload in bulk the legacy agreements that were created outside of ICI. This feature enhances productivity by allowing you to upload a large volume of existing Agreements and other entities using Excel.
The highlights of this feature are :
- Uploading Agreements, Teams, Notes and Commitments in bulk.
- Uploading Associations, Masterdata, User Information and Amendments in bulk.
- Scheduled batch processing for improved performance.
- Enhanced validations, including the ability to exclude the specified attributes from being validated.
- Ability to view logs and reporting of success and failure statuses for validations and uploads.
You can use the utility to upload the following entities:
- Agreements
- Amendments
- Associated Documents (with or without workflow)
- Masterdata (with or without workflow)
- Team, Notes, and Commitment
- User details
Refer to the Legacy Upload page or link for more details.
Translations Editor
The ICI platform is available in different languages and different languages label text are available for localization. However, to make any changes to the localization values, users had to reach out to the Solutions Engineering or Database teams. Sometimes, these changes were minor and of low complexity, but the turnaround time was substantial.
Hence, a self-service "Translations Editor" tool has been introduced that contains all strings that are localized.
Users can now download all keys and their localization values as an Excel file, modify multiple values, and upload the modified changes to ICI. Once the values are updated in ICI, the caches are updated automatically to avoid the cache flush and server restart. This has significantly enhanced productivity as the turnaround time to update the Resource Key values has been eradicated.
Using this tool, users can now:
- Search for a specific string using the search bar and update the Resource Key value for Language and Locale.
- Update multiple language strings by selecting and saving the Resource Key value.
- Download and upload the localization key values using Microsoft Excel.
- View the modified values in the ICI instance immediately.
To use the Translations Editor Tool:
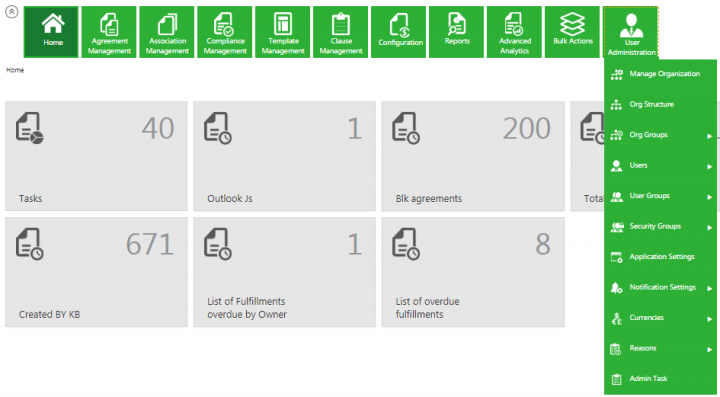
1. Click Admin tile on the Home page and then click "Admin Task". The "Admin Task" page opens.
2. Select the "Translation Editor"task from the left pane.
Users can update translations in the following ways:
- For selective editing, select a language and a resource key to update the translations.
- For bulk editing and updation of multiple languages and resource keys, use the Download / Upload option to download an MS Excel sheet.
Selective Editing to Update Translations
For editing Resource Key values selectively:
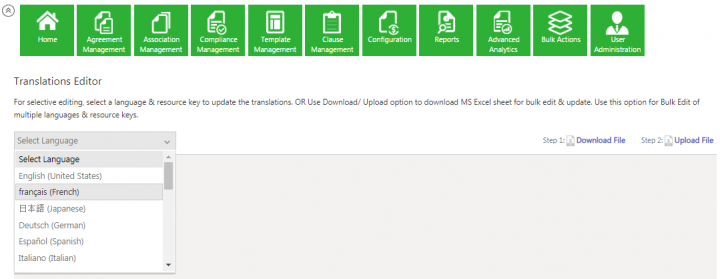
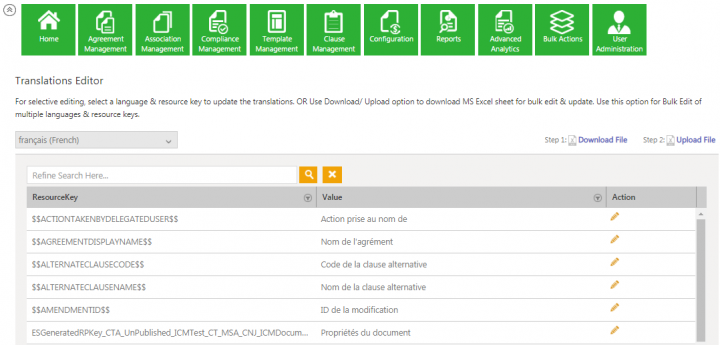
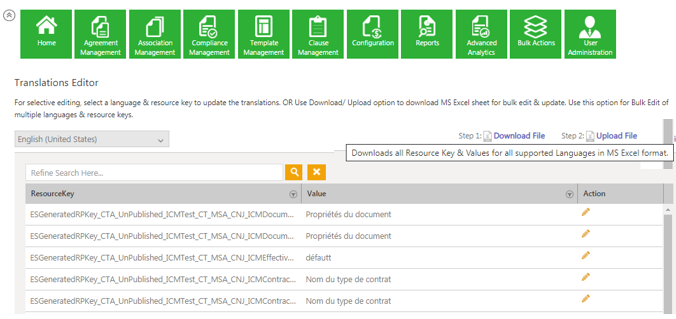
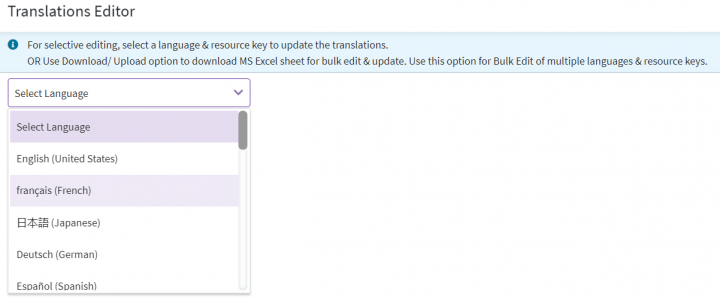
1. From the "Select Language" drop-down, select a language in which you want to edit the labels. For example, français (French).
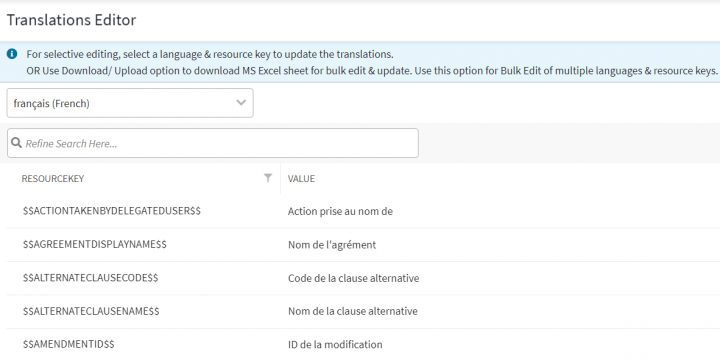
The Resource Key and respective values of the selected language are displayed.
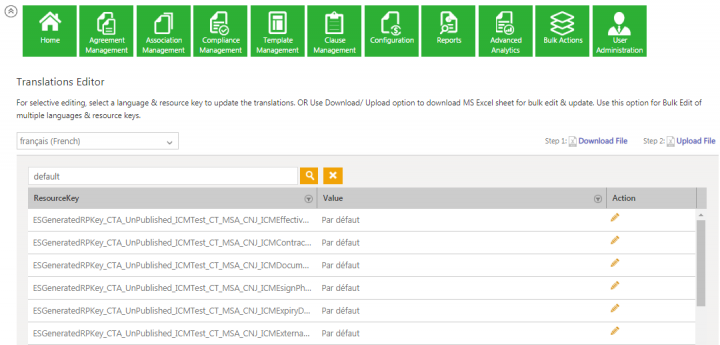
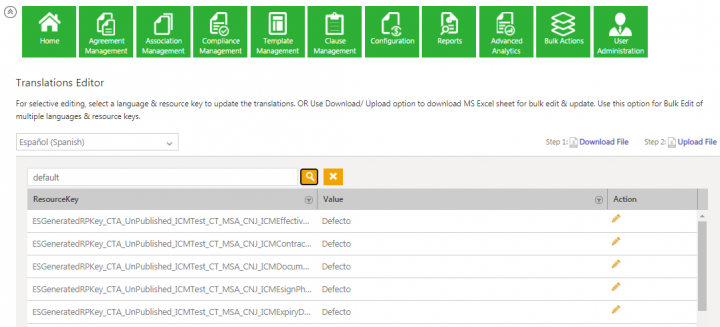
2. Enter a "ResourceKey" value in the "Search" field to edit. For example, default. All ResourceKey(s) with the "Par défaut (default)" values from the French language are displayed.
3. Click the "Edit this Resource Key for the Multiple Languages" icon ![]() in the "Actions" column on the right.
in the "Actions" column on the right.
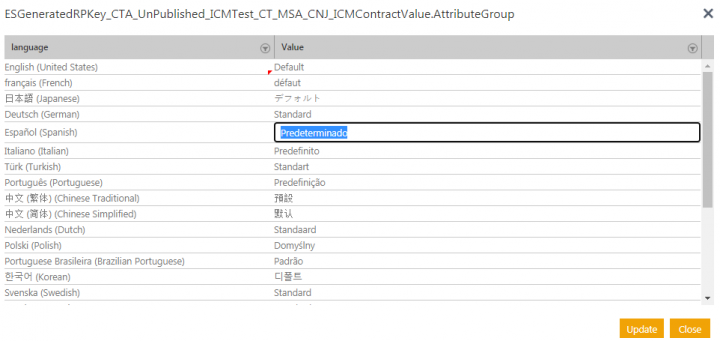
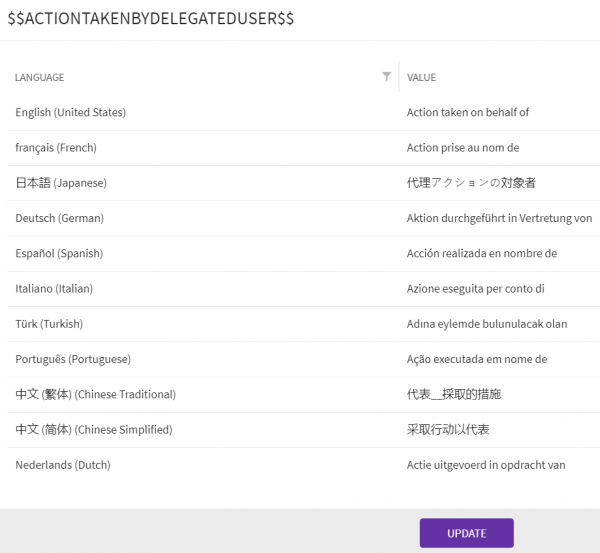
You can change the key for a single language or for multiple languages as required. For example, change "Par défaut to défaut" in French or "Predeterminado" in Español (Spanish) to "Defecto".
4. Click the "Update" button.
5. After the "Resources Updated Successfully" message is displayed.
You can select the respective languages (French or Spanish) to verify that the resources have been successfully updated.
Bulk Editing in Multiple Languages
For editing Resource Key values of multiple languages in bulk:
1. Click the "Download File" button. A Microsoft Excel file (named BulkActionWorkBookStringResource) that contains all the Resource keys and values for all supported languages in ICI is downloaded.
2. Open the downloaded Microsoft Excel file.
3. Click "Enable Editing". All ICI supported language Resource keys and their respective values are displayed.
4. Edit the ResouceKey of multiple languages as required.
5. Save the Excel file.
6. Click the "Upload File" button. The "Upload Translations" window opens.
7. Click "SelectFile". The "Open"window opens.
8. Select the updated Excel file.
9. Click "Open". A warning window opens indicating that this is a heavy operation and can potentially affect overall application performance.
10. Click "Ok". The "Upload Summary" displays the number of "Records Uploaded", "Records Processed", and "Records Updated Successfully"values.
11. Click "Close". The label translations have been achieved for multiple languages in bulk.
Data Management
Moving one step ahead in the self-service, ICI now allows performing data management activities for entities in all workflow stages.
The data management activities introduced with this release are update and delete operations for Agreements, Associated Documents, Contract Requests, User Information, Files and Attributes. These self-serve data management operations will empower administrative users to troubleshoot data inconsistency issues on their own.
However, users are advised to execute these operations cautiously as the data fix does not go through necessary business validations and are performed directly in the database itself. Furthermore, updating or deleting data through the data management tool cannot be undone and will not trigger any underlying rules, workflows, notifications, triggers, or integrations. Therefore, it is recommended to follow standard ICI workflows for any major or entity state modifications.
By default, the Data Management utility is enabled and can be controlled through the technical configuration.
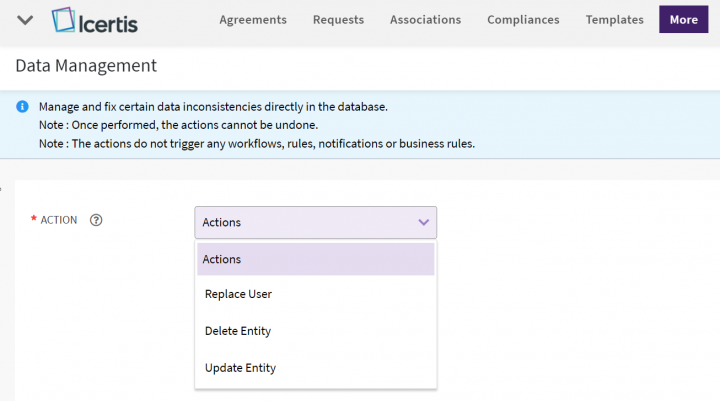
Administrators can perform the following actions from the Data Management page:
- Replace User
- Delete Entity
- Update Entity
A data management notification will be sent to a user who performs any data fix action along with primary owner, secondary owner and contract manager upon the data fix task completion with the details of the entity and modified data.
Please refer "Notifications Dashboard" page for notification details.
Replacing a user with multiple users
In ICI, administrators can replace user(s) with all associated records using the “Replace User” functionality. In practice, administrators may need to replace a user with more than one user. For example, if a user leaves the organization, the administrator may want to replace that user by dividing agreements associated with that user, in subsets, among multiple users. This would help the organization to balance the workload within its employees.
Administrators can now:
- Replace the user with one or more users by selecting the entity and all/selective instances of that entity and create a saved search for an input to replace users.
- Validate the replaced user role against the assigned role.
- Get a notification on adding or completing a task.
This capability is available across ICI for contract requests, agreements, associations, masterdata, template and clause teams, user groups, and rules. A separate data management user interface is provided for these admin actions.
To replace user:
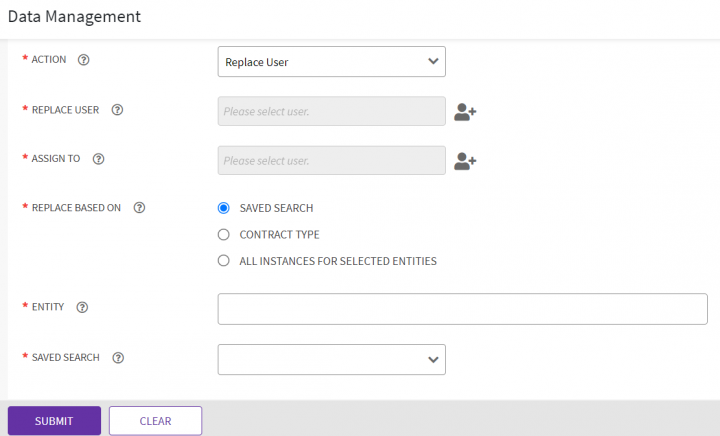
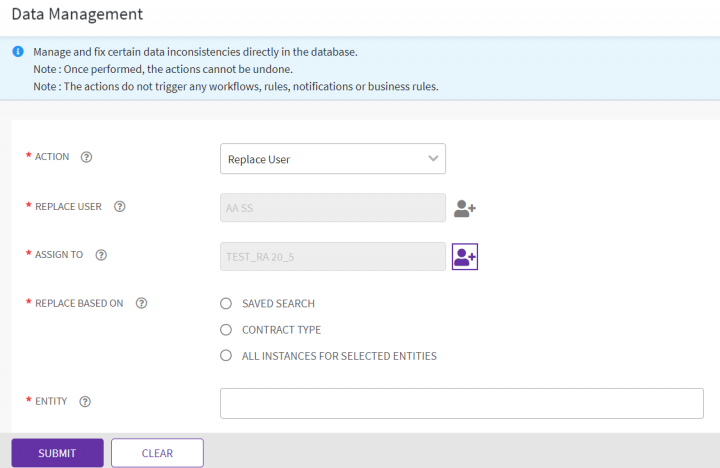
1. Navigate to the "Data Management" page.
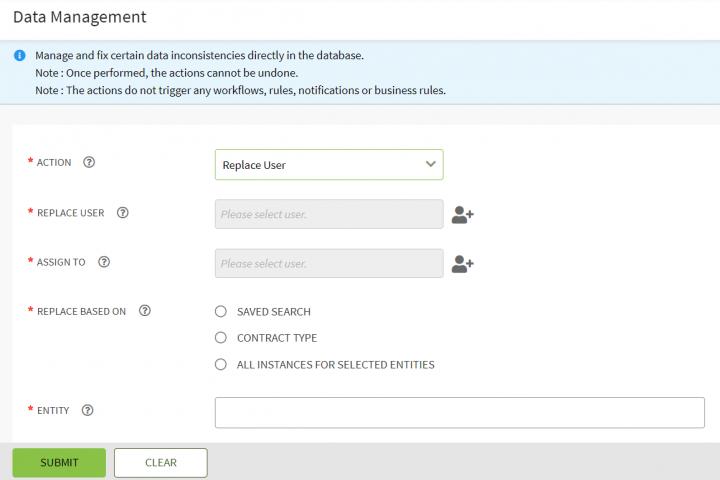
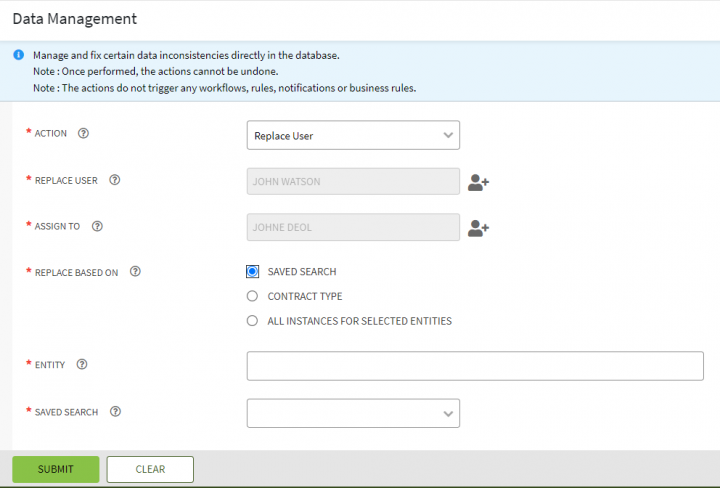
2. Select "Replace User" in the "Action" field. The fields to enter details such as user to be replaced, user to be assigned, replacement criteria, and entity are displayed.
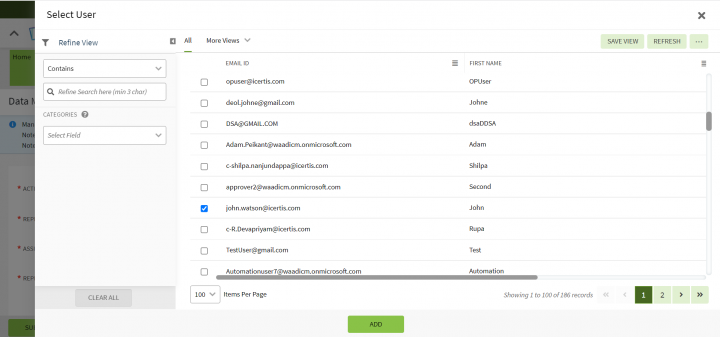
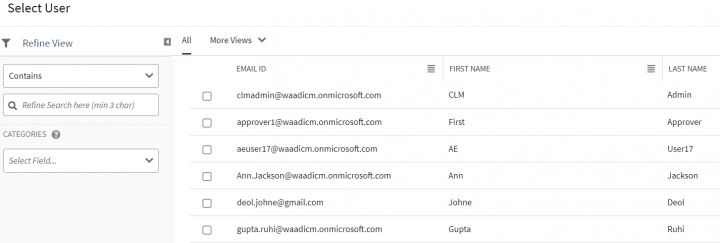
3. Click Add User icon corresponding to the "Replace User" field. The "Search User" drawer opens.
5. Click "Add". The user will be entered in the "Replace User" field.
6. Search and Add the "Assign To" user with whom you want to replace the user.
- Saved Search
- Contract Type
- All Instances For Selected Entities
Saved Search
Administrators can replace a user in selective instances of an entity with different users by selecting a relevant Saved Search configured for that entity and user.
For example, user John Watson is added to the Teams of agreements from India and US regions. He can be replaced by multiple users by splitting agreements under his name in subsets using Saved Searches, one for agreements for the India region and the other for agreements in the US region. A saved search "JonhWatson_India_Agreements" can be created for John Watson's’s India region agreements and assigned to a user Johne Doel. A saved search "JonhWatson_US_Agreements" for his US region agreements can be created and assigned to another user, for example, Prajakta.
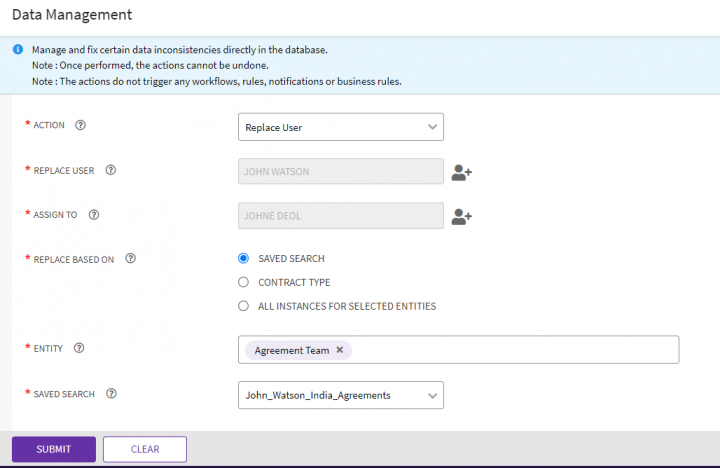
7.1 Select "Saved Search". The "Entity" and "Saved Search" fields are displayed.
Select the Entity for which you want to replace the user in its instances "Team". For example, "Agreement Team".
Select the "Saved Search". For example, "John_Watson_India_Agreements". Users need to create a saved search on the entity for which they want to replace a user in its instances team.
Click "Submit". The success message flashes displaying a "Replace User action is submitted successfully".
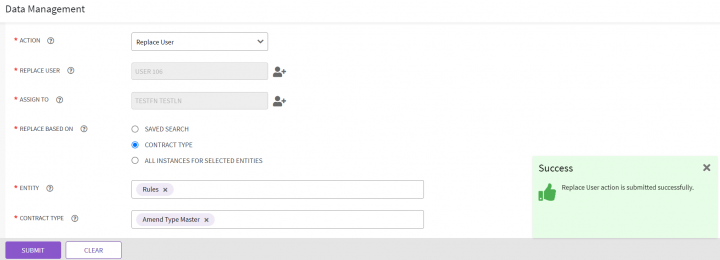
Contract Type
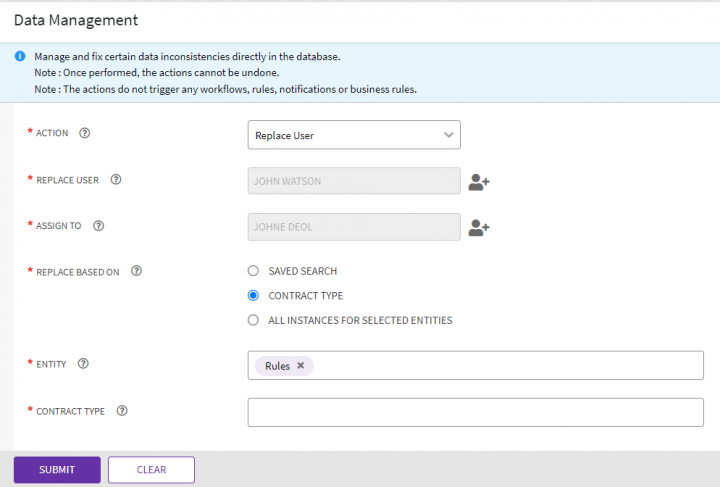
This option replaces a user added in "Rules" actions configured on the selected "Contract Type" by the "Assign To" user.
7.2 Select "Contract Type". The "Entity" and "Contract Type" fields are displayed.
Select the "Entity" as "Rules".
Select "Contract Types". For example, "Standard Document Master".
Click "Submit". The success message flashes displaying a "Replace User action is submitted successfully".
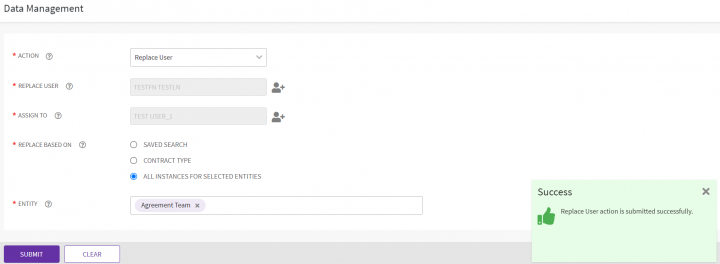
All Instances For Selected Entities
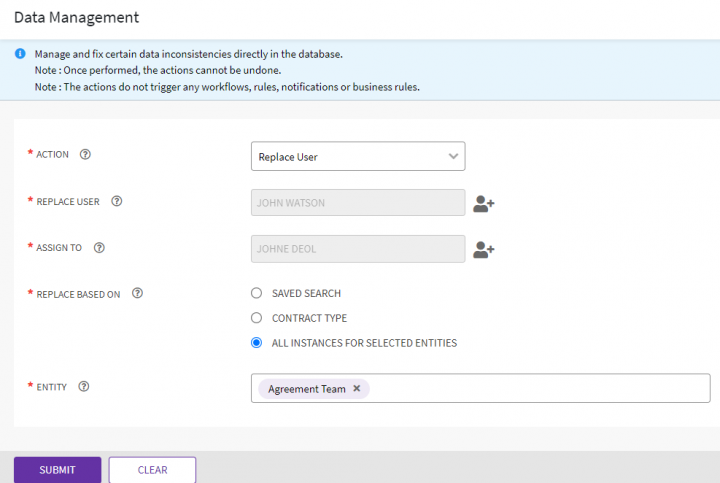
This option replaces a user in the Team of all instances of the selected entity by the "Assign To" user.
7.3 Select "All Instances For Selected Entities". The Entity field is displayed.
Select 'Entity". For example, "Agreement Team".
Click "Submit". The success message flashes displaying a "Replace User action is submitted successfully".
The task is submitted and will be scheduled and processed according to the "Time zone" set in "User Preferences". The audit details are captured and displayed in the Agreement History tab.
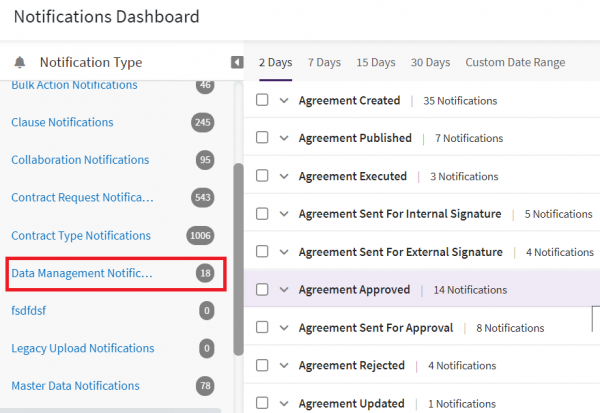
Users can access the notifications in the "Data Management" category from the "Notifications Dashboard" from the bell icon on the top right. The notification contains a link to view the summary of the Replace User task.
Deleting an Entity
When you want to remove certain records as a part of data clearance process, Administrators can mark the entity instances as deleted for you using Data Management tools.
When the entity instance is deleted, its linked child records will also be marked as deleted as per the standard behavior and will not be accessible. Administrators can delete instances of agreement, amendment, contract request and associated document entities in any workflow states.
To delete an entity instance:
1. Navigate to the "Data Management" option as mentioned in the above section.
2. Select the "Delete Entity" in the "Action" field. The fields to select an entity and its instance to be deleted, are displayed.
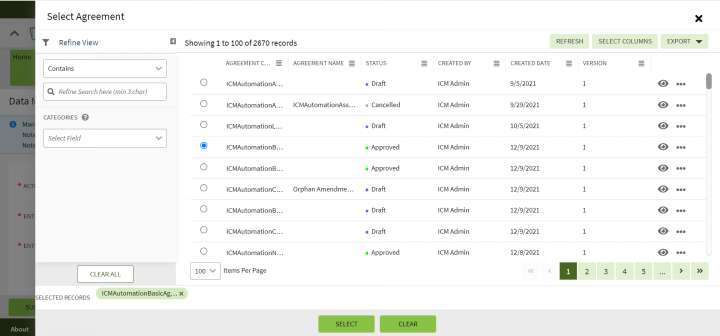
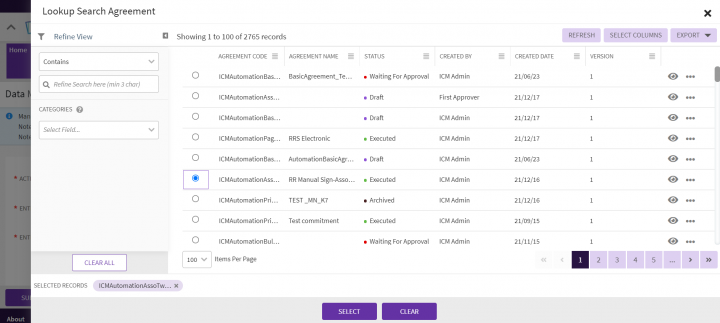
4. Click the Search icon corresponding to the "Entity Instance" field to select an instance of that entity to be deleted. The Lookup Search "Select Agreement" drawer for the selected entity opens.
5. Choose an instance and click "Select".
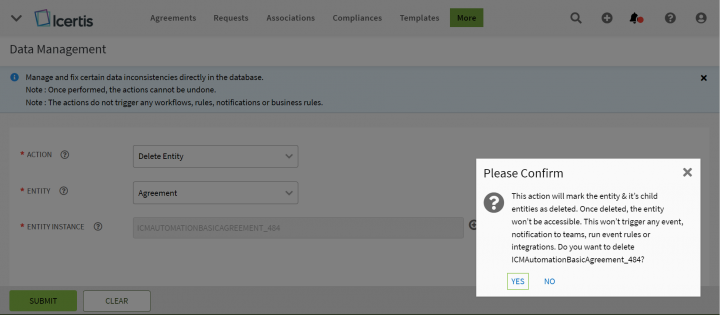
6. Click "Submit". The confirmation window appears.
7. Click "Yes". The selected entity instance will no longer be accessible.
Updating an Entity
There may be a business requirement to update selective data as a data maintenance and management process without processing any underlying actions associated with the update. Also, there may be a case, where a user does not have required access privileges to modify specific data. In such cases, Administrators can update data for you using Data Management tools.
Administrators can update instances of agreement, amendment, contract request, associated document, masterdata, user information and commitment entities. Business users can view the data modifications done for a specific record in the audit logs from the History tab on the entity details page.
To update entity:
1. Navigate to the "Data Management" page as mentioned in the above section.
2. Select the "Update Entity" option in the "Action" field. The fields to select an entity, its instance, and attribute are displayed.
3. Select "Entity". For example, "Masterdata".
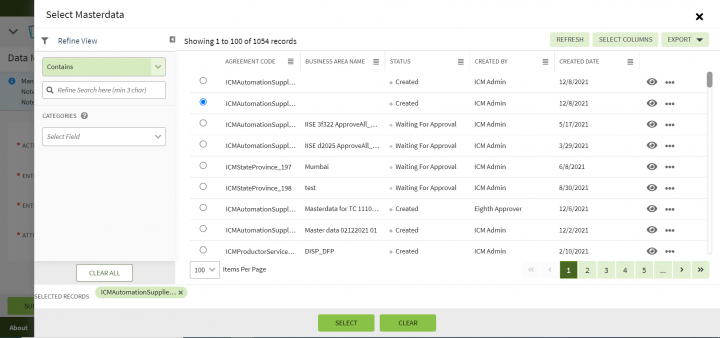
4. Click the Search icon corresponding to the "Entity Instance" field to select an instance of the entity that you want to update. The Lookup Search "Select MasterData" drawer for the selected entity opens.
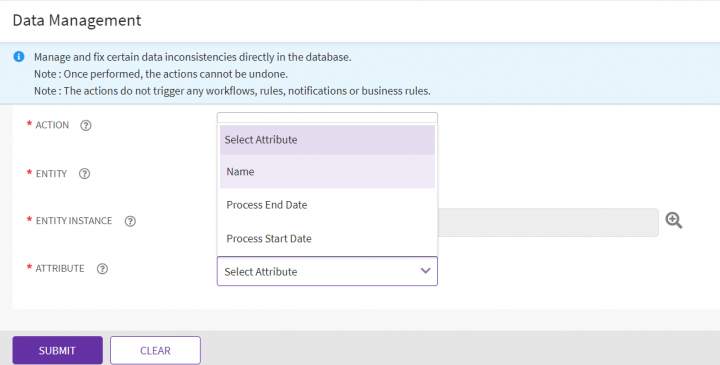
5. Select an instance. All supported attributes from the selected entity are displayed in the Attribute dropdown field.
6. Select the "Attribute" whose value you want to modify. For example, "Name". The attribute’s value from the selected instance is displayed for a user to edit.
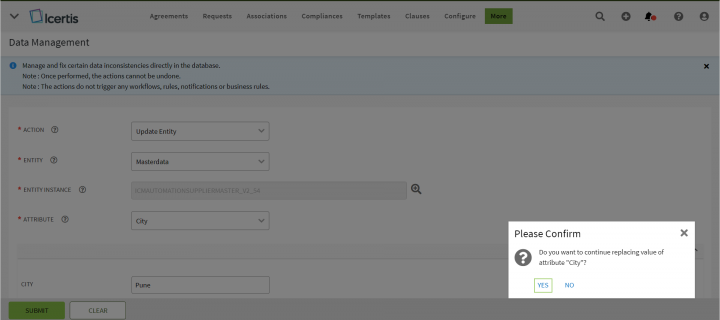
8. Click "Submit". The confirmation window opens.
9. Click "Yes" to proceed. The attribute of the entity instance will be updated with the new value.


