Shefali DK (Talk | contribs) |
|||
| (3 intermediate revisions by 2 users not shown) | |||
| Line 9: | Line 9: | ||
*Uploading entities such as Agreements and their respective Teams, Notes, and Commitments in bulk. | *Uploading entities such as Agreements and their respective Teams, Notes, and Commitments in bulk. | ||
| − | *Uploading Associations, Masterdata, User Information and Amendments in bulk. | + | *Uploading Associations, Masterdata, User Information, and Amendments in bulk. |
*Bulk Clause and Template creation, with the power of Attribute/metadata tagging. | *Bulk Clause and Template creation, with the power of Attribute/metadata tagging. | ||
*Enhanced validations, including the ability to exclude the specified attributes from being validated. | *Enhanced validations, including the ability to exclude the specified attributes from being validated. | ||
| − | *Ability to view logs and report | + | *Ability to view logs and report success and failure statuses on legacy UI. |
*Record level email notification trigger capability as per customer requirement. | *Record level email notification trigger capability as per customer requirement. | ||
*Reporting capabilities on the uploaded legacy records. | *Reporting capabilities on the uploaded legacy records. | ||
| Line 18: | Line 18: | ||
*Support of Peer Association & Linkage types, ensuring no manual work post legacy upload. | *Support of Peer Association & Linkage types, ensuring no manual work post legacy upload. | ||
*Enabling legacy upload of Agreements with Status as Expired, Terminated. | *Enabling legacy upload of Agreements with Status as Expired, Terminated. | ||
| − | *Support uploading of files from | + | *Support uploading of files from Subfolder from Task server and blob storage repository. |
| + | *Records can be uploaded bypassing the workflow state transitions to the desired state, thereby improving the upload speed. | ||
| + | *An administrator can select the date, time, priority, batch size, and memory impact so that a user can set the guardrails for prioritization of the queue. This benefits in improving the performance, having greater control over the system resources and setting up jobs in a predictable manner. | ||
| + | *Customer Support Engineers can detect the exact point of failure and take system-based or manual corrective action depending on the type of error and clear the queue if required. | ||
| + | *System Administrators can provision resources on-demand based on the priority and complexity of the batch. This will help efficient executions, increased resource utilization, reduced troubleshooting, and reduced complexity. | ||
| + | *System Administrators can update operations seamlessly without downtime and reduce the impact on end-users during the update process. | ||
== Important Considerations == | == Important Considerations == | ||
| Line 24: | Line 29: | ||
*Only an Administrator can perform a Legacy Upload of the entities. | *Only an Administrator can perform a Legacy Upload of the entities. | ||
*The absolute path where the Agreements and other entities documents are saved must be accessible by the task service of the ICI instance. This must be ensured while configuring the ICI instance. | *The absolute path where the Agreements and other entities documents are saved must be accessible by the task service of the ICI instance. This must be ensured while configuring the ICI instance. | ||
| − | *The Data files created in Excel can only have .xlsx extension. | + | *The Data files created in Excel can only have a .xlsx extension. |
*For Agreements, only .pdf files are supported. For Associations, several file formats such as .pdf, .docx, .doc, .xlsx, .jpeg, .png and .zip are supported. | *For Agreements, only .pdf files are supported. For Associations, several file formats such as .pdf, .docx, .doc, .xlsx, .jpeg, .png and .zip are supported. | ||
*Contract types for the Agreements and other entities that you are trying to upload must be present in the Published state in ICI. | *Contract types for the Agreements and other entities that you are trying to upload must be present in the Published state in ICI. | ||
| Line 55: | Line 60: | ||
If the contract type does not exist in ICI, you must create the contract type for the entity of legacy records. You must configure the details of legacy records as the attributes in the ICI contract type. | If the contract type does not exist in ICI, you must create the contract type for the entity of legacy records. You must configure the details of legacy records as the attributes in the ICI contract type. | ||
| − | |||
| − | |||
'''Configuring Contract Type with or without Approval Workflow''' | '''Configuring Contract Type with or without Approval Workflow''' | ||
You can upload entities such as Associations, Masterdata with or without Approval Workflow using Legacy Upload. | You can upload entities such as Associations, Masterdata with or without Approval Workflow using Legacy Upload. | ||
| − | + | <div class="note-box">'''Note:''' "Agreement" Contract Types have Approval Workflow mandatory.</div> | |
| − | '''Note:''' "Agreement" Contract Types have Approval Workflow mandatory. | + | |
| − | + | ||
You can automatically attach the Approval workflow to an entity while processing the Legacy Upload batch. All you have to do is enable the approval workflow in the contract type by setting the Enable Approval Workflow attribute value to Yes. | You can automatically attach the Approval workflow to an entity while processing the Legacy Upload batch. All you have to do is enable the approval workflow in the contract type by setting the Enable Approval Workflow attribute value to Yes. | ||
| Line 95: | Line 96: | ||
<div class="image-green-border">[[File:8.0-Legacy Upload-2-CreateCT-Associations.PNG|620px|8.0-Legacy Upload-2-CreateCT-Associations.PNG]]</div> | <div class="image-green-border">[[File:8.0-Legacy Upload-2-CreateCT-Associations.PNG|620px|8.0-Legacy Upload-2-CreateCT-Associations.PNG]]</div> | ||
2. If Prerequisite or Post requisite is selected in the Constraints drop-down list while creating an Associated Document Contract Type, an Association is mandatory. | 2. If Prerequisite or Post requisite is selected in the Constraints drop-down list while creating an Associated Document Contract Type, an Association is mandatory. | ||
| − | <div class="image-green-border">[[File:8.0-Legacy Upload-3-CreateCT-Associations.PNG|620px|8.0-Legacy Upload-3-CreateCT-Associations.PNG]]</div> | + | <div class="image-green-border">[[File:8.0-Legacy Upload-3-CreateCT-Associations.PNG|620px|8.0-Legacy Upload-3-CreateCT-Associations.PNG]]</div> |
| − | + | ||
| − | + | ||
== Creating a Batch for an Entity == | == Creating a Batch for an Entity == | ||
Once the relevant contract type is present in the ICI, you can create a new batch to upload the legacy records in the ICI from the Legacy Upload page. | Once the relevant contract type is present in the ICI, you can create a new batch to upload the legacy records in the ICI from the Legacy Upload page. | ||
| − | |||
| − | |||
| − | |||
| − | |||
=== Creating a Batch for Agreements === | === Creating a Batch for Agreements === | ||
| Line 111: | Line 106: | ||
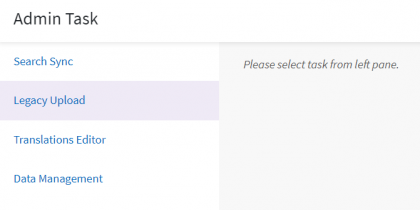
2. '''Click '''"Admin Task". The "Admin Task" page opens. | 2. '''Click '''"Admin Task". The "Admin Task" page opens. | ||
| − | <div class="image-green-border">[[File:8.0-Legacy Upload-1-Admin-CreateLU.PNG|280px|8.0-Legacy Upload-1-Admin-CreateLU.PNG]]</div> <div class="image-green-border"> </div> <div class="image-green-border">3.'''Click''' the "Legacy Upload" option. The "Legacy Upload" page opens.</div> <div class="image-green-border"> </div> <div class="image-green-border">[[File:8.0-Legacy Upload-2-Admin-CreateLU.PNG|420px|8.0-Legacy Upload-2-Admin-CreateLU.PNG]]</div> | + | <div class="image-green-border">[[File:8.0-Legacy Upload-1-Admin-CreateLU.PNG|280px|8.0-Legacy Upload-1-Admin-CreateLU.PNG]]</div> <div class="image-green-border"> </div> <div class="image-green-border">3. '''Click''' the "Legacy Upload" option. The "Legacy Upload" page opens.</div> <div class="image-green-border"> </div> <div class="image-green-border">[[File:8.0-Legacy Upload-2-Admin-CreateLU.PNG|420px|8.0-Legacy Upload-2-Admin-CreateLU.PNG]]</div> |
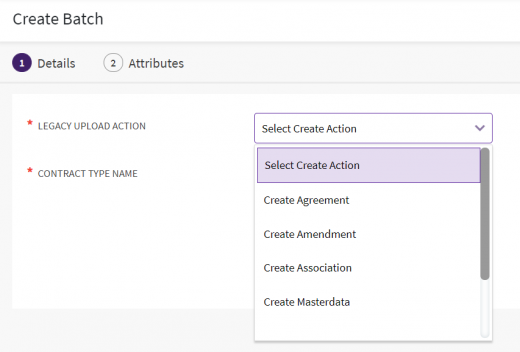
| − | 4.'''Click''' "Create Batch" on the far right in the title bar. The "Create Batch" page’s "Details" tab opens. | + | 4. '''Click''' "Create Batch" on the far right in the title bar. The "Create Batch" page’s "Details" tab opens. |
<div class="image-green-border">[[File:8.0-Legacy Upload-1-Index.PNG|720px|8.0-Legacy Upload-1-Index.PNG]]</div> <div class="image-green-border"> </div> | <div class="image-green-border">[[File:8.0-Legacy Upload-1-Index.PNG|720px|8.0-Legacy Upload-1-Index.PNG]]</div> <div class="image-green-border"> </div> | ||
5. '''Identify''' the entity for legacy records and select the "Legacy Upload Action" accordingly from the dropdown. For example, select "Create Agreement"'' ''when you are creating a batch of agreements. | 5. '''Identify''' the entity for legacy records and select the "Legacy Upload Action" accordingly from the dropdown. For example, select "Create Agreement"'' ''when you are creating a batch of agreements. | ||
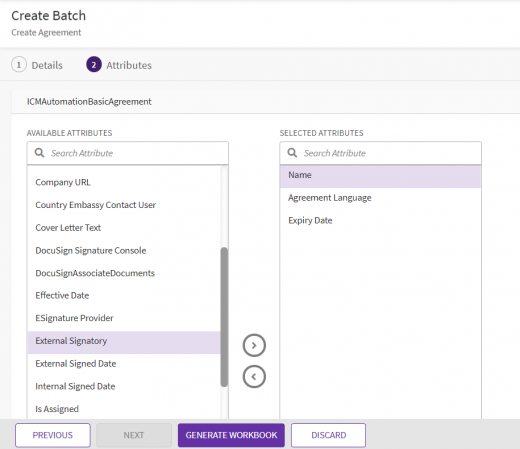
| Line 124: | Line 119: | ||
9'''. Click''' "Generate Workbook". The workbook template is generated in the Microsoft Excel format and downloaded at the pre-set download location on your system. | 9'''. Click''' "Generate Workbook". The workbook template is generated in the Microsoft Excel format and downloaded at the pre-set download location on your system. | ||
<div class="image-green-border">[[File:8.0-Legacy Upload-2-CreateBatch-Attributes.PNG|520px|8.0-Legacy Upload-2-CreateBatch-Attributes.PNG]]</div> | <div class="image-green-border">[[File:8.0-Legacy Upload-2-CreateBatch-Attributes.PNG|520px|8.0-Legacy Upload-2-CreateBatch-Attributes.PNG]]</div> | ||
| − | |||
| − | |||
=== Creating a Batch for Amendments === | === Creating a Batch for Amendments === | ||
| Line 143: | Line 136: | ||
<li>'''Click''' "Next" and complete the batch creation for Amendments following the same process as for the creation of the agreement batch.</li> | <li>'''Click''' "Next" and complete the batch creation for Amendments following the same process as for the creation of the agreement batch.</li> | ||
</ol> | </ol> | ||
| − | |||
| − | |||
=== Creating a Batch for Associations === | === Creating a Batch for Associations === | ||
| − | Before you proceed to upload Associations using the Legacy Upload, ensure that the parent Agreements are already uploaded. Also ensure that the Associated Document Contract Type has been added in the Associations tab in the parent Agreement Contract Type. | + | Before you proceed to upload Associations using the Legacy Upload, ensure that the parent Agreements are already uploaded. Also, ensure that the Associated Document Contract Type has been added in the Associations tab in the parent Agreement Contract Type. |
You can upload Associations with or without Approval Workflow using Legacy Upload in the ICI. | You can upload Associations with or without Approval Workflow using Legacy Upload in the ICI. | ||
| − | Associations can be mapped with their parent agreements using a Saved Search capability. A set of agreements can be created for which you want to upload peer associations by configuring a Saved Search beforehand. The auto-generated workbook will contain the | + | Associations can be mapped with their parent agreements using a Saved Search capability. A set of agreements can be created for which you want to upload peer associations by configuring a Saved Search beforehand. The auto-generated workbook will contain the details of the agreement from the selected saved search as the parent agreements. These details would help users to find the records in the ICI and map them with the Association agreement code in the workbook. |
To create an Association batch: | To create an Association batch: | ||
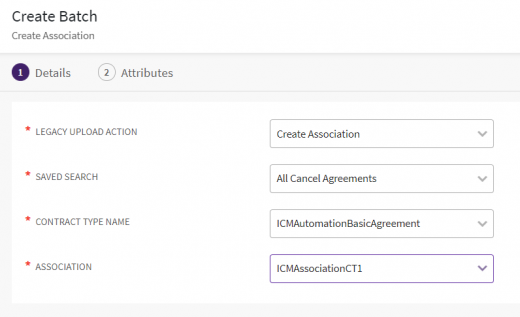
| Line 171: | Line 162: | ||
The auto-generated workbook will contain the pre-filled details for the selected agreement contract type from the selected saved search as parent agreements. | The auto-generated workbook will contain the pre-filled details for the selected agreement contract type from the selected saved search as parent agreements. | ||
<div class="image-green-border">[[File:8.0-Legacy Upload-2-CreateBatch-Associations.PNG|520px|8.0-Legacy Upload-2-CreateBatch-Associations.PNG]]</div> | <div class="image-green-border">[[File:8.0-Legacy Upload-2-CreateBatch-Associations.PNG|520px|8.0-Legacy Upload-2-CreateBatch-Associations.PNG]]</div> | ||
| − | |||
| − | |||
==== Creating a Batch for Peer Associations ==== | ==== Creating a Batch for Peer Associations ==== | ||
You can upload associated documents as peer associations to agreements using Legacy Upload. | You can upload associated documents as peer associations to agreements using Legacy Upload. | ||
| − | #'''Follow''' the same process explained in the section "Creating a Batch for Associations" till "Association" field | + | #'''Follow''' the same process explained in the section "Creating a Batch for Associations" till the "Association" field. |
#'''Select''' the "Association". For example, ICMAutomationSupplierMaster. | #'''Select''' the "Association". For example, ICMAutomationSupplierMaster. | ||
When you select the peer Associated Document Contract Type in the "Association" field, the "Association" field will reflect this relationship for the selected parent Contract Type and Associated Document Contract Type combination. | When you select the peer Associated Document Contract Type in the "Association" field, the "Association" field will reflect this relationship for the selected parent Contract Type and Associated Document Contract Type combination. | ||
| − | <div class="note-box">'''Note: '''When the Self-Linkage is enabled for the selected parent contract type, you can select the same contract type to link as peer association in the Association field.</div> <div class="image-green-border"> </div> <div class="image-green-border">[[File:8.0-Legacy Upload-2-CreateBatch-Peer-Associations.PNG|520px|8.0-Legacy Upload-2-CreateBatch-Peer-Associations.PNG]] | + | <div class="note-box" style="margin-left: 40px;">'''Note: '''When the Self-Linkage is enabled for the selected parent contract type, you can select the same contract type to link as peer association in the Association field.</div> <div class="image-green-border"> </div> <div class="image-green-border">[[File:8.0-Legacy Upload-2-CreateBatch-Peer-Associations.PNG|520px|8.0-Legacy Upload-2-CreateBatch-Peer-Associations.PNG]]</div> <ol start="3"> |
<li>'''Click''' "Generate Workbook". The workbook is auto-generated with the pre-filled details of parent records for the selected contract type from the selected saved search in the “Parent Agreement Name | Agreement Code | SysId” format.</li> | <li>'''Click''' "Generate Workbook". The workbook is auto-generated with the pre-filled details of parent records for the selected contract type from the selected saved search in the “Parent Agreement Name | Agreement Code | SysId” format.</li> | ||
</ol> | </ol> | ||
| − | The workbook for peer associations also contains the Linkage Type column with the values | + | The workbook for peer associations also contains the Linkage Type column with the values Parent, Child, and Peer. When there is the Linkage Type Masterdata configured in the ICI, the Linkage Type column will reflect the values from that masterdata. |
| − | + | ||
| − | | + | |
==== Creating a Batch for Peer Associations with Create Wizard Flow. ==== | ==== Creating a Batch for Peer Associations with Create Wizard Flow. ==== | ||
| Line 197: | Line 184: | ||
When you select the peer Associated Document Contract Type in the Association field, the Association field will reflect this relationship for the selected parent Contract Type and Associated Document Contract Type combination. | When you select the peer Associated Document Contract Type in the Association field, the Association field will reflect this relationship for the selected parent Contract Type and Associated Document Contract Type combination. | ||
| − | <div class="note-box">'''Note: '''When the Self-Linkage is enabled for the selected parent contract type, you can select the same contract type to link as peer association in the Association field.</div> <ol start="3"> | + | <div class="note-box" style="margin-left: 40px;">'''Note: '''When the Self-Linkage is enabled for the selected parent contract type, you can select the same contract type to link as peer association in the Association field.</div> <ol start="3"> |
<li>'''Click''' "Generate Workbook". The workbook is auto-generated with the pre-filled details of parent records for the selected contract type from the selected saved search in the “Parent Agreement Name | Agreement Code | SysId” format, along with the Peer Association attributes as system would create Peer association like agreement creation and it would get linked to the Parent Agreement.</li> | <li>'''Click''' "Generate Workbook". The workbook is auto-generated with the pre-filled details of parent records for the selected contract type from the selected saved search in the “Parent Agreement Name | Agreement Code | SysId” format, along with the Peer Association attributes as system would create Peer association like agreement creation and it would get linked to the Parent Agreement.</li> | ||
</ol> | </ol> | ||
The workbook for peer associations also contains the Linkage Type column with the values as Parent, Child, and Peer. When there is the Linkage Type Masterdata configured in the ICI, the Linkage Type column will reflect the values from that masterdata. | The workbook for peer associations also contains the Linkage Type column with the values as Parent, Child, and Peer. When there is the Linkage Type Masterdata configured in the ICI, the Linkage Type column will reflect the values from that masterdata. | ||
| − | |||
| − | |||
| − | |||
| − | |||
=== Creating a batch for Masterdata === | === Creating a batch for Masterdata === | ||
| Line 217: | Line 200: | ||
#'''Select''' the masterdata in the "Contract Type Name" field. The dropdown will show all masterdata contract types configured in ICI. For example, select "ICMRegionMasterdata". | #'''Select''' the masterdata in the "Contract Type Name" field. The dropdown will show all masterdata contract types configured in ICI. For example, select "ICMRegionMasterdata". | ||
#'''Click''' "Next" and complete the batch creation for Masterdata following the same process as for the creation of the agreement batch. | #'''Click''' "Next" and complete the batch creation for Masterdata following the same process as for the creation of the agreement batch. | ||
| − | <div class="image-green-border">[[File:8.0-Legacy Upload-2-CreateBatch-MasterData.PNG|520px|8.0-Legacy Upload-2-CreateBatch-MasterData.PNG]]</div> | + | <div class="image-green-border">[[File:8.0-Legacy Upload-2-CreateBatch-MasterData.PNG|520px|8.0-Legacy Upload-2-CreateBatch-MasterData.PNG]]</div> <div class="image-green-border"> </div> <div class="image-green-border"> </div> <div class="image-green-border"> </div> <div class="image-green-border"> </div> <div class="image-green-border"> </div> <div class="image-green-border"> </div> <div class="image-green-border"> </div> <div class="image-green-border"> </div> <div class="image-green-border"> </div> <div class="image-green-border"> </div> <div class="image-green-border"> </div> <div class="image-green-border"> </div> <div class="image-green-border"> </div> <div class="image-green-border"> </div> |
| − | | + | |
| − | + | ||
=== Creating a batch for User information === | === Creating a batch for User information === | ||
| Line 239: | Line 220: | ||
5. '''Click''' "Generate Workbook". The workbook template is generated in the Microsoft Excel format and downloaded at the pre-set download location on your system. | 5. '''Click''' "Generate Workbook". The workbook template is generated in the Microsoft Excel format and downloaded at the pre-set download location on your system. | ||
| − | |||
| − | |||
| − | |||
=== Creating a batch for Clauses === | === Creating a batch for Clauses === | ||
| Line 258: | Line 236: | ||
<li>'''Click''' "Generate Workbook". The workbook template is generated in the Microsoft Excel format and downloaded at the pre-set download location on your system.</li> | <li>'''Click''' "Generate Workbook". The workbook template is generated in the Microsoft Excel format and downloaded at the pre-set download location on your system.</li> | ||
</ol> | </ol> | ||
| − | |||
| − | |||
=== Creating a batch for Template === | === Creating a batch for Template === | ||
| Line 268: | Line 244: | ||
Follow the same steps as above with selecting "Template" in the "Legacy Upload Action". | Follow the same steps as above with selecting "Template" in the "Legacy Upload Action". | ||
| − | |||
| − | |||
== Accessing Legacy Upload Page == | == Accessing Legacy Upload Page == | ||
| Line 290: | Line 264: | ||
Once the workbook is generated through the Create Batch process, you need to fill the legacy records data in the respective worksheets to prepare the workbook for uploading the batch. | Once the workbook is generated through the Create Batch process, you need to fill the legacy records data in the respective worksheets to prepare the workbook for uploading the batch. | ||
| − | |||
| − | |||
=== Accessing the Workbook === | === Accessing the Workbook === | ||
| Line 306: | Line 278: | ||
<li>'''Save''' and close the workbook.</li> | <li>'''Save''' and close the workbook.</li> | ||
</ol> | </ol> | ||
| − | |||
| − | |||
=== Specifications of a workbook === | === Specifications of a workbook === | ||
| Line 323: | Line 293: | ||
*The peer association worksheet also contains the Linkage Type column with the values as Parent, Child and Peer. When there is the Linkage Type Masterdata configured in the ICI, the Linkage Type column will reflect the values from that masterdata. | *The peer association worksheet also contains the Linkage Type column with the values as Parent, Child and Peer. When there is the Linkage Type Masterdata configured in the ICI, the Linkage Type column will reflect the values from that masterdata. | ||
<div class="image-green-border">[[File:7.16 Legacy 24.png|720px|7.16 Legacy 24.png]]</div> | <div class="image-green-border">[[File:7.16 Legacy 24.png|720px|7.16 Legacy 24.png]]</div> | ||
| − | |||
| − | |||
=== Preparing the Mapping Sheet === | === Preparing the Mapping Sheet === | ||
| Line 337: | Line 305: | ||
The snapshot of the sample mapping sheet for Agreement is: | The snapshot of the sample mapping sheet for Agreement is: | ||
<div class="image-green-border">[[File:7.16 Legacy 25.png|720px|7.16 Legacy 25.png]]</div> | <div class="image-green-border">[[File:7.16 Legacy 25.png|720px|7.16 Legacy 25.png]]</div> | ||
| − | + | === Preparing the datasheet for ICI entities === | |
| + | The datasheet in the auto-generated workbook contains details specific to the entity and contract type. Also, the data-sheet is named after the selected entity contract type. For example, the datasheet for the Masterdata- ICIStateMaster, is named as same as the contract type name which is ICIStateMaster. | ||
| + | <div class="note-box">'''Note:''' The datasheet reflects the attributes as they are present on the UI for creating the respective entity.</div> | ||
| + | ==== Preparing the datasheet for Agreement, Amendment, Associated Documents and Masterdata ==== | ||
| + | The datasheet for Entities- Agreement, Amendment, Associated Documents, and Masterdata, contains the attributes you selected from the contract type when creating the batch. These attributes will appear in the datasheet in the order of their selection. | ||
| − | + | The datasheet for these entities also contains the necessary backend attributes required for the processing which may or may not be visible on the UI such as Business Status, Org Unit, Type Of Paper, and File Name. The Type Of Paper attribute has the default value as Third Party. The datasheet for Amendment has additional attributes Is Amendment and Use Amendment Template. | |
| − | The | + | The contract type datasheet for Amendment and Peer Association contains prefilled details for the parent agreements of the selected contract type from the selected saved search. The details comprise pipe-delimited values of Parent Agreement Name, Agreement Code and Sysid within a single column, which would help the system easily find parent records in the ICI. |
| − | + | ||
| − | | + | |
| − | + | The snapshot of the sample auto-generated data sheet for Amendment is: | |
| − | + | ||
| − | + | ||
| − | + | ||
| − | + | ||
| − | + | ||
| − | + | ||
| − | + | ||
| − | The snapshot of the sample auto generated data sheet for Amendment is: | + | |
<div class="image-green-border">[[File:7.16 Legacy 26.png|720px|7.16 Legacy 26.png]]</div> | <div class="image-green-border">[[File:7.16 Legacy 26.png|720px|7.16 Legacy 26.png]]</div> | ||
| − | You can add the legacy records details in the respective columns to prepare the | + | You can add the legacy records details in the respective columns to prepare the datasheet. |
<div class="image-green-border">[[File:7.16 Legacy 27.png|720px|7.16 Legacy 27.png]]</div> | <div class="image-green-border">[[File:7.16 Legacy 27.png|720px|7.16 Legacy 27.png]]</div> | ||
| − | |||
| − | |||
===== Linkage type support for peer associations ===== | ===== Linkage type support for peer associations ===== | ||
| − | The | + | The datasheet for uploading peer associations also contains the Linkage Type column with the values Parent'', ''Child, and Peer. When there is the Linkage Type Masterdata configured in the ICI, the Linkage Type column will reflect the values from that masterdata. |
| − | After the successful batch upload for peer associations, the appropriate linkage type relationship is automatically established for the legacy records based on their contract types. | + | After the successful batch upload for peer associations, the appropriate linkage-type relationship is automatically established for the legacy records based on their contract types. |
| − | *For self-linkage type, the associations will be linked as | + | *For the self-linkage type, the associations will be linked as peers to the agreements of the same contract type. For example, the SOW agreement instance will be linked to another instance of SOW with linkage type as a peer. |
| − | *For two-way linkage type, the base agreement and association will be linked as parent and child respectively. For example, when user selects the linkage type as Child while uploading SOW legacy record, the linked MSA record will be automatically updated as parent based on the two-way linkage type configuration. | + | *For the two-way linkage-type, the base agreement and association will be linked as parent and child respectively. For example, when the user selects the linkage type as Child while uploading SOW legacy record, the linked MSA record will be automatically updated as a parent based on the two-way linkage-type configuration. |
<div class="image-green-border">[[File:7.16 Legacy 24.png|720px|7.16 Legacy 24.png]]</div> | <div class="image-green-border">[[File:7.16 Legacy 24.png|720px|7.16 Legacy 24.png]]</div> | ||
| − | |||
| − | |||
'''Adding Team members, Notes, and Commitments''' | '''Adding Team members, Notes, and Commitments''' | ||
| Line 378: | Line 336: | ||
The worksheets for adding the details for Team members'', ''Notes, and Commitments are part of the workbook. | The worksheets for adding the details for Team members'', ''Notes, and Commitments are part of the workbook. | ||
| − | The snapshot of the auto generated Team Members worksheet is: | + | The snapshot of the auto-generated Team Members worksheet is: |
<div class="image-green-border">[[File:7.16 Legacy 28.png|720px|7.16 Legacy 28.png]]</div> | <div class="image-green-border">[[File:7.16 Legacy 28.png|720px|7.16 Legacy 28.png]]</div> | ||
The snapshot of the auto generated Notes worksheet is: | The snapshot of the auto generated Notes worksheet is: | ||
| Line 386: | Line 344: | ||
| | ||
<div class="note-box">'''Note:''' Uploading the team, notes or commitments must be done at the first time when uploading the Agreements. Updating these entities later after Agreements are uploaded is not supported.</div> | <div class="note-box">'''Note:''' Uploading the team, notes or commitments must be done at the first time when uploading the Agreements. Updating these entities later after Agreements are uploaded is not supported.</div> | ||
| − | + | ==== Preparing the datasheet for User Provisioning, Clauses, and Templates ==== | |
| − | + | ||
| − | ==== Preparing the | + | |
| − | The | + | The datasheet for entities User Provisioning, Clauses, and Templates reflects all attributes from the selected entity contract type in the same display sequence as they appear on the UI for that entity. |
| − | In addition to contact type attributes, the | + | In addition to contact type attributes, the datasheet for these entities also contains the user-selected attributes from the respective extended entity masterdata at the time of batch creation. |
| − | Here is the snapshot of the auto generated User Information worksheet with the sample legacy record details that is ready for upload: | + | Here is the snapshot of the auto-generated User Information worksheet with the sample legacy record details that is ready for upload: |
<div class="image-green-border">[[File:7.16 Legacy 31.png|720px|7.16 Legacy 31.png]]</div> | <div class="image-green-border">[[File:7.16 Legacy 31.png|720px|7.16 Legacy 31.png]]</div> | ||
| − | Here is the snapshot of the auto generated Clauses worksheet with the sample legacy record details that | + | Here is the snapshot of the auto-generated Clauses worksheet with the sample legacy record details that are ready for upload: |
<div class="image-green-border">[[File:7.16 Legacy 32.png|720px|7.16 Legacy 32.png]]</div> | <div class="image-green-border">[[File:7.16 Legacy 32.png|720px|7.16 Legacy 32.png]]</div> | ||
| − | Here is the snapshot of the auto generated Templates worksheet with the sample legacy record details that | + | Here is the snapshot of the auto-generated Templates worksheet with the sample legacy record details that are ready for upload: |
<div class="image-green-border">[[File:7.16 Legacy 33.png|720px|7.16 Legacy 33.png]]</div> | <div class="image-green-border">[[File:7.16 Legacy 33.png|720px|7.16 Legacy 33.png]]</div> | ||
| − | |||
| − | |||
===== Observations and assumptions for clauses batch ===== | ===== Observations and assumptions for clauses batch ===== | ||
The following observations and assumptions need to be taken into consideration while bulk uploading clauses using the Legacy Upload tool: | The following observations and assumptions need to be taken into consideration while bulk uploading clauses using the Legacy Upload tool: | ||
| − | *A Primary Clause and a Linked Primary Clause should not be a part of same batch. The Primary Clause must be created first and then it should be used as a Linked Primary Clause. | + | *A Primary Clause and a Linked Primary Clause should not be a part of the same batch. The Primary Clause must be created first and then it should be used as a Linked Primary Clause. |
| − | *A clause with Is Alternate Clause value marked as TRUE and the clause that it is the Alternate of should not be part of same batch. | + | *A clause with Is Alternate Clause value marked as TRUE and the clause that it is the Alternate of should not be part of the same batch. |
| − | *A clause with Is Dependent Clause value marked as TRUE and the clause which it Depends On should not be part of same batch. | + | *A clause with Is Dependent Clause value marked as TRUE and the clause which it Depends On should not be part of the same batch. |
*Tags must be on the same line in the template document. Tagging will not function if the tags are on separate lines. For example, if the closing tag is on the next line, tagging does not work. | *Tags must be on the same line in the template document. Tagging will not function if the tags are on separate lines. For example, if the closing tag is on the next line, tagging does not work. | ||
*There should be no non-breaking spaces (ASCII value xA0) within XML tags. Ensure to replace them with regular spaces in XML tags. Using deactivated clause groups is allowed. | *There should be no non-breaking spaces (ASCII value xA0) within XML tags. Ensure to replace them with regular spaces in XML tags. Using deactivated clause groups is allowed. | ||
*Template Variables cannot be tagged in a clause. If tagged, the template variable will be treated as plain text and no exceptions are triggered. | *Template Variables cannot be tagged in a clause. If tagged, the template variable will be treated as plain text and no exceptions are triggered. | ||
| − | *The user importing templates and clauses must have permissions on the respective tiles, otherwise they will not be able to view them in Icertis Experience for Word. | + | *The user importing templates and clauses must have permissions on the respective tiles, otherwise, they will not be able to view them in Icertis Experience for Word. |
| − | *Only creation of clause is supported. Bulk edits and updating edited clause text in templates where the clause is referred are currently not supported. | + | *Only the creation of a clause is supported. Bulk edits and updating edited clause text in templates where the clause is referred are currently not supported. |
| − | + | ||
| − | + | ||
===== Observations and Assumptions for templates batch ===== | ===== Observations and Assumptions for templates batch ===== | ||
| Line 421: | Line 373: | ||
The following observations and assumptions need to be taken into consideration while uploading templates using the Legacy Upload tool: | The following observations and assumptions need to be taken into consideration while uploading templates using the Legacy Upload tool: | ||
| − | *If tagging fails for a part of the batch, only the Passed count gets updated while the Failed count is not updated. However, the | + | *If tagging fails for a part of the batch, only the Passed count gets updated while the Failed count is not updated. However, the failure count can be inferred. |
| − | *The entire XML should be on the same line. Tagging will not function if the tags are split | + | *The entire XML should be on the same line. Tagging will not function if the tags are split into separate lines. |
*There should be no non-breaking spaces (ASCII value is xA0) within XML tags. Ensure to replace them with regular spaces in XML tags. | *There should be no non-breaking spaces (ASCII value is xA0) within XML tags. Ensure to replace them with regular spaces in XML tags. | ||
| − | *Primary and alternate templates cannot be a part of same batch. | + | *Primary and alternate templates cannot be a part of the same batch. |
| − | *Threading causes some issues. Further, if there has been | + | *Threading causes some issues. Further, if there has been an error in tagging, it is not possible to rollback or delete instances created using batch upload. |
*Ensure each template is given a unique name. If two templates are uploaded with the same name, then one of the entries fails. However, the Error file does not show any corresponding error message. | *Ensure each template is given a unique name. If two templates are uploaded with the same name, then one of the entries fails. However, the Error file does not show any corresponding error message. | ||
| − | |||
| − | |||
===== Mandatory tags for clause document ===== | ===== Mandatory tags for clause document ===== | ||
| − | The mandatory | + | The mandatory attribute tags are available in the XML format for tagging inside clauses and templates. |
| − | + | The below table provides the details for XML tags: | |
[[File:7.16 Legacy Table 4.JPG|720px|7.16 Legacy Table 4.JPG]] | [[File:7.16 Legacy Table 4.JPG|720px|7.16 Legacy Table 4.JPG]] | ||
| Line 442: | Line 392: | ||
[[File:7.16 Legacy Table 5.png|720px|7.16 Legacy Table 5.png]] | [[File:7.16 Legacy Table 5.png|720px|7.16 Legacy Table 5.png]] | ||
| − | To further understand tag properties, refer the below table: | + | To further understand tag properties, refer to the below table: |
[[File:7.16 Legacy Table 6.JPG|720px|7.16 Legacy Table 6.JPG]] | [[File:7.16 Legacy Table 6.JPG|720px|7.16 Legacy Table 6.JPG]] | ||
| − | |||
| − | |||
== Uploading the batch == | == Uploading the batch == | ||
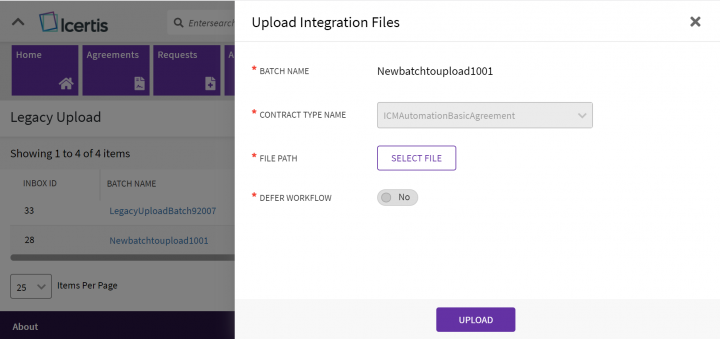
| − | + | 1. '''Click''' "Upload Batch" on the "Legacy Upload" page. The "Upload Batch" drawer opens. | |
| − | <div class="image-green-border">[[File:8.0-Legacy Upload-1-Index-Upload Batch.PNG|720px|8.0-Legacy Upload-1-Index-Upload Batch.PNG]]</div> | + | <div class="image-green-border">[[File:8.0-Legacy Upload-1-Index-Upload Batch.PNG|720px|8.0-Legacy Upload-1-Index-Upload Batch.PNG]]</div> |
| − | + | 2. The "Upload Batch" drawer opens, where you can enter relevant details in the fields. | |
| − | + | <div class="image-green-border">[[File:Upload Batch.png|550px|Upload Batch.png]]</div> | |
| − | < | + | Details of the fields are given below: |
| − | + | <div class="image-green-border">[[File:LegacyUpload Fields.png|700px|LegacyUpload Fields.png]]</div> <div class="note-box">'''Note:''' For the '''"File Path"''' field, the system validates the data upon file selection. The errors found, if any, will be highlighted so that the user can make corrections. You can only upload Excel files, the Create button will be enabled only when you upload the correct file format.<br/> Do not select the check box for Defer Workflow while creating the batch for an entity with enabled approval workflow.</div> | |
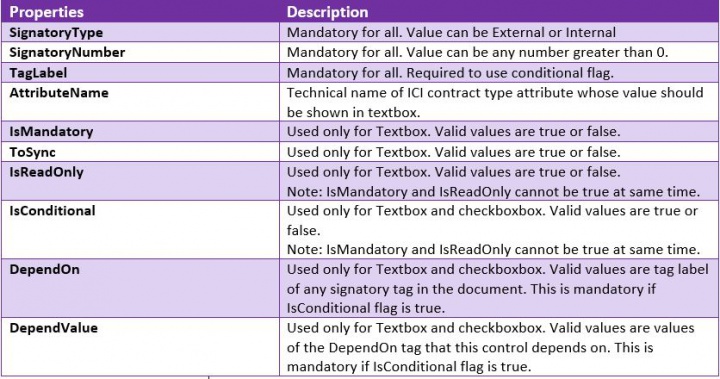
| − | <div class="note-box">'''Note: ''' | + | 3. '''Click "'''Create". The batch will be added to the queue for processing and the status will move to Schedule on the successful validation of the file. |
| − | + | ||
| − | + | ||
| − | + | ||
| − | + | ||
| − | + | ||
If there are any errors encountered during validation, the batch will be created in the Draft state. | If there are any errors encountered during validation, the batch will be created in the Draft state. | ||
| Line 480: | Line 423: | ||
After the successful processing, the agreements batch status moves to "Workflow Processed" with the attached workflow. | After the successful processing, the agreements batch status moves to "Workflow Processed" with the attached workflow. | ||
<div class="image-green-border">Uploading Peer association with the create Wizard flow along with Linkage Type.</div> | <div class="image-green-border">Uploading Peer association with the create Wizard flow along with Linkage Type.</div> | ||
| − | *In case of Peer associations | + | *In the case of Peer associations with create wizard flow, you can first upload the association batch with all the details input in the workbook on the Upload Batch window. System would process the Association by creating the instance on the ICI Application, the status of the batch would show as "Workflow Processed". |
*Once the Peer Association are successfully uploaded in the ICI the system would automatically process with linking with its Parent agreement with linkage type defined in the workbook. Once the batch is processed the status of the batch would show as "Completed". | *Once the Peer Association are successfully uploaded in the ICI the system would automatically process with linking with its Parent agreement with linkage type defined in the workbook. Once the batch is processed the status of the batch would show as "Completed". | ||
| Line 488: | Line 431: | ||
The ICI will auto initiate the tagging of attributes in clauses and templates upon the batch creation to avoid manual efforts. | The ICI will auto initiate the tagging of attributes in clauses and templates upon the batch creation to avoid manual efforts. | ||
| − | |||
| − | |||
=== Status changes for the processed batch === | === Status changes for the processed batch === | ||
| Line 530: | Line 471: | ||
</ol> | </ol> | ||
<div class="image-green-border">[[File:7.16 Legacy 44.png|720px|7.16 Legacy 44.png]]</div> | <div class="image-green-border">[[File:7.16 Legacy 44.png|720px|7.16 Legacy 44.png]]</div> | ||
| − | |||
| − | |||
| − | |||
| − | |||
== Re-uploading of a batch == | == Re-uploading of a batch == | ||
| Line 551: | Line 488: | ||
<div class="image-green-border">[[File:8.0-Legacy Upload-4-Index-Upload-Integration.PNG|720px|8.0-Legacy Upload-4-Index-Upload-Integration.PNG]]</div> | <div class="image-green-border">[[File:8.0-Legacy Upload-4-Index-Upload-Integration.PNG|720px|8.0-Legacy Upload-4-Index-Upload-Integration.PNG]]</div> | ||
| | ||
| − | <div class="note-box">'''Note: '''The data will be picked up for processing when the task service runs on the backend every day. When the task is triggered, the status updates to | + | <div class="note-box">'''Note: '''The data will be picked up for processing when the task service runs on the backend every day. When the task is triggered, the status updates to "Processing". After the processing is complete, the status changes to "Completed". The Task can be configured as per customer requirements from the ICM Tools.</div> |
| | ||
| Line 576: | Line 513: | ||
#'''Select''' the notification to view. The notification details are displayed in the right pane. | #'''Select''' the notification to view. The notification details are displayed in the right pane. | ||
| − | Refer "Notifications Dashboard" page for more information. | + | Refer "Notifications Dashboard" page for more information. |
| + | |||
== Accessing the uploaded entities in the ICI == | == Accessing the uploaded entities in the ICI == | ||
| Line 582: | Line 520: | ||
After you upload the legacy records into the ICI, you can view and access the records on the entity’s respective pages and tabs. | After you upload the legacy records into the ICI, you can view and access the records on the entity’s respective pages and tabs. | ||
| − | *You can view uploaded legacy Agreements from the "Agreements" index page. Click "Agreements"'' ''main navigation menu on top'' ''to open the "Agreement" index page. | + | *You can view uploaded legacy Agreements from the "Agreements" index page. Click the "Agreements"'' ''main navigation menu on top'' ''to open the "Agreement" index page. |
| − | *Click the View Details | + | *Click the "View Details" eye icon beside the agreement to open its Details page. If you have added any Notes'', ''Team'', ''or Commitments, they will be displayed under the respective tabs in the left navigation pane. |
*After the Amendments are successfully uploaded, you can view them under the "Amendments" tab in the previously uploaded parent Agreement on the left pane of the Agreement Details page. | *After the Amendments are successfully uploaded, you can view them under the "Amendments" tab in the previously uploaded parent Agreement on the left pane of the Agreement Details page. | ||
*After the Associations are successfully uploaded, you can view them under the "Associations" tab in the previously uploaded Agreement. You can also access Associations from the "Associations" main navigation menu on top. | *After the Associations are successfully uploaded, you can view them under the "Associations" tab in the previously uploaded Agreement. You can also access Associations from the "Associations" main navigation menu on top. | ||
| Line 589: | Line 527: | ||
When an Association uploaded without workflow is viewed in ICI, it will not have any buttons visible on the UI. | When an Association uploaded without workflow is viewed in ICI, it will not have any buttons visible on the UI. | ||
| − | *You can view uploaded legacy masterdata records on the Masterdata index page. Click | + | *You can view uploaded legacy masterdata records on the Masterdata index page. '''Click''' "Configure" > "Masterdata" on the main navigation menu on top to open the Masterdata index page. |
| − | *You can view the user information | + | *You can view the user information under the "Users" sub-menu under the "Admin" on top. |
| − | *You can view uploaded legacy Templates on the Templates index page. Click the "Templates" main navigation menu on top to open the "Templates" index page. | + | *You can view uploaded legacy Templates on the "Templates" index page. Click the "Templates" main navigation menu on top to open the "Templates" index page. |
| − | *You can view uploaded legacy Clauses on the | + | *You can view uploaded legacy Clauses on the Clauses index page. Click the "Clauses"'' ''main navigation menu on top. to open the "Clauses" index page. |
| − | + | ||
| − | + | ||
| − | + | ||
| − | + | ||
| − | + | ||
| − | + | ||
| − | + | ||
| − | + | ||
| − | + | ||
| − | + | ||
| − | '''Related Topics: '''[[Agreement_Management|Agreement Management]] | [[Managing_Organization|Managing Organization]] | [[Managing_Users|Managing Users]] | [[Managing_User_Groups|Managing User Groups]] | [[Managing_Security_Groups|Managing Security Groups]] | [[Application_Settings|Application Settings]] | [[Notification_Settings|Notification Settings]] | [[Currencies|Currencies]] | [[Reasons|Reasons | + | '''Related Topics: '''[[Agreement_Management|Agreement Management]] | [[Managing_Organization|Managing Organization]] | [[Managing_Users|Managing Users]] | [[Managing_User_Groups|Managing User Groups]] | [[Managing_Security_Groups|Managing Security Groups]] | [[Application_Settings|Application Settings]] | [[Notification_Settings|Notification Settings]] | [[Currencies|Currencies]] | [[Reasons|Reasons]] | [[Search_Sync|Search Sync]] | |
Latest revision as of 10:23, 9 June 2022
Contents
- 1 Legacy Upload
- 1.1 Important Considerations
- 1.2 Uploading Entities Using Legacy Upload
- 1.3 Creating a Batch for an Entity
- 1.4 Accessing Legacy Upload Page
- 1.5 Preparing the workbook with legacy records data
- 1.5.1 Accessing the Workbook
- 1.5.2 Specifications of a workbook
- 1.5.3 Preparing the Mapping Sheet
- 1.5.4 Preparing the datasheet for ICI entities
- 1.6 Uploading the batch
- 1.7 Viewing the batch Activity Log
- 1.8 Checking Integration Files
- 1.9 Re-uploading of a batch
- 1.10 Accessing Integrated batches report
- 1.11 Accessing Notifications
- 1.12 Accessing the uploaded entities in the ICI
Legacy Upload
Organizations may have a large number of existing Agreements that are created outside of ICI platform. These are henceforth referred to as Legacy Agreements. Organizations may want to import these Agreements to ICI to leverage its vast capabilities and manage all Agreements within a single platform.
ICI legacy Migration tool helps in migrating these large volumes of legacy Contracts from the Customer system to ICI Application with accuracy and efficiency which helps in creating a central repository. This in turn helps in a shift from Paper base to digitalization.
The highlights of the ICI Legacy Migration Tool are:
- Uploading entities such as Agreements and their respective Teams, Notes, and Commitments in bulk.
- Uploading Associations, Masterdata, User Information, and Amendments in bulk.
- Bulk Clause and Template creation, with the power of Attribute/metadata tagging.
- Enhanced validations, including the ability to exclude the specified attributes from being validated.
- Ability to view logs and report success and failure statuses on legacy UI.
- Record level email notification trigger capability as per customer requirement.
- Reporting capabilities on the uploaded legacy records.
- Email Notifications for batch initiation and completion.
- Support of Peer Association & Linkage types, ensuring no manual work post legacy upload.
- Enabling legacy upload of Agreements with Status as Expired, Terminated.
- Support uploading of files from Subfolder from Task server and blob storage repository.
- Records can be uploaded bypassing the workflow state transitions to the desired state, thereby improving the upload speed.
- An administrator can select the date, time, priority, batch size, and memory impact so that a user can set the guardrails for prioritization of the queue. This benefits in improving the performance, having greater control over the system resources and setting up jobs in a predictable manner.
- Customer Support Engineers can detect the exact point of failure and take system-based or manual corrective action depending on the type of error and clear the queue if required.
- System Administrators can provision resources on-demand based on the priority and complexity of the batch. This will help efficient executions, increased resource utilization, reduced troubleshooting, and reduced complexity.
- System Administrators can update operations seamlessly without downtime and reduce the impact on end-users during the update process.
Important Considerations
- Only an Administrator can perform a Legacy Upload of the entities.
- The absolute path where the Agreements and other entities documents are saved must be accessible by the task service of the ICI instance. This must be ensured while configuring the ICI instance.
- The Data files created in Excel can only have a .xlsx extension.
- For Agreements, only .pdf files are supported. For Associations, several file formats such as .pdf, .docx, .doc, .xlsx, .jpeg, .png and .zip are supported.
- Contract types for the Agreements and other entities that you are trying to upload must be present in the Published state in ICI.
- To upload any Associations, ensure that the relevant contract type has been added in the Associations tab in the parent contract type.
- An attribute that will always have a unique value must be present in ICI so that the relevant value can be used as a Primary Key to map other entities with that Agreement. If such an attribute does not already exist, you must create it. The unique value attribute can be a backend attribute that may not be visible on the UI. However, the Agreement Code attribute, though unique, contains a system-generated value that is generated only after an Agreement has been created thus, cannot be used as a Primary Key for the contract type.
- When adding batches for uploading, it is advisable not to schedule too many batches at close intervals and configure schedules to line-up batches to be uploaded at different times to optimize the processing speed.
- Since this is only a provisioning tool, as such any sort of updates to uploaded records are not supported.
Uploading Entities Using Legacy Upload
You can use the utility to upload the following entities:
- Agreements with Team, Notes, and Commitment
- Amendments with Team, Notes, and Commitment
- Associated Documents (with or without workflow)
- Masterdata (with or without workflow)
- User Information (with or without Extended Attributes)
- Clauses (with or without Extended Attributes)
- Templates (with or without Extended Attributes)
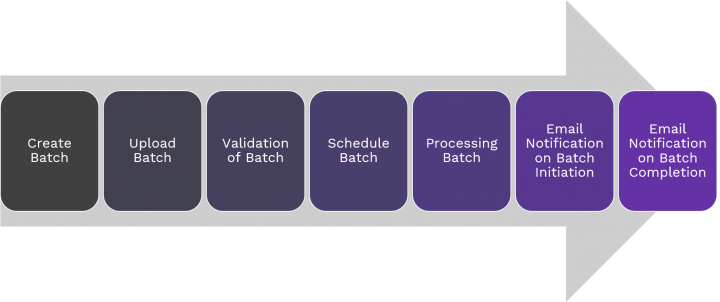
The Legacy Upload tool follows a simple workflow to upload the aforementioned entities.
The workflow for the Legacy Upload process at a glance:
Creating a Contract Type Entity for Legacy Upload
To upload legacy records in ICI, there must be a relevant contract type configured in the ICI as per the specific entity type needed for legacy records.
If the contract type does not exist in ICI, you must create the contract type for the entity of legacy records. You must configure the details of legacy records as the attributes in the ICI contract type.
Configuring Contract Type with or without Approval Workflow
You can upload entities such as Associations, Masterdata with or without Approval Workflow using Legacy Upload.
You can automatically attach the Approval workflow to an entity while processing the Legacy Upload batch. All you have to do is enable the approval workflow in the contract type by setting the Enable Approval Workflow attribute value to Yes.
For entities that have the Enable Approval Workflow attribute value set to No in their contract type, the approval workflow will not follow automatically. You can enable the workflow manually, whenever needed, by clicking the Resume WF under the three dots.
When an Entity that has been uploaded without workflow is viewed in ICI, it will not have any buttons visible on the UI.
To create a contract type:
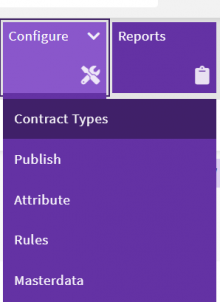
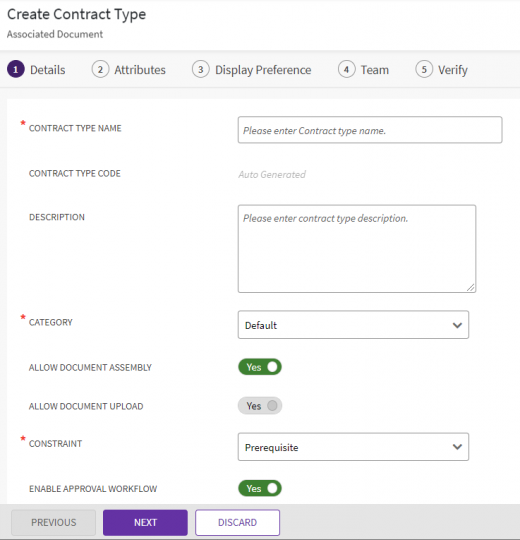
1. Click the "Configure" > "Contract Types" navigation menu on the top of the page. The "Contract Types" index page opens.
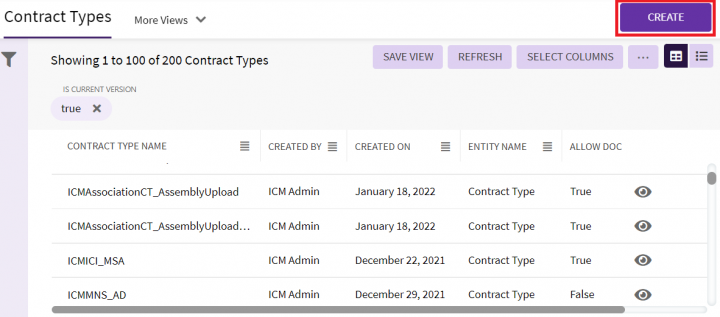
2. Click "Create" on the far right in the title bar. The "Create Contract Type" page opens.
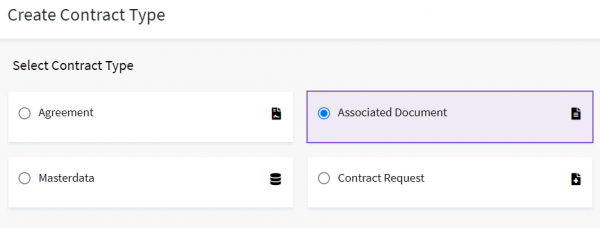
3. Click the Contract Type of the entity for which you want to upload legacy records. For example, "Associated Documents" Contract Type.
4. Enter the "Contract Type Name" and other required details in the "Details" tab. Toggle the "Enable Approval Workflow" to "Yes" if you want to enable the workflow for approval for this contract type with the creation.
5. Click "Next". The "Attributes" tab opens.
6. Select and add the Attributes which are required for the legacy records you are uploading, to map them to the ICI Contract Type.
7. Click "Next" and enter the details on the Associations, Display Preference, and Team tabs to complete the contract type creation following the standard ICI workflow.
Refer to the "Creating Contract Type" for further details on how to configure contract types.
Configuring Contract Type with Mandatory Associations
There may be cases where any associated documents are required before an Agreement can move to the Executed, Expired or Terminated state. In that case, you can defer the workflow for the Agreement while uploading, then upload the required Association with workflow attached, and then enable the workflow for the Agreement when needed.
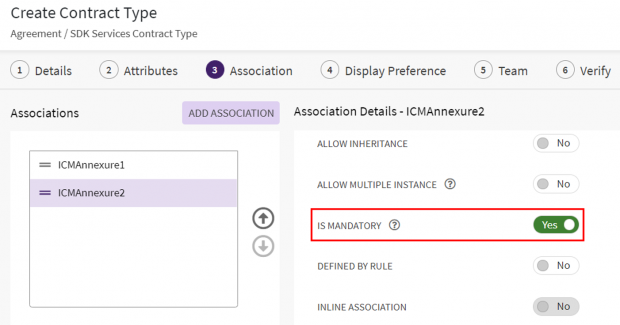
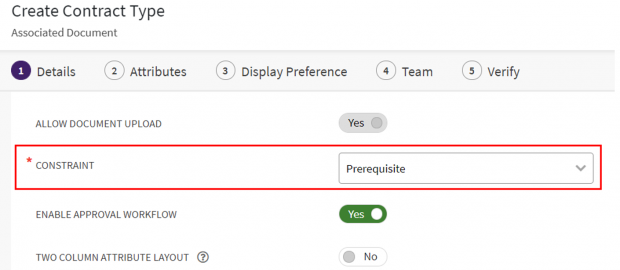
Whether an Association is mandatory or not can be seen in ICI in the following 2 ways:
1. If the "Is Mandatory" flag is set to Yes while adding an Association for a particular Agreement Contract Type, an Association is mandatory.
2. If Prerequisite or Post requisite is selected in the Constraints drop-down list while creating an Associated Document Contract Type, an Association is mandatory.
Creating a Batch for an Entity
Once the relevant contract type is present in the ICI, you can create a new batch to upload the legacy records in the ICI from the Legacy Upload page.
Creating a Batch for Agreements
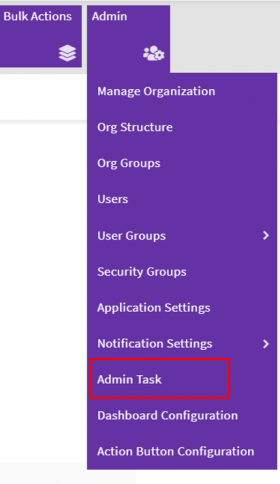
1. Click the "Admin" main navigation menu on the top of the page. The sub-menu tiles dropdown opens.
2. Click "Admin Task". The "Admin Task" page opens.
4. Click "Create Batch" on the far right in the title bar. The "Create Batch" page’s "Details" tab opens.
5. Identify the entity for legacy records and select the "Legacy Upload Action" accordingly from the dropdown. For example, select "Create Agreement" when you are creating a batch of agreements.
6. Select the "Contract Type Name". The dropdown will show all agreement contract types configured in ICI. For example, ICMMSA
7. Click "Next". The "Attributes" tab opens. The "Available Attribute" section shows all attributes from the selected agreement contract type in the left column. The mandatory attributes like "Name" are already populated in the "Selected Attribute" list
8. Select the attributes for which you want to upload the legacy data in the current batch from the "Available Attribute" section and add to the "Selected Attribute" section using the action arrows. For example, select attributes Name, Contract Description, and Effective Date.
9. Click "Generate Workbook". The workbook template is generated in the Microsoft Excel format and downloaded at the pre-set download location on your system.
Creating a Batch for Amendments
The agreement contract type for uploading Amendments is already available in the ICI when the parent agreements were created or unloaded. You can create a set of agreements that you want to upload amendments to, using the Saved Search capability.
To create an amendment batch:
- Navigate to the "Create Batch" page as explained in the above section.
- Select the "Legacy Upload Action" from the dropdown. For example, "Create Amendment". The fields to select Saved Search and Contract Type name are displayed.
- Select a "Saved Search". For example, "All Executed Agreements".
You must create a saved search beforehand to group the agreement records to which you want to add the amendments through Legacy Upload. For example, here, configure the Saved Search for all Executed Agreements. The system would ignore all statuses other than Executed.
Refer to Saved Searches for more details on creating a saved search.
- Select the "Contract Type Name". The dropdown will show all agreement contract types from the selected Saved Search. For example, select "ICMMSA".
- Click "Next" and complete the batch creation for Amendments following the same process as for the creation of the agreement batch.
Creating a Batch for Associations
Before you proceed to upload Associations using the Legacy Upload, ensure that the parent Agreements are already uploaded. Also, ensure that the Associated Document Contract Type has been added in the Associations tab in the parent Agreement Contract Type.
You can upload Associations with or without Approval Workflow using Legacy Upload in the ICI.
Associations can be mapped with their parent agreements using a Saved Search capability. A set of agreements can be created for which you want to upload peer associations by configuring a Saved Search beforehand. The auto-generated workbook will contain the details of the agreement from the selected saved search as the parent agreements. These details would help users to find the records in the ICI and map them with the Association agreement code in the workbook.
To create an Association batch:
- Navigate to the "Create Batch" page as explained in the "Creating a Batch for Agreement" section above.
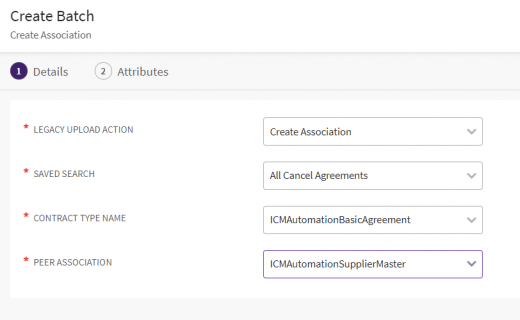
- Select the "Legacy Upload Action" from the dropdown. For example, "Create Association". The fields to select a Saved Search and parent Contract Type are displayed.
- Select a "Saved Search" to pick a set of parent agreements.
- Select the "Contract Type Name" for which you want to upload the legacy associations. This dropdown field displays the contract types from the selected Saved Search. For example, select "ICMAutomationBasicAgreement".
The "Association" field is displayed to select the associated document contract type for the legacy associations you are uploading in this batch.
This dropdown field displays all Associated Document Contract Types configured under the "Association" tab for the Contract Type that you have selected in the "Contract Type Name" field.
- Select the "Association" contract type. For example, "ICMAssociationCT1".
- Click "Next" and complete the batch creation for Association following the same process as for the creation of the agreement batch.
The auto-generated workbook will contain the pre-filled details for the selected agreement contract type from the selected saved search as parent agreements.
Creating a Batch for Peer Associations
You can upload associated documents as peer associations to agreements using Legacy Upload.
- Follow the same process explained in the section "Creating a Batch for Associations" till the "Association" field.
- Select the "Association". For example, ICMAutomationSupplierMaster.
When you select the peer Associated Document Contract Type in the "Association" field, the "Association" field will reflect this relationship for the selected parent Contract Type and Associated Document Contract Type combination.
- Click "Generate Workbook". The workbook is auto-generated with the pre-filled details of parent records for the selected contract type from the selected saved search in the “Parent Agreement Name | Agreement Code | SysId” format.
The workbook for peer associations also contains the Linkage Type column with the values Parent, Child, and Peer. When there is the Linkage Type Masterdata configured in the ICI, the Linkage Type column will reflect the values from that masterdata.
Creating a Batch for Peer Associations with Create Wizard Flow.
You can create associated documents as peer associations to agreements using Legacy Upload.
- Follow the same process explained in the section above for creating a batch for Associations till the "Association" field.
- Select the "Association" contract type. For example, ICMMasterServicesAgreement.
When you select the peer Associated Document Contract Type in the Association field, the Association field will reflect this relationship for the selected parent Contract Type and Associated Document Contract Type combination.
- Click "Generate Workbook". The workbook is auto-generated with the pre-filled details of parent records for the selected contract type from the selected saved search in the “Parent Agreement Name | Agreement Code | SysId” format, along with the Peer Association attributes as system would create Peer association like agreement creation and it would get linked to the Parent Agreement.
The workbook for peer associations also contains the Linkage Type column with the values as Parent, Child, and Peer. When there is the Linkage Type Masterdata configured in the ICI, the Linkage Type column will reflect the values from that masterdata.
Creating a batch for Masterdata
You can upload Masterdata with or without Approval Workflow using Legacy Upload.
To create a batch for masterdata:
- Navigate to the "Create Batch" page as explained in the above section "Creating a Batch for Agreement".
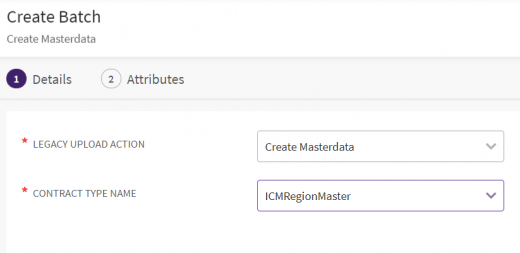
- Select the "Legacy Upload Action" from the dropdown. For example, "Create Masterdata". The fields to select Saved Search and Contract Type name are displayed.
- Select the masterdata in the "Contract Type Name" field. The dropdown will show all masterdata contract types configured in ICI. For example, select "ICMRegionMasterdata".
- Click "Next" and complete the batch creation for Masterdata following the same process as for the creation of the agreement batch.
Creating a batch for User information
You can provision the users in ICI using the Legacy Upload utility. User information is uploaded independently as it is not related to any other entities.
To create a User Provisioning batch:
1. Navigate to the "Create Batch" page as explained in above "Creating a batch for Agreements" section
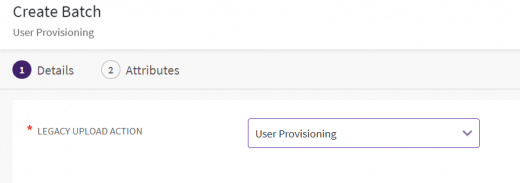
2. Select the "Legacy Upload Action" from the dropdown. For example, "User Provisioning".
When the "Extended User Entity" masterdata is configured in the system, the "Next" button is displayed to select the attributes from the extended masterdata, else the "Generate Workbook" button is displayed.
3. Click "Next". The "Attributes" tab opens.
The "Available Attribute" section displays all attributes from the "Extended User Entity" masterdata contract type.
4. Select the attributes for which you want to upload the legacy data in the current batch from the "Available Attribute" section and add them to the "Selected Attribute" section using the action arrows.
5. Click "Generate Workbook". The workbook template is generated in the Microsoft Excel format and downloaded at the pre-set download location on your system.
Creating a batch for Clauses
You can import bulk clauses into ICI with the help of Legacy Upload Tool. User can migrate their existing clause repository from their previous system with lot of easy, along with it the tool also supports attributes tagging capability. An XML specification document is also released which can be used for creating tags in the input document files of Clauses.
To create Clauses batch:
- Navigate to the "Create Batch" page as explained in the "Creating a Batch for Agreements" section above.
- Select the "Legacy Upload Action" from the dropdown. For example,"Clauses".
When the "Extended Clause Entity" masterdata is configured in the system, the "Next" button is displayed to select the Clause Additional Attributes from the extended masterdata, else the "Generate Workbook" button is displayed.
- Click "Next". The "Attributes" tab opens. The "Available Attribute" section displays all attributes from the "Extended Clause Entity".
- Select the attributes for which you want to upload the legacy data in the current batch from the "Available Attribute" section and add to the "Selected Attribute" section using the action arrows.
- Click "Generate Workbook". The workbook template is generated in the Microsoft Excel format and downloaded at the pre-set download location on your system.
Creating a batch for Template
You can import bulk Templates into ICI with the help of Legacy Upload Tool. User upload relevant templates with capability of Attribute tagging in it. This helps in reducing the implementation duration and achieve faster efficiency. Along with the tool, an XML specification document is also released which can be used for creating tags in the input document files of templates.
To create Templates batch:
Follow the same steps as above with selecting "Template" in the "Legacy Upload Action".
Accessing Legacy Upload Page
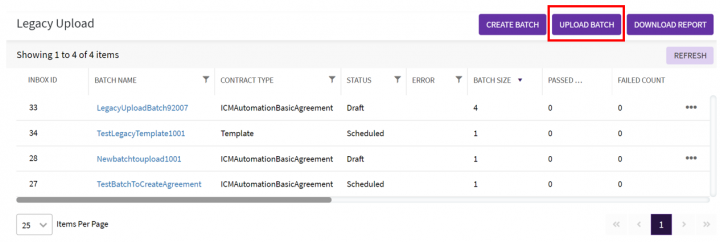
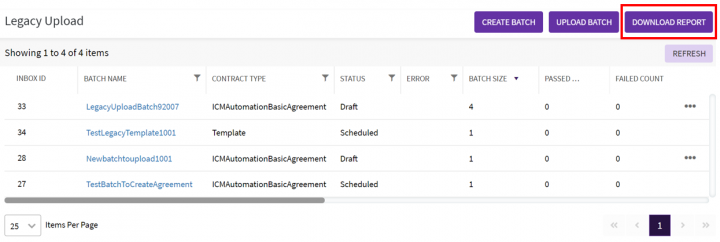
The Legacy Upload page displays the details of uploaded batches in a table format. The batch details include Actions, Status, Error details, Batch Passed count, Failed count and so on. User can filter and search legacy upload batch with column filter capability.
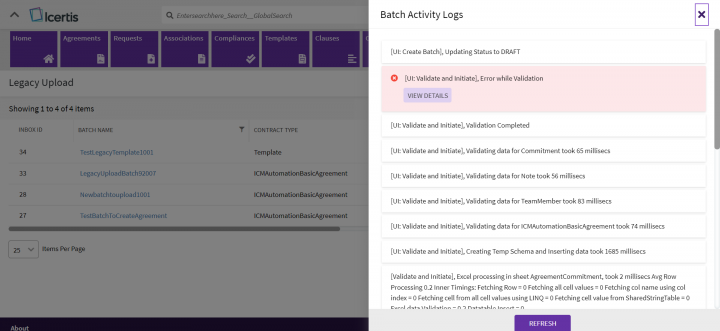
You can view the status of the batch by clicking the Refresh button in the top right hand corner to refresh the status of the batch. If you encounter any error while processing the batch, it is highlighted in red color and displayed under the Failed Count column. After the batch is uploaded, click the batch Name to view the history of the processes performed on a particular batch.
To access the Legacy Upload page:
Follow the steps explained in "Creating a Batch Agreement" above.
The page displays the complete statistics for all created and uploaded batches. The page also displays the options to "Create Batch" and "Upload Batch".
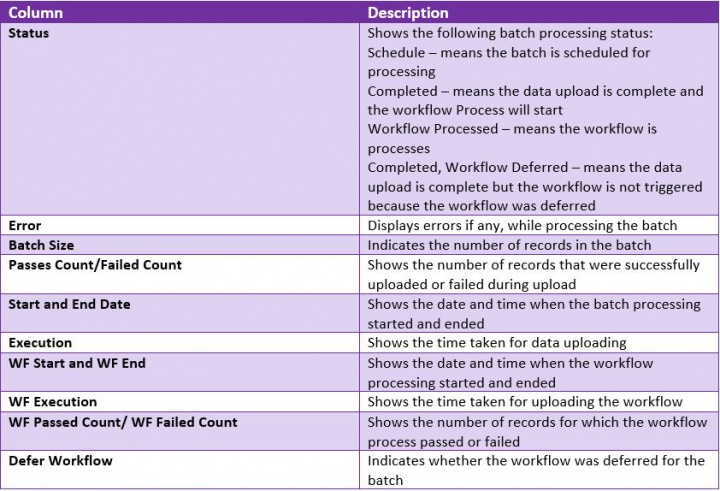
Some of the columns on the Legacy Upload page are explained below:
Preparing the workbook with legacy records data
Once the workbook is generated through the Create Batch process, you need to fill the legacy records data in the respective worksheets to prepare the workbook for uploading the batch.
Accessing the Workbook
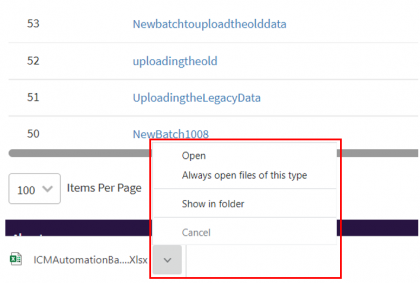
- Click the arrow beside the file in the Download bar to display available actions.
- Click "Open". The pre-configured workbook for the selected contract type opens.
Alternatively, you can browse and open the downloaded Workbook from the pre-set download location on your system.
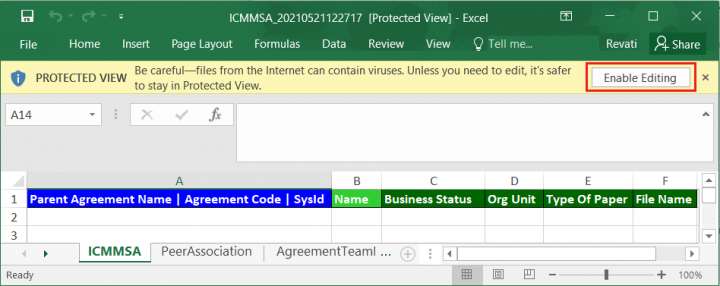
- Click "Enable Editing" to allow entering of data in the workbook.
- Enter the legacy data in the appropriate worksheets.
- Save and close the workbook.
Specifications of a workbook
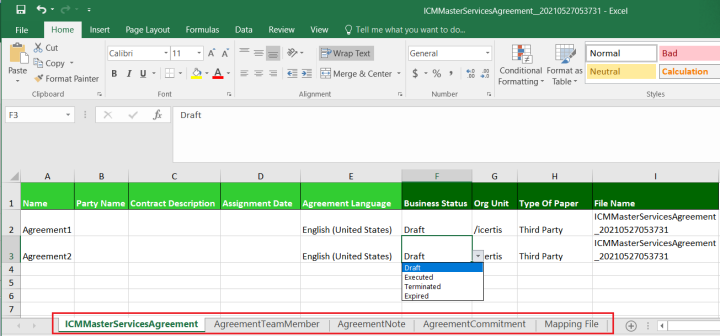
- The Workbook is generated based on the selected contract type.
- The name of the workbook is constructed as the ICI name of the selected Contract Type Name amended with the date timestamp.
- The mapping sheet is configured automatically and is part of the workbook.
- The metadata of the workbook is also auto populated in the Information sheet to avoid any manual efforts.
- The column order in workbook sheet is maintained same as the sequence of attributes on the UI to maintain the consistency.
- Mandatory fields are highlighted in red.
- The lookup fields are provided that display the values from reference entities to avoid wrong data entry errors.
- All related worksheets for an entity, such as Team members, Notes, and Commitments, are available in a single workbook.
- The attributes necessary for processing are provided as lookup attributes to avoid errors due to manually entering values.
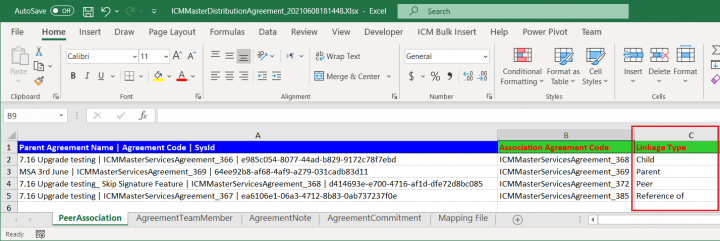
- The peer association worksheet also contains the Linkage Type column with the values as Parent, Child and Peer. When there is the Linkage Type Masterdata configured in the ICI, the Linkage Type column will reflect the values from that masterdata.
Preparing the Mapping Sheet
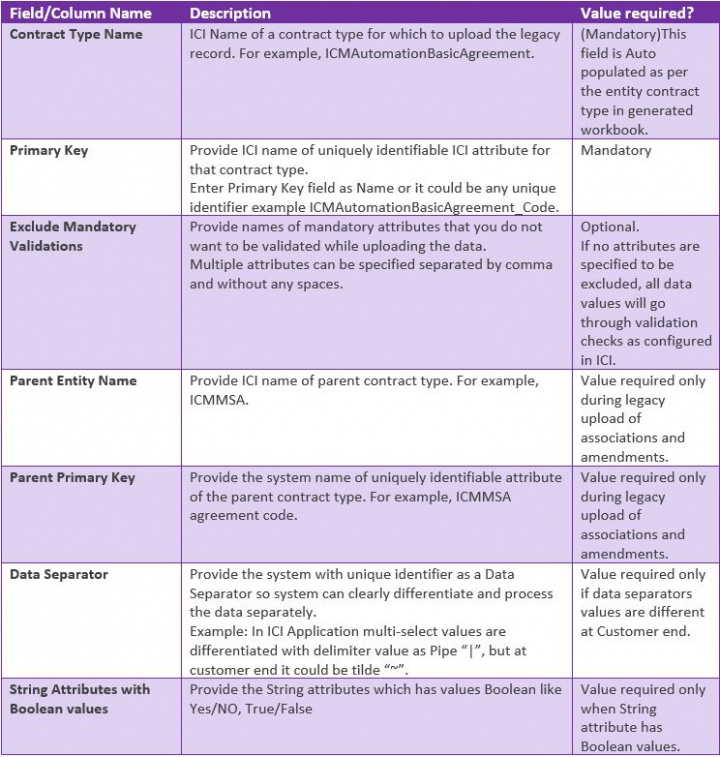
The mapping sheet is a part of the generated workbook. You need to provide below mentioned details required to process the Legacy Upload batch.
Apart from these Batch processing details, you also need to provide the entity details.
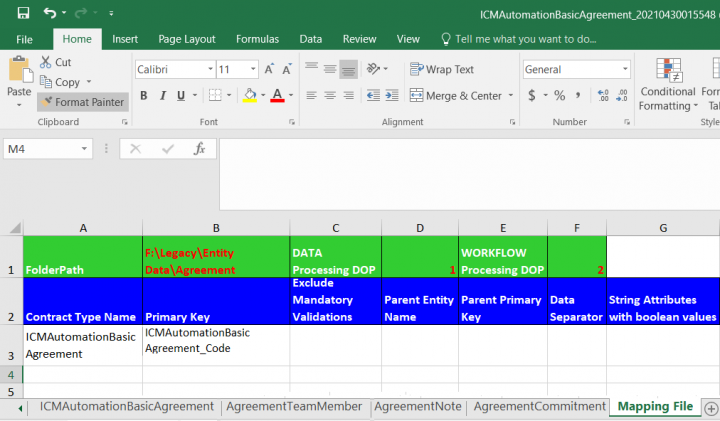
The snapshot of the sample mapping sheet for Agreement is:
Preparing the datasheet for ICI entities
The datasheet in the auto-generated workbook contains details specific to the entity and contract type. Also, the data-sheet is named after the selected entity contract type. For example, the datasheet for the Masterdata- ICIStateMaster, is named as same as the contract type name which is ICIStateMaster.
Preparing the datasheet for Agreement, Amendment, Associated Documents and Masterdata
The datasheet for Entities- Agreement, Amendment, Associated Documents, and Masterdata, contains the attributes you selected from the contract type when creating the batch. These attributes will appear in the datasheet in the order of their selection.
The datasheet for these entities also contains the necessary backend attributes required for the processing which may or may not be visible on the UI such as Business Status, Org Unit, Type Of Paper, and File Name. The Type Of Paper attribute has the default value as Third Party. The datasheet for Amendment has additional attributes Is Amendment and Use Amendment Template.
The contract type datasheet for Amendment and Peer Association contains prefilled details for the parent agreements of the selected contract type from the selected saved search. The details comprise pipe-delimited values of Parent Agreement Name, Agreement Code and Sysid within a single column, which would help the system easily find parent records in the ICI.
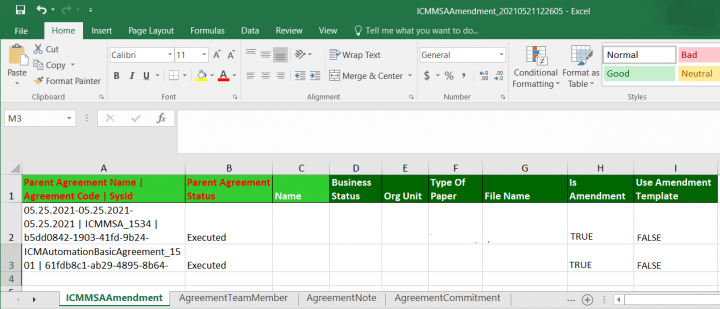
The snapshot of the sample auto-generated data sheet for Amendment is:
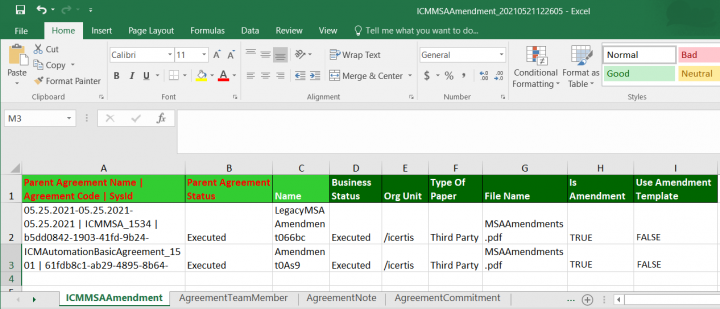
You can add the legacy records details in the respective columns to prepare the datasheet.
Linkage type support for peer associations
The datasheet for uploading peer associations also contains the Linkage Type column with the values Parent, Child, and Peer. When there is the Linkage Type Masterdata configured in the ICI, the Linkage Type column will reflect the values from that masterdata.
After the successful batch upload for peer associations, the appropriate linkage-type relationship is automatically established for the legacy records based on their contract types.
- For the self-linkage type, the associations will be linked as peers to the agreements of the same contract type. For example, the SOW agreement instance will be linked to another instance of SOW with linkage type as a peer.
- For the two-way linkage-type, the base agreement and association will be linked as parent and child respectively. For example, when the user selects the linkage type as Child while uploading SOW legacy record, the linked MSA record will be automatically updated as a parent based on the two-way linkage-type configuration.
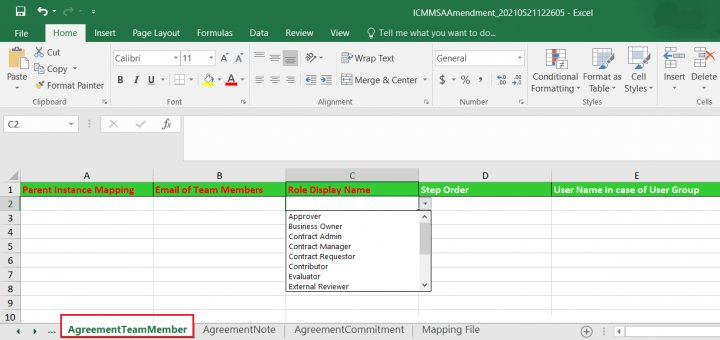
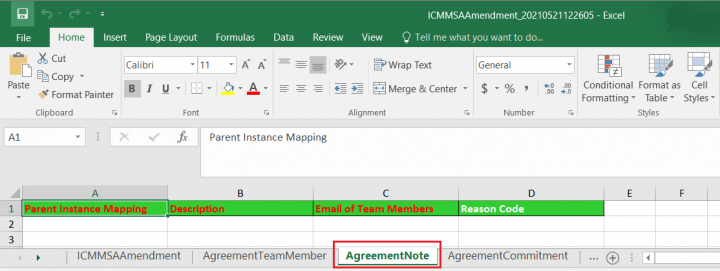
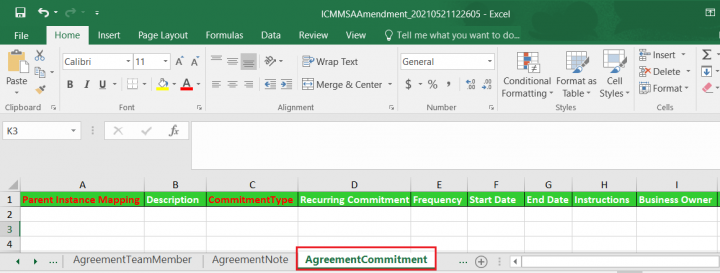
Adding Team members, Notes, and Commitments
You can also add Team members, Notes, and Commitments if applicable to the legacy record using the same workbook by adding the details in the respective sheets at the same time when uploading the legacy records.
The worksheets for adding the details for Team members, Notes, and Commitments are part of the workbook.
The snapshot of the auto-generated Team Members worksheet is:
The snapshot of the auto generated Notes worksheet is:
The snapshot of the auto generated Commitments worksheet is:
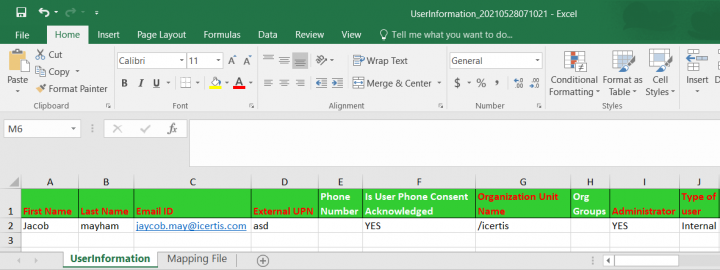
Preparing the datasheet for User Provisioning, Clauses, and Templates
The datasheet for entities User Provisioning, Clauses, and Templates reflects all attributes from the selected entity contract type in the same display sequence as they appear on the UI for that entity.
In addition to contact type attributes, the datasheet for these entities also contains the user-selected attributes from the respective extended entity masterdata at the time of batch creation.
Here is the snapshot of the auto-generated User Information worksheet with the sample legacy record details that is ready for upload:
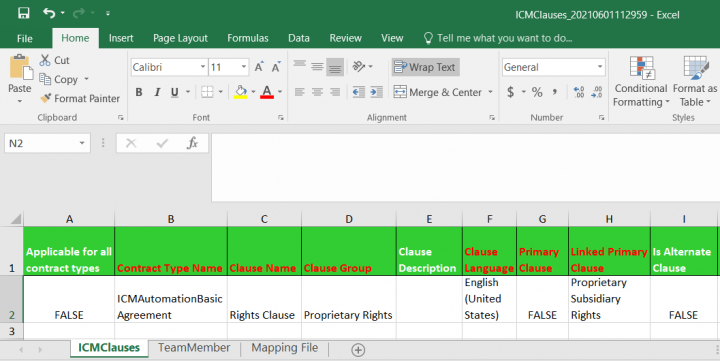
Here is the snapshot of the auto-generated Clauses worksheet with the sample legacy record details that are ready for upload:
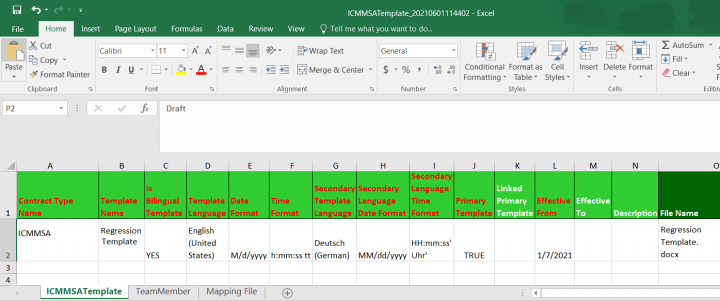
Here is the snapshot of the auto-generated Templates worksheet with the sample legacy record details that are ready for upload:
Observations and assumptions for clauses batch
The following observations and assumptions need to be taken into consideration while bulk uploading clauses using the Legacy Upload tool:
- A Primary Clause and a Linked Primary Clause should not be a part of the same batch. The Primary Clause must be created first and then it should be used as a Linked Primary Clause.
- A clause with Is Alternate Clause value marked as TRUE and the clause that it is the Alternate of should not be part of the same batch.
- A clause with Is Dependent Clause value marked as TRUE and the clause which it Depends On should not be part of the same batch.
- Tags must be on the same line in the template document. Tagging will not function if the tags are on separate lines. For example, if the closing tag is on the next line, tagging does not work.
- There should be no non-breaking spaces (ASCII value xA0) within XML tags. Ensure to replace them with regular spaces in XML tags. Using deactivated clause groups is allowed.
- Template Variables cannot be tagged in a clause. If tagged, the template variable will be treated as plain text and no exceptions are triggered.
- The user importing templates and clauses must have permissions on the respective tiles, otherwise, they will not be able to view them in Icertis Experience for Word.
- Only the creation of a clause is supported. Bulk edits and updating edited clause text in templates where the clause is referred are currently not supported.
Observations and Assumptions for templates batch
The following observations and assumptions need to be taken into consideration while uploading templates using the Legacy Upload tool:
- If tagging fails for a part of the batch, only the Passed count gets updated while the Failed count is not updated. However, the failure count can be inferred.
- The entire XML should be on the same line. Tagging will not function if the tags are split into separate lines.
- There should be no non-breaking spaces (ASCII value is xA0) within XML tags. Ensure to replace them with regular spaces in XML tags.
- Primary and alternate templates cannot be a part of the same batch.
- Threading causes some issues. Further, if there has been an error in tagging, it is not possible to rollback or delete instances created using batch upload.
- Ensure each template is given a unique name. If two templates are uploaded with the same name, then one of the entries fails. However, the Error file does not show any corresponding error message.
Mandatory tags for clause document
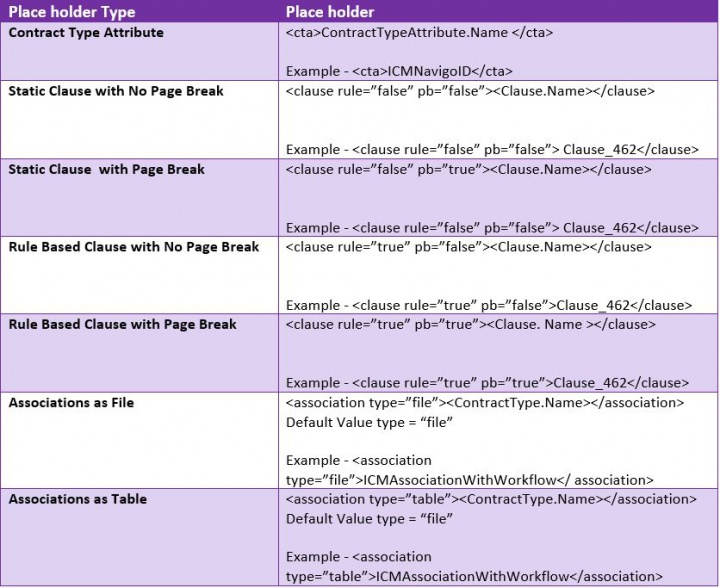
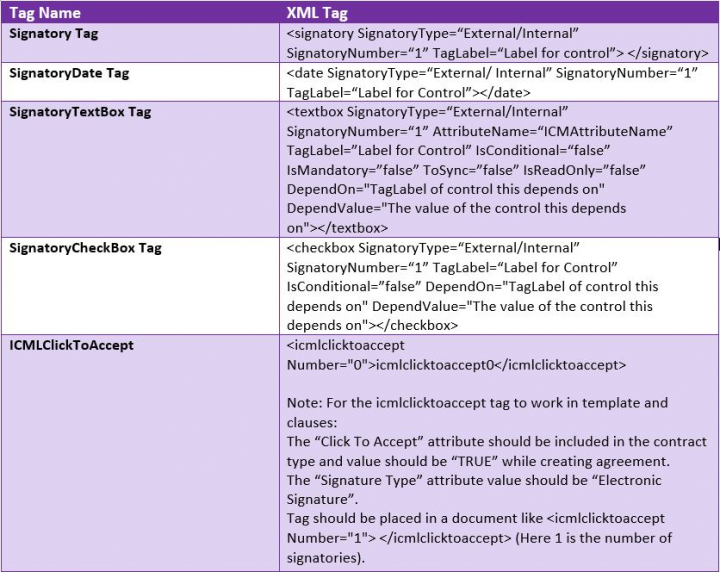
The mandatory attribute tags are available in the XML format for tagging inside clauses and templates.
The below table provides the details for XML tags:
To further understand tag properties, refer to the below table:
Uploading the batch
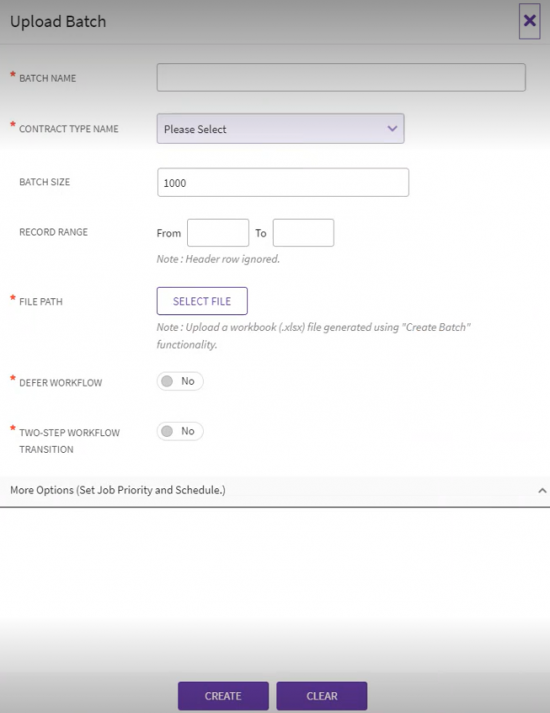
1. Click "Upload Batch" on the "Legacy Upload" page. The "Upload Batch" drawer opens.
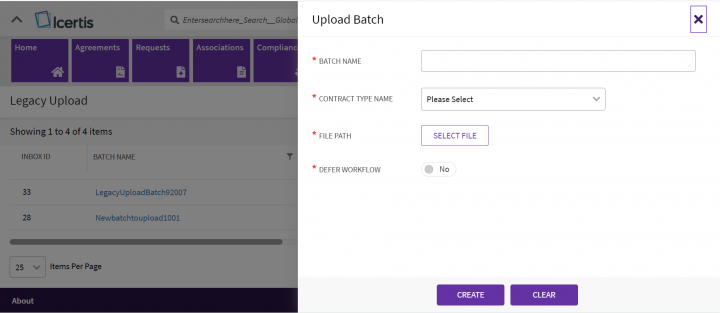
2. The "Upload Batch" drawer opens, where you can enter relevant details in the fields.
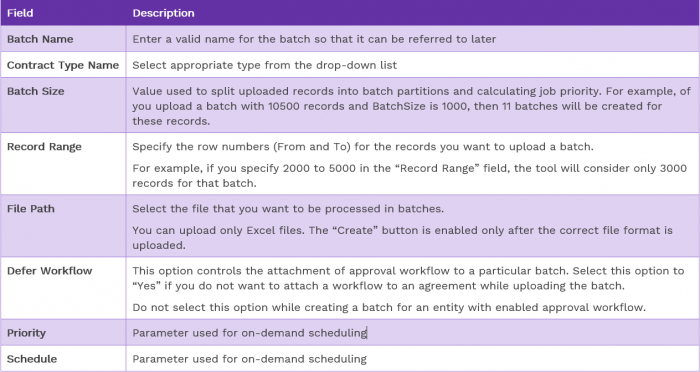
Details of the fields are given below:
Do not select the check box for Defer Workflow while creating the batch for an entity with enabled approval workflow.
3. Click "Create". The batch will be added to the queue for processing and the status will move to Schedule on the successful validation of the file.
If there are any errors encountered during validation, the batch will be created in the Draft state.
The data will be picked up for processing when the task service runs on the backend every day. When the task is triggered, the status updates to Processing.
The Task can be configured as per customer requirements from the ICM Tools. The data records in a batch are processed and uploaded based on the State they are in.
Uploading Agreements with mandatory Associations
- In the case of mandatory associations for agreements, you can first upload the agreements batch with the deferred workflow by selecting the checkbox for "Defer Workflow" on the "Upload Batch" drawer. After the successful processing of the agreements batch, the "Status" of the batch will move to "Completed", "WFDeferred", indicating that the agreement will not follow the workflow automatically.
- Once the Agreements are successfully uploaded in the ICI with the deferred workflow, upload the mandatory Associations following the steps:
- i. Search or create the contract type for Associations you want to upload. ii. Create a Batch for Associations as explained in the same section above. iii. Prepare the workbook by entering the legacy records data. iv. Upload the batch with the attached Workflow.
- Once the mandatory associations are successfully uploaded in the ICI, you can click on the "Resume WF" available under the three dots (...) in the last sticky column in the right for the batch which is in "Completed", "WF Deferred" status.
After the successful processing, the agreements batch status moves to "Workflow Processed" with the attached workflow.
- In the case of Peer associations with create wizard flow, you can first upload the association batch with all the details input in the workbook on the Upload Batch window. System would process the Association by creating the instance on the ICI Application, the status of the batch would show as "Workflow Processed".
- Once the Peer Association are successfully uploaded in the ICI the system would automatically process with linking with its Parent agreement with linkage type defined in the workbook. Once the batch is processed the status of the batch would show as "Completed".
Uploading clauses and template batch
To upload the batch for clauses and templates, follow the same process as for uploading batch for other entities.
The ICI will auto initiate the tagging of attributes in clauses and templates upon the batch creation to avoid manual efforts.
Status changes for the processed batch
The entities which support uploading with or without attached approval workflow, are processed based on their approval workflow configuration by following the deferred workflow steps. The status of the batch processing for such entities goes from Completed, WF Differed to Workflow processed.
For entities that do not need approval workflow, the batch status will move to "Completed" on successful processing.
Viewing the batch Activity Log
To access the processing logs for a specific batch:
- Click the batch name on the "Legacy Upload" page to view the activity log of a particular batch. The activity log shows the operations performed while processing the batch and also displays the errors if any in Red color.
- Click on the error message highlighted in Red to expand and view the details of the encountered error by clicking "View Details". A "Download" button will appear along with the details.
- Click "Download" to download all the details of the specific record with the errors or warnings.
Checking Integration Files
You can check the errors and warnings encountered during processing for failed records for the processed batch after the batch or workflow processing is complete.
To download integration files:
- Click the "Download Integration Files" option under the three dots (...) in the last column corresponding to the processed Batch that you want to review, on the "Legacy Upload" page.
The "Download Integration Files" drawer opens offering below file options to download:
- "Download Status File" and "Download Error File" buttons at the bottom for batches in the "Completed" status
- "Download WorkFLow Status File" and "Download WorkFlow Error File" for batches in the "Workflow Processed" status
- Select "Download WorkFlow Error File". The error file is downloaded in the Excel format. The file contains the details about Errors and Warnings encountered while processing for the failed records along with the details of each failed record in each of the data worksheet in the uploaded workbook.
- Select "Download WorkFlow Status File" to view the workflow processing status for all records in the batch file. The Excel file is downloaded on the pre-set download location on your system.
Re-uploading of a batch
You can correct the errors in the data file and re-upload the batch of a specific batch that is in the draft state from the "Legacy Upload" page itself.
To upload the batch in draft for processing
- Open the downloaded Integration file. It contains details on Integration Status, Validation Status, Errors, Warnings, Contract Type Name, Name (of the uploaded file), and so on.
- Check the message in the Errors column and correct that record accordingly in the batch workbook that you uploaded before, by referring to the entity code provided in the integration file.
- Click the "Upload Integration Files" under the three dots Actions column in the right for the batch in the "Draft" state for which you want to upload the workbook. The "Upload Integration File" drawer opens.
The Batch Name, Contract Type Name, and Defer Workflow will be pre-selected with respect to the batch you are uploading.
- Click "Select File" to browse and select the revised workbook from its location on your system.
- Click "Upload". The batch will be added to the queue for processing.
Accessing Integrated batches report
You can view the consolidated status report for all the batches run for the current date. To access the report, click "Download Report" on the "Legacy Upload" page on the far right in the title bar on top beside Create and Upload Batch buttons.
The consolidated report will be downloaded on the pre-set default download location on your system.
The report contains the following details for the batches run on the particular date:
Accessing Notifications
The user will get the notification on the batch initiation and completion informing the processing status of records by the Legacy Upload tool as success or failure. The notification template for the Legacy Upload Notification can be configured as per the requirements.
To access Legacy Upload Notification:
- Click Notifications bell icon on the top right of the page. The "Notifications Dashboard" opens.
- Select "Legacy Upload Notification Category". The respective notifications under the events for "Legacy Upload Batch Initiation" and "Legacy Upload Batch Completion" are displayed.
- Select the notification to view. The notification details are displayed in the right pane.
Refer "Notifications Dashboard" page for more information.
Accessing the uploaded entities in the ICI
After you upload the legacy records into the ICI, you can view and access the records on the entity’s respective pages and tabs.
- You can view uploaded legacy Agreements from the "Agreements" index page. Click the "Agreements" main navigation menu on top to open the "Agreement" index page.
- Click the "View Details" eye icon beside the agreement to open its Details page. If you have added any Notes, Team, or Commitments, they will be displayed under the respective tabs in the left navigation pane.
- After the Amendments are successfully uploaded, you can view them under the "Amendments" tab in the previously uploaded parent Agreement on the left pane of the Agreement Details page.
- After the Associations are successfully uploaded, you can view them under the "Associations" tab in the previously uploaded Agreement. You can also access Associations from the "Associations" main navigation menu on top.
When an Association uploaded without workflow is viewed in ICI, it will not have any buttons visible on the UI.
- You can view uploaded legacy masterdata records on the Masterdata index page. Click "Configure" > "Masterdata" on the main navigation menu on top to open the Masterdata index page.
- You can view the user information under the "Users" sub-menu under the "Admin" on top.
- You can view uploaded legacy Templates on the "Templates" index page. Click the "Templates" main navigation menu on top to open the "Templates" index page.
- You can view uploaded legacy Clauses on the Clauses index page. Click the "Clauses" main navigation menu on top. to open the "Clauses" index page.
Related Topics: Agreement Management | Managing Organization | Managing Users | Managing User Groups | Managing Security Groups | Application Settings | Notification Settings | Currencies | Reasons | Search Sync |
