| Line 16: | Line 16: | ||
To manage legacy contracts using AI, you need to first create an attribute Clause Discovery Type. | To manage legacy contracts using AI, you need to first create an attribute Clause Discovery Type. | ||
| − | To create an atttribute, do the following:<br/> 1. '''Click''' "Agreements" tile on the Home page. The Agreements page opens. | + | To create an atttribute, do the following: |
| + | |||
| + | <br/> 1. '''Click''' "Agreements" tile on the Home page. The Agreements page opens. | ||
2. '''Click''' "Create" button on the Agreements page. The Create Agreement page opens. | 2. '''Click''' "Create" button on the Agreements page. The Create Agreement page opens. | ||
| Line 22: | Line 24: | ||
3. '''Select''' "Category". For example, Default. | 3. '''Select''' "Category". For example, Default. | ||
| − | 4. '''Select''' "Contract Type Name". For example, | + | 4. '''Select''' "Contract Type Name". For example, MandatoryClauseCT. |
5. '''Select '''"Third Party" from the Type of Paper drop-down list. | 5. '''Select '''"Third Party" from the Type of Paper drop-down list. | ||
| − | <div class="image-green-border">[[File:Create Agreement2.png| | + | <div class="image-green-border">[[File:Create Agreement2.png|720px|Create Agreement2.png]]</div> |
| + | 5. '''Click '''"Next".<br/> 6. On the Attributes page, '''click''' AI Model (which is a mandatory field). <br/> 7. '''Select''' DiscoverAI Standard from the drop-down to use AI to discover the clauses. | ||
| + | <div class="image-green-border">[[File:AI Model Values.png|720px|AI Model Values.png]]</div> <div class="image-green-border"> </div> <div class="note-box">'''Note: '''Selecting the None option from the drop-down creates a regular third party Agreement.</div> | ||
8. '''Click '''"Select File" in the File Path field. You can select a PDF or .docx legacy file which you want to be discovered. | 8. '''Click '''"Select File" in the File Path field. You can select a PDF or .docx legacy file which you want to be discovered. | ||
| − | <div class="image-green-border">[[File:File Attributes Discover.png| | + | <div class="image-green-border">[[File:File Attributes Discover.png|720px|File Attributes Discover.png]]</div> |
| + | 9. '''Click''' Discover to view the attributes discovered from the uploaded file. | ||
| + | <div class="note-box">'''Note:''' <br/> - Using AI, there will be a mapping of the attributes that you want to get discovered from the selected legacy file. For example, if the uploaded file with a Contract Value, that value will get discovered and populated in the Contract Value field. <br/> - The attributes that you want to be discovered can also be configured.</div> | ||
9. '''Click''' "Next". <br/> 10. On the Verify page, '''click''' "Create and Publish". | 9. '''Click''' "Next". <br/> 10. On the Verify page, '''click''' "Create and Publish". | ||
<div class="image-green-border">[[File:Create and Publish.png|720px|Create and Publish.png]]</div> | <div class="image-green-border">[[File:Create and Publish.png|720px|Create and Publish.png]]</div> | ||
| Line 38: | Line 44: | ||
<div class="image-green-border">[[File:Discovered Data1.png|720px|Discovered Data1.png]]</div> | <div class="image-green-border">[[File:Discovered Data1.png|720px|Discovered Data1.png]]</div> | ||
12. '''Click''' the AI Studio menu. You can view the summary of discovered data, as well as view the details of individual entities. | 12. '''Click''' the AI Studio menu. You can view the summary of discovered data, as well as view the details of individual entities. | ||
| − | <div class="image-green-border">[[File:AI | + | <div class="image-green-border">[[File:Studio AI Dashboard.png|720px]]</div> |
You can review the discovered clauses and compare them for any deviation. | You can review the discovered clauses and compare them for any deviation. | ||
| Line 50: | Line 56: | ||
*Defer the review for a later time | *Defer the review for a later time | ||
*Compare the the discovered clause for any deviation. | *Compare the the discovered clause for any deviation. | ||
| − | <div class="image-green-border">[[File:Confirm Deviation.png|720px|Confirm Deviation.png]]</div> | + | <div class="image-green-border">[[File:Confirm Deviation.png|720px|Confirm Deviation.png]]</div> |
| + | 17. '''Click''' "Confirm with Deviation". A pop to Add Note opens. | ||
| + | |||
| + | 18. '''Add''' an appropriate note, and then '''click''' "Confirm". A deviation analysis is done.<br/> | ||
| + | <div class="note-box">'''Note: '''The deviation logic is complete only on clicking the ''Finish ''button. The Deviation count will change to 1 on the ''Deviation''s tab. The regular deviation process continues hereon.</div> | ||
== Downloading Matched Clauses to Excel == | == Downloading Matched Clauses to Excel == | ||
Latest revision as of 12:01, 19 January 2022
Contract Digitalization
ICI includes important capabilities to help you manage legacy contracts using Artificial Intelligence (AI). To manage them effectively, ICI supports the following features:
- Converting legacy contracts (PDF and Images) into machine searchable documents
- Converting unstructured contracts into structured contracts by identifying the metadata attributes (including String, Data, Date, Email, Boolean, User, and Lookup) in the contracts
- Identifying and extracting clauses from the contract
- Excel-based Bulk Upload capability that processes legacy contracts with attribute extraction in bulk
- Visual cues on AI confidence on extracted information in Excel
You can quickly find a relevant contract through search on text or metadata, and analyze the presence or absence of clauses to identify hidden risks. You can also easily perform lifecycle actions such as renewal, terminate, amend and assign, as well as perform bulk actions to comply with changing regulations.
Create Attribute for Clause Discovery
To manage legacy contracts using AI, you need to first create an attribute Clause Discovery Type.
To create an atttribute, do the following:
1. Click "Agreements" tile on the Home page. The Agreements page opens.
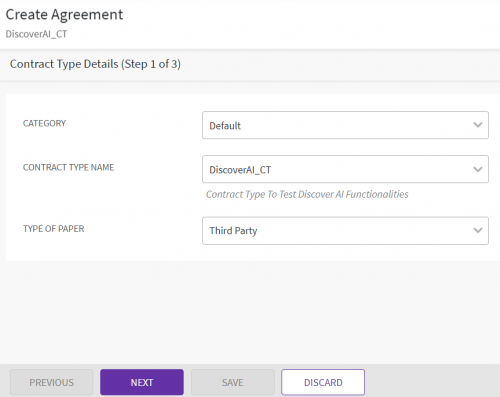
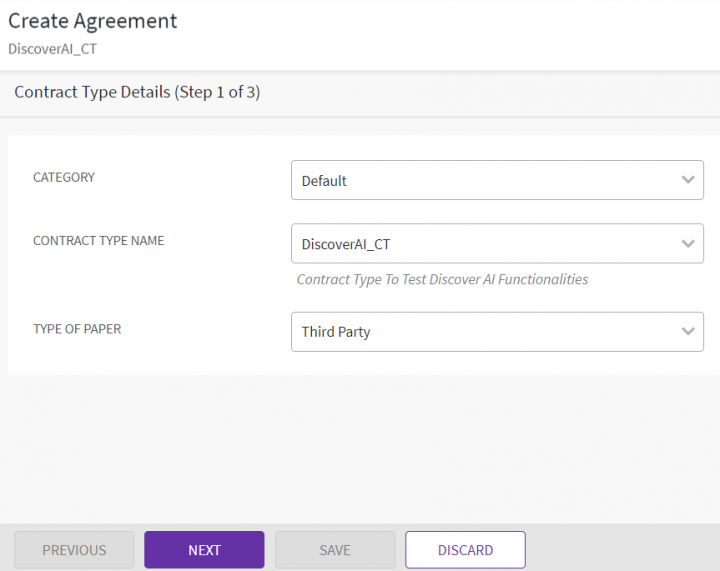
2. Click "Create" button on the Agreements page. The Create Agreement page opens.
3. Select "Category". For example, Default.
4. Select "Contract Type Name". For example, MandatoryClauseCT.
5. Select "Third Party" from the Type of Paper drop-down list.
5. Click "Next".
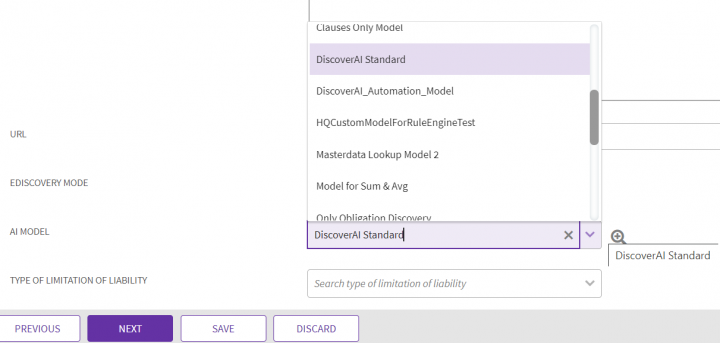
6. On the Attributes page, click AI Model (which is a mandatory field).
7. Select DiscoverAI Standard from the drop-down to use AI to discover the clauses.
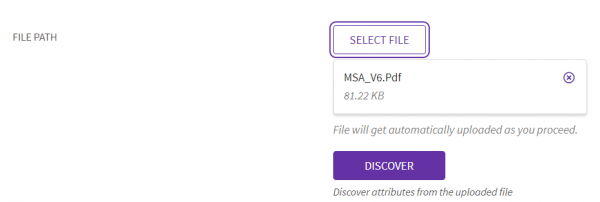
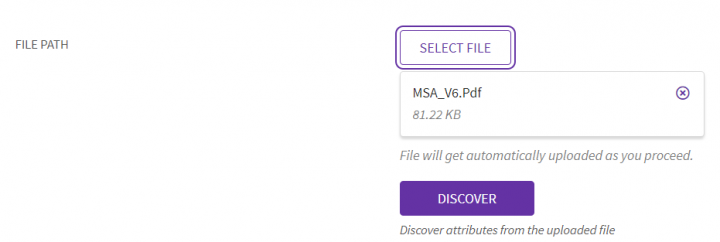
8. Click "Select File" in the File Path field. You can select a PDF or .docx legacy file which you want to be discovered.
9. Click Discover to view the attributes discovered from the uploaded file.
- Using AI, there will be a mapping of the attributes that you want to get discovered from the selected legacy file. For example, if the uploaded file with a Contract Value, that value will get discovered and populated in the Contract Value field.
- The attributes that you want to be discovered can also be configured.
9. Click "Next".
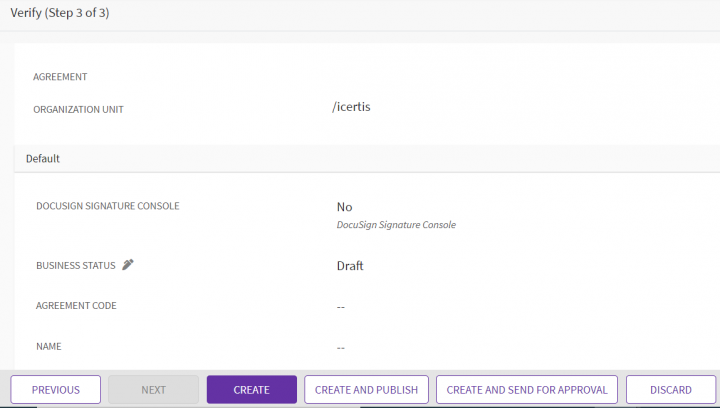
10. On the Verify page, click "Create and Publish".
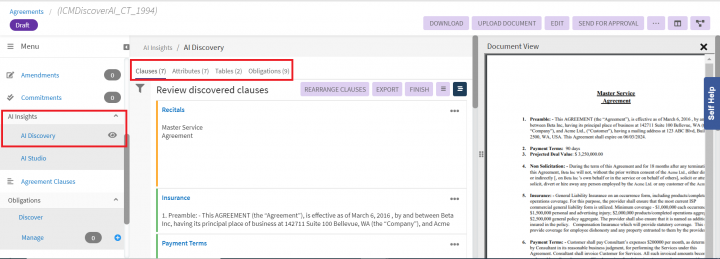
The left side menu will now have AI Insights as a new menu option. Under this menu you will notice two sub-menus AI Discovery and AI Studio
- AI Discovery: displays the metadata values of the discovered clauses from the uploaded legacy document
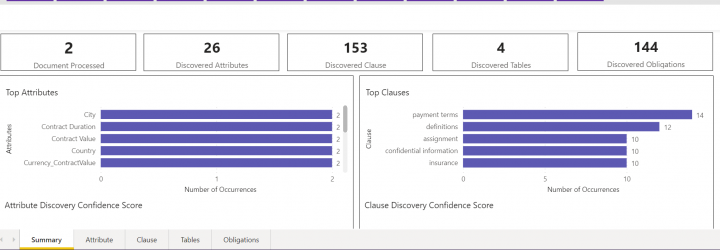
- AI Studio: is a dashboard for displaying the summary of various types of discovered clauses
11. Click the "AI Discovery" menu option. The values that have been fetched from the uploaded legacy file are displayed. You can different discovered data such as Clauses, Attributes, Tables, and Obligations.
12. Click the AI Studio menu. You can view the summary of discovered data, as well as view the details of individual entities.
You can review the discovered clauses and compare them for any deviation.
13. Click the "Elipses" button next to the Clause name. A Review button will pop-up.
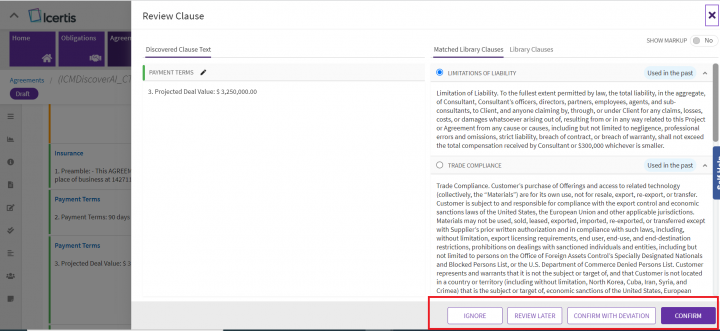
14. Click the Review button. This opens a Review Clause window.
15. You can perform the following actions on this window:
- Ignore the review
- Defer the review for a later time
- Compare the the discovered clause for any deviation.
17. Click "Confirm with Deviation". A pop to Add Note opens.
18. Add an appropriate note, and then click "Confirm". A deviation analysis is done.
Downloading Matched Clauses to Excel
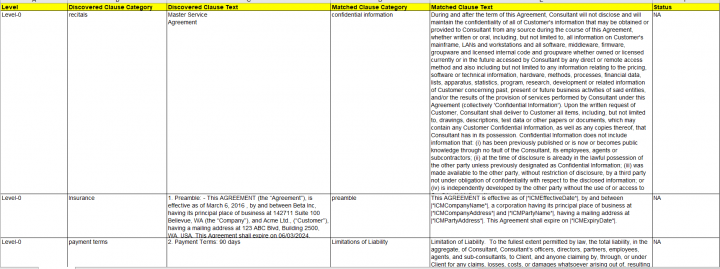
The Clauses from the uploaded document are discovered and extracted. These discovered clauses will appear on the AI Discovery menu as descibed in the above section. These clauses can be exported to Excel for convenient offline reviews as follows:
1. Click the "Export" button to download the clause data in Excel format.
Related Topics: DiscoverAI | NegotiateAI | ObligationAI | VisualizeAI
