| Line 433: | Line 433: | ||
Previously, clauses discovered through DiscoverAI followed a flat structure in which every paragraph was identified as a clause and assigned a clause category. However, in a contract each paragraph could be part of a typical hierarchy where, for example, a clause might be a combination of multiple paragraphs forming one section.<br/> With this release, DiscoverAI is being considerably enhanced to identify the different levels within a clause. Users now have a distinct visual representation of clauses with sub-sections of clauses displayed in a delineated view, during the clause discovery process. The hierarchical representation of clauses helps users to compare clause sections, sub-sections and so on.<br/> Further, any document objects which are in the agreement document but not necessarily a part of the clause language will now be identified separately and will be excluded from the actual clause discovery process. | Previously, clauses discovered through DiscoverAI followed a flat structure in which every paragraph was identified as a clause and assigned a clause category. However, in a contract each paragraph could be part of a typical hierarchy where, for example, a clause might be a combination of multiple paragraphs forming one section.<br/> With this release, DiscoverAI is being considerably enhanced to identify the different levels within a clause. Users now have a distinct visual representation of clauses with sub-sections of clauses displayed in a delineated view, during the clause discovery process. The hierarchical representation of clauses helps users to compare clause sections, sub-sections and so on.<br/> Further, any document objects which are in the agreement document but not necessarily a part of the clause language will now be identified separately and will be excluded from the actual clause discovery process. | ||
| + | |||
=== Recommendation === | === Recommendation === | ||
| − | Currently support for clause delineation is provided for documents in well- | + | Currently support for clause delineation is provided for documents in well-structured format. Hence, it is recommended to use documents in which: |
*Lists, headers, footers, tables and table of contents have been added by using MS Word functions. | *Lists, headers, footers, tables and table of contents have been added by using MS Word functions. | ||
| Line 453: | Line 454: | ||
A few examples: | A few examples: | ||
| − | <div class="image-green-border">[[File:7.14 Clause hierarchy recommendation 04.png|720px]]</div> | + | <div class="image-green-border">[[File:7.14 Clause hierarchy recommendation 04.png|720px|7.14 Clause hierarchy recommendation 04.png]]</div> |
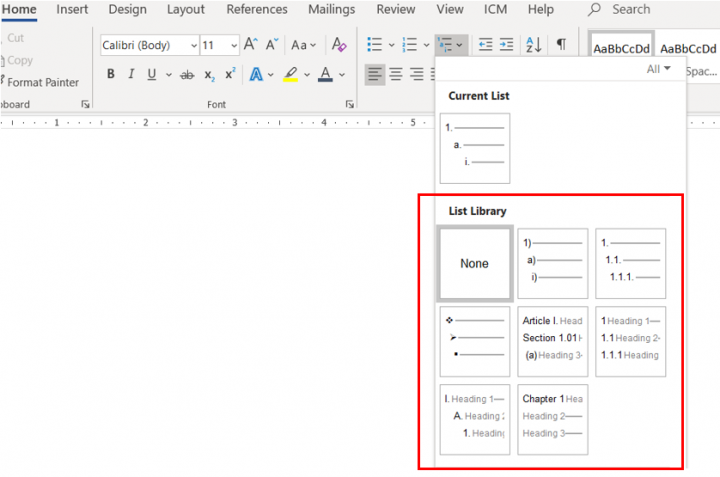
List Levels added from the MS Word List Library are supported. | List Levels added from the MS Word List Library are supported. | ||
| − | <div class="image-green-border">[[File:7.14 Clause hierarchy recommendation 05.png|720px]]</div> <div class="image-green-border"> </div> <div class="image-green-border">[[File:7.14 Clause hierarchy recommendation 06.png|720px]]</div> <div class="image-green-border"> </div> <div class="image-green-border">[[File:7.14 Clause hierarchy recommendation 07.png|720px]]</div> <div class="image-green-border"> </div> | + | <div class="image-green-border">[[File:7.14 Clause hierarchy recommendation 05.png|720px|7.14 Clause hierarchy recommendation 05.png]]</div> <div class="image-green-border"> </div> <div class="image-green-border">[[File:7.14 Clause hierarchy recommendation 06.png|720px|7.14 Clause hierarchy recommendation 06.png]]</div> <div class="image-green-border"> </div> <div class="image-green-border">[[File:7.14 Clause hierarchy recommendation 07.png|720px|7.14 Clause hierarchy recommendation 07.png]]</div> <div class="image-green-border"> </div> |
== UX revamp to display discovered entities and original document side-by-side == | == UX revamp to display discovered entities and original document side-by-side == | ||
Revision as of 09:19, 29 September 2020
Contents
- 1 DiscoverAI
- 2 Table Discovery
- 3 DiscoverAI - Support for Own Paper
- 4 Inbuilt Discovery of Attributes and Clauses
DiscoverAI
Contract Highlights
Whenever contracts are sent to CXOs, legal or finance teams for their approval or signatures, they are interested to know if a certain language is present or absent in the contract. This helps them to understand the nuances of the contracts, viewpoints of various stakeholders, etc. and they can quickly take an informed decision.
With this release,
- The DiscoverAI model can find the terms in documents and highlight them for business decision makers. Configurators can now specify the important words by the business so that the DiscoverAI model can find matching as well as similar terms in documents and highlight them for the intended audience.
- In case no phrases are specified, then ICI will identify the important sections in the contract based on learnings from historical data. The identified sections will also be ranked in order of importance.
- A configurator can also specify the maximum number of highlights to be extracted from the agreements. The AI algorithm would rank the findings and present only the top ranked highlights to the user.
- Configurators can configure the event to generate the contract highlight, for example agreement updated, etc. Using this configuration, when the specified event occurs, ICI will identify the important sections of the contract based on historical data and phrases specified by the configurator
To configure generating contract highlights from an agreement:
- Create an Agreement Contract Type using Third Party Paper. You can use an existing Agreement Contract Type as well.
- Click Next, the Attributes page opens.
- To be able to generate contract highlights from an Agreement, include the following attributes in the Agreement Contract Type:
- Contract Highlight Terms: The Data Type must be selected as String. In the Default Value attribute, enter the different terms or keywords expected in the highlight, separated by a pipe symbol. For example, Legal|Confidentiality|Liability|NoOfRecords:10.
- Contract Highlights: Here the Data Type RichTextArea must be selected.
- Create an Associated Document Contract Type, for example, ICILegalHighlights to generate contract highlights for your legal department.
- To add contract highlights in an Associated Document, include the following attributes in the Associated Document Contract Type.
- Contract Highlight Terms: The Data Type must be selected as String. In the Default Value attribute, enter the different terms or keywords expected in the highlight, separated by a pipe symbol. For example, Legal|Confidentiality|Liability|NoOfRecords:10.
- Contract Highlights: Here the Data Type RichTextArea must be selected.
To add the created Associated Document Contract Type to the Agreement Contract Type:
- On the Contract Types page, click the Agreement Contract Type created earlier. The Details page for that contract type opens.
- Click the Edit button. The Edit Contract Type wizard opens.
- Navigate to the Association tab by clicking Next.
- Click the plus icon next to Association.
- Create an Association for the Associated Document Contract Type.
- Select the created Associated Document Contract Type. You can set the Allow Multiple Instance option to Yes, to allow different contract highlight associated documents to be created for different departments, such as legal or finance.
- Create a template for the Associated Document.
- Create a Template Selection Rule for the Associated Document.
- Create an Event Rule with the action AITriggerContractHighlights.
- To get the contract highlights in the Associated Document, you need to create an Association with the Parent Agreement.
- Click Next. The Meta Data page opens.
- Enter the keywords in the Contract Highlight Terms. For example, CEO|Liabilities | Amount |Penalty |obligation| regulation| price| jurisdiction|NoOfRecords:10.
- Add NoOfRecords:n where 'n' denotes the number of contract highlights to be extracted. The default is NoOfRecords:20, if the value of n is not specified in the keywords.
- When an Agreement created using the selected Agreement Contract Type is published, the configured contract highlights will be extracted and compiled in the Associated Document.
Bulk Upload with Clause Discovery
To upload Agreements in bulk:
1. Click Agreement Management > Agreements on the dashboard. The Agreement Management page opens. Let us take an example of an Agreement Contract Type (CT1) that should have already been created and published.
2. Click Bulk Actions > Bulk Actions on the dashboard. The Bulk Action Management page opens.
3. Click Add Batch. The Add Batch pop up window opens.
4. Click the Select Batch File button to select the file for a bulk upload. In this example, we are selecting the LegacyBulkUpload.zip file.
- The Meta.xlsx files contains data related to ContractType (CT1 in this case), CTTypeofContract (Agreement Contract Type), Technical Name of the Attributes present in the Contract and Display Name of the Attributes.
- The Data.xlsx files contains all the Attributes in Contract Type (CT1) as a column name in which the data gets auto-populated from the PDF/docx file. User needs to add the Bulk Upload Business Status is Executed and the file name under File Path column in Data.xlsx file. 5. Click the Submit button. The File Uploaded Successfullymessage is displayed.
5. Click the Submit button. The File Uploaded Successfully message is displayed.
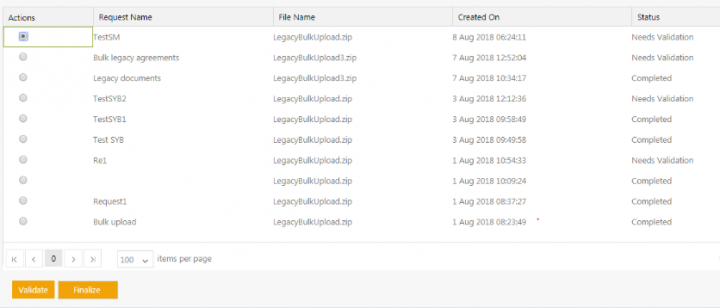
6. Click OK. The file is now displayed in the Grid view with the status Not Started.
7. Click Refresh icon twice. On first Refresh, the Status changes to In Progress and then to Needs Validation.
8. Select an Actions radio button for the file that you want to finalize. The Validate and Finalize buttons are enabled.
9. Click the Validate button to download the PopulatedData.xlsx file. The values of the Attributes can be edited in this file.
Note: The data in the Excel sheet that is marked green signifies the highest confidence level, data in yellow indicates medium confidence level and data in red indicates lowest confidence level. You can then make any changes to the Attribute values. (In this example, you can make changes to the Attribute value from the downloaded PopulatedData.xlsx file).
10. Click Save to save the changes.
11. Click the Finalize button, the PopulatedData.xlsx file can be uploaded. The Finalized File Uploaded Successfully message is displayed.
12. The Needs Validation status changes to Completed.
13. Click the Agreements tile to view the Agreements which will be in the Draft state.
Table Discovery
Along with clauses and metadata, ICI also extracts tables (including information such as SLAs, price list, etc.) in Agreements and displays them on the Tables tab (on the Details page). ICI tries to match the discovered table(s) with the Associated Contract Types of the Agreement. If a strong match is found, then the table is tagged with that Associated Contract Type, and the table columns are also matched with the Attributes of that Associated Contract Type.
You can then take relevant action such as creating new instances of the Associations. Automatically recognizing table data inside the Agreements saves a lot of manual labor of identifying and tagging the data correctly.
The table discovery allows you to:
- Identify and discover the table(s) in the Agreement Document
- Update the data in the discovered table as required
- Create new instances of the Associations for the uploaded Agreement
The table discovery in PDF agreements works well with:
- Tables with well-defined borders in text PDFs and high-quality scanned PDFs
- Tables that may be slightly skewed or tilted
- Table cells with light-colored backgrounds
The table discovery in PDF agreements may not work well with:
- Tables in low-quality scanned PDFs and those without borders
- Tables without well-defined borders or characters overlapping the table border, etc., due to certain OCR limitations
- Certain non-table elements, such as flowcharts and diagrams
- Tables with merged columns and rows
- Nested tables, which may be discovered as multiple tables
Discovering Tables in an Agreement
To discover tables in an Agreement:
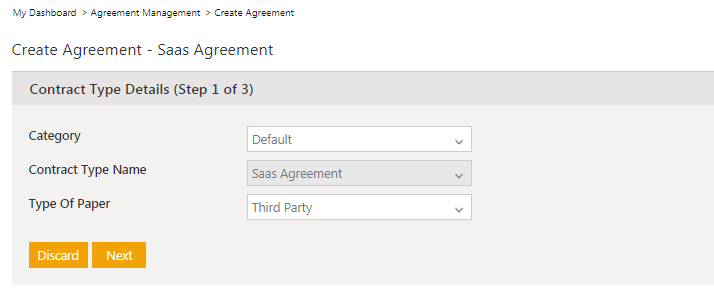
1. Create an Agreement (Third Party Type Of Paper).
2. Ensure that the Clause Discovery functionality is turned On and the Contract Type is enabled for table discovery.
3. Create and Publish the Agreement. ICI automatically queues the Agreement for table discovery.
Viewing Discovered Tables in an Agreement
You can view all the discovered tables in an Agreement, so that you can review them and take actions as needed (based on whether they meet the criteria for creating an associated document or not).
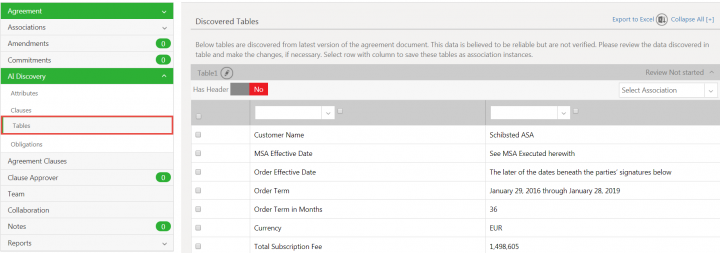
1. Click the Tables tab on the uploaded Agreement Details page.
2. ICI displays a list of the Discovered Tables for that Agreement Document.
Editing Table Data
1. Click the Edit Table Name icon next the table that you want to edit. For example, Table 2.
2. Toggle the Has Header button toYes if you want the table to have a header.
3. Click inside the header box to add the header name. For example, PSE Workers, Term, etc.
4. Click inside each of the boxes to add data in the columns. For example, 3.0 (Version), 09 Sep, 2019 (Date Released), etc.
5. Click Save Changes to save changes if you want to review or edit them later. The Table data saved message is displayed.
6. Select the Association for which you want to create this data from the Select Association drop-down. For example, Payment Details.
7. A validation message is displayed to check if you want to save the updated data. Click Save to update the data in the table, else click Discard.
8. Select the checkbox for the rows and columns that you want to update.
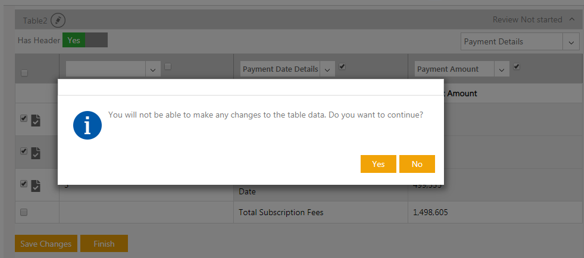
9. Click Finish. A validation message is displayed informing you that you will not be able to make any changes to the table data after this.
10. Click Yes if you are sure that you want to update the table and proceed.
11. A message is displayed indicating that the table data is saved and the Associations are being created. Click Yes if you are sure that you want to update the table and proceed, else click No.
12. You can view the associations on the Associations tab.
13. Click View Record to view the details of the individual records.
14. You can take further action as needed. For example, send it for Approval.
Selecting the Type of Table to be able to create Associations for it
You can create Associated Documents using the data in the discovered tables. You are basically discovering the Associated Document type and the columns associated with that document type.
To do so:
1. Click the Tables tab on the uploaded Agreement Details page.
2. In the Discovered Tables window when matching data is present, the exact Associations with that table are discovered. For example, the Payment Details are discovered. These are associated and the names of the header are also discovered.
3. You can select whether the table should have a header or not by enabling the Has Header flag to Yes.
By doing this, the first row of the table will be marked as the header and Associations will not be created for it. If there are 2 rows other than the header, then 2 Associations will be created. A green tick mark will be displayed next to them which means that they are successfully created in the Tables tab.
4. In the Discovered Tables window, make changes in the table as required. For example, select 3 rows and columns.
Saving the changes of the Table Discovery for the Agreement
You can save the interim progress of the Table Discovery for an Agreement, so that you can review it later by:
1. Click Save Changes. The Table data saved message is displayed.
Finishing the Table Identification for an Agreement
You can complete the Table identification for an Agreement, so that the identified tables become part of the Agreement.
1. Click Finish. A message will be displayed indicating that you will not be able to make any changes to the table data.
2. Click Yes if you are certain that you want to make the changes, else you can save changes and review them later.
3. Click the Associations tab to see the Associations that are discovered, as shown in the screenshot below:
4. Click the Payment Details association to view the details and send for approval.
5. Click Export to Excel if you want to export the table that has been discovered.
Note:
- Once the Associations are created, you cannot make any changes to the table. The table is disabled and the status changes to Review Completed.
- It is not necessary to match every table to one of the association contract type. You can still make changes to such tables and download them using ‘Export to excel’ functionality.
DiscoverAI - Support for Own Paper
ICI already leverages the DiscoverAI app to discover attributes, clauses, tables and obligations in agreements created using third party paper type.
Now, ICI has extended the support to discover attributes, clauses, tables and obligations in agreements created using own paper type, and tagging the attributes and clauses to the original agreement document. This helps convert unstructured documents into structured agreements, making it easier to manage and also increase compliance.
Note:
- Tagging is supported only in Word documents.
- The attributes and clauses that have been confirmed in ICI (even on the web UI) are tagged back in the agreement document.
Discovering Attributes, Clauses, Tables and Obligations
To discover attributes, clauses, tables and obligations using own type of paper:
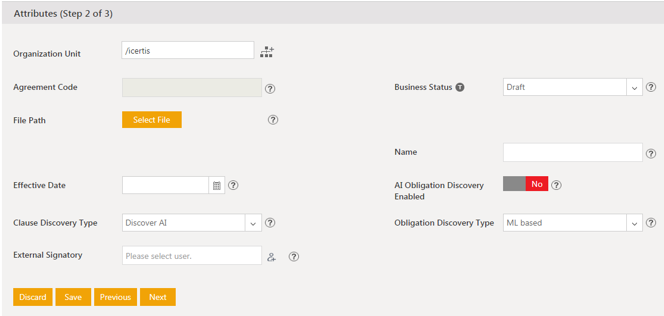
1. Create an agreement using Own Type of Paper.
2. Click Next. The Attributes page opens.
3. Select Discover AI from the Clause Discovery Type drop-down and ML based from the Obligation Discovery Type drop-down.
4. Click Next. The Select Template page opens.
5. Select a template or upload a file.
6. Click Next.
7. Click Create and Publish. The agreement Details page opens.
All non-tagged attributes, clauses, tables (if present in the agreement document) and obligations (if you select the value in the Obligation Discovery Type drop-down) are discovered.
Tagging Discovered Attributes
1. Click the Attributes tab.
2. Click Save to confirm the attributes. You can also modify the discovered attribute values by clicking the View potential matching values icon and then click Save.
The AI model will learn and recommend values when:
- The discovered attribute value is incomplete, and the user selects the complete value, such as selecting the complete address line if the system has discovered only partial address
- Manual corrections are made to incorrectly identified attribute values, such as correction in vendor name
- A different attribute value is selected using the Keep selected text option
The newly learnt values will, from thereon, be presented as default to the user and any changes will continue to be learnt and recommended by the AI model.
3. The Metadata Save Confirmation message is displayed.
4. Click the Versions tab.
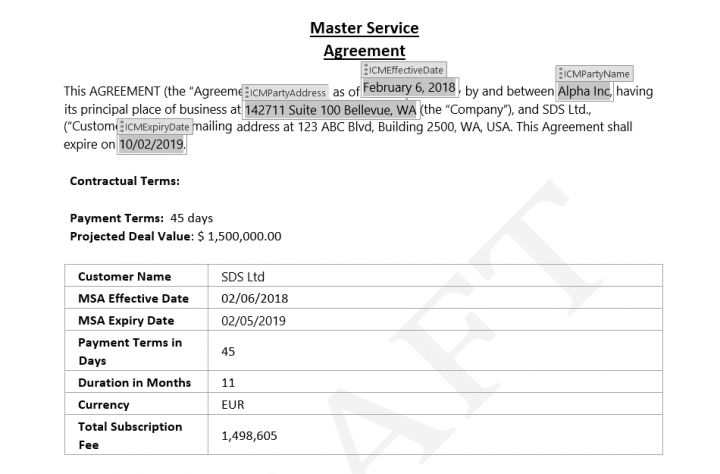
5. Download the latest version of the agreement in Word format. The discovered attributes are tagged as ICI attributes in the agreement document, as shown in the screenshot below:
Tagging Discovered Clauses
1. Click the Clauses tab. The discovered clauses are displayed.
2. Take actions (such as Confirm, Confirm with Deviation, Ignore, Review Later) on the discovered clauses.
3. Click Finish to complete the review process, as shown in the screenshot below:
4. Click the Versions tab. A new version of the agreement is created in both Word and PDF formats.
5. Download the latest version. The confirmed clauses are tagged as ICI clauses in the agreement document.
Note:
- If you create a new agreement and upload the Word document that was downloaded in Step 5, the discovery will be triggered, however the clauses that were already confirmed and tagged as ICI clauses are not displayed.
- Only when the agreement is published, the clauses that you confirm on clicking Finish will be saved as ICI clauses and displayed in the Agreement Clauses tab on the Details page.
- A new agreement version is created each time you save the discovered attributes and confirm the clauses by clicking Finish.
Inbuilt Discovery of Attributes and Clauses
Previously, discovering attributes and clauses in customers’ agreement documents was time consuming as it required retraining of the algorithms from scratch, causing delay in deployment of services.
Now, ICI has an inbuilt discovery model that helps to automatically extract and discover the most common attributes and clauses in agreements besides enhancing clause delineation in third party contracts. This facilitates the prediction of accurate clause categories and capturing the right metadata within clauses. This improves contract turnaround time and quality of results, thus leading to improved user experience.
The inbuilt discovery model supports the discovery of the following predefined attributes and clauses in any MSA, NDA and SOW third party paper contract types:
- Attributes: Party Name, Party Address, Effective Date, Expiry Date, Contract Value, Contract Duration, Renewal, EverGreen, PaymentTerms, Jurisdiction, Governing Law, Notice Period For Termination, LiabilityType and ComplianceType
Note: The Contract Value attribute supports the following currencies - USD, CAD, EUR, INR and CAN
- Clauses: Amendment, Assignment, Audit, Confidential Information, Conflicts, Counterparts, Definitions, Dispute Resolution, Entire Agreement, Force Majeure, Governing Law, Indemnification, Insurance, Intellectual Property Rights, Limitation Of Liability, Non-Compete, Non-Solicitation, Notices, Payment Terms, Penalties/Remedies, Personnel, Preamble, Publicity, Relationship Of Parties, Representations, Warranties and Compliances, Severability, Signature, Survival, Taxes, Term, Termination, Waiver, Deemed Acceptance, Acceptance Criteria, Rejection Remedy, Cost of Living Adjustments, Most Favored Customer, Use of Third Party Software, Exclusivity, Subcontract, Technology Escrow, Governance Schedules, Termination Assistance, Change Control, Non Circumvention, Rebates and discounts, Fixed Liability, No Liability and Uncapped
The discovery support has been further extended for URL datatype attributes. DiscoverAI would be able to discover the URLs in contract and associate them with URL datatype attribute. Also, users now would be able to select and save multi-choice attributes as well as multi-choice lookup datatypes on the Attributes Discovery page.
With this release, identification of the following attributes in the document has additionally been introduced: City, State, Zip, Point of contact – Name, Point of contact – Title, Point of contact – Email and Point of contact – Phone.
Discovering Common Attributes and Clauses
1. Create an agreement using Third Party Type of Paper.
2. Click Next. The Attributes page opens.
3. Upload a file and click Next.
4. Click Create and Publish. The agreement Details page opens.
The most common attributes and clauses from the agreement document that you uploaded in Step 3 are discovered and displayed in the Attributes and Clauses tab, as shown in the screenshots below for Attributes and Clauses respectively:
Attributes:
- Click the View potential matching values icon next to the discovered attribute values to take actions on them such as Accept, Reject or Keep Selected Text.
- The attribute values are normalized and displayed based on the defined rules. For example, the Effective Date is displayed in the ICI-supported format, as shown in the screenshot below:
Clauses:
- You can filter clauses based on Action Status, Clause categories and Confidence.
- The level of confidence associated with Discovered Clauses is displayed using different color indicators to depict High (green), Medium (orange) and Low (pink) confidence. All discovered clauses have the Review link next to them until you click it to take an action (such as Confirm, Confirm with Deviation, Ignore or Review Later). In addition, clauses with obligations have the
icon next to them. You can click the icon to view the obligations.
- Click the Finish button to complete the review process.
eDiscovery using AI
With this release, we are now introducing a framework using Artificial Intelligence to automatically identify and analyze clauses in the legacy contract. This will help contract owners to leverage existing documented clauses and derive insights from them.
With eDiscovery using AI:
- ICI can automatically confirms certain discovered clauses, so that users do not have to confirmed them manually
- Auto confirmed clauses can be searched same as any other agreement clauses.
- Contract owners can distinguish between automatically confirmed clauses and those that have been manually confirmed. This helps contract owners to treat automatically confirmed clauses with extra precaution as compared to standard clauses.
- Configurators can now specify list of clauses by the agreement contract types which should be discovered and confirmed automatically.
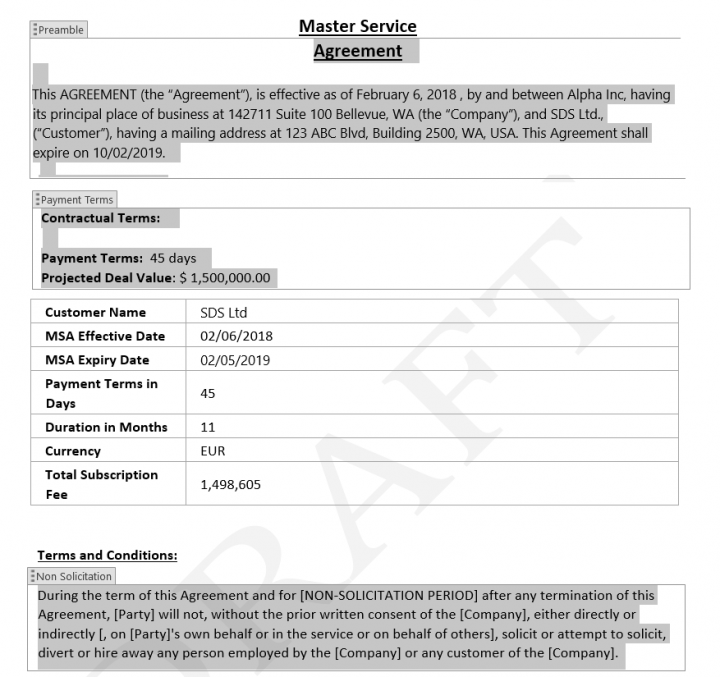
- While auto confirming, ICI compares the discovered clause text with the clauses in the clause library. If the clause text matches more than a threshold value (say 70%) with clause in clause library, then discovered clause is identified as the clause library clause. If the match percentage is lesser than the threshold then clause is identified as one of the standard ICI AI clause category.
This feature is available in ICI through a technical configuration. To configure the eDiscovery of clauses:
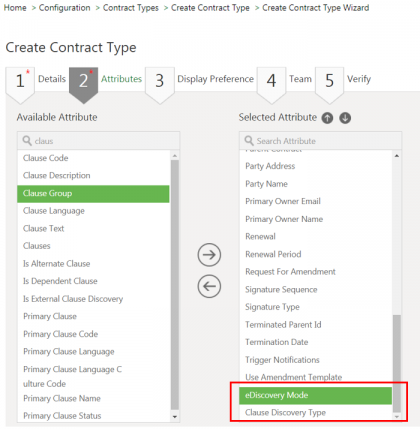
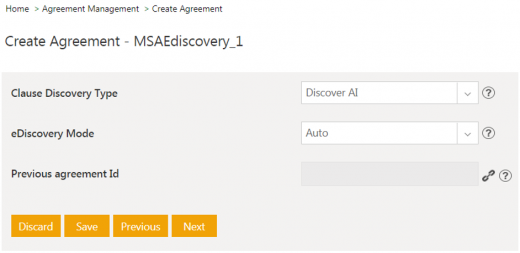
- Configure an Agreement Contract Type specific to eDiscovery. While configuring the attributes for the agreement contract type, the eDiscovery Mode and Clause Discovery Type attributes must be added.
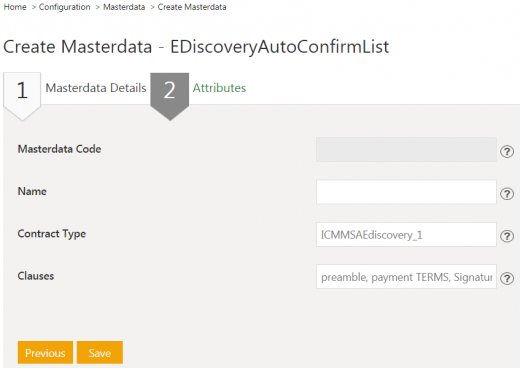
- Configure a Masterdata Contract Type named EDiscoveryAutoConfirmList. It should contain two attributes:
- Contract Type (Datatype: String)
- Clauses (Datatype: String)
- Create Masterdata using the newly created Masterdata Contract Type. While configuring the Masterdata:
- Specify the Contract Type name for eDiscovery (created in Step 1).
- Specify the Clauses that need to be auto-confirmed post eDiscovery, for example preamble, payment terms andsignature.
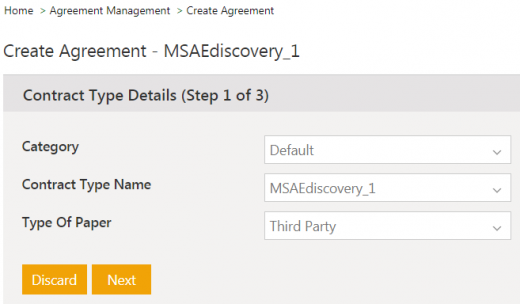
- Create an Agreement using a contract type configured for eDiscovery.
- Click Next, the Attributes page opens.
- Select an Agreement file.
- Select the Clause Discovery Type as Discover AI.
- Select the eDiscovery Mode.
The eDiscovery Mode attribute has 3 options: None, Auto andManual Review.
- Auto: By selecting this option, the clauses will get auto-confirmed and added as agreement clauses. The user will not have an option to review the discovered clauses.
- Manual Review: By selecting this option, the clauses will only be confirmed, and the user still has the option to go to each clause and ignore or confirm these clauses. These clauses will be added as agreement clauses only when the user clicks the Finish button.
- None: By selecting this option, the user can opt out of eDiscovering clauses in the agreements.
- Click Create and Publish.
- Go to the Agreement Details page.
- In the AI Discovery tab, click Clauses to trigger the Clause Discovery.
- Once the discovery of the clauses is complete, the AI model will try to match the discovered clause with the clauses in the clause library. If a match score is greater than the set threshold, then the discovered clause is identified as a clause from the clause library. Otherwise it will be identified as one of the default AIML clause categories.
Support for additional languages in AI apps
The discovery models have now been enhanced to support clause and obligation discovery for the following additional languages – German, Spanish and Portuguese, to meet the needs of our customers.
With this release:
- Additional language support is available in NegotiateAI and DiscoverAI for legacy migration.
- Discovered clauses and obligations are displayed and then linked back to the matching text in original document.
- Identified clause and obligation categories/ sub-categories are displayed in user preferred language on the UI.
- While discovering or matching the clause from clause library, document language is taken into consideration.
- The additional languages are supported while discovering similar clauses.
Supporting clause hierarchy in agreements in .docx format
Previously, clauses discovered through DiscoverAI followed a flat structure in which every paragraph was identified as a clause and assigned a clause category. However, in a contract each paragraph could be part of a typical hierarchy where, for example, a clause might be a combination of multiple paragraphs forming one section.
With this release, DiscoverAI is being considerably enhanced to identify the different levels within a clause. Users now have a distinct visual representation of clauses with sub-sections of clauses displayed in a delineated view, during the clause discovery process. The hierarchical representation of clauses helps users to compare clause sections, sub-sections and so on.
Further, any document objects which are in the agreement document but not necessarily a part of the clause language will now be identified separately and will be excluded from the actual clause discovery process.
Recommendation
Currently support for clause delineation is provided for documents in well-structured format. Hence, it is recommended to use documents in which:
- Lists, headers, footers, tables and table of contents have been added by using MS Word functions.
- All the items added in the list are linked to each other. Appropriate MS Word styles must be used for creating lists like numbering and so on.
- List of the entire clause block are created at the same time. No changes should be made manually.
- Appropriate indentation has been given as per level while designing the layout. Indentation of parent clauses must be lower than child clauses.
- Document lists have been added using MS Word functions and should be updated automatically if there is any deletion / addition.
- Document should not have any field which is not linked to other MS Word fields using Word functionality.
Note:
- Manually added lists are currently not supported.
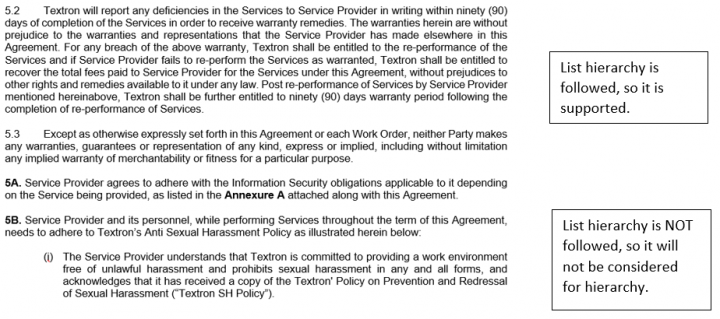
- Numbering format must be uniform across a clause. If there is any change in the numbering style, then it will be treated as a different clause even though MS Word styles have been used.
- Free text added without linking it to a parent list level, will not be considered for hierarchy.
- Headers edited manually are currently not supported, they will be treated as blank.
A few examples:
List Levels added from the MS Word List Library are supported.
UX revamp to display discovered entities and original document side-by-side
Previously, contract negotiators had to periodically visit the AI discovery section to check for discovery completion. Then, they had to switch to the Document View in order to review the recommendations given by the AI algorithm.
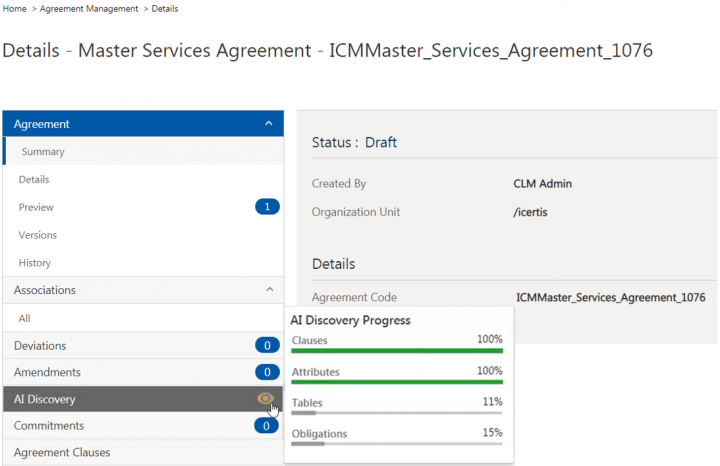
With this release, when contract negotiators trigger the discovery process, they can readily view the progress of AI discovery within the agreement details page.
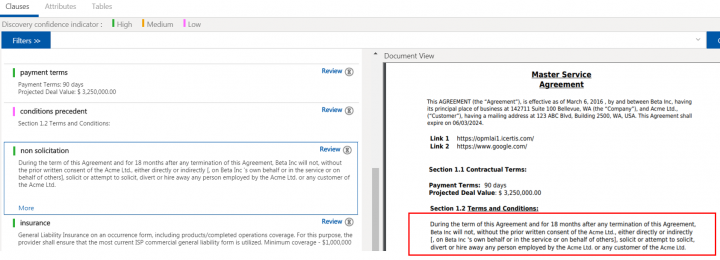
When the discovery for one of the entities is complete, contract negotiators will now have an option to launch an interface in a new tab/window where the discovered clauses, attributes, tables and obligations are displayed alongside the agreement document. On clicking any of the discovered entities, the system automatically scrolls to the page where that entity is present in the document.
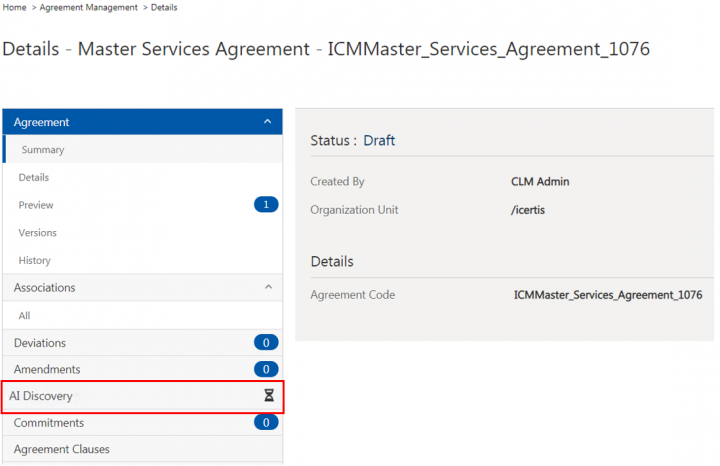
- Create an agreement in ICI. The discovery process is automatically triggered for the agreement and the agreement Details page is displayed. The AI Discovery tab shows an hourglass icon to indicate that the discovery is in progress.
- Hover over the hourglass icon to view the discovery progress in percentage. If the discovery is complete for one or more than one entities, the View icon is displayed.
- Click the View icon. A new page opens, displaying tabs for the discovered Clauses, Attributes, Table and Obligations, with a parallel view of the agreement document for each entity. The Clauses tab is displayed first by default.
- Click on the clause which you want to review, for example License/Grant of License. The Document View section displays the page of the document where this clause is present.
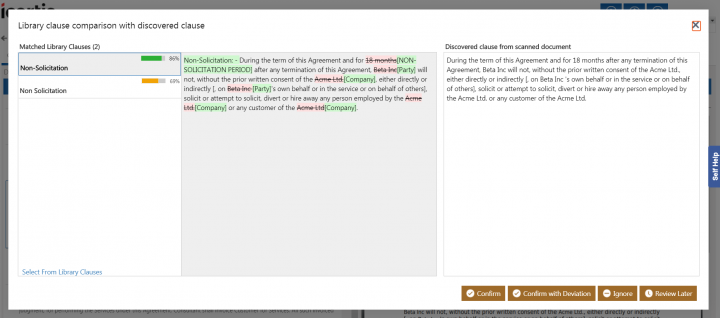
- Click Review on the clause you want to review, for example License. The Library clause comparison with discovered clause window opens.
You can review an entire section as a clause or review each sub-section separately and confirm each as a separate clause.
- Take actions (such as Confirm, Confirm with Deviation, Ignore, Review Later) on the discovered clauses.
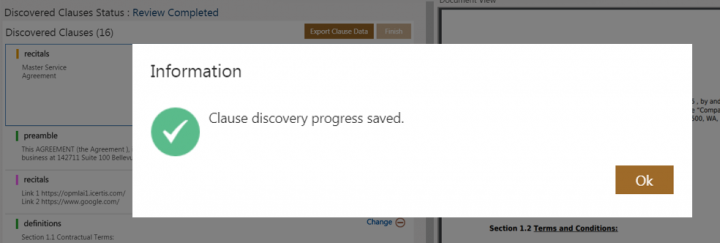
- Click Finish to complete the review process. The Clause discovery progress saved message is displayed and the Discovered Clauses Status changes to Review Completed.
- Click Ok.
- Click Export Clause Data if you want to export the clause which has been discovered.
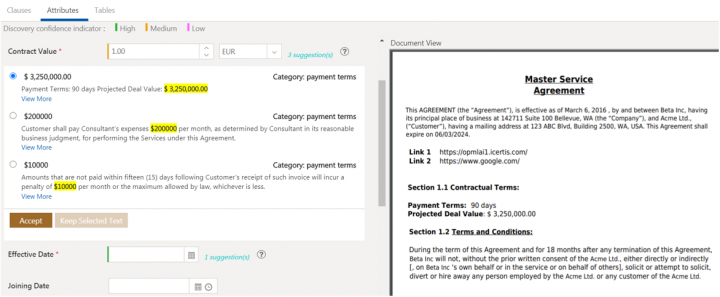
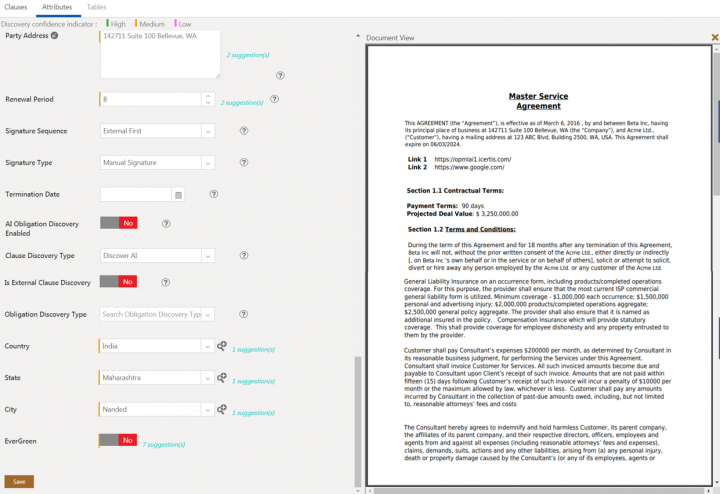
- Click the Attributes tab. Similar to clauses, the discovered attributes and document are displayed in a parallel view. The Document View section displays the page of the document where the attribute is present.
- Available suggestions will be displayed for the discovered attributes. Click the suggestions, for example 3 suggestion(s) to view the potential matching values.
- Select the appropriate value, for example $ 3,250,000.00.
- Click Accept to add the value to the respective attribute, for example Contract Value.
- Click Save. The Your data has been saved successfully message is displayed.
- Click Ok.
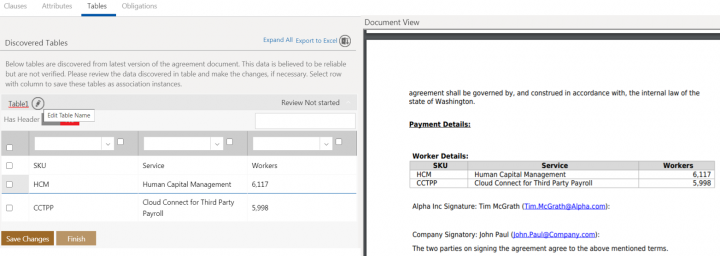
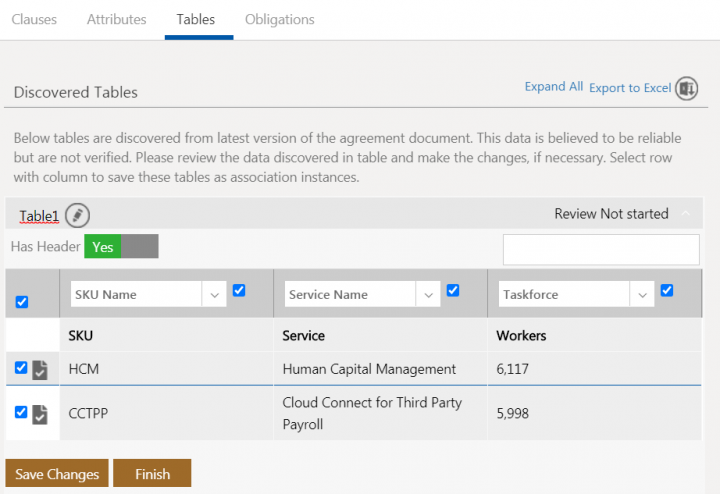
- Click the Tables tab. Similar to attributes, the discovered tables and document are displayed in a parallel view. The Document View section displays the page of the document where the table is present.
- Click the Edit Table Name icon next the table that you want to edit. For example, Table 1.
- Toggle the Has Header flag to Yes if you want the table to have a header.
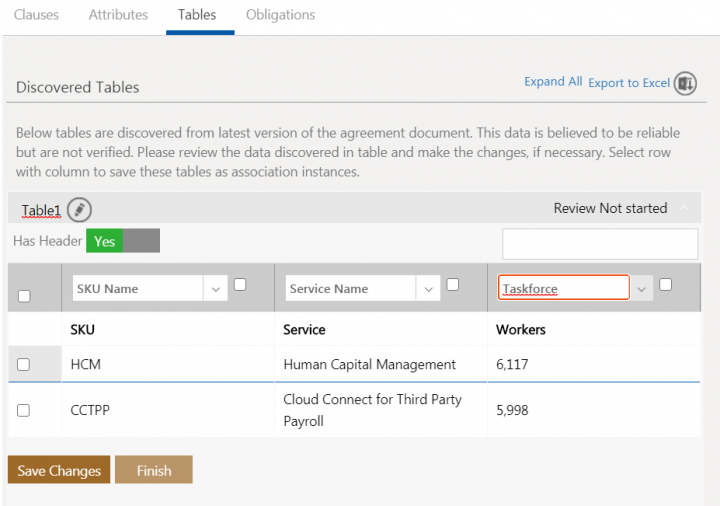
- Click inside the header box to add the header name. For example, SKU Name, Service Name, etc.
- Click inside each of the boxes to add data in the columns. For example, HCM (SKU), Human Capital Management (Service), etc.
- Select the checkbox for the rows and columns that you want to update.
- Click Save Changes to save changes if you want to review or edit them later.
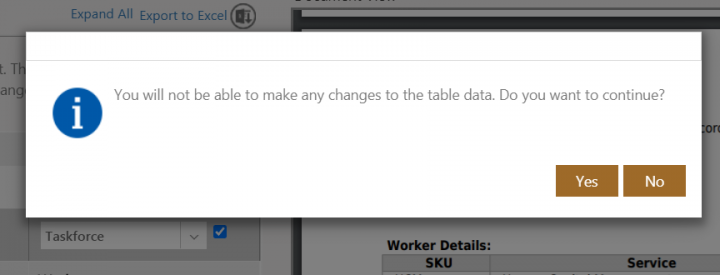
- Click Finish. A validation message is displayed informing you that you will not be able to make any changes to the table data after this.
- Click Yes if you are sure that you want to update the table and proceed.
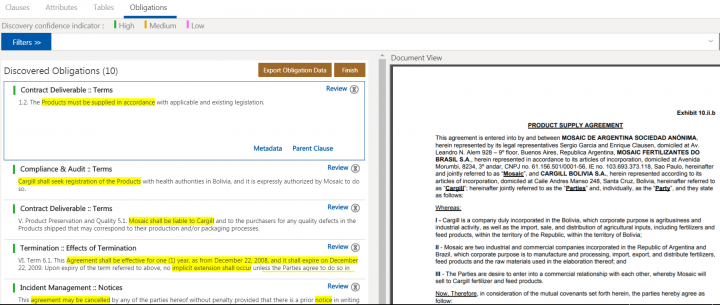
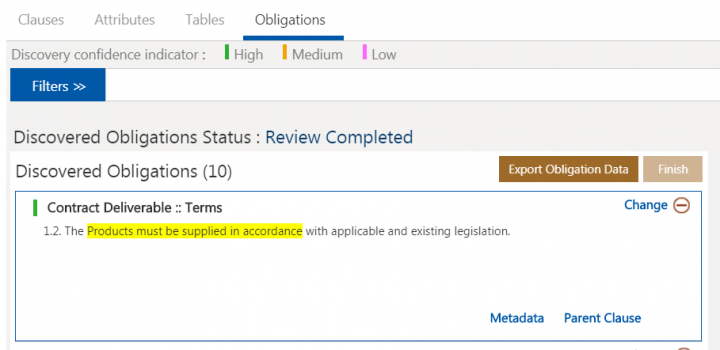
- Click the Obligations tab. Similar to tables, the discovered obligations and document are displayed in a parallel view. The Document View section displays the page of the document where the obligations are present.
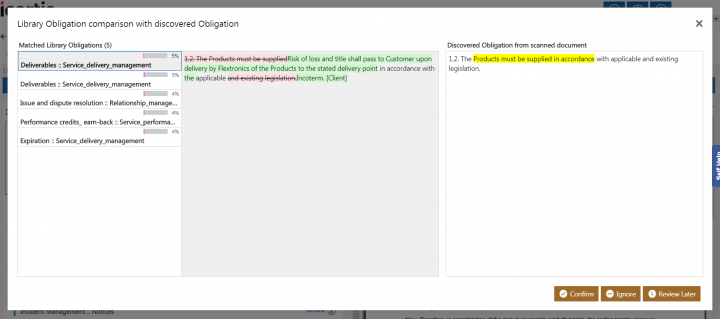
- Click Review on the obligation you want to review. The Library Obligation comparison with discovered Obligation window opens.
- The following actions can be taken on selected Obligation:
- Click Confirm to confirm the Obligation.
- Click Review Later if you are unsure and want to review the Obligation later.
- Click Ignore to ignore the Obligation.
- Click Metadata to view all the discovered metadata. The number (for example, 10.10) indicates the number of Attributes that are discovered such as Email, Numbers, Date and Time, and so on.
- Click Parent Clause to see the parent Clause that the Obligation is linked to.
- Click Export Obligation Data to export the Obligation information to an Excel file.
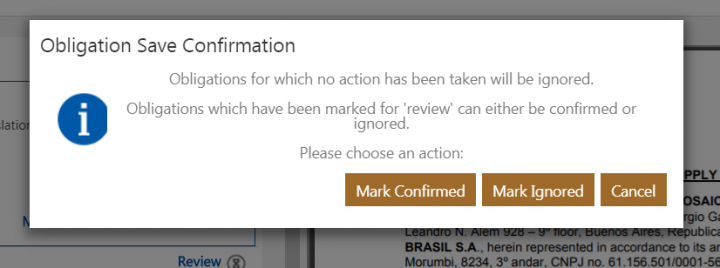
- Click Finish to complete the review and continue with the workflow as expected. The Obligation Save Confirmation window opens.
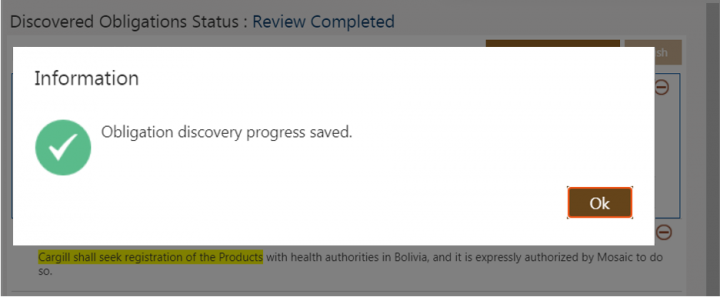
- Click Mark Confirmed, Mark Ignored or Cancel as required. The obligations are marked as Review Completed and the Obligation discovery progress saved message is displayed.
- Click Ok.
- Click Export Obligation Data to export the Obligation information to an Excel file.
Using Filters
Click Filters on the clauses tab. The Document View tab minimizes and the filters panel is displayed.
- You can filter clauses as well as obligations based on Clause/Obligation categories, Confidence and Review Status.
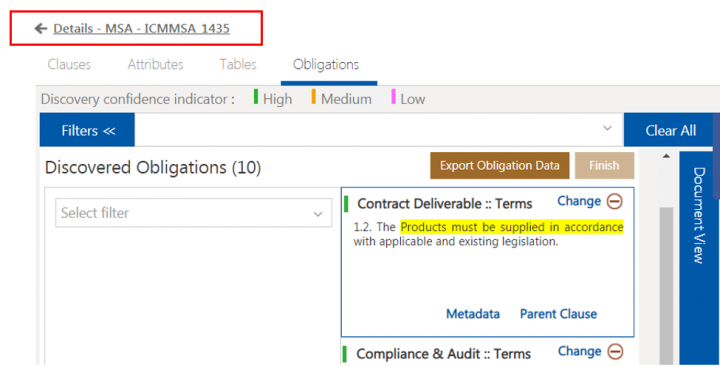
- The level of confidence associated with Discovered Clauses/Obligations is displayed using different color indicators to depict High (green), Medium (orange) and Low (pink) confidence. All discovered clauses have the Review link next to them until you click it to take an action (such as Confirm, Confirm with Deviation, Ignore or Review Later). In addition, clauses with obligations have the icon next to them. You can click the icon to view the obligations.
- Click the Finish button to complete the review process.
- Click the link above the tabs to go back to the agreement Details page.
Related Topics: Agreement Management | Obligation Management | Managing US Federal Contracts using ICI | Contract Digitalization | NegotiateAI | ObligationAI | VisualizeAI


