| Line 399: | Line 399: | ||
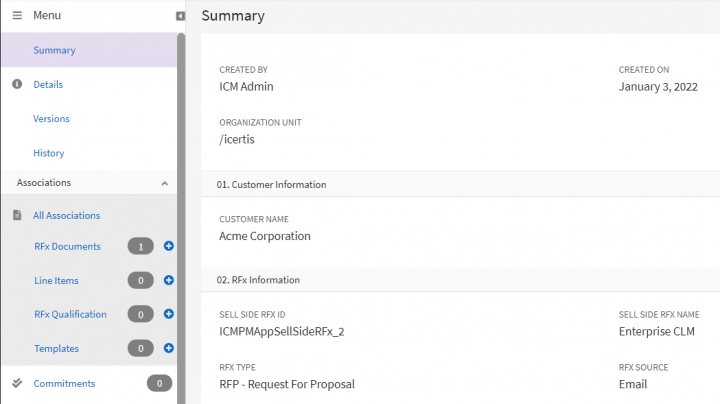
For example, the Sell Side RFx, Enterprise CLM, is expired as its Bid Proposal submission deadline date - April 27, 2022 has already passed. | For example, the Sell Side RFx, Enterprise CLM, is expired as its Bid Proposal submission deadline date - April 27, 2022 has already passed. | ||
| − | <div class="image-green-border"> | + | <div class="image-green-border">[[File:8.1pmapp23.png|600px]]</div> |
=== <br/> Making a Bid Decision === | === <br/> Making a Bid Decision === | ||
| Line 409: | Line 409: | ||
There can be only one RFx qualification for a Sell Side RFx. | There can be only one RFx qualification for a Sell Side RFx. | ||
| − | <div class="image-green-border"> | + | <div class="image-green-border">[[File:8.1pmapp24.png|720px]]</div> |
Based on the company’s objectives, the Sell Side RFx is qualified for a decision to bid or not to bid. The sales team of the organization can mention the Bid Decision details for a Sell Side RFx in an “Awaiting Qualification” status by creating an RFx Qualification association. There can be only one RFx qualification for a Sell Side RFx. | Based on the company’s objectives, the Sell Side RFx is qualified for a decision to bid or not to bid. The sales team of the organization can mention the Bid Decision details for a Sell Side RFx in an “Awaiting Qualification” status by creating an RFx Qualification association. There can be only one RFx qualification for a Sell Side RFx. | ||
| Line 465: | Line 465: | ||
Selecting the RFx Qualification option navigates the user to the “RFx Qualification” index page, where a list of qualified RFx is displayed. This option is visible only to users who have “View” or “Manage” access to the RFx qualification. On selecting a record, the user is directed to the “RFx Qualification Details” page that provides information such as Bid Decision details, Versions, History, Team, Notes, etc. in the left navigation pane. | Selecting the RFx Qualification option navigates the user to the “RFx Qualification” index page, where a list of qualified RFx is displayed. This option is visible only to users who have “View” or “Manage” access to the RFx qualification. On selecting a record, the user is directed to the “RFx Qualification Details” page that provides information such as Bid Decision details, Versions, History, Team, Notes, etc. in the left navigation pane. | ||
| − | <div class="image-green-border">1. '''Click '''“Proposals” > “RFx Qualification” from the “Home” page. The saved search result for RFx Qualifications is rendered displaying all RFx Qualification records.< | + | <div class="image-green-border">1. '''Click '''“Proposals” > “RFx Qualification” from the “Home” page. The saved search result for RFx Qualifications is rendered displaying all RFx Qualification records.</div> <div class="image-green-border"> </div> <div class="image-green-border">[[File:8.1pmapp26.png|720px]]<br/> <br/> 2. '''Click '''the View Record icon corresponding to the RFx Qualification you want to open.</div> <div class="image-green-border"> </div> <div class="image-green-border">[[File:8.1pmapp26-2.PNG|720px]]</div> <div class="image-green-border"> </div> <div class="image-green-border">The RFx Qualification Details page opens.<br/> <br/> [[File:8.1pmapp27.png|720px]]</div> |
| − | 2. '''Click '''the View Record icon corresponding to the RFx Qualification you want to open. | + | |
| − | <div class="image-green-border"><image></div> <div class="image-green-border"> </div> <div class="image-green-border">The RFx Qualification Details page opens.<br/> <br/> | + | |
==== <br/> Sending RFx Qualification for approval ==== | ==== <br/> Sending RFx Qualification for approval ==== | ||
1. '''Click''' “Send For Approval” on the RFx Qualification Details page. The RFx Qualification will be sent to relevant users for approval. | 1. '''Click''' “Send For Approval” on the RFx Qualification Details page. The RFx Qualification will be sent to relevant users for approval. | ||
| − | <div class="image-green-border"> | + | <div class="image-green-border">[[File:8.1pmapp28.png|720px]]<br/> <br/> The status of the RFx Qualification changes to “Waiting For Approval from the First (or respective) Approver”.<br/> <br/> 2. '''Click '''“Recall” if you want to recall the RFx Qualification sent to approvers. The “Add Note” drawer opens.</div> <div class="image-green-border"> </div> <div class="image-green-border">3. '''Add '''a note and select a Reason Code for recalling.</div> <div class="image-green-border"> </div> <div class="image-green-border">4. '''Click '''"Add". The RFx Qualification will be recalled and moves back to "Draft" state.</div> |
==== <br/> Approving RFx Qualification ==== | ==== <br/> Approving RFx Qualification ==== | ||
| Line 487: | Line 485: | ||
When a user deletes an approved RFx qualification, the RFx qualification instance is deleted and the corresponding Sell Side RFx moves back to the “Awaiting Qualification” state. | When a user deletes an approved RFx qualification, the RFx qualification instance is deleted and the corresponding Sell Side RFx moves back to the “Awaiting Qualification” state. | ||
| − | <div class="image-green-border"> | + | <div class="image-green-border">[[File:8.1pmapp29.png|720px]]</div> |
=== <br/> Working with Bid Proposal === | === <br/> Working with Bid Proposal === | ||
| Line 545: | Line 543: | ||
1. '''Click''' “Proposals” > "Bid Proposal" from the Home page. | 1. '''Click''' “Proposals” > "Bid Proposal" from the Home page. | ||
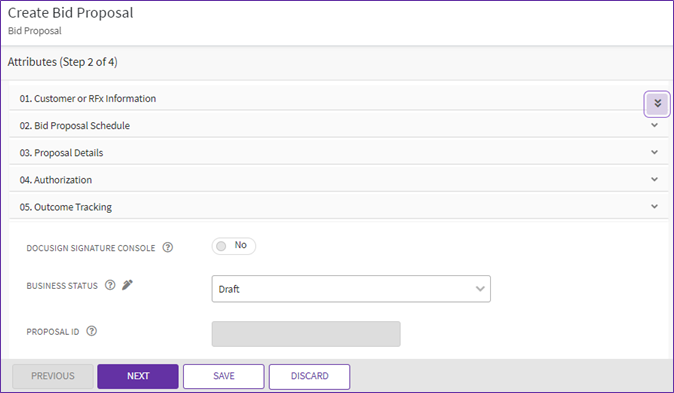
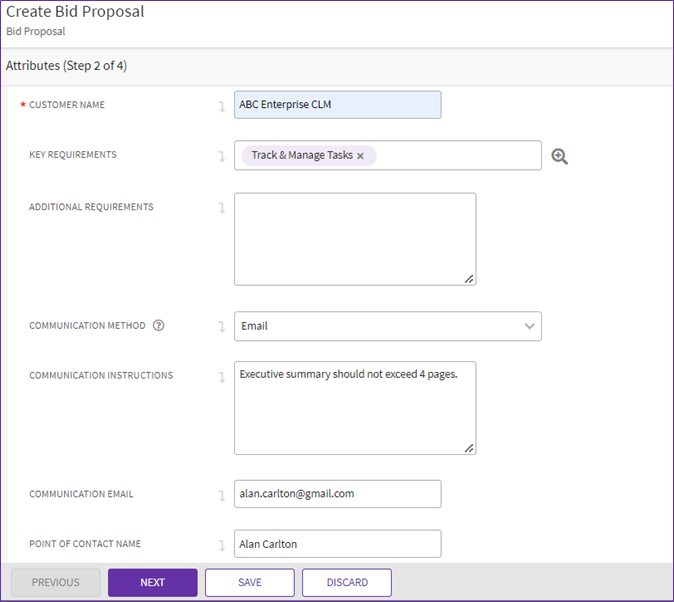
| − | <div class="image-green-border"> | + | <div class="image-green-border">[[File:8.1pmapp30.png|720px]]</div> <div class="image-green-border"> </div> <div class="image-green-border">2. '''Click''' “Create” button. The “Attributes” page opens. This page contains key information required to be captured for creating the Bid Proposal.</div> <div class="image-green-border"> </div> <div class="image-green-border">[[File:8.1pmapp31.png|720px]]</div> <div class="image-green-border"> </div> <div class="image-green-border">'''3. Select '''or enter the values for the fields on the "Attributes" page.<br/> <br/> [[File:8.1pmapp32.png|720px]]</div> |
*'''Associate and Inherit:''' '''Click '''the icon next to this option to inherit and select the Sell Side RFx for creating the Bid Proposal. It opens the Lookup Search drawer to search and associate the Sell Side RFx to Bid Proposal. The Lookup Search drawer displays Sell Side RFx records in “Awaiting Qualification” and “Bid” business states. | *'''Associate and Inherit:''' '''Click '''the icon next to this option to inherit and select the Sell Side RFx for creating the Bid Proposal. It opens the Lookup Search drawer to search and associate the Sell Side RFx to Bid Proposal. The Lookup Search drawer displays Sell Side RFx records in “Awaiting Qualification” and “Bid” business states. | ||
<div class="image-green-border">[[File:8.0 PM 51.PNG|800px|8.0 PM 51.PNG]]<br/> <br/> Inheriting the Sell Side RFx inherits the attributes and Associations of Sell Side RFx to Bid Proposal.</div> <div class="image-green-border"> </div> <div class="note-box">Note: All associations except line items associations are inherited. Line items are Bulk Association Contract Types and will not be inherited.</div> | <div class="image-green-border">[[File:8.0 PM 51.PNG|800px|8.0 PM 51.PNG]]<br/> <br/> Inheriting the Sell Side RFx inherits the attributes and Associations of Sell Side RFx to Bid Proposal.</div> <div class="image-green-border"> </div> <div class="note-box">Note: All associations except line items associations are inherited. Line items are Bulk Association Contract Types and will not be inherited.</div> | ||
| Line 560: | Line 558: | ||
*Point of Contact Name | *Point of Contact Name | ||
*Point of Contact Title | *Point of Contact Title | ||
| − | <div class="image-green-border"> | + | <div class="image-green-border">[[File:8.1pmapp33.png|720px]]</div> |
4. '''Select '''or enter values for the fields in the “Bid Proposal Schedule” section: | 4. '''Select '''or enter values for the fields in the “Bid Proposal Schedule” section: | ||
| Line 571: | Line 569: | ||
The values in these fields will be inherited from the corresponding Sell Side RFx. | The values in these fields will be inherited from the corresponding Sell Side RFx. | ||
| − | <div class="image-green-border">[[File:8.0 PM 107.PNG| | + | <div class="image-green-border">[[File:8.0 PM 107.PNG|480px|8.0 PM 107.PNG]]</div> <div class="image-green-border"> </div> |
5. '''Select '''or enter values for the fields in the “Proposal Details” section. | 5. '''Select '''or enter values for the fields in the “Proposal Details” section. | ||
| Line 610: | Line 608: | ||
*Create and Publish | *Create and Publish | ||
*Create and Send for Approval | *Create and Send for Approval | ||
| − | <div class="image-green-border"> | + | <div class="image-green-border">[[File:8.1pmapp34.png|720px]]</div> |
The Bid Proposal will be created in “Draft” state. | The Bid Proposal will be created in “Draft” state. | ||
| − | <div class="image-green-border"> | + | <div class="image-green-border">[[File:8.1pmapp35.png|720px]]</div> <div class="image-green-border"> </div> |
'''Associations of Bid Proposal''' | '''Associations of Bid Proposal''' | ||
| Line 631: | Line 629: | ||
To view the Bid Proposal: | To view the Bid Proposal: | ||
| − | 1. '''Click '''“Proposals” > "Bid Proposal" from the “Home” page. The | + | 1. '''Click '''“Proposals” > "Bid Proposal" from the “Home” page. The Bid Proposal index page opens displaying all the Bid Proposal records. |
| − | <div class="image-green-border"> | + | <div class="image-green-border">2. '''Click '''View Record icon corresponding to the Bid Proposal record you want to open.</div> <div class="image-green-border"> </div> <div class="image-green-border">The Bid Proposal Details page opens.</div> <div class="image-green-border"> </div> <div class="image-green-border">[[File:8.1pmapp38.png|720px]]</div> |
| − | 2. '''Click '''View Record icon corresponding to the Bid Proposal record you want to open. | + | |
| − | + | ||
==== <br/> Managing Bid Proposal using Commitments ==== | ==== <br/> Managing Bid Proposal using Commitments ==== | ||
| Line 644: | Line 640: | ||
2. '''Click''' “Add Commitment”. The “Add Commitment” drawer opens. | 2. '''Click''' “Add Commitment”. The “Add Commitment” drawer opens. | ||
| − | <div class="image-green-border">[[File:8. | + | <div class="image-green-border">[[File:8.1pmapp39.png|720px]]</div> <div class="image-green-border"> </div> |
3. '''Enter''' the details for the commitment. | 3. '''Enter''' the details for the commitment. | ||
<div class="image-green-border">[[File:8.0 PM 91.PNG|520px|8.0 PM 91.PNG]]</div> <div class="image-green-border"> </div> <div class="image-green-border"> </div> <div class="image-green-border">4. '''Click '''“Add Commitment”. The commitment is created and added to the Bid Proposal.</div> <div class="image-green-border"> </div> <div class="image-green-border">[[File:8.0 PM 120.PNG|720px|8.0 PM 120.PNG]]</div> <div class="image-green-border"> </div> <div class="image-green-border"> </div> <div class="image-green-border">To view and take action on the commitment tasks:</div> <div class="image-green-border"><br/> 1. '''Select '''the "Take action on commitment" option from the three dots action dropdown. The “Add Action” drawer opens.</div> <div class="image-green-border"> </div> <div class="image-green-border">[[File:8.0 PM 121.PNG|720px|8.0 PM 121.PNG]]</div> <div class="image-green-border"> </div> | <div class="image-green-border">[[File:8.0 PM 91.PNG|520px|8.0 PM 91.PNG]]</div> <div class="image-green-border"> </div> <div class="image-green-border"> </div> <div class="image-green-border">4. '''Click '''“Add Commitment”. The commitment is created and added to the Bid Proposal.</div> <div class="image-green-border"> </div> <div class="image-green-border">[[File:8.0 PM 120.PNG|720px|8.0 PM 120.PNG]]</div> <div class="image-green-border"> </div> <div class="image-green-border"> </div> <div class="image-green-border">To view and take action on the commitment tasks:</div> <div class="image-green-border"><br/> 1. '''Select '''the "Take action on commitment" option from the three dots action dropdown. The “Add Action” drawer opens.</div> <div class="image-green-border"> </div> <div class="image-green-border">[[File:8.0 PM 121.PNG|720px|8.0 PM 121.PNG]]</div> <div class="image-green-border"> </div> | ||
Revision as of 18:07, 16 May 2022
Contents
- 1 ICI Proposal Management App
- 1.1 Purpose of the Document
- 1.2 Prerequisites
- 1.3 ICI Proposal Management Application
- 1.4 The Proposal Management Process
- 1.5 Working with the Proposal Management App
- 1.5.1 Setting masterdata values
- 1.5.2 Working with Sell Side RFx
- 1.5.2.1 Overview
- 1.5.2.2 Creating Sell Side RFx
- 1.5.2.3 Accessing Sell Side RFx
- 1.5.2.4 Creating Associations for Sell Side RFx
- 1.5.2.5 Editing Sell Side RFx
- 1.5.2.6 Canceling Sell Side RFx
- 1.5.2.7 Deleting Sell Side RFx
- 1.5.2.8 Sending Sell Side RFx for Approval
- 1.5.2.9 Approving Sell Side RFx
- 1.5.2.10 Rejecting Sell Side RFx
- 1.5.2.11 Expiring of Sell Side RFx
- 1.5.3 Making a Bid Decision
- 1.5.4 Working with Bid Proposal
- 1.5.5 Accessing Bid Proposal
- 1.5.5.1 Managing Bid Proposal using Commitments
- 1.5.5.2 Editing Bid Proposal
- 1.5.5.3 Canceling Bid Proposal
- 1.5.5.4 Deleting Bid Proposal
- 1.5.5.5 Reviewing Bid Proposal
- 1.5.5.6 Sending Bid Proposal for approval
- 1.5.5.7 Approving Bid Proposal
- 1.5.5.8 Rejecting Bid Proposal
- 1.5.5.9 Executing Bid Proposal
- 1.5.5.10 Capturing Bid Outcome
- 1.5.5.11 Adding Amendments to Bid Proposal
- 1.5.5.12 Expiring of Bid Proposal
- 1.5.6 Working with Proposal Management Summary Dashboard
ICI Proposal Management App
Purpose of the Document
The purpose of this document is to provide an insight into:
- The ICI Proposal Management App.
- Functional walkthrough of the ICI Proposal Management App as a platform that supports any proposal management process.
- The recommendations for using the application in production context.
Prerequisites
The user must have:
- Completed the ICI Product Training.
- The ICI Proposal Management App must be enabled on customer environment.
ICI Proposal Management Application
With the ICI Proposal Management application, Icertis has devised an opportunity to introduce out-of-the-box entities, drive the lifecycle and entire business process that begins with the inputs from an RFx, qualifies them, plans and reverts with a proposal, and finally facilitates the completion of the proposal. In addition, Icertis gives the flexibility to configure the Proposal Management App as per the customer requirement, making it a truly enterprise App.
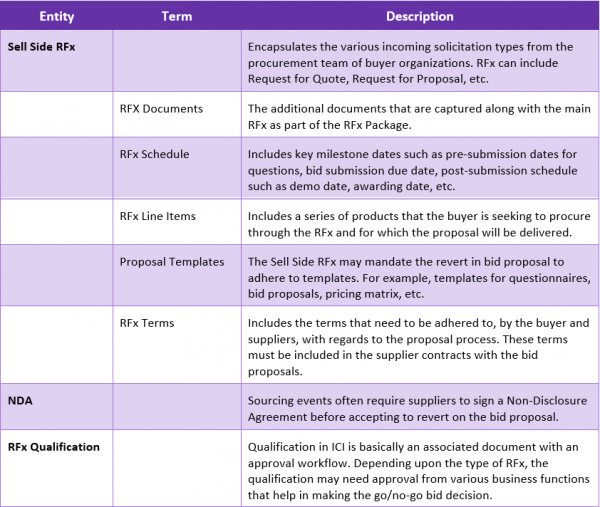
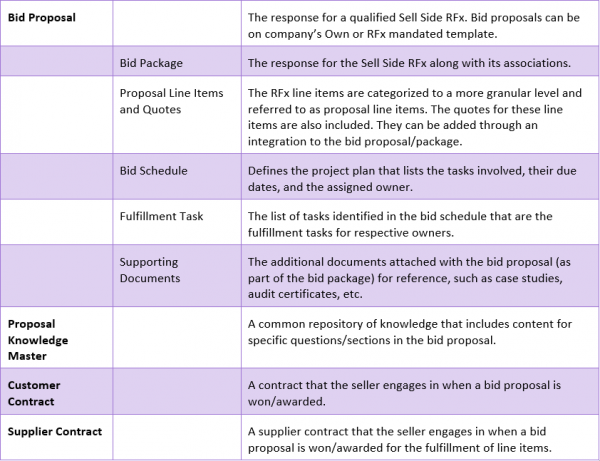
The Terminology
Here are some terms that will help you better understand the Proposal Management process:
The Challenge
Some key challenges to overcome in order to set and mature your sell side practice include:
- Absence of a mature proposal management setup
- The proposal management process is not structured and is run ad-hoc. Dashboards to get an insight to metrics such as win rate or capture ratio are not available. Also, as organizations mature, they need insights to devise their strategy (for example, if win rate has decreased over time) and the tools to enforce business processes.
- No single platform for seamless collaboration
- Enterprises rely on system of systems and expect seamless interplay of data across systems. As a result of disparate systems, data is fragmented across systems or entities which does not let leadership have insights on win rate, capture ratio, etc.
- Nightmare to manage, track and compile tasks
- Identifying and managing tasks between cross-functional stakeholder teams and completing proposals on stringent timelines are arduous.
- Cumbersome content and knowledge management
- Reviewing, managing and reusing content is time consuming in addition to the challenges of quality and compliance that are critical for the business. Content and knowledge management repository is not present. For example, the organization receives multiple RFPs of similar nature. If a library of similar, reusable content is maintained, then it will save time by utilizing the same answers and using a qualitative template. Due to the lack of such a repository, the user has to give the same responses repetitively and recreate new proposals each time using non-standard or non-qualitative templates, which is time-consuming and results in duplication of efforts.
These challenges help shape the solution framework for the ICI Proposal Management App.
The Opportunity
For businesses, responding to Requests for Proposals (RFPs) is a regular process. However, each RFP is a sales opportunity which contributes to growth. It is, thus, imperative for the RFP to be successful as its execution will have a significant impact on the final outcome.
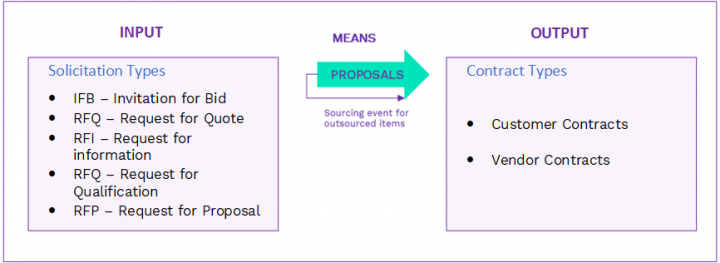
Keeping this in mind, Icertis introduces the Proposal Management App, which is built on the ICI platform that presents out-of-the-box entities to drive the entire business process. This essentially consists of creating and qualifying RFx, and responding to the buyers with the Bid Proposal.
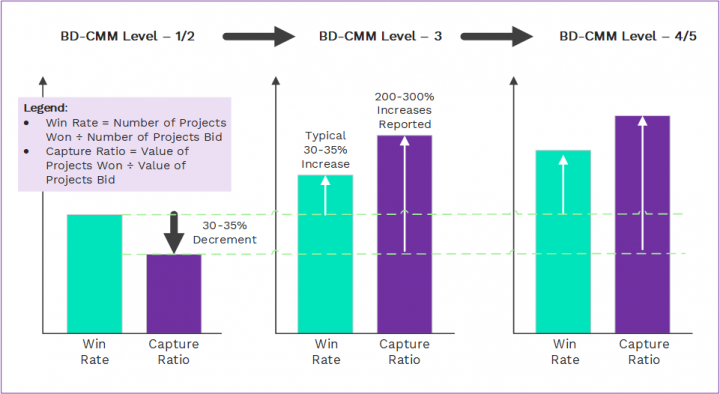
The App provides the ability to track KPI metrics such as Win Rate, Value Capture Ratio, etc. that help in executing incoming solicitation types efficiently and improving response processes paving the way for a mature proposal management team over time.
ICI allows creating a contract-centric proposal process connected with Sourcing and Obligation Management to flexibly drive the end-to-end business process for enterprise needs.
The Solution Framework
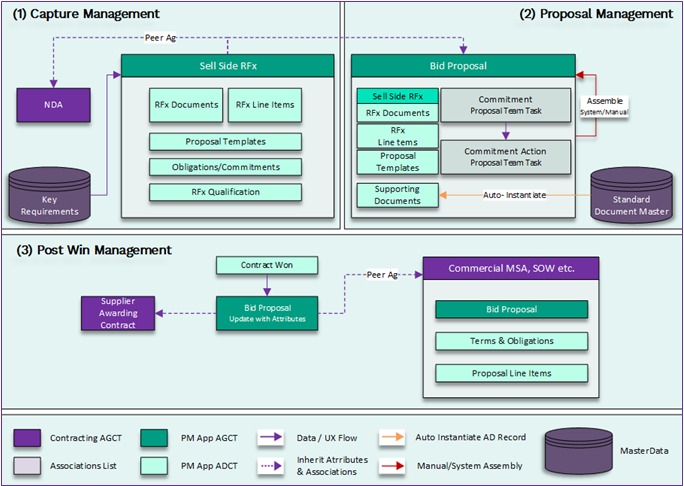
The functional decomposition of how the overall solution framework from capturing the Sell Side RFx to initiating a contract followed by knowledge management through configuration, integration, and usage of entities includes the following:
- Sell Side RFx Capture Management
- Capture Sell Side RFx
- Sign an NDA to participate in the RFx event
- Capture RFx schedule, line items, key requirements, and terms
- Qualify RFx and perform go/no-go decision to bid
- Proposal Management
- Develop solution and proposal strategy
- Plan a bid schedule
- Enrich proposal line items with quotes
- Assemble proposal package
- Approve proposal and submit
- Post-Win Management
- Negotiate proposal with customer
- Record proposal outcome
- Obligation extraction and tracking
- Initiate customer and supplier contracts post win
- Knowledge Management
- Update content
- Tagged content for search and reuse
- Historical proposals search
Based on this framework, the solution includes:
The Benefits
Icertis’ end-to-end solution connected with the ICI contract-led proposal management has several benefits including:
- Increased speed-to-market and proposal quality by using strengths of the ICI platform to create proposals quickly and effectively using templates based on the nature of products and services in a proposal
- Improved deal quality and profitability by building the right proposal with the right products, prices, and terms and conditions
- Standard and customizable KPI tracking (win rate, capture ratio analysis), post-win contract and obligation tracking
- Seamlessly connected experience with Sourcing, Contracting and Obligation Management
- Increased ROI by realizing revenue and margins through proper governance on deal approvals
The Users
ICI Proposal Management typically involves the following set of users:
- Capture Management Team: Includes members from the sales, business development, pre-sales teams, who would be involved in the process of capture management. This team will quickly capture the RFx, ensure right fidelity of the input to make a bid/ no-bid decision, get the downstream proposal qualification process as quickly as possible, and improve the quality of the proposal.
- Proposal Management Team: Includes members from the delivery, IT, legal, or product teams, who would be involved in the process of proposal management. This team will take a qualified RFx, plan and create a proposal with a winning strategy that covers all the requirements of the incoming RFx.
- Sourcing/Procurement Team: Includes members who would be involved in the overall view of the inventory, state of vendor deliverables, etc. They are a common function which can plan for any procurement that might need to be planned for the case that Bid Proposal converts into actual contract and the entity needs to engage with vendors for respective deliverables.
- Contracting (Legal) Team: Includes the standard legal function in an organization that helps qualify the RFx, convert the won proposal to appropriate customer/ supplier contracts.
- Knowledge Management Team: Includes members from the senior leadership within the sales and proposal teams who would be involved in the planning, curation, and baseline content reuse across Bid Proposal.
The Proposal Management Process
The Proposal Management process has the following stages:
- Setting up and Configuring the App
- The ICI Proposal Management App must be enabled on the customer environment.
- Identify seeded configuration for the Proposal Management App
- Use ICI platform navigation tiles to view and create proposal management entities
- Extend the configuration for seeded proposal entities, attributes, workflows, rules that are necessary for the proposal management workflow
- Set up templates, metadata, and clauses for Bid Proposals as per company policy
- The ICI Proposal Management App must be enabled on the customer environment.
- Capture Management
- Manually create Sell Side RFx (solicitation types such as RFP, RFQ, RFI, Tender)
- Capture RFx details for Sell Side RFx (documents, key requirements, terms, templates, etc.), capture the RFx schedule/key dates or milestones of an event that occur on a selected date
- Support API integration use cases out-of-the-box to create and capture Sell Side RFx
- Sign NDAs while participating in RFx cycle
- Manually extract and create RFx line items
- Capture the audit history for changes to Sell Side RFx
- Qualifying Sell Side RFx
- Qualify Sell Side RFx with a Go/No-Go decision to bid
- Ability to set up questionnaires to assist the qualification process
- Set up departmental approvals as part of the Sell Side RFx workflow
- Creating and Planning Bid Schedule
- Create a Bid Proposal for a qualified Sell Side RFx
- Inherit attributes and associations from Sell Side RFx to Bid Proposal record
- Plan, create, and allocate tasks to cross-functional teams for proposal responses
- Managing the Bid Proposal Workflow
- Use Own templates instead of third-party paper for assembly of clauses, template-variables, etc.
- Track tasks for proposal responses that need to be fulfilled by one or more cross-functional team members
- Set reminders and notifications to keep in the know and prevent missed deadlines
- Send Bid Proposals for one-off reviews
- Set up approval rules for various departmental approvals before finalizing the Bid Proposal and sending for signatures
- Collaborate on various topics using the ICI platform between multiple stakeholders instead of using external tools such as email
- Make amendments to submitted Bid Proposals
- Tracking Win/Loss Outcome
- Capture the Bid Proposal outcome as win or loss
- Capture win/loss attributes for better KPI tracking
- Track the KPI metrics such as Win Rate, Capture Ratio, etc. on the ICI dashboard
- Knowledge Management
- Have a common repository of knowledge (ICI masterdata) that includes content and framing for specific questions/sections in the Bid Proposal
- Keep content updated (templates and clauses) at all times for reuse and reference
- Use the advanced search (metadata and in-document) capability of the ICI platform to search for relevant historical proposals
Working with the Proposal Management App
When implementing the Proposal Management App, some entities such as contract types and rules, necessary for the flow, are seeded. Using these seeded entities, proposal owners can populate an initial set of data imperative to the entity workflow.
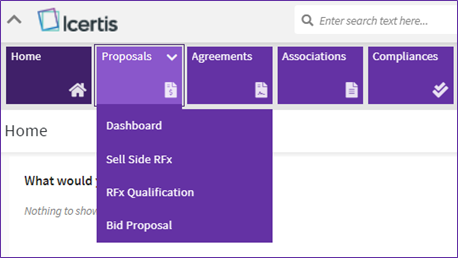
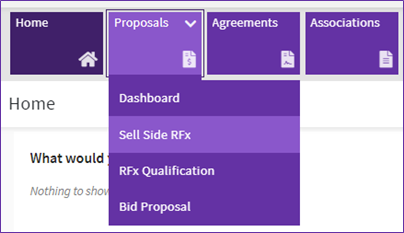
A dedicated “Proposals” tile is displayed on the ICI Home page for customers who have the license for the App. Users having either “View” or “Manage” access to the proposal management contract types can access this tile and use the available options - Dashboard, Sell Side RFx, and Bid Proposal to view and manage them.
The navigation tiles support localization and theming and can be configured by implementation teams.
Setting masterdata values
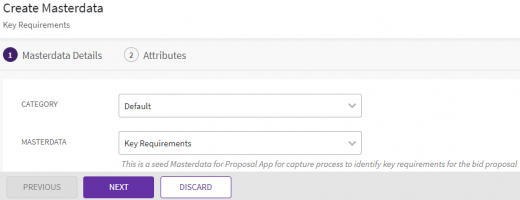
The ICI Proposal Management provides seeded masterdata “Key Requirements” to capture the essential contents of an RFx that would help in winning the Bid Proposal.
Users can create masterdata instances as per the business requirements.
To create a masterdata instance:
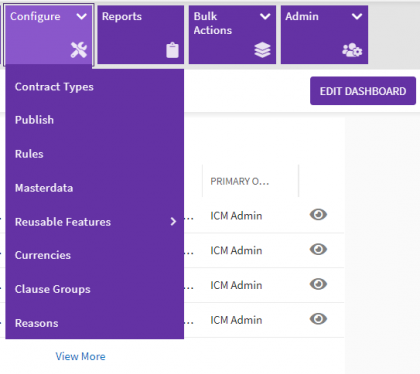
1. Click “Configure” > “Masterdata”
- Category: For example, "Default".
- Masterdata (contract type): For example, "Key requirements".
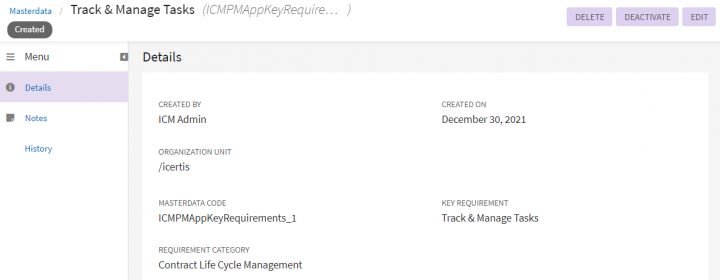
- Key Requirement: For example, "Track & Manage Tasks".
- Requirement Category: For example, "Contract Life Cycle Management".
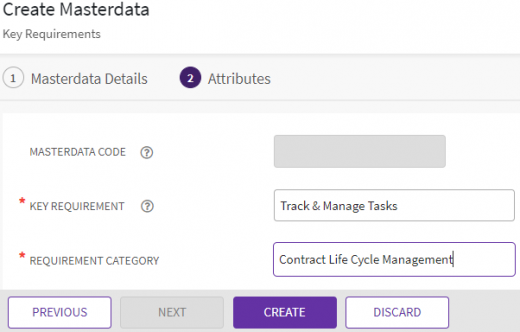
5. Click “Create”. The masterdata instance is created. You can edit, deactivate or delete the created masterdata, as required.
Working with Sell Side RFx
Overview
Proposal Management contract types must be configured as agreement contract type with Business Application Type as “Proposal Management” and Business Application Category as “Sell Side RFx”. It is controlled through role action mapping.
Sell Side RFx helps in converting incoming solicitation types efficiently and improving response processes paving the way for mature proposal management.
- Sell Side RFx: Selecting this option navigates the user to the Sell Side RFx index page that displays all the current Sell Side RFx. Details related to Sell Side RFx such as Sell Side RFx ID, Sell Side RFx Name, RFx Type, Business Status, Created Date, RFx Source, RFx Reference No., RFx Capture Date, RFx Capture Complete Date, are displayed along with the actions that can be taken on them.
- Capture Management: In ICI, it is basically an association which may require approval from various business functions. The capturing process is typically performed by the sales teams of the organization which helps in qualifying the Sell Side RFx to be able to make the decision to bid or not. Some of these include Line Items, RFx Qualification, RFx Documents, and Proposal Templates.
Sell Side RFx comprises of the incoming solicitation types that the suppliers receive including:
- Invitation for Bid
- Request for Quote
- Request for Information
- Tender
- Request for Proposal
The solicitation types are converted into successful businesses after winning the contract. For example, a supplier may place a bid for a firm fixed price.
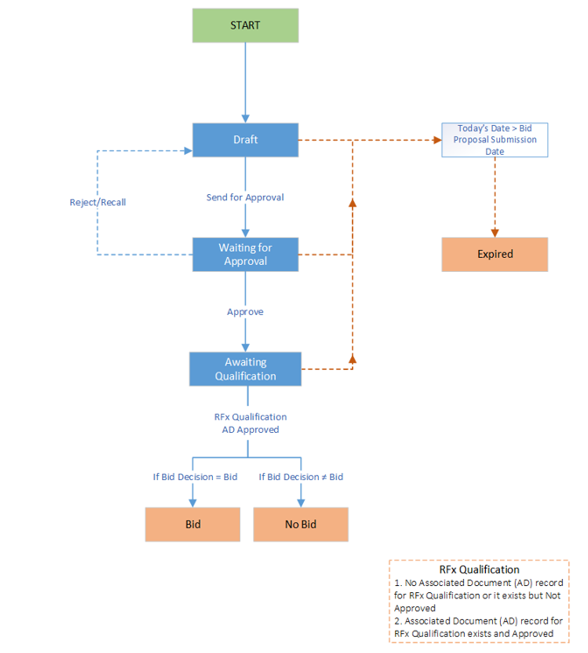
The Sell Side RFx workflow is as follows:
- Create Sell Side RFx:
- Create a Sell Side RFx by capturing all RFx details such as line items, templates, etc. The RFx is now in the “Draft state”.
- Send for Approval:
- Send the RFx for approval; it moves to the “Waiting for Approval” state.
- If approved, the RFx qualification association will have to be created. The RFx moves to the “Awaiting Qualification” state.
- If there is no approver, the Sell Side RFx is auto-approved; the status of the RFx moves to “Awaiting Qualification”.
- If rejected or recalled, the RFx moves back to the “Draft” state.
Here is the workflow for Sell Side RFx at a glance:
Creating Sell Side RFx
The details that would help the Sell Side RFx to qualify and potentially win a bidding are captured during the creation of a Sell Side RFx instance. The details include information related to RFx, RFx Type, key requirements for RFx, RFx documents, templates, customer details, selection process and logistics details, RFx schedules, and so on.
To create a Sell Side RFx:
1. Click “Proposals” tile > “Sell Side RFx”.
2. Click the “Create” button. The “Attributes” page opens which contains key information required to be captured for creating the Sell Side RFx.
3. Select or enter values for the following fields in the “Customer Information” section:
- Customer Name: The name of the buyer organization (prospect) from whom RFx is received for bidding. For example, "Acme Corporation".
- Customer Address: The business address of the buyer organization (prospect) from which RFx is received for bidding. For example, "Park Street, Singapore".
- Customer Geography: The location where the prospect or the customer is located. You can use this attribute to analyze the performance of your capture/proposal process with customer geography as a dimension. For example, "Asia Pacific".
- Industry Vertical: The industry or domain which the buyer organization, prospect or customer falls under. For example, "Finance".
- Sell Side RFx ID: A unique ID generated automatically by the system on creation of the Sell Side RFx.
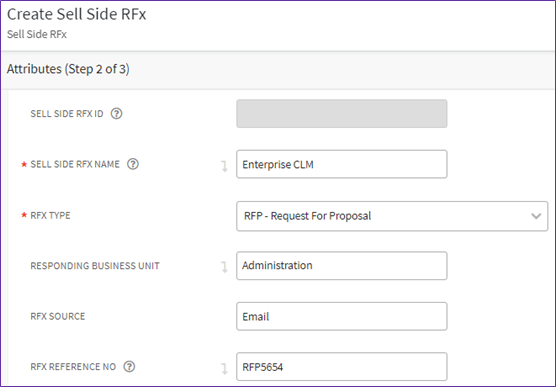
- Sell Side RFx Name: The name as mentioned in the RFx documents, or the customer/opportunity name. For example, "Enterprise CLM".
- RFx Type: The solicitation types include:
o Request for Proposal (RFP): Is a solicitation type that helps obtaining the proposal for procuring goods and services. This is typically done through the bidding process.
o Request for Quote (RFQ): Is a solicitation type that allows organizations to request for quote from the suppliers for purchasing goods or services. RFQ is also called Invitation for Bid (IFB).
o Request for Information (RFI): The set of questions shared with potential suppliers to assess their ability to fulfil certain requirements to provide goods or services. This is done in the form of a questionnaire with specific and general questions.
o Tender: The invitation to bid for a specific project or supplying goods or services. For example, governments typically invite bids from organizations that should be submitted within the defined deadline.
- Responding Business Unit: The business unit responsible for responding to the Sell Side RFx. For example, "Administration".
- RFx Source: The source includes all the input channels for the RFx. For example, RFx would be received on email, all the input data is captured.
- RFx Reference No: The unique identification of the RFx received from external system for reference.
- RFx Capture Date: The automatically generated date and time when the RFx was captured and a Sell Side RFx record is created in ICI Proposal Management App.
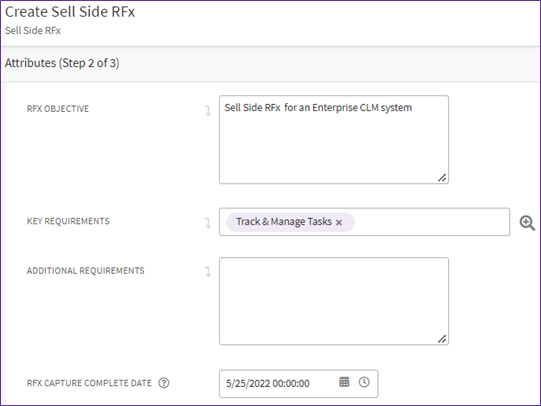
- RFx Objective: The purpose of creating the RFx.
- Key Requirements: The essential needs of the buyer captured in the RFx to fulfill the key objectives of the RFx.
- Additional Requirements: The additional needs that are interpreted and not necessarily mentioned in the RFx documents. This helps giving additional information to the proposal creation team.
- RFx Capture Complete Date: This is an auto computed attribute that captures the date and time whenever Sell Side RFx record is edited or approved.
5. Select or enter values for the following fields in the “Selection Process and Logistics” section:
- Is NDA Required: This flag must be enabled if it is mandatory for the buyer and supplier to sign the NDA.
- Communication Method: The preferred method of correspondence to submit the proposal. For example, Email, Customer Workshop, etc.
- Point of Contact Name: The point of contact at the buyer’s end to whom the proposal or any other queries should be submitted.
- Communication Email: The email address of the designated point of contact from the buyer’s side.
- Communication Address: The mailing or communication address of the buyer organization, in case the proposal or queries need to be submitted physically.
- Communication Instructions: The specific guidelines (if any) for communicating with customers as part of RFx process.
- Authorized Signature Required: This flag must be enabled if the authorized signature is required to be performed by the buyer and supplier. This helps defining signatory for Bid Proposals that will be created to address the Sell Side RFx.
- Bid Proposal Template Requirement: The specific format provided by the buyer that needs to be adhered to by the supplier while responding to the Sell Side RFx. It could also be in the supplier’s “Own” template format for responding as per business requirements.
- Pre Bid Conference Date: The date when buyer holds a conference for all bidders prior to bidding. The intent is to elaborate and provide details about the RFx and to answer any questions that bidders may have in a common forum. It is not applicable in all RFx context.
- Supplier Questions Due Date: The date by which the suppliers can submit the queries for received RFx to the buyer.
- Bid Proposal Submission Deadline Date: The date by which the Bid Proposal must be submitted by the suppliers.
- Supplier Demo Date: The date on which suppliers must present a demonstration of the goods or services that they will supply.
- Due Diligence Check Date: The date and time by which the references provided by suppliers would be validated.
- Awarding Date: The date when the supplier is awarded the RFx.
- Contract Execution Date: The date when the contract is executed between the buyer and the supplier.
8. Click “Next”. The “Verify” page opens.
9. Verify the details and click one of the following options.
- Create
- Create and Publish
- Create and Send for Approval
The RFx is created in the “Draft” state.
The Sell Side RFx, being the standard ICI Agreement Contract Type, follows all ICI agreement functionalities such as adding members to Team, Rules and Approval process to approve the Sell Side RFx.
Accessing Sell Side RFx
You can view existing Sell Side RFx from the “Proposals” tile.
To view the created Sell Side RFx:
1. Click the “Proposals” tile. The following options are displayed depending upon the access privileges of a user: "Sell Side RFx, "RFx Qualification", "Bid Proposal”.
2. Click “Sell Side RFx”, the Sell Side RFx index page opens.
The SSR index page opens displaying all available Sell Side RFx records. Users can refine the list of Sell Side RFx by applying filters, options and keywords using the Refine View search panel as well as the Saved Search functionality (“Save View”) functionality.
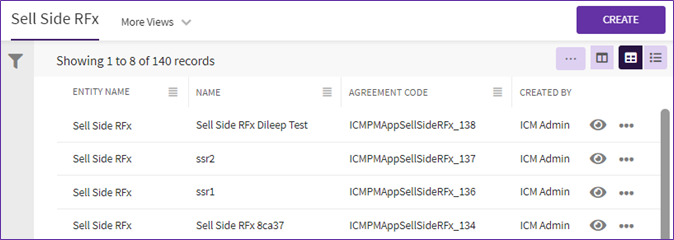
3. Click View record icon corresponding to the sell side RFx record you want to open. For example, "Enterprise CLM". The sell side RFx Details page opens.
Suppliers can view the current status of the sell side RFx on the Details page. Suppliers can also perform a variety of actions based on the current state of the sell side RFx.
Creating Associations for Sell Side RFx
You can associate supporting documents with Sell Side RFx from the “Associations” tab in the left navigation pane on the Details page. This tab displays a list of associations relevant to the current Sell Side RFx instance such as All, Peers, Prerequisites, Post requisites, and No Constraint. It has following sub-sections.
- All: All the associations relevant to the current Sell Side RFx instance.
- RFx Documents: The Sell-Side RFx content may be split across various logical documents. For example, Specific Requirements, Demo Cases, Questionnaires, and so on. RFx Documents captures all such documents for a Sell Side RFx.
- Line Items: A buyer may break down the RFx requirement in a series of line items or a sales persona analyses and may create RFx line items for proposal. Line Items associations capture the details about required quantity for line items associated with the current Sell Side RFx.
- RFx Qualification: After the Sell Side RFx capture is complete, an RFx Qualification captures the outcome of the Bid or No-Bid decision. This association provides information such as Bid Decision details, Versions, History, Team, Notes, and so on. A Sell Side RFx can have only one RFx Qualification.
The RFx Qualification association impacts the Sell Side RFx workflow. Refer to Making a Bid Decision for details.
- Templates: Sell-Side RFx may mandate the template to follow for a Bid Proposal. For example, templates for questionnaire, bid-proposal, pricing matrix, and so on. Templates associations capture such third party templates which specify the format for bid response.
To create an association for Sell Side RFx from Details page:
1. Click the plus + icon to “Create Association” corresponding to the type of association that you want to create, for example, "RFx Documents". The “Create Association” page opens.
2. Enter the details. The Sell Side RFx details are pre-populated.
3. Click “Create”.
1. Click Association type under Associations in left navigation pane. For example, “Line Items”. The selected associations open.
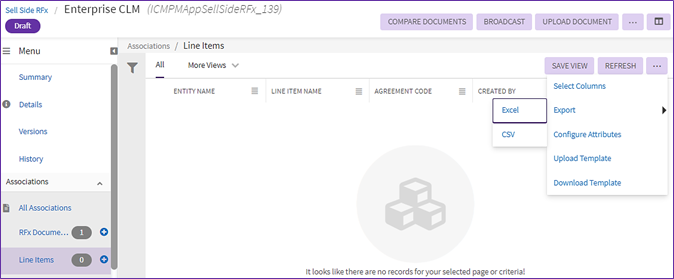
2. Click three dots menu > "Export" > "Excel". The Excel template will be downloaded as “ICMPMAppLineItems.xlsx” on your machine in the configured download folder.
6. Select File and click "Open".
Editing Sell Side RFx
You can modify the sell side RFx as per business requirements:
1. Click “Edit” on the sell side RFx Details page. The “Edit Sell Side RFx” page opens.
2. Make the required changes and click “Next”. The “Verify” page opens.
Canceling Sell Side RFx
You can cancel a sell side RFx as per business requirements.
To cancel a sell side RFx:
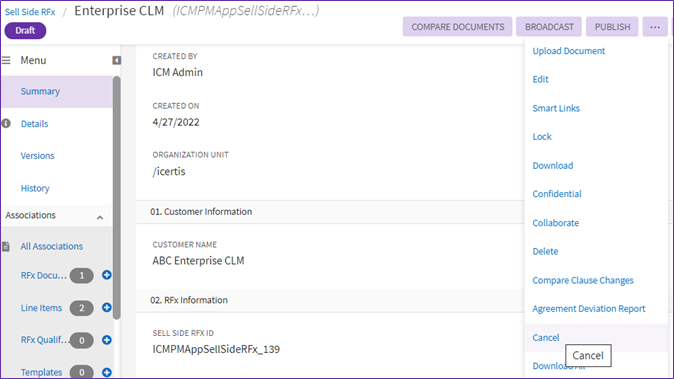
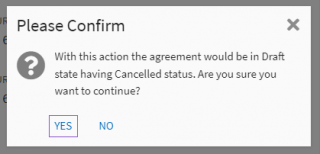
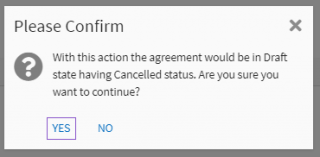
1. Click “Cancel” on the sell side RFx Details page. The “Please Confirm” pop up opens.
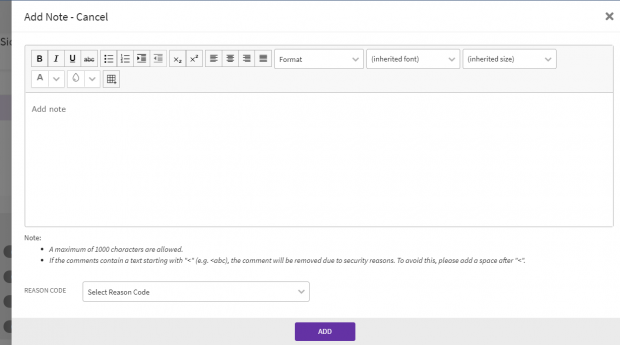
2. Click “Yes” if you are sure that the RFx should be cancelled. The “Add Note” drawer opens.
3. Enter a note such as the reason for cancellation and select the reason code.
4. Click “Add”. The status of sell side RFx changes to “Cancelled”.
Deleting Sell Side RFx
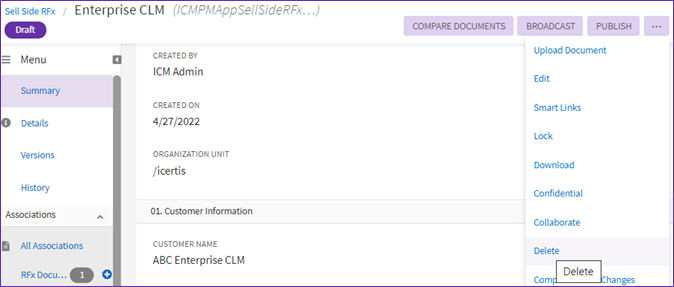
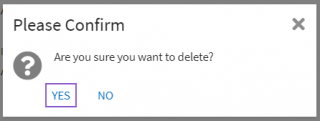
1. Click “Delete” on the three dots menu of Sell Side RFx Details page to delete the RFx. The “Please Confirm” pop up opens.
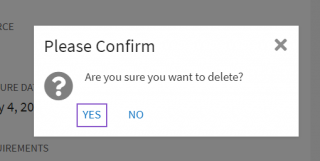
2. Click “Yes” on the “Please Confirm” pop up. The Sell Side RFx will be deleted.
Sending Sell Side RFx for Approval
You can send the Sell Side RFx for approval if not already sent during the creation process.
1. Click “Send for Approval” on the Sell Side RFx Details page. The Sell Side RFx is sent to approvers added in the record’s team.
The Sell Side RFx status moves to “Waiting for Approval”.
2. Click "Recall" under three dots menu on the Sell Side RFx details page if you want to recall the Sell Side RFx sent to approvers. The Add Note drawer opens.
3. Add a note and select a Reason Code for recalling.
4. Click "Add". The Sell Side RFx will be recalled and moves back to "Draft" state.
Approving Sell Side RFx
Approvers can approve or reject a Sell Side RFx based on the company’s objectives being fulfilled. They can see the Approval task listed in their “My Tasks” widget on the “Home” dashboard.

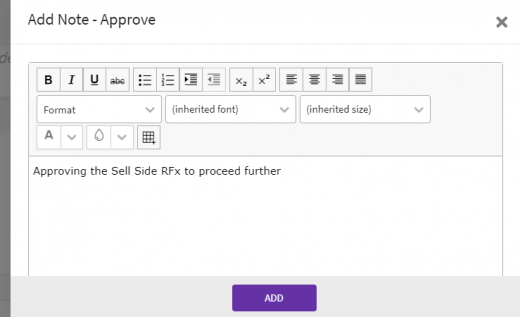
1. Click “Approve” under the three dots menu of Sell Side RFx Details page. The “Add Note” drawer opens.
The Sell Side RFx status changes to “Awaiting Qualification” once all approvers added in the Team approve it, the status changes to approved.
Rejecting Sell Side RFx
Approvers can reject a Sell Side RFx based on the company’s objectives.
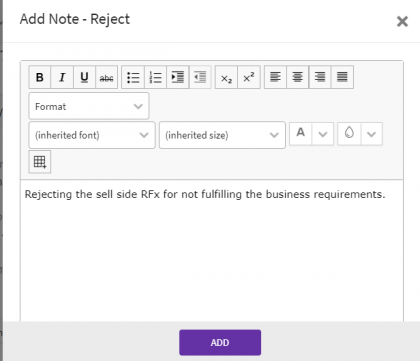
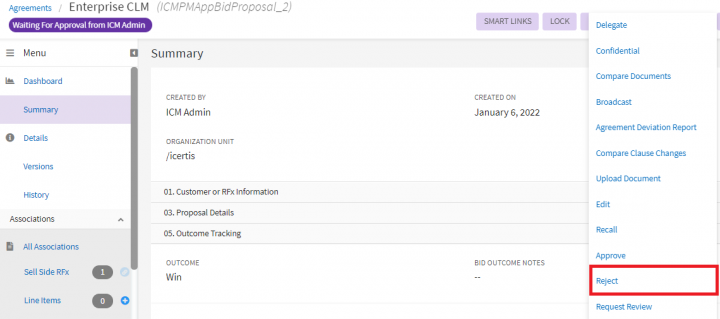
1. Click “Reject” under the three dots menu of Sell Side RFx Details page. The “Add Note” drawer opens.
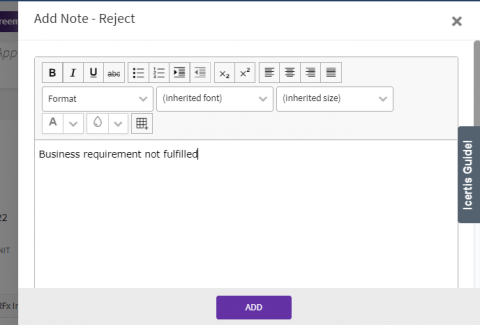
2. Entera note and select a reason for rejection.
3. Click “Add”.
The Sell Side RFx is rejected and goes back to the “Draft” state.
Expiring of Sell Side RFx
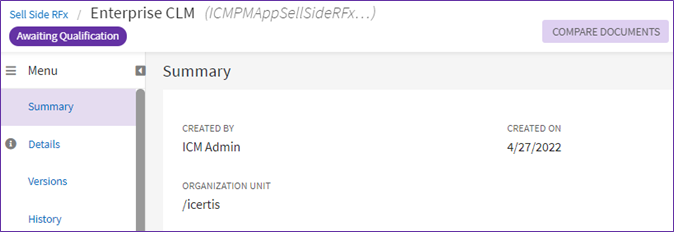
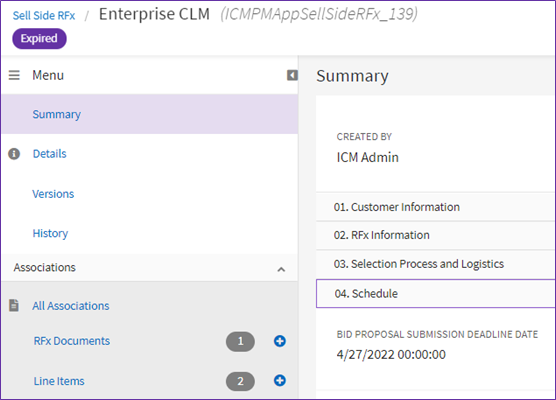
If the Bid Proposal submission deadline date is past the current date and the bid decision is not yet captured for the Sell Side RFx, then the Sell Side RFx moves to the “Expired” state.
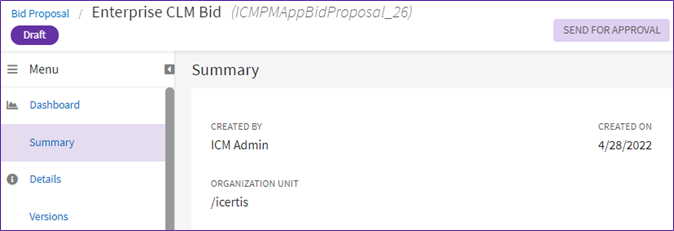
For example, the Sell Side RFx, Enterprise CLM, is expired as its Bid Proposal submission deadline date - April 27, 2022 has already passed.
Making a Bid Decision
Overview
Based on the company’s objectives, the Sell Side RFx is qualified for a decision to bid or not to bid through RFx Qualification. RFx Qualification in ICI is basically an associated document with an approval workflow. Depending upon the type of RFx, the qualification may need approval from various business functions that help in making the decision about placing the bids.
The capture management or the sales team of the organization may or may not revert to every RFx, but the team has to ensure that it meets the business objective, and then make the decision to bid or not. They can mention the Bid Decision details for a Sell Side RFx in an “Awaiting Qualification” status by creating an RFx Qualification association.
There can be only one RFx qualification for a Sell Side RFx.
Based on the company’s objectives, the Sell Side RFx is qualified for a decision to bid or not to bid. The sales team of the organization can mention the Bid Decision details for a Sell Side RFx in an “Awaiting Qualification” status by creating an RFx Qualification association. There can be only one RFx qualification for a Sell Side RFx.
The creation of an RFx Qualification Association invokes the Approver rule and workflows and moves the corresponding Sell Side RFx to the status according to the bid decision, upon RFx qualification approval.
Users can set Bid Decision using the following options:
- Bid: Allows user to place a bid based on the RFx received if the RFx meets the company’s objectives. For an approved Sell Side RFx, when the bid decision is set as Bid, the status of the Sell Side RFx moves to “Bid” once the RFx qualification is approved.
- No Bid: Allows user to avoid placing a bid based on the RFx received if the RFx does not meet the company’s objectives. For an approved Sell Side RFx, when the bid decision is set as No Bid, the status of the Sell Side RFx moves to “No Bid” once the RFx qualification is approved.
- Hold: Allows user to keep the bid on hold if the buyer organization communicates that the RFx is put on hold. For an approved Sell Side RFx, when the bid decision is set as Hold, the status of the Sell Side RFx moves to “No Bid” once the RFx qualification is approved.
- Awaiting Qualification: The default status of the Sell Side RFx till a bid decision is made based on the company’s objectives.
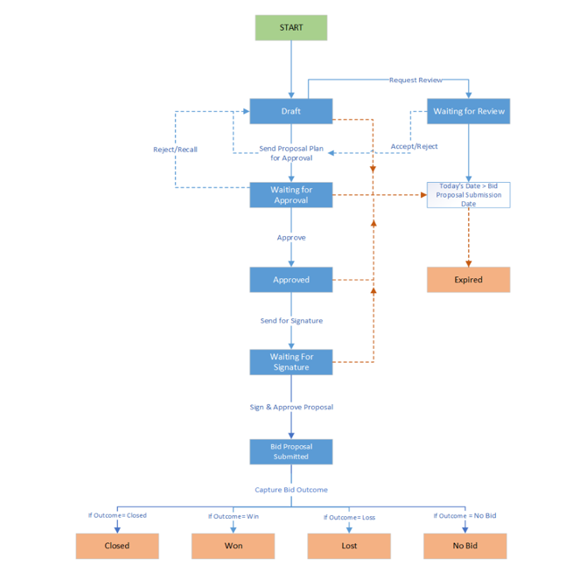
The RFx Qualification workflow is as follows:
- Select Sell Side RFx for Qualification:
- Go to “Proposal Management” > “RFx Qualification” and select a record on the index page. The status of the RFx Qualification is “Draft” and of the Sell Side RFx is “Awaiting Qualification” till a bid decision is made.
- Make a Bid Decision:
- If the bid decision is made, the RFx qualification is sent for approval; the status of the Sell Side RFx moves to “Bid”, once the RFx Qualification is approved.
- If the bid decision is rejected, the RFx qualification can be sent for approval; the status of the Sell Side RFx moves to “No Bid”, once the RFx Qualification is approved.
- For any reason/rationale, if the bid decision cannot be made, the RFx qualification can be put on hold; the status of the Sell Side RFx moves to “No Bid”, once the RFx Qualification is approved.
- Send RFX Qualification for Approval:
- If the decision to bid is made, send the RFx Qualification for approval from the Details page. The RFx Qualifications moves to the “Waiting for Approval (from the Approver)” state.
- If approved, the status of the RFx qualification moves to “Approved”.
- If there is no approver, the RFx qualification is auto-approved; the status of the RFx qualification moves to “Approved”.
- If rejected or recalled, the status of the RFx qualification moves back to “Draft”.
- If the decision to bid is made, send the RFx Qualification for approval from the Details page. The RFx Qualifications moves to the “Waiting for Approval (from the Approver)” state.
Creating RFx Qualification
After the Sell Side RFx capture is complete, an RFx Qualification captures the outcome of the Bid/No Bid decision.
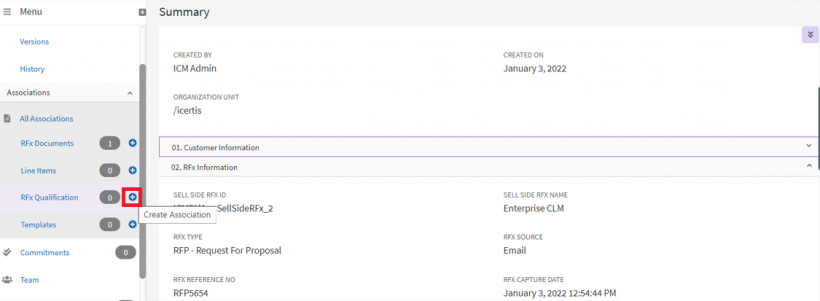
1. Click the plus + icon next to RFx Qualification in the “Associations” section, on Sell Side RFx Details page. The “Create Association” page opens.
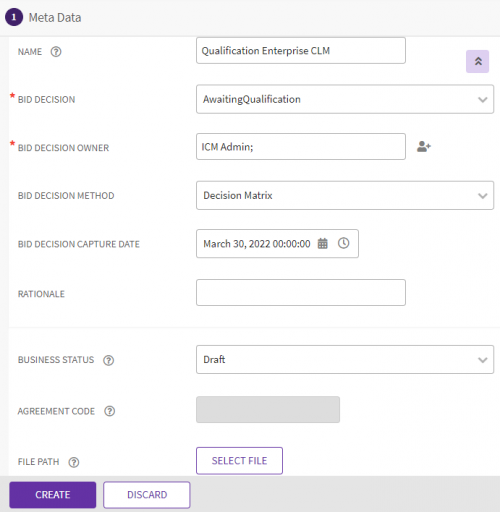
2. Select or enter values for the following fields in the “Bid Decision” section:
- Name: The name of the RFx Qualification. For example, “Qualification Enterprise CLM”.
- Bid Decision: The bid decision for the Approved Sell Side RFx which has options- Bid, No Bid, Hold, and Awaiting Qualification.
- Bid Decision Owner: The owner who will make the decision if the RFx qualifies for a bid or not.
- Bid Decision Method: The method used to arrive at a go or no-go decision for the bid. For example, "Decision Matrix".
- Bid Decision Capture Date: The date and time at which the bid decision is taken.
- Rationale: The reason behind taking a specific decision to bid or not, or keep the bid on hold.
- Agreement Code: An automatically generated code after the RFx qualification is generated.
- File Path: Any document to capture rationale for decision taken. For example, a questionnaire in an Excel format.
3. Click “Create”. The RFx Qualification is created in a “Draft” state.
Accessing RFx Qualification
Users can access all RFx Qualifications.
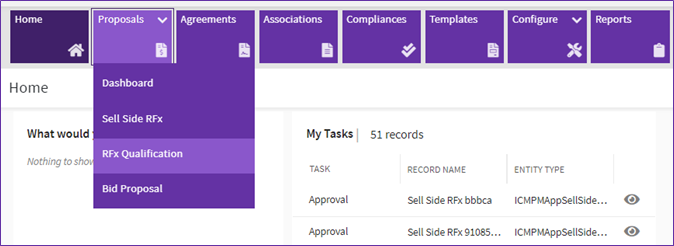
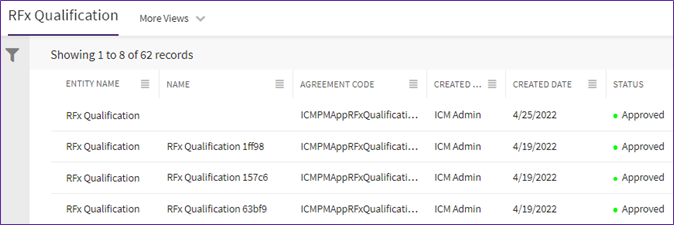
Selecting the RFx Qualification option navigates the user to the “RFx Qualification” index page, where a list of qualified RFx is displayed. This option is visible only to users who have “View” or “Manage” access to the RFx qualification. On selecting a record, the user is directed to the “RFx Qualification Details” page that provides information such as Bid Decision details, Versions, History, Team, Notes, etc. in the left navigation pane.
Sending RFx Qualification for approval
1. Click “Send For Approval” on the RFx Qualification Details page. The RFx Qualification will be sent to relevant users for approval.

The status of the RFx Qualification changes to “Waiting For Approval from the First (or respective) Approver”.
2. Click “Recall” if you want to recall the RFx Qualification sent to approvers. The “Add Note” drawer opens.
Approving RFx Qualification
The approvers (sales or business or legal team) can approve or reject the RFx Qualification based on the company’s objectives being fulfilled or not.
To approve the RFx Qualification:
The status of the corresponding Sell Side RFx changes as per the bid decision selected while creating the RFx Qualification. For example, here the status changes to “Bid”.
Rejecting RFX Qualification
1. Click “Reject” on RFx Qualification Details page. The “Association Reject Note” drawer opens.
Deleting RFx Qualification
When a user deletes an approved RFx qualification, the RFx qualification instance is deleted and the corresponding Sell Side RFx moves back to the “Awaiting Qualification” state.
Working with Bid Proposal
Overview
Bid Proposal comprises of the response provided by the supplier against the qualified RFx received such as Request for Quote, Request for Information, and so on. The Proposal Management team of the organization is typically responsible for creating the Bid Proposal. A thorough review of the Bid Proposal is performed by the reviewer team ensuring that the proposal meets the business requirements, quality, and compliance standards.
Proposal Management contract types must be configured as agreement contract type with Business Application Type as “Proposal Management” and Business Application Category as “Bid Proposal”. It is controlled using role action mapping.
A typical Bid Proposal has the following associations:
- Sell Side RFx – Associate a Sell Side RFx with a Bid Proposal if not already inherited while creating a Bid Proposal. A Bid Proposal can have only one Sell Side RFx Association.
- Proposal Line Items
- RFx Documents
- Supporting documents, if any
- Templates
The Bid Proposal workflow is as follows:
- Create Bid Proposal
- After the Sell Side RFx is received and qualified, the proposal management team works on creating the Bid Proposal and tracking its progress until it is won or lost.
- Go to “Proposals” > “Create Bid Proposal” to create the Bid Proposal in the “Draft” state.
- The set of attributes allow capturing important elements for the Bid Proposal such as Customer or RFx Information (point of contact, key requirements, communication method, etc.), Bid Proposal Schedule (submission date, due diligence date, awarding date, etc.), Proposal Details (proposal manager, review dates, status, etc.), Authorization, and Outcome Tracking (win, loss, closed, etc.).
- Request Review
- Send the Bid Proposal for review; it moves to the “Review Pending (from Reviewer)” state. Whether approved or rejected, the Bid Proposal moves back to the “Draft” state.
- Send for Approval
- Send the Bid Proposal for internal approval to the Proposal Manager or to the final approvers such as Head of Sales team. it moves to the “Waiting for Approval” state.
- If approved by all approvers, the Bid Proposal moves to the “Approved” state.
- If rejected by any approver, the RFx moves back to the “Draft” state.
- Send the Bid Proposal for internal approval to the Proposal Manager or to the final approvers such as Head of Sales team. it moves to the “Waiting for Approval” state.
- Send for Signature
- The Bid Proposal is sent for internal or external signature based on the selected signature sequence once the Bid Proposal is approved. The status of the Bid Proposal is “Waiting for Internal/External Signature from Signatory”.
- When signed by all signatories, the business status is “Bid Proposal Submitted”.
- The Bid Proposal is sent for internal or external signature based on the selected signature sequence once the Bid Proposal is approved. The status of the Bid Proposal is “Waiting for Internal/External Signature from Signatory”.
- Tracking the Bid Proposal
- Based on the submission, the proposal team tracks the bid outcome (the attributes and data that capture the win or loss for the Bid Proposal). This helps in establishing and measuring the benchmarks for win or loss tracking.
- Depending on the selected bid outcome, the Bid Proposal status can be “Awaiting Outcome”, “Won”, “Lost”, “No Bid”, or “Closed”.
- Based on the submission, the proposal team tracks the bid outcome (the attributes and data that capture the win or loss for the Bid Proposal). This helps in establishing and measuring the benchmarks for win or loss tracking.
- Collaborating through Proposal Process
- A key aspect of the ICI Proposal Management App is the ability to use the “Collaboration” tab on the platform, at any stage, which is a dedicated space available within the proposal itself, to communicate between multiple stakeholders.
- Create a New Topic from the “Collaboration” tab on the Bid Proposal Details page. Specify details such as Participants, Confidentiality, Message, etc.
- A key aspect of the ICI Proposal Management App is the ability to use the “Collaboration” tab on the platform, at any stage, which is a dedicated space available within the proposal itself, to communicate between multiple stakeholders.
- Managing Bid Proposal using Commitments
- Commitments can be added to the proposal which can serve as reminders of the tasks and actions that need to be taken for tracking Bid Proposals to ensure that the necessary obligations are completed on time.
- Add Commitments from the “Commitments” tab on the Bid Proposal Details page. Specify details such as Commitment Type (Clause, Meta Data, Risk, Transaction), Due Date, Instructions, Reminder, etc.
- Commitments can be added to the proposal which can serve as reminders of the tasks and actions that need to be taken for tracking Bid Proposals to ensure that the necessary obligations are completed on time.
- Amending Bid Proposal
- Submitted Bid Proposals can be edited only through amendments. For example, a supplier can submit changes while a round is still open, or when a supplier is shortlisted in a round and needs to provide additional details. The amendment is created in the “Draft” state.
Here is the workflow for Bid Proposal at a glance:
Creating the Bid Proposal
1. Click “Proposals” > "Bid Proposal" from the Home page.
- Associate and Inherit: Click the icon next to this option to inherit and select the Sell Side RFx for creating the Bid Proposal. It opens the Lookup Search drawer to search and associate the Sell Side RFx to Bid Proposal. The Lookup Search drawer displays Sell Side RFx records in “Awaiting Qualification” and “Bid” business states.
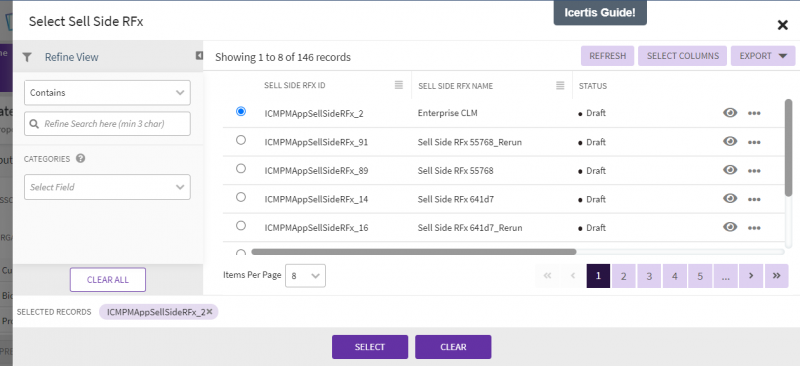
Inheriting the Sell Side RFx inherits the attributes and Associations of Sell Side RFx to Bid Proposal.
- Organization Unit: Click the icon next to this option to select the organization unit which you want the Bid Proposal to be part of.
4. Select or enter information in the “Customer or RFx Information” section.
- Customer Name
- Key Requirements
- Additional Requirements
- Communication Method
- Communication Instructions
- Communication Email
- Point of Contact Name
- Point of Contact Title
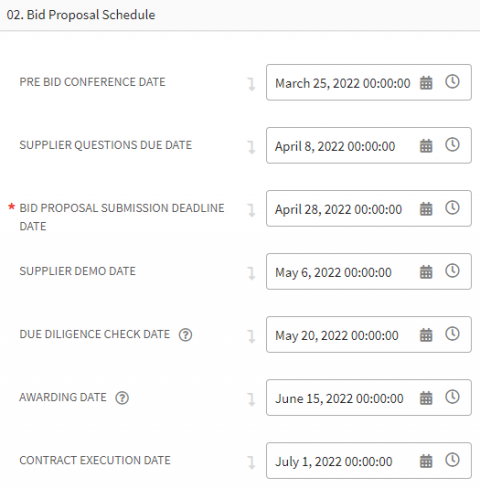
4. Select or enter values for the fields in the “Bid Proposal Schedule” section:
- Supplier Questions Due Date
- Bid Proposal Submission Deadline Date
- Supplier Demo Date
- Due Diligence Check Date
- Awarding Date
- Contract Execution Date
The values in these fields will be inherited from the corresponding Sell Side RFx.
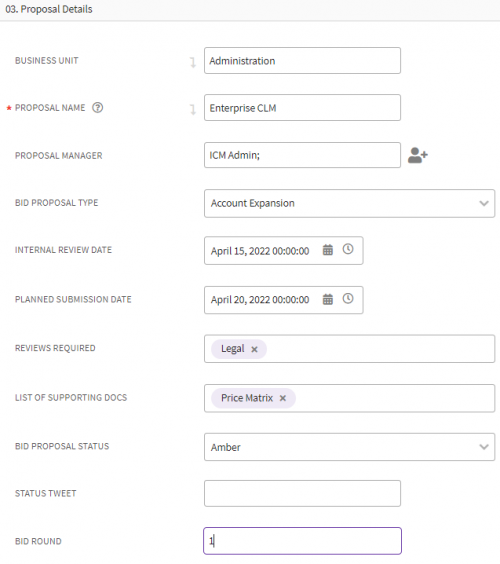
5. Select or enter values for the fields in the “Proposal Details” section.
- Business Unit: The business unit responsible for responding to the Sell Side RFx. For example, Administration.
- Proposal Name: The name of the proposal managed by the supplier organization.
- Proposal Manager: The designated person authorized to manage the proposal.
- Bid Proposal Type: The Bid Proposal type that will be submitted. For example:
o Counter Signed: Allows signing the Bid Proposal that is already signed by the other party.
o Account Expansion: The effort made through the Bid Proposal to expand the current business account with the other party.
o For Pre Bid Qualification: The process of identifying potential vendors who indicate that they are qualified for placing a bid for a potential project.
o Reverting to RFx: The process of creating the Bid Proposal as a response to the RFx received.
- Internal Review Date: The date by which the internal review of the Bid Proposal must be completed. This helps the Proposal Manager to track any internal milestones for proposal review.
- Planned Submission Date: The date by which the Bid Proposal must be submitted. This helps the Proposal Manager track when the Bid Proposal will be submitted to the customer or prospect.
- Reviews Required: The list of users or the departments that should review the Bid Proposal. For example, "Legal".
- List of Supporting Docs: The list of associated documents that must be added with the Bid Proposal when submitting. It helps the Proposal Manager assemble any supporting documents that are routinely added with the Bid Proposal. For example, "Case Studies".
- Bid Proposal Status: It helps the Proposal Manager track and report the overall status of the Bid Proposal. For example, Green that indicates the Bid Proposal is on track to be submitted as per the defined time frame. "Amber" is selected by default.
- Status Tweet: It helps the Proposal Manager convey the summary of the Bid Proposal and can also be effective in aggregate reporting of the Bid Proposal project. For example, if the Bid Proposal status is selected as “Red”, the status tweet can be “No resources available”.
- Bid Round: It captures the information of the rounds that happen during the process of submitting the Bid Proposal. This helps the Proposal Manager identify if the Bid Proposal is used as part of a specific round in the RFx process.
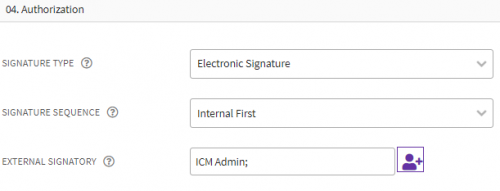
6. Select or enter the information in “Authorization”.
- Signature Type: The signature method that will be used for the Bid Proposal. For example, “Electronic Signature”.
- Signature Sequence: The sequence in which the Bid Proposal should be signed.
- External Signatory: A designated person from buyer/prospect team for Bid Proposal execution when the signatures are required for executing a Bid Proposal.
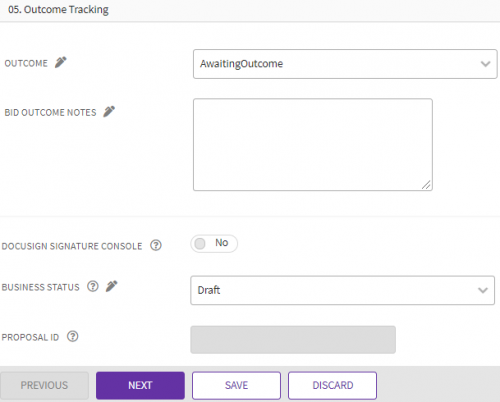
7. Select or enter the values for the fields in the “Outcome Tracking” section:
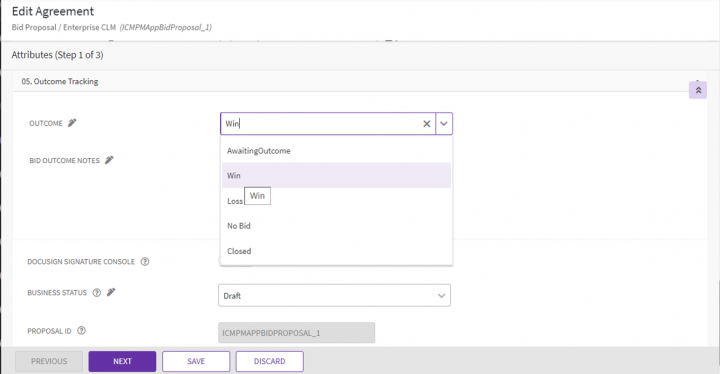
- Outcome: The result of the Bid Proposal that is being created. The available options are: Awaiting Outcome, Win, Loss, No Bid, and Closed. The default value is set as "Awaiting Outcome".
- Bid Outcome Notes: Any additional information that can be added to support the bid outcome of the proposal.
- Proposal ID: A unique ID generated automatically after creating the Bid Proposal.
8. Click “Next”. The “Select Template (Step 3 of 4)” page opens.
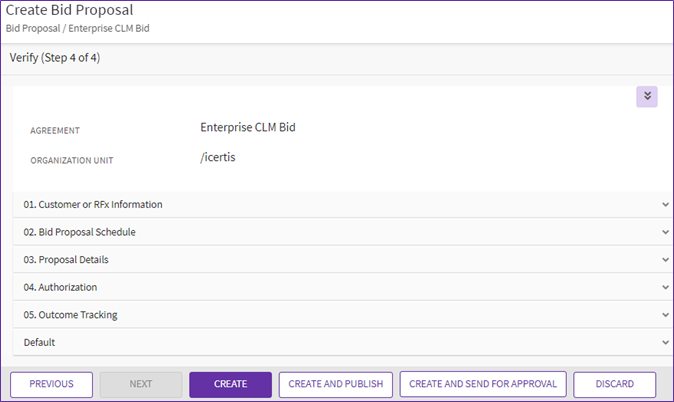
9. Select the template and click “Next”. The “Verify” page opens.
10. Verify the information and click one of the following:
- Create
- Create and Publish
- Create and Send for Approval
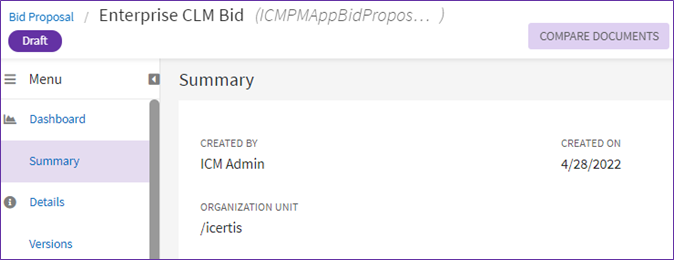
The Bid Proposal will be created in “Draft” state.
Associations of Bid Proposal
The Bid Proposal has following Associations:
- Sell Side RFx: A Sell Side RFx encapsulates various incoming soliciting types such as Request for Quote, Request for Proposal and so on. A Bid Proposal can have only one Sell Side RFx association.
- Line Items: The proposal line items are RFx Line items that are broken down into fine grained line items with details such as quotes.
- RFx Documents: The Sell Side RFx content may be split across various logical documents. For example, specific requirements, questionnaires, and so on. RFx Documents captures all such documents for a Sell Side RFx which will be inherited to a Bid Proposal.
- Supporting Documents: The Bid Proposal may have supporting documents such as case-studies, audit certificates and so on, that need to be associated with the Bid Proposal.
- Templates: The third party templates which specify the format the Bid Proposal needs to adhere to. These associations will be inherited from the associated Sell Side RFx.
Accessing Bid Proposal
You can search and view the created Bid Proposal from the “Proposal Management” tile.
To view the Bid Proposal:
1. Click “Proposals” > "Bid Proposal" from the “Home” page. The Bid Proposal index page opens displaying all the Bid Proposal records.
Managing Bid Proposal using Commitments
Proposal owners can create tasks to plan and track Bid Proposals using commitments in ICI. Commitment Tasks help to work and collaborate with different teams with the defined timelines to manage Bid Proposals.
To create a task using commitment:
1. Click the “Commitments” tab in the left navigation pane on the Details page. The existing commitments are displayed if any.
2. Click “Add Commitment”. The “Add Commitment” drawer opens.
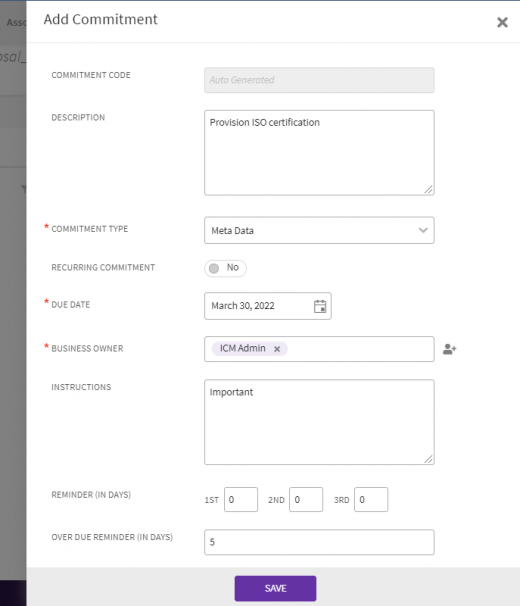
3. Enter the details for the commitment.
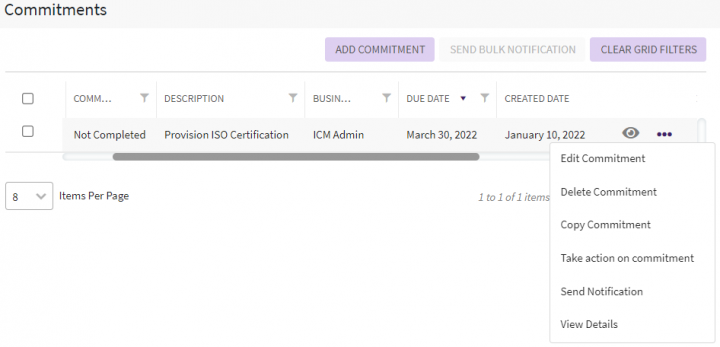
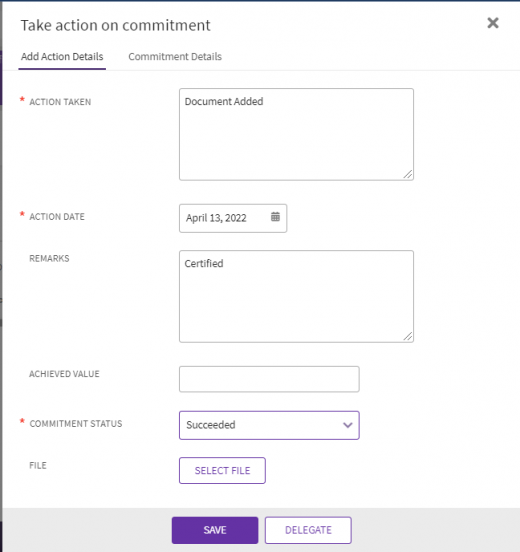
1. Select the "Take action on commitment" option from the three dots action dropdown. The “Add Action” drawer opens.
2. Add Action Details and Commitment Details.
3. Click “Save”. The Commitment status is updated according to the action taken.
Refer to the Compliance Management for more details on working with commitments.
Editing Bid Proposal
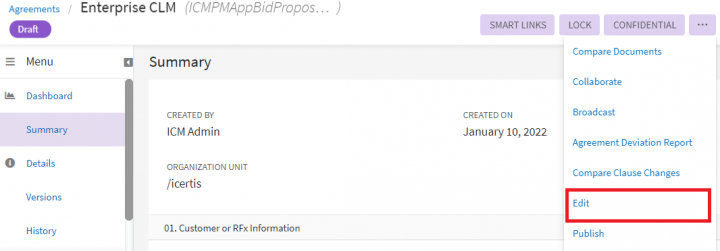
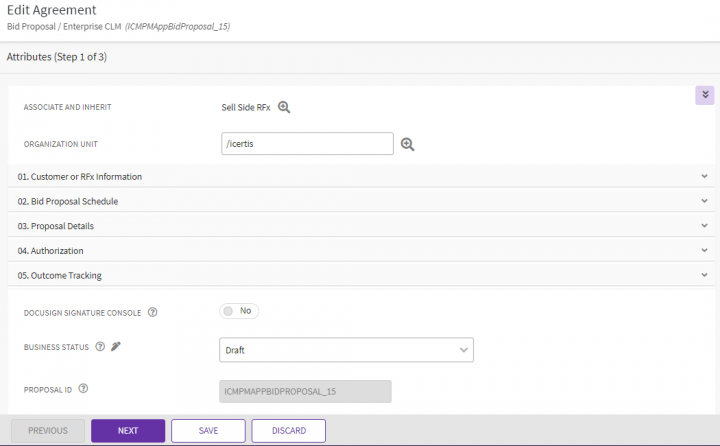
1. Click “Edit” from the three dots menu on the Bid Proposal Details page. The "Edit Agreement" page for Bid Proposal opens.
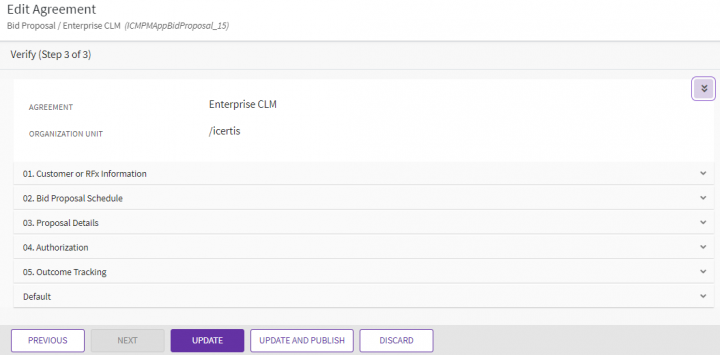
2. Edit the details on the Attributes page as required and click "Next". The “Verify” page opens.
3. Verify the details and click “Update” or "Update and Publish".
The changes will be saved to the Bid Proposal.
Canceling Bid Proposal
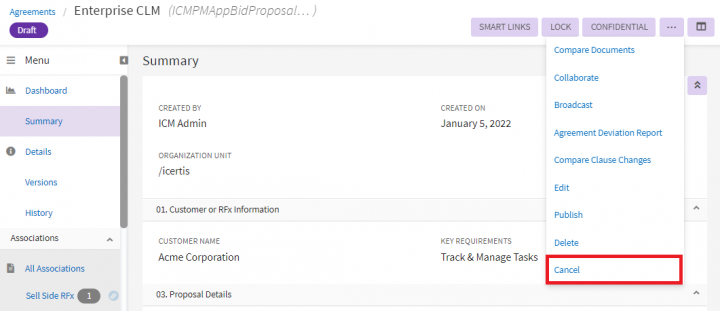
1. Click “Cancel” from the three dots menu on the Bid Proposal Details page. The Confirmation popup opens with a message that the agreement will move to a canceled state.
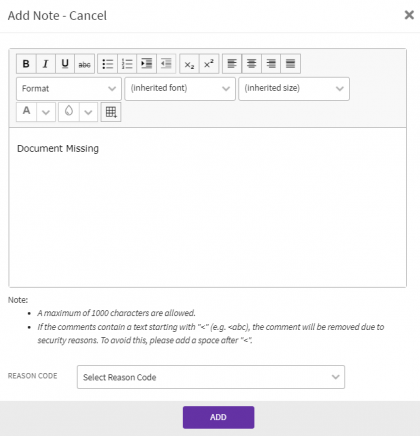
2. Click “Yes” to proceed. The “Add Note” drawer opens.
3. Add a note and select a Reason Code for canceling the Bid Proposal.
4. Click “Add”. The Bid Proposal will move to a Cancelled state.
Deleting Bid Proposal
You can delete Bid Proposals which are in draft state.
The Bid Proposal will be deleted.
Reviewing Bid Proposal
Users can send the Bid Proposal for review for its quality and compliance check.
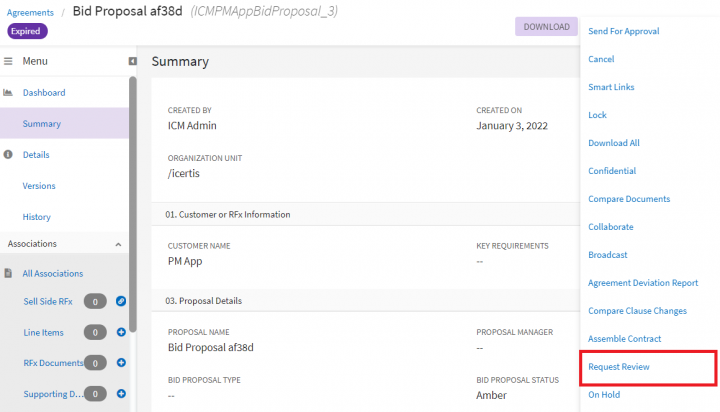
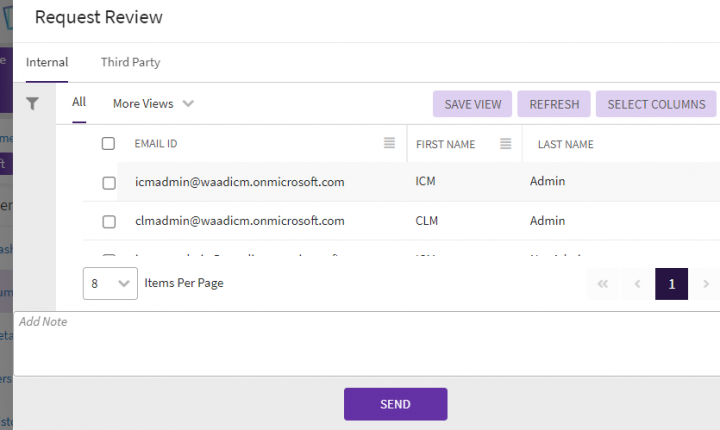
1. Click "Request Review" from the three dots menu on the Bid Proposal Details page. The "Search User" drawer opens.
2. Select a user and click “Send”. The Bid Proposal will be sent to the selected Reviewer.
The status of the Bid Proposal changes to "Review Pending".The reviewer can approve or reject the Bid Proposal following the standard ICI Approval/Reject workflow.
After the reviewers have reviewed (Approve/Reject) the Bid Proposal, it moves back to its previous state.
Sending Bid Proposal for approval
1. Click “Send for Approval” on Bid Proposal Details page. The status of the Bid Proposal changes to “Waiting for Approval” and a task is generated for the approver added to the Team.
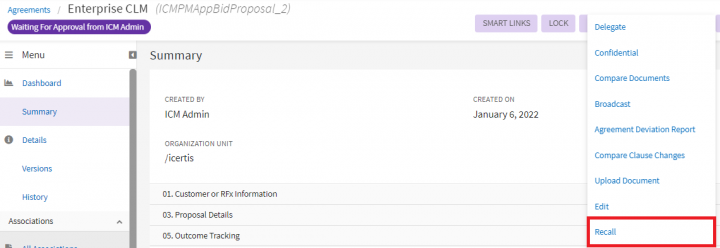
2. Click “Recall” if you want to recall the Bid Proposal sent to approvers. The “Add Note” drawer opens.
3. Add a note and select a Reason Code for recalling.
4. Click "Add". The Bid Proposal will be recalled and moves back to “Draft” state.
Approving Bid Proposal
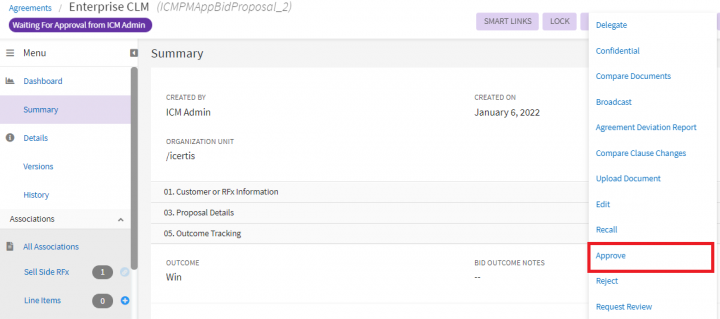
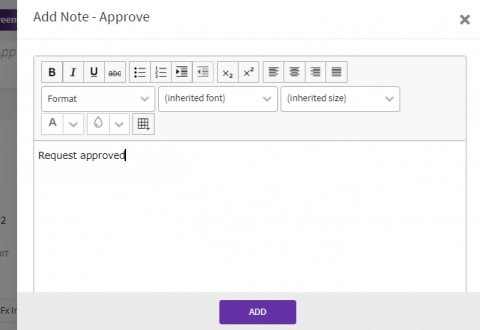
1. Click “Approve” on Bid Proposal Details page. The "Add Note" drawer opens.
2. Add note and click "Add". The Bid Proposal will be approved and the status will change to “Approved”.
Rejecting Bid Proposal
1. Click “Reject” on Bid Proposal Details page. The "Add Note" drawer opens.
2. Add a note and select a relevant "Reason Code" for rejecting the Bid Proposal.
3. Click "Add". The Bid Proposal is rejected and goes back to the "Draft" state.
Executing Bid Proposal
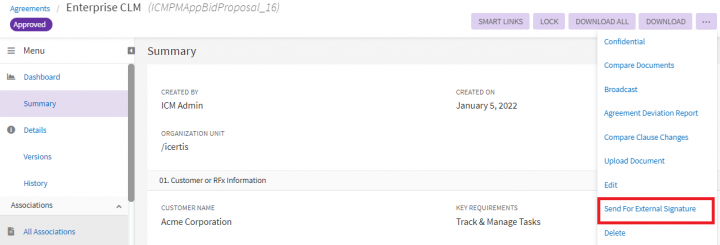
You can send the Bid Proposal for signature to the external signatory added to the Bid Proposal team, once the Bid Proposal is approved.
To send the Bid Proposal for signature:
Click “Send For External Signature” on Bid Proposal Details page. The status of the Bid Proposal changes to “Waiting for External Signature” and a task is generated for a signatory.
You can recall the Bid Proposal sent to signatories using “Recall” from the three dots menu.
Capturing Bid Outcome
After you capture the Bid Outcome, the submitted Bid Proposal status will change to “Won”, “Lost”, “No Bid” or “Closed”, as per the selected bid outcome value for the Bid Proposal record.
To capture the bid outcome:
1. Click "Edit" from the three dots menu on the Bid Proposal Details page. The "Edit Agreement" page opens.
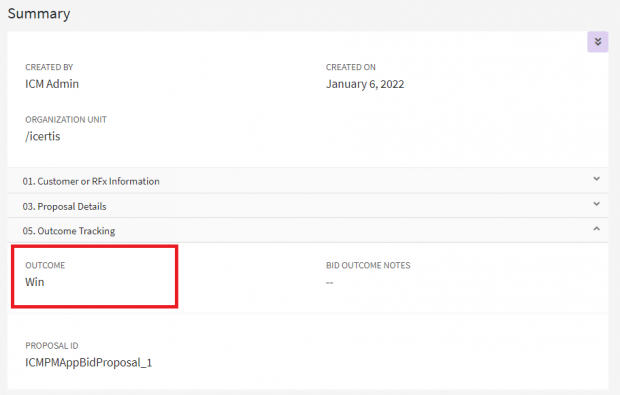
2. Select the Outcome in the "Outcome Tracking" attributes section. For example, “Win”.
3. Click "Next". The "Verify" page opens.
4. Verify the details and click "Update".
The Bid Proposal status changes to “Won” based on the selected Outcome as “Win”.
Adding Amendments to Bid Proposal
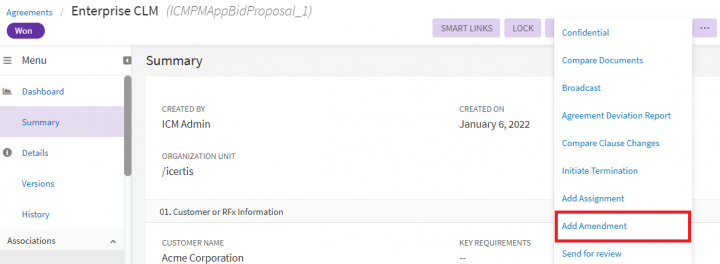
If users want to make changes to a Bid Proposal after it is executed and moves to a “Bid Proposal Submitted” Business Status, they can do so by adding amendments to it.
To add an amendment to a Bid Proposal:
1. Click “Add Amendment” from the three dots menu on Bid Proposal Details page. The “Add Amendment” page opens.
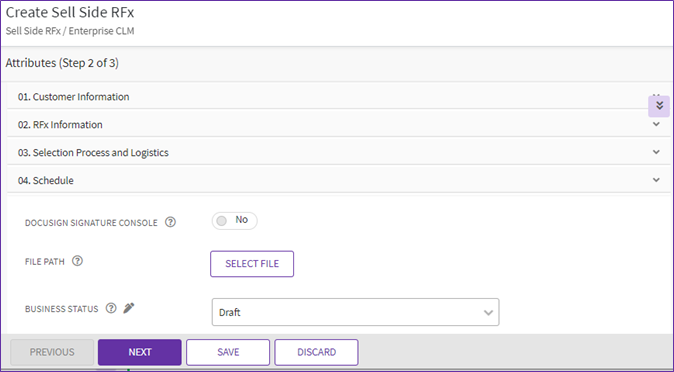
2. Make the necessary changes to the “Attributes (Step 2 of 3)” page and click “Next”. The “Verify” page opens.
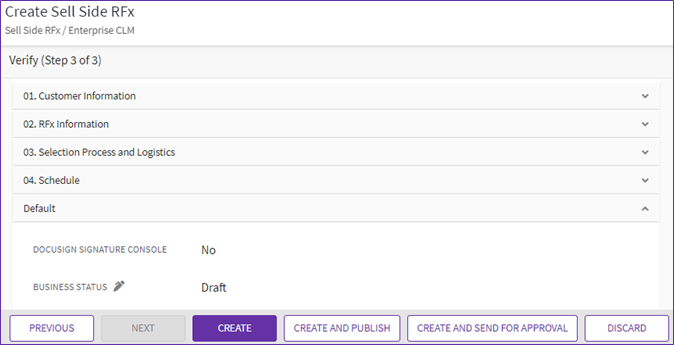
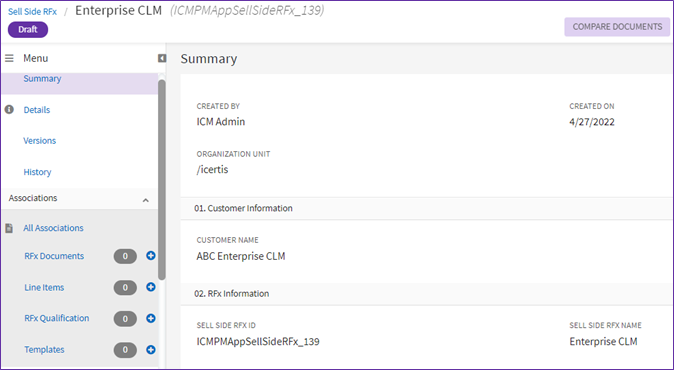
3. Verify the information entered on this page and click “Create”. The amendment is created in “Draft” state.
The amendment workflow for Bid Proposal follows the standard ICI amendment workflow. The amendment status will be updated on the basis of outcome tracking such as Won, Lost, No Bid or Closed.
Expiring of Bid Proposal
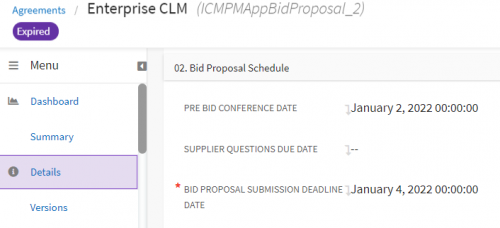
If the Bid Proposal is not submitted by the Bid Proposal submission deadline date, the Bid Proposal record expires and its status changes to “Expired”. For example, the Bid Proposal "Enterprise CLM" is expired as the Bid Proposal submission deadline date- "January 4, 2022" has passed the current date.
Working with Proposal Management Summary Dashboard
ICI Proposal Management App allows users with appropriate privileges to access the “Dashboard” tile option, to use the Power BI dashboard reports seeded with the PM App, and it will be available to users out-of-the-box.
To access the Dashboard - click “Proposals” tile and then click “Dashboard”, and the “Proposal Management Summary” dashboard page opens.
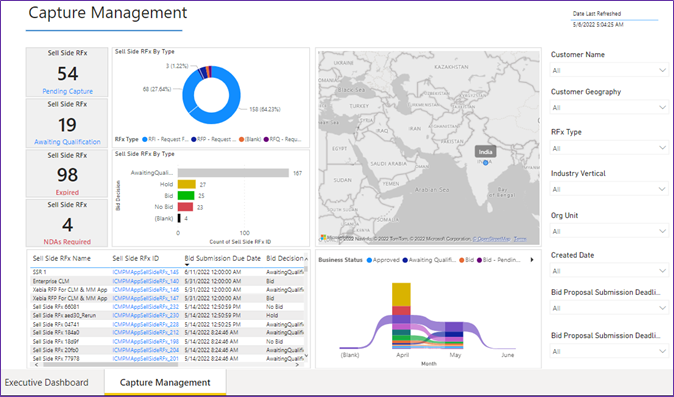
The “Proposal Management Summary” dashboard contains these analytical Power BI reports - “Proposal Management KPIs” and “Capture Management”.
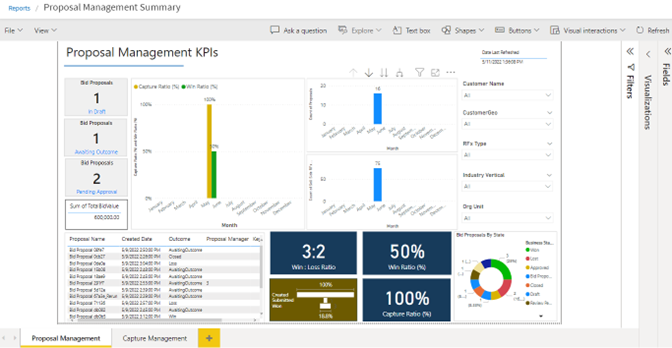
The “Proposal Management KPIs” report appears on the first report tab that opens by default on clicking the “Dashboard” tile option. This out-of-the-box report presents the KPIs for the proposal process as an overall dashboard for proposals.
Here are the specifications of the “Proposal Management KPIs” report:
- Users can view proposal-specific KPI information such as:
- Count of Sell Side RFx pending Capture
- Count of Sell Side RFx Awaiting Qualification
- Count of Bid Proposals Awaiting Outcome
- Count of Sell Side RFx across time
- Count of Bid Proposals across time
- Capture Ratio
- Win Ratio
- Win : Loss Ratio
- Users can filter and view the report information by:
- Customer Name
- Customer Geography (country)
- RFx Type
- Industry Vertical
- Organization Unit
The “Capture Management” report provides the KPIs along the capture management process, covering the journey of the Sell Side RFx entity. Here are its specifications:
- Users can view Capture Management specific KPI information such as:
- Count of different Sell Side RFx statuses
- Sell Side RFx classifications by type
- Sell Side RFx status progress count
- Bid Decisions
- Sell Side RFx Capture across time
- Users can filter and view the report information by:
- Customer Name
- Customer Geography (country)
- RFx Type
- Industry Vertical
- Organization Unit
- Created Date
- Bid Proposal Submission Deadline Date
Each report can be viewed as preferred based on the options/parameters given on the far right:
- Filters
- Visualizations
- Fields
- Users with access to Sell Side RFx or Bid Proposal can view the “Dashboard” tile option.
- Reports access can be configured via Security Groups for “View”, “Manage”, or “None”.
The Win Ratio and Value Capture Ratio can be calculated with the help of certain seeded attributes, and these base values will be used to generate desired Power BI reports. Here are the details of this feature:
- These new attributes, seeded with the Bid Proposal entity, contribute to the essential computations of the Win Ratio and the Value Capture Ratio:
- Total Bid Value for Proposal - This is the total monetary value of a proposed bid in the selected currency.
- Total Value Won or Lost - This indicates the total monetary value of bid won or lost, in the selected currency, and this field appears on selecting “Win” or “Loss” in the “Outcome” field under the “Outcome Tracking” group.
- Customer Address - Official address of the Customer organization.
- Customer Geography - Region/Country of the Customer organization.
- Win Ratio = This indicates the percentage of proposals won in the bidding process – Total Number of (Bid) Proposals Won / Total Number of Bids.
- Capture Ratio = This indicates the percentage of aggregate (currency) value won amongst the total (currency) value of bids. Total Value from Bid Proposals Won / Total Value from Bid Proposals (Submitted + Won).
- Win : Loss Ratio = This metric indicates the bid proposals won versus the bid proposals lost, therefore indicative of the overall performance of the proposals sent, wherein a higher win versus loss is desired. For example, a metric of 4:1 indicates there are 4 times the amount of proposals won than lost.
- These computations are done within the Power BI Dataset.
Related Topics: Agreement Management | Icertis Business Apps | Biz Apps Release Notes
