| Line 2: | Line 2: | ||
= Approving and Rejecting Agreements = | = Approving and Rejecting Agreements = | ||
| − | + | <font face="Segoe UI">An agreement can be created from an [[Creating_an_Agreement_from_a_Contract_Request|approved contract request]] or by [[Create_Agreement_Page|creating a new agreement]]. Rejecting an agreement sends it back to the primary owner to make the required changes. Either way it is created, an agreement must be approved before it moves to the next stage of the workflow. All permissions, such as creating, approving and deleting of entities are controlled from the [[Working_with_Role_Action_Mapping|role-action mapping]].</font> | |
<font face="Segoe UI">Following are the predefined roles for Agreements:</font> | <font face="Segoe UI">Following are the predefined roles for Agreements:</font> | ||
| Line 19: | Line 19: | ||
*<font face="Segoe UI">your list of [[Tasks|Tasks]], or </font> | *<font face="Segoe UI">your list of [[Tasks|Tasks]], or </font> | ||
| − | *the [[ | + | *the [[Agreement_details_page|agreement details page]]. |
To approve or reject an agreement from yoiur Tasks: | To approve or reject an agreement from yoiur Tasks: | ||
| − | <font face="Segoe UI">1. Click the '''Tasks''' KPI tile on | + | <font face="Segoe UI">1. Click the '''Tasks''' KPI tile on [[My_Dashboard|My Dashboard]]. This opens the User Task Dashboard Page.</font> |
<font face="Segoe UI">2. Click the link of the agreement that you need to approve. This opens the [[Agreement_Details_Page|Agreement Details Page]].</font> | <font face="Segoe UI">2. Click the link of the agreement that you need to approve. This opens the [[Agreement_Details_Page|Agreement Details Page]].</font> | ||
| − | <font face="Segoe UI">3. Click '''Approve'''. This opens the [[Add_Notes|Add Notes]] dialog box.</font> | + | <font face="Segoe UI">3. Click '''Approve''' or '''Reject'''. This opens the [[Add_Notes|Add Notes]] dialog box.</font> |
| − | <font face="Segoe UI">4. Type | + | <font face="Segoe UI">4. Type approval or rejection notes and click '''Add'''. The status of the agreement changes to '''Approved''' or '''Rejected'''.</font> |
| + | |||
| + | | ||
| + | |||
| + | To approve or reject agreements from the Agreement Details Page: | ||
| + | |||
| + | | ||
| + | |||
| + | | ||
| + | |||
| + | | ||
| + | |||
| + | <font face="Segoe UI">1. On the ICM Home page, click the '''Notifications''' tile, and then click the '''Tasks''' tab. List of tasks waiting for your action appears.</font> | ||
| + | |||
| + | <font face="Segoe UI">2. Click the Agreement name link that you want to '''Approve'''. The '''Agreement Details''' page appears.</font> | ||
| + | |||
| + | | ||
| + | |||
| + | | ||
| + | |||
| + | | ||
| + | |||
| + | <font face="Segoe UI">[[File:Reject an Agreement new.png|RTENOTITLE]]</font><br/> | ||
| + | |||
| + | <font face="Segoe UI">3. Review the Agreement, and then click '''Reject''' to reject and Agreement. The '''Add Note''' dialog box appears.</font><br/> | ||
| + | |||
| + | <font face="Segoe UI">[[File:Reject an Agreement new 2.png|RTENOTITLE]]</font><br/> | ||
| + | |||
| + | <font face="Segoe UI">4. Type your comments or details explaining why you are rejecting the Agreement.</font> | ||
| + | |||
| + | <font face="Segoe UI">5. In the '''Reason Code''' list, select the appropriate reason, and then click '''Add'''. The Agreement goes back to the '''Draft''' state.</font> | ||
| + | |||
| + | | ||
| + | |||
| + | | ||
| + | |||
| + | | ||
<font face="Segoe UI">Refer to [[Sending_an_Agreement_for_Review|Sending an Agreement for Review]] for details.</font> | <font face="Segoe UI">Refer to [[Sending_an_Agreement_for_Review|Sending an Agreement for Review]] for details.</font> | ||
<font face="Segoe UI">Related Topics:<br/> [[Delegate_an_Agreement_Approval/Review|Delegate an Agreement Approval/Review]]</font> | <font face="Segoe UI">Related Topics:<br/> [[Delegate_an_Agreement_Approval/Review|Delegate an Agreement Approval/Review]]</font> | ||
Revision as of 13:46, 4 March 2017
Approving and Rejecting Agreements
An agreement can be created from an approved contract request or by creating a new agreement. Rejecting an agreement sends it back to the primary owner to make the required changes. Either way it is created, an agreement must be approved before it moves to the next stage of the workflow. All permissions, such as creating, approving and deleting of entities are controlled from the role-action mapping.
Following are the predefined roles for Agreements:
- Primary Owner: creates the agreements
- Contract Admin: can configure security settings and role permissions
- Approver: can approve and reject agreements
- Reviewer: this is an optional role that review the agreement, if the primary owner or the approver chooses to send the agreement for reviews.
- Deviation Approver: reviews any deviations in rules and clauses and approves and reject the deviations.
You can approve or reject agreements in two ways from:
- your list of Tasks, or
- the agreement details page.
To approve or reject an agreement from yoiur Tasks:
1. Click the Tasks KPI tile on My Dashboard. This opens the User Task Dashboard Page.
2. Click the link of the agreement that you need to approve. This opens the Agreement Details Page.
3. Click Approve or Reject. This opens the Add Notes dialog box.
4. Type approval or rejection notes and click Add. The status of the agreement changes to Approved or Rejected.
To approve or reject agreements from the Agreement Details Page:
1. On the ICM Home page, click the Notifications tile, and then click the Tasks tab. List of tasks waiting for your action appears.
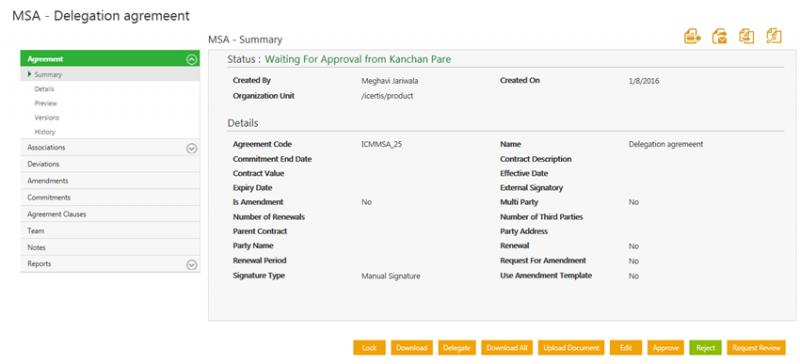
2. Click the Agreement name link that you want to Approve. The Agreement Details page appears.
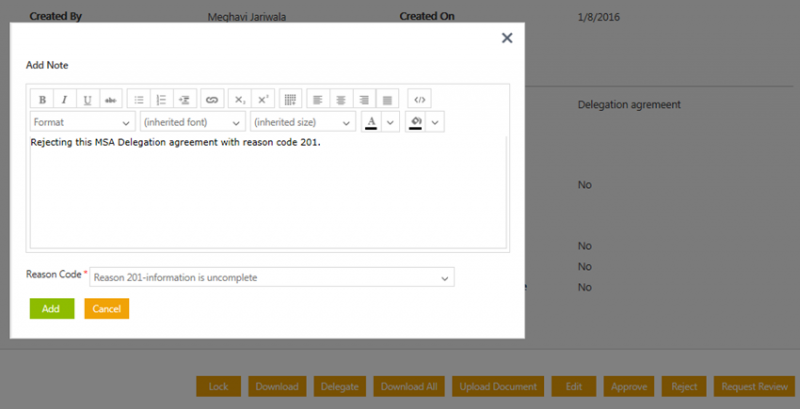
3. Review the Agreement, and then click Reject to reject and Agreement. The Add Note dialog box appears.
4. Type your comments or details explaining why you are rejecting the Agreement.
5. In the Reason Code list, select the appropriate reason, and then click Add. The Agreement goes back to the Draft state.
Refer to Sending an Agreement for Review for details.
Related Topics:
Delegate an Agreement Approval/Review

