Contents
- 1 Generic Integration Framework to Support SFTP Interface
- 1.1 Configuring SFTP Adapter to load Masterdata
- 1.2 Using SFTP Adapter to load/publish Masterdata
- 1.3 Using SFTP adapter to load/publish Transaction Data
- 1.4 Support for pre/post processing
- 1.5 Support for defining folder structure in Generic Integration Framework
- 1.6 Support for user provisioning/deprovisioning from ASB/SFTP/BLOB
Generic Integration Framework to Support SFTP Interface
The Secure File Transfer Protocol (SFTP) adapter will be built as an automated solution to load Masterdata once extracted from source of truth via SFTP. SFTP, a secure version of File Transfer Protocol (FTP), is a network protocol which facilitates file access, file transfer and file management over a Secure Shell (SSH) data stream.
Configuring SFTP Adapter to load Masterdata
The ICI support for generic integration provides the ability to synchronize ICI Masterdata tables using the input file from SFTP server. Through a technical configuration, you can specify the attributes to be used for this generic integration.
Create Masterdata Contract Type
To enable synchronization between ICI and SFTP, a Masterdata Contract Type should first be configured in ICI, with specific attributes for the integration.
To create a Masterdata Contract Type:
1. Click Create Contract Type sub menu from the Configuration tile. The Select Contract Type page opens.
2.Select Masterdata.
3. Click the Next button. The Create Contract Type Wizard page opens.
The Create Contract Type page has the following sections:
- Details: Enter the contract type name.
- Attributes: Select the Attributes for the Masterdata Contract Type.
- Display Preference: Select Attributes to be displayed in the Agreement Tile View.
- Team: Select the team.
- Verify: Verify the details in preview mode and click Create.
Client App Cross Reference
The Client App Cross Reference mapping maps ICI entities (for example, ICI attributes) to client app entities.
1. Navigate to the Create Masterdata page in ICI. This page contains the following tabs:
Masterdata Details
1. Select the Category from the drop-down. For example, Default.
2. Select the Masterdata Contract Type.
3. Click Next. The Attributes page opens.
Attributes
- Enter the relevant attribute values. For example, enter ICI Entity Name as ICISupplierMaster and Client Entity Name as SupplierMaster. The Payload Type can be selected as CSV or Json.
- Select the Text Delimiter. Supported options are pipe, colon and comma.
- Select the Text Qualifier. Supported options are Single Quote, Double Quote, No Quote.
4. Click Save to save the entity mapping.
Client App Entity Mapping
The Client App Entity Mapping maps ICI attributes (for example, attribute names used in Supplier Master) to attributes in the file uploaded through SFTP.
1. Navigate to theCreate Masterdata page in ICI. This page contains the following tabs:
Masterdata Details
1. Select the Category from the drop-down. For example, Default.
2.Select the Masterdata Contract Type.
3. Click Next. The Attributes page opens.
Attributes
1. Enter the relevant attribute values. For example, enter ICI Entity Name as ICISupplierMaster and Client Entity Name as SupplierMaster.
To create mapping using SFTP, select FileBased in the Integration Mode drop-down. The Client Name selected must be GenericIntegration.
In case of lookup and non-lookup attributes: The ICI Relationship Key should be set for lookup attributes and kept blank for non-lookup attributes. The Relationship Key framing should be <Master Contract Type Name> Double Underscore<ICI Attribute Name>. For example, in case of Supplier Master the ICI attribute name will be ICISupplierCountry and the Masterdata Contract Type for this attribute will be ICICountryMaster. Hence, relationship key will be ICICountryMaster__ICISupplierCountry.
2. Click Save to save the entity mapping.
Using SFTP Adapter to load/publish Masterdata
Download Payload
- Navigate to the Masterdata page in ICI.
- Click the View Record icon next to the Client App Cross Reference entity you have created. The Masterdata Details page opens.
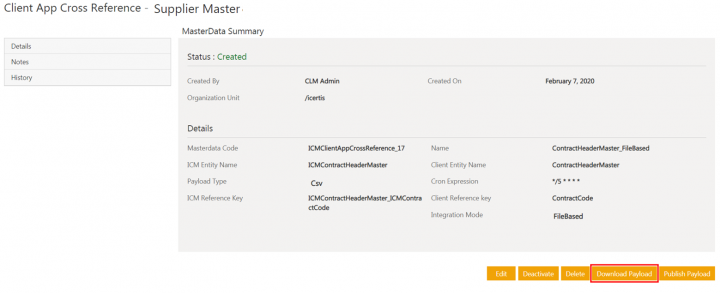
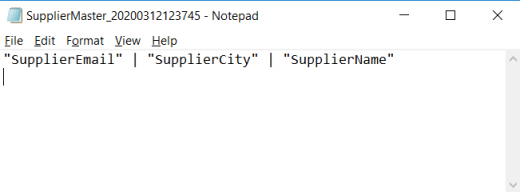
- Click the Download Payload button. The template for the Masterdata will be downloaded to your local drive.
- Open the downloaded CSV or Json file. This file will be used by third-party systems to push data to the SFTP adapter.
Publish Payload
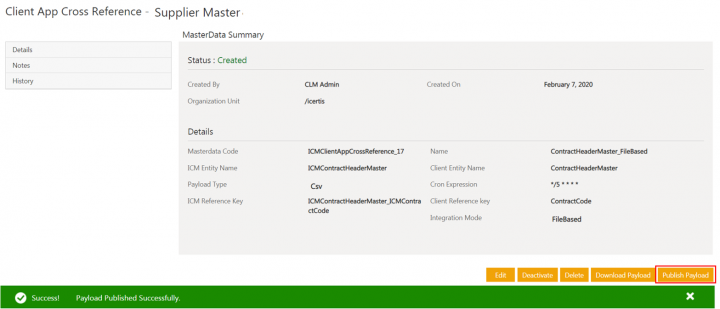
Click Publish Payload. The empty payload will be published.
Using SFTP adapter to load/publish Transaction Data
Download Payload
1. Navigate to the Masterdata page in ICI.
2. Click the View Record icon next to the Client App Cross Reference entity you have created. The Masterdata Details page opens.
3. Click the Download Payload button. The template for the Masterdata will be downloaded to your local drive.
4. Open the downloaded CSV file. This file will be used by third-party systems to push data to the SFTP adapter.
Publish Payload
Click Publish Payload. The empty payload will be published.
A notification is displayed once the Payload is published successfully.
Support for pre/post processing
With this release, support is being provided for custom pre- and post-processing hooks to the Generic Integration Framework in order to considerably reduce implementation time. These hooks are now provided to:
- Pre-process inbound data through file-based integrations.
- Pre-process inbound and outbound data through ASB-based integrations.
ICI administrators will now be able to:
- Enable or disable the hook as part of file-based integration.
- Pass parameters to the hook for executing a custom logic.
- Enable or disable the hook at file or record level. When hook is enabled at file level, the system will process all records in the file before handing off control to the hook. When hook is enabled at record level, system will wait for hook to complete processing at record level before processing the next record.
- Execute any custom logic in the system for a file or record when hook is configured.
- Complete GIF process even when custom logic encounters any error while processing a record or file.
Support for defining folder structure in Generic Integration Framework
Previously, the generic integration framework provided a fixed folder structure for file-based inbound master data integration.
Now, support is being extended so that users will be able to define and configure the folder structure and file names depending on their business requirement. This helps in reducing effort during implementation while aiding better adoption of changes on the client's system.
With this release users have:
- Support for single or multiple folders in the folder structure.
- A folder and file naming convention which is flexible, and configurable via masterdata (in JSON format).
- Support for folder structure based on ICI entities, with separate folders for each ICI entity.
- Folders which are easy to configure and flexible to modify via JSON structure, whenever business needs change.
- A choice to use standard folders as per requirement. If JSON structure is not added, then the ICI default folder structure will automatically be used.
Creating a Customized Folder Structure
To create a customized folder structure using GIF:
1. Click Home > Configuration > Masterdata > Create Masterdata. The Masterdata Details page opens.
2. Enter the relevant details:
- Category: Select Default
- Masterdata: Select Client App Cross Reference
3. Click Next. The Attributes page opens.
4. Enter the relevant attribute values in the respective fields.
5. Copy the Json format from the tool-tip of the Folder Structure Json attribute.
6. Edit the Json format text to customize the folder structure.
Note:
- The folders Inbox and Processing are mandatory whereas Archive, Error and Passed are not mandatory and can be removed. For example, if the Passed folder is removed, no Pass file will be created after the files are processed. However, if the Inbox or Processing folder(s) is/are removed, then the GIF will use the default folder structure.
- Folder structures using only one folder will also have a separate folder for processing.
- Users can configure different folder structures per entity.
- If no customization is needed, then leave the Folder Structure Json attribute blank and Update the existing Client App Cross Reference. In this case, the default folder structure will be created on the FTP folder structure.
7. Click Save. The cross reference mapping will be created.
8. Click Publish Payload on the Masterdata Summary page. The folder structure will be created in the FTP.
Support for user provisioning/deprovisioning from ASB/SFTP/BLOB
Configuring Client App Cross Reference Mapping
When the files are uploaded and the job is triggered at the backend, the line items and main payload will be picked up for processing. The user will get added and the team will get updated in ICI.
The Folder Structure Json attribute has been updated to Version 2.0, however earlier versions continue to be supported.
Notifications to individual users and mass notification to functional users are not supported.
Creating a new security group or user group is not supported.
Related Topics: Agreement Management | Integrations | Salesforce | Using Adobe Sign | Using DocuSign | Using Namirial eSignAnyWhere | Generic Integration Framework to Support ASB Interface | Release_Notes |


