Promote Configurations
The Promote to Production (P2P) process of the ICM platform helps to move ICM Configuration from source (Config/UAT) environment to target (production) environment. P2P process enables to selectively move ICM configuration. The Promote Configuration Tool or P2P is designed to accomplish just that.
With the 7.11 release, the Promote to Production (P2P) tool to enable users with the following enhancements:
- Vulnerability and Penetration Testing (VAPT) fixes
- Testing open bugs in P2P engine
- Some new validations in the P2P engine
- Better user interface to provide support to P2P and DevOps teams
With the 7.12 release, changes have been made in ICM to support the P2P engine. This functionality, provided to Administrators, can promote ICM configurations/modifications that are made to ICM configurations in pre-production environments to production environments. This tool provides support for contract types, contract type attributes, clauses and templates (along with the documents), notification templates, rules, masterdata, users, user groups and security groups. The Icertis search sync is also supported by the tool.
Note: UI changes on contract type, rule set, notification template are not included. Customers using ICM version before 7.12 need to upgrade for this capability.
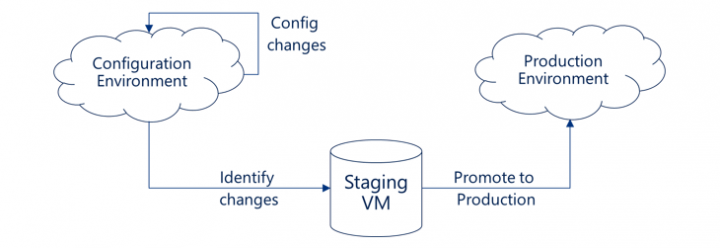
Here is an overview of the P2P process:
Accessing P2P tool
To access the P2P tool:
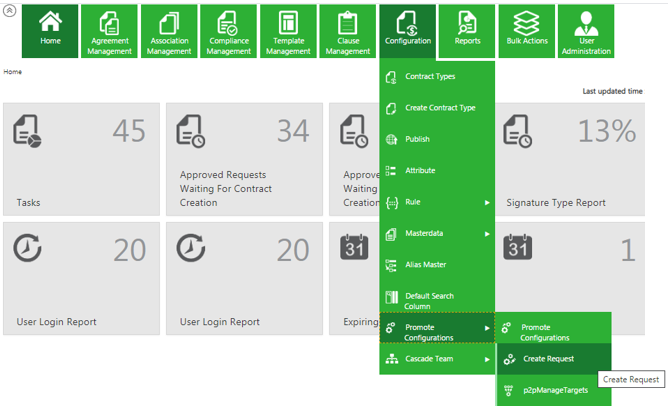
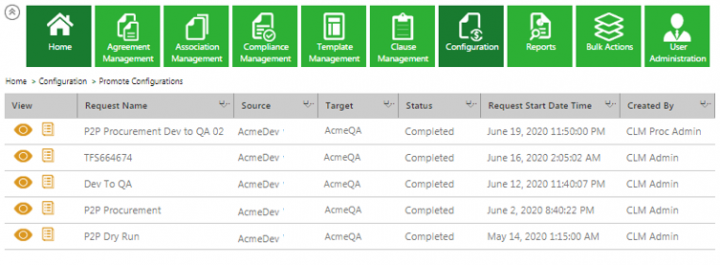
1. Click Home > 'Configurationtile. The Configuration page opens.
2. Click the Promote Configurations tile. The Promote Configuration page opens. The Promote Configurations displays the current status of PToP requests and their status.
Creating a P2P Request
To create a P2P Request:
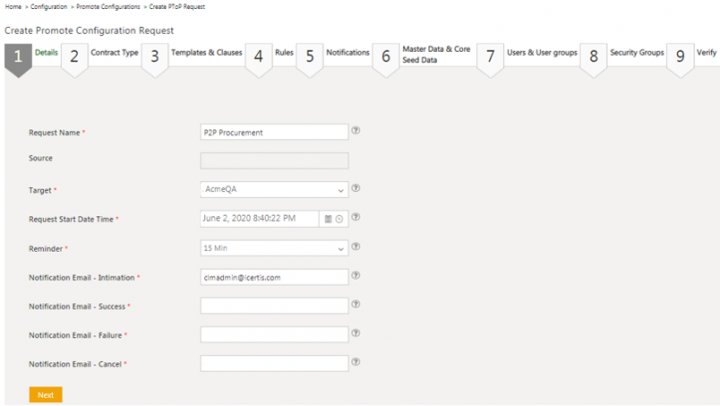
1. Click Configurations > Promote Configurations > Create Request. The Create P2P Request page opens.
2. Enter a Request Name. For example, Procurement.
3. Select a Target from the drop-down. For example, Acme Dev.
4. Select the P2P Request Start Date Time.
5. Select the time to trigger an email to the recipient from the Intimation Email minutes before P2P Starts drop-down list. For example, 15 Min.
6. Enter the intimation recipient Email Id in the Notification Email – Intimation field.
7. Enter the notification recipient Email Id in the Notification Email – Success field.
8. Enter the notification recipient email Id in the Notification Email – Failure field.
9. Enter the notification recipient email Id in the Notification Email – Cancel field.
10. Click Next. The Contract Type tab opens.
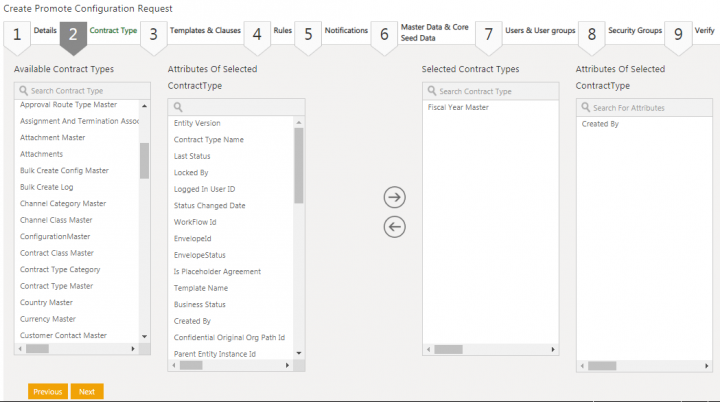
11. Select the Contract Type from the Available Contract Types. For example, Fiscal Year Master. The selected Contract Type attributes are available in the Attributes Of Selected Contract Type columns.
12. Select the attributes for the selected contract type. For example, Created By.
13. Click the right arrow to move the selected contract type and attribute to the Selected Contract Types and Attributes Of Selected Contract Type columns respectively.
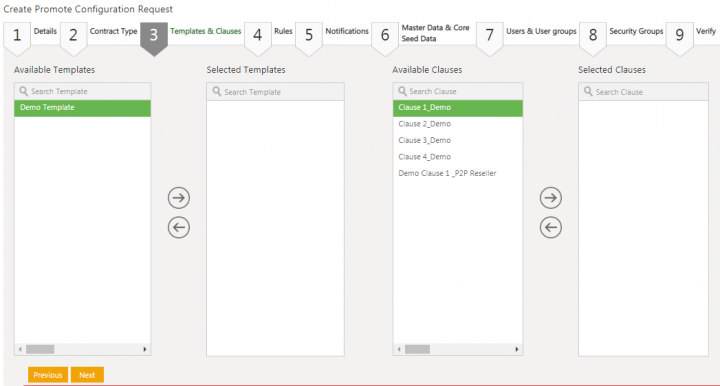
14. Click Next. The Templates and Clauses tab opens.
15. Select a template from the Available Templates columns. For example, Demo Template.
16. Click the arrow key to move the selected template to the Selected Templates column.
17. Select a clause from the Available Clauses columns. For example, Clause 1_Demo.
18. Click the arrow key to move the selected clause to the Selected Clauses column.
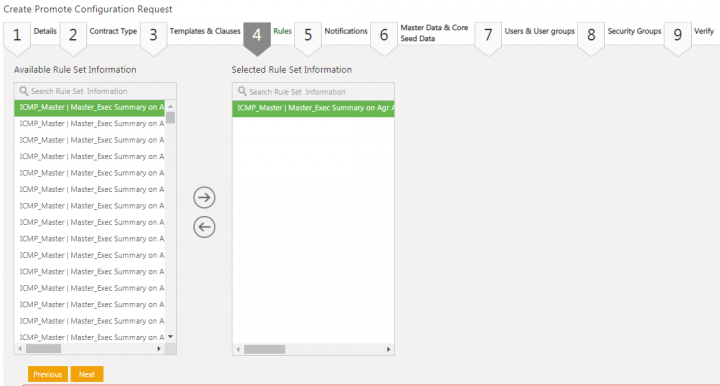
19. Click Next. The Rules tab opens.
20. Select a Rule from the Available Rule Set Information column. For example, ICM_Master I Master_Exec Summary on Agr Add Association.
21. Click the arrow key to move the selected rule to the Selected Rule Set Information column.
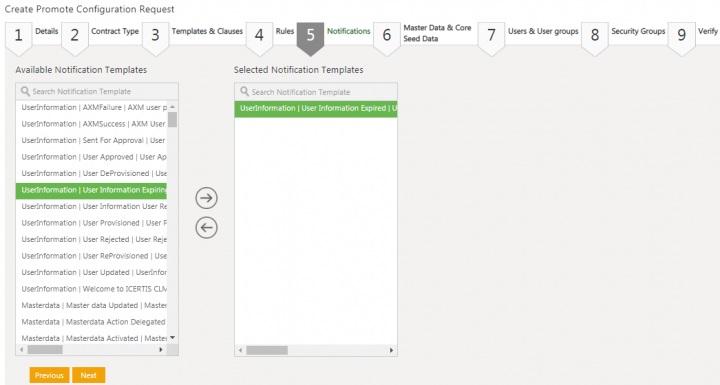
22. Click Next. The Notifications tab opens.
23. Select the notification template from the Available Notification Template columns. For example, UserInformation I User Information Expired I UserInformationExpired I User Notifications.
24. Click the arrow key to move the selected template to the Selected Notification Templates column.
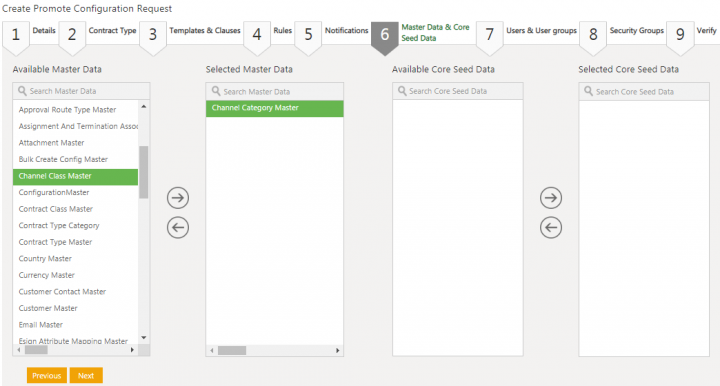
25. Click Next. The Master Data & Core Seed Data tab opens.
26. Select the masterdata from the Available Master Data column. For example, Channel Category Master.
27. Click the arrow key to move the selected rule to the Selected Master Data column.
28. Select the seed data from the Available Core Seed Data column.
29. Click the arrow key to move the selected master data to the Selected Core Seed Data column.
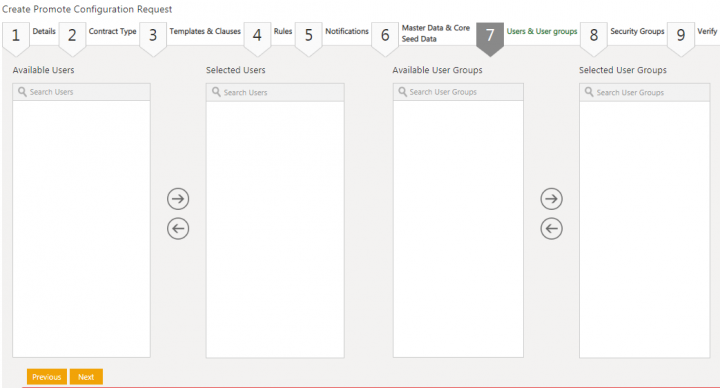
30. Click Next. The Users & User groups tab opens.
31. Select the users from the Available Users column.
32.Click the arrow key to move the selected user to the Selected Users column.
33. Select the user group from the Available User Groups column.
34. Click the arrow key to move the selected user to the Selected User Groups column.
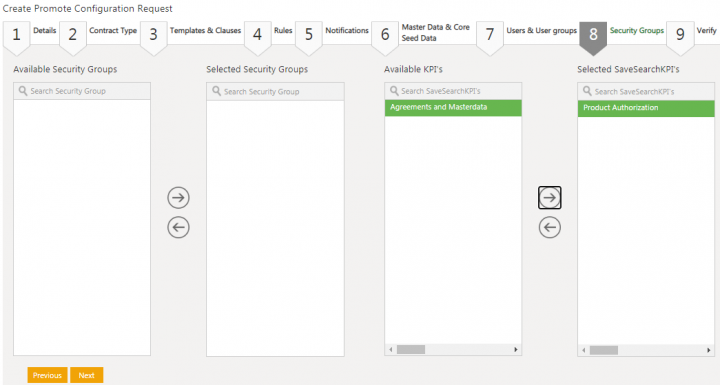
35. Click Next if any or no user or user group is selected. The Security Groups tab opens.
36. Select the security group from the Available Security Groups columns.
37. Click the arrow key to move the selected security group to the Selected Security Groups column.
38.Select the KPI from the Available KPI’s columns.
39.Click the arrow key to move the selected KPI to the Selected SaveSearchKPIs column. For example, Product Authorization.
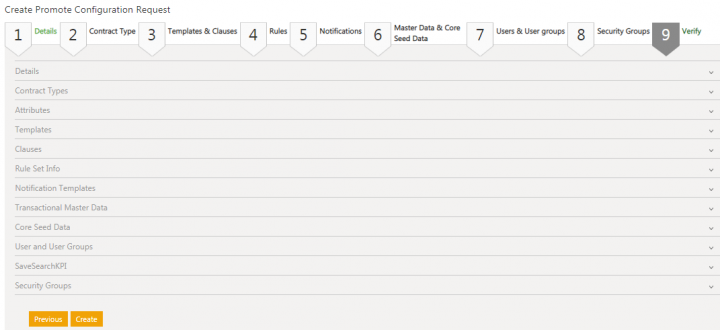
40. Click Next. The Verify tab opens.
41. Verify details of the contract types, attributes, templates, clauses, rule set information, notification templates, master data, core seed data, user and user groups, save search KPI and security groups that you have selected.
42. Click Create. The Please Confirm window opens indicating that downtime is required for this request.
Note: The P2P tool verifies all the information entered by the user before creating a P2P request.
43.Click Yes if you wish to proceed. The Information window opens indicating that the P2P request created successfully.
44.Click Ok. The P2P request status changes to ADDED.
45. On completion of the P2P request, the status changes to Completed.
Related Topics:Agreement_Management | Association Management | Compliance Management | Template Management | Clause Management | Configuration | Reports | Localizing ICM
