Contents
- 1 ICI Proposal Management App
- 1.1 Purpose of the Document
- 1.2 Prerequisites
- 1.3 ICI Proposal Management Application
- 1.4 The Proposal Management Process
- 1.4.1 Setting masterdata values
- 1.4.2 Working with Sell Side RFx
- 1.4.2.1 Creating Sell Side RFx
- 1.4.2.2 Accessing Sell Side RFx
- 1.4.2.3 Creating Associations for Sell Side RFx
- 1.4.2.4 Editing Sell Side RFx
- 1.4.2.5 Canceling Sell Side RFx
- 1.4.2.6 Deleting Sell Side RFx
- 1.4.2.7 Sending Sell Side RFx for Approval
- 1.4.2.8 Approving Sell Side RFx
- 1.4.2.9 Rejecting Sell Side RFx
- 1.4.2.10 Expiring of Sell Side RFx
- 1.4.3 Making a Bid Decision
- 1.4.4 Working with Bid Proposal
- 1.4.4.1 Creating the Bid Proposal
- 1.4.4.2 Accessing Bid proposal
- 1.4.4.3 Managing Bid Proposal using Commitments
- 1.4.4.4 Editing Bid Proposal
- 1.4.4.5 Canceling Bid Proposal
- 1.4.4.6 Deleting Bid Proposal
- 1.4.4.7
- 1.4.4.8 Reviewing bid proposal
- 1.4.4.9 Sending bid proposal for approval
- 1.4.4.10 Approving Bid Proposal
- 1.4.4.11 Rejecting Bid proposal
- 1.4.4.12 Executing bid proposal
- 1.4.4.13 Capturing Bid Outcome
- 1.4.4.14 Adding Amendments to Bid Proposal
- 1.4.4.15 Expiring of Bid Proposal
ICI Proposal Management App
Purpose of the Document
Prerequisites
ICI Proposal Management Application
Overview
The Terminology
The Challenge
The Opportunity
The Solution Framework
The Users
The Proposal Management Process
Setting masterdata values
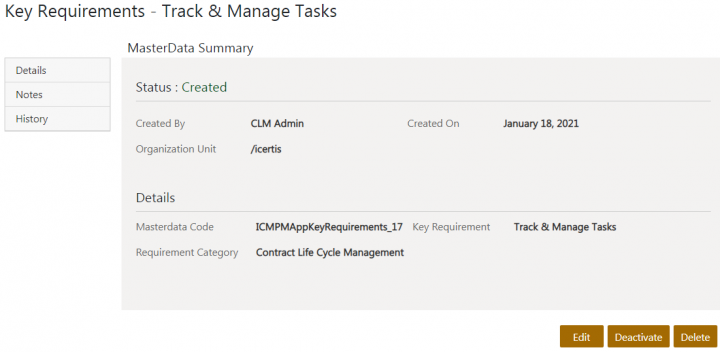
The ICI Proposal Management provides seeded masterdata “Key Requirements” to capture the essential contents of an RFx that would help in winning the bid proposal.
Users can create masterdata instances as per the business requirements.
To create a masterdata instance:
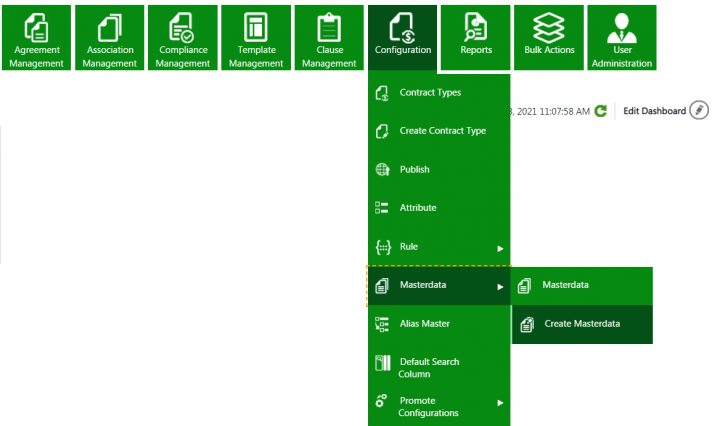
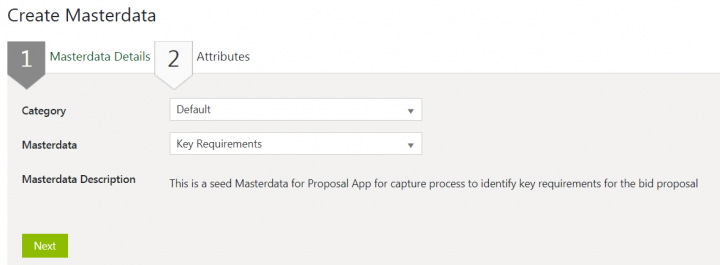
1. Click “Configuration” > “Masterdata” > “Create Masterdata” on the “Home” page. The “Create Masterdata” page opens.
- Category: For example, Default.
- Masterdata (contract type): For example, Key requirements.
- Key Requirement: For example, Track & Manage Tasks.
- Requirement Category: For example, Contract Life Cycle Management.
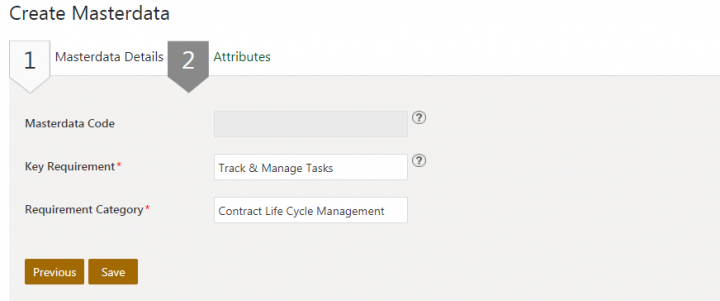
5. Click “Save”. The masterdata instance is created. You can edit, deactivate or delete the created masterdata, as required.
Working with Sell Side RFx
The details that would help the Sell Side RFx to qualify and potentially win a bidding are captured during the creation of a Sell Side RFx instance. The details include information related to RFx, RFx Type, key requirements for RFx, RFx documents, templates, customer details, selection process and logistics details, RFx schedules, and so on.
Creating Sell Side RFx
A Sell Side RFx contains the various incoming solicitation types received by the supplier organization for purchase or supply of goods or services from the buyer organization. RFx can be a Request for Proposal, Request for Quote, Request for Information, and so on.
To create a Sell Side RFx:
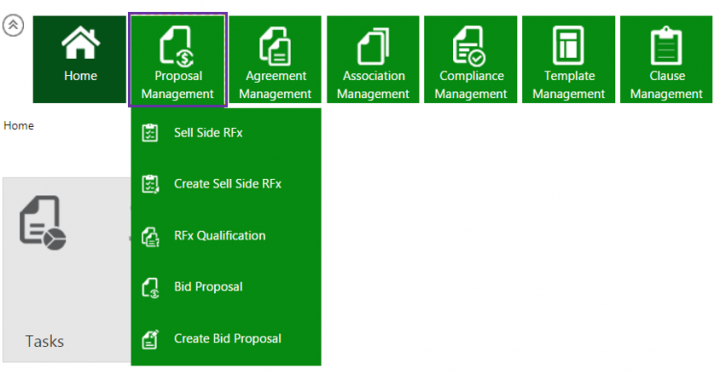
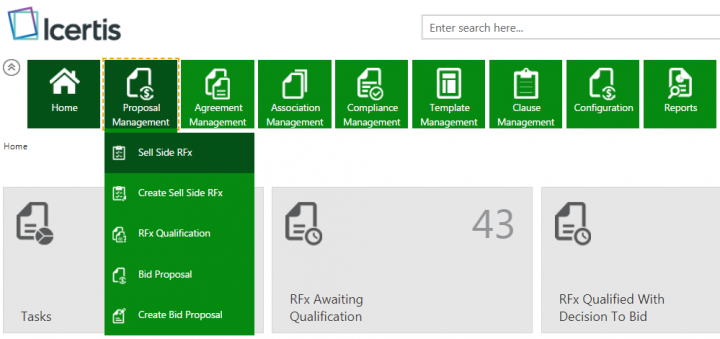
1. Click the “Proposal Management” tile on the “Home” page. The following options are displayed depending upon the access privileges of a user: Sell Side RFx, Create Sell Side RFx, RFx Qualification, Bid Proposal, Create Bid Proposal.
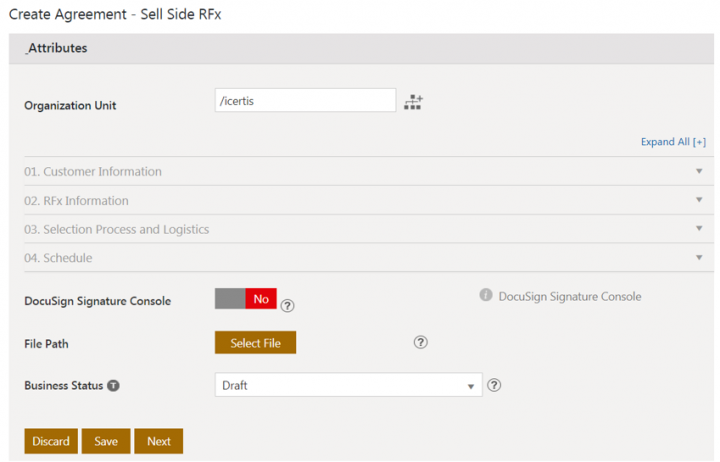
2. Click “Create Sell Side RFx”. The “Attributes” page opens which contains key information required to be captured for creating the Sell Side RFx.
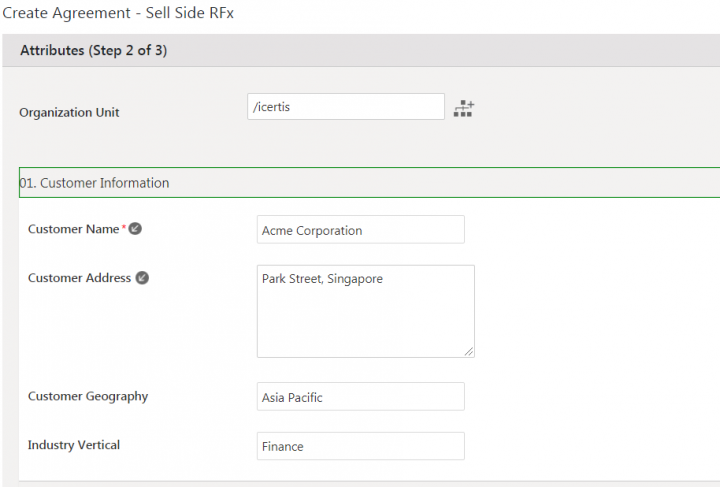
3. Select or enter values for the following fields in the “Customer Information” section:
- Customer Name: The name of the buyer organization (prospect) from whom RFx is received for bidding. For example, Acme Corporation.
- Customer Address: The business address of the buyer organization (prospect) from which RFx is received for bidding. For example, Park Street, Singapore.
- Customer Geography: The location where the prospect or the customer is located. You can use this attribute to analyze the performance of your capture/proposal process with customer geography as a dimension. For example, Asia Pacific.
- Industry Vertical: The industry or domain which the buyer organization, prospect or customer falls under. For example, Finance.
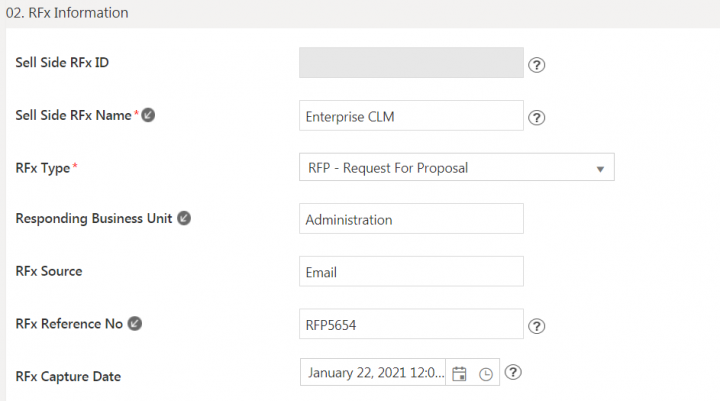
4. Enter values for the following fields in the “RFx Information” section:
- Sell Side RFx ID: A unique ID generated automatically by the system on creation of the Sell Side RFx.
- Sell Side RFx Name: The name as mentioned in the RFx documents, or the customer/opportunity name. For example, Enterprise CLM.
- RFx Type: The solicitation types include:
o Request for Proposal (RFP): Is a solicitation type that helps obtaining the proposal for procuring goods and services. This is typically done through the bidding process.
o Request for Quote (RFQ): Is a solicitation type that allows organizations to request for quote from the suppliers for purchasing goods or services. RFQ is also called Invitation for Bid (IFB).
o Request for Information (RFI): The set of questions shared with potential suppliers to assess their ability to fulfil certain requirements to provide goods or services. This is done in the form of a questionnaire with specific and general questions.
o Tender: The invitation to bid for a specific project or supplying goods or services. For example, governments typically invite bids from organizations that should be submitted within the defined deadline.
- Responding Business Unit: The business unit responsible for responding to the Sell Side RFx. For example, Administration.
- RFx Source: The source includes all the input channels for the RFx. For example, RFx would be received on email, all the input data is captured.
- RFx Reference No: The unique identification of the RFx received from external system for reference.
- RFx Capture Date: The automatically generated date and time when the RFx was captured and a Sell Side RFx record is created in ICI Proposal Management App.
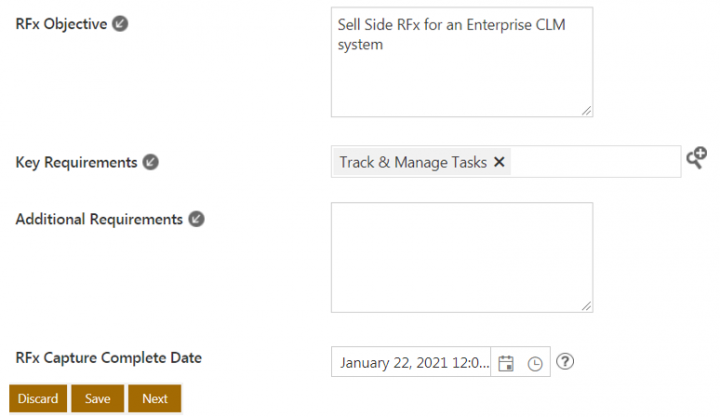
- RFx Objective: The purpose of creating the RFx.
- Key Requirements: The essential needs of the buyer captured in the RFx to fulfill the key objectives of the RFx.
- Additional Requirements: The additional needs that are interpreted and not necessarily mentioned in the RFx documents. This helps giving additional information to the proposal creation team.
- RFx Capture Complete Date: This is an auto computed attribute that captures the date and time whenever Sell Side RFx record is edited or approved.
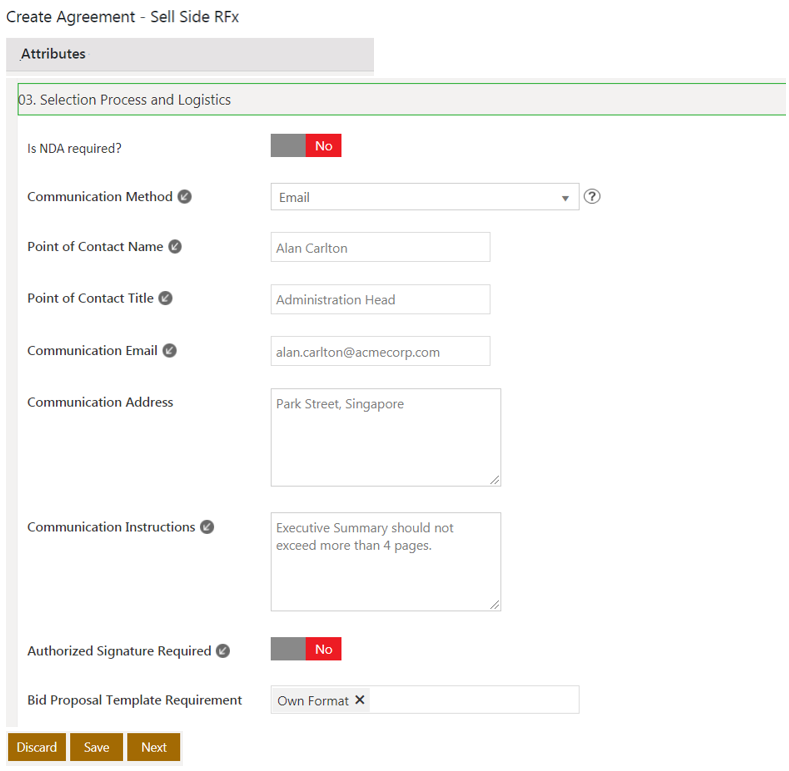
5. Select or enter values for the following fields in the “Selection Process and Logistics” section:
- Is NDA Required: This flag must be enabled if it is mandatory for the buyer and supplier to sign the NDA.
- Communication Method: The preferred method of correspondence to submit the proposal. For example, Email, Customer Workshop, etc.
- Point of Contact Name: The point of contact at the buyer’s end to whom the proposal or any other queries should be submitted.
- Communication Email: The email address of the designated point of contact from the buyer’s side.
- Communication Address: The mailing or communication address of the buyer organization, in case the proposal or queries need to be submitted physically.
- Communication Instructions: The specific guidelines (if any) for communicating with customers as part of RFx process.
- Authorized Signature Required: This flag must be enabled if the authorized signature is required to be performed by the buyer and supplier. This helps defining signatory for bid proposals that will be created to address the Sell Side RFx.
- Bid Proposal Template Requirement: The specific format provided by the buyer that needs to be adhered to by the supplier while responding to the Sell Side RFx. It could also be in the supplier’s “Own” template format for responding as per business requirements.
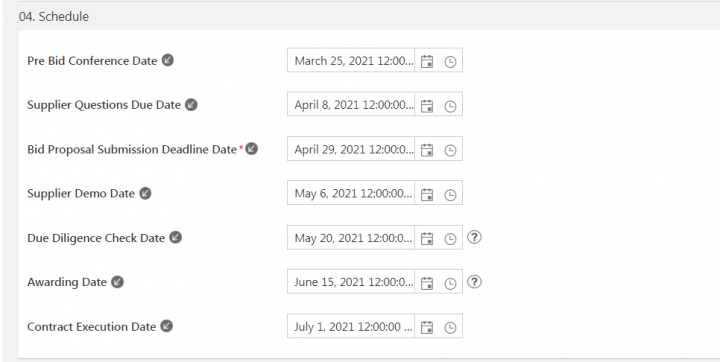
6. Select or enter values in following fields of the “Schedule” section:
- Pre Bid Conference Date: The date when buyer holds a conference for all bidders prior to bidding. The intent is to elaborate and provide details about the RFx and to answer any questions that bidders may have in a common forum. It is not applicable in all RFx context.
- Supplier Questions Due Date: The date by which the suppliers can submit the queries for received RFx to the buyer.
- Bid Proposal Submission Deadline Date: The date by which the bid proposal must be submitted by the suppliers.
- Supplier Demo Date: The date on which suppliers must present a demonstration of the goods or services that they will supply.
- Due Diligence Check Date: The date and time by which the references provided by suppliers would be validated.
- Awarding Date: The date when the supplier is awarded the RFx.
- Contract Execution Date: The date when the contract is executed between the buyer and the supplier.
7. Click “Select File” in the “File Path” field to upload an RFx document that supports the Sell Side RFx.
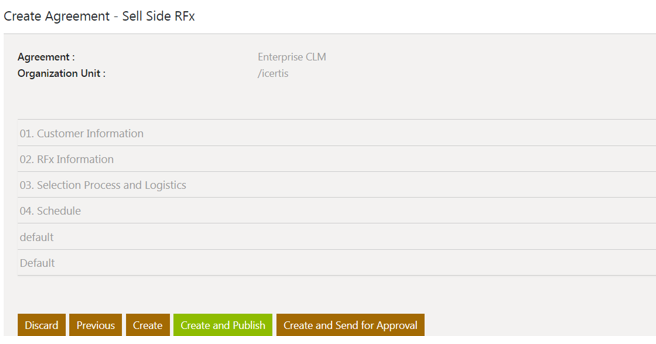
8. Click “Next”. The “Verify” page opens.
9. Verify the details and click one of the following options.
- Create
- Create and Publish
- Create and Send for Approval
The RFx is created in the “Draft” state.
The Sell Side RFx, being the standard ICI Agreement Contract Type, follows all ICI agreement functionalities such as adding members to Team, Rules and Approval process to approve the Sell Side RFx.
Accessing Sell Side RFx
You can view existing sell side RFx from the “Proposal Management” tile.
To view the created sell side RFx:
1. Click “Proposal Management” >” Sell Side RFx” on the “Home” page.
The saved search result page opens displaying all available sell side RFx records. Users can refine the search result by applying filters, options and keywords.
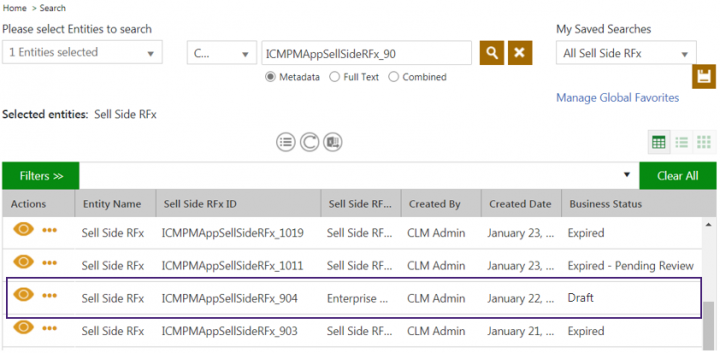
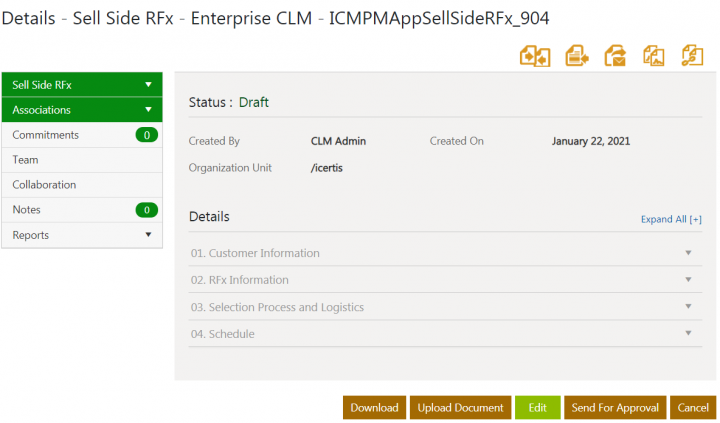
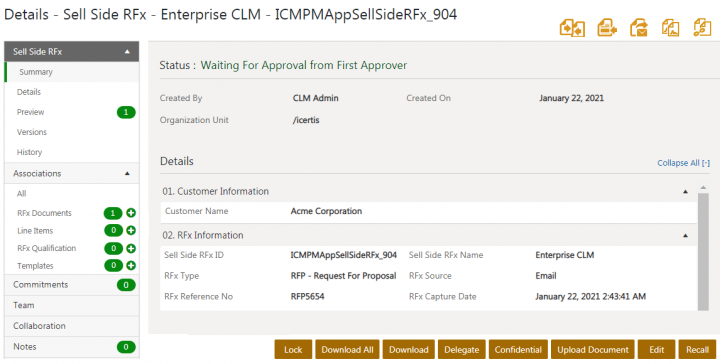
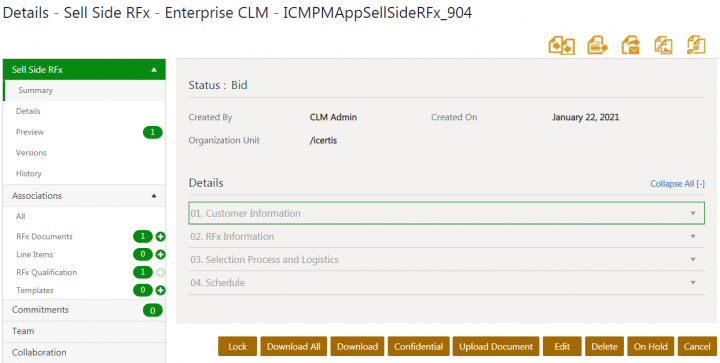
2. Click “View Record” icon corresponding to the sell side RFx record you want to open. For example, Enterprise CLM. The sell side RFx “Details” page opens.
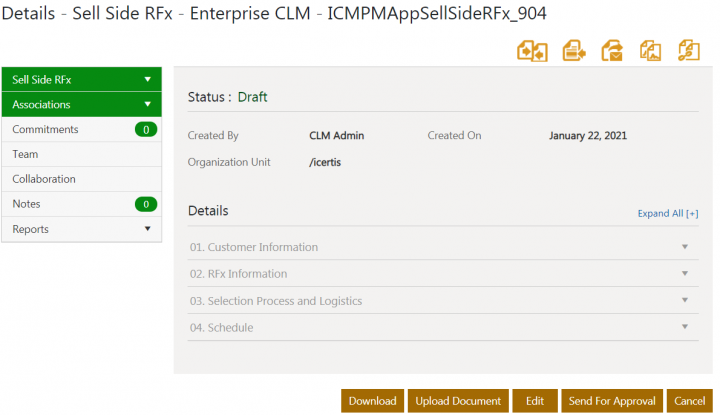
Suppliers can view the current status of the sell side RFx on the “Details” page. Suppliers can also perform a variety of actions based on the current state of the sell side RFx.
Creating Associations for Sell Side RFx
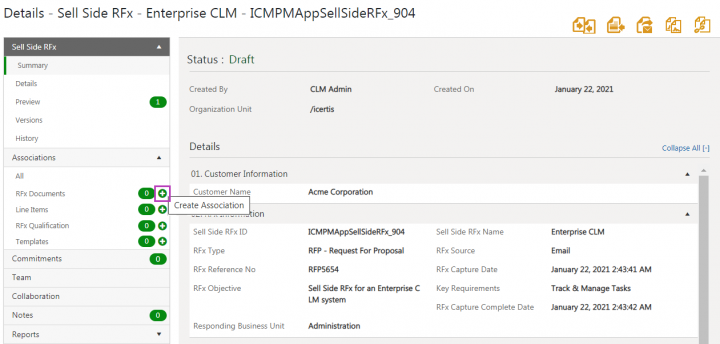
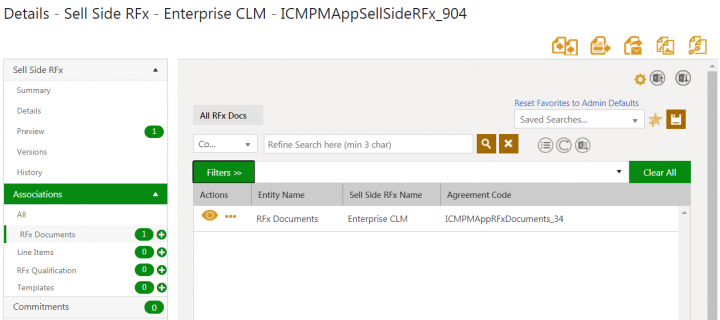
You can associate supporting documents with Sell Side RFx from the “Associations” tab in the left navigation pane on the “Details” page. This tab displays a list of associations relevant to the current Sell Side RFx instance such as All, Peers, Prerequisites, Post requisites, and No Constraint. It has following sub-sections.
- All: All the associations relevant to the current Sell Side RFx instance.
- RFx Documents: The Sell-Side RFx content may be split across various logical documents. For example, Specific Requirements, Demo Cases, Questionnaires, and so on. RFx Documents captures all such documents for a Sell Side RFx.
- Line Items: A buyer may break down the RFx requirement in a series of line items or a sales persona analyses and may create RFx line items for proposal. Line Items associations capture the details about required quantity for line items associated with the current Sell Side RFx.
- RFx Qualification: After the Sell Side RFx capture is complete, an RFx Qualification captures the outcome of the Bid or No-Bid decision. This association provides information such as Bid Decision details, Versions, History, Team, Notes, and so on. A Sell Side RFx can have only one RFx Qualification.
The RFx Qualification association impacts the Sell Side RFx workflow. Refer to Making a Bid Decision for details.
- Templates: Sell-Side RFx may mandate the template to follow for a Bid Proposal. For example, templates for questionnaire, bid-proposal, pricing matrix, and so on. Templates associations capture such third party templates which specify the format for bid response.
To create an association for Sell Side RFx from Details page:
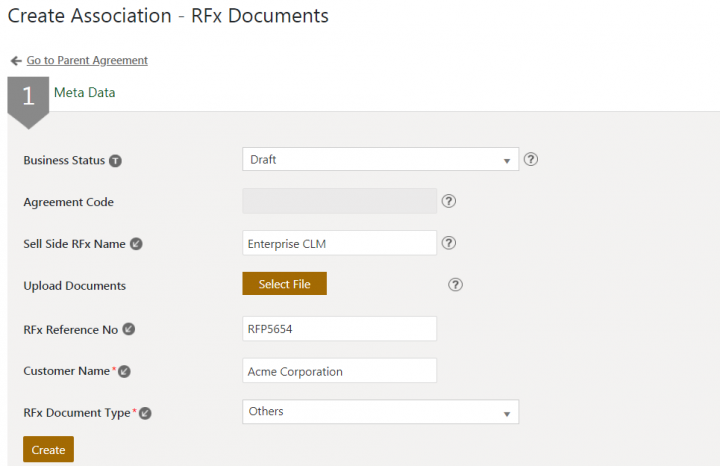
1. Click the plus + icon to “Create Association” corresponding to the type of association that you want to create. For example, RFx Documents. The “Create Association” page opens.
2. Enter the details. The Sell Side RFx details are pre-populated.
3. Click “Create”.
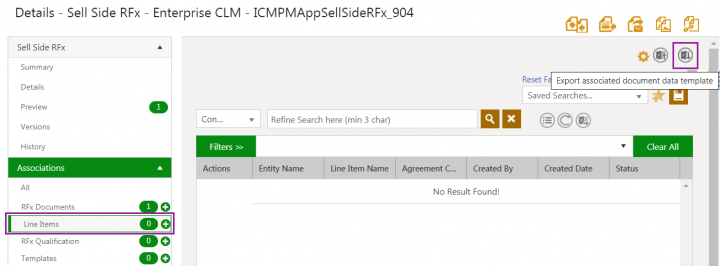
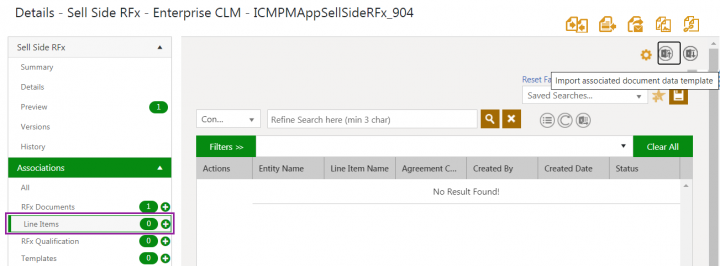
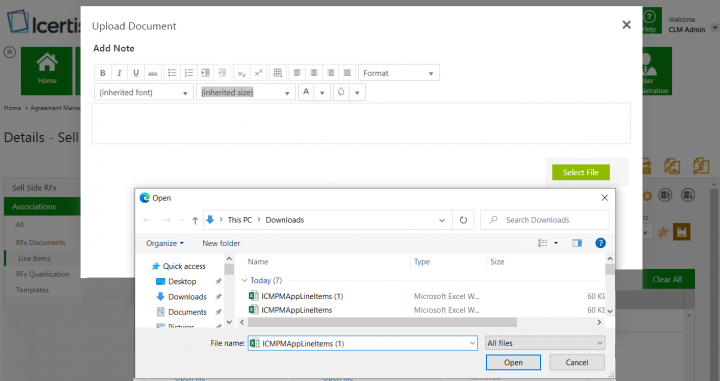
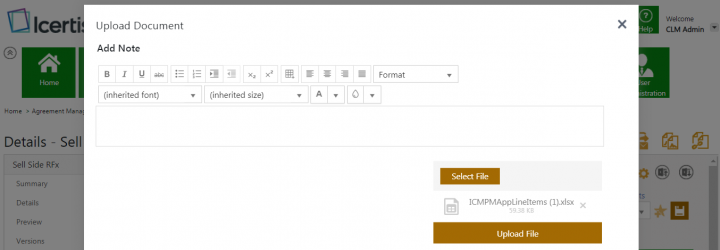
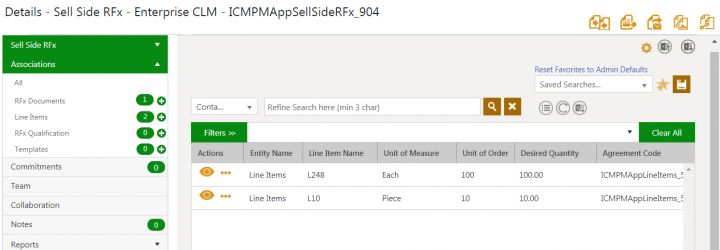
1. Click Association type under Associations in left navigation pane, you want to add to the Sell Side RFx. For example, “Line Items”. The selected associations open in grid.
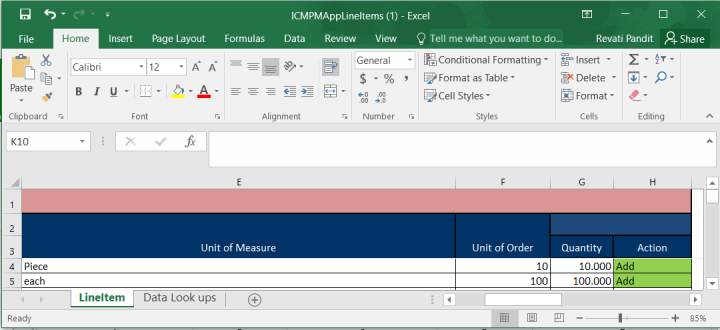
2. Click “Export associated document data template” icon. The Excel template will be downloaded as “ICMPMAppLineItems.xlsx” on your machine in the configured download folder.
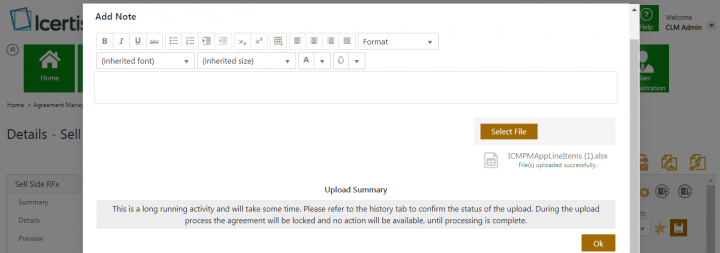
4. Save the details and close the file.
8. Click “Ok”.
Editing Sell Side RFx
You can modify the sell side RFx as per business requirements:
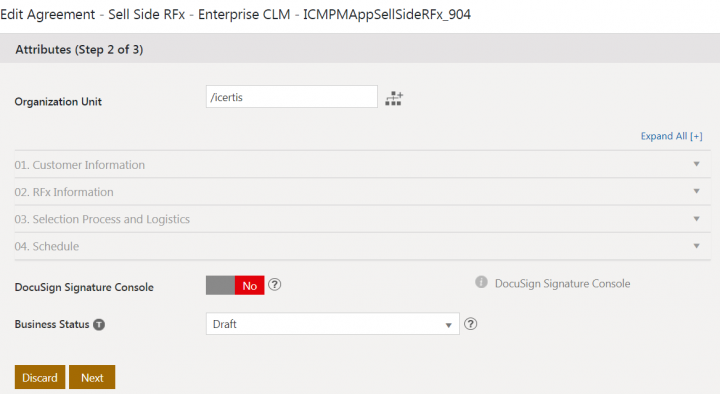
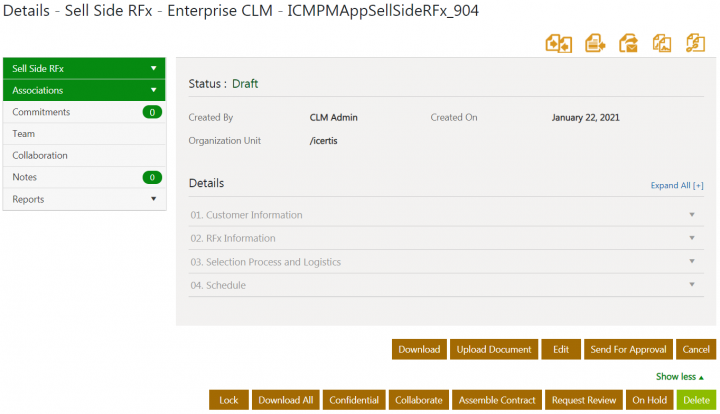
1. Click “Edit” on the sell side RFx “Details” page. The “Edit Agreement for Sell Side RFx” page opens.
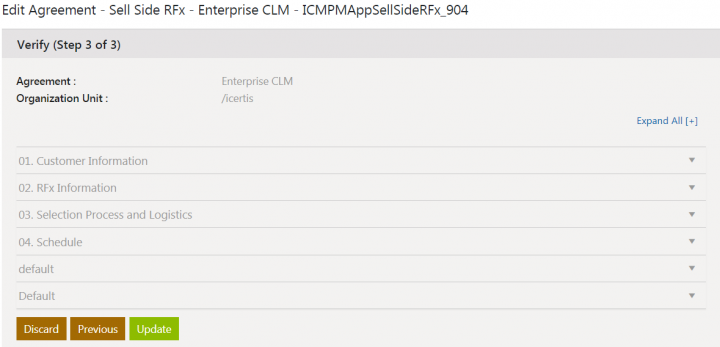
2. Make the required changes and click “Next”. The “Verify” page opens.
3. Verify the changes made to the RFx and click “Update”.
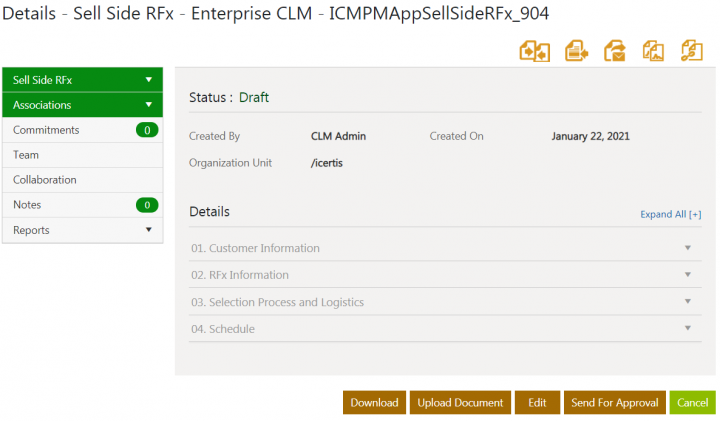
The RFx will save the updates made.
Canceling Sell Side RFx
You can cancel a sell side RFx as per business requirements.
To cancel a sell side RFx:
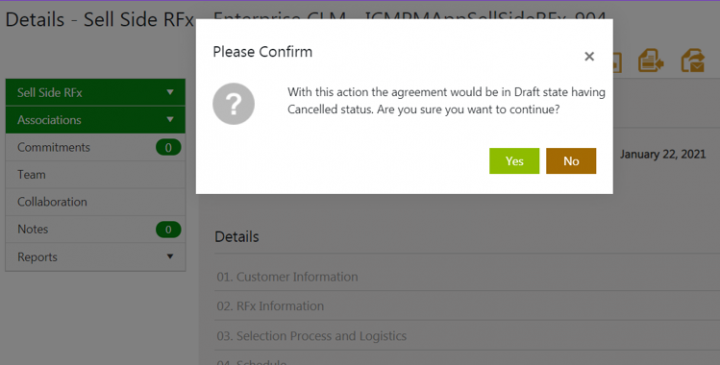
1. Click “Cancel” on the sell side RFx “Details” page. The “Please Confirm” window opens.
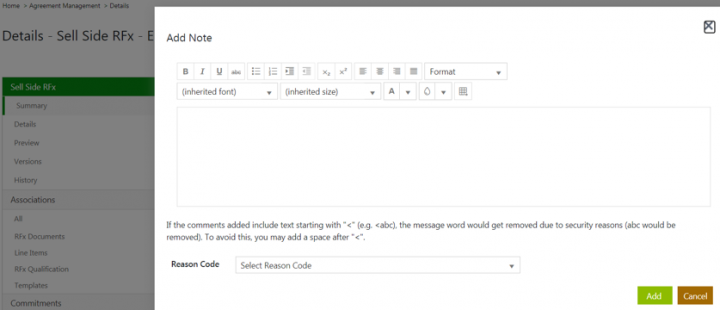
2. Click “Yes” if you are sure that the RFx should be cancelled. The “Add Note” window opens.
3. Enter a note such as the reason for cancellation and select the reason code.
4. Click “Add”. The status of sell side RFx changes to “Cancelled”.
Deleting Sell Side RFx
1. Click “Delete” on the Sell Side RFx “Details” page to delete the RFx. The “Please Confirm” window opens.
2. Click “Yes” on the “Please Confirm” window. The Sell Side RFx will be deleted.
Sending Sell Side RFx for Approval
You can send the Sell Side RFx for approval if not already sent during the creation process.
1. Click “Send for Approval” on the Sell Side RFx Details page. The Sell Side RFx is sent to approvers added in the record’s team.
The Sell Side RFx status moves to “Waiting for Approval”.
2. Click Recall if you want to recall the Sell Side RFx sent to approvers. The Add Note window opens.
3. Add a note and select a Reason Code for recalling.
4. Click Add. The Sell Side RFx will be recalled and moves back to Draft state.
Approving Sell Side RFx
Approvers can approve or reject a Sell Side RFx based on the company’s objectives being fulfilled.
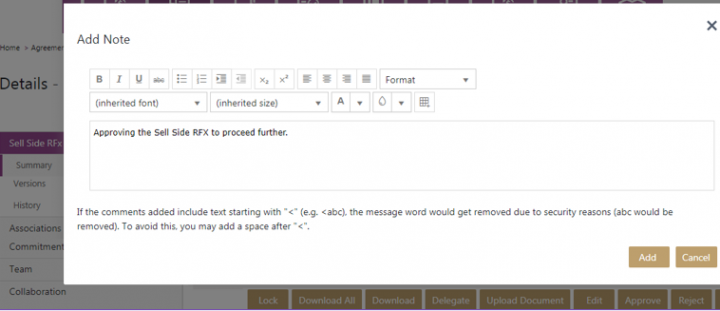
1. Click “Approve” on the Sell Side RFx “Details” page. The “Add Note” window opens.
2. Enter a note and click “Add”. The Sell Side RFx is approved.
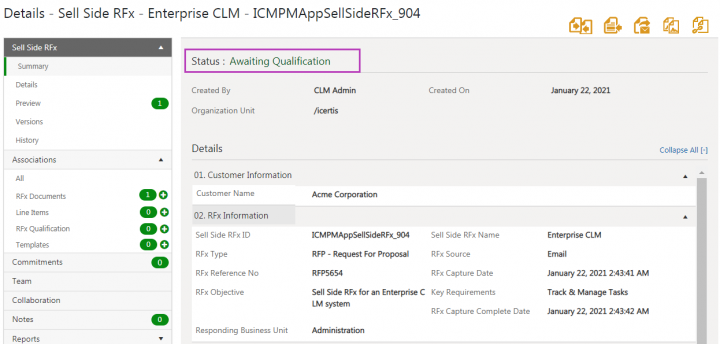
The Sell Side RFx status changes to “Awaiting Qualification” once all approvers added in the Team approve it.
Rejecting Sell Side RFx
Approvers can reject a Sell Side RFx based on the company’s objectives.
1. Click “Reject” on the Sell Side RFx “Details” page. The “Add Note” window opens.
2. Enter a note and select a reason for rejection.
3. Click “Add”.
The Sell Side RFx is rejected and goes back to the “Draft” state.
Expiring of Sell Side RFx
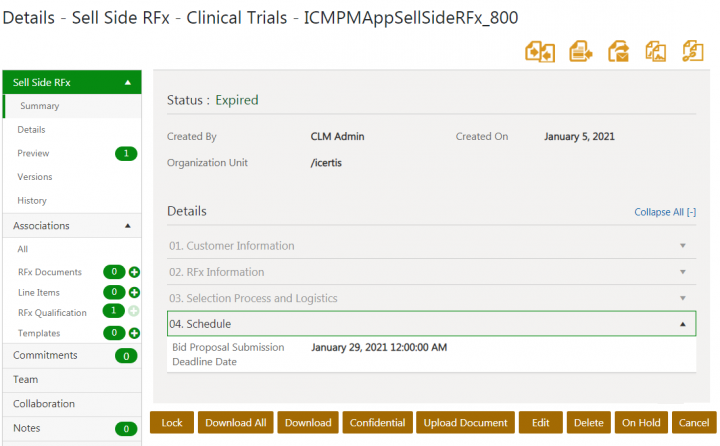
If the bid proposal submission deadline date is past the current date and the bid decision is not yet captured for the Sell Side RFx, then the Sell Side RFx moves to the “Expired” state.
For example, the Sell Side RFx, Clinical Trials, is expired as its bid proposal submission deadline date- January 29, 2021 has already passed.
Making a Bid Decision
Based on the company’s objectives, the Sell Side RFx is qualified for a decision to bid or not to bid. The sales team of the organization can mention the Bid Decision details for a Sell Side RFx in an “Awaiting Qualification” status by creating an RFx Qualification association. There can be only one RFx qualification for a Sell Side RFx.
The creation of an RFx Qualification Association invokes the Approver rule and workflows and moves the corresponding Sell Side RFx to the status according to the bid decision, upon RFx qualification approval.
Users can set Bid Decision using the following options:
- Bid: Allows user to place a bid based on the RFx received if the RFx meets the company’s objectives. For an approved Sell Side RFx, when the bid decision is set as Bid, the status of the Sell Side RFx moves to “Bid” once the RFx qualification is approved.
- No Bid: Allows user to avoid placing a bid based on the RFx received if the RFx does not meet the company’s objectives. For an approved Sell Side RFx, when the bid decision is set as No Bid, the status of the Sell Side RFx moves to “No Bid” once the RFx qualification is approved.
- Hold: Allows user to keep the bid on hold if the buyer organization communicates that the RFx is put on hold. For an approved Sell Side RFx, when the bid decision is set as Hold, the status of the Sell Side RFx moves to “No Bid” once the RFx qualification is approved.
- Awaiting Qualification: The default status of the Sell Side RFx till a bid decision is made based on the company’s objectives.
Creating RFx Qualification
After the Sell Side RFx capture is complete, an RFx Qualification captures the outcome of the Bid/No Bid decision.
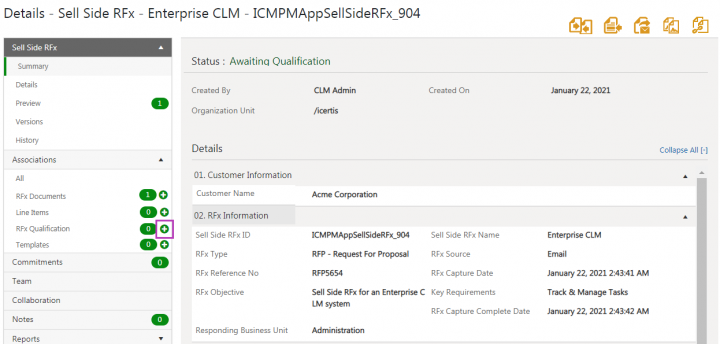
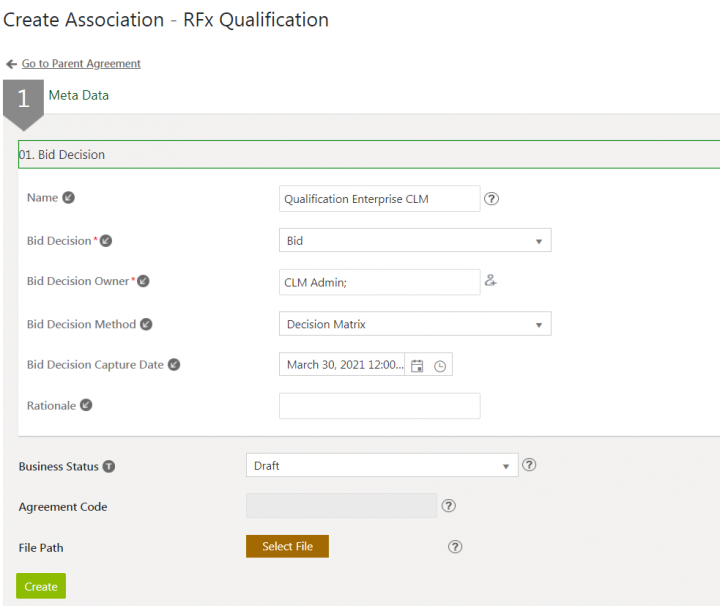
1. Click the plus + icon next to RFx Qualification in the “Associations” section, on Sell Side RFx “Details” page. The “Create Association” page opens.
2. Select or enter values for the following fields in the “Bid Decision” section:
- Name: The name of the RFx Qualification. For example, “Qualification Enterprise CLM”.
- Bid Decision: The bid decision for the Approved Sell Side RFx which has options- Bid, No Bid, Hold, and Awaiting Qualification.
- Bid Decision Owner: The owner who will make the decision if the RFx qualifies for a bid or not.
- Bid Decision Method: The method used to arrive at a go or no-go decision for the bid. For example, Decision Matrix.
- Bid Decision Capture Date: The date and time at which the bid decision is taken.
- Rationale: The reason behind taking a specific decision to bid or not, or keep the bid on hold.
- Agreement Code: An automatically generated code after the RFx qualification is generated.
- File Path: Any document to capture rationale for decision taken. For example, a questionnaire in an Excel format.
3. Click “Create”. The RFx Qualification is created in a “Draft” state.
You can add only one RFx Qualification to a Sell Side RFx.
Audit History of all actions taken on RFx qualification is captured and displayed under History section.
Accessing RFx Qualification
Users can access all RFx Qualifications.
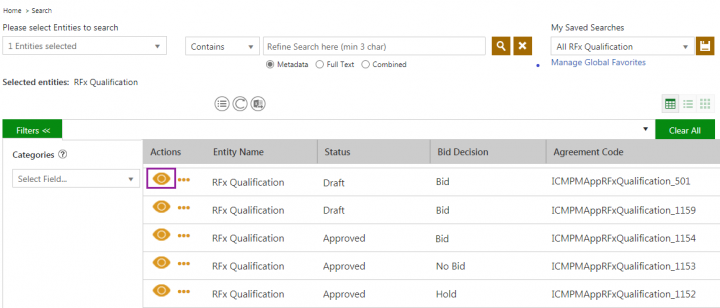
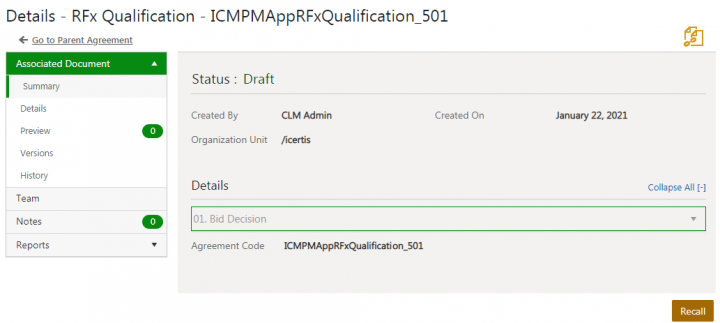
Selecting the RFx Qualification option navigates the user to the “RFx Qualification” index page, where a list of qualified RFx is displayed. This option is visible only to users who have “View” or “Manage” access to the RFx qualification. On selecting a record, the user is directed to the “RFx Qualification Details” page that provides information such as Bid Decision details, Versions, History, Team, Notes, etc. in the left navigation pane.
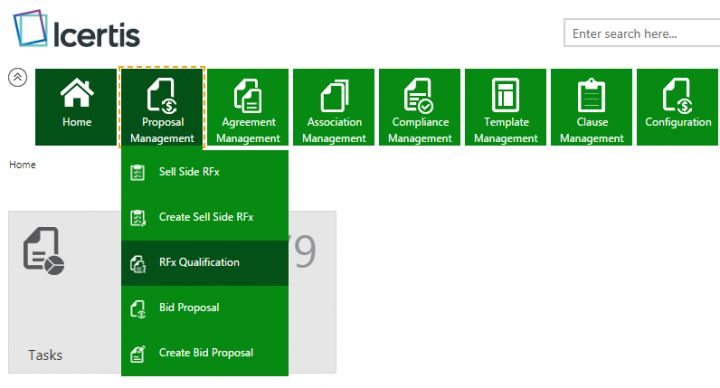
2. Click the “View Record” icon corresponding to the RFx Qualification you want to open.
Sending RFx Qualification for approval
1. Click “Send For Approval” on the RFx Qualification Details page. The RFx Qualification will be sent to relevant users for approval.
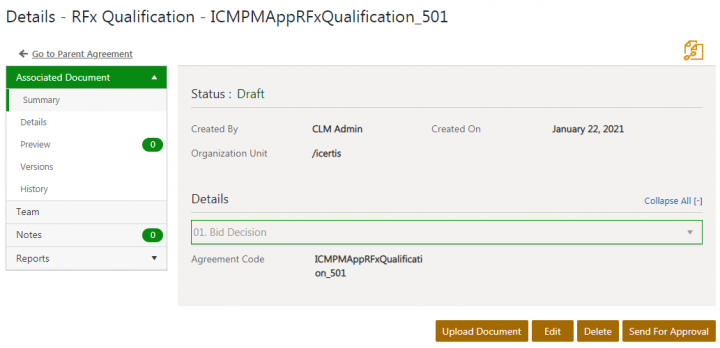
The status of the RFx Qualification changes to “Waiting For Approval from the First (or respective) Approver”.
2. Click “Recall” if you want to recall the RFx Qualification sent to approvers. The “Add Note” window opens.
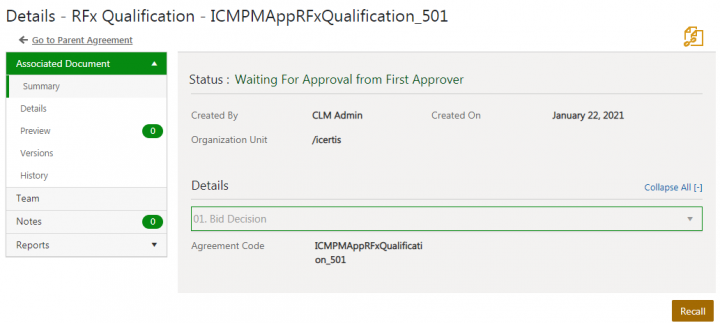
3. Add a note and select a Reason Code for recalling.
4. Click Add. The RFx Qualification will be recalled and moves back to Draft state.
Approving RFx Qualification
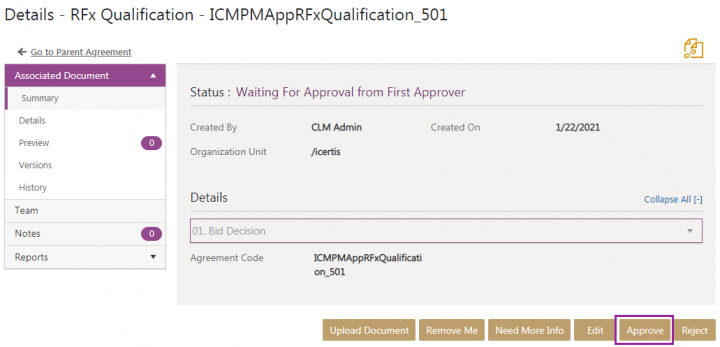
The approvers (sales or business or legal team) can approve or reject the RFx Qualification based on the company’s objectives being fulfilled or not.
To approve the RFx Qualification:
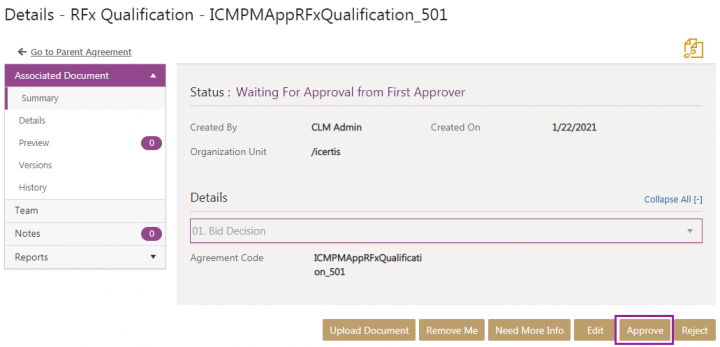
2. Enter a note and click “Add”. The status of the RFx Qualification changes to “Approved”.
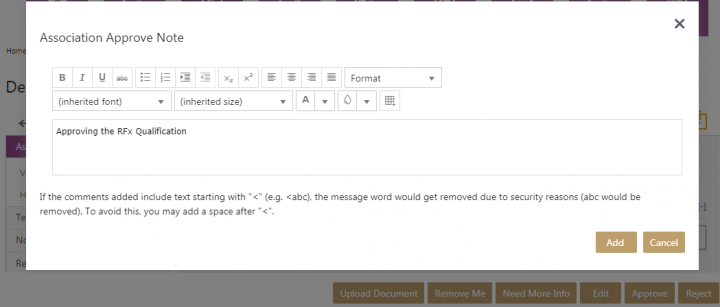
The status of the corresponding Sell Side RFx changes as per the bid decision selected while creating the RFx Qualification. For example, here the status changes to “Bid”.
If a user modifies the approved RFx qualification, it moves back to the “Draft” state and the corresponding Sell Side RFx moves to the “Awaiting Qualification” state.
Rejecting RFX Qualification
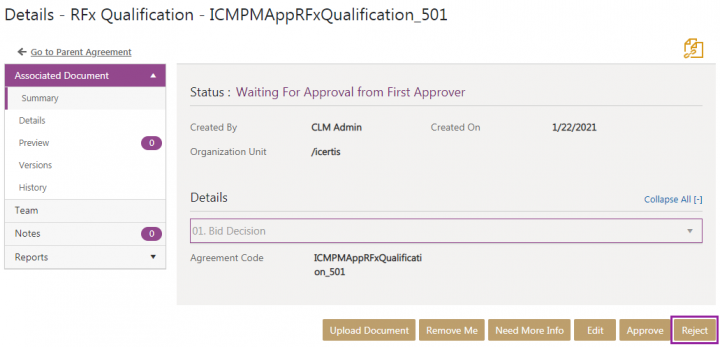
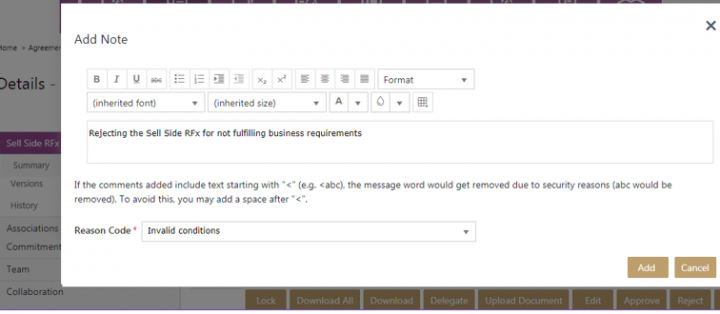
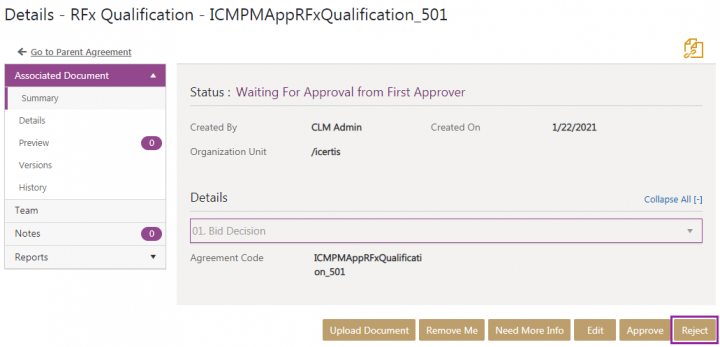
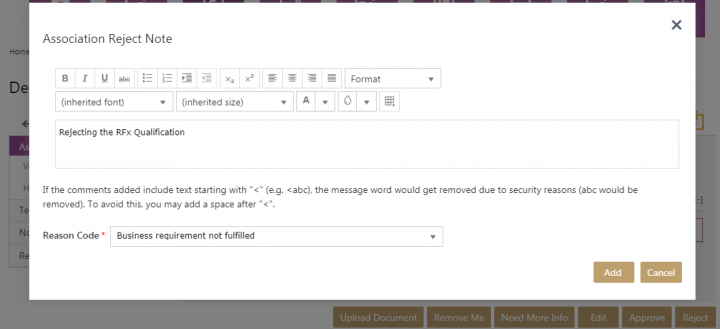
1. Click “Reject” on RFx Qualification “Details” page. The “Association Reject Note” window opens.
Deleting RFx Qualification
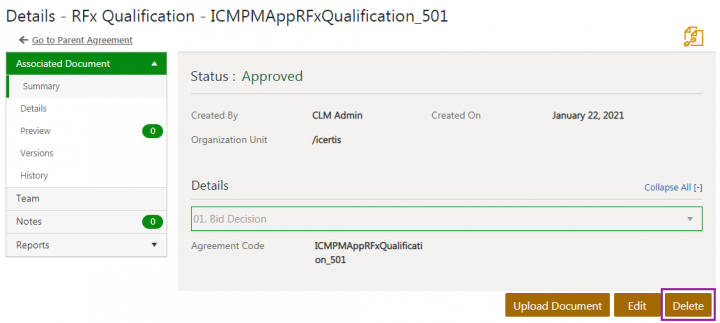
When a user deletes an approved RFx qualification, the RFx qualification instance is deleted and the corresponding Sell Side RFx moves back to the “Awaiting Qualification” state.
Working with Bid Proposal
Bid proposal comprises of the response provided by the supplier against the qualified RFx received such as Request for Quote, Request for Information, and so on. The Proposal Management team of the organization is typically responsible for creating the bid proposal. A thorough review of the bid proposal is performed by the reviewer team ensuring that the proposal meets the business requirements, quality, and compliance standards.
While assembling the bid proposal, all ICI platform constructs such as templates, clauses, template variables and functionalities such as deviation, agreement clauses, clause approver and so on work as per standard ICI behavior.
Creating the Bid Proposal
1. Click “Proposal Management” >” Create Bid Proposal” on the Home page. The “Attributes” page opens. This page contains key information required to be captured for creating the bid proposal.
screen 1
2. Select or enter the values for the fields on the Attributes page.
screen 2
- Associate and Inherit: Click the icon next to this option to inherit and select the Sell Side RFx for creating the bid proposal. It opens the Lookup Search window to search and associate the Sell Side RFx to bid proposal. The Lookup Search window displays Sell Side RFx records in “Awaiting Qualification” and “Bid” business states.
screen 3
Inheriting the Sell Side RFx inherits the attributes and Associations of Sell Side RFx to bid proposal.
Note: All associations except line items associations are inherited. Line items are Bulk Association Contract Types and will not be inherited.
- Organization Unit: Click the icon next to this option to select the organization unit which you want the bid proposal to be part of.
3. Select or enter information in the “Customer or RFx Information” section.
- Customer Name
- Key Requirements
- Additional Requirements
- Communication Method
- Communication Instructions
- Communication Email
- Point of Contact Name
- Point of Contact Title
screen 4
4. Select or enter values for the fields in the “Bid Proposal Schedule” section:
- Supplier Questions Due Date
- Bid Proposal Submission Deadline Date
- Supplier Demo Date
- Due Diligence Check Date
- Awarding Date
- Contract Execution Date
The values in these fields will be inherited from the corresponding Sell Side RFx.
screen 5
5. Select or enter values for the fields in the “Proposal Details” section.
- Business Unit: The business unit responsible for responding to the Sell Side RFx. For example, Administration.
- Proposal Name: The name of the proposal managed by the supplier organization.
- Proposal Manager: The designated person authorized to manage the proposal.
- Bid Proposal Type: The bid proposal type that will be submitted. For example:
o Counter Signed: Allows signing the bid proposal that is already signed by the other party.
o Account Expansion: The effort made through the bid proposal to expand the current business account with the other party.
o For Pre Bid Qualification: The process of identifying potential vendors who indicate that they are qualified for placing a bid for a potential project.
o Reverting to RFx: The process of creating the bid proposal as a response to the RFx received.
- Internal Review Date: The date by which the internal review of the bid proposal must be completed. This helps the Proposal Manager to track any internal milestones for proposal review.
- Planned Submission Date: The date by which the bid proposal must be submitted. This helps the Proposal Manager track when the bid proposal will be submitted to the customer or prospect.
- Reviews Required: The list of users or the departments that should review the bid proposal. For example, Legal.
- List of Supporting Docs: The list of associated documents that must be added with the bid proposal when submitting. It helps the Proposal Manager assemble any supporting documents that are routinely added with the bid proposal. For example, Case Studies.
- Bid Proposal Status: It helps the Proposal Manager track and report the overall status of the bid proposal. For example, Green that indicates the bid proposal is on track to be submitted as per the defined time frame.
Note: “Amber” is selected by default.
- Status Tweet: It helps the Proposal Manager convey the summary of the bid proposal and can also be effective in aggregate reporting of the bid proposal project. For example, if the bid proposal status is selected as “Red”, the status tweet can be “No resources available”.
- Bid Round: It captures the information of the rounds that happen during the process of submitting the bid proposal. This helps the Proposal Manager identify if the bid proposal is used as part of a specific round in the RFx process.
screen 6
6. Select or enter the information in “Authorization”.
- Signature Type: The signature method that will be used for the bid proposal. For example, “Electronic Signature”.
- Signature Sequence: The sequence in which the bid proposal should be signed.
- External Signatory: A designated person from buyer/prospect team for bid proposal execution when the signatures are required for executing a bid proposal.
screen 7
7. Select or enter the values for the fields in the “Outcome Tracking” section:
- Outcome: The result of the bid proposal that is being created. The available options are: Awaiting Outcome, Win, Loss, No Bid, and Closed. The default value is set as Awaiting Outcome.
- Bid Outcome Notes: Any additional information that can be added to support the bid outcome of the proposal.
- Proposal ID: A unique ID generated automatically after creating the bid proposal.
8. Click “Next”. The “Select Template (Step 3 of 4)” page opens.
screen 8
9. Select the template and click “Next”. The “Verify” page opens.
10. Verify the information and click one of the following:
- Create
- Create and Publish
- Create and Send for Approval
screen 9
The Bid Proposal will be created in “Draft” state.
screen 10
Associations of Bid Proposal
The bid proposal has following Associations:
- Sell Side RFx: A Sell Side RFx encapsulates various incoming soliciting types such as Request for Quote, Request for Proposal and so on. A bid proposal can have only one Sell Side RFx association.
- Line Items: The proposal line items are RFx Line items that are broken down into fine grained line items with details such as quotes.
- RFx Documents: The Sell Side RFx content may be split across various logical documents. For example, specific requirements, questionnaires, and so on. RFx Documents captures all such documents for a Sell Side RFx which will be inherited to a bid proposal.
- Supporting Documents: The bid proposal may have supporting documents such as case-studies, audit certificates and so on, that need to be associated with the bid proposal.
- Templates: The third party templates which specify the format that the bid proposal needs to adhere to. These associations will be inherited from the associated Sell Side RFx.
Accessing Bid proposal
You can search and view the created bid proposal from the “Proposal Management” tile.
To view the bid proposal:
1. Click “Proposal Management” >”Bid Proposal” on the “Home” page.
screen 1
The saved search results page opens displaying all the bid proposal records. Users can refine the search results by applying filters, options, and keywords.
screen 2
2. Click “View Record” icon corresponding to the Bid Proposal record you want to open. The bid proposal “Details” page opens.
screen 3
Managing Bid Proposal using Commitments
Proposal owners can create tasks to plan and track bid proposals using commitments in ICI. Commitment Tasks help to work and collaborate with different teams with the defined timelines to manage bid proposals.
To create a task using commitment:
1. Click the “Commitments” tab in the left navigation pane on the Details page. The existing commitments are displayed if any.
2. Click “Add Commitment” action icon. The “Add Commitment” window opens.
screen 1
3. Enter the details for the commitment.
screen 2
4. Click “Add Commitment”. The commitment is created and added to the bid proposal.
screen 3
To view and take action on the commitment tasks:
1. Select the Take action on commitment option from the three dots action drop-down. The “Add Action” window opens.
screen 4
2. Add Action Details and Commitment Details.
3. Click “Save”. The Commitment status is updated according to the action taken.
screen 5
Refer to the Compliance Management for more details on working with commitments.
Editing Bid Proposal
1. Click “Edit” on the bid proposal “Details” page. The Edit Agreement page for bid proposal opens.
screen 1
2. Edit the details on the Attributes page as required and click Next. The “Verify” page opens.
screen 2
3. Verify the details and click “Update” or Update and Publish.
screen 3
The changes will be saved to the bid proposal.
Canceling Bid Proposal
1. Click “Cancel” on the bid proposal “Details” page. The Confirmation window opens with a message that the agreement will move to a canceled state.
screen 1
2. Click “Yes” to proceed. The “Add Note” window opens.
screen 2
3. Add a note and select a reason code for canceling the bid proposal.
screen 3
4. Click “Add”. The bid proposal will move to a Cancelled state.
screen 4
Deleting Bid Proposal
You can delete bid proposals which are in draft state.
1. Click “Delete” on the bid proposal Details page. The Confirmation window opens.
screen 1
2. Click “Yes” to proceed.
screen 2
The bid proposal will be deleted.
Reviewing bid proposal
Users can send the bid proposal for review for its quality and compliance check.
1. Click Request Review on the bid proposal Details page. The Search User window opens.
screen 1
2. Select a user and click “Send”. The bid proposal will be sent to selected Reviewer.
screen 2
The status of the bid proposal changes to Review Pending. Reviewer can approve or reject the bid proposal following the standard ICI Approval/Reject workflow.
screen 3
After the Reviewers have reviewed (Approve/Reject) the bid proposal, it moves back to its previous state.
Sending bid proposal for approval
1. Click “Send for Approval” on bid proposal “Details” page. The status of the bid proposal changes to “Waiting for Approval” and a task is generated for the approver added to the Team.
screen 1
2. Click “Recall” if you want to recall the bid proposal sent to approvers. The “Add Note” window opens.
screen 2
3. Add a note and select a Reason Code for recalling.
4. Click Add. The bid proposal will be recalled and moves back to “Draft” state.
Approving Bid Proposal
1. Click “Approve” on bid proposal “Details” page. The Add Note window opens.
screen 1
2. Add a note and click Add. The bid proposal is approved.
screen 2
The status of the bid proposal changes to “Approved” once all approvers approve the record.
screen 3
Rejecting Bid proposal
1. Click “Reject” on bid proposal “Details” page. The Add Note window opens.
scrren 1
2. Add a note and select a relevant Reason Code for rejecting the bid proposal.
3. Click Add. The bid proposal is rejected and goes back to the Draft state.
screen 2
Executing bid proposal
You can send the bid proposal for signature to the external signatory added to the bid proposal’s team, once the bid proposal is approved.
To send the bid proposal for signature:
Click “Send For External Signature” on bid proposal “Details” page. The status of the bid proposal changes to “Waiting for External Signature” and a task is generated for a signatory.
scrren 1
You can recall the bid proposal sent to signatories using “Recall” action.
screen 2
Once signed by the external signatory, the bid proposal is executed and moves to the “Bid Proposal Submitted” state.
screen 3
Capturing Bid Outcome
After you capture the Bid Outcome, the submitted bid proposal status will change to “Won”, “Lost”, “No Bid” or “Closed”, as per the selected bid outcome value for the bid proposal record.
To capture the bid outcome:
1. Click Edit on the bid proposal Details page. The Edit Agreement page opens.
screen 1
2. Select the Outcome in the Outcome Tracking attributes section. For example, “Win”.
screen 2
3. Click Next. The Verify page opens.
4. Verify the details and click Update.
screen 3
The bid proposal status changes to “Won” based on the selected Outcome as “Win”.
Adding Amendments to Bid Proposal
If users want to make changes to a bid proposal after it is executed and moves to a “Bid Proposal Submitted” Business Status, they can do so by adding amendments to it.
To add an amendment to a bid proposal:
1. Click “Add Amendment” on bid proposal “Details” page. The “Add Amendment” page opens.
screen 1
2. Make the necessary changes to the “Attributes (Step 2 of 3)” page and click “Next”. The “Verify” page opens.
3. Verify the information entered on this page and click “Create”. The amendment is created in “Draft” state.
The amendment workflow for bid proposal follows the standard ICI amendment workflow. The amendment status will be updated on the basis of outcome tracking such as Won, Lost, No Bid or Closed.
Expiring of Bid Proposal
If the bid proposal is not submitted by the bid proposal submission deadline date, the bid proposal record expires and its status changes to “Expired”.
For example, the bid proposal Clinical Trials is expired as the bid proposal submission deadline date- January 3, 2021 has passed the current date.
screen 1
Related Topics: Agreement Management | Icertis Business Apps | Biz Apps Release Notes
