Contents
- 1 Contract Type
- 1.1 Creating a Structure of an Associated Document
- 1.2 Creating a Structure of an Agreement
- 1.3 Creating a Structure of a Contract Request
- 1.4 Creating a Structure of Masterdata
- 1.5 Displaying drop-downs as radio buttons or checkbox list for user selection
- 1.6 Approval Rule Support for Masterdata
- 1.7 Add System Attribute for Federal Regulation (FR) Discovery
- 1.8 Implementing Bulk Association to support large volume data of associations
- 1.9 Defining display sequence on lookup attributes at contract type level
Contract Type
Creating a Structure of an Associated Document
Supporting documents are necessary for every Contract or Agreement. In ICI, you can create a structure of supporting documents for the Contract or Agreement. Using this structure, you can associate the required documents while creating an Agreement.
To create a structure of Supporting Documents for Agreement:
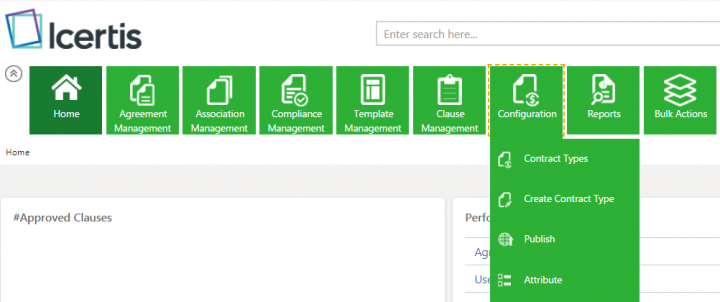
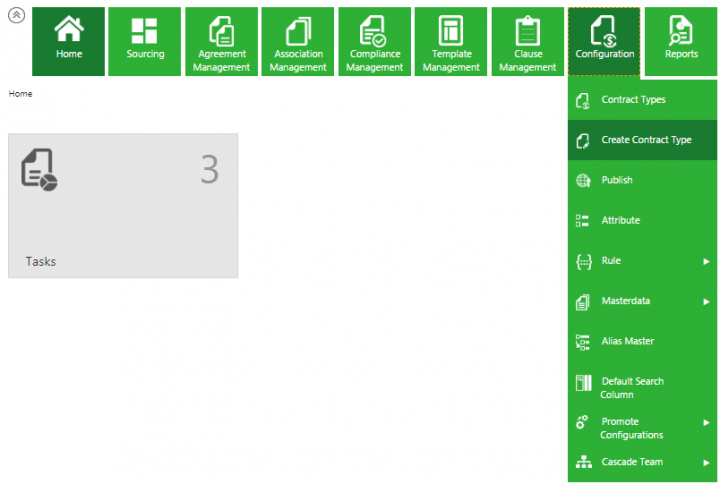
1. Click Configuration > Create Contract Type on the Home page. The Select Contract Type page opens.
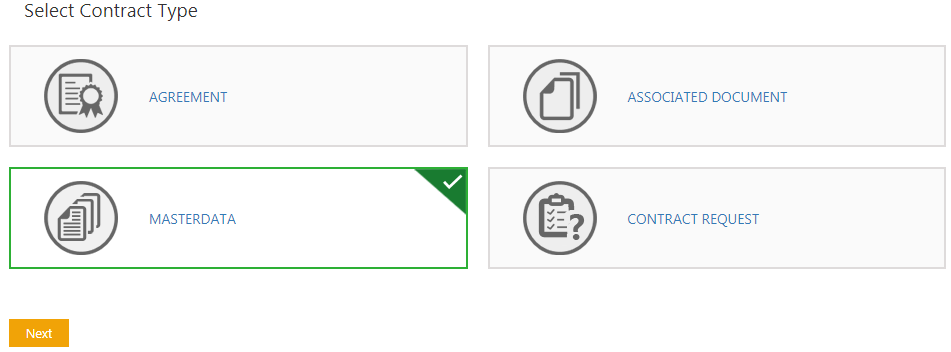
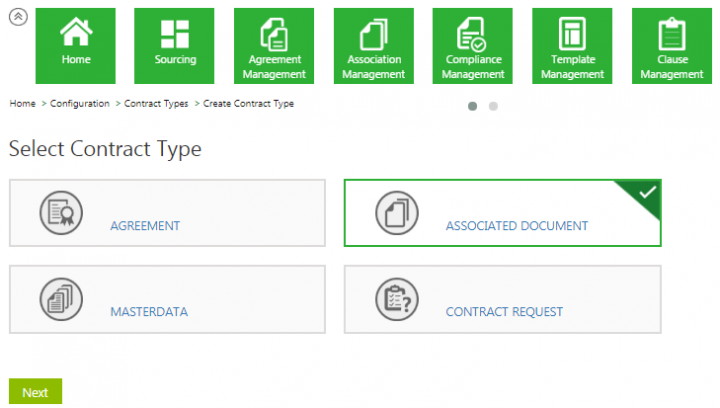
Select any of the following Contract Types on the Create Contract Type page.: Agremeent, Associated Document, Masterdata or Contract Request
3. Click ASSOCIATED DOCUMENT, and then click Next. The Create Contract Type page opens.
The Create Contract Type page consists of the following sections:
- Details
- Attributes
- Display Preference
- Team
- Verify
Details
This tab is mandatory.
- Contract Type Name: Type the Contract Type name.
- Contract Type Code: It is a system generated code that auto-populates after the creation of Contract Type.
- Description: Type the description for the Contract Type. This field helps users to select the desired Contract Type.
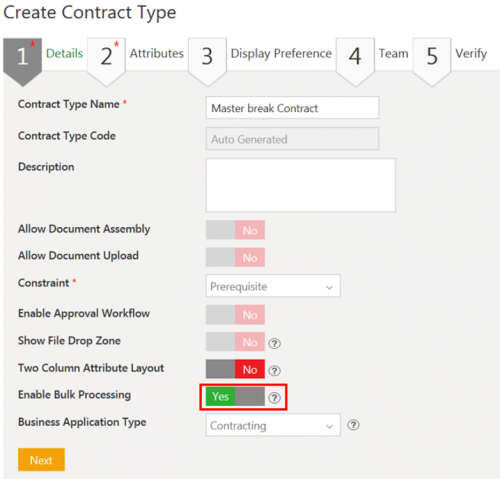
- Allow Document Assembly: Select Yes to link the associated document with the Agreement Contract Type. ICI supports document assembly of PDF files in associations and file type attributes by converting PDF into images. The assembled content from the PDF file is now searchable and can be technically configured to specify the maximum number of pages in the PDF file to be considered in document assembly. If the file has more pages than specified in the configuration, then the file will be uploaded but not assembled. Similarly, document assembly also supports the images in .png and .jpeg format.
- Allow Document Upload: The File Path Attribute for Associations can be removed using this flag. If the flag is set to No, then the file path will no longer be mandatory, and the user can create an Association instance without the Attribute. When the Allow Document Assembly flag is set to No, this flag is automatically set to No.
- Constraint: Select the state for the Associated Document as per the requirement.
- Prerequisite
- Postrequisite
- None
- Enable Approval Workflow: Select Yes if you do not want the workflow for the associations of the Contract Type.
- Show File Drop Zone: If this flag is turned to Yes, The File Drop zone becomes visible in the Associations tab.
- Two Column Attribute Layout: This flag can decide the view of the attributes.
- Enable Bulk Processing: Select Yes if you want to enable bulk processing. Once enabled, the other flags such as Document Assembly, Allow document upload, Enable Approval workflow, are automatically disbled. Once the flag is set to either Yes or No, it can not be changed.
Click Next to define attributes of the contract type after you enter the details.
Attributes
This tab is mandatory.
You can add new attributes to your Contract Type or select those that are already present in ICI through from the Attributes tab. On the Attributes tab, you can add new attributes to your Contract Type or select those that are already present in ICI.
- Available Attributes: Select the appropriate attributes. Click to move attributes to the Selected Attributes pane.
- Edit Attribute: Select any attribute to view the information for the selected attributes. Click the add icon to add a new attribute.
- Display Name: Type a name for the attribute.
- Data Type: Select a data type value.
- Help Message: Type a help message for the attribute, the message is displayed when you point to the Help icon.
- Default Value: Type a value for the attribute.
- Is Global: Select On to make the attribute available for all Contract Types.
- Is Default: Select On to make the attribute selected for the Contract Types.
- Is Editable: Select On to make the attribute editable in an Agreement.
- Is Mandatory: Select On to make an attribute value mandatory in an Agreement.
- Tracking Attribute: Select On to allow attribute tracking.
- Is Unique: Select On to make the attribute value unique for all Agreements of a particular Contract Type.
- Defined by Rule: Select On to define attribute by rule.
- Is Inherit: Select On to make an attribute inherit data from an associated Agreement.
- Is Searchable: Select On to make the attribute is displayed in the search operations.
- Is Conditional: Select On to make an attribute dependent on other attributes.
- Is Lookup: Select On to make an attribute lookup for another attribute.
- Select Contract Type: Select an attribute from Select Attribute list and then click Save. The new attribute is displayed in the Selected attributes.
Click Next, to define the display preferences of the Contract Type after you enter the attributes.
Display Preference
You can select the Attributes that are displayed in Agreement tile view and Agreement details view on the Display Preference tab.
- Click Next, to define the Team of the Contract Type after you enter the display preferences.
- Available Attributes: Select the attributes from the list. Select to move the attributes to the selected attributes.
- Select the arrows to manage the sequence of the attributes.
Team
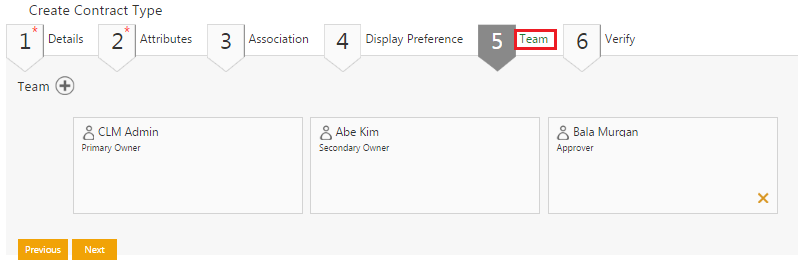
You can see the existing team members along with their roles on the Team tab.
To add more team members:
1. Click the icon next to Team. The Add User window opens.
2. Click Select Role drop-down list to select a role.
3. Select a user from the user tiles. You can use scroll arrows to browse through the user tiles.
4. Click Add to add the user. The user name and the role opens as a tile.
5. Click the icon next to the user, if you want to remove a user from the list.
6. Click Next. The Verify tab opens.
7. Click Next, to verify the contract type information after you define the Team.
Verify
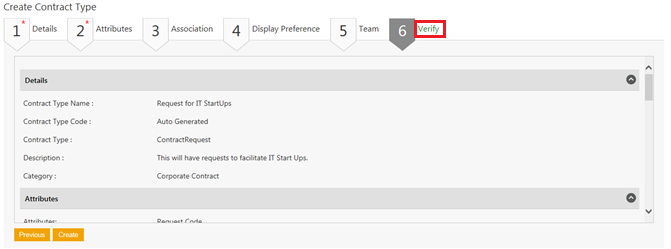
You can view all the information related to the Contract Type and also do the following on the Verify tab.
- Click Previous to go back to the respective tabs in case any changes are required to be made.
- Click Create to create a new Contract Type. The Contract Type with Draft status is displayed.
Creating a Structure of an Agreement
The structure of an Agreement in ICI is based on the concept of Contract Types. These are user-defined workflows (as opposed to Rule-based) and are of the following types:
- Contract Request: defines the request form to assemble all the inputs and data required to create an Agreement or Contract. It is based on attributes and rules.
- Agreement: defines the structure of an Agreement or Contract that is to be executed and is based on Attributes, Templates, Clauses and Rules.
- Associated Document: defines the nature and format of the supporting documents that will be required to execute the Agreement or contract in its entirety. It is based on Attributes, Templates and Rules.
- Masterdata: defines the structure to store the less frequently changing data and business information, such as vendor and company details, business number and address, and so on. It is based on Attributes and Rules.
All these concepts are discussed in various sections of this Wiki and can be found from the table of content to the left.
To create a Contract Type:
1. Click Configuration > Create Contract Type on the Home page. The Create Contract Type page opens.
You should see all the available Contract Types. Agreement is selected by default.
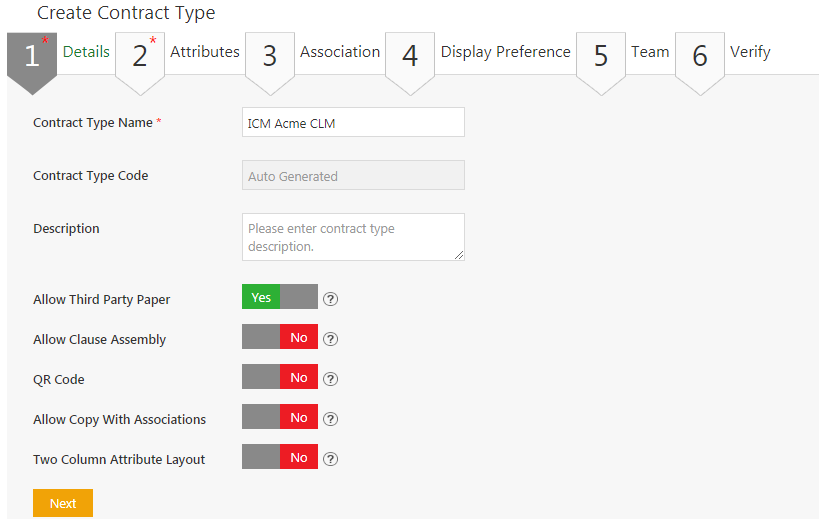
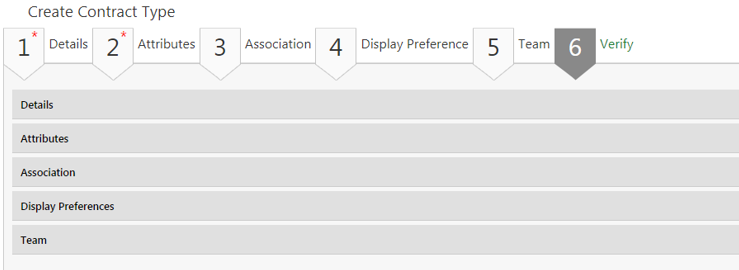
3. Click Next to create an Agreement Contract Type. The Create Contract Type page opens that collects all the required details for the chosen Contract Type in six sections:
- Details
- Attributes
- Association
- Display Preference
- Team
- Verify
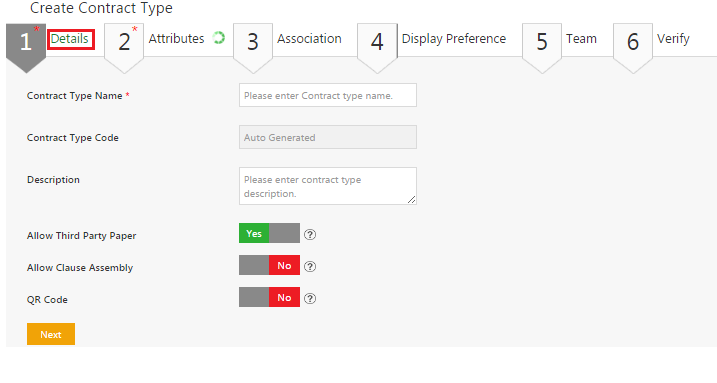
Type the details for the fields in all the sections. The Details and Attributes sections have some mandatory fields, while the rest of the sections are optional. Note that while the process for creating all Contract Types is the same, the fields on each section will vary based on the Contract Type being created. Click Next to move to the next section. Let us go through each section in detail.
Details
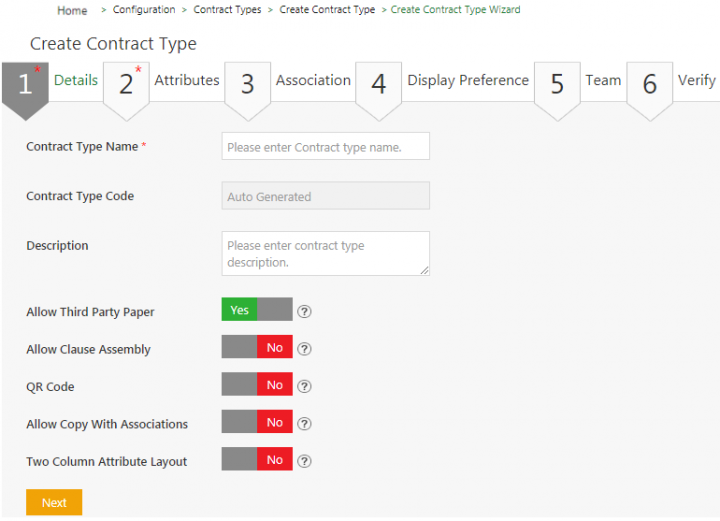
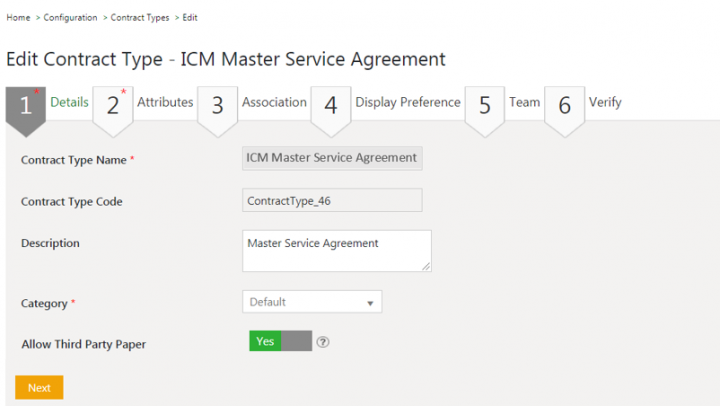
- Contract Type Name: Type a name for this Contract Type. It can be a descriptive name such as the Agreement this Contract Type is being used for.
- Contract Type Code: This is a system-generated code that will be auto-populated once this Contract Type is created.
- Description: Type the description for the Contract Type. This field helps users to select the desired Contract Type.
- Allow Third Party Paper: When creating an Agreement, you can choose to use own or a third party paper. Select Yes if you would like to allow third party paper for this Agreement.
- Yes: gives you the option to use either an ICI template or third party papers when creating a new Agreement. ICI Templates are used for Agreement Contract Types with own paper. For the third party, their Template is uploaded using File Upload.
- No: third party paper is not allowed. Only ICI Templates will be used for creating this Agreement.
- Allow Clause Assembly: Specify if you would like to have the option of adding Rule-based Clauses in the Agreement:
- Yes: gives you the option of adding clauses through the Template as well as adding a rule-based clause to the Agreement.
- No: rule-based clauses will not be allowed. Clauses can only be added through the Template.
- Two Column Attribute Layout: Set Yes, if you would like to convert attributes on the Attributes page into the two-column layout for better use of the screen.
- QR Code: This is a machine-readable code used to store a host of information. The code is made up of an array of black and white squares that can be read by a smartphone camera. It is system generated and can be used to verify if the correct document is being uploaded in the system, for example, after manual signatures. In ICI QR code is used to verify these four parameters of the Agreement:
- Agreement Code
- Version of the document
- Page number
- Total number of pages
Specify if you would like to include a QR code on the Agreement being created.
- Yes: will add QR code on every page of the Agreement.
- No: will not include a QR code on the Agreement
- Allow Copy with Associations: Select Yes next to Allow Copy with Associations to enable copying the RFx along with its associations. If the Allow Copy with Associations flag is set as No, ICI displays a message Are you sure you want to copy the record and the Copy Record window is not displayed when copying an RFx.
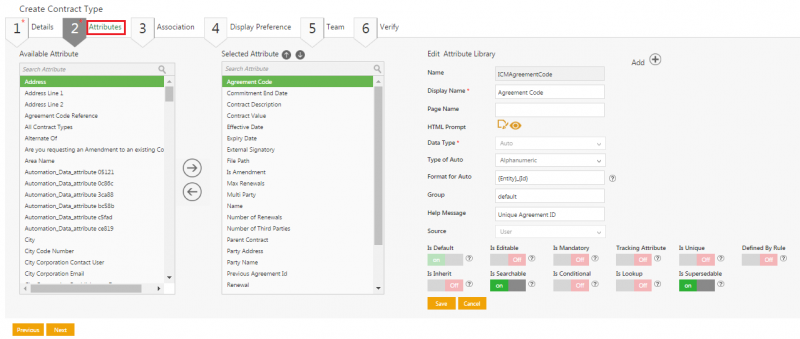
Attributes
Select existing attributes or create new attributes specifically for the Contract Type that you are creating from this section.
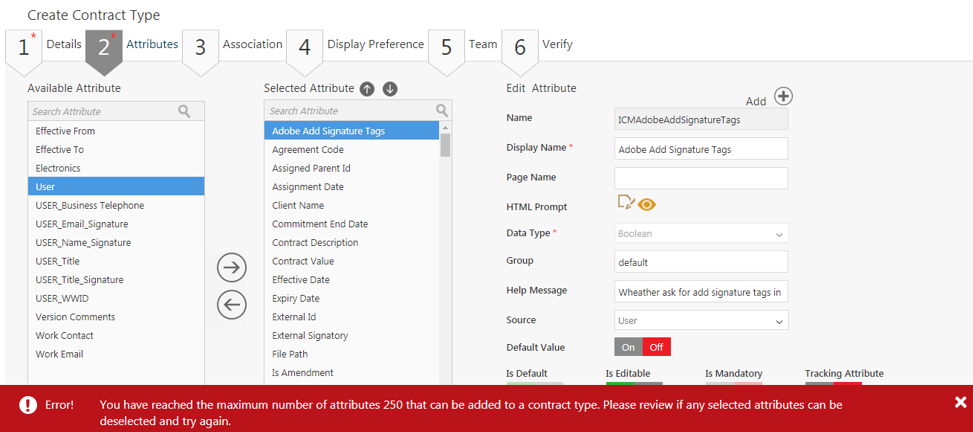
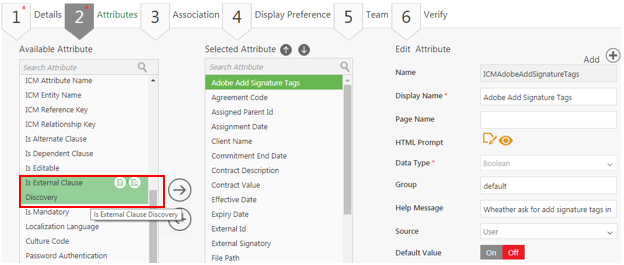
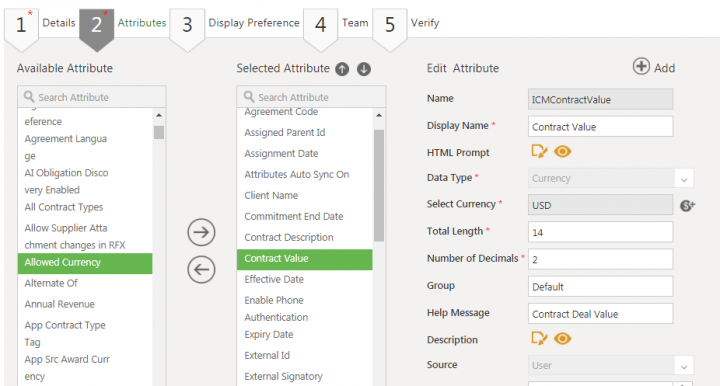
This section consists of 3 columns:
- Available Attribute
This column shows a list of all the attributes available in ICI. You can do several things in this column:
- Hover over an attribute to see 2 View icons:
[[File:Attribute details.PNG|middle|Attribute details.PNG]]shows the Attribute Details popup window. You can view the details of the selected attribute.
[[File:Contract type attribute.PNG|middle|Contract type attribute.PNG]]shows a list of all the Contract Types this attribute is used in.
- Find an Attribute faster by searching for it. Since there are many attributes, scrolling to find a specific one can be time-consuming. If you know the attribute, start entering its initials in the Search box. All attributes matching the initials are displayed.
- Select the Attributes you wish to add to the selected Contract Type. Click the arrows to select and unselect.
- Selected Attribute
This column shows a list of all attributes that are selected for the Contract Type. There are a few attributes like Name and Agreement Code that cannot be removed - they are mandatory. The attributes in this section can be edited, but if moved back to the Available Attribute column, it reverts to its original state.
- Edit Attribute
This column enables you to add new attributes and edit existing ones. Edit an attribute by selecting it in the Selected Attribute column. This populates all the fields in the Edit Attribute column. All details can be edited except Data Type, which is read-only. Click Save when you are done editing.
To add a new attribute to the Selected Attribute column, click the Add icon. Specify the following details:
- Name: This is auto-generated and populated after you save the attribute.
- Display Name: Type a name for the attribute. This is the name the attribute will appear as while creating Agreement.
- HTML Prompt: Consists of Edit and View icons.
- Edit icon shows an HTML Prompt popup. You can edit the display name that was originally given to this attribute. You can also set the look and feel of the display name - select the font, size, color and a variety of other formatting options. The formatting controls how it will look while creating the Agreement. Click OK, when you have set the format. Keep a few things in mind when setting the format of the attribute as it can disturb the aesthetics of the Agreement:
- Avoid using excessively large font size.
- Avoid flashy or bright colors
- Try to use easy-to-read fonts.
- View icon shows a preview of the set format for the name.
- Data Type: select a Data Type from the list provided. This indicates the type of data, such as date, number, alphanumeric characters, an email, etc. that will be entered into the field. The data gets validated based on the data type selected. For example, alphabets will not be accepted in a data type defined as currency.
- Edit icon shows an HTML Prompt popup. You can edit the display name that was originally given to this attribute. You can also set the look and feel of the display name - select the font, size, color and a variety of other formatting options. The formatting controls how it will look while creating the Agreement. Click OK, when you have set the format. Keep a few things in mind when setting the format of the attribute as it can disturb the aesthetics of the Agreement:
Note that the details required for the attribute being created vary based on the data type created. For example, the details needed for data type 'currency' are considerably different than those for 'choice'.
- Type of Auto: this field is only available if the data type selected in the field above is Auto. Select the type from the drop-down.
- Format for Auto: this field is only available if the type of auto-selected in the field above is alphanumeric. The format can be a combination of system keywords and a string. System supported keywords are <Entity> and <ID>.
- Group: type a name for the group
- Help Message: type a help note that opens when you point to the Help icon This message should describe the use and purpose of the attribute as it is especially helpful for attributes that are newly created.
- Source: select an appropriate source for the attribute.
- Default Value: specify the default values for the selected data type. These values will be displayed as defaults for this attribute while creating the Agreement. For example:
- For Date: select default Date.
- For Email: enter the default email.
- For RichTextArea: click Edit icon, Default Value and set the format for that as desired. Specify if this default value can be edited in the Is Editable field.
- Is Global: specify if this attribute should be made available for all Contract Types. Selecting Off makes it available to the current contract type only.
- Is Default: this field is only available if Is Global field is enabled (On). Specify if this attribute should be available for all Contract Types by default (opens in the Selected Attribute column by default). Turning this field off, will display the attribute in the Available Attributes column for all Contract Types.
- Is Editable: specify if the value entered in the Default Value field above can be edited. Turning this field off, does not allow you to change the value of the attribute.
- Is Mandatory: specify if this attribute should be made mandatory.
- Tracking Attribute: specify if this attribute should remain editable at anytime throughout the agreement lifecycle.
- Is Unique: specify if the attribute value should be made unique in all agreements for the chosen Contract Type.
- Defined by Rule: specify if a rule can be set on this attribute. The attribute will not be rule-based, if this field is set to off.
- Is Inherit: specify if you want this attribute to inherit data from an associated agreement.
- Is Searchable: turning this field on will make this attribute open in search operations.
- Is Conditional: selecting On will make this attribute dependent on another attribute. If another attribute is available, only then will this one become available. Turn this field to Off if you want to keep this attribute independent of any other attribute.
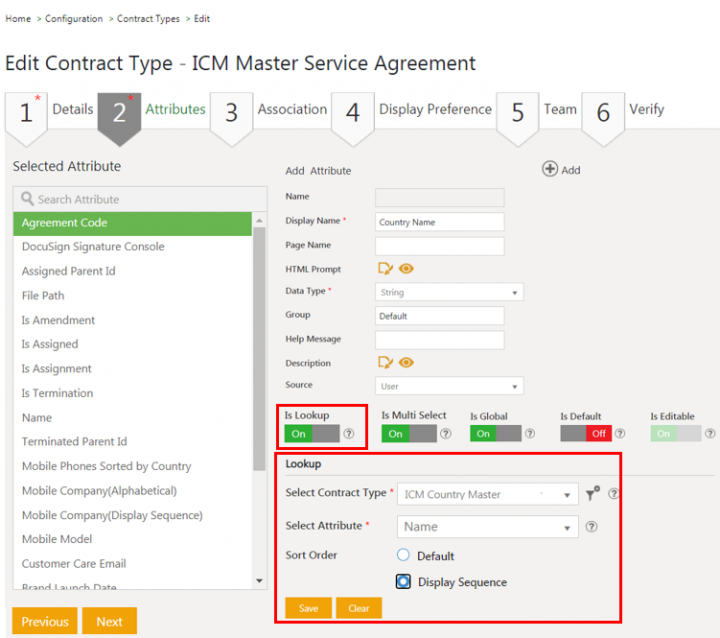
- Is Lookup: select On to make this attribute as a lookup for another attribute.
- Select Contract Type: select an attribute from Select Attribute list, and then click Save. The new attribute is displayed in the Selected Attributes.
Click Save to save this attribute. It will now open in the Selected Attributes column. Request Code into Agreement:
- To get Contract Request Code into Agreement you need to add Request Code Reference attribute while creating Contract Type. Request Code Reference attribute is available in Available Attribute section, move it to Selected Attribute section.
- The ICI name for the attribute will be ICIRequestCodeReference but the Display name can be different and configurable.
- The Contract Request Code will be generated and displayed in the Request Code Reference field when the Agreement is created.
Click Next, to define the Associations for the Contract Type.
Association
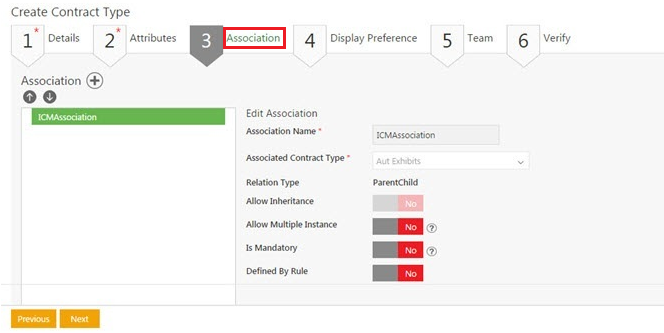
You can associate this Contract Type to other Contract Types. You can also add or remove peer associations to an Agreement even after the execution of an Agreement. It is a configurable feature through the setting for Allow peer associations post-execution. By default, its value is set toNO. As per business needs, you can turn it ON for Executed, Waiting for review andReviewed states. Thus, peer associations can be added or removed in these states of Agreement.
To add an Association:
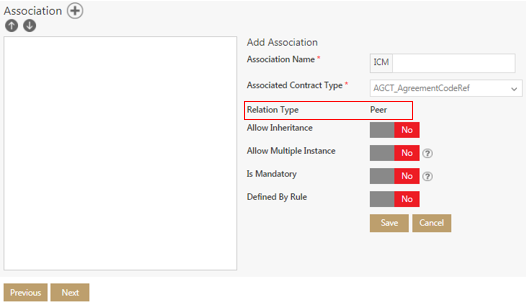
1. Click the Add icon. The Add Association field is displayed on the right.
- Association Name: Type a name for the association in this field.
- Associated Contract Type: Select the Contract Type to associate this Contract Type with.
- Relation type: this field is auto-populated and indicates the relation between this and the associated Contract Type. The Contract Type relationships are:
- Agreement and Contract Request are Peer to Peer
- Associated Document and Masterata are Parent Child
- Allow Inheritance: Select 'Yes to make this association mandatory for an Agreement.
- Allow Multiple Instances: Specify if this association can be used multiple times in the associated Agreement.
- Is Mandatory: Select 'Yes to make this association mandatory for an Agreement'.
- Update: Select to update the Association.
2. Click Save to add this association to the Contract Type. To add more associations, click the plus icon again.
3. Click Next to continue to the Display Preference section of the Contract Type.
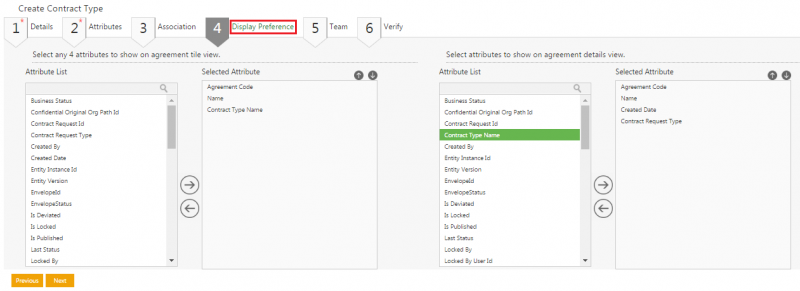
Display Preference
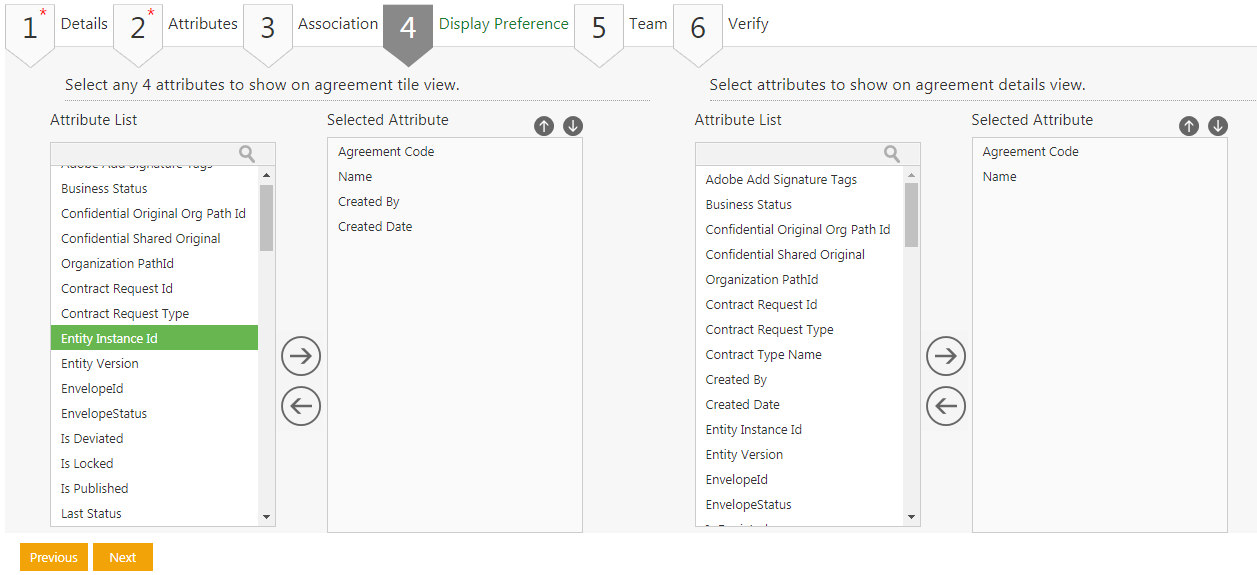
In this section, select attributes that you want to see in the Agreement Tile and Agreement Details view.
- Attribute List: Select upto 4 attributes from this column to display on the Agreement tile view.
- Click the Right arrow to move an attribute to the list of Selected Attributes. Click the Left arrow to move the selected attribute back to the Attribute List column.
- Select the arrows to change the sequence of the attributes.
Click Next, to define the team of the contract type after you enter the display preferences.
Team
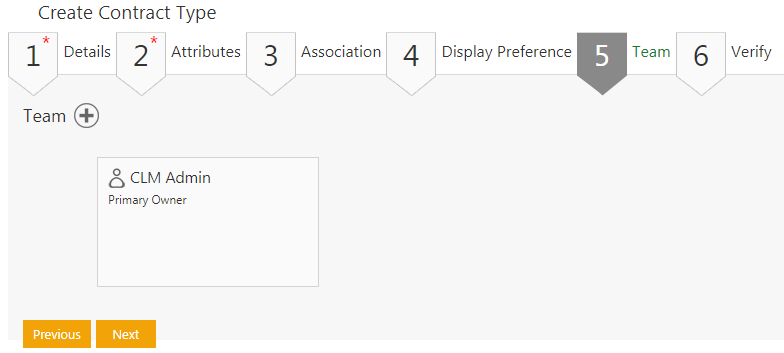
All users that are associated with a specific entity, form a team for that entity.
To add more members to the team:
- Click the icon next to Team. This opens the Add User window.
- Select a role from the drop-down.
- Select the users that are to be added to the team using the user tiles. You can choose any number of users. Use the Left and Right arrows to browse through all the users that can be added.
- Click Add to add the selected users. The selected users are added to the team. Their roles are also shown under their respective names. User can also be removed from the Team by clicking on the icon on their tiles. All users except the Primary Owner can be removed.
Click Next to continue to the Verify section.
Verify
In this section, you can review and verify all the information for the Contract Type you just created. If you wish to edit anything, either click Previous or one of the 6 sections.
Click Create to create the new Contract Type. The Contract Type with Draft status opens.
When you click the Create button, the contract type gets created; and it needs to be sent for approval. It will be sent to the approver user you have added while creating this Contract Type.
Click Send for Approval button to send the Contract Type for approval. You can view this new Contract Type under Search.
Creating a Structure of a Contract Request
The structure of an Agreement in ICI is based on the concept of Contract Types. These are user-defined workflows (as opposed to rule-based) and are of following types:
- Contract Request: defines the request form to assemble all the inputs and data required to create an Agreement or Contract. It is based on attributes and rules.
- Agreement: defines the structure of an Agreement or Contract that is to be executed and is based on Attributes, Templates, Clauses, and Rules.
- Associated Document: defines the nature and format of the supporting documents that will be required to execute the agreement or contract in its entirety. It is based on Attributes, Templates, and Rules.
- Master Data: defines the structure to store the less frequently changing data and business information, such as vendor and company details, business number and address, and so on. It is based on Attributes and Rules.
All these concepts are discussed in various sections of this Wiki and can be found from the table of content to the left.
To create a Contract Type:
1. Click Configuration > Create Contract Type on the Home page. The Select Contract Type page opens.
3. Select Contract Request and click Next to create a Contract Request Contract Type. This opens the Create Contract Type page that collects all the required details for the chosen Contract Type in six sections:
- Details
- Attributes
- Association
- Display Preference
- Team
- Verify
4. Type the details for the fields in the tabs. The Details and Attributes sections have some mandatory fields, while rest of the tabs are optional. Note that while the process for creating all Contract Types is the same, the fields on each section will vary based on the Contract Type being created.
To move to the next section, click Next.
Let us go through each section in detail.
Details
- Contract Type Name: Type a name for the Contract Type.
- Contract Type Code: This is a system generated code and is auto-populated after the Contract Type is created.
- Description: Type the description for the Contract Type. This field helps users to select the desired Contract Type.
- Allow Third Party Paper: Specify if you would like to allow third party papers:
- Selecting Yes gives the provision to either use the ICI Template or third party template while creating a new Agreement.
- Selecting No allows the use of third party template only while creating the agreement.
- Allow Clause Assembly: Specify if you would like to have the option of adding Rule Based Clauses to the Agreement:
- Selecting Yes gives the provision to add the Rule Based Clause to the Agreement other than adding the Clauses through Template.
- Selecting No allows to add Clauses only through Template to the Agreement.
- QR Code: Specify if you would like to include a QR code into an Agreement created:
- Selecting No will not add QR code to the Agreement.
- Selecting Yes will add QR code in every page of an Agreement. The QR code is system generated and used to verify that if the correct document is getting uploaded into the system, for example, after manual signatures.
QR Code verifies the Agreement on 4 parameters:
- Agreement Code
- Version of the document
- Page number
- Total number of pages
Click Next, to define the Attributes for the Contract Type.
Attributes
Attributes tab allows selecting existing attributes in ICI for the Contract Type, as well as to create a new one specific for the Contract Type which is getting created.
It consists of the following sections:
• Available Attribute
This section consists of the list of attributes available in ICI. When you take the pointer on any attribute, two types of View icons pops up:
- when clicked on it, attribute Details window pops up which consists of all the details of the attribute.
- when clicked on it, it displays the list of Contract Types in which this attribute is already used.
Select the attribute which is required for the Contract Type. To search any attribute in the section, enter the initials of the attribute in the Search box, all the attributes related to that will be displayed. Once selected move the attributes to Select Attribute section, by clicking on . The attribute can also be moved back to Available Attribute section by clicking on
.
• Selected Attribute
This section consists of all the attributes which are selected for the Contract Type. It consists of few default attributes as well which you can't move to Attribute List, for example, Name and Agreement Code.
This section also has a Search box to search attributes. The attributes in this section can also be edited, but if moved back to Available Attribute section it will be back to previous state. To edit any attribute, select the attribute in Selected Attribute section. All the fields in Edit Section will get populated in editable mode except Data Type field , which is read-only. Edit the fields as per the requirement and click Save.
• Edit Attribute
This section helps you to edit and add new attributes in Selected Attribute section. All the fields here gets populated with the details of the attribute which is selected in Selected Attribute section.
To add new attribute into Selected Attribute section click Add icon, now enter the details as per the table below:
- Name: Gets auto-generated after clicking on Save, once all the fields are filled in for the new Attribute.
- Display Name: Type a display name for the attribute.
- HTML Prompt: This field consists of two icons Edit and View:
- Click Edit HTML Prompt window pops-up. Type the Display Name for the attribute and set the format (font type, font size , font color and so on) the way you want it to get displayed while creating the Agreement. Click OK when the format is set. Things to avoid while setting the format of the Display Name as it can violate the standard display of the Agreement:
- Don't use too large font size
- Use professional font types
- Don't use too flashy colors
- Click View HTML Prompt window pops up. You can see the Display Name with the format you have set.
- Click Edit HTML Prompt window pops-up. Type the Display Name for the attribute and set the format (font type, font size , font color and so on) the way you want it to get displayed while creating the Agreement. Click OK when the format is set. Things to avoid while setting the format of the Display Name as it can violate the standard display of the Agreement:
- Data Type: Select a Data Type from the list provided.
- Help Message: Type a help message for the attribute. The message opens when you point to.
- Source: Select a source for the attribute.
- Default Value: Type or select the default value for the data type selected. This value will be displayed as the default value for that specific attribute while creating the Agreement. For example:
- For Date, select default date
- For Email, type the default email
- For RichTextArea, click Edit icon , the Default Value window pops up. Now type the default value for that specific attribute while creating the Agreement.
- Is Global: Select On to make the attribute available for all Contract Types.
- Is Default: Select On to make the attribute selected for the Contract Types.
- Is Editable: Select On to make the value of the attribute editable in an agreement.
- Is Mandatory: Select On to make an attribute value mandatory in an agreement.
- Tracking Attribute: Select On to allow attribute tracking.
- Is Unique: Select On to make the attribute value unique for all agreements of a particular contract type.
- Defined by Rule: Select On to define the attribute by rule.
- Is Inherit: Select On to make an attribute inherit data from an associated agreement.
- Is Searchable: Select On to make the attribute open in search operations.
- Is Conditional: Select On to make an attribute dependent on another attribute.
- Is Lookup: Select On to make an attribute lookup for another attribute.
- Select Contract Type: Select an attribute from Select Attribute list and then click Save. The new attribute is displayed in the Selected Attributes.
Click Save, the attribute will be saved and will be displayed in the list of Selected Attribute section.
Agreement Code into Request:
- To get Agreement Code into Request you need to add Agreement Code Reference attribute while creating Contract Type. Agreement Code Reference attribute is available in Available Attribute section, move it to Selected Attribute section.
- The ICI name for the attribute will be ICIAgreementCodeReference but the Display name can be different and configurable.
- The Agreement Code will be generated and displayed in the Agreement Code Reference field when the Agreement is created.
Click Next, to define the Associations for the Contract Type.
Association
You can associate different contract types with the present contract type on the Association tab.
: Click to add an association.
- Association Name: Type an appropriate name for the association.
- Associated Contract Type: Select an appropriate contract type.
- Allow Inheritance: Select Yes to enable inheritance for an association.
- Allow Multiple Instances: Select Yes to make association mandatory for an agreement.
- Update: Select to update the association.
Click Next, to define the display preferences of the contract type after you enter the attributes.
Display Preference
You can select Attributes that open in the Agreement tile view and the Agreement details view on the Display Preference tab.
- Available Attributes: Select the attributes from the list.
 : Select to move the attributes to the Selected Attributes.
 - ↑↓: Select the arrows to manage the sequence of the attributes.
Click Next, to define the team of the contract type after you enter the display preferences.
Team
You can view the existing team members along with their roles on the Team tab.
To add more team members:
1. Click the add icon next to Team. The Add User window opens.
2. Click Select Role drop down list to select a role.
3. Select a user from the user tiles. You can use scroll arrows to browse through the user tiles.
4. Click Add to add the user. The username and the role are displayed as a tile.
5. Click the remove icon to remove the user from the list.
6. Click Next. The Verify tab opens.
Click Next,to verify the contract type information after you define the Team.
Verify
You can view all the information related to a contract type on the Verify section. You can do the following tasks in the Verify section.
- Click Previous to go back to the respective tabs in case of any doubt.
- Click Create to create a new Contract Type. The contract type with Draft status opens.
- To learn more about the Tabs that is displayed on the Contract Type Details page, click Tabs.
Creating a Structure of Masterdata
The Masterdata structure is used to enter and store Master data, in an organized way.
To create a structure of Masterdata:
1. Click Configuration > Create Contract Type on the Home page. The Select Contract Type page opens.
2. Select the Contract Type as Masterdata.
3. Click Next. Create Contract Type page opens.
The Create Contract Type page consists of the following tabs:
- Details
- Attributes
- Display Preference
- Team
- Verify
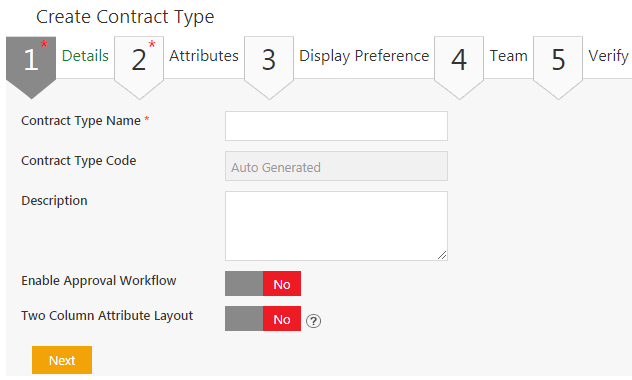
The Details section consists of the following fields:
- Contract Type Name: Type the Contract Type Name.
- Contract Type Code: Gets auto-populated
- Description: Type the description for the Contract Type. This field helps users to select the desired Contract Type.
- Enable Approval Workflow: Select Yes if you want an approval workflow for the Masterdata instances which will be created further.
4.Click Next.
5. Type the required information in Attributes section. You can edit the existing attributes or add a new attribute. You can add the Source of Effective Date attribute from drop-down options. This can be User, Integrated or Script.
6. Click Next. Display Preference section will open:
- Select any 4 attributes for a display on Agreement tile view.
- Select any 4 attributes for a display on Agreement details view.
- Click Next to go to Team tab.
7. Select the Team members in Team section, by clicking Add (+) icon.
8. Verify the details in the Verify section and click Create.
9. Click Send for Approval to send the Contract Type for approval. This contract type is displayed in the Tasks list of the approver user.
Displaying drop-downs as radio buttons or checkbox list for user selection
ICI provides new controls for multi-select and single-select choice attributes.
Users can configure an alternate UI control for drop-downs with a limited number of values for choice attributes at contract type, global attribute, and template variable levels. This improves the user experience as the number of clicks and scrolls required to view options in a drop-down are considerably reduced and provides better readability in terms of post-selection data review.
Users can select:
- The radio button for single-select choice attributes.
- The checkbox list for multi-select choice attributes.
The configuration applies across ICI for the creation and editing of agreement, amendment, associated document, masterdata, and contract request entities.
Configuring Group box control for a contract type
Users can configure the input control type for single select and multi-select choice attributes while creating or editing a contract type.
To edit the contract type:
1. Click Configuration > Contract Types on the Home page. The Contract Types index page opens.
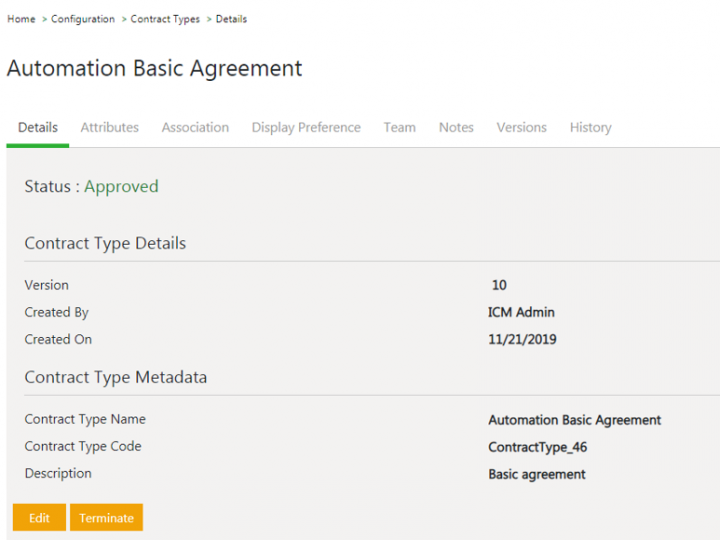
2. Click View Record icon corresponding to the contract type. For example, ICMAutomationBasicAgreement. The contract type Details page opens.
3. Click Edit. The Details tab of the Edit Contract Type page opens.
4. Click Attributes tab. The Attributes page opens.
5. Click Add icon. The Add Attributes section opens.
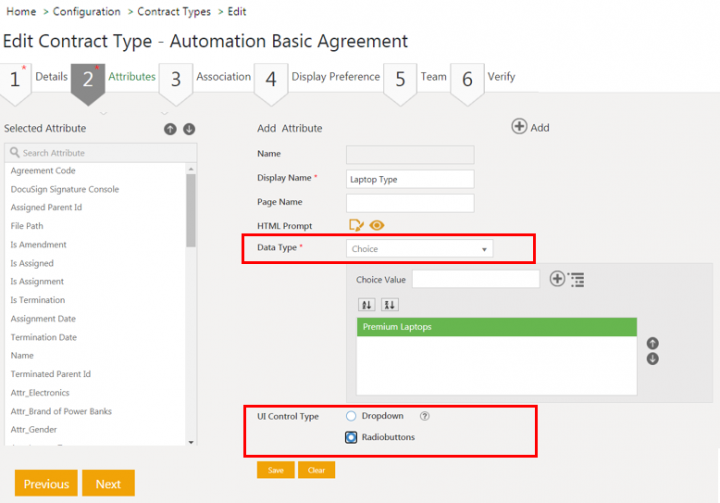
6. Enter the Display Name. For example, Laptop Type.
7. Select the Data Type. For example, Choice. The UI Control Type field is displayed.
8. Enter Choice Value. For example, Premium Laptop.
9. Select the UI Control Type.
- Dropdown
- Radiobuttons
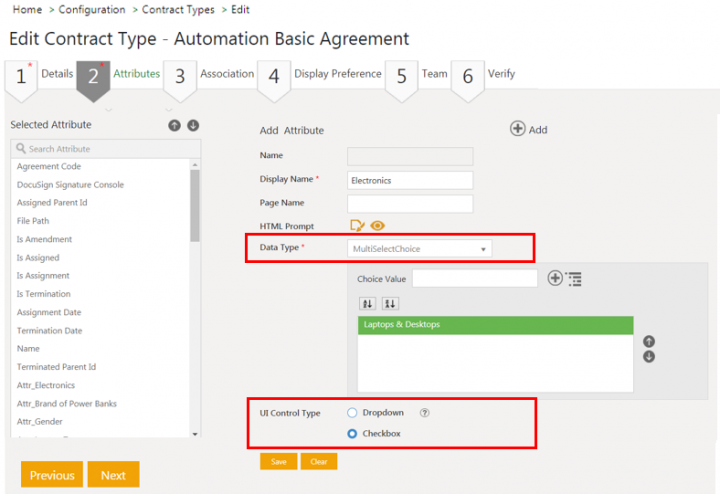
When Data Type is selected as MultiSelectChoice, options Dropdown and Checkbox are displayed.
Note: Select Radio button or checkbox list if there are less than 8 options, select dropdown if there are more.
10. Enter or set the details.
11. Click Save. The attribute is added to the contract type.
12. Click Next.
13. Enter details in the Associations, Display Preference and Team tabs.
14. Verify the details and click Update. The Contract Type ICMAutomationBasicAgreement will be updated with the selected multi-select choice UI control.
15. Publish and Approve the Contract Type following the standard ICI workflows.
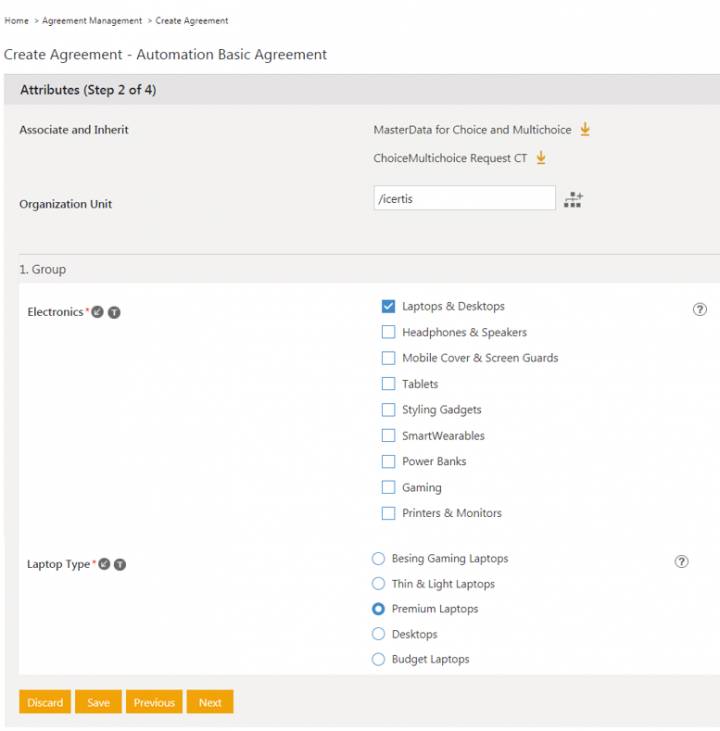
The Choice type attribute Laptop Type is rendered as Radio buttons and the multi-select choice type attribute Electronics is rendered as Checkbox list. The page height will increase with the number of options added in the attribute.
Approval Rule Support for Masterdata
You can set Approval Rule for defining a workflow for Masterdata. By default, the AllowWorkflow value will be set as No. After the Contract Type is created, the AllowWorkflow field will not be editable for subsequent editing.
Add System Attribute for Federal Regulation (FR) Discovery
ICI auto-detects the Federation Regulation (FR) Clauses that are extracted from the custom table and then confirms or rejects the FR discovery. This ensures an accurate metadata representation of the information contained in the Agreement.
To identify if the FR discovery should be added to an Agreement or not, you need to create an Agreement Contract Type that has these Attributes based on which the Agreement is created. These Attributes will then be seen on the Agreement Details page.
Let’s see an example of how this works:
1. Click Configuration > Create Contract Type on the Home page. The Select Contract Type page opens.
2. Select Agreement and click Next.
3. Enter the Contract Type Name on the Details tab and select/enter the other details based on your requirements. Ensure that you toggle the Allow Third Party Paper option to Yes. Select other options as required and click Next.
4. On the Attributes tab, select the Attribute Is External Clause Discovery in the Available Attribute column and move to the Selected Attribute column. An Attribute updates successfully message is displayed.
5. Select four Attributes to show on the Agreement Tile view as per your requirements from the Attribute List column and move to the Selected Attribute column on the Display Preferences tab. Click Next.
6. Select the Team members on the Team tab and click Next.
7. Verify the contract details on the Verify tab and click Create and Publish.
After the Agreement Contract Type is published, you can view the Attributes on the Agreement Details page and accept or reject them based on the requirements. To understand more, go to the Contract Digitalization page.
Implementing Bulk Association to support large volume data of associations
The Bulk Associations capability has enabled ICI to handle large number of associations in the tune of thousands, by presenting itself as a light weight association as well as tremendously improving performance.
The bulk association configuration has now been simplified by providing aEnable Bulk Processing flag at contract type definition level which triggers a set of defaults which has been intentionally restricted. The end user experience for the bulk association has not changed from the way that the conventional association is handled from the UI, rather the underlying data structure has been further enhanced to make it go the distance. Performance has been the key while introducing and designing this new association, which has given way to the new type of instance, namely the Proxy Instance, which is retrieved in every GET call. The actual instances are referred by using this Proxy instance, thereby reducing the load on the GET APIs. Specialized GET and SET APIs have also been introduced for Bulk associations to improve it adaptability and ease-of-use.
Bulk Associations have very effectively consumed the Icertis Search Bulk API to sync a large set of data at one go, rather than the traditional way of one instance at a time, adding to the boost in performance.
• Disabling the Workflow.
• Restricting the system associations to just Team.
• Restricting Document Assembly.
• Simplifying the Association Team by maintaining team at Proxy level to use access level as ALL or NONE, using a layer over the existing robust ICI authorization.
• Restricting indexing of bulk associations attributes in the parent, which can be achieved through a technical configuration.
To create a Contract Type for Bulk Associations:
1. Click Home > Configuration > Create Contract Type. The Create Contract Type page opens.
3. Click Next. The Details tab opens.
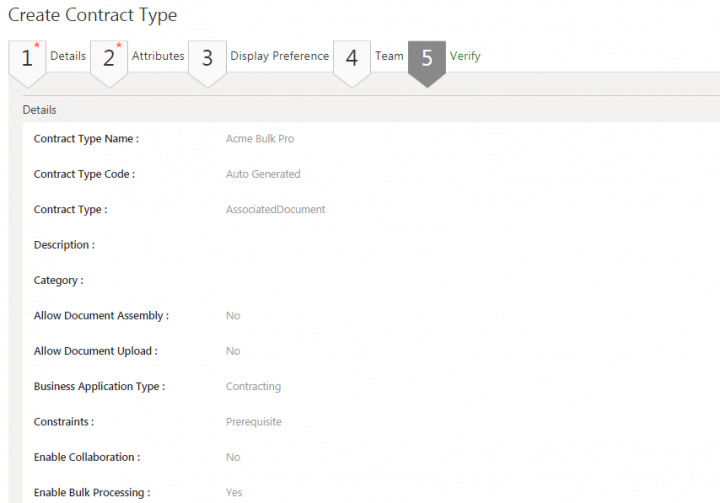
4. Enter a Contract Type Name. For example, Acme Bulk Pro.
5. Toggle the Enable Bulk Processing option to Yes. This configuration at the contract type definition level triggers a set of defaults and improves the bulk association performance by syncing a large amount of data at one go instead of one instance at a time.
6. Click Next. The Attributestab opens.
7. Select the Available Attributes and move to the Selected Attributes column.
9. Click Next. The Display Preferences tab opens.
10. Select any 4 attributes to display in the agreement tile view and agreement details view.
11. Click Next. The Team tab opens.
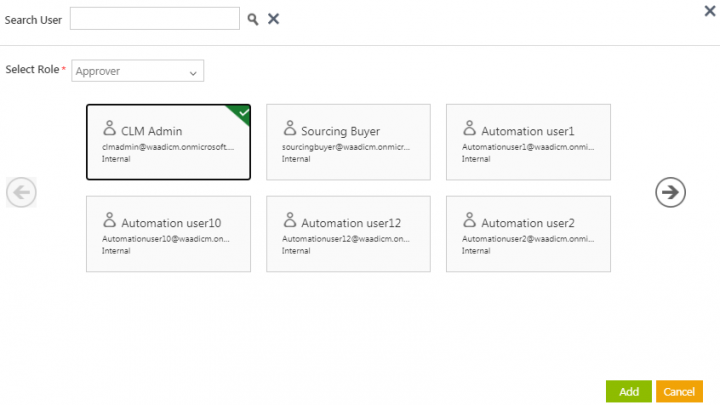
12. Click + icon next to Team. The Add User window opens.Select a user and a role from the Select Role drop-down. For example, CLM Admin as Approver.
13. Click Add. TheTeam tab opens displaying the selected user and role.
14. Click Next. The Verify page opens.
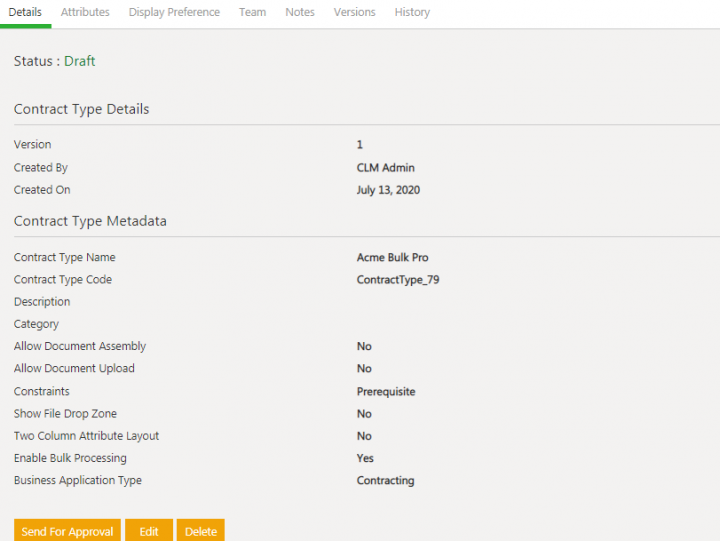
16. Click the View Record icon next to this entity to view the Contract Type Details with the Enable Bulk Processing flag asYes.
17. To proceed with Bulk Processing, go to the Bulk Actions.
Defining display sequence on lookup attributes at contract type level
Configurators can now define and maintain the display sequence for masterdata records, starting from 1 to n, at the contract type level, using a seeded display sequence attribute. They can also define the order for only selected records in the masterdata. The configured values will thus be displayed at the top for easier and faster selection in lookup attributes.
This display sequence setting is supported on create, edit and lookup search pages of contract requests, agreements, amendments, associated documents, extended clause and template entities, and template variables. The display will follow the default alphabetical order if the display sequence is not configured in masterdata.
Enabling sorting order for masterdata records
Users can enable the configuration of sorting order for any lookups referring a masterdata by adding the global seeded Display Sequence attribute while creating or editing a masterdata contract type.
To edit the masterdata contract type and add attribute to:
1. Click Configuration > Contract Types on the Home page. The Contract Type Index page opens.
2. Click View Record icon corresponding to the contract type you want to edit. For example, ICM Country Master. The contract type Details page opens.
3. Click Edit. The Details tab of the Edit Contract Type page opens.
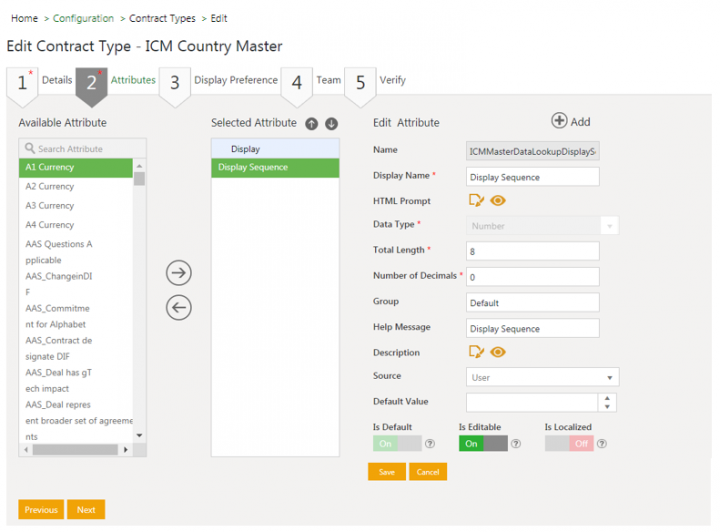
4. Click Next. The Attributes tab opens.
5. Select and add a seeded attribute Display Sequence from the Available Attributes to the Selected Attribute using action arrows.
6. Edit the details for Display Sequence attribute, if required.
7. Click Save. The Attribute updated successfully message is displayed.
8. Click Next. The Display Preference tab opens.
9. Enter the details on the Display Preference and Team tab.
10. Click Next. The Verify page opens.
11. Verify the details and click Update. The masterdata is updated and configured with the Sort Order.
12. Publish and Approve the masterdata following the ICI approval workflow.
Setting display sequence for masterdata records
Users can selectively set the numeric display sequence value for each masterdata instance.
To create masterdata instance:
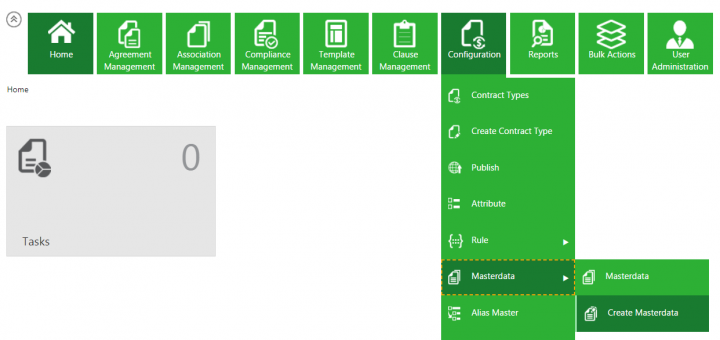
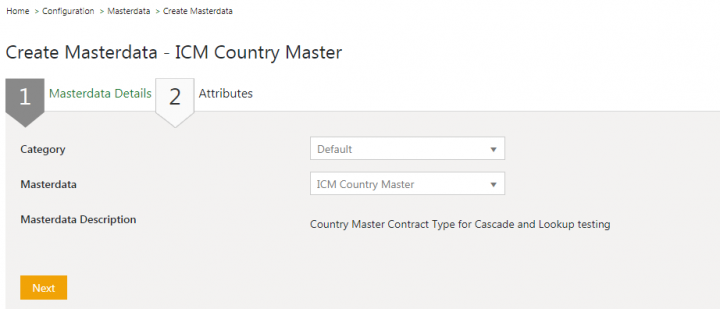
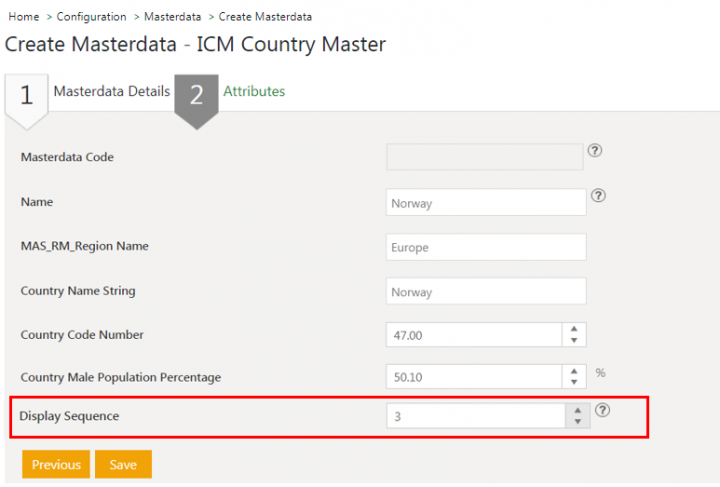
1. Click Configuration > Masterdata > Create Masterdata on the Home page. The Create Masterdata page opens.
- The display sequence is a numeric value.
- The field is not mandatory and can be left blank.
- The field can also be set with negative (-) value, to display values at the top in a drop-down, by preceding existing configured display sequences.
6. Enter other details.
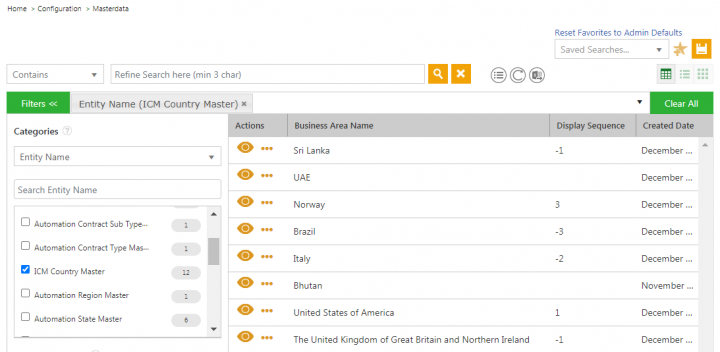
The instances with blank display sequence will be displayed at the end of the drop-down and sorted in a default alphabetical order.
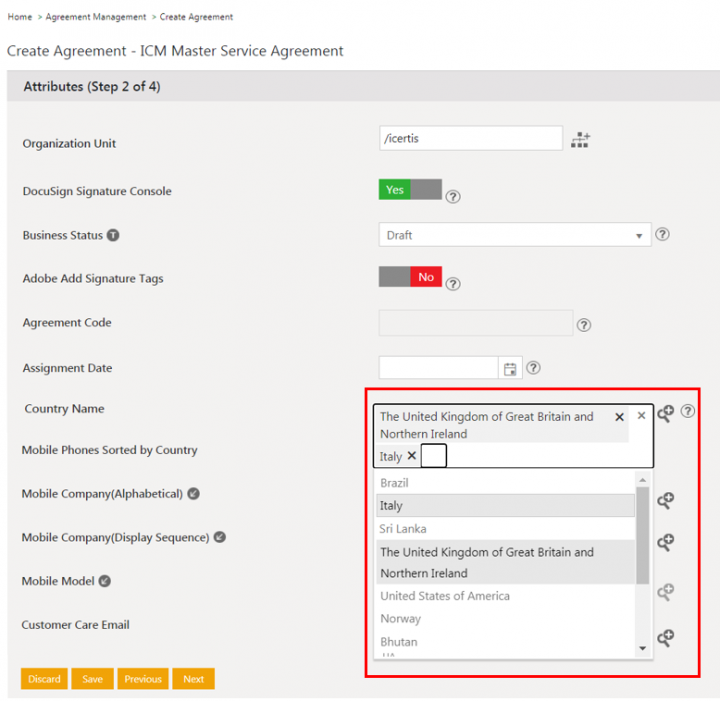
For example, here the Country Master instances will be sorted in an order:
- Brazil
- Italy
- Sri Lanka
- The United Kingdom of Great Britain and Northern Ireland
- United States of America
- Norway
- Bhutan
- UAE
Configuring Sort Order for lookup on agreement Contract Type
The Sort Order field is displayed with the options:
- Default: sorts and displays the lookup values alphabetically in a drop-down.
- Display Sequence: sorts and displays the lookup values in a drop-down as per the set display sequence in masterdata.
Related Topics: Agreement Management | Configuration |Template Management | Clause Management

