You do not have permission to edit this page, for the following reason:
You can view and copy the source of this page:
Return to Agreements Page.
This page displays all the Agreements that you are associated with in one way or the other. You may have created an Agreement or you may be a member of the team that is working on the Agreement. This page displays the most current version of an Agreement regardless of its status.
From this page you can:
You navigate to this page from the Dashboard by clicking the Agreement Management > Create Agreement tiles. On this page, you can do the following tasks:
You can create Agreements in ICM in the following ways:
The following figure shows the different states of an agreement with various roles that are involved in creating it.
Figure: Agreement workflow and various roles involved at different states of the Agreement.
To create a new Agreement, complete the details for the sections mentioned below:
Click Next at the end of each section to go to the next section and complete creating the Agreement. You can also Save a section at any time and return to this page to complete your Agreement.
Enter the following basic details of the Agreement in this section:
This section captures important details of the agreement that you are creating. Note that the attributes shown on this page will vary depending on the Contract Type that you selected. Below is an explanation of some of the less obvious attributes.
This section displays the Templates that you created for the selected Contract Type. This section is displayed only if you select Own paper to create the agreement on the Contract Type Details section. Select the appropriate Template. Template Selection page displays all the applicable templates in a Grid view by default. Clicking on the row having the desired template selects the template. Clicking again on the same row deselects it. You can switch between the Grid and Tile views as desired and if any selections exist, these are retained between any view switches.
The Templates listed in the Grid view includes columns based on template metadata such as, template name, template status, etc. or extended template metadata if configured in your instance. Through a technical configuration, you can specify which columns should display on the grid.
You can preview the Template on the Template Selection page itself prior to selection when creating or editing Agreements.

This is the final section for creating an agreement. It displays only the sections and attributes that you used to create this agreement. Verify all the details you have entered.You can:
The Primary Owner can cancel or delete an agreement in any state, except executed. The Cancel button is displayed once the Agreement is published.
To cancel an Agreement:
1. Open the Agreement that you wish to cancel from the Agreements page.
2. Click Cancel. The he Add Note page opens.
3. Select a Reason Code and type a note for cancelling this agreement. Though this field is optional, it should be used to enter detailed notes for future reference. The Reason Code is mandatory; select one from the drop down list.
4. Click Add. The status of the agreement changes to Cancelled.
The cancellation action appears in the History section of the Agreement Details page. The cancelled Agreement continues to be displayed in the Agreement searches and you can revert cancelled agreements to draft state from the Agreement Details page.
You can edit an Agreement at any stage till it is executed. Editing an executed agreement involves going through the approval process with both internal and external parties again.
To edit an existing Agreement:
1. Click the View Record icon next to the Agreement you wish to edit on the Agreements page. The Agreement Details page opens.
2. Click Edit. The Create Agreement page opens.
3. Follow the steps in Creating an Agreement section to edit the Agreement.
4. Click Update to save your changes.
5. Click Upload Document to upload the new version fot he docuemnt. When a new document version is uploaded to ICM, the user is redirected to the Versions page.
Here you can Copy an existing Agreement to create a new one. This helps you to create a new Agreement which is very similar to the existing one. The resulting Agreement consists of all the metadata in addition to the Associated Documents used in the existing Agreement.
Follow these steps to copy an Agreement:
1. Click the Agreement Management tile on My Dashboard. This opens the Agreements page.
2. Click View Record icon next to the Agreement for which you would like to create copy.
3. Click Copy Existing Agreement icon. The Copy Existing Agreement page opens.
4. Select the Associated Documents that you want to copy in addition to the Agreement Metadata in the resulting Agreement. You can either select Associations checkbox to select all available Associated Documents, or select the checkboxes for specific Associated Documents.
5. If the Associated Documentselected is of the Parent-Child type, then a new copy of that Associated Document is created and attached to the copied Agreement. However, if the Associated Document is of the Peer-to-Peer type, then the actual Associated Document is attached.
6. Click Copy, this creates the copy of the original Agreement with your selections. The Agreement created is in Draft state.
Note: The Associated Document of Prerequisite and None constraints can only get copied.
The only prerequisite for creating a copy of an Agreement with your selection of Associated Documents are that you need to select Yes for Allow Copy With Associations field, while creating Agreement Contract Type.
The Agreement created using this specific Contract Type will have this feature enabled by default.
ICM has eliminated the need to use external tools such as Email, Skype, etc. and created a dedicated space available within the Agreement itself to collaborate between multiple stakeholders.
To collaborate, multiple stakeholders involved in the contracting/sourcing process can:
This can be achieved by setting the Enable Collaboration flag to Yes for the Agreement Contract Type, which displays a Collaboration tab on the Agreement Details page. To prevent data loss, once Collaboration is enabled for a Contract Type, it cannot be disabled.
Configuring Collaboration for Contract Types
To enable Collaboration for Contract Types:
1. Click the Configuration tile on the Dashboard. The Configuration page opens.

8. Click Next. The Attributes tab opens.
9. Enter the details in the remaining Attributes, Association, Display Preference, Team, and Verify tabs to send the Collaboration Contract Type to Approved state. Alternatively, you can edit an already existing Contract Type to enable the Collaboration tab.
1. Click the Agreement Management tile on the Dashboard. The Agreement Management page opens.

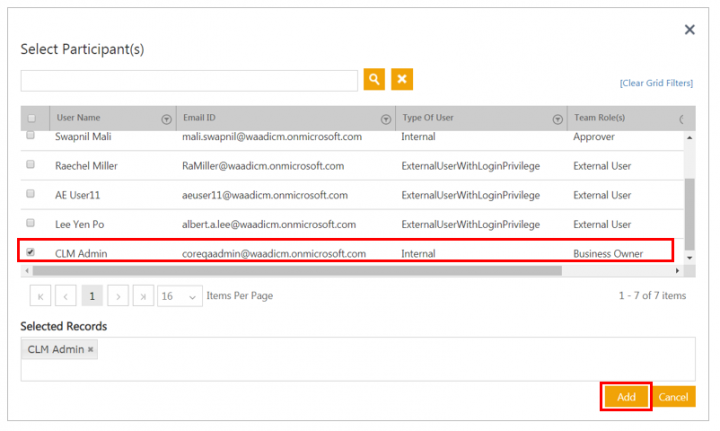
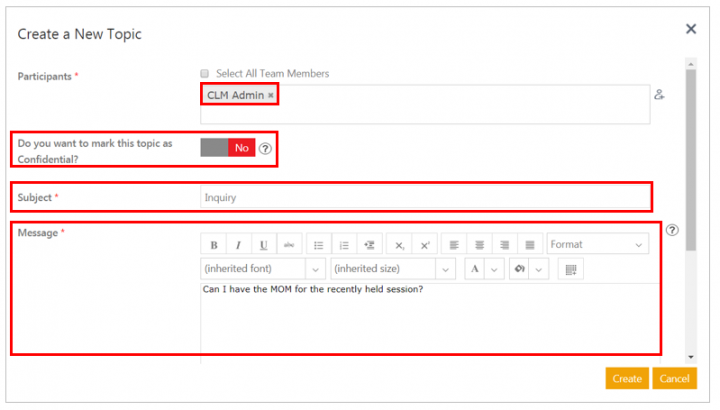
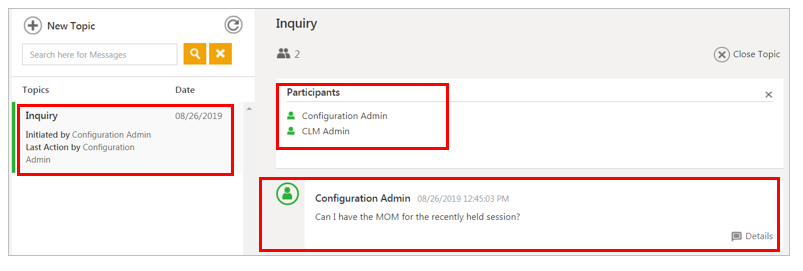
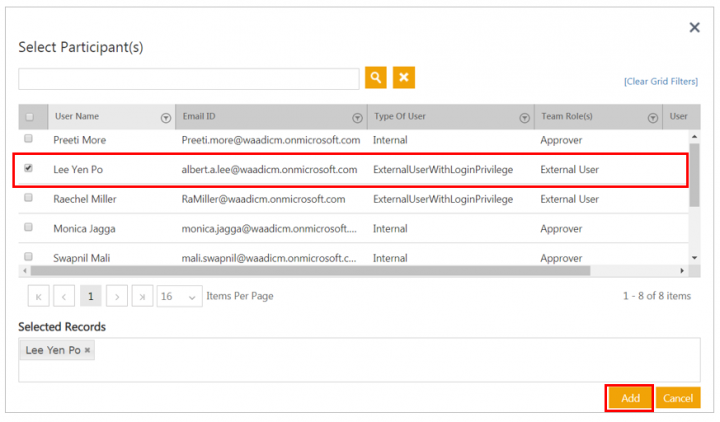
6. To select Participants for the Topic, click the Add Team Members icon or you can select all Team members. The Select Participant(s) window opens. For example, let’s collaborate with an Internal user, CLM Admin.
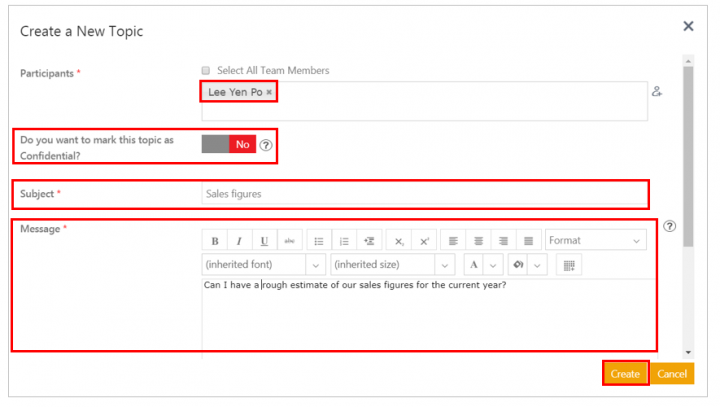

Creating a Topic by External user and Sending Messages to Internal user
1. Click the Agreement Management tile on the Dashboard. The Agreement Management page opens.
2. Select the Agreement where you want to Collaborate. For example, SaaS Agreement.

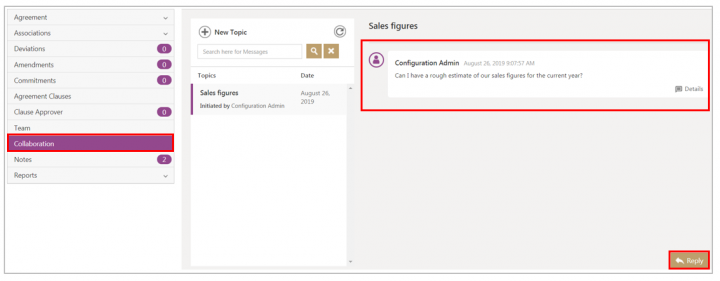
Creating a Topic by External user and Sending Messages to Internal user
1. Click the Agreement Management tile on the Dashboard. The Agreement Management page opens.
2. Select the Agreement where you want to Collaborate. For example, SaaS Agreement.

A user can search messages across topics using the Search tab available in the Collaboration window.
To search messages in a topic:
1. Enter the keyword in the Search for Messages field. For example, let’s search the word - Can. All the topics where the message contains the searched criteria are rendered in the search result along with the search word is highlighted.
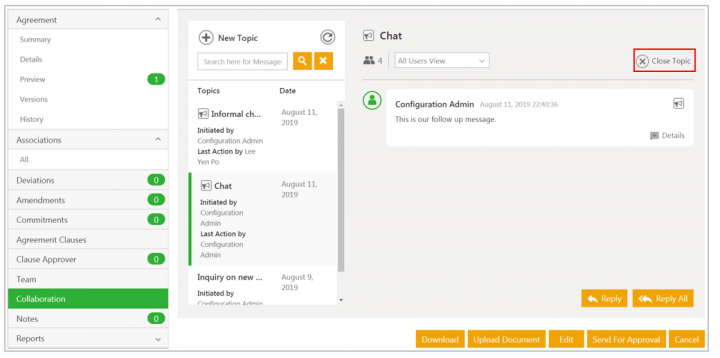
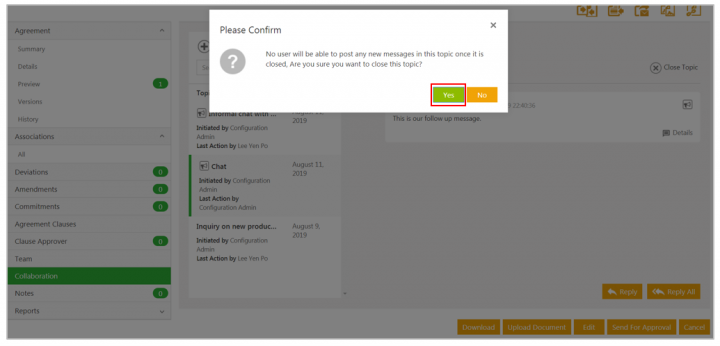
2. Click Yes. The Topic is now closed.
1. Click Saved Searches and select the specific one on which you need to perform the Bulk Action. This displays the Agreements matching the criteria defined in the Saved Searches, with checkboxes next to it.
3.Select the checkboxes next to the Agreements on which the action has to be taken as shown in the figure below.
4.Click the Bulk Action icon. This displays a list of actions that you can take on the selection. For example, Approve, Reject, Delete, Send for Approval, Send for External Signature and Download.
5. Clicking the required action, displays a confirmation window. Click OK.
You do not have permission to edit this page, for the following reason:
You are not allowed to execute the action you have requested.
You can view and copy the source of this page:
Return to Agreements Page.