From ICIHelp7.14
| (3 intermediate revisions by one other user not shown) | |||
| Line 2: | Line 2: | ||
= Create a Reason = | = Create a Reason = | ||
| − | + | ICM allows you to create Reasons, to track a particular rejection involved in clause, template, attributes and so on. | |
<div><div style="float:left;width:65%;"> | <div><div style="float:left;width:65%;"> | ||
| − | + | To create a reason: | |
| − | # | + | #'''Click''' the ''Reasons'' tile on the ''User Administration'' page. The ''Reasons'' page appears. |
| − | + | <div class="image-green-border">[[File:Adm.jpeg]]</div> <ol start="2"> | |
| − | < | + | <li>'''Click''' the ''Create Reason'' tile. The ''Create Reason'' page appears.</li> |
| − | <ol start="2"> | + | |
| − | <li | + | |
</ol> | </ol> | ||
| − | === | + | === <font size="3">'''Details tab'''</font> === |
</div> <div style="clear:both"> </div> | </div> <div style="clear:both"> </div> | ||
| − | + | #Provide appropriate details as follows in the ''Details'' tab. | |
| − | < | + | <ul style="margin-left: 80px;"> |
| − | <li | + | <li>'''Type''' an appropriate ''code for the reason''''' '''In the ''Code'' box.</li> |
| − | <li | + | <li>'''Type''' the ''appropriate details for the reason''''' '''in the ''Heading'' box,.</li> |
| − | </ | + | </ul> |
| − | + | <div class="image-green-border">[[File:Create Reason - Details.png|RTENOTITLE]]</div> | |
| − | + | :c. Click '''Next''' go to the '''Verify''' tab. | |
| − | + | ||
| − | < | + | |
| − | + | ||
| − | : | + | |
| − | + | ||
| − | + | ||
| − | + | ||
| − | + | ||
| − | + | ||
| − | <font | + | <font size="3">'''Verify tab'''</font> |
| − | + | :a. In the ''Verify ''tab, verify the information. | |
| − | < | + | :b. '''Click''' ''Save ''to save the newly created reason. |
| − | + | <div class="image-green-border">[[File:Create Reason - Verify.png|RTENOTITLE]]</div> <div class="related_topics">'''Related Topics: '''[[Edit_a_Reason|Edit a Reason]]</div> </div> | |
Latest revision as of 07:46, 29 August 2018
Create a Reason
ICM allows you to create Reasons, to track a particular rejection involved in clause, template, attributes and so on.
To create a reason:
- Click the Reasons tile on the User Administration page. The Reasons page appears.
- Click the Create Reason tile. The Create Reason page appears.
Details tab
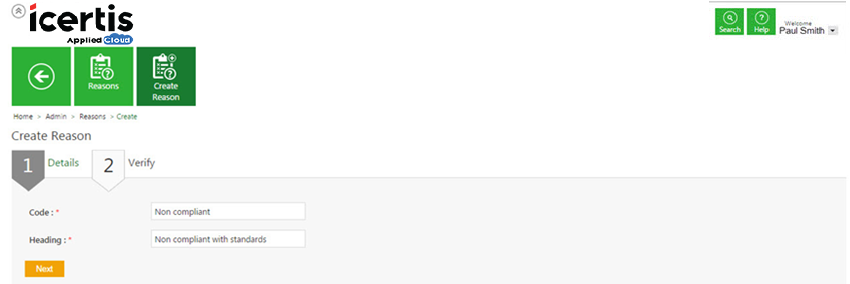
- Provide appropriate details as follows in the Details tab.
- Type an appropriate code for the reason In the Code box.
- Type the appropriate details for the reason in the Heading box,.
- c. Click Next go to the Verify tab.
Verify tab
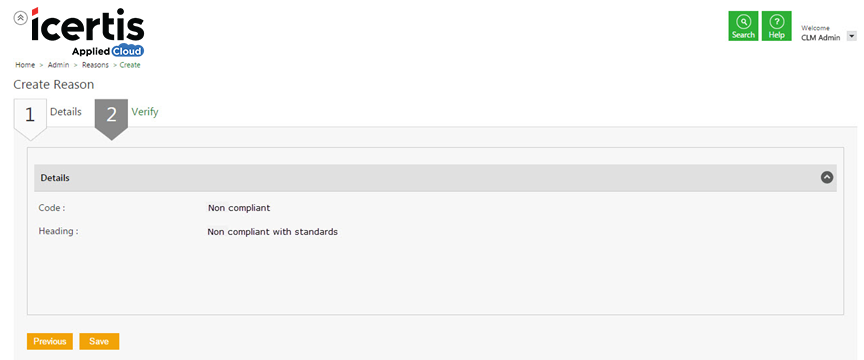
- a. In the Verify tab, verify the information.
- b. Click Save to save the newly created reason.


