| (One intermediate revision by one other user not shown) | |||
| Line 2: | Line 2: | ||
= Bulk Actions = | = Bulk Actions = | ||
| − | Users can perform bulk actions using the ''Bulk Actions'' tile on the ''Home ''page to create and update multiple entities directly within | + | Users can perform bulk actions using the ''Bulk Actions'' tile on the ''Home ''page to create and update multiple entities directly within ICI. When uploaded, these entities become part of the ICI workflow and can be managed within ICI itself. You can also perform these actions using Excel Add-in. With this utility, the overhead of installing and updating ICI Excel Add-in periodically on your machine can be avoided, besides, reducing the time taken to create and/or update records in ICI. |
| − | + | <div class="image-green-border">[[File:Bulk Actions.PNG|720px|Bulk Actions]]</div> | |
Using Bulk Action you can: | Using Bulk Action you can: | ||
| Line 17: | Line 17: | ||
*Optimal use of APIs and parallel processing for improved performance, thus allowing multiple users to add multiple batches of files simultaneously. | *Optimal use of APIs and parallel processing for improved performance, thus allowing multiple users to add multiple batches of files simultaneously. | ||
*Eliminates the need of using a third party application such as Excel Add-in to upload entities in bulk. | *Eliminates the need of using a third party application such as Excel Add-in to upload entities in bulk. | ||
| − | *Ability to select Attributes from | + | *Ability to select Attributes from ICI user interface (which is not possible when using Excel Add-in). |
*Ability to check the number of valid Templates for an Amendment when using ''Own ''Type of paper. | *Ability to check the number of valid Templates for an Amendment when using ''Own ''Type of paper. | ||
*Access control by showing the Bulk Actions tile only to users with ''Manage ''privileges. | *Access control by showing the Bulk Actions tile only to users with ''Manage ''privileges. | ||
| Line 140: | Line 140: | ||
User must select this Attribute on the ''Attributes ''page to achieve the desired result as mentioned below: | User must select this Attribute on the ''Attributes ''page to achieve the desired result as mentioned below: | ||
<ul style="margin-left: 40px;"> | <ul style="margin-left: 40px;"> | ||
| − | <li>If the ''Type Of Paper ''is ''Own ''and a valid Template name is specified in the ''Template Name ''column, then | + | <li>If the ''Type Of Paper ''is ''Own ''and a valid Template name is specified in the ''Template Name ''column, then ICI attaches that valid Template to the Amendment. </li> |
| − | <li>If the ''Type Of Paper ''is ''Own, ''the ''Use Amendment Template ''is set to ''True, ''and the ''Template Name ''column is blank, then | + | <li>If the ''Type Of Paper ''is ''Own, ''the ''Use Amendment Template ''is set to ''True, ''and the ''Template Name ''column is blank, then ICI automatically selects the valid Template. If there is exactly one Template applicable for the combination of the Attribute metadata, the ICI automatically selects that Template to create an Amendment. If there are several valid Templates that are applicable, the ICI generates an error and provides a list of Templates to select from.</li> |
| − | <li>If the ''Type Of Paper ''is ''Own,'' the ''Use Amendment Template'' is set to ''False,'' and the ''Template Name'' column is left blank, | + | <li>If the ''Type Of Paper ''is ''Own,'' the ''Use Amendment Template'' is set to ''False,'' and the ''Template Name'' column is left blank, ICI selects the last approved version of the parent Agreement to create that Amendment.</li> |
<li>If the ''Type Of Paper ''is ''Third Party ''and user specifies the file name in the ''File Path'' column, the specified file is used to create that Amendment.</li> | <li>If the ''Type Of Paper ''is ''Third Party ''and user specifies the file name in the ''File Path'' column, the specified file is used to create that Amendment.</li> | ||
| − | <li>If the ''Type Of Paper ''is ''Third Party ''and ''File Path'' column is left blank, | + | <li>If the ''Type Of Paper ''is ''Third Party ''and ''File Path'' column is left blank, ICI uses the last approved version of the parent Agreement to add that Amendment.</li> |
</ul> | </ul> | ||
| Line 151: | Line 151: | ||
*''Type of Paper'': This is mandatory and user-editable Attribute, the values of which may be ''Own ''or ''Third Party.'' | *''Type of Paper'': This is mandatory and user-editable Attribute, the values of which may be ''Own ''or ''Third Party.'' | ||
*''Template Name'': This is a user-defined field. If the ''Type of Paper'' is ''Own'' ,the value in this field is considered when adding an Amendment. | *''Template Name'': This is a user-defined field. If the ''Type of Paper'' is ''Own'' ,the value in this field is considered when adding an Amendment. | ||
| − | *''File Path'': This is a user-defined (editable) field. If the Type Of Paper is ''Third Party'' the value in this field is considered when adding an Amendment. '''Specify '''the complete name of Agreement document, including the file extension such as .pdf, .docx. The file name mentioned here must be part of the zip file you upload to | + | *''File Path'': This is a user-defined (editable) field. If the Type Of Paper is ''Third Party'' the value in this field is considered when adding an Amendment. '''Specify '''the complete name of Agreement document, including the file extension such as .pdf, .docx. The file name mentioned here must be part of the zip file you upload to ICI when adding a new batch. |
*''Actions'': This field is used to specify the workflow action. In this release, only ''Create'' action is supported. | *''Actions'': This field is used to specify the workflow action. In this release, only ''Create'' action is supported. | ||
== Understanding the Information Sheet == | == Understanding the Information Sheet == | ||
<div> | <div> | ||
| − | * | + | *ICI adds a default sheet named ''Information,'' where you can find general information about the ''Upload'' action you have selected as well as the mapping of Contract Type name with sheet names. |
*<u>'''Do not make any changes to this sheet.'''</u> | *<u>'''Do not make any changes to this sheet.'''</u> | ||
*When the records have been updated and the Workbook is populated, you must create a zip file that contains all the files mentioned in the Workbook, including the file names mentioned under ''File Path'' column, or the file names mentioned under Attributes with ''File'' data type. This zip file is required for performing the next step of ''Adding a new Batch''. | *When the records have been updated and the Workbook is populated, you must create a zip file that contains all the files mentioned in the Workbook, including the file names mentioned under ''File Path'' column, or the file names mentioned under Attributes with ''File'' data type. This zip file is required for performing the next step of ''Adding a new Batch''. | ||
| − | *The zip file can contain all the file formats supported by | + | *The zip file can contain all the file formats supported by ICI, and can be up to 100 MB in size. |
</div> | </div> | ||
== Adding a new Batch == | == Adding a new Batch == | ||
| − | You must create a batch to update existing Entities in | + | You must create a batch to update existing Entities in ICI, such as new set of Amendments. Creating a new batch enables the system to upload all the changes you made to the workbook and process them. The number of records in the batch is indicated in the ''Batch Size'' column. |
You can create a batch using the following steps: | You can create a batch using the following steps: | ||
| − | #<div class="image-green-border">'''Click '''the ''Add Batch [[File:Add Batch icon.png|RTENOTITLE]] '' icon on the ''Bulk Action Management ''page. The ''Add Batch ''window opens from where you can upload the populated Workbook to | + | #<div class="image-green-border">'''Click '''the ''Add Batch [[File:Add Batch icon.png|RTENOTITLE]] '' icon on the ''Bulk Action Management ''page. The ''Add Batch ''window opens from where you can upload the populated Workbook to ICI.</div> |
<div class="image-green-border">[[File:Add Batch Details.PNG|480px|RTENOTITLE]]</div> <ol start="2"> | <div class="image-green-border">[[File:Add Batch Details.PNG|480px|RTENOTITLE]]</div> <ol start="2"> | ||
<li>'''Enter '''the Batch Name. For example, ''AutomationAgreement.''</li> | <li>'''Enter '''the Batch Name. For example, ''AutomationAgreement.''</li> | ||
<li>'''Click '''''Choose File ''next to the ''Data File ''field to select the Workbook to upload. You should upload the Workbook that you populated in the previous steps. </li> | <li>'''Click '''''Choose File ''next to the ''Data File ''field to select the Workbook to upload. You should upload the Workbook that you populated in the previous steps. </li> | ||
<li>'''Click '''''Choose File ''next to the ''Attached Zip File ''field to select the zip file that contains all the files you have mentioned in the Workbook, either as a ''File Path ''or as '' File Type ''Attribute.</li> | <li>'''Click '''''Choose File ''next to the ''Attached Zip File ''field to select the zip file that contains all the files you have mentioned in the Workbook, either as a ''File Path ''or as '' File Type ''Attribute.</li> | ||
| − | <li>'''Click '''the ''Add ''button. The Workbook will be uploaded to | + | <li>'''Click '''the ''Add ''button. The Workbook will be uploaded to ICI with a status of ''Added to Queue. ''The batch is added to the queue for automatic validation. </li> |
</ol> | </ol> | ||
| Line 179: | Line 179: | ||
== Processing the Batch == | == Processing the Batch == | ||
| − | The Batch that you added in the ''Adding a Batch ''section will be processed by | + | The Batch that you added in the ''Adding a Batch ''section will be processed by ICI. Multiple users can create multiple batches at the same time. These batches would be queued and ICI would pick them up for processing from the queue. The status of the batch can be as follows: |
| − | *''Added to Queue: ''This is the status of the Batch when you upload the Workbook using the ''Add Batch ''button on the ''Bulk Action Management ''page. | + | *''Added to Queue: ''This is the status of the Batch when you upload the Workbook using the ''Add Batch ''button on the ''Bulk Action Management ''page. ICI validates the accuracy of the records in the batch. |
*''In Process: ''Indicates that the batch is being processed after the user has uploaded the batch. | *''In Process: ''Indicates that the batch is being processed after the user has uploaded the batch. | ||
*''Completed: ''The status of the batch changes automatically to ''Completed ''after the batch is processed. | *''Completed: ''The status of the batch changes automatically to ''Completed ''after the batch is processed. | ||
| Line 192: | Line 192: | ||
*In case of ''Add Amendments Upload ''action, Agreements of the selected Contract Types are in ''Executed ''state.''' | *In case of ''Add Amendments Upload ''action, Agreements of the selected Contract Types are in ''Executed ''state.''' | ||
*Lookup and Cascade Attributes validation: | *Lookup and Cascade Attributes validation: | ||
| − | **Lookup Attribute: Based on the Masterdata, specific values will be displayed for selection. For such Attributes, | + | **Lookup Attribute: Based on the Masterdata, specific values will be displayed for selection. For such Attributes, ICI checks if the value you have specified is present is the Masterdata or not. |
| − | **Cascade Attribute: Based on the value selected in the Lookup Attribute, specific values will be displayed for selection. For such Attributes, | + | **Cascade Attribute: Based on the value selected in the Lookup Attribute, specific values will be displayed for selection. For such Attributes, ICI checks if the value you have specified is valid for the combination of lookup value and the Masterdata associated with it. |
== Bulk Action Management == | == Bulk Action Management == | ||
| Line 233: | Line 233: | ||
*The number of failed records in the file will correspond to the number in the ''Failure ''column on the ''Bulk Action Management ''page. | *The number of failed records in the file will correspond to the number in the ''Failure ''column on the ''Bulk Action Management ''page. | ||
*The ''Warnings and Errors ''columns in the Error File indicates the specific issue. If the validation of a record fails for multiple reasons, then all such reasons are mentioned against that record. | *The ''Warnings and Errors ''columns in the Error File indicates the specific issue. If the validation of a record fails for multiple reasons, then all such reasons are mentioned against that record. | ||
| − | *If you want to process the failed records, then you must create a new batch and upload a Workbook that contains corrected values of the failed record. You are not required to start the process from the beginning (select Upload action, select Attributes, and so on.) You can reuse the Workbook that was generated earlier. All records that have been successfully created in | + | *If you want to process the failed records, then you must create a new batch and upload a Workbook that contains corrected values of the failed record. You are not required to start the process from the beginning (select Upload action, select Attributes, and so on.) You can reuse the Workbook that was generated earlier. All records that have been successfully created in ICI can be viewed from the UI. |
| | ||
| Line 261: | Line 261: | ||
''[[File:Bulk actions update esisting Details page 7.8 home.png|720px|RTENOTITLE]]'' | ''[[File:Bulk actions update esisting Details page 7.8 home.png|720px|RTENOTITLE]]'' | ||
| − | 8. '''Click '''''Generate Workbook''. The Workbook will contain the Agreement, Associations and the selected Attributes. You can make changes, upload the files to | + | 8. '''Click '''''Generate Workbook''. The Workbook will contain the Agreement, Associations and the selected Attributes. You can make changes, upload the files to ICI and continue with the workflow. |
<div class="note-box">'''Note''': Follow the same process to update other entities.</div> | <div class="note-box">'''Note''': Follow the same process to update other entities.</div> | ||
| | ||
Latest revision as of 09:07, 11 September 2020
Contents
- 1 Bulk Actions
- 1.1 Creating New Agreement using Bulk Actions
- 1.2 Adding an Amendment using Bulk Actions
- 1.3 Selecting Attributes
- 1.4 Populating the Workbook
- 1.5 Understanding the Information Sheet
- 1.6 Adding a new Batch
- 1.7 Processing the Batch
- 1.8 Bulk Action Management
- 1.9 Viewing the Status and Error Files
- 1.10 Updating the Existing Entities
Bulk Actions
Users can perform bulk actions using the Bulk Actions tile on the Home page to create and update multiple entities directly within ICI. When uploaded, these entities become part of the ICI workflow and can be managed within ICI itself. You can also perform these actions using Excel Add-in. With this utility, the overhead of installing and updating ICI Excel Add-in periodically on your machine can be avoided, besides, reducing the time taken to create and/or update records in ICI.
Using Bulk Action you can:
- Create new Agreements and Masterdata
- Update existing Amendments and Agreements.
- Create/update Associations with Agreements or Amendments.
- Process multiple batches in parallel, instead of sequentially processing them.
- Get drop-downs in the Workbook for static and dynamic lists to select from. For example, Type Of Paper, Workflow Action, Org Unit, Lookup/Cascade Attributes, etc.
- Easily differentiate each column in the Workbook for mandatory, user selected, Information fields due to the color-coding.
Feature highlights:
- Optimal use of APIs and parallel processing for improved performance, thus allowing multiple users to add multiple batches of files simultaneously.
- Eliminates the need of using a third party application such as Excel Add-in to upload entities in bulk.
- Ability to select Attributes from ICI user interface (which is not possible when using Excel Add-in).
- Ability to check the number of valid Templates for an Amendment when using Own Type of paper.
- Access control by showing the Bulk Actions tile only to users with Manage privileges.
- Provides error and status files for every batch processed. The status file indicates if the records passed or failed the validations. The error file indicates the specific validation errors while processing the batch.
You can enable the Bulk Actions tile through the Security Groups.
To enable the Bulk Actions tile:
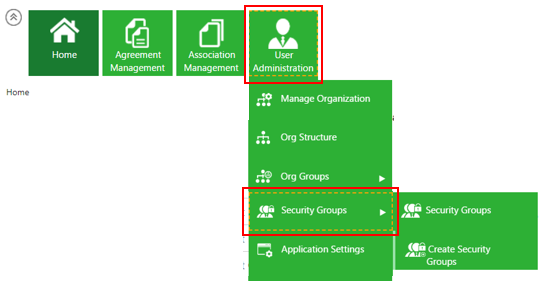
- Click User Administration > Security Groups > Security Groups on the Home page. The Security Groups index page opens.
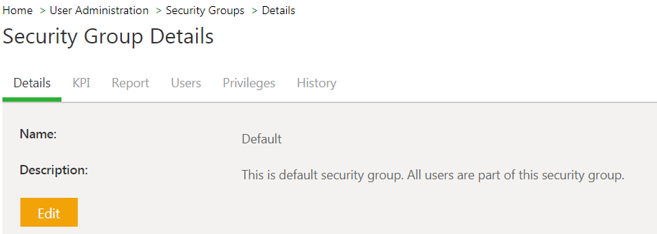
- Click the View Record icon next to the Security Group you want to view. The Security Group Details page opens.
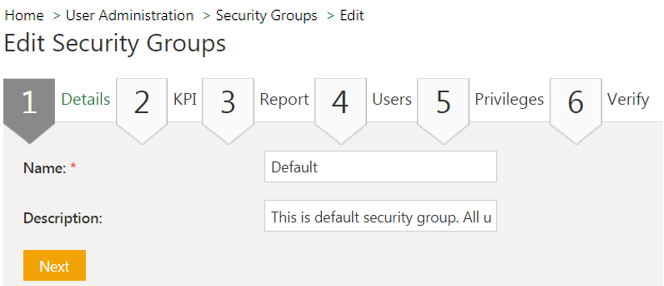
- Click Edit. The Edit Security Groups page opens.
- Navigate to the Privileges section in the Security Group and search for Bulk Action under the Entity Name column.
- Select Bulk Action option under Manage or View column depending on whether you want to provide Manage or View privileges to the Bulk Action tile. The Bulk Actions tile will be displayed on the Home page.
The Bulk Actions tile enables you to:
- Update Existing Entities. For example making changes to Agreements that are in Executed state
- Populate the Workbook.You can use the same Workbook to upload multiple Agreement records
- Add a new Batch
- Process the Batch
- View the Status and Error files
Creating New Agreement using Bulk Actions
To create a new Agreement:
1. Click Bulk Actions tile on the Home page. The Bulk Action Management page opens.
2. Click the Create New tile. The Create page opens with 2 tabs: Details and Attributes
3. In the Details section, select Create Agreement from the Bulk Upload Action drop-down.
- The mandatory Attributes (such as Contract Value) are in red
- The non-mandatory Attributes (such as Name) are in white with a light green background
- The system Attributes are in white with a dark green background
- The information Attrbiutes are in white with a blue background
11. Upload the Workbook with all the sheets as a zip file.
12. Click Add Batch. The Add Batch window opens.
- Enter the Batch Name
- Select the Data File
- Select the Attached Zip File
13. Click Add. The batch file is displayed on the Bulk Action Management Index page with a statusAdded to Queue. The status changes toCompleted when the batch is successfully uploaded.
14. Click the arrow in the Action column of the batch to download the status file. The Download Status File window opens.
15. The Status File displays the status of the files that are uploaded successfully, partially or failed to upload. The Status column displays the status of the files and the reason for partial success or failure is displayed in the Reasons column. For example, if an Association fails but the Agreement is successfully uploaded, then it will be a partial success.
16. Click the Error File button on the Download Status File window to download the error processing file to understand the reason for failure.
Adding an Amendment using Bulk Actions
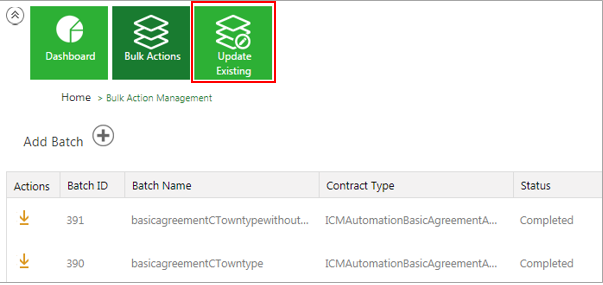
1. Click Bulk Actions tile on the Home page. The Bulk Action Management page opens where you can update the existing entities by adding Amendments using the Update Existing tile.
2. Click Update Existing on the Bulk Action Management page. The Update page opens.
3. Perform the following actions on this page:
- Bulk Upload Action: Select Add Amendments from the drop-down. This helps in adding an Amendment to an existing Agreement.
- Saved Search: You must have a Saved Search created before you can update any entity. Select the Saved Search from the drop-down, that shows all the Saved Searches by the logged in user, as well as Global Saved Searches.
- Contract Type Name: Select the Contract Type name from the drop-down. The user can view only those Contract Types that are associated with the Saved Search, and to which the user has access to.
4.Click Next.
Selecting Attributes
When adding an Amendment to an existing Agreement, select only the Attributes that you want to modify.
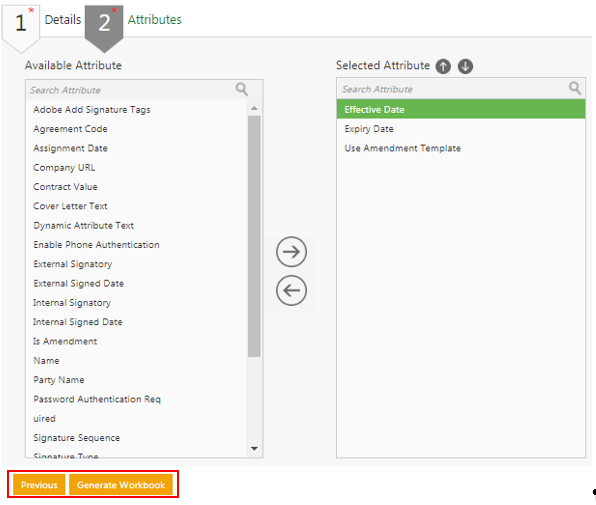
This page displays only Attributes related to Contract Type you have selected. You can select only the editable Attributes. If you select a dependent Attribute, the primary Attribute also gets selected by default. The Attributes selected on this page will be visible in the Workbook you generate. For example, Effective Date and Expiry Date.
To select any additional Attributes:
- Select the Attributes from the Available Attributes list and move it to the Selected Attribute column. For example, Use Amendment Template. Click Yes when prompted to add parent Attribute.
- Click Generate Workbook. This generates and downloads the Workbook with the system Attributes that are inherited as well the Attributes that you selected.
- Open the Workbook that was downloaded on your local drive. This Workbook contains the information about the selected Attributes and Contract Type.
- Click the Enable Editing button on the Excel Workbook to make changes as required.
Populating the Workbook
The Workbook that was generated in the previous step contains the Attributes you have selected as few additional system Attributes. You should see the following Attributes in this Workbook:
- Parent Agreement Code: This is a system-generated field, the value of which should not be changed as it will result in an error. It contains the Agreement codes of the Agreements that are part of the Contract Type you selected.
- Effective and Expiry Dates: These are user-editable fields that are included in the workbook because we selected them when generating the Workbook in the example above.
- Use Amendment Template: This Attribute plays an important role in selection of the Template when creating the Amendment. The system will:
- Either use the specified Template or,
- The last approved version of the Template in the parent Agreement or,
- Auto-select a Template based on various combinations of this Attribute such as Type Of Paper, Template Name and File Path Attributes.
User must select this Attribute on the Attributes page to achieve the desired result as mentioned below:
- If the Type Of Paper is Own and a valid Template name is specified in the Template Name column, then ICI attaches that valid Template to the Amendment.
- If the Type Of Paper is Own, the Use Amendment Template is set to True, and the Template Name column is blank, then ICI automatically selects the valid Template. If there is exactly one Template applicable for the combination of the Attribute metadata, the ICI automatically selects that Template to create an Amendment. If there are several valid Templates that are applicable, the ICI generates an error and provides a list of Templates to select from.
- If the Type Of Paper is Own, the Use Amendment Template is set to False, and the Template Name column is left blank, ICI selects the last approved version of the parent Agreement to create that Amendment.
- If the Type Of Paper is Third Party and user specifies the file name in the File Path column, the specified file is used to create that Amendment.
- If the Type Of Paper is Third Party and File Path column is left blank, ICI uses the last approved version of the parent Agreement to add that Amendment.
- Parent Agreement Status:This is a system-generated field, the value of which should not be changed as it will result in an error. It indicates the status of the Agreement to which you are adding the Amendment. When adding an Amendment, the parent Agreement status will always be Executed.
- Organization Unit: This is a system-generated field, the value of which should not be changed as it will result in an error.
- Type of Paper: This is mandatory and user-editable Attribute, the values of which may be Own or Third Party.
- Template Name: This is a user-defined field. If the Type of Paper is Own ,the value in this field is considered when adding an Amendment.
- File Path: This is a user-defined (editable) field. If the Type Of Paper is Third Party the value in this field is considered when adding an Amendment. Specify the complete name of Agreement document, including the file extension such as .pdf, .docx. The file name mentioned here must be part of the zip file you upload to ICI when adding a new batch.
- Actions: This field is used to specify the workflow action. In this release, only Create action is supported.
Understanding the Information Sheet
- ICI adds a default sheet named Information, where you can find general information about the Upload action you have selected as well as the mapping of Contract Type name with sheet names.
- Do not make any changes to this sheet.
- When the records have been updated and the Workbook is populated, you must create a zip file that contains all the files mentioned in the Workbook, including the file names mentioned under File Path column, or the file names mentioned under Attributes with File data type. This zip file is required for performing the next step of Adding a new Batch.
- The zip file can contain all the file formats supported by ICI, and can be up to 100 MB in size.
Adding a new Batch
You must create a batch to update existing Entities in ICI, such as new set of Amendments. Creating a new batch enables the system to upload all the changes you made to the workbook and process them. The number of records in the batch is indicated in the Batch Size column.
You can create a batch using the following steps:
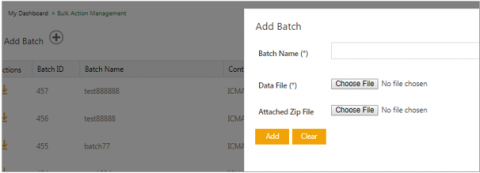
- Enter the Batch Name. For example, AutomationAgreement.
- Click Choose File next to the Data File field to select the Workbook to upload. You should upload the Workbook that you populated in the previous steps.
- Click Choose File next to the Attached Zip File field to select the zip file that contains all the files you have mentioned in the Workbook, either as a File Path or as File Type Attribute.
- Click the Add button. The Workbook will be uploaded to ICI with a status of Added to Queue. The batch is added to the queue for automatic validation.
</div>
Processing the Batch
The Batch that you added in the Adding a Batch section will be processed by ICI. Multiple users can create multiple batches at the same time. These batches would be queued and ICI would pick them up for processing from the queue. The status of the batch can be as follows:
- Added to Queue: This is the status of the Batch when you upload the Workbook using the Add Batch button on the Bulk Action Management page. ICI validates the accuracy of the records in the batch.
- In Process: Indicates that the batch is being processed after the user has uploaded the batch.
- Completed: The status of the batch changes automatically to Completed after the batch is processed.
While processing the Batch, every record is validated for:
- Correct data type for all records being uploaded.
- Any Template that may have been selected is correctly added.
- All files specified in File Path column or File Type Attribute of the workbook are physically present in the uploaded zip file.
- In case of Add Amendments Upload action, Agreements of the selected Contract Types are in Executed state.
- Lookup and Cascade Attributes validation:
- Lookup Attribute: Based on the Masterdata, specific values will be displayed for selection. For such Attributes, ICI checks if the value you have specified is present is the Masterdata or not.
- Cascade Attribute: Based on the value selected in the Lookup Attribute, specific values will be displayed for selection. For such Attributes, ICI checks if the value you have specified is valid for the combination of lookup value and the Masterdata associated with it.
Bulk Action Management
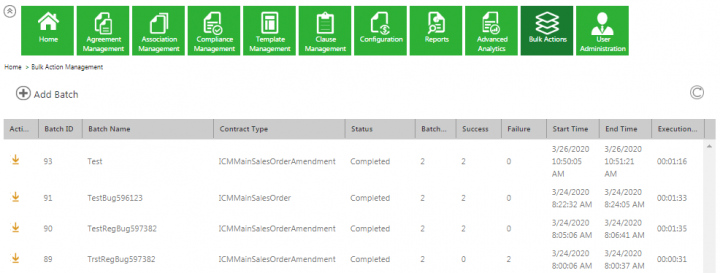
Clicking the Bulk Actions tile navigates you to the Bulk Action Management page.
The following tasks can be performed here:
- Adding a new batch
- Viewing the status of a batch
- Updating Existing Entities
The following columns are displayed here:
- Status: displays the following states of the batches that are processed.
- Added to Queue: indicates that the user added a new batch for processing.
- In Process: indicates that the batch is being processed after the user has uploaded the batch.
- Completed: indicates that processing of the batch is complete, even though errors might be encountered when validating the records.
The Download Status Files icon appears in the Actions column after the status of the batch changes to Completed. Any errors during the processing of the batch are displayed in the Failure column on the Bulk Action Management page.
- Success: displays the number of records that passed the validation process.
- Failure: displays the number of records that failed the validation process.
- Start Time: displays the Date and Time when the batch processing started.
- End Time: displays the Date and Time when the batch processing concluded.
- Execution Time: displays the Time taken to process the batch and change the status of the Batch to Completed.
- Created By: displays the name of the user who created the batch.
Viewing the Status and Error Files
After a batch is processed, a Download Status Files icon is displayed in the Actions column.
To view the files:
- Click the Download Status File icon. The Download Status Files window opens.
- Click the Status File or Error File to download the applicable file of the batch.
- The Status File shows the status of the records that were processed in a batch along with any failures.
- The number of failed records in the file will correspond to the number in the Failure column on the Bulk Action Management page.
- The Warnings and Errors columns in the Error File indicates the specific issue. If the validation of a record fails for multiple reasons, then all such reasons are mentioned against that record.
- If you want to process the failed records, then you must create a new batch and upload a Workbook that contains corrected values of the failed record. You are not required to start the process from the beginning (select Upload action, select Attributes, and so on.) You can reuse the Workbook that was generated earlier. All records that have been successfully created in ICI can be viewed from the UI.
Updating the Existing Entities
1. Select the Update Existing tile on the Bulk Action Management window. The Update page opens with the Details tab active.
2. Click the Bulk Upload Action drop-down. The following Bulk Upload Actions are available:
- Add Amendment
- Update Agreement
- Update Amendment
- Update Executed Agreement
- Update Executed Amendment
- Add Association to Agreement
- Add Association to Amendment
4. Select Saved Search. All saved searches that the user has access to get populated in the drop-down.
5. Select Contract Type Name. This list will be populated based on the selected Saved Search.
6. Select Association(s) that you want to update for this Agreement.
7. Click Next. The Attributes tab is active. You can now select the Attributes for the selected Agreement and the Associations.
8. Click Generate Workbook. The Workbook will contain the Agreement, Associations and the selected Attributes. You can make changes, upload the files to ICI and continue with the workflow.
Related Topics: Agreement Management | Agreements Page | Add Amendment to an Agreement
