| (31 intermediate revisions by 3 users not shown) | |||
| Line 51: | Line 51: | ||
'''Click''' ''Next'' at the end of each section to go to the next section and complete creating the Agreement. You can also ''Save'' a section at any time and return to this page to complete your Agreement. | '''Click''' ''Next'' at the end of each section to go to the next section and complete creating the Agreement. You can also ''Save'' a section at any time and return to this page to complete your Agreement. | ||
<div class="image-green-border">[[File:7.11 Contract type description.png|720px|7.11 Contract type description.png]]</div> | <div class="image-green-border">[[File:7.11 Contract type description.png|720px|7.11 Contract type description.png]]</div> | ||
| + | | ||
| + | |||
=== Contract Type Details === | === Contract Type Details === | ||
| Line 85: | Line 87: | ||
*The current page is displayed again if any file has malicious contents. | *The current page is displayed again if any file has malicious contents. | ||
| − | Note: | + | '''Note:''' |
*Any ICI entity (such as agreement, associations, template, clause, masterdata and so on) that takes file as an input in any mode, the virus scan is performed by default for that entity before uploading file into the ICI. | *Any ICI entity (such as agreement, associations, template, clause, masterdata and so on) that takes file as an input in any mode, the virus scan is performed by default for that entity before uploading file into the ICI. | ||
| Line 99: | Line 101: | ||
You can preview the Template on the ''Template Selection'' page itself prior to selection when creating or editing Agreements. | You can preview the Template on the ''Template Selection'' page itself prior to selection when creating or editing Agreements. | ||
<div class="image-green-border">[[File:Template create an agreement tile1.PNG|720px|RTENOTITLE]]<br/> <br/> • The template preview displays the directly added Clauses and Attribute/Association placeholders, but does not display any rule based clauses that have been added to the Template. <br/> • For a new Template that is currently being used, the latest approved version is displayed in the preview. <br/> • When editing an Agreement and the template has been previously selected, ICI displays the content from the version of the template that was used at the time of original selection. For example, a user is trying to edit an agreement for which v2 of the MSA template had been used. The current version of the approved MSA template is v5. Now when the user is editing the agreement and chooses to preview the selection of the MSA template, the product shall display the contents as of v2 of the MSA template. There shall be no difference between the contents of the template displayed in the preview and the agreement document that gets generated except for addition of any rule based clauses and associations. <br/> Refer to Template Management for complete details on creating, editing, uploading and working with Templates.</div> | <div class="image-green-border">[[File:Template create an agreement tile1.PNG|720px|RTENOTITLE]]<br/> <br/> • The template preview displays the directly added Clauses and Attribute/Association placeholders, but does not display any rule based clauses that have been added to the Template. <br/> • For a new Template that is currently being used, the latest approved version is displayed in the preview. <br/> • When editing an Agreement and the template has been previously selected, ICI displays the content from the version of the template that was used at the time of original selection. For example, a user is trying to edit an agreement for which v2 of the MSA template had been used. The current version of the approved MSA template is v5. Now when the user is editing the agreement and chooses to preview the selection of the MSA template, the product shall display the contents as of v2 of the MSA template. There shall be no difference between the contents of the template displayed in the preview and the agreement document that gets generated except for addition of any rule based clauses and associations. <br/> Refer to Template Management for complete details on creating, editing, uploading and working with Templates.</div> | ||
| + | | ||
| + | |||
=== Verify === | === Verify === | ||
| Line 112: | Line 116: | ||
| | ||
| − | == | + | === Visibility of sections on the left navigation pane to non-team users === |
| + | |||
| + | The Administrator can configure access control for users who are not part of the team to sections/ sub-sections in the left navigation pane at the contract type level. The non-team users are generally at a higher level in the organization and want a quick glance at the contract. <br/> This can be achieved through a backend configuration for the non-team user role in panel mapping as required and is applicable to agreements, amendments, contract requests and associations. | ||
| + | |||
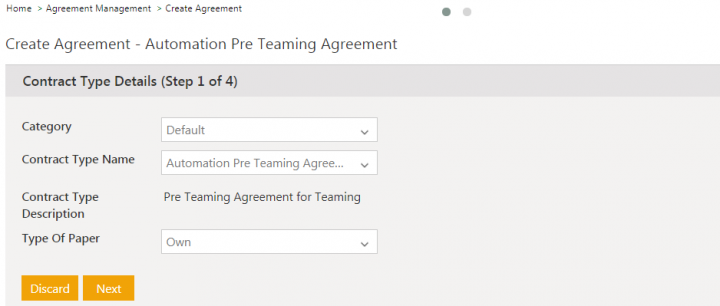
| + | Let’s consider an example where a team member who is at a lower level of the Organization Structure, such as ''Automation user5'', creates an agreement.<br/> 1. '''Click''' ''Home > Agreement Management > Create Agreement''. The ''Create Agreement'' page opens. | ||
| + | <div class="image-green-border">[[File:512931 - 1.png|720px|512931 - 1]]</div> | ||
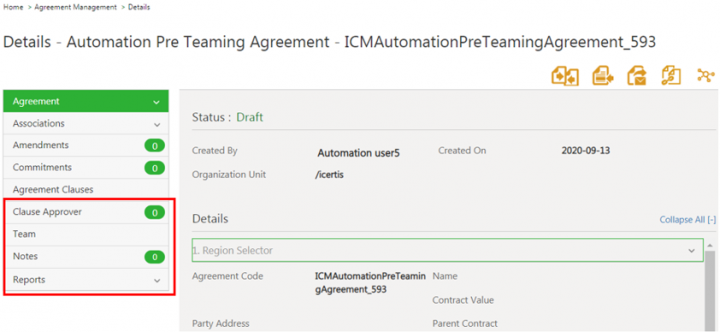
| + | 2. '''Click''' ''Next''. Enter and verify all details for the following tabs.<br/> 3. '''Click''' ''Create''. The ''Details ''page opens with the agreement in ''Draft ''status. Note that the user ''Automation user5'', who is at a lower level in the organization chart (an engineer at level 5 of the hierarchy) but part of the team, has access to all the tabs including''Team'' and ''Notes''. | ||
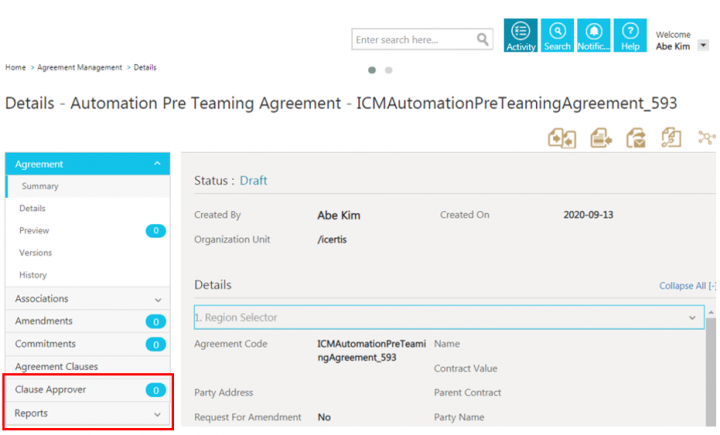
| + | <div class="image-green-border">[[File:512931 - 2.png|720px|512931 - 2]]</div> <div class="image-green-border"> </div> <div class="image-green-border">Suppose ''Abe Kim ''who is at a higher level in the organization chart (CTO at level 2 of the hierarchy) tries to access the agreement, visibility to the tabs can be controlled for him.</div> <div class="image-green-border"> </div> <div class="image-green-border">4. To remove access for the user ''Abe Kim'' to the ''Team ''and''Notes t''abs in the ''Draft'' state, a backend hard coded configuration using a GUID is done so that these tabs will not be visible for ''Abe Kim'' in the left navigation pane.</div> <div class="image-green-border"><br/> The user ''Abe Kim'' will see all other tabs except for ''Team'' and ''Notes ''tabs.</div> <div class="image-green-border"> </div> <div class="image-green-border">[[File:512931 - 4.png|720px|512931 - 4]]<br/> </div> | ||
| + | == Creating multiple agreements from a single agreement == | ||
You can create multiple agreements from a single agreement with the provision of copying associations and attributes as required. <br/> <br/> Users now: | You can create multiple agreements from a single agreement with the provision of copying associations and attributes as required. <br/> <br/> Users now: | ||
| Line 138: | Line 150: | ||
8. '''Enter '''''All Data'' in the ''Test Case Id'' field. | 8. '''Enter '''''All Data'' in the ''Test Case Id'' field. | ||
<div class="image-green-border">[[File:7.11 creating single agreement 1 2.png|720px|7.11 creating single agreement 1 2.png]]<br/> <br/> 9. '''Click '''''Next''. The ''Select Template'' tab opens.<br/> 10. '''Select '''''All Data Types Basic Template''.</div> <div class="image-green-border"> </div> <div class="image-green-border"> [[File:7.11 creating single agreement 1 3.png|720px|7.11 creating single agreement 1 3.png]]</div> <div class="image-green-border"><br/> 11. '''Click '''''Next''. The ''Verify'' tab opens.<br/> 12. '''Click '''''Create and Publish''. The ''Details'' window opens. The agreement changes to ''Draft'' state.<br/> 13. '''Click '''''Show more''. </div> <div class="image-green-border"> </div> <div class="image-green-border">[[File:7.11 creating single agreement 1 4.png|720px|7.11 creating single agreement 1 4.png]]<br/> <br/> 14. '''Click '''''Generate Bulk Contracts''. The ''Information'' window opens.</div> <div class="image-green-border"> </div> <div class="image-green-border">[[File:7.11 creating single agreement 1 5.png|720px|7.11 creating single agreement 1 5.png]]<br/> <br/> 15. '''Enter '''a unique batch identifier. For example, ''Batch-4284''. <br/> </div> <div class="note-box">'''Note''': The batch identifier must be a unique number.</div> <div class="image-green-border"> </div> <div class="image-green-border">[[File:7.11 creating single agreement 1 6.png|720px|7.11 creating single agreement 1 6.png]]<br/> <br/> 16. Click ''Ok''. The Information window opens displaying that Bulk Creation for ''Batch-4284'' initiated successfully.</div> <div class="image-green-border"> </div> <div class="image-green-border">[[File:7.11 creating single agreement 1 7.png|720px|7.11 creating single agreement 1 7.png]]<br/> <br/> 17. Click ''Ok''. The Bulk Creation action started in the background. Users get the notification email that Bulk operation is completed along with the information regarding the success and failure of individual agreements created. <br/> 18. Click the ''Agreement Management'' tile.<br/> </div> <div class="note-box">'''Note''': To filter agreements created by any batch id, users need filter agreements using ''Bulk Agreement Batch Identifier''.</div> <div class="image-green-border"> </div> <div class="image-green-border">19. '''Enter '''''Bulk Agreement Batch Identifier'' in the Categories field.<br/> 20. '''Select''' the batch identifier from the drop-down list.</div> <div class="image-green-border"> </div> <div class="image-green-border">[[File:7.11 creating single agreement 1 8 gr Action.png|720px|7.11 creating single agreement 1 8.png]]</div> <div class="image-green-border"><br/> All three agreements (''Other Party 01, Other Party 02, & Other Party 03'') are created using Bulk action. The Agreements created using Bulk action are in the Draft state and users are notified regarding the success and failure of agreements created. </div> <div class="image-green-border"> </div> | <div class="image-green-border">[[File:7.11 creating single agreement 1 2.png|720px|7.11 creating single agreement 1 2.png]]<br/> <br/> 9. '''Click '''''Next''. The ''Select Template'' tab opens.<br/> 10. '''Select '''''All Data Types Basic Template''.</div> <div class="image-green-border"> </div> <div class="image-green-border"> [[File:7.11 creating single agreement 1 3.png|720px|7.11 creating single agreement 1 3.png]]</div> <div class="image-green-border"><br/> 11. '''Click '''''Next''. The ''Verify'' tab opens.<br/> 12. '''Click '''''Create and Publish''. The ''Details'' window opens. The agreement changes to ''Draft'' state.<br/> 13. '''Click '''''Show more''. </div> <div class="image-green-border"> </div> <div class="image-green-border">[[File:7.11 creating single agreement 1 4.png|720px|7.11 creating single agreement 1 4.png]]<br/> <br/> 14. '''Click '''''Generate Bulk Contracts''. The ''Information'' window opens.</div> <div class="image-green-border"> </div> <div class="image-green-border">[[File:7.11 creating single agreement 1 5.png|720px|7.11 creating single agreement 1 5.png]]<br/> <br/> 15. '''Enter '''a unique batch identifier. For example, ''Batch-4284''. <br/> </div> <div class="note-box">'''Note''': The batch identifier must be a unique number.</div> <div class="image-green-border"> </div> <div class="image-green-border">[[File:7.11 creating single agreement 1 6.png|720px|7.11 creating single agreement 1 6.png]]<br/> <br/> 16. Click ''Ok''. The Information window opens displaying that Bulk Creation for ''Batch-4284'' initiated successfully.</div> <div class="image-green-border"> </div> <div class="image-green-border">[[File:7.11 creating single agreement 1 7.png|720px|7.11 creating single agreement 1 7.png]]<br/> <br/> 17. Click ''Ok''. The Bulk Creation action started in the background. Users get the notification email that Bulk operation is completed along with the information regarding the success and failure of individual agreements created. <br/> 18. Click the ''Agreement Management'' tile.<br/> </div> <div class="note-box">'''Note''': To filter agreements created by any batch id, users need filter agreements using ''Bulk Agreement Batch Identifier''.</div> <div class="image-green-border"> </div> <div class="image-green-border">19. '''Enter '''''Bulk Agreement Batch Identifier'' in the Categories field.<br/> 20. '''Select''' the batch identifier from the drop-down list.</div> <div class="image-green-border"> </div> <div class="image-green-border">[[File:7.11 creating single agreement 1 8 gr Action.png|720px|7.11 creating single agreement 1 8.png]]</div> <div class="image-green-border"><br/> All three agreements (''Other Party 01, Other Party 02, & Other Party 03'') are created using Bulk action. The Agreements created using Bulk action are in the Draft state and users are notified regarding the success and failure of agreements created. </div> <div class="image-green-border"> </div> | ||
| + | == Creating peer agreement from base agreement == | ||
| + | <div class="image-green-border">It is possible to create an agreement from the ''Create Agreement'' page and link it to another agreement contract type and inherit values from it. <br/> You can also create peer agreements directly from within their associated base agreement inheriting all the attribute values of the base agreement. For example, you can create a SOW directly from the MSA. This is achieved by enabling the following flags - ''Allow Peer Creation Wizard, Allow Multiple Instances ''and''Allow Two-Way Linkage''.<br/> <br/> Consider an example of creating a peer-peer association (of SOWs) from within the base agreement (MSA). </div> <div class="image-green-border"> </div> | ||
| + | === Creating the base contract type === | ||
| + | |||
| + | Let’s create a base agreement such as an MSA. | ||
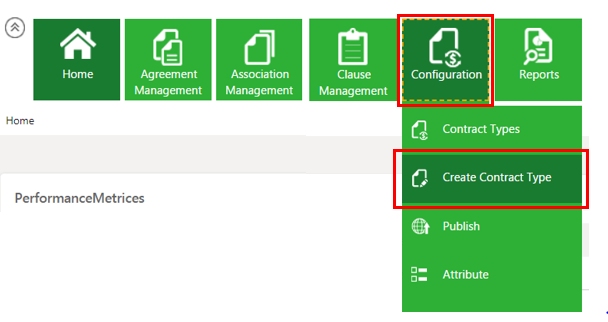
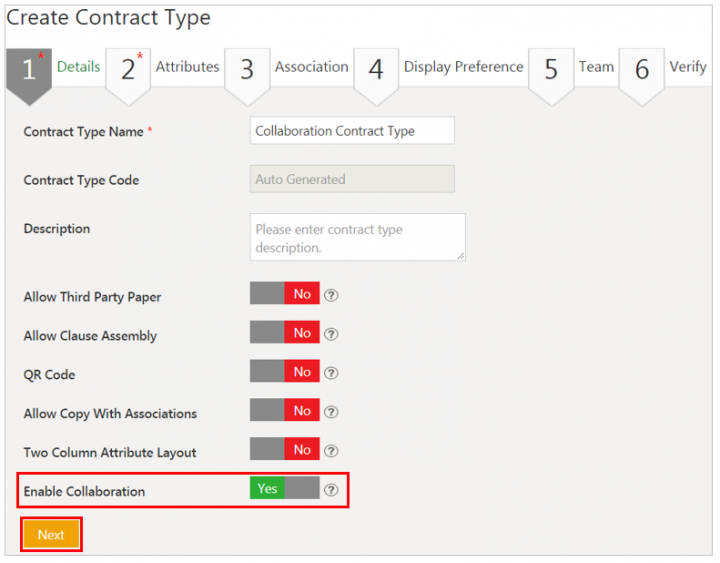
| + | <div class="image-green-border">1. '''Click '''''Home > Configuration > Create Contract Type''. The ''Create Contract Type'' page opens.</div> <div class="image-green-border"> </div> <div class="image-green-border">[[File:Peer from base agreement 1.png|720px|peer from base agreement 1]]</div> <div class="image-green-border"><br/> 2. '''Select''' ''Agreement.''<br/> 3. '''Click''' ''Next.'' The ''Details'' tab opens.</div> <div class="image-green-border"> </div> <div class="image-green-border">[[File:Peer from base agreement 2.png|720px|peer from base agreement 2]]</div> <div class="image-green-border"><br/> 4. '''Enter''' a ''Contract Type Name''. For example, ''Automation MSA_PeerAssociationcreation''.</div> <div class="image-green-border"> </div> <div class="image-green-border">[[File:Peer from base agreement 3.png|720px|peer from base agreement 3]]</div> <div class="image-green-border"><br/> 5. '''Click''' ''Next''. The ''Attributes'' tab opens. <br/> 6. '''Select''' the ''Available Attributes'' and move to the ''Selected Attributes'' column. <br/> 7. '''Edit''' the attributes as required. '''Click''' ''Save''.</div> <div class="image-green-border"> </div> | ||
| + | === Creating an association of the base agreement === | ||
| + | |||
| + | Let’s create an association of the base agreement as a peer such as a SOW. | ||
| + | |||
| + | 8. '''Click''' ''Next''. The ''Associations'' tab opens.<br/> 9. '''Click''' '''+ '''''Association''. | ||
| + | <div class="image-green-border">[[File:Peer from base agreement 4.png|720px|peer from base agreement 4]]</div> | ||
| + | | ||
| + | |||
| + | 10. '''Enter''' an ''Association Name''. For example,''ICMSOWPeercreation''. <br/> The ''Associated Contract Type ''is automatically populated and ''Relation Type'' is ''Peer''. | ||
| + | |||
| + | 11. By default, all flags are set to ''No''. You may set the flags to ''Yes'' as required. However, the following flags must be enabled: | ||
| + | |||
| + | *'''Toggle''' the ''Allow Peer creation wizard ''flag to ''Yes''. This allows the user to create the peer association instance and directly link it to the base agreement. In this case, the association ''ICMSOWPeercreation ''will directly be linked to the base agreement Automation MSA_PeerAssociationcreation as a peer. | ||
| + | *'''Toggle '''the ''Allow Inheritance ''flag to ''No''. | ||
| + | *'''Toggle '''the ''Multiple Instance'' flag to ''Yes'' to create multiple peer agreement instances in the base agreement. | ||
| + | *'''Toggle''' the''Allow Two Way Linkage'' flag to ''Yes'' for both the base and peer assocaition. This creates a two-way linkage so that the peer association gets linked to the base agreement and vice-versa. | ||
| + | |||
| + | Peer agreement can also be created from within the base agreement in ''Executed'' state. | ||
| + | |||
| + | The configuration key “''Core.Agreement.StatesToAlowPeerAssociationsPostExecution''” is used to create the association from the executed state of the base agreement. | ||
| + | <div class="note-box">'''Note: '''To copy with association, the peer association that has Allow peer creation wizard enabled will be skipped.</div> | ||
| + | 12. '''Click''' ''Save''. The created association ICMSOWPeercreation will be displayed in the Association list on the left hand side. | ||
| + | <div class="image-green-border">[[File:Peer from base agreement 5.png|720px|peer from base agreement 5]]</div> | ||
| + | 13. '''Click''' ''Next''. Enter the required details in the following tabs.<br/> 14. '''Verify''' all the details and '''click''' ''Create''. The ''Contract Type Details ''page opens.<br/> 15. '''Click''' ''Send For Approval''. The ''Configuration'' page opens listing the created C''ontract Type - Automation MSA_PeerAssociationcreation'' in an ''Approved ''state. | ||
| + | <div class="image-green-border">[[File:Peer from base agreement 6.png|720px|peer from base agreement 6]]</div> | ||
| + | 16. '''Click '''the ''View Record'' icon next to this entity to view the contract type details. <br/> | ||
| + | |||
| + | === Creating association for peer contract type === | ||
| + | |||
| + | Create a peer contract type in the similar way as mentioned in section 1. For example, ''Automation SOW_PeerAssociationcreation''. | ||
| + | |||
| + | Then create an association of the base agreement under peer contract type ''Automation SOW_PeerAssociationcreation''. | ||
| + | |||
| + | 17. '''Click'''''<i>Next</i>. The ''Associations''tab opens.<br/> 18. '''Click'''''<b>+</b> Association''.'' | ||
| + | <div class="image-green-border">''[[File:Peer from base agreement 7.png|720px|peer from base agreement 7]]''</div> | ||
| + | 19. '''Enter '''an ''Association Name''. For example,''ICMPeerCT_MSAassociation''. <br/> The Associated Contract Type is automatically populated and''Relation Type'' is''Peer''. | ||
| + | |||
| + | 20. By default, all flags are set to ''No''. You may set the flags to ''Yes'' as required. However, the following flags must be enabled: | ||
| + | |||
| + | *'''Toggle''' the ''Allow Inheritance ''flag to ''Yes''. This inherits the values from the base agreement into the peer agreement. In this case, the association ''ICMPeerCT_SOWassociation'' will directly be linked to the base agreement ''Automation MSA_PeerAssociationcreation'' as a peer. | ||
| + | *'''Toggle''' the ''Allow Two Way Linkage'' flag to Yes for both the base and peer contract type assocaition. This creates a two-way linkage so that the peer contract type association gets linked to the base agreement and vice-versa. | ||
| + | |||
| + | 21. '''Click '''''Create ''to create the peer contract type with MSA association. | ||
| + | |||
| + | | ||
| + | |||
| + | === Create multiple associations from base agreement === | ||
| + | |||
| + | The base agreement MSA can have multiple associations (SOWs), but the associations (SOWs) can have just 1 parent agreement. | ||
| + | |||
| + | 22. '''Create''' MSA agreement and go to ''Details'' page. | ||
| + | <div class="image-green-border">[[File:Peer from base agreement 8.png|peer from base agreement 8]]</div> | ||
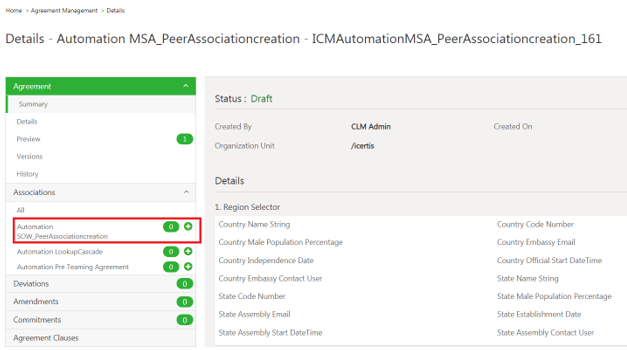
| + | 23. Under the ''Associations ''section in the left navigation pane, all the associations will be listed. '''Click''' the ''Add'' icon against a particular association. In this example, ''Automation SOW_PeerAssociationCreation''. | ||
| + | <div class="image-green-border">[[File:Peer from base agreement 9.png|720px|peer from base agreement 9]]</div> | ||
| + | The page will redirect the user to the new agreement creation wizard for Automation SOW_PeerAssociationCreation. | ||
| + | |||
| + | The contract type name will be auto-populated. | ||
| + | |||
| + | 24. '''Select''' ''Own Type Of Paper ''from the drop-down.<br/> 25. On the ''Attributes'' page, attribute values from base agreement will get inherited into peer attributes. | ||
| + | <div class="image-green-border">[[File:Peer from base agreement 10.png|720px|peer from base agreement 10]]</div> | ||
| + | 26. '''Click''' ''Next'' on the following tabs.<br/> 27. '''Verify''' the details and '''click''' ''Create'' to create the agreement. | ||
| + | |||
| + | The peer agreement will get linked to the base agreement. | ||
| + | |||
| + | 28. '''Click''' ''View Record'' icon next to the created agreement on the agreement index page. The agreement ''Details'' page opens. | ||
| + | <div class="image-green-border">[[File:Peer from base agreement 11.png|720px|peer from base agreement 11]]</div> | ||
| + | The agreement details displays the peer to peer association from within the (''MSA_PeerAssociationCreation'') listed in the ''Associations ''tab. | ||
| + | |||
| + | '''Note:''' | ||
| + | |||
| + | *The base agreement can have multiple associations; however, the association can have only one base agreement. For example, base agreement is MSA and association is SOW, then MSA can have multiple SOWs, but SOW can be attached to only 1 MSA. This can be achieved by enabling the ''Allow Multiple Instances'' flag. | ||
| + | *When copying associations, creating peer to peer association from base agreement is disabled. Hence, the MSA will not be attached to the new SOWs. | ||
| + | |||
| + | | ||
| + | |||
| + | == Adding Contract Manager role for agreements == | ||
| + | |||
| + | In the contracting process, a Contract Manager/Owner manages or owns the agreement and is generally different from the user who has created/ initiated the agreement. This user who is managing the agreement might change from time to time. For example, User A may have ownership during authoring process, whereas the User B might look after the agreement during the negotiation process. <br/> Hence, the Contract Manager role has been introduced to manage agreement ownership throughout the agreement lifecycle.<br/> With this release:<br/> • Assignment of the user against Contract Manager role in the team can be only achieved through event rules using action Add To Team.<br/> • Only one Contract Manager is available inside the agreement at any given point of time.<br/> • The Contract Manager will have provisions same as that of primary owner.<br/> • Contract Manager Name are displayed on the agreement Summary page.<br/> • Agreements can be searched using the Contract Manager Name.<br/> • Managing adhoc modification for Contract Manager role user will be restricted inside the agreement team tab similar to primary owner role user. | ||
| + | |||
| + | === Viewing the Contract Manager role in ICM === | ||
| + | |||
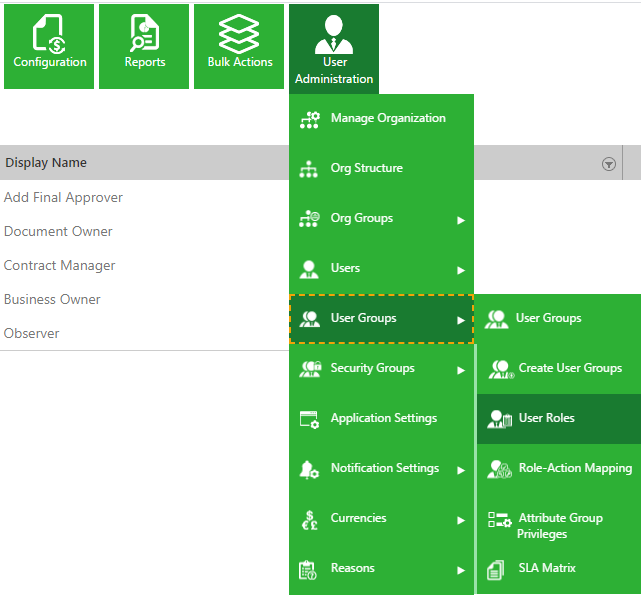
| + | To view the contract manager role: <br/> 1. '''Click '''''User Administration ''tile and then click ''User Groups'' > ''User Roles''. The ''User Roles ''page opens. | ||
| + | <div class="image-green-border">[[File:7.14 contract manager 1.png|720px|7.14 contract manager 1.png]]</div> | ||
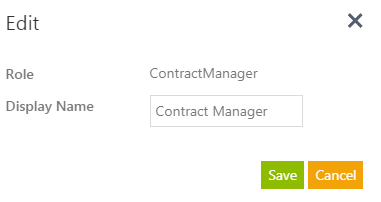
| + | 2. '''Navigate '''to the section displaying the ''Contract Manager'' role. <br/> 3. '''Click '''the icon next to the ''Contract Manager'' to edit the ''Display Name ''of the ''Contract Manager'' role. The ''Edit ''window opens. | ||
| + | <div class="image-green-border">[[File:7.14 contract manager 2.png|720px|7.14 contract manager 2.png]]</div> | ||
| + | 4. '''Edit '''the ''Display Name'' of the role and click ''Save''. The display name for ''Contract Manager ''set here will be used across ICI such as on agreement details and summary pages. | ||
| + | <div class="image-green-border">[[File:7.14 contract manager 3.png|720px|7.14 contract manager 3.png]]</div> <div class="image-green-border"> </div> <div class="note-box">Note: You can view and manage the Contract Manager role for ICI entities on the Role Action Mapping page. By default, the access privileges for contract manager role would be the same as that of the primary owner. </div> | ||
| + | | ||
| + | |||
| + | === Adding a Contract Manager to the Team === | ||
| + | |||
| + | ''Add to Team'' condition is addition of users to a team after the particular event occurs. For example, addition of approvers after the ''Agreement Created'' event occurs. <br/> You can add a contract manager to the team only using the event rule. | ||
| + | |||
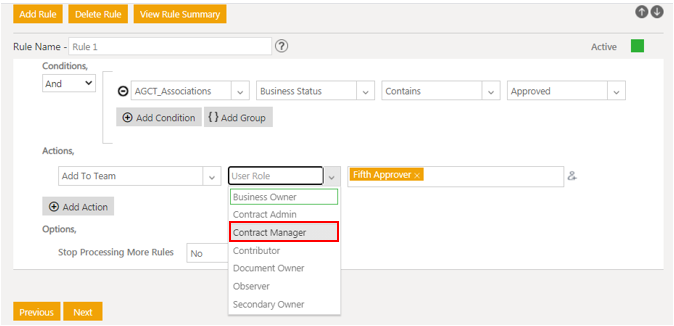
| + | To add a contract manager: <br/> 1. '''Select '''the action as ''Add To Team'' and then select ''Contract Manager'' role from the drop-down and the appropriate user. | ||
| + | <div class="image-green-border">[[File:7.14 contract manager 4.png|720px|7.14 contract manager 4.png]]</div> <div class="image-green-border"> </div> <div class="note-box">Note: You can add only one and the users who are provisioned in ICM as the contract manager.</div> | ||
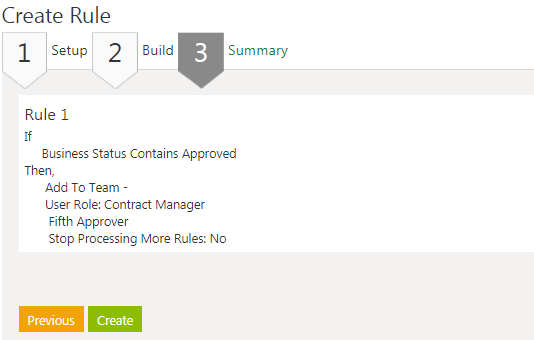
| + | 2. '''Click '''''Next ''and then click ''Create'' to create the event rule. | ||
| + | <div class="image-green-border">[[File:7.14 contract manager 5.png|720px|7.14 contract manager 5.png]]</div> | ||
| + | | ||
| + | |||
| + | === Viewing Contract Manager in Agreement Team === | ||
| + | |||
| + | You can view the contract manager added in the agreement team if the event rule is executed as expected. | ||
| + | <div class="image-green-border">[[File:7.14 contract manager 6.png|720px|7.14 contract manager 6.png]]</div> <div class="image-green-border"> </div> <div class="note-box">Note: You can also view the contract manager on the agreement Details page in the Summary section.</div> | ||
| + | | ||
| + | <div class="image-green-border">[[File:7.14 contract manager 7.png|720px|7.14 contract manager 7.png]]</div> | ||
| + | | ||
| + | |||
| + | === Searching an agreement with Contract Manager role === | ||
| + | |||
| + | Select the attribute from the drop-down on agreement index page to display the list of users with contract manager role. | ||
| + | <div class="image-green-border">[[File:7.14 contract manager 8.png|720px|7.14 contract manager 8.png]]</div> | ||
| + | | ||
| + | |||
== Ability to support Approver Sub-roles == | == Ability to support Approver Sub-roles == | ||
| Line 244: | Line 375: | ||
When the user other than above roles tries to access the agreement, the ''Edit'', ''Dissociate ''and ''Copy ''actions will not be visible to him from the agreement-association grid page. <br/> For example, the ''Edit'', ''Dissociate ''and ''Copy ''action are not visible to the user ''William Fagan'' with the user role as an ''Approver''. | When the user other than above roles tries to access the agreement, the ''Edit'', ''Dissociate ''and ''Copy ''actions will not be visible to him from the agreement-association grid page. <br/> For example, the ''Edit'', ''Dissociate ''and ''Copy ''action are not visible to the user ''William Fagan'' with the user role as an ''Approver''. | ||
<div class="image-green-border">[[File:7.12 User Role Control 12.png|720px|7.12 User Role Control 12.png]]</div> | <div class="image-green-border">[[File:7.12 User Role Control 12.png|720px|7.12 User Role Control 12.png]]</div> | ||
| + | | ||
| + | |||
| | ||
| Line 250: | Line 383: | ||
You can add Static and Dynamic filters after configuring the filters on Masterdata records. For more information about Static and Dynamic filters configuration, see ''Applying filters on Masterdata records''. | You can add Static and Dynamic filters after configuring the filters on Masterdata records. For more information about Static and Dynamic filters configuration, see ''Applying filters on Masterdata records''. | ||
| − | === To add Static filters: | + | === Adding Static Filters === |
| + | |||
| + | To add Static filters: | ||
1. '''Click '''the ''Agreement Management'' tile on the ''Home ''page. The ''Agreement Management'' menu opens.<br/> 2. '''Click '''the ''Create Agreement'' menu. The ''Create Agreement ''menu opens.<br/> 3. '''Select''' the ''Contract Type'' Name. For example, ''MSA''.<br/> 4. '''Select''' ''Type Of Paper'' as ''Own''. | 1. '''Click '''the ''Agreement Management'' tile on the ''Home ''page. The ''Agreement Management'' menu opens.<br/> 2. '''Click '''the ''Create Agreement'' menu. The ''Create Agreement ''menu opens.<br/> 3. '''Select''' the ''Contract Type'' Name. For example, ''MSA''.<br/> 4. '''Select''' ''Type Of Paper'' as ''Own''. | ||
<div class="image-green-border">[[File:7.11 Dealer master records - 8.png|720px|7.11 Dealer master records - 8.png]]<br/> <br/> 5. '''Click''' ''Next''. The ''Attributes ''tab opens. <br/> 6. '''Click''' the ''Filtered Lookup Search'' or ''Add New Record'' icon in the ''Country Name String'' drop-down list.<br/> <br/> [[File:7.11 Dealer master records - 9 9.png|720px|7.11 Dealer master records - 9 9.png]]<br/> <br/> The ''Country Name String'' attribute displays all countries except the country ''West Indies'' as set in the configured static filter. </div> <div class="image-green-border">[[File:7.11 Dealer master records - 10 gr action.png|720px|7.11 Dealer master records - 10.png]]<br/> <br/> The predefined Static filter is applied to the masterdata record.<br/> <br/> 7. '''Select''' the checkbox as per requirement. For example, ''Indonesia''.<br/> 8. '''Click''' ''Select''. <br/> 9. '''Click''' ''Next''.<br/> Complete the remaining tabs of ''Select Template'' and ''Verify ''to move the Agreement to the ''Draft ''state.</div> | <div class="image-green-border">[[File:7.11 Dealer master records - 8.png|720px|7.11 Dealer master records - 8.png]]<br/> <br/> 5. '''Click''' ''Next''. The ''Attributes ''tab opens. <br/> 6. '''Click''' the ''Filtered Lookup Search'' or ''Add New Record'' icon in the ''Country Name String'' drop-down list.<br/> <br/> [[File:7.11 Dealer master records - 9 9.png|720px|7.11 Dealer master records - 9 9.png]]<br/> <br/> The ''Country Name String'' attribute displays all countries except the country ''West Indies'' as set in the configured static filter. </div> <div class="image-green-border">[[File:7.11 Dealer master records - 10 gr action.png|720px|7.11 Dealer master records - 10.png]]<br/> <br/> The predefined Static filter is applied to the masterdata record.<br/> <br/> 7. '''Select''' the checkbox as per requirement. For example, ''Indonesia''.<br/> 8. '''Click''' ''Select''. <br/> 9. '''Click''' ''Next''.<br/> Complete the remaining tabs of ''Select Template'' and ''Verify ''to move the Agreement to the ''Draft ''state.</div> | ||
| − | === To add Dynamic filters: | + | |
| + | |||
| + | === Adding Dynamic Filters === | ||
| + | |||
| + | To add Dynamic filters: | ||
1. '''Click '''the ''Agreement Management'' tile on the ''Home ''page. The ''Agreement Management'' menu opens.<br/> 2. '''Click '''the ''Create Agreement'' menu. The ''Create Agreement'' menu opens.<br/> 3. '''Select '''the ''Contract Type'' ''Name''. For example, ''MSA''.<br/> 4. '''Select '''''Type Of Paper'' as ''Own''. | 1. '''Click '''the ''Agreement Management'' tile on the ''Home ''page. The ''Agreement Management'' menu opens.<br/> 2. '''Click '''the ''Create Agreement'' menu. The ''Create Agreement'' menu opens.<br/> 3. '''Select '''the ''Contract Type'' ''Name''. For example, ''MSA''.<br/> 4. '''Select '''''Type Of Paper'' as ''Own''. | ||
| Line 338: | Line 477: | ||
1. '''Click '''the ''Agreement Management ''menu. The ''Agreement menu'' opens.<br/> 2. '''Click '''''Create Agreement''. The ''Create Agreement'' page opens.<br/> 3. '''Select '''the ''Contract Type Name''. For example, ''Quotation''.<br/> 4. '''Select '''the ''Type Of Paper''. | 1. '''Click '''the ''Agreement Management ''menu. The ''Agreement menu'' opens.<br/> 2. '''Click '''''Create Agreement''. The ''Create Agreement'' page opens.<br/> 3. '''Select '''the ''Contract Type Name''. For example, ''Quotation''.<br/> 4. '''Select '''the ''Type Of Paper''. | ||
| − | <div class="image-green-border">[[File:7.11 Flexible Super Set - 6.png|720px|7.11 Flexible Super Set - 6.png]]<br/> <br/> 5. '''Click '''''Next''. The ''Extension Attributes'' tab opens.<br/> On clicking the ''Next ''button, the ''Extension Selection'' rule for Agreement Contract Type (''Quotation'') gets triggered and all the configured attributes of ''Select Extension Contract Types'' (''PurchaseMaster''), ''Select Extension Attributes'' (''FoodPurchaseMaster'') and attributes group ''Quality'' (''FoodMaster'') are already selected and available in the ''Extension Attributes'' tab.<br/> <br/> 6. '''Enter '''''Order ID''.<br/> 7. '''Enter '''''<i>Food Category</i>.''<br/> 8. '''Select '''''Order Date''.<br/> 9. '''Select '''''Expiry Date''.<br/> 10. '''Select '''the ''Order Status'' from the drop-down list.<br/> 11. '''Enter '''''Quantity''.</div> <div class="image-green-border">[[File:7.12 Extension Attributes 23.png|720px|7.12 Extension Attributes 23.png]]<br/> <br/> 12. '''Click '''the ''Configure Attributes'' icon to add or remove attributes. The ''Configure Attributes'' page opens.<br/> </div> <div class="image-green-border">[[File:7.11 Flexible Super Set - 6 2.png|720px|7.11 Flexible Super Set - 6 2.png]] <br/> <br/> 13. '''Select '''''Food Master'' in the ''Select Contract Type'' drop-down field. <br/> 14. '''Select '''the attribute ''Storage Information'' from the ''Available Attribute'' list.<br/> 15. '''Click '''the arrow icon to move the attribute to the ''Selected Attribute'' list.<br/> 16. '''Click '''''Next''. The ''View and Confirm'' tab opens.<br/> 17. '''Click''' ''Confirm''. The ''Storage Information'' field is added to the page.</div> <div class="image-green-border"> </div> <div class="image-green-border">[[File:7.11 Flexible Super Set - 6 3.png|720px|7.11 Flexible Super Set - 6 3.png]]<br/> <br/> 18. '''Click '''''Next''. The ''Verify'' page opens.<br/> 19. '''Click '''''Create and Publish''. The agreement status changes to the ''Draft ''state. <br/> </div> <div class="image-green-border"> [[File:7.11 Flexible Super Set - 9.png|720px|7.11 Flexible Super Set - 9.png]]</div> | + | <div class="image-green-border">[[File:7.11 Flexible Super Set - 6.png|720px|7.11 Flexible Super Set - 6.png]]<br/> <br/> 5. '''Click '''''Next''. The ''Extension Attributes'' tab opens.<br/> On clicking the ''Next ''button, the ''Extension Selection'' rule for Agreement Contract Type (''Quotation'') gets triggered and all the configured attributes of ''Select Extension Contract Types'' (''PurchaseMaster''), ''Select Extension Attributes'' (''FoodPurchaseMaster'') and attributes group ''Quality'' (''FoodMaster'') are already selected and available in the ''Extension Attributes'' tab.<br/> <br/> 6. '''Enter '''''Order ID''.<br/> 7. '''Enter '''''<i>Food Category</i>.''<br/> 8. '''Select '''''Order Date''.<br/> 9. '''Select '''''Expiry Date''.<br/> 10. '''Select '''the ''Order Status'' from the drop-down list.<br/> 11. '''Enter '''''Quantity''.</div> <div class="image-green-border"> </div> <div class="image-green-border">[[File:7.12 Extension Attributes 23.png|720px|7.12 Extension Attributes 23.png]]<br/> <br/> 12. '''Click '''the ''Configure Attributes'' icon to add or remove attributes. The ''Configure Attributes'' page opens.<br/> </div> <div class="image-green-border">[[File:7.11 Flexible Super Set - 6 2.png|720px|7.11 Flexible Super Set - 6 2.png]] <br/> <br/> 13. '''Select '''''Food Master'' in the ''Select Contract Type'' drop-down field. <br/> 14. '''Select '''the attribute ''Storage Information'' from the ''Available Attribute'' list.<br/> 15. '''Click '''the arrow icon to move the attribute to the ''Selected Attribute'' list.<br/> 16. '''Click '''''Next''. The ''View and Confirm'' tab opens.<br/> 17. '''Click''' ''Confirm''. The ''Storage Information'' field is added to the page.</div> <div class="image-green-border"> </div> <div class="image-green-border">[[File:7.11 Flexible Super Set - 6 3.png|720px|7.11 Flexible Super Set - 6 3.png]]<br/> <br/> 18. '''Click '''''Next''. The ''Verify'' page opens.<br/> 19. '''Click '''''Create and Publish''. The agreement status changes to the ''Draft ''state. <br/> </div> <div class="image-green-border"> [[File:7.11 Flexible Super Set - 9.png|720px|7.11 Flexible Super Set - 9.png]]</div> |
20. '''Click '''the ''Create Association'' icon in the ''Associations ''tab. The ''Create Association'' page opens.<br/> 21. '''Enter '''a ''Name''. For example, ''Raw material''.<br/> 22. '''Enter '''a ''Product ID''.<br/> 23. '''Select '''the ''Priority'' from the drop-down list. For example, ''Medium''.<br/> 24. '''Select '''the ''Category'' from the drop-down list. For example, ''Other''. | 20. '''Click '''the ''Create Association'' icon in the ''Associations ''tab. The ''Create Association'' page opens.<br/> 21. '''Enter '''a ''Name''. For example, ''Raw material''.<br/> 22. '''Enter '''a ''Product ID''.<br/> 23. '''Select '''the ''Priority'' from the drop-down list. For example, ''Medium''.<br/> 24. '''Select '''the ''Category'' from the drop-down list. For example, ''Other''. | ||
<div class="image-green-border">[[File:7.11 Flexible Super Set - 10.png|720px|7.11 Flexible Super Set - 10.png]] </div> | <div class="image-green-border">[[File:7.11 Flexible Super Set - 10.png|720px|7.11 Flexible Super Set - 10.png]] </div> | ||
| Line 681: | Line 820: | ||
=== Tracking Notifications using the Notifications Dashboard === | === Tracking Notifications using the Notifications Dashboard === | ||
| − | As per the event rule, reminder notification gets triggered every day and users can keep a track of notifications by using the Notifications Dashboard.<br/> <br/> To view notifications:<br/> 1. '''Click''' the Notifications tile. The Notifications Dashboard opens.<br/> 2. '''Click''' Agreement Reminder under the Agreement Notifications tab. | + | As per the event rule, reminder notification gets triggered every day and users can keep a track of notifications by using the Notifications Dashboard.<br/> <br/> To view notifications:<br/> 1. '''Click''' the Notifications tile. The Notifications Dashboard opens.<br/> 2. '''Click''' Agreement Reminder under the Agreement Notifications tab.<br/> 3. The Agreement Reminder Notification message is displayed on the right side. |
| − | </div> <div class="image-green-border"> </div> <div class="image-green-border"> | + | |
| + | | ||
| + | |||
| + | == Capturing user emails to send notifications == | ||
| + | |||
| + | Users can capture multiple valid internal or external email addresses at a run time in a single attribute configured at the contract type level.. These email addresses then can be used for sending the automated email notifications and configure the sender’s email ID (From and Reply To Email Addresses) dynamically based on subscription configuration. | ||
| + | |||
| + | Administrators can: | ||
| + | |||
| + | *Configure email attribute to capture single or multiple email addresses while setting up a contract type | ||
| + | *Configure email attribute in Notification Subscriptions as To, Cc and Bcc recipients. | ||
| + | *Configure the sender’s email ID (From Email Address) dynamically based on the specific contract type or instance of a record by setting up subscription templates using specific user or role or user attribute. | ||
| + | *Configure the email addresses for Reply To in the subscriptions setup which recipients can revert to<br/> | ||
| + | |||
| + | === Configuring contract types to capture user emails === | ||
| + | |||
| + | Users can enable capturing the single or multiple user email addresses during agreement creation by configuring attributes with ''Data Type'' as ''Email ''and ''Email Type Option'' as ''Single/Multiple'' at the contract type level.<br/> To edit the contract type: | ||
| + | |||
| + | 1. '''Click '''''Configuration > Contract Types'' on the ''Home ''page. The contract type index page opens. | ||
| + | |||
| + | 2. '''Click '''''View Record'' icon corresponding to the contract type you want to edit. For example, ''ICI Master Service Agreement''. The contract type details page opens. | ||
| + | |||
| + | 3. '''Click '''''Edit''. The ''Edit Contract Type'' page opens. | ||
| + | |||
| + | 4. '''Select '''''Attributes ''tab. | ||
| + | |||
| + | 5. '''Click '''''Add ''action icon. The section for adding new attribute opens. | ||
| + | |||
| + | 6. '''Enter '''a ''Display ''name. For example, ''Observer Emails''. | ||
| + | |||
| + | 7. '''Select '''''Email ''in the ''Data Type'' field. | ||
| + | |||
| + | 8. '''Select '''''Multiple ''in the ''Email Type Option'' field. This enables users to enter multiple email addresses in the attribute value. | ||
| + | |||
| + | 9. '''Click '''''Save''. The attribute will be added to the contract type. | ||
| + | <div class="note-box">'''Note''': The ''Email Type Option'' field has default value as ''Single''. The field will be frozen once users set it to ''Multiple ''and changing back to ''Single ''is not allowed.</div> <div class="image-green-border"> </div> <div class="image-green-border">[[File:Configuring contract types to capture user emails.png|720px|Configuring contract types to capture user emails.png]]</div> <div class="image-green-border"> </div> | ||
| + | 10. '''Add '''another attribute following steps no. 5 to 9 for capturing a single email address with ''Data Type'' as ''Email ''and ''Email Type Option'' as ''Single''. For example, attribute ''Customer Email''. | ||
| + | |||
| + | 11. '''Click '''''Next''. | ||
| + | |||
| + | 12. '''Edit '''the details in ''Association, Display Preference ''and ''Team'' tabs if required. | ||
| + | |||
| + | 13. '''Verify '''the details and '''click '''''Update''. The contract type will be updated with the attributes configured to capture multiple and single email addresses. | ||
| + | |||
| + | 14. '''Approve '''the contract type following standard ICI approval workflow. | ||
| + | |||
| + | | ||
| + | |||
| + | === Capturing email addresses during agreement creation === | ||
| + | |||
| + | 1. '''Click '''''Agreement Management > Create Agreement'' on the ''Home ''page. The ''Create Agreement'' page opens. | ||
| + | |||
| + | 2. '''Select '''the ''Contract Type Name'' for which you want to add recipient emails. For example, ''ICI Master Service Agreement''. | ||
| + | |||
| + | | ||
| + | <div class="image-green-border">[[File:Capturing email addresses during agreement creation.png|720px|Capturing email addresses during agreement creation.png]]</div> <div class="image-green-border"> </div> | ||
| + | 3. '''Click '''''Next''. The ''Attributes'' tab opens. | ||
| + | |||
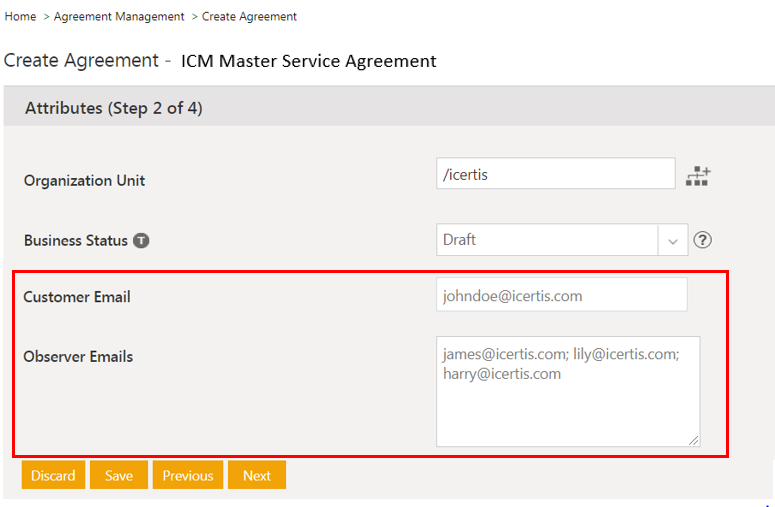
| + | 4. '''Enter '''the email in the ''Customer Email''. For example, ''johndoe@icertis.com''. | ||
| + | |||
| + | 5. '''Enter '''multiple email addresses in ''Observer Emails'' field. | ||
| + | <div class="note-box">'''Note''': The semicolon (;) is used as a delimiter to separate multiple email addresses.</div> | ||
| + | The Incorrect email address error message is displayed if user enters any invalid email address. | ||
| + | |||
| + | | ||
| + | <div class="image-green-border">[[File:Capturing email addresses during agreement creation2.png|720px|Capturing email addresses during agreement creation2.png]]</div> <div class="image-green-border"> </div> | ||
| + | For example, enter email addresses as ''james@icertis.com; lily@icertis.com; harry@icertis.com''. | ||
| + | |||
| + | | ||
| + | <div class="image-green-border">[[File:Capturing email addresses during agreement creation3.png|RTENOTITLE]]</div> <div class="image-green-border"> </div> | ||
| + | 6. '''Enter '''other required details and '''click''' ''Next''. The ''Select Template'' page opens. | ||
| + | |||
| + | 7. '''Select '''the template and '''click '''''Next''. The ''Verify ''page opens. | ||
| + | |||
| + | 8. '''Click '''''Show more'' link to display all email addresses in the ''Observer Emails'' field. | ||
| + | <div class="note-box">'''Note''': The Show more link is displayed only when there are more than two email addresses present in the multiple email address field. The count of remaining email addresses is displayed along with the Show more link.</div> <div class="image-green-border"> </div> <div class="image-green-border">[[File:Capturing email addresses during agreement creation4.png|720px|Capturing email addresses during agreement creation4.png]]</div> <div class="image-green-border"> </div> | ||
| + | 9. '''Verify '''the details and click ''Create and Publish''. The agreement is created with the entered email addresses. | ||
| + | |||
| + | | ||
| + | |||
| + | === Sample Emails === | ||
| + | |||
| + | Users can now configure the [[Notification_Settings|Notification Subscriptions]] and [[Rule|Notification Rule]] to send the automated emails to the captured email addresses. | ||
| + | |||
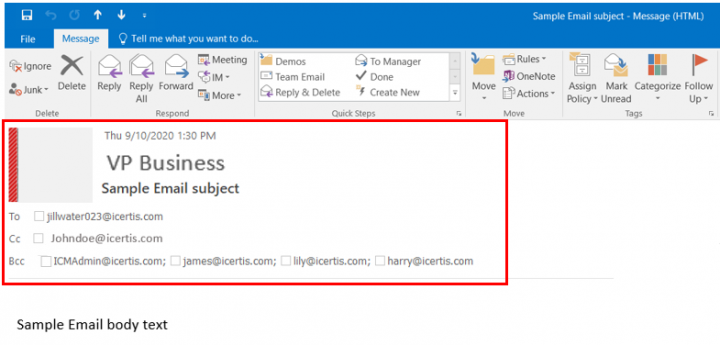
| + | The email as per the configured Email Types in Subscription and notification rule and email addresses provided in the attributes Customer Email and Observer Emails in the ICM Master Service Agreement instance. | ||
| + | |||
| + | *From Email Type:sample VP Business | ||
| + | *To Email Type: <u>jillwater023@icertis.com</u> | ||
| + | *CC EmailUsers can now configure the notification subscription and notification rule to send the automated emails to the captured addresses. Type: Customer Email <u>Johndoe@icertis.com</u> | ||
| + | *Bcc Email Type: <u>ICMAdmin@icertis.com</u> and Observer Emails as <u>james@icertis.com</u>; <u>lily@icertis.com</u>; <u>harry@icertis.com</u> | ||
| + | |||
| + | [[File:Sample Emails.png|720px|Sample Emails.png]] | ||
| + | <div class="image-green-border"> </div> | ||
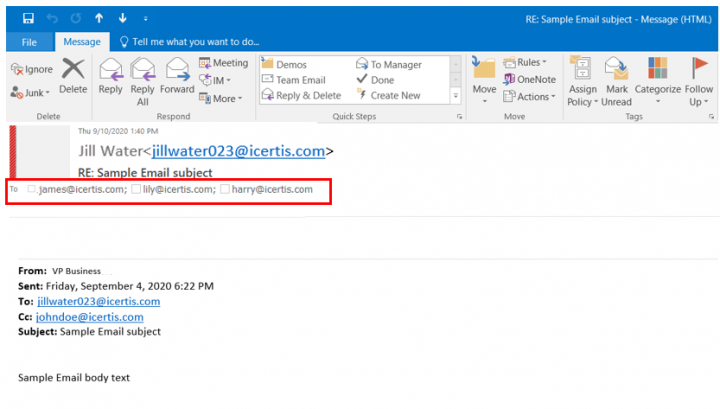
| + | When the recipient <u>jillwater023@icertis.com</u> replies to the received email, the reply would be sent to the email addresses configured with the Email Type as Reply To:. In this case, Observer Emails attribute value: <u>james@icertis.com</u>; <u>lily@icertis.com</u>; <u>harry@icertis.com</u>. | ||
| + | <div class="image-green-border">[[File:Sample Emails2.png|720px|Sample Emails2.png]]</div> | ||
| + | | ||
| + | |||
| | ||
| + | <div class="image-green-border">'''Related Topics: '''[[Agreement_Management|Agreement Management]] | [[Requests_Page|Requests Page]] | [[Searching_agreements_and_requests|Searching agreements and requests]] | [[Adding_Supporting_Documents_to_an_Agreement|Adding Supporting Documents to an Agreement]] | [[Sending_an_Agreement_for_Review_and_Approval|Sending an Agreement for Review and Approval]] | [[Notes|Notes]] | [[Creating_an_Agreement_from_a_Contract_Request|Creating an Agreement from a Contract Request]] | [[Bulk_Actions|Bulk Actions]] | [[Sending_agreements_for_approval_during_bulk_creation|Sending agreements for approval during bulk creation]]</div> </div> | ||
Latest revision as of 11:36, 30 September 2020
Contents
- 1 Agreements
- 1.1 Creating an Agreement
- 1.2 Creating multiple agreements from a single agreement
- 1.3 Creating peer agreement from base agreement
- 1.4 Adding Contract Manager role for agreements
- 1.5 Ability to support Approver Sub-roles
- 1.6 Flexibility to control the Agreement actions based on the user role
- 1.7 Adding Static and Dynamic Filters
- 1.8 Ability to have flexible contract type extension
- 1.8.1 Defining access for extension attributes actions using Role Action Mapping
- 1.8.2 Defining access for extension attributes using Attribute Group Privileges
- 1.8.3 Making the contract type available for extension attributes selection
- 1.8.4 Creating Agreement and Associated Document instances with flexible entity attributes
- 1.8.5 Saving the extension attributes selection as a template
- 1.8.6 Setting a template as default for associations
- 1.8.7 Audit with Extension attribute
- 1.8.8 Saving a search with extension attributes
- 1.9 Using the Activity Panel
- 1.10 Canceling an Agreement
- 1.11 Editing an Agreement
- 1.12 Copy the Existing Agreement
- 1.13 Word Document Compatibility between two different ICI Instances
- 1.14 Collaboration in Contracts
- 1.15 Creating a new Topic and sending Messages by Internal user and External user
- 1.16 Replying Messages
- 1.17 Email Notifications to Participants
- 1.18 Searching Messages
- 1.19 Closing the Topics
- 1.20 Performing Bulk Actions on Agreements
- 1.21 Ability to configure Reminder Notification on Entities
- 1.22 Capturing user emails to send notifications
Agreements
This page displays all the Agreements that you are associated with in one way or the other. You may have created an Agreement or you may be a member of the team that is working on the Agreement. This page displays the most current version of an Agreement regardless of its status.
From this page you can:
- Search Agreements in several ways. You can Search Agreements using the Search tile or use the Advanced Search page.
- View pinned saved searched by Administrator. If you are logging on to ICI for the first time, you will see saved searches pinned to your Agreement page. These pinned searches are applicable to the User Group you belong to and will remain unchanged, unless you modify them. The saved searches are created by the Administrator for the User Groups and pinned to the Agreements page by the application. A maximum of six searches can be pinned. Once you modify any of your pinned searches, your preferences override the Administrator’s preferences.
- View details of an Agreement by clicking the View Record icon. The details are displayed on the Agreement Details Page.
- View the document to see what the printed Agreement would look like by clicking the View Document icon. Thus, you can quickly find the required Agreement record without opening each Agreement record to view the document. If the Agreement is in Draft state, the preview only displays the attributes defined in the Agreement. If it is in an Approved state, then it also displays the actual values of those attributes. You can print the document or export the Agreement attributes to the desired format.
- View Smart Links to link related documents to one another by clicking the View Smart Links icon drop-down. For example, if there are several Agreements with the same vendor, you can link all of them through smart links to see the types of Agreements that are currently in force with that vendor. See the Creating Smart Links page for details.
- Perform Bulk Actions on Agreements.
- Configure default columns and their sequence on the Search and Index pages throughout ICI for all the users. The configuration can be done for each Entity as well as Contract Type thus offering complete flexibility to define columns as per your business needs.
- Configure multiple mandatory and non-mandatory filters at Contract Type level for inheritance by which agreements can be filtered. This is achieved through a technical configuration at the contract type level.
Creating an Agreement
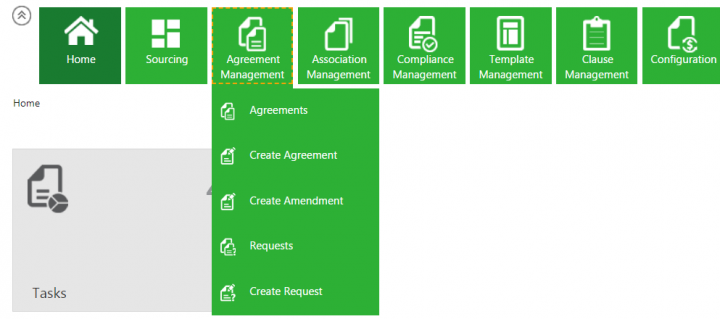
You navigate to this page from the Home page by clicking the Agreement Management > Create Agreement tiles.
On this page, you can do the following tasks:
- Specify basic details of the Agreement
- Select Attributes
- Select a Template to use for creating the Agreement
- Publish the Agreement
- Send the Agreement for approval
You can create Agreements in ICI in the following ways:
- Copy an Existing Agreement and make changes to the copy.
- Create an Agreement from a Contract Request.
- Create a new Agreement by using the Create Agreement tile. This help page describes this process.
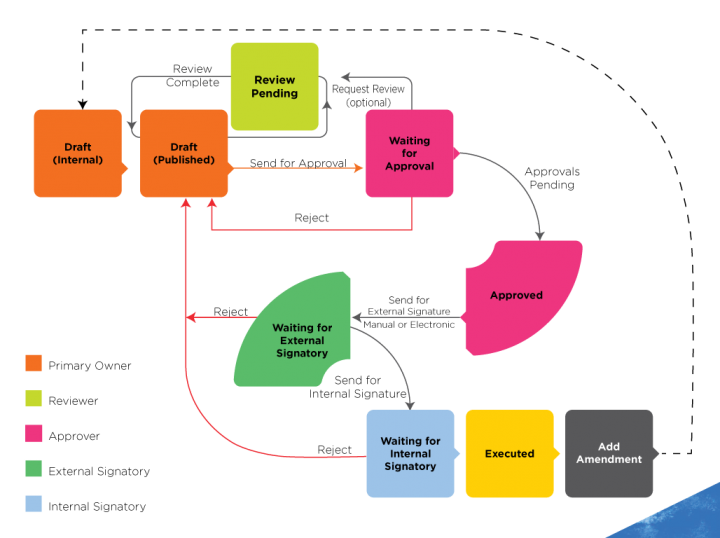
The following figure shows the different states of an agreement with various roles that are involved in creating it.
Figure: Agreement workflow and various roles involved at different states of the Agreement.
To create a new Agreement, complete the details for the sections mentioned below:
- Contract Type Details
- Attributes
- Select Template
- Verify
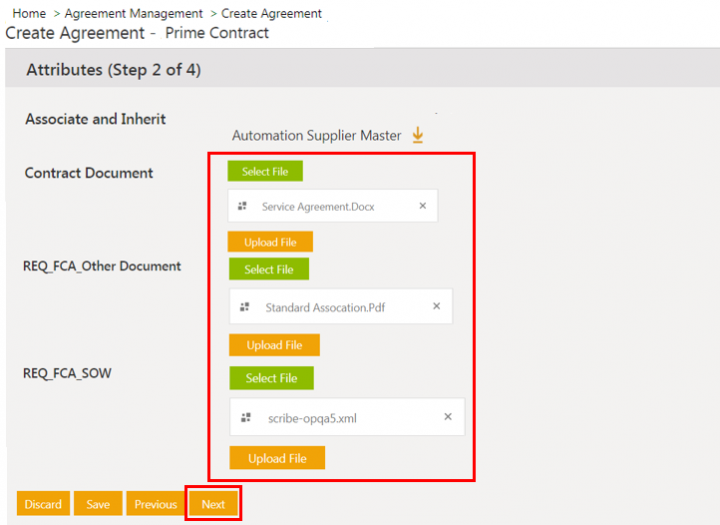
Click Next at the end of each section to go to the next section and complete creating the Agreement. You can also Save a section at any time and return to this page to complete your Agreement.
Contract Type Details
Enter the following basic details of the Agreement in this section:
- Category: categories are created by the administrator and they are similar to labels; useful for organizing your agreements. The drop-down shows all the categories that were chosen while creating the Contract Type. Select one.
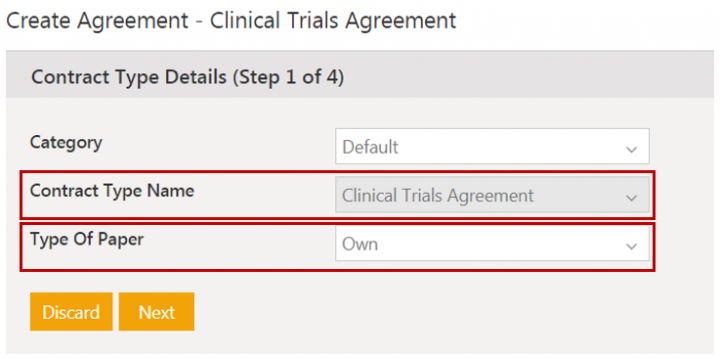
- Contract Type Name: shows a list of all the contract types that were created for the chosen category. The Type of Paper option is displayed depending on the contract type definition.
- Contract Type Description: This field facilitates users to select the desired Contract Type.
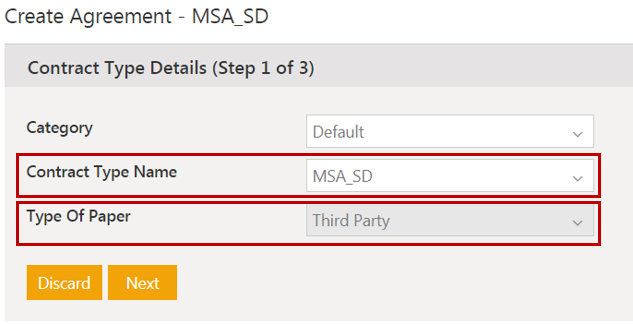
- Type of Paper: indicates if your own or a third party template should be used for creating this agreement. Provide your template if you select Own. Select Third Party option when you want to create the agreement by uploading a template agreement provided by the vendor or the provider. Few points to remember when selecting third party paper:
- should be used mainly when dealing with legacy contracts
- in case of a deviation, the deviation approval becomes a manual process in ICI,
- are uploaded as a PDF, making it difficult to analyze them. As a result, attributes may have to be manually created in ICI (which can be time-consuming) or ICI may have to be used with limited functionality.
If the Type of Paper is Own, the Select Template page with a list of templates is displayed for the selected Contract Type. If the Type Of Paper selected is Third Party, the Select Template section is not shown. Instead, you would manually upload a third party agreement. You cannot use Own paper with this option.
Attributes
This section captures important details of the agreement that you are creating. Note that the attributes shown on this page will vary depending on the Contract Type that you selected. Below is an explanation of some of the less obvious attributes.
- Associate and Inherit: Click the icon to associate that agreement and inherit all its attributes to the agreement that you are creating. This field is displayed only for those contract types that have an association with any other contract type.
- Organization Unit: Select the organization unit you would like to create this agreement in. Users within an organization unit must also have certain privileges. With a Vi'ew privilege, users can only view agreements but users with Manage privilege can perform actions on the agreement. For example, if John and Mary share one organization unit, then for John to have access to Mary's agreements, John needs view privilege on her agreements. View privilege is also required for users to search a particular agreement.
- Name: Type a name for the Agreement you are creating. To make it easier for users in the organization to find your Agreement, the name should include some basic information about the Agreement. Basic information could include details such as the purpose of the Agreement and with which vendor this Agreement was entered in to.
- Contract Value: Type the value of the contract or set it using the controls provided. Selecting a currency is mandatory.
- Agreement Code: Each agreement is assigned a unique agreement ID in ICI, known as its Agreement code. The system automatically generates the Agreement ID when you click the Create button in the 4. Verify section.
- Signature Type: Select if this agreement will be signed manually or electronically. Note that the signatures of both parties must be of the same type, meaning, ICI does not allow one party to sign electronically and the other party to sign manually. If the external signatory prefers to sign manually, the agreement must get manually signed internally too. Select Click to Sign signature option so that the user can see an online preview of the agreement, which can be used to mark the agreement as signed and executed.
- Is Amendment: Specify if this Agreement is being created as an amendment for an existing agreement.
- Multi-Party: Specify if this Agreement involves multiple parties. For example, if the organization this agreement is being created for uses a sub-contractor, then this agreement would be marked as multi-party, as the sub-contractor details would also have to be captured.
- Previous Agreement ID: If this agreement is an amendment or a renewal of an existing agreement, use this field to add a smart link to the existing agreement.
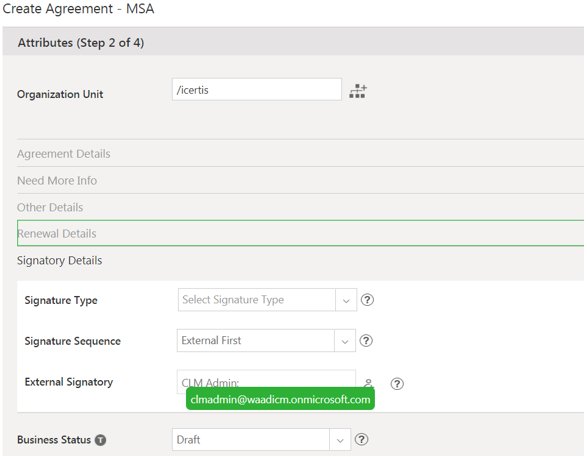
- External Signatory: C'lick' the Add User icon. The Select User window opens. If the External user is already provisioned you can select that user from the list, or click the Add External User button. The Create External User window opens. Enter all the mandatory fields such as, Name, Email Address and Language. It’s important to select the appropriate language for the user since the user will receive all the ICI notifications in the selected language. Click Save, the user gets added as an External Signatory.
- File Path: specify the path from where you want to upload the third party template. This field is displayed only when you select Third Party paper on 1. Contract Type Details section.
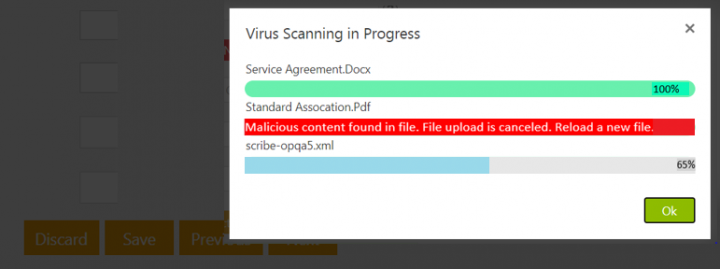
When configured, this will help to scan files for any malware and protect ICI against a wide variety of threats whenever a user uploads a file using the File Upload attribute in ICI or a file is uploaded through an API.
- The next page in the workflow opens if the files are safe.
- The current page is displayed again if any file has malicious contents.
Note:
- Any ICI entity (such as agreement, associations, template, clause, masterdata and so on) that takes file as an input in any mode, the virus scan is performed by default for that entity before uploading file into the ICI.
- Files can be scanned in bulk.
- File scanning while uploading through Word and Excel plugins is handled through API.
Template
This section displays the Templates that you created for the selected Contract Type. This section is displayed only if you select Own paper to create the agreement on the Contract Type Details section. Select the appropriate Template. Template Selection page displays all the applicable templates in a Grid view by default. Clicking on the row having the desired template selects the template. Clicking again on the same row deselects it. You can switch between the Grid and Tile views as desired and if any selections exist, these are retained between any view switches.
The Templates listed in the Grid view includes columns based on template metadata such as, template name, template status, etc. or extended template metadata if configured in your instance. Through a technical configuration, you can specify which columns should display on the grid.
You can preview the Template on the Template Selection page itself prior to selection when creating or editing Agreements.

• The template preview displays the directly added Clauses and Attribute/Association placeholders, but does not display any rule based clauses that have been added to the Template.
• For a new Template that is currently being used, the latest approved version is displayed in the preview.
• When editing an Agreement and the template has been previously selected, ICI displays the content from the version of the template that was used at the time of original selection. For example, a user is trying to edit an agreement for which v2 of the MSA template had been used. The current version of the approved MSA template is v5. Now when the user is editing the agreement and chooses to preview the selection of the MSA template, the product shall display the contents as of v2 of the MSA template. There shall be no difference between the contents of the template displayed in the preview and the agreement document that gets generated except for addition of any rule based clauses and associations.
Refer to Template Management for complete details on creating, editing, uploading and working with Templates.
Verify
This is the final section for creating an agreement. It displays only the sections and attributes that you used to create this agreement. Verify all the details you have entered.You can:
- Click Previous to go back and make any changes. Click Next to return to this section after making the required changes.
- Click Create to create the Agreement. The Agreement is not visible to anyone yet (as it is not published) and you can continue creating or editing it on the Agreement Details Page.
- Click Create and Publish to create and publish the Agreement. After the Agreement is published, other users with adequate access can search, view, and take actions on the agreement. After publishing, a Draft watermark appears on the Agreement in all states until it is approved. The watermark gets removed after the agreement is approved.
- Click Create and Send for approval to create and send the Agreement for approval. The Agreement gets sent to approvers that are set by a rule on the Contract Type selected for this Agreement. The state changes to Pending Approval. If no rules are set and no approvers are defined, the Agreement status automatically changes to Approved.
- Click Cancel to cancel the Agreement. With this action, the status of the Agreement changes to Cancelled and the Agreement continues to be visible on the Agreement Management page in the list of Agreements.
- Click Revert to revert the cancelled Agreement. This changes the status of the Agreement to Draft again.
The Administrator can configure access control for users who are not part of the team to sections/ sub-sections in the left navigation pane at the contract type level. The non-team users are generally at a higher level in the organization and want a quick glance at the contract.
This can be achieved through a backend configuration for the non-team user role in panel mapping as required and is applicable to agreements, amendments, contract requests and associations.
Let’s consider an example where a team member who is at a lower level of the Organization Structure, such as Automation user5, creates an agreement.
1. Click Home > Agreement Management > Create Agreement. The Create Agreement page opens.
2. Click Next. Enter and verify all details for the following tabs.
3. Click Create. The Details page opens with the agreement in Draft status. Note that the user Automation user5, who is at a lower level in the organization chart (an engineer at level 5 of the hierarchy) but part of the team, has access to all the tabs includingTeam and Notes.
The user Abe Kim will see all other tabs except for Team and Notes tabs.
Creating multiple agreements from a single agreement
You can create multiple agreements from a single agreement with the provision of copying associations and attributes as required.
Users now:
- Have complete flexibility at configuration level to define the applicable contract type, decision attribute, compute attribute for bulk agreement creation
- Have the option of bulk agreement creation in the model agreement based on the above configuration with provision to define unique batch Id for all the agreements created using a single model agreement
- Can access model agreements only through technically configured Admin saved search.
Bulk created agreements are created in Draft status by default. However, users can send agreements for approval as part of the bulk creation process by configuring an attribute added in the bulk configuration masterdata contract type. The bulk agreements will then be created in Approved or Waiting for Approval status.
Note: Amendments can also be sent for approval using the same functionality.
Configuring Bulk Agreement
Users are required to use the instance of seeded masterdata contract type to enable bulk agreement creation. The seeded masterdata attributes and their description are explained here briefly. For information about how to configure a masterdata contract type for bulk creation, see the Configuration Guide for Bulk Agreement.
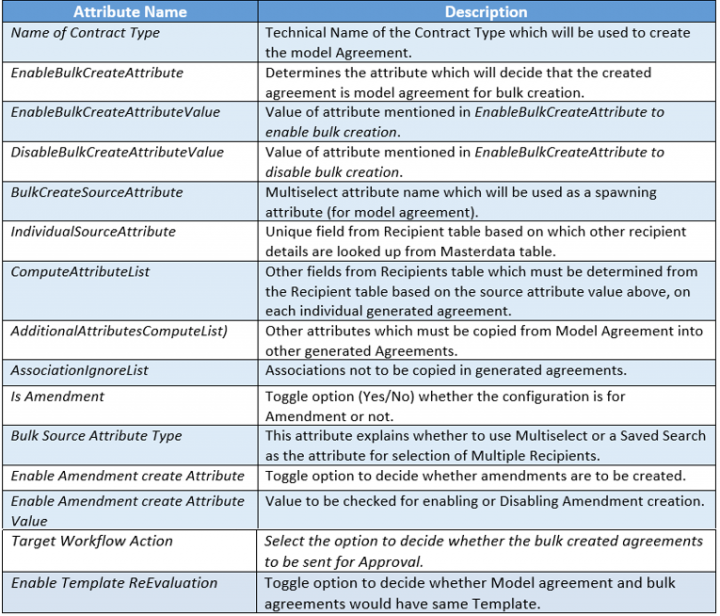
The seeded masterdata attributes in ICI:
Creating Bulk Agreement
Let us consider an example where we create an agreement using the contract type Automation All DataTypes Attributes which is already configured for the bulk creation.
1. Click the Agreement Management tile on the Home page. The Agreement Management menu opens.
2. Click the Create Agreement menu. The Create Agreement menu opens.
3. Select the Contract Type Name. For example, Agreement CT with All DataTypes Attributes.
4. Select Type Of Paper as Own.

5. Click Next. The Attributes tab opens.
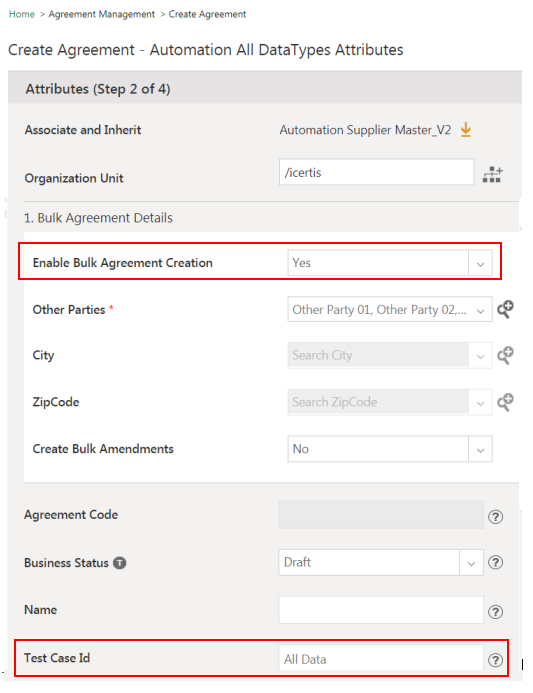
6. Select Yes from Enable Bulk Agreement Creation drop-down list.
7. Select parties from the Other Parties drop-down list. For example, Other Party 01, Other Party 02, & Other Party 03.
8. Enter All Data in the Test Case Id field.
11. Click Next. The Verify tab opens.
12. Click Create and Publish. The Details window opens. The agreement changes to Draft state.
13. Click Show more.

16. Click Ok. The Information window opens displaying that Bulk Creation for Batch-4284 initiated successfully.

17. Click Ok. The Bulk Creation action started in the background. Users get the notification email that Bulk operation is completed along with the information regarding the success and failure of individual agreements created.
18. Click the Agreement Management tile.
20. Select the batch identifier from the drop-down list.
All three agreements (Other Party 01, Other Party 02, & Other Party 03) are created using Bulk action. The Agreements created using Bulk action are in the Draft state and users are notified regarding the success and failure of agreements created.
Creating peer agreement from base agreement
You can also create peer agreements directly from within their associated base agreement inheriting all the attribute values of the base agreement. For example, you can create a SOW directly from the MSA. This is achieved by enabling the following flags - Allow Peer Creation Wizard, Allow Multiple Instances andAllow Two-Way Linkage.
Consider an example of creating a peer-peer association (of SOWs) from within the base agreement (MSA).
Creating the base contract type
Let’s create a base agreement such as an MSA.
2. Select Agreement.
3. Click Next. The Details tab opens.
4. Enter a Contract Type Name. For example, Automation MSA_PeerAssociationcreation.
5. Click Next. The Attributes tab opens.
6. Select the Available Attributes and move to the Selected Attributes column.
7. Edit the attributes as required. Click Save.
Creating an association of the base agreement
Let’s create an association of the base agreement as a peer such as a SOW.
8. Click Next. The Associations tab opens.
9. Click + Association.
10. Enter an Association Name. For example,ICMSOWPeercreation.
The Associated Contract Type is automatically populated and Relation Type is Peer.
11. By default, all flags are set to No. You may set the flags to Yes as required. However, the following flags must be enabled:
- Toggle the Allow Peer creation wizard flag to Yes. This allows the user to create the peer association instance and directly link it to the base agreement. In this case, the association ICMSOWPeercreation will directly be linked to the base agreement Automation MSA_PeerAssociationcreation as a peer.
- Toggle the Allow Inheritance flag to No.
- Toggle the Multiple Instance flag to Yes to create multiple peer agreement instances in the base agreement.
- Toggle theAllow Two Way Linkage flag to Yes for both the base and peer assocaition. This creates a two-way linkage so that the peer association gets linked to the base agreement and vice-versa.
Peer agreement can also be created from within the base agreement in Executed state.
The configuration key “Core.Agreement.StatesToAlowPeerAssociationsPostExecution” is used to create the association from the executed state of the base agreement.
12. Click Save. The created association ICMSOWPeercreation will be displayed in the Association list on the left hand side.
13. Click Next. Enter the required details in the following tabs.
14. Verify all the details and click Create. The Contract Type Details page opens.
15. Click Send For Approval. The Configuration page opens listing the created Contract Type - Automation MSA_PeerAssociationcreation in an Approved state.
16. Click the View Record icon next to this entity to view the contract type details.
Creating association for peer contract type
Create a peer contract type in the similar way as mentioned in section 1. For example, Automation SOW_PeerAssociationcreation.
Then create an association of the base agreement under peer contract type Automation SOW_PeerAssociationcreation.
17. ClickNext. The Associationstab opens.
18. Click+ Association.
19. Enter an Association Name. For example,ICMPeerCT_MSAassociation.
The Associated Contract Type is automatically populated andRelation Type isPeer.
20. By default, all flags are set to No. You may set the flags to Yes as required. However, the following flags must be enabled:
- Toggle the Allow Inheritance flag to Yes. This inherits the values from the base agreement into the peer agreement. In this case, the association ICMPeerCT_SOWassociation will directly be linked to the base agreement Automation MSA_PeerAssociationcreation as a peer.
- Toggle the Allow Two Way Linkage flag to Yes for both the base and peer contract type assocaition. This creates a two-way linkage so that the peer contract type association gets linked to the base agreement and vice-versa.
21. Click Create to create the peer contract type with MSA association.
Create multiple associations from base agreement
The base agreement MSA can have multiple associations (SOWs), but the associations (SOWs) can have just 1 parent agreement.
22. Create MSA agreement and go to Details page.
23. Under the Associations section in the left navigation pane, all the associations will be listed. Click the Add icon against a particular association. In this example, Automation SOW_PeerAssociationCreation.
The page will redirect the user to the new agreement creation wizard for Automation SOW_PeerAssociationCreation.
The contract type name will be auto-populated.
24. Select Own Type Of Paper from the drop-down.
25. On the Attributes page, attribute values from base agreement will get inherited into peer attributes.
26. Click Next on the following tabs.
27. Verify the details and click Create to create the agreement.
The peer agreement will get linked to the base agreement.
28. Click View Record icon next to the created agreement on the agreement index page. The agreement Details page opens.
The agreement details displays the peer to peer association from within the (MSA_PeerAssociationCreation) listed in the Associations tab.
Note:
- The base agreement can have multiple associations; however, the association can have only one base agreement. For example, base agreement is MSA and association is SOW, then MSA can have multiple SOWs, but SOW can be attached to only 1 MSA. This can be achieved by enabling the Allow Multiple Instances flag.
- When copying associations, creating peer to peer association from base agreement is disabled. Hence, the MSA will not be attached to the new SOWs.
Adding Contract Manager role for agreements
In the contracting process, a Contract Manager/Owner manages or owns the agreement and is generally different from the user who has created/ initiated the agreement. This user who is managing the agreement might change from time to time. For example, User A may have ownership during authoring process, whereas the User B might look after the agreement during the negotiation process.
Hence, the Contract Manager role has been introduced to manage agreement ownership throughout the agreement lifecycle.
With this release:
• Assignment of the user against Contract Manager role in the team can be only achieved through event rules using action Add To Team.
• Only one Contract Manager is available inside the agreement at any given point of time.
• The Contract Manager will have provisions same as that of primary owner.
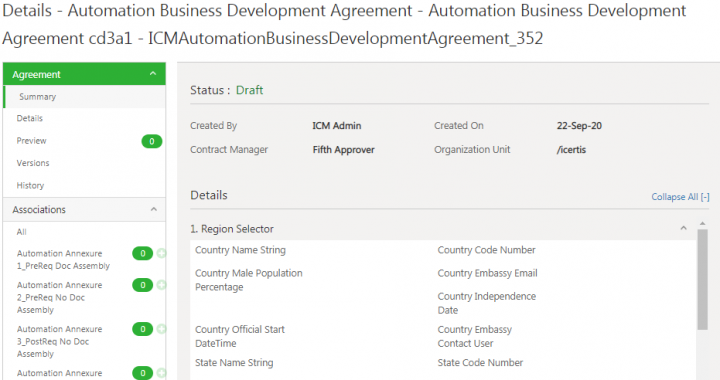
• Contract Manager Name are displayed on the agreement Summary page.
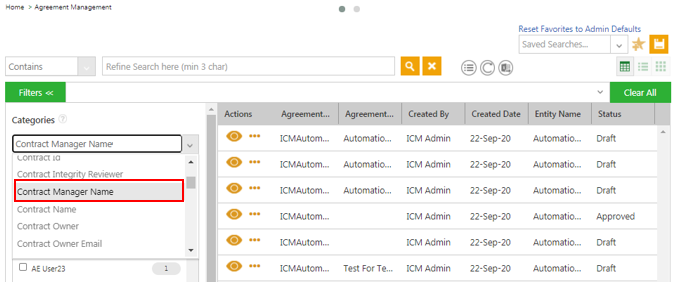
• Agreements can be searched using the Contract Manager Name.
• Managing adhoc modification for Contract Manager role user will be restricted inside the agreement team tab similar to primary owner role user.
Viewing the Contract Manager role in ICM
To view the contract manager role:
1. Click User Administration tile and then click User Groups > User Roles. The User Roles page opens.
2. Navigate to the section displaying the Contract Manager role.
3. Click the icon next to the Contract Manager to edit the Display Name of the Contract Manager role. The Edit window opens.
4. Edit the Display Name of the role and click Save. The display name for Contract Manager set here will be used across ICI such as on agreement details and summary pages.
Adding a Contract Manager to the Team
Add to Team condition is addition of users to a team after the particular event occurs. For example, addition of approvers after the Agreement Created event occurs.
You can add a contract manager to the team only using the event rule.
To add a contract manager:
1. Select the action as Add To Team and then select Contract Manager role from the drop-down and the appropriate user.
2. Click Next and then click Create to create the event rule.
Viewing Contract Manager in Agreement Team
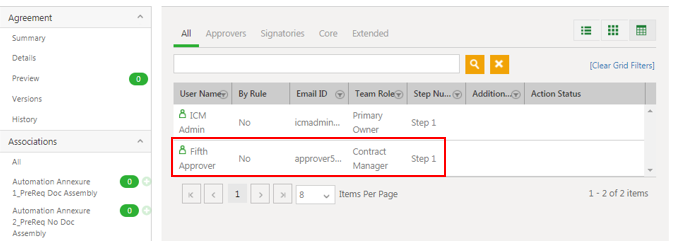
You can view the contract manager added in the agreement team if the event rule is executed as expected.
Searching an agreement with Contract Manager role
Select the attribute from the drop-down on agreement index page to display the list of users with contract manager role.
Ability to support Approver Sub-roles
Users have the ability to define sub-roles for the Approver role. This flexibility enables all the capabilities of the Approver for the users at the sub-role level.
For example, you can now set different types of approvers for an agreement based on functions such as legal approver, finance approver, and so on. This can be achieved through a technical configuration.
Provisioning User
User roles can be provided while Provisioning users.
1. Click User Administration >Users > Provision Users. The Provision User page opens.

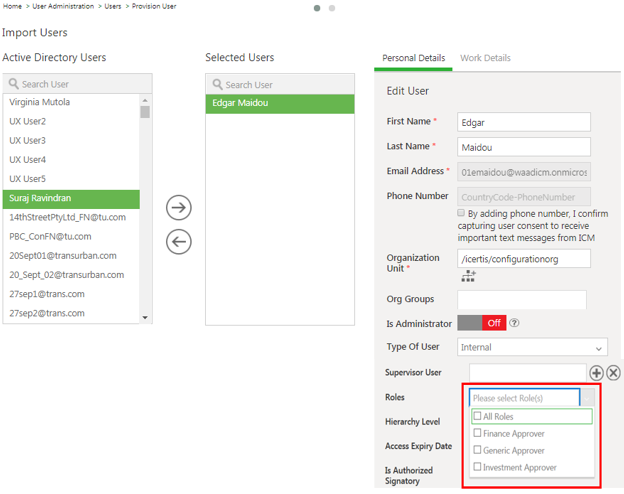
2. Select a user from the Active Directory Users column and move to the Selected Users columns using the right arrow key. The user details are displayed.
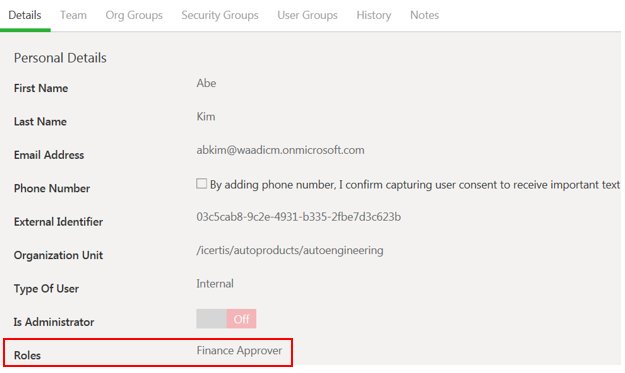
3. In the Personal Details tab, select Approver Role from Roles drop-down.
For example, Finance Approver.
4. On the Work Details tab, enter the details.
5. Click Next. The User Details page opens. The Finance Approver Role is added.
Creating a User Group
The user created above can create a User Group.
To create a User Group:
1. Click User Administration > User Groups > Create. The Create User Group page opens.
2. On the Details tab, enter the Name and Description for the user group.
3. Click Next. The Users tab opens.
4. Click Add User icon. The Add User window opens.
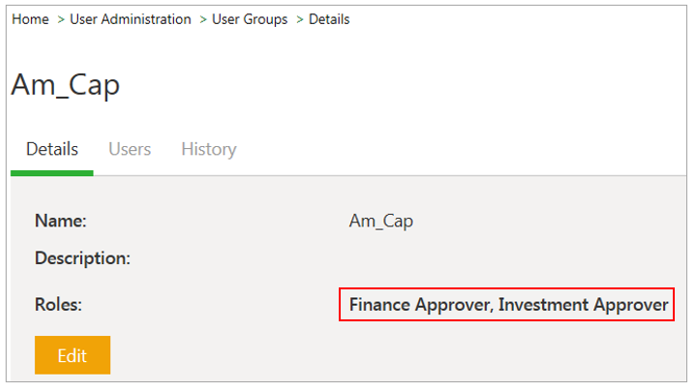
5. Select the sub-roles for the User Group from the Roles drop-down. For example, Finance Approver, Investment Approver.
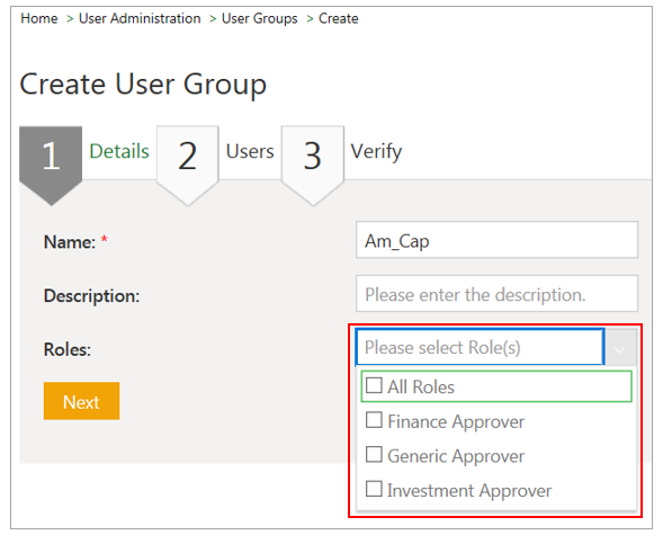
6. Click the Add User button. The user group of the sub-roles is displayed which you selected above.
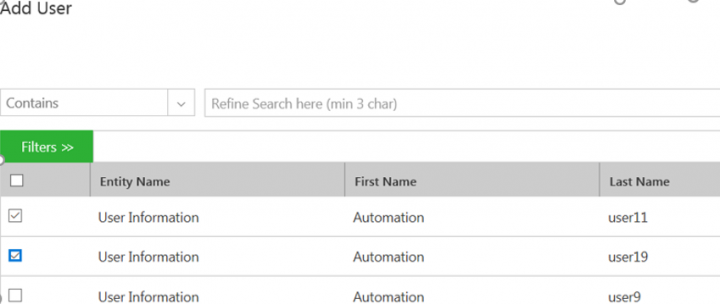
7. Click Next. The Verify tab opens. You can verify that the created group is created with the appropriate role.
Creating a Rule for the sub-role
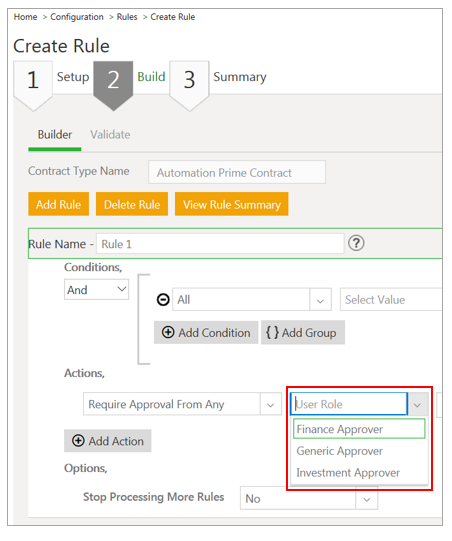
You can add a user for a sub-role by creating a Rule. The user Roles drop-down is only available for the Approval Rule and Notification Rule types.
1. Click Configuration > Rule > Create Rule. The Create Rule page opens.
2. Select the Contract Type from the drop-down.
3. Enter the Rule Name and Rule Description.
4. Select the Rule Type. For example, Approval Rule. The Team Role field is displayed.
5. Select a Team Role for the user. For example, Approver.
6. Click Next. The Build tab opens.
7. Click the Add Rule button.
8. In the Action section, select Require Approval From Any.
9. Select the User Role from the drop-down. For example, Finance Approver.
10. Click the Search User icon to select a user for the sub-role. The Search User window opens.
11. Click Add after selecting the user.
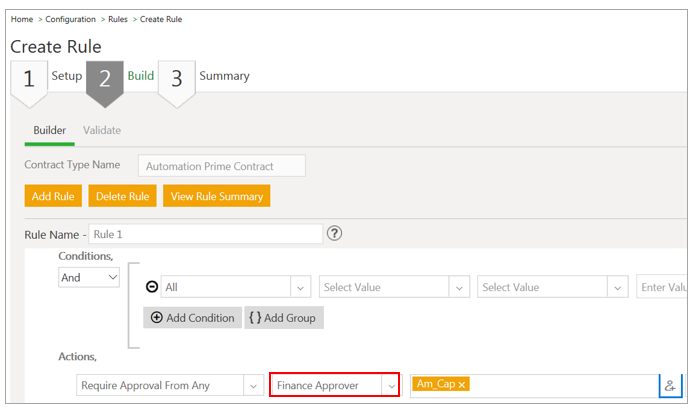
12. Click Next. The Build tab opens.
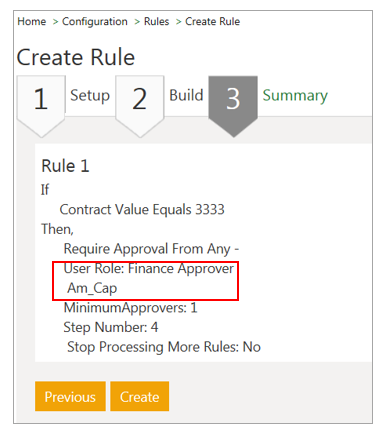
13. Click Next. The Summary tab opens displaying details of the created Rule.
14. Click Create. The Rule created successfully message is displayed.
13. When the agreement is created, the user with the sub-role (Finance Approver) is displayed on the Team tab of the agreement Details page.
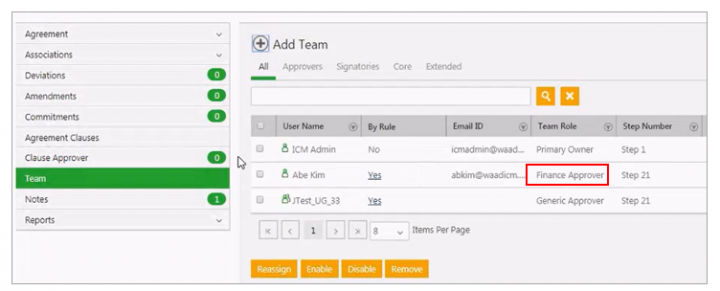
Creating a Subscription
1. Click User Administration > Notification Setting > Subscription. The Create Subscription page opens.
2. On the Details tab, enter the user details for the Subscription.
3. Click Next. The Template tab opens.
4. Enter the sub-role Display Name in Template Subject and the sub-role details In the Template Body.
5. Click Next. The Recipient tab opens.
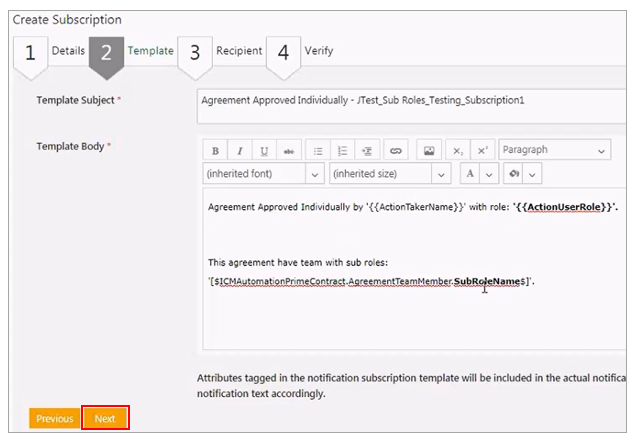
6. Click the Add Recipients icon to add the recipient. The Add Recipients window is displayed.
8. Click Next. The Verify tab opens.
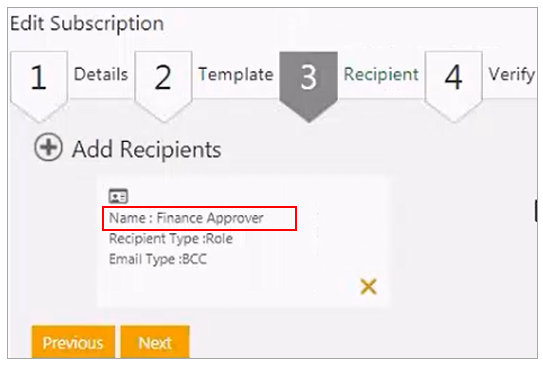
9. Click Save. The Subscription Details page opens.
The subscription with the user sub-role Finance Approver is created.
Limitations of Approver Sub-roles
This functionality has the following limitations:
- Sub-roles can be defined for the Approver role only.
- The following sub-roles are supported in the workflow of User Group, Agreement, Amendment, Associated Document, Rule creation based on Approval Rule, Subscription, Notification, Auto-delegation, and Broadcast from the Agreement Details page.
- When the sub-role for the Approver role is defined in addition to the existing Approver role, in that scenario all roles new and old are supported unless the user disables the existing Approver role. ICI behaves as is and data migration with respect to the new and old role is not supported.
Flexibility to control the Agreement actions based on the user role
The access control for Agreements and Amendments has been extended to control additional agreement level tasks and actions based on the user role.
Users can control:
- The agreement actions such as Compare Documents, Compare Clause Changes, Broadcast and so on
- Creation and disassociation of associated documents from an agreement
- Linking and disassociation of peer association from an agreement
- The visibility of the individual reports available on the agreement details page is controlled through technical configuration
Controlling the actions available on the agreement details page using the Role-Action Mapping
Consider an example where the agreement Automation AssoTwocolumn has the user added in the team as Approver. The agreement action Broadcast has the user role Approver mapped for the agreement in Draft state. If you remove the role approver from this role-action mapping, he or she will no longer has the access to the Broadcast action on agreement page for Draft state.
Click on the Team tab in the left panel configuration on the agreement details page to view the users added in the team. For example, user William Fagan is added as Approver for the agreement Automation AssoTwocolumn.
The role-action mapping for the agreement Broadcast action for Draft state has user role Approver mapped.
Now remove the user role Approver from the Broadcast action and Draft state.
To edit the role action mapping:
- Click User Administration > User Groups > Role-Action Mapping on the Home page. The Role-Action Mapping page opens.
- Select entity in the Select Entity field. For example, agreement Automation AssoTwocolumn. The list of all Role-Action mappings applicable to the agreement opens.
- Click Edit icon next to the action for particular state you want to edit. For example, action Broadcast for state Draft. The Edit window opens.
- Add or remove the User Roles in the right section with the help of arrows. For example, remove user role Approver from right section.
- Click Save. The role is removed from the Roles column for selected action and state.
The user with role Approver will then not be able to view the action Broadcast for the agreement in Draft state.
Controlling the Associations actions on the Agreement page using the Role-Action Mapping
The access to the associated documents of the agreement can be controlled by role action mapping.
Only authorized users can:
- Add associations to the agreement from left panel configuration on the agreement details page
- Dissociate the associated document from the agreement from grid page.
Create Associations instances from Agreement details page
To control access on the associations creation action from agreement details page through role-action mapping:
- Click User Administration > User Groups > Role-Action Mapping on the Home page. The Role-Action Mapping page opens.
- Select entity in the Select Entity field. For example, Automation Annexure Assembly (Associated Document Contract Type). The list of all applicable role-action mappings opens.
- Click Edit icon next to the action for particular state that you want to edit. For example, Create Association From Parent. The Edit window opens.
- Add or remove the User Roles in the right section using arrows. For example, add Primary Owner.
- Click Save. The role is added to the Roles column for selected action and state.
The Create Associations action for Automation Annexure Assembly on the left panel configuration will be disabled for all users other than Primary Owner. For example, the Create Association action is disabled for the user William Fagan with the user role as an Approver.
Controlling the access for Association instances from the Association grid
Only authorized users can edit, dissociate or copy associations from agreement-association grid page. These actions are controlled using role-action mappings defined for respective parent-child or peer-to-peer associated document contract type.
To control access on the association actions through role-action mapping:
- ClickUser Administration >User Groups> Role-Action Mappingon the Home page. The Role-Action Mappingpage opens.
- Select entity in the Select Entity field. For example, Automation Annexure Assembly (Associated Documents Contract Type). The list of all applicable role-action mappings of the association opens.
- Click Edit icon next to the action for particular state that you want to edit. For example, Edit. The Edit window opens.
- Add or remove the User Roles in the right section with using arrows. For example, add Primary Owner, Secondary Owner and Document Owner.
- Click Save. The role is added to the Roles column for selected action and state. For example, For Automation Annexure Assembly, only Primary Owner, Secondary Owner and Document Owner can edit the Associations for Draft state.
When the user other than above roles tries to access the agreement, the Edit, Dissociate and Copy actions will not be visible to him from the agreement-association grid page.
For example, the Edit, Dissociate and Copy action are not visible to the user William Fagan with the user role as an Approver.
Adding Static and Dynamic Filters
You can add Static and Dynamic filters after configuring the filters on Masterdata records. For more information about Static and Dynamic filters configuration, see Applying filters on Masterdata records.
Adding Static Filters
To add Static filters:
1. Click the Agreement Management tile on the Home page. The Agreement Management menu opens.
2. Click the Create Agreement menu. The Create Agreement menu opens.
3. Select the Contract Type Name. For example, MSA.
4. Select Type Of Paper as Own.

5. Click Next. The Attributes tab opens.
6. Click the Filtered Lookup Search or Add New Record icon in the Country Name String drop-down list.

The Country Name String attribute displays all countries except the country West Indies as set in the configured static filter.

The predefined Static filter is applied to the masterdata record.
7. Select the checkbox as per requirement. For example, Indonesia.
8. Click Select.
9. Click Next.
Complete the remaining tabs of Select Template and Verify to move the Agreement to the Draft state.
Adding Dynamic Filters
To add Dynamic filters:
1. Click the Agreement Management tile on the Home page. The Agreement Management menu opens.
2. Click the Create Agreement menu. The Create Agreement menu opens.
3. Select the Contract Type Name. For example, MSA.
4. Select Type Of Paper as Own.

5. Click Next. The Attributes tab opens.
6. Select the country in the Country Name drop-down list. For example, Singapore.
7. Click the Filtered Lookup Search or Add New Record icon in the Country Name String drop-down list to select the country. For example, Singapore.

8. Select the checkbox. For example, Indiana.
9. Click Select.
10. Click Next.
Complete the remaining tabs of Select Template and Verify to move the Agreement to the Draft state.
Ability to have flexible contract type extension
ICI provides the flexibility to select and use masterdata attributes as extensions to agreements and associated documents at the time of instance creation. Users can create rules to add or remove these extended attributes to agreement and associated documents. ICI capabilities support the extension attributes in the same way as normal attributes.
Users can:
- Configure conditional attributes, tracking attributes, computations (enable expressions) to use as extended attributes
- Save extension attributes selection as a template for reuse
- Control access privileges for extended attributes based on the user role
- Maintain audits for the extended attributes
Defining access for extension attributes actions using Role Action Mapping
The authorized users can control the access privileges for the actions Configure Attributes and Re-evaluate Rule on the Extension Attributes page during agreement creation through Role-Action Mapping.
- Click User Administration > User Groups > Role-Action Mapping on the Home page. The Role-Action Mapping page opens.
- Select entity in the Select Entity field. For example, Agreement. The list of all role-action mappings applicable to the agreement opens.
- Click Edit icon next to the action for particular state you want to edit. For example, Configure Extension Attributes for state Approved. The Edit window opens.
- Add or remove the User Roles in the right column with the help of arrows. For example, add user roleBusiness Owner to the right column.
- Click Save. The role is mapped under the Roles column for selected action and state.
The users with role as Business Owner will now be able to access the action Configure Extension Attributes for the agreement entities in Approved state. For example, user Anushree added to the agreement’s team as Business Owner can access Configure Attributes action on Extension Attributes page for the agreement entities in Approved state.
Defining access for extension attributes using Attribute Group Privileges
Authorized users can restrict the access to extension attributes for specific users using Attributes Group Privileges.
To restrict the access:
- Click User Administration > User Groups > Attribute Group Privileges > Add on the Home page. The Add window to configure and add the attribute group privileges opens.
- Select Copy from Contract Type. For example, RFQ.
- Toggle Show Extension attribute Group to Yes.
- Select Attribute Group for which you want to restrict the access. For example,Location Details.
- Select States for which you want restrict the access. For example, Approved.
- Select user Roles for whom you want restrict the access. For example, Business Owner.
- Click Save. The Mapping added successfully message is displayed. The added mapping will be displayed in the table on attribute group privileges page under the selected entity.
The user with roleBusiness Owner will be restricted to access the selected attribute group in selected state. For example, user Anushree (added as Business Owner to the agreement’s team) will not be able to access Location Details attributes for the RFQ contract type in Approved state.
Making the contract type available for extension attributes selection
Users can make the attributes of masterdata available for extension by setting Is available to be used as Extension field to Yes. Masterdata contract types which have this field value set to Yes will only be available for extension on the Configure Attributes window during agreement creation.
To edit the masterdata:
- Click Configuration > Contract Types on the Home page. The Contract Type index page opens.
- Click View Record icon next to the masterdata contract type you want to edit. For example, Food Master. The contract type Details page opens.
- Click Edit. The Edit Contract Type page opens.
- Toggle the Is available to be used as Extension field to Yes.
- Click Next.
- Edit the details on the remaining Display Preference and Team tabs if required.
- Verify the details and click Update. The contract type is updated.
The masterdata Food Master is then available on the Configure Attributes window in the Select Contract Type drop-down during agreement creation.
Examples of different attribute types available as extension attributes
Attribute types such as conditional, lookup, computations (enable expressions), tracking, multi-select choice and so on can be configured to support extension attributes.
For example, the masterdata Vehicle Master has types of attributes which can be extended. The attribute Place of delivery Vehicle is conditional attribute and it’s value depends upon the Do you want to Place Order attribute’s value.
The attribute Place of Delivery Vehicle is displayed only when the attribute Do you want to Place Order is set to Yes.
Users can make the attribute mandatory by setting the Is Required For Extension attribute field On in the contract type.
For example, the attribute Vehicle Part Number is mandatory (with red asterix mark). The mandatory attributes are available on the Extension Attributes tab during agreement creation by default and users cannot remove them. For example, the delete action is disabled for the mandatory attribute Vehicle Part Number.
Creating Agreement and Associated Document instances with flexible entity attributes
1. Click the Agreement Management menu. The Agreement menu opens.
2. Click Create Agreement. The Create Agreement page opens.
3. Select the Contract Type Name. For example, Quotation.
4. Select the Type Of Paper.
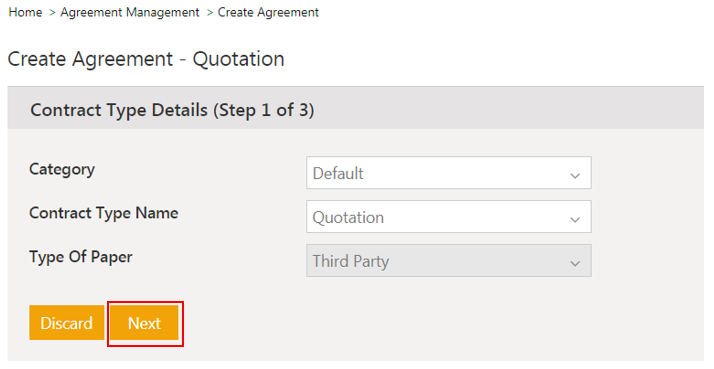
5. Click Next. The Extension Attributes tab opens.
On clicking the Next button, the Extension Selection rule for Agreement Contract Type (Quotation) gets triggered and all the configured attributes of Select Extension Contract Types (PurchaseMaster), Select Extension Attributes (FoodPurchaseMaster) and attributes group Quality (FoodMaster) are already selected and available in the Extension Attributes tab.
6. Enter Order ID.
7. Enter Food Category.
8. Select Order Date.
9. Select Expiry Date.
10. Select the Order Status from the drop-down list.
11. Enter Quantity.
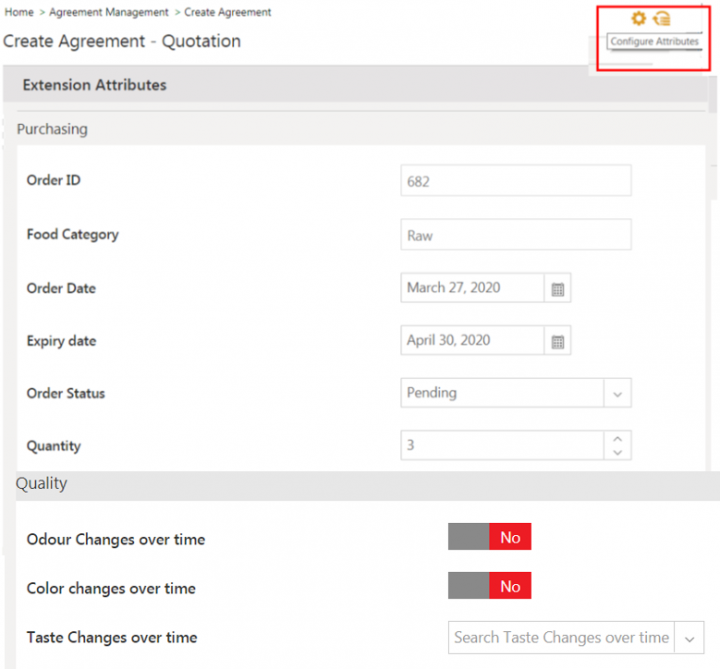
12. Click the Configure Attributes icon to add or remove attributes. The Configure Attributes page opens.

13. Select Food Master in the Select Contract Type drop-down field.
14. Select the attribute Storage Information from the Available Attribute list.
15. Click the arrow icon to move the attribute to the Selected Attribute list.
16. Click Next. The View and Confirm tab opens.
17. Click Confirm. The Storage Information field is added to the page.

18. Click Next. The Verify page opens.
19. Click Create and Publish. The agreement status changes to the Draft state.
20. Click the Create Association icon in the Associations tab. The Create Association page opens.
21. Enter a Name. For example, Raw material.
22. Enter a Product ID.
23. Select the Priority from the drop-down list. For example, Medium.
24. Select the Category from the drop-down list. For example, Other.
25. Click Next. The Extension Attributes tab opens.
On clicking the Next button, the Extension Selection rule for Associated Document Contract Type (Quotation Line Item) gets triggered and all the configured attributes of Select Extension Contract Types (PurchaseMaster) and attribute groups (FoodMaster) are already selected and available in the Extension Attributes tab.
The Other category displays the three attributes Order ID, Order Date and, Order Status as per the configured Extension Selection rule.
26. Enter the Order ID.
27. Select the Order Date from the drop-down list.
28. Select the Order Status from the drop-down list.
29. Enter the details in the fields on the attribute group Quality.

Let us now create another Quotation Line Item with a Food Category and also insert attributes from other Contract Type dynamically.
31. Click the Create Association icon in the Associations tab. The Create Association page opens.
32. Enter a Name. For example, Raw material.
33. Enter a Product ID.
34. Select the Priority from the drop-down list. For example, Medium.
35. Select the Category from the drop-down list. For example, Food.

36. Click Next. The Extension Attributes tab opens.
On clicking the Next button, the Extension Selection rule for Associated Document Contract Type (Quotation Line Item) gets triggered and all the configured attributes of Select Extension Contract Types (PurchaseMaster), Select Extension Attribute Groups (FoodMaster) and Select Extension Attributes (FoodPurchaseMaster) are already selected and available in the Extension Attributes tab.
The Food category displays the attributes: Order ID, Order Date and Order Status from PurchaseMaster Contract Type, Food Category, Expiry Date, and Quantity from FoodPurchaseMaster and attributes from Quality attributes group from FoodMaster as per the configured Extension Selection rule.
37. Enter the Order ID.
38. Select the Food Category.
39. Select the Order Date.
40. Select the Expiry Date.
41. Select the Order Status from the drop-down list.
42. Enter the Quantity.
43. Click the Configure Attributes icon to add attributes during run time. The Configure Attributes window opens.
44. Enter the details in the fields on the attribute group Quality.
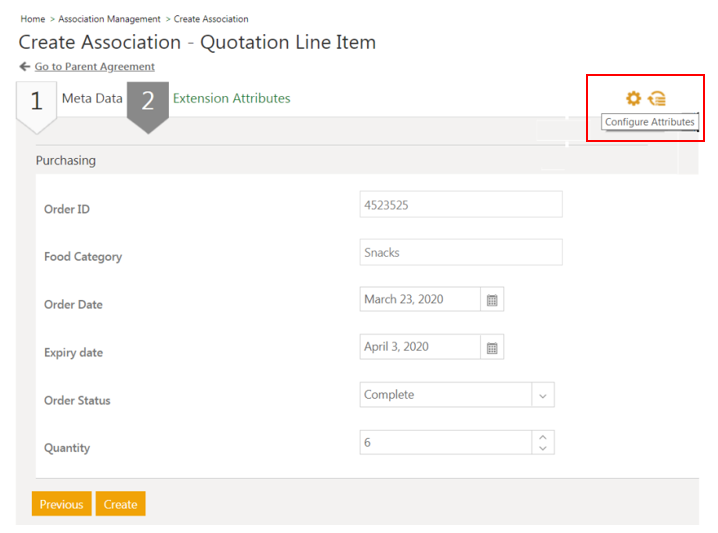
45. Select the Contract Type from the drop-down list. For example, Food Master.
46. Select the attribute Storage Information from the Available Attribute list.
47. Click the arrow icon to move the attribute to the Selected Attribute list.
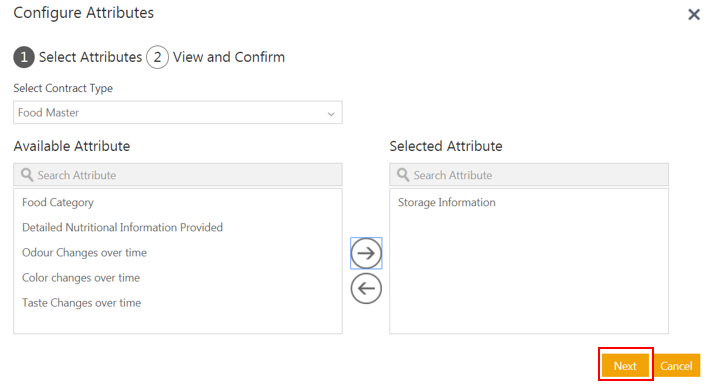
48. Click Next. The View and Confirm tab opens.
All attributes and theirContract Types are displayed.

50. Click Create. The two Quotation Line Items are displayed.
51. Click the view icon. The Quotation Line Item Details page is displayed.
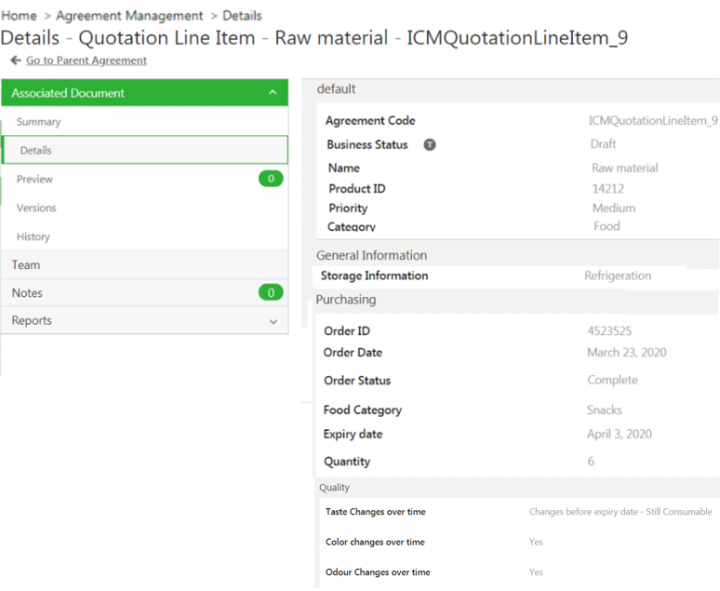
All attributes of the Quotation Line Item Association are displayed including the recently added Storage Information attribute.
Saving the extension attributes selection as a template
Users can save their selection of extension attributes as a template for reuse during the creation of agreement.
To save a template of the selection of extension attribute:
- Click Agreement Management > Create Agreement on the Home page. The Create Agreement page opens.
- Enter details on the Details, Attributes and Select Template tabs.
- Click Next. The Extension Attributes tab opens.
- Click Configure Attributes action icon. The Configure Attributes window opens.
- Select the contract type and its corresponding attributes on Select Attributes tab. For example,VehicleMaster.
- Click Next. The View and Confirm tab opens.
- Select the checkbox to Save configuration as an extension template.
- Enter a name in Template Name field. For example, Vehicle.
- Click Confirm. TheExtension attribute template ‘Vehicle’ saved successfully message is displayed.
The selection is saved as a template and available in Select Template drop-down on the Select Attribute tab.
When user selects the saved template, the extension attributes from that template are displayed on the Extension Attributes page during agreement creation.
If the user adds a new attribute through Configure Attributes window during agreement instance creation, the existing attributes on theExtension Attributes page evaluated from the rule will be retained on the page with their values.
Setting a template as default for associations
Users can save the selection of extension attributes as a template to create the associations for agreements or amendments instances.
To save a template for the association for the agreement:
- Click Associations on the left panel configuration on agreement Details page. For example, Line Item.
- Click Create Associations. The Create Association page opens.
- Enter the details on Metadata tab.
- Click Next. The Extension Attributes tab opens.
- Click Confiure Attribute action icon. The Configure Attribute window opens.
- Click Next. TheView and Confirm tab opens.
- Click checkbox for Save configuration for all future associations. The Extension attribute template saved successfully message is displayed.
The selected extension attributes will be available by default on the Extention Attributes page during future assocaition creations for the current agreement instance.
Audit with Extension attribute
Changes in extension attributes are captured and can be viewed on the History tab. For example, changes in extension attribute Vehicle Type from Vehicle Master are captured.
Saving a search with extension attributes
Users can search and retrieve entities with extended attributes as search parameters and save the search criteria as a saved search. Extended attributes are available in search facets drop-downs along with regular attributes.
To search entities with extension attributes:
- Click Search on the Home page. The Search page opens.
- Select entity in Entity drop-down. For example, Agreement.
- Select extended attribute as search parameter in the Categories drop-down. Extension attributes are available in search drop-down with Extension Attributes: prefix. For example, Extension Attribute: Vehicle Type.
All the entities with extension attribute Vehicle Type will be displayed.
Refer to Using Advanced Search for details on using search filters, operators, and options.
Users can save the search criteria with extended attributes as search parameters and use as global or local Saved Search. Refer to Saved Searches for details on saving a search. Refer to Using Advanced Search for details on retrieving a Saved Search.
Using the Activity Panel
The Activity Panel tile helps logged on users to track, create and resume workflow actions at the agreement, association and amendment levels.
Configuring the Activity Panel tile
1. Click the User Administration > Application Settings on the Home page. The Application Settings page opens.
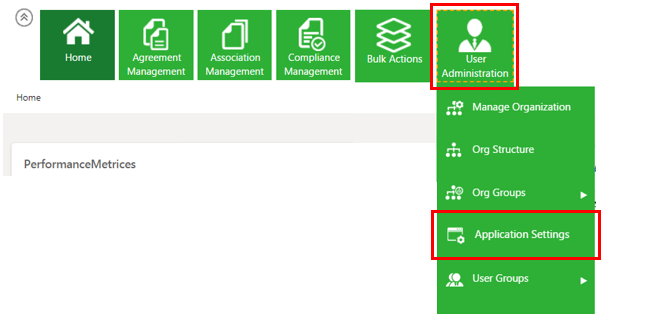
2. Click the Other Configuration tab.
3. Toggle the Show Activity Panel to Yes.
4. Click Update. The Application Settings updated successfully window opens.
Displaying the Activity Panel tile at the agreement level
1. Click Agreement Management > Create Agreement on the Home page. The Create Agreement page opens.
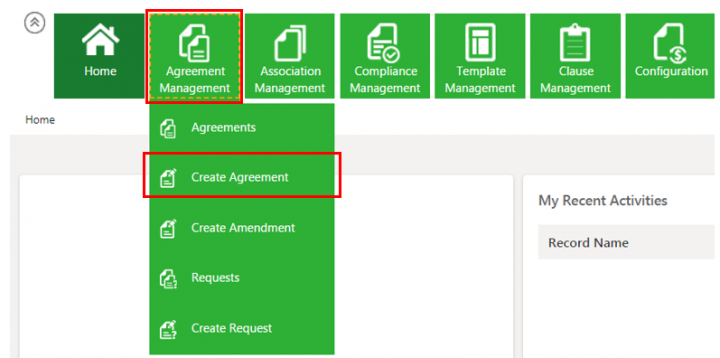
2. Enter all the details on the Create Agreement page.
3. Select a Contract Type Name. For example, MSA_Calculations.
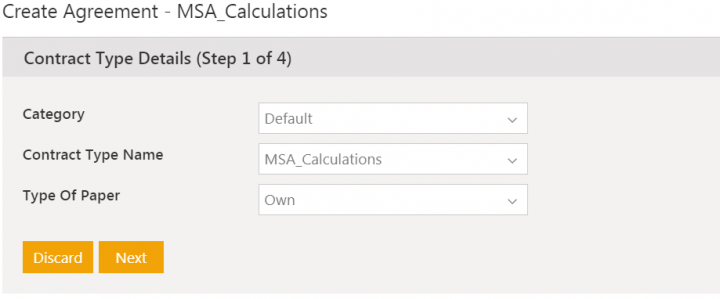
4. Enter the remaining details in the Attributes section.
5. Click Next.
6. Select a file for the Template.
7. Click Next. The Verify window opens.
8. Click Create or Create and Publish or Create and Send for Approval as required. The agreement is now in the Draft state.
As soon as the agreement moves to Draft, a validation message is displayed to the user indicating that the request has been successfully submitted. The Activity Panel displays the number of activities completed by the user for any given session.
The count on the Activity Panel gets incremented as and when the user performs activities during a given session.

* Activities are displayed in the same browser tab only. If the user opens any other browser, the current activities will not be displayed.
* Activities are displayed in the logged on tab only. If the user opens another tab, the current activities will not be displayed.
* If the logged in user closes a session and opens a new tab, then the current activities will not be displayed.
Canceling an Agreement
The Primary Owner can cancel or delete an agreement in any state, except executed. The Cancel button is displayed once the Agreement is published.
To cancel an Agreement:
1. Open the Agreement that you wish to cancel from the Agreements page.
2. Click Cancel. The he Add Note page opens.
3. Select a Reason Code and type a note for cancelling this agreement. Though this field is optional, it should be used to enter detailed notes for future reference. The Reason Code is mandatory; select one from the drop down list.
4. Click Add. The status of the agreement changes to Cancelled.
The cancellation action appears in the History section of the Agreement Details page. The cancelled Agreement continues to be displayed in the Agreement searches and you can revert cancelled agreements to draft state from the Agreement Details page.
Editing an Agreement
You can edit an Agreement at any stage till it is executed. Editing an executed agreement involves going through the approval process with both internal and external parties again.
To edit an existing Agreement:
1. Click the View Record icon next to the Agreement you wish to edit on the Agreements page. The Agreement Details page opens.
2. Click Edit. The Create Agreement page opens.
3. Follow the steps in Creating an Agreement section to edit the Agreement.
4. Click Update to save your changes.
5. Click Upload Document to upload the new version fot he docuemnt. When a new document version is uploaded to ICI, the user is redirected to the Versions page.
- If the new version being uploaded includes changes to key document tags such as Attribute, Clause, Association or Signatory tags, i.e. if a tag has been added, removed or their values changed; while uploading the document, the user receives a notification that specifies the details of the changes (i.e. added, deleted or attribute/clause value changed). The notification includes an option to proceed with the changes or cancel them if found to be unintentional. If the user continues, the document is uploaded to ICI and a summary of changes gets logged in the Versions tab. Tags are tracked based on changes to tag count between two document versions and only for .docx formats. Changes regarding the position of tags are not tracked and notified.
- If the new version being uploaded includes a tagged Association that has margin less than that of the Agreement or Amendment document, the user receives a notification regarding the margin mismatch between the two. The notification includes an option to proceed with the changes or cancel them if found to be unintentional. If the user continues, the document is uploaded to ICI and changes logged in the Versions tab against the particular version. The notification includes information about margin and orientation differences. If the Agreement or Amendment includes more than one tagged Association, all Associations having lesser margin than the Agreement or Amendment document are included in the notification. Margin tracking is done only for .docx file types. The Type Of Paper differences are not included (e.g. A4, Legal).
Copy the Existing Agreement
Users can copy an existing agreement and create a new agreement using Copy Record functionality. The resulting agreement will be a copy of existing agreement with all the metadata and selected associated documents from existing source agreement. The source agreement’s latest approved template will be selected by default to create the copy.
Configuring contract type to enable copy existing agreement
Authorized users can configure Agreement Contract Type and set Allow Copy With Associations field to Yes to enable Copy record. The agreement created using this specific Contract Type will have Copy Record feature enabled by default.
To configure agreement contract type:
- Click Configuration > Create Contract Type > Agreement > Next on the Home page. The Create Contract Type page opens.
- Toggle Allow Copy With Associations to Yes on Details tab.
- Enter remaining details on the Details tab.
- Click Next. The Attributes tab opens.
- Enter the details in the remaining fields on Attributes, Association, Display Preference and Team tabs.
- Verify and click Create.
- Approve and Publish the Contract Type.
You can also edit the existing contract type and set the Allow Copy With Associations to Yes to enable the Copy Record functionality.
Copy the agreement from agreement details page
Follow these steps to copy an Agreement:
1. Click the Agreement Management > Agreement on the Home page. The agreement index page opens.
2. Click View Record icon next to the Agreement for which you would like to create copy.
3. Click Copy Record icon. The Copy Record page opens.
4. Select the Associated Documents and Commitments that you want to copy in addition to the Agreement Metadata in the resulting Agreement. You can either select the Associations and Commitments checkbox to select all available Associated Documents and Commitments or select the checkboxes for specific Associated Documents and Commitments.
- If the Associated Document selected is of the Parent-Child type, then a new copy of that Associated Document is created and attached to the copied Agreement. However, if the Associated Document is of the Peer-to-Peer type, then the actual Associated Document is attached.
- Click Copy, this creates the copy of the original Agreement with your selections. The Agreement created is in Draft state.
Exclude auto-attached associated documents during copy
ICI allows attaching standard documents from the masterdata repository as associations to the agreement based on the defined event rule on the agreement.
When a user copies the agreement with auto-attached associations, system excludes all auto attached associations from being copied to the new agreement. The auto-attached associations won’t be displayed on the Copy Record window. The resulting agreement has the selected manual associations and its own auto-attached associations as per the configured rules.
This avoids the unnecessary upload of files into the ICI repository and duplication of association records on copied agreement as it will have its own auto-attached documents.
Users can select auto-attachment associations when an agreement is sent for signature along with the bundled association and download all associations of an agreement in the ZIP format.
Copy the agreement from agreement index page
You can copy the agreement by clicking Copy Record icon next to the agreement name on the agreement index page.
You can only copy published agreements. The error message will be displayed if users try to copy non-published agreement.
Click Ok to go back to the agreement index page.
To copy an agreement from agreement index page:
- Click the Agreement Management > Agreement on the Home page. The Agreement index page opens.
- Click Select Action (3 dots) icon next to the Agreement of which you would like to create a copy. For example, Saas Agreement. The drop-down with available actions opens.
- Click Copy Record . The Copy Record page opens.
- Click the checkbox next to the Associations and Commitments that you want to copy in addition to the agreement metadata in the resulting agreement.
- Click Copy. The copy of the original agreement with your selections is created in Draft state.
When Allow Copy with Association in the Agreement Contract Type is False and users try to copy the agreement from agreement index page, the confirmation message is displayed.
After clicking Ok, the agreement will be copied and new agreement is generated in Draft status.
Only users with manage privileges can copy the agreement record. The error message will be displayed if unauthorized users try to copy the agreement.
Click Ok to go back to the agreement index page.
Word Document Compatibility between two different ICI Instances
For example, consider a scenario where a user (non-owner) is using a document as third party paper created by the user (owner) and makes some changes in the Word document and sends it to the owner. The owner then uploads the modified version of the Word document. ICI now also supports document assembly, data sync (of metadata, clauses), etc. of the agreement document.
Creating an Agreement by the Owner in an ICI Instance
1. Click Agreement Management > Create Agreement on the Home page. The Create Agreement page opens.
4. Enter all the details on the Create Agreement page.
5. Select Own for Type Of Paper.
6. Select Contract Type Name. For example, Clinical Trials Agreement.
7. Follow the steps to create the agreement. It is now in the Draft state.
Modification of an agreement by a Non-Owner using Owner’s document in a different ICI Instance
- Click Agreement Management > Create Agreement on the Home page. The Create Agreement page opens.
- Enter all the details on the Create Agreement page.
- Select a Contract Type Name. For example, MSA_SD.
- Select the Type Of Paper field. The Non-Owner will select the Third Party type of paper.
- Click Next. The Attributes tab opens.
- Upload the owner’s document to non-owner ICI instance.
- Follow the remaining steps to send the agreement to the Draft state. The document gets uploaded with a message indicating that Document Assembly is restricted for this agreement.
Now make some changes in the agreement document at Non-Owner’s ICI instance that is uploaded in the Owner’s instance. For example, change tagged effeective date December 10, 2019 to December 12, 2019 in the document.
Uploading the revised agreement document in the Owner’s instance
1. Click Upload Document in the Owner’s instance. The Upload Document window opens.
2. Click Select File to upload the modified agreement document.
3. Click Upload File. The Please Confirm window opens indicating the changes in the original document.
4. Click Yes.
5. Click Preview in the agreement Details tab. You can now view the changes that were made to the agreement document at Non-Owner’s instance in the owner’s instance as well.
Collaboration in Contracts
ICI has eliminated the need to use external tools such as Email, Skype, etc. and created a dedicated space available within the Agreement itself to collaborate between multiple stakeholders.
To collaborate, multiple stakeholders involved in the contracting/sourcing process can:
- Use the Collaboration tab available inside the Agreement
- Provision an internal/external Team member to communicate with other internal or external team member(s) by creating Topics and posting messages in it
- Provision users to send and receive attachments along with the message
- Provision users to mark the topic as closed once the discussion is concluded
- Send Email notification to participants when messages are posted on the topic
This can be achieved by setting the Enable Collaboration flag to Yes for the Agreement Contract Type, which displays a Collaboration tab on the Agreement Details page. To prevent data loss, once Collaboration is enabled for a Contract Type, it cannot be disabled.
Configuring Collaboration for Contract Types
To enable Collaboration for Contract Types:
1. Click the Configuration > Create Contract Type on the Home page. The Create Contract Type page opens.

3. Click Next. The Create Contract Type page opens.
4. Enter a name in the Contract Type Name field. For example, Collaboration Contract Type.
5. Enter all the details on the Details tab.
6. Toggle the Enable Collaboration flag to Yes to enable Collaboration at Agreement level.
7. Click Next. The Attributes tab opens.
8. Enter the details in the remaining Attributes, Association, Display Preference, Team, and Verify tabs to send the Collaboration Contract Type to Approved state. Alternatively, you can edit an already existing Contract Type to enable the Collaboration tab.
Creating a new Topic and sending Messages by Internal user and External user
Sending Messages by an Internal user to another Internal user
1. Click the Agreement Management > Create Agreement on the Home page. The Create Agreement page opens.
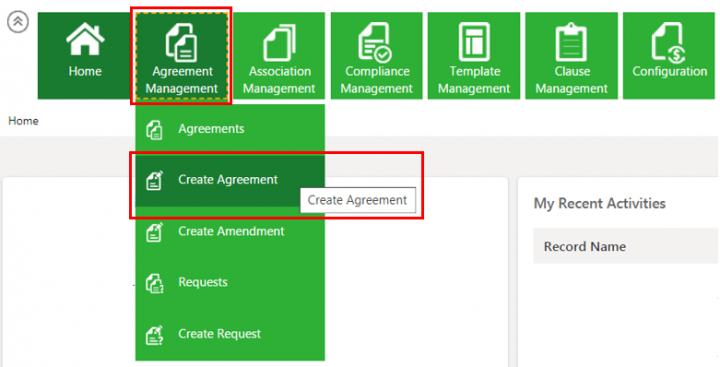
2. Enter all the details in the Create Agreement page.
3. Click the Collaboration tab on the Agreement’s Details page. The Collaboration page opens in the right pane as shown in the below image indicating that there is no topic for you to collaborate as you click the Collaboration tab for the first time. You would see a different window if Topics and its related conversations are already present.
4. Click the New Topic icon. The Create a New Topic window opens.
- You can now select participants who will collaborate and able to send and receive messages for a topic related to the agreement. For example, let’s collaborate with an Internal user, CLM Admin.
5. To select Participants for the Topic, click the Add Team Members icon or you can select all Team members. The Select Participant(s) window opens. For example, let’s collaborate with an Internal user, CLM Admin.
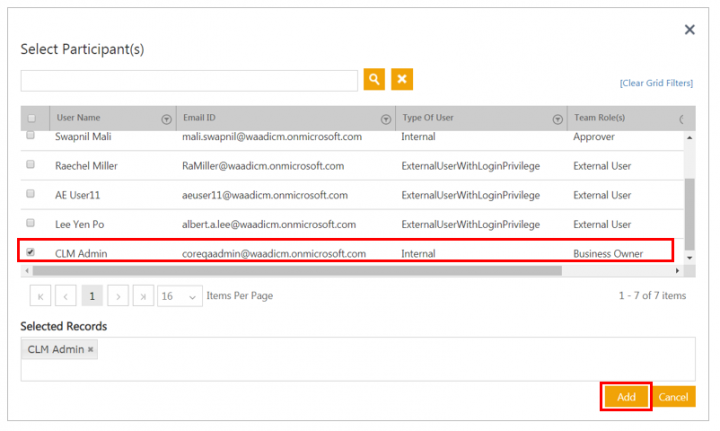
6. Click Add. The Create a New Topic window opens displaying the Participant.
7. You can choose to keep the topic confidential from other internal participants by toggling the Do you want to mark this topic as Confidential flag to Yes. In that case, only internal users who are part of the Topic conversation (Participants) will be able to view and reply to the Topic.
8. Enter the Subject for the Topic.
9. Enter the message in the Message field.
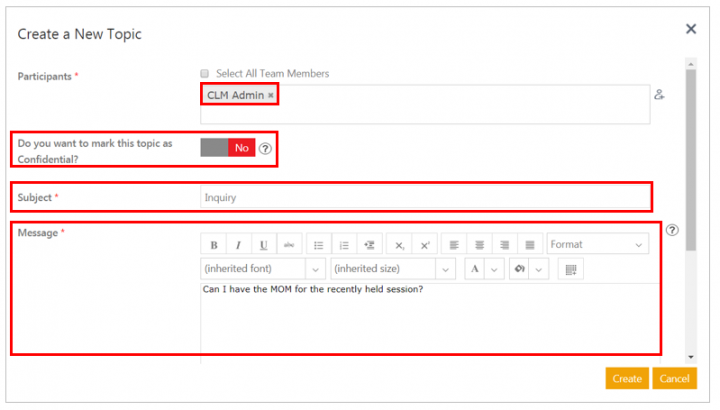
10. Click Create. The Topic is created. Based on the confidentiality, participants or other team members can view the created topic, in the Topics window of the Collaboration page.
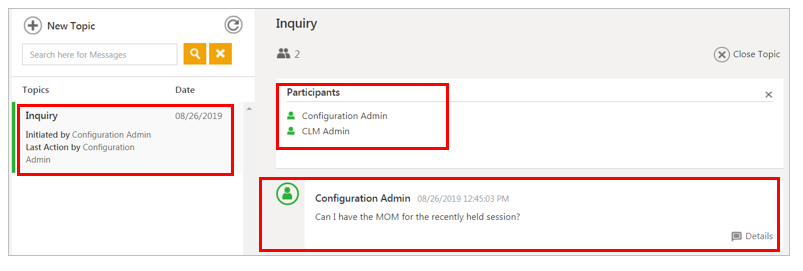
Sending Messages by an Internal user to External user
1. Click the New Topic icon. The Create a New Topic window opens.
2. To select Participants for the Topic, click the Add Team Members icon or you can select all Team members. For example, let’s collaborate with an External user, Lee Yen Po.
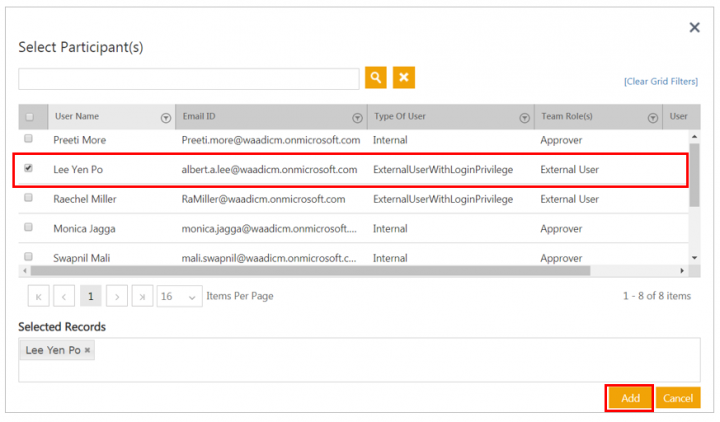
3. Click Add. The Create a New Topic window opens displaying the Participant.
4. You can choose to keep the topic confidential from other internal users by toggling the Do you want to mark this topic as Confidential flag to Yes.
5. Enter the Subject for the Topic.
6. Enter the message in the Message field.
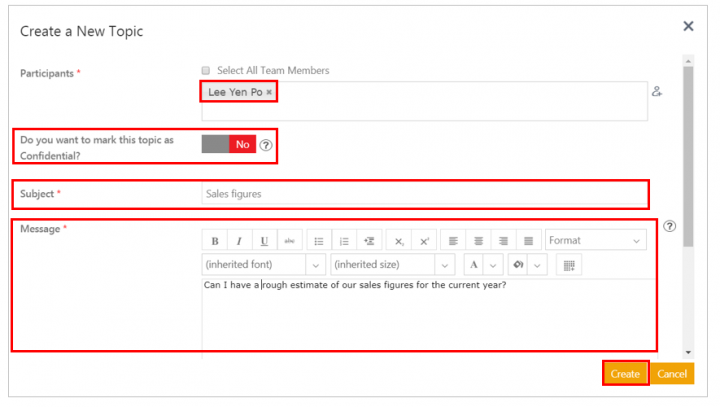
7. Click Create. The Topic is created. The participants can view this topic in the Topics window of the Collaboration page and the body of the message at the right.

Details such as who initiated the conversation, who took the last action on a Topic, along with the Date, are displayed in the window.
Sending Messages by an External user to Internal user
1. Click the Agreement Management > Agreements on the Home page. The Agreement index page opens.

2. Select the Agreement where you want to Collaborate. For example, SaaS Agreement.
3. Click the Collaboration tab on the Agreement’s Details page. The Collaboration page opens in the right pane.
4. Click the New Topic icon. The Create a New Topic window opens.
5. Enter the Subject for the Topic.
6. Enter the message in the Message field.
7. Click Create. The Topic is created. The participants can view this topic in the Topics window of the Collaboration page and the body of the message at the right.

Replying Messages
Replying Messages by an Internal user to another Internal user
1. Click the Collaboration tab of the Agreement Details page.
2. Select the Topic where you communicate with an internal user. Let’s consider topic Informal chat.
3. Click Reply to reply to the message to a single participant or click Reply All to broadcast the message to all participants. The response window opens.
4. Enter the message in the Message field.
5. Click Send.
Let’s see how the Internal user views the Internal user’s response.
Replying Messages by an External user to Internal user
Now let's see how the provisioned external user Lee Yen Po can respond to the message.
1. Click the Collaboration tab of the Agreement Details page.
2. Click Reply to respond to the selected message.
Based on confidentiality, a message posted by an external user will be visible to participants or other team members, but not external users.
3. Click Send.
Email Notifications to Participants
For every message sent or replied in any topic triggers a notification email to its participants and has got the following conditions:
1. An email notification is sent to all participants whenever an internal or external user posts a message based on confidential condition.
2. All email notifications can be tracked from the Notifications Alerts present on the Home page and then Collaboration Notifications section present in the Notifications Dashboard.
Searching Messages
A user can search messages across topics using the Search tab available in the Collaboration window.
To search messages in a topic:
1. Enter the keyword in the Search for Messages field. For example, let’s search the word - Can. All the topics where the message contains the searched criteria are rendered in the search result along with the search word is highlighted.
Closing the Topics
To close a topic:
1. Click Close Topic to end any Topic conversation. A message is displayed indicating that once you closed the topic, you can no longer post any new messages in this topic.
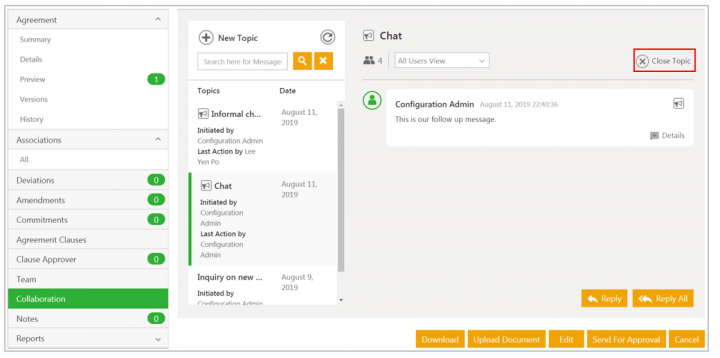
2. Click Yes. The Topic is now closed.
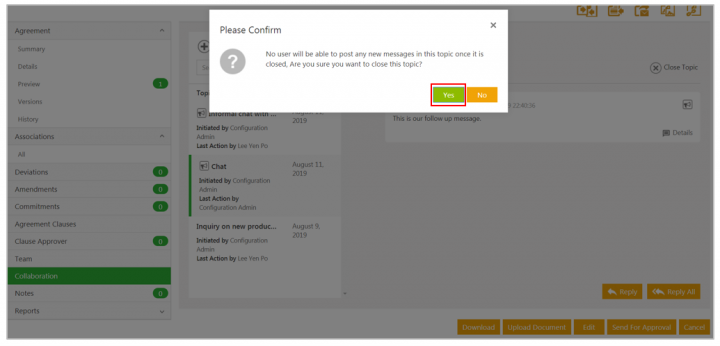
The message is displayed in the message window indicating the name of the user who closed the topic along with the date and time.
Performing Bulk Actions on Agreements
1. Click Saved Searches and select the specific one on which you need to perform the Bulk Action. This displays the Agreements matching the criteria defined in the Saved Searches, with checkboxes next to it.
2. Select the checkboxes next to the Agreements on which the action has to be taken as shown in the figure below.
3. Click the Bulk Action icon. This displays a list of actions that you can take on the selection. For example, Approve, Reject, Delete, Send for Approval, Send for External Signature and Download.
4. Clicking the required action, displays a confirmation window. Click OK.
Ability to configure Reminder Notification on Entities
ICI provides the ability to send the entity-wise reminder notifications by using the Subscription Reminder Notification Template.
Creating a Subscription
To create a Subscription Reminder Notification Template:
1. Click the User Administration tile. The User Administration menu opens.
2. Click Notification Settings. The Notification Settings menu opens.
3. Click Subscription. The Subscriptions page opens.
4. Click Create Subscription. The Details tab of the Create Subscription page opens.
5. Enter the Template Name. For example,Reminder Notification.
6. Select the entity from the Entity Name drop-down list. For example, Agreement.
7. Select the Event Name from the drop-down list. For example, Agreement Reminder.
8. Select the Category Name from the drop-down list. For example, Reminder Notifications.
9. Click Next. The Template tab opens.
10. Enter a subject in the Template Subject field. For example, Reminder Notification for [$Agreement.Name$] expiry.
11. Tag attributes from the Attributes section as per requirement.
12. Enter a message in the Template Body field.
13. Click Next. The Recipient tab opens.
14. Click the Add Recipients icon to add recipients.
15. Select recipients from the list.
16. Click Next. The Verify tab opens.
17. Click Save.
The Reminder Notification is created for Agreement. It can be viewed on the Notification Template page.
Let us now create a Rule for the Agreement Reminder Event.
Creating an Event Rule for the Agreement Reminder Event
To create an Event Rule:
1. Click the Configuration tile. The Configuration menu opens.
2. Click Rule. The Rule menu opens.
3. Click Create Rule. The Create Rule page opens.
4. Select the Contract Type. For example, MSA_SD.
5. Enter a Rule Name. For example, Agreement Expiry Notification.
6. Enter a description for the Rule in the Rule Description field.
7. Select Event Rule from the Rule Type drop-down list.
8. Select Agreement Reminder from the Rule Type drop-down list.
9. Click Next. The Build tab opens.
10. Click Add Rule under the Build tab.
11. Select the Contract Type from the drop-down list for which you want to apply the condition. For example, MSA_SD.
12. Select the Attribute for which you want to apply the condition from the Select Value drop-down list. For example, Created By.
13. Select the operator from the drop-down list. For example, Equals.
14. Select the user for which you want to apply the condition from the Enter Value drop-down list. For example, CLM Admin.
15. Select the Action that you want to take from the Actions drop-down list. For example, Set Recurrence Reminder.
16. Select the template from the Reminder Template drop-down list. For example, Reminder Notification.
17. Enter the value in the Interval field. For example, 1.
18. Select the frequency from the Interval Frequency drop-down list. For example, Day(s).
19. Select the date in the Start Date drop-down list from where you want to start the reminder. For example, Reminder Start Time.
20. Select the date in the End Date drop-down list from where you want to end the reminder. For example, Reminder End Time.
21. Select Yes or No in the Stop Processing More Rules drop-down list.
22. Click Next. The Summary tab opens.
The Reminder Notification for Agreement will get triggered every day for the Contract Type MSA_SD created by the user CLM Admin.
23. Click Create.
The Agreement Expiry Notification rule gets created. This can be viewed on the Rules page.
Tracking Notifications using the Notifications Dashboard
As per the event rule, reminder notification gets triggered every day and users can keep a track of notifications by using the Notifications Dashboard.
To view notifications:
1. Click the Notifications tile. The Notifications Dashboard opens.
2. Click Agreement Reminder under the Agreement Notifications tab.
3. The Agreement Reminder Notification message is displayed on the right side.
Capturing user emails to send notifications
Users can capture multiple valid internal or external email addresses at a run time in a single attribute configured at the contract type level.. These email addresses then can be used for sending the automated email notifications and configure the sender’s email ID (From and Reply To Email Addresses) dynamically based on subscription configuration.
Administrators can:
- Configure email attribute to capture single or multiple email addresses while setting up a contract type
- Configure email attribute in Notification Subscriptions as To, Cc and Bcc recipients.
- Configure the sender’s email ID (From Email Address) dynamically based on the specific contract type or instance of a record by setting up subscription templates using specific user or role or user attribute.
- Configure the email addresses for Reply To in the subscriptions setup which recipients can revert to
Configuring contract types to capture user emails
Users can enable capturing the single or multiple user email addresses during agreement creation by configuring attributes with Data Type as Email and Email Type Option as Single/Multiple at the contract type level.
To edit the contract type:
1. Click Configuration > Contract Types on the Home page. The contract type index page opens.
2. Click View Record icon corresponding to the contract type you want to edit. For example, ICI Master Service Agreement. The contract type details page opens.
3. Click Edit. The Edit Contract Type page opens.
4. Select Attributes tab.
5. Click Add action icon. The section for adding new attribute opens.
6. Enter a Display name. For example, Observer Emails.
7. Select Email in the Data Type field.
8. Select Multiple in the Email Type Option field. This enables users to enter multiple email addresses in the attribute value.
9. Click Save. The attribute will be added to the contract type.
10. Add another attribute following steps no. 5 to 9 for capturing a single email address with Data Type as Email and Email Type Option as Single. For example, attribute Customer Email.
11. Click Next.
12. Edit the details in Association, Display Preference and Team tabs if required.
13. Verify the details and click Update. The contract type will be updated with the attributes configured to capture multiple and single email addresses.
14. Approve the contract type following standard ICI approval workflow.
Capturing email addresses during agreement creation
1. Click Agreement Management > Create Agreement on the Home page. The Create Agreement page opens.
2. Select the Contract Type Name for which you want to add recipient emails. For example, ICI Master Service Agreement.
3. Click Next. The Attributes tab opens.
4. Enter the email in the Customer Email. For example, johndoe@icertis.com.
5. Enter multiple email addresses in Observer Emails field.
The Incorrect email address error message is displayed if user enters any invalid email address.
For example, enter email addresses as james@icertis.com; lily@icertis.com; harry@icertis.com.
6. Enter other required details and click Next. The Select Template page opens.
7. Select the template and click Next. The Verify page opens.
8. Click Show more link to display all email addresses in the Observer Emails field.
9. Verify the details and click Create and Publish. The agreement is created with the entered email addresses.
Sample Emails
Users can now configure the Notification Subscriptions and Notification Rule to send the automated emails to the captured email addresses.
The email as per the configured Email Types in Subscription and notification rule and email addresses provided in the attributes Customer Email and Observer Emails in the ICM Master Service Agreement instance.
- From Email Type:sample VP Business
- To Email Type: jillwater023@icertis.com
- CC EmailUsers can now configure the notification subscription and notification rule to send the automated emails to the captured addresses. Type: Customer Email Johndoe@icertis.com
- Bcc Email Type: ICMAdmin@icertis.com and Observer Emails as james@icertis.com; lily@icertis.com; harry@icertis.com
When the recipient jillwater023@icertis.com replies to the received email, the reply would be sent to the email addresses configured with the Email Type as Reply To:. In this case, Observer Emails attribute value: james@icertis.com; lily@icertis.com; harry@icertis.com.

