| (7 intermediate revisions by the same user not shown) | |||
| Line 111: | Line 111: | ||
You can perform ICI EndPoint Configuration only after you have installed Salesforce ICI from AppExchange. | You can perform ICI EndPoint Configuration only after you have installed Salesforce ICI from AppExchange. | ||
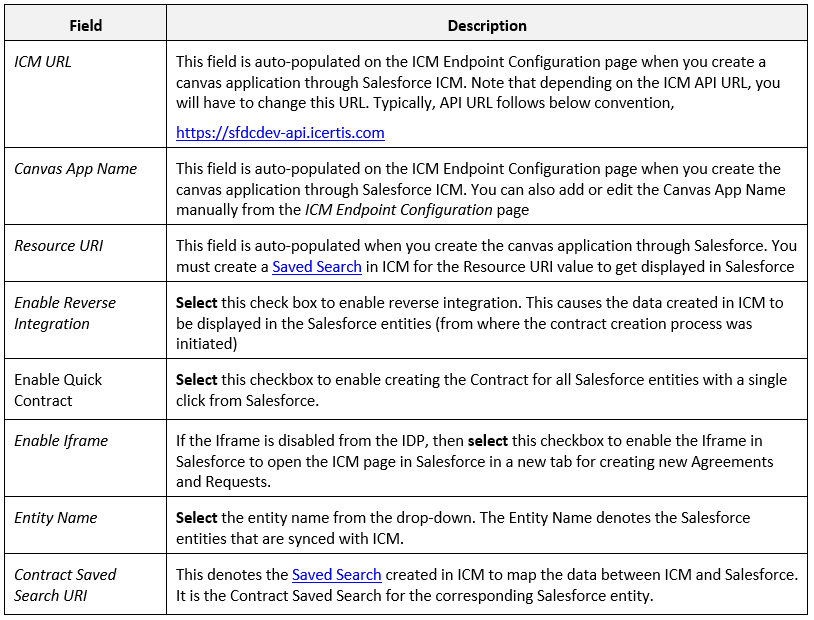
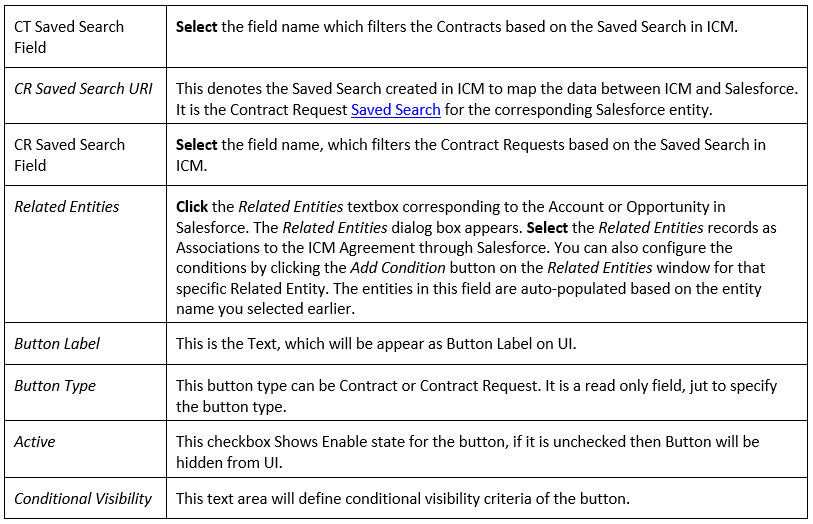
| − | <div class="image-green-border">[[File:Configuring ICM EndPoint 1.PNG|720px|RTENOTITLE]]</div> <div class="image-green-border"> </div> <div class="image-green-border">Follow these steps to configure ICI EndPoint:</div> <div class="image-green-border"> </div> <div class="image-green-border">1. '''Click''' ''ICI Configuration'' in the top navigation bar by logging on to the ICI App in Salesforce on ICI App Home page. ''ICI EndPoint Configuration'' page opens.<br/> 2. Provide relevant information in the respective fields:</div> <div class="image-green-border"> </div> <div class="image-green-border">[[File:Table 1 1.PNG|RTENOTITLE]][[File:Table 1 2.PNG|RTENOTITLE]]</div> | + | <div class="image-green-border">[[File:Configuring ICM EndPoint 1.PNG|720px|RTENOTITLE]]</div> <div class="image-green-border"> </div> <div class="image-green-border">Follow these steps to configure ICI EndPoint:</div> <div class="image-green-border"> </div> <div class="image-green-border">1. '''Click''' ''ICI Configuration'' in the top navigation bar by logging on to the ICI App in Salesforce on ICI App Home page. ''ICI EndPoint Configuration'' page opens.<br/> 2. Provide relevant information in the respective fields:</div> <div class="image-green-border"> </div> <div class="image-green-border">[[File:Table 1 1.PNG|RTENOTITLE]]</div> <div class="image-green-border">[[File:Table 1 2.PNG|RTENOTITLE]]</div> |
=== Creating a Field Set === | === Creating a Field Set === | ||
| Line 149: | Line 149: | ||
<div class="image-green-border">[[File:View FieldSet 2.png|720px|RTENOTITLE]]</div> | <div class="image-green-border">[[File:View FieldSet 2.png|720px|RTENOTITLE]]</div> | ||
3. '''Click''' ''New Contract'' in the ''Icertis Contracts'' section. The ''Create'' page opens displaying the details to be entered for creating the Contract. | 3. '''Click''' ''New Contract'' in the ''Icertis Contracts'' section. The ''Create'' page opens displaying the details to be entered for creating the Contract. | ||
| − | <div class="image-green-border"> | + | <div class="image-green-border">4. '''Select '''the following on ''Create ''page. </div> |
| − | 4. '''Select '''the following on ''Create ''page. | + | |
| − | + | ||
*''Category: '''''Select '''the Category from this dropdown. For example, ''Default. '' | *''Category: '''''Select '''the Category from this dropdown. For example, ''Default. '' | ||
*''Contract Type Name: '''''Select '''the Contract Type based on which you want to create the Contract. For example, ''SFMSA. '' | *''Contract Type Name: '''''Select '''the Contract Type based on which you want to create the Contract. For example, ''SFMSA. '' | ||
| Line 345: | Line 343: | ||
'''Click''' the saved search link on the Performance Metrices widget, for example, ''Mobile Agreement Search''. The Saved Search page is displayed in Salesforce. | '''Click''' the saved search link on the Performance Metrices widget, for example, ''Mobile Agreement Search''. The Saved Search page is displayed in Salesforce. | ||
| − | + | <div class="image-green-border">[[File:7.14-Using Performance Metrices in Salesforce.png|720px|7.14-Using Performance Metrices in Salesforce.png]]</div> | |
| − | [[File:7.14-Using Performance Metrices in Salesforce.png|720px|7.14-Using Performance Metrices in Salesforce.png]] | + | |
<div class="note-box">'''Note''': Reports under Performance Metrices such as Templates Pending Approval, Agreements Pending Execution and so on will open in a new tab.</div> | <div class="note-box">'''Note''': Reports under Performance Metrices such as Templates Pending Approval, Agreements Pending Execution and so on will open in a new tab.</div> | ||
| | ||
| Line 383: | Line 381: | ||
| | ||
| − | To create a Contract Request from an account: | + | To create a Contract Request from an account: |
| − | + | 1. '''Log on''' ''to Salesforce using your ICI credentials.'' | |
| − | 3. Click Account in the top navigation, and click the Account for which you want to create a Contract Request. | + | 2. '''Select''' ICI in the top right corner of your Salesforce page to use ICI through Salesforce. |
| + | |||
| + | 3. '''Click''' ''Account'' in the top navigation, and click the Account for which you want to create a Contract Request. | ||
4. On the ''Account Detail'' page, scroll down to the ''Icertis Contracts'' section. | 4. On the ''Account Detail'' page, scroll down to the ''Icertis Contracts'' section. | ||
| − | 5. Click ''New Contract Request''. The ''Create Contract Request'' page opens in Salesforce. The options available on this page indicate the type of contract for which you are creating this request. <div class="image-green-border">[[File:Creating a Contract Request from an Account2.PNG|720px|RTENOTITLE]]</div> | + | 5. '''Click''' ''New Contract Request''. The ''Create Contract Request'' page opens in Salesforce. The options available on this page indicate the type of contract for which you are creating this request. <div class="image-green-border">[[File:Creating a Contract Request from an Account2.PNG|720px|RTENOTITLE]]</div> |
6. Select the ''Category'' and Request Typebased on the request you are creating and click Next. | 6. Select the ''Category'' and Request Typebased on the request you are creating and click Next. | ||
<div class="image-green-border">[[File:Creating a Contract Request from an Account3.PNG|360px|RTENOTITLE]]'</div> | <div class="image-green-border">[[File:Creating a Contract Request from an Account3.PNG|360px|RTENOTITLE]]'</div> | ||
7.''Specify'' the details of the request on the various sections of this page | 7.''Specify'' the details of the request on the various sections of this page | ||
| − | <div class="image-green-border">[[File:Table 7.PNG|720px|RTENOTITLE]]</div> | + | <div class="image-green-border">[[File:Table 7.PNG|720px|RTENOTITLE]]</div> |
| − | | + | 8. '''Click''' ''Next''. The ''Request Summary'' page opens. You can also click ''Save'' if you want to save the changes and create the request later. |
| − | + | ||
| − | 8. Click ''Next''. The ''Request Summary'' page opens. You can also click ''Save'' if you want to save the changes and create the request later. | + | |
<div class="image-green-border">[[File:Creating a Contract Request from an Account5.PNG|720px|RTENOTITLE]]'</div> | <div class="image-green-border">[[File:Creating a Contract Request from an Account5.PNG|720px|RTENOTITLE]]'</div> | ||
| − | 9. Click ''Create Request''. The ''Accounts'' page opens showing the Contract Request you created in ''Draft'' state. | + | 9. '''Click''' ''Create Request''. The ''Accounts'' page opens showing the Contract Request you created in ''Draft'' state. |
| − | 10. Click ''ICI'' in the top navigation bar and then click ''Contract Requests''. The Contract Request page opens and it shows the list of available requests. | + | 10. '''Click''' ''ICI'' in the top navigation bar and then click ''Contract Requests''. The Contract Request page opens and it shows the list of available requests. |
| − | 11.Click ''View'' next to the Request you created. The ''Request Details'' page opens. <div class="image-green-border">[[File:Creating a Contract Request from an Account6.PNG|720px|RTENOTITLE]]</div> | + | |
| + | 11.'''Click''' ''View'' next to the Request you created. The ''Request Details'' page opens. | ||
| + | |||
| + | | ||
| + | <div class="image-green-border">[[File:Creating a Contract Request from an Account6.PNG|720px|RTENOTITLE]]</div> | ||
12. Use the buttons in the table below to perform a desired action: | 12. Use the buttons in the table below to perform a desired action: | ||
<div class="image-green-border">[[File:Table 8.PNG|720px|RTENOTITLE]]</div> </div> | <div class="image-green-border">[[File:Table 8.PNG|720px|RTENOTITLE]]</div> </div> | ||
| Line 409: | Line 411: | ||
The process of creating a contract from ICI in Salesforce is dependent on the workflow that is implemented in your organization. | The process of creating a contract from ICI in Salesforce is dependent on the workflow that is implemented in your organization. | ||
<div class="image-green-border">[[File:Creating a Contract Request from an Account.PNG|RTENOTITLE]]</div> | <div class="image-green-border">[[File:Creating a Contract Request from an Account.PNG|RTENOTITLE]]</div> | ||
| − | To create a Contract from an Account: | + | To create a Contract from an Account: |
| − | + | 1. '''Log on''' to Salesforce using your ICI credentials. | |
| − | 3. Click ''Accounts'' in the top navigation, and click the ''Account'' for which you want to create a contract. | + | 2. '''Select''' ''ICI'' in the top right corner of your Salesforce page to use ICI through Salesforce |
| + | |||
| + | 3. '''Click''' ''Accounts'' in the top navigation, and click the ''Account'' for which you want to create a contract. | ||
<div class="image-green-border">[[File:Creating a Contract from an Account1 new.PNG|720px|RTENOTITLE]]</div> | <div class="image-green-border">[[File:Creating a Contract from an Account1 new.PNG|720px|RTENOTITLE]]</div> | ||
| − | 4. On the ''Account Detail'' page, scroll down to the ''Icertis Contracts'' section.<br/> Click ''New Contract''. This opens the ''Create Contract'' page in Salesforce. | + | 4. On the ''Account Detail'' page, scroll down to the ''Icertis Contracts'' section.<br/> 5. '''Click'''''New Contract''. This opens the ''Create Contract'' page in Salesforce. |
| − | <div class="note-box">Note: You can set the label of the buttons as required.</div> <div class="image-green-border">[[File:Creating a Contract Request from an Account2.PNG|720px|RTENOTITLE]]</div> | + | <div class="note-box">'''Note'''''': '''You can set the label of the buttons as required.</div> |
| − | 5. Complete the details in the sections below and click ''Next''. Contract Type Details Enter the following information in this section: | + | <br/> |
| + | <div class="image-green-border">[[File:Creating a Contract Request from an Account2.PNG|720px|RTENOTITLE]]</div> | ||
| + | 5. Complete the details in the sections below and '''click''' ''Next''. Contract Type Details. Enter the following information in this section: | ||
<div class="image-green-border">[[File:Table 9.PNG|720px|RTENOTITLE]]</div> | <div class="image-green-border">[[File:Table 9.PNG|720px|RTENOTITLE]]</div> | ||
| − | + | '''Attributes''' | |
| − | + | ||
| − | + | This section contains the attributes that the primary owner selected while creating the Contract Type for the agreement, which you are creating. You can also save the details at any stage and return to this page to complete the agreement later. The attributes displayed in this section vary based on the Contract Type you select. | |
| + | |||
| + | | ||
<div class="image-green-border">[[File:Creating a Contract from an Account3.PNG|360px|RTENOTITLE]]</div> | <div class="image-green-border">[[File:Creating a Contract from an Account3.PNG|360px|RTENOTITLE]]</div> | ||
| − | + | Below is the description of some of the attributes. | |
<div class="image-green-border">[[File:Creating a Contract Request from an Account9.PNG|720px|RTENOTITLE]]</div> | <div class="image-green-border">[[File:Creating a Contract Request from an Account9.PNG|720px|RTENOTITLE]]</div> | ||
| − | + | | |
| − | + | ||
| − | + | '''Template''' | |
| + | |||
| + | This section shows the templates that you created for the selected Contract Type. This section opens only if you select Own type of paper to create the agreement. Select the template from the list. | ||
<div class="image-green-border">[[File:Creating a Contract from an Account4.PNG|360px|RTENOTITLE]]</div> | <div class="image-green-border">[[File:Creating a Contract from an Account4.PNG|360px|RTENOTITLE]]</div> | ||
| − | + | | |
| − | + | ||
| + | '''Verify''' | ||
| − | This is the final step in the agreement creation process. The details in this section open based on the attributes and sections you used to create this agreement. | + | This is the final step in the agreement creation process. The details in this section open based on the attributes and sections you used to create this agreement. |
<div class="image-green-border">[[File:Creating a Contract from an Account5.PNG|720px|RTENOTITLE]]</div> | <div class="image-green-border">[[File:Creating a Contract from an Account5.PNG|720px|RTENOTITLE]]</div> | ||
| − | You can perform the following actions on this page: | + | You can perform the following actions on this page: |
| − | *Click ''Previous''to go back and make any changes to the agreement. Click ''Next'' to return to this section after making the required changes. | + | *'''Click''' ''Previous'' to go back and make any changes to the agreement. '''Click''' ''Next'' to return to this section after making the required changes. |
| − | *Click ''Create'' to create the Agreement. After the agreement is created it is not visible to all users until it is published by its primary owner. | + | *'''Click''' ''Create'' to create the Agreement. After the agreement is created it is not visible to all users until it is published by its primary owner. |
| − | *Click ''Create and Publish'' to create and publish the agreement. After the agreement is published it becomes visible to other users and a Draft watermark opens on the agreement in all states until it is approved by the designated approver. | + | *'''Click''' ''Create and Publish'' to create and publish the agreement. After the agreement is published it becomes visible to other users and a Draft watermark opens on the agreement in all states until it is approved by the designated approver. |
| − | *Click ''Create and Send for Approval'' to create and send the agreement for approval. The agreement is sent to the approvers that are set by rule for the Contract Type selected for this | + | *'''Click''' ''Create and Send for Approval'' to create and send the agreement for approval. The agreement is sent to the approvers that are set by rule for the Contract Type selected for this agreement. |
| − | + | ||
| − | + | *'''Click''' ''Discard'' to stop the agreement creation process. A discarded agreement is no longer available in ICI. You can discard the agreement from any section while creating the agreement. After the Agreement is created in Salesforce, it is available in ICI in the Draft state. You can send the agreement for approval through Salesforce, however, the approve and reject actions on the agreement can only happen through ICI. | |
=== Adding Amendment to a Contract === | === Adding Amendment to a Contract === | ||
| + | |||
After the Contract is executed, it cannot be edited. However, the primary owner can add an amendment to the Contract that is in the ''Executed'' state only.<br/> Amendments are added to a Contract due to following reasons: | After the Contract is executed, it cannot be edited. However, the primary owner can add an amendment to the Contract that is in the ''Executed'' state only.<br/> Amendments are added to a Contract due to following reasons: | ||
| − | *Payment terms of the Contract have changed. | + | |
| − | *Scope of work in the Contract has changed. | + | *Payment terms of the Contract have changed. |
| − | *The terms and conditions of the Contract have changed due to the introduction of the new regulation. | + | *Scope of work in the Contract has changed. |
| − | To add an amendment to a Contract:<br/> | + | *The terms and conditions of the Contract have changed due to the introduction of the new regulation. |
| − | 1. Log | + | |
| − | 2. Click ''ICI'' in the top navigation. The ''ICI'' page showing the list of Contracts and Contract Requests opens. <br/> | + | To add an amendment to a Contract:<br/> 1. '''Log on''' to Salesforce with your credentials.<br/> 2. '''Click''' ''ICI'' in the top navigation. The ''ICI'' page showing the list of Contracts and Contract Requests opens. <br/> 3. Select and open the Contract that is in the ''Executed'' state. The ''Contract'' page opens.<br/> 4. '''Click''' ''Add Amendment'' on the ''Contract'' page. The ''Add Amendment'' page opens.<br/> 5. Make the required changes to the Contract on the ''Initial Attributes'' tab and click ''Next''. <br/> 6. Click ''Create''. The ''Amendment'' moves to the ''Draft'' state and opens the ''Amendment Details'' page. |
| − | 3. Select and open the Contract that is in the ''Executed'' state. The ''Contract'' page opens.<br/> | + | |
| − | 4. Click ''Add Amendment'' on the ''Contract'' page. The ''Add Amendment'' page opens.<br/> | + | 7. You can perform the following actions on the ''Amendment Details'' page:' |
| − | 5. Make the required changes to the Contract on the ''Initial Attributes'' tab and click ''Next''. <br/> | + | <div class="image-green-border">[[File:Adding Amendment to a Contract.PNG|720px|RTENOTITLE]]</div> |
| − | 6. Click ''Create''. The ''Amendment'' moves to the ''Draft'' state and opens the ''Amendment Details'' page. | + | |
| − | 7. You can perform the following actions on the ''Amendment Details'' page:' <div class="image-green-border">[[File:Adding Amendment to a Contract.PNG|720px|RTENOTITLE]]</div> | + | |
After adding an Amendment, it goes through the similar flow of Agreement from Draft till execution. | After adding an Amendment, it goes through the similar flow of Agreement from Draft till execution. | ||
=== Creating a Contract Request from an Opportunity === | === Creating a Contract Request from an Opportunity === | ||
| − | You can create a Contract Request if your organization does not provide the privileges to create a contract from ICI in Salesforce. To create a Contract Request from an Opportunity: <br/> | + | You can create a Contract Request if your organization does not provide the privileges to create a contract from ICI in Salesforce. To create a Contract Request from an Opportunity: <br/> 1. Log onto Salesforce using your ICI credentials. <br/> 2. Select ''ICI'' in the top right corner of your Salesforce page to use ICI through Salesforce.<br/> 3. Click ''Opportunities'' in the top navigation, and click the ''Opportunity '' for which you want to create a Contract Request. |
| − | 1. Log onto Salesforce using your ICI credentials. <br/> | + | <div class="image-green-border">[[File:Creating a Contract Request from an opportunity.PNG|720px|RTENOTITLE]]</div> |
| − | 2. Select ''ICI'' in the top right corner of your Salesforce page to use ICI through Salesforce.<br/> | + | 4. On the ''Opportunity Detail'' page, scroll down to the ''Icertis Contracts'' section.<br/> 5. ''Click New Contract Request''. The ''Create Contract Request'' page opens in Salesforce. The options available on this page indicate the type of contract for which you are creating this request.<br/> 6. The rest of the process to create a Contract Request from an Opportunity is same as Creating a Contract Request from an Account. |
| − | 3. Click ''Opportunities'' in the top navigation, and click the ''Opportunity '' for which you want to create a Contract Request. | + | |
| − | <div class="image-green-border">[[File:Creating a Contract Request from an opportunity.PNG|720px|RTENOTITLE]]</div> | + | |
| − | + | ||
| − | 4. On the ''Opportunity Detail'' page, scroll down to the ''Icertis Contracts'' section.<br/> | + | |
| − | 5. ''Click New Contract Request''. The ''Create Contract Request'' page opens in Salesforce. The options available on this page indicate the type of contract for which you are creating this request.<br/> | + | |
| − | 6. The rest of the process to create a Contract Request from an Opportunity is same as Creating a Contract Request from an Account. | + | |
| + | | ||
=== Creating a Contract from an Opportunity === | === Creating a Contract from an Opportunity === | ||
| Line 476: | Line 480: | ||
The process of creating a contract from ICI in Salesforce is dependent on the workflow implemented in your organization. | The process of creating a contract from ICI in Salesforce is dependent on the workflow implemented in your organization. | ||
| − | To create a Contract from an Opportunity: <br/> <br/> | + | To create a Contract from an Opportunity: <br/> <br/> 1. '''Log on''' to Salesforce using your ICI credentials. <br/> 2. '''Select''' ''ICI'' in the top right corner of your Salesforce page to use ICI through Salesforce.<br/> 3. '''Click''' ''Opportunities'' in the top navigation, and '''click''' the Opportunity for which you want to create a contract. |
| − | 1. Log | + | <div class="image-green-border">[[File:Creating a Contract from an opportunity.PNG|720px|RTENOTITLE]]</div> |
| − | 2. Select ''ICI'' in the top right corner of your Salesforce page to use ICI through Salesforce.<br/> | + | 4. On the ''Opportunity Detail'' page, scroll down to the ''Icertis Contracts'' section. <br/> 5. '''Click'''''New Contract''. The ''Create Contract'' page opens in Salesforce. The options available on this page indicate the type of contract for which you are creating this request.<br/> <br/> The rest of the process to create a Contract Request from an Opportunity is same as Creating a Contract from an Account. |
| − | 3. Click ''Opportunities'' in the top navigation, and click the Opportunity for which you want to create a contract. | + | |
| − | + | ||
| − | 4. On the ''Opportunity Detail'' page, scroll down to the ''Icertis Contracts'' section. <br/> | + | |
| − | 5. ''Click New Contract''. The ''Create Contract'' page opens in Salesforce. The options available on this page indicate the type of contract for which you are creating this request.<br/> <br/> The rest of the process to create a Contract Request from an Opportunity is same as Creating a Contract from an Account. | + | |
| + | | ||
=== Creating a Contract Request from a Quote === | === Creating a Contract Request from a Quote === | ||
| − | You can create a Contract Request if your organization does not provide the privileges to create a contract from ICI in Salesforce. <br/> <br/> To create a Contract Request from a Quote:<br/> <br/> | + | You can create a Contract Request if your organization does not provide the privileges to create a contract from ICI in Salesforce. <br/> <br/> To create a Contract Request from a Quote:<br/> <br/> 1. '''Log on''' to Salesforce using your ICI credentials. <br/> 2. '''Select''' ''ICI'' in the top right corner of your Salesforce page to use ICI through Salesforce. |
| − | 1. Log | + | |
| − | 2. Select ''ICI'' in the top right corner of your Salesforce page to use ICI through Salesforce. | + | 3. '''Click'''''Quotes'' in the top navigation, and '''click''' the Quotes for which you want to create a Contract Request. |
| − | 3. ''Click Quotes'' in the top navigation, and click the Quotes for which you want to create a Contract Request. <div class="image-green-border">[[File:Creating a Contract Request from a Quote.PNG|720px|RTENOTITLE]]</div> | + | <div class="image-green-border">[[File:Creating a Contract Request from a Quote.PNG|720px|RTENOTITLE]]</div> |
| − | 4. On the ''Quote Detail'' page, scroll down to the ''Icertis Contracts'' section. <br/> | + | 4. On the ''Quote Detail'' page, scroll down to the ''Icertis Contracts'' section. <br/> 5. '''Click'''''New Contract Request''. The ''Create Contract Request'' page opens in Salesforce. The options available on this page indicate the type of contract for which you are creating this request.<br/> 6. The rest of the process to create a Contract Request from a Quote is same as Creating a Contract Request from an Account. |
| − | 5. ''Click New Contract Request''. The ''Create Contract Request'' page opens in Salesforce. The options available on this page indicate the type of contract for which you are creating this request.<br/> | + | |
| − | 6. The rest of the process to create a Contract Request from a Quote is same as Creating a Contract Request from an Account. | + | |
| | ||
| Line 501: | Line 500: | ||
The process of creating a contract from ICI in Salesforce is dependent on the workflow implemented in your organization. | The process of creating a contract from ICI in Salesforce is dependent on the workflow implemented in your organization. | ||
| − | To create a Contract from a Quote:<br/> <br/> | + | To create a Contract from a Quote:<br/> <br/> 1. '''Log on''' to Salesforce using your ICI credentials. <br/> 2. '''Select''' ''ICI'' in the top right corner of your Salesforce page to use ICI through Salesforce.<br/> 3. '''Click'''''Quotes'' in the top navigation, and '''click'''''the ''Quotes''for which you want to create a contract''. |
| − | 1. Log | + | <div class="image-green-border">[[File:Creating a Contract Request from a Quote.PNG|720px|RTENOTITLE]]</div> |
| − | 2. Select ''ICI'' in the top right corner of your Salesforce page to use ICI through Salesforce.<br/> | + | 4. On the ''Quote Detail'' page, scroll down to the ''Icertis Contracts'' section. <br/> 5. '''Click'''''New Contract''. The Create Contract page opens in Salesforce. The options available on this page indicate the type of contract for which you are creating this request.<br/> <br/> The rest of the process to create a Contract from a quote is the same as Creating a Contract from an Account. |
| − | 3. ''Click Quotes'' in the top navigation, and ''click the Quotes for which you want to create a contract | + | |
| − | <div class="image-green-border">[[File:Creating a Contract Request from a Quote.PNG|720px|RTENOTITLE]]</div> | + | |
| − | 4. On the ''Quote Detail'' page, scroll down to the ''Icertis Contracts'' section. <br/> | + | |
| − | 5. ''Click New Contract''. The Create Contract page opens in Salesforce. The options available on this page indicate the type of contract for which you are creating this request.<br/> <br/> The rest of the process to create a Contract from a quote is the same as Creating a Contract from an Account. | + | |
| − | + | ||
| + | | ||
=== Configuring Auto-creation of Contracts and Tasks in Salesforce === | === Configuring Auto-creation of Contracts and Tasks in Salesforce === | ||
| Line 515: | Line 510: | ||
With this release, the contract creation process has been automated based on Opportunity or Quote status, thus increasing the productivity of Salesforce users.<br/> Salesforce Administrators can now: | With this release, the contract creation process has been automated based on Opportunity or Quote status, thus increasing the productivity of Salesforce users.<br/> Salesforce Administrators can now: | ||
| − | *Configure the Opportunity or Quote status which can automatically trigger the contract creation. | + | *Configure the Opportunity or Quote status which can automatically trigger the contract creation. |
| − | *Configure the contract type which should be used to create the contract based on data from an Opportunity or Quote. | + | *Configure the contract type which should be used to create the contract based on data from an Opportunity or Quote. |
| − | *Define the Type of Paper to be used as Own or Third Party. | + | *Define the Type of Paper to be used as Own or Third Party. |
| − | *Configure automated contract creation or automated task creation to initiate the contract creation process: | + | *Configure automated contract creation or automated task creation to initiate the contract creation process: |
| − | **For auto creation of contracts, the ICI Experience for Salesforce will determine the dependencies for the contract. For example, if the opportunity is for an extension, the existing master agreement for the account will be identified and an appropriate contract type such as an order form will be selected and associated with it. | + | **For auto creation of contracts, the ICI Experience for Salesforce will determine the dependencies for the contract. For example, if the opportunity is for an extension, the existing master agreement for the account will be identified and an appropriate contract type such as an order form will be selected and associated with it. |
| − | **For auto creation of tasks, Salesforce users will be able to create a contract using a single button click that will assemble all necessary documents for the type of contract to be created. | + | **For auto creation of tasks, Salesforce users will be able to create a contract using a single button click that will assemble all necessary documents for the type of contract to be created. |
==== Configuring Logs ==== | ==== Configuring Logs ==== | ||
| − | | + | 1. Go to the ''ICI Configuration'' tab in Salesforce. The ''ICI Endpoint Configuration'' page opens. |
| − | |||
2. Enter ''Duration for logs in days'', for example 60.0 days. The number of days for which the logs will be preserved can be defined here. | 2. Enter ''Duration for logs in days'', for example 60.0 days. The number of days for which the logs will be preserved can be defined here. | ||
| − | <div class="image-green-border">[[File:7.12 Salesforce Auto Contract 1.png|720px|7.12 Salesforce Auto Contract 1.png]]</div> | + | <div class="image-green-border">[[File:7.12 Salesforce Auto Contract 1.png|720px|7.12 Salesforce Auto Contract 1.png]]</div> |
| − | + | 3. Set the ''Logging Level'':<br/> a. "Log Error'': Only errors will be logged.''<br/> b. "Log Info'': Only information will be logged, for example request and response.''<br/> c. "Log Always'': Errors and information will be logged.'' | |
| − | 3. Set the ''Logging Level'':<br /> | + | |
| − | a. "Log Error'': Only errors will be logged.<br /> | + | |
| − | b. "Log Info'': Only information will be logged, for example request and response.<br /> | + | |
| − | c. "Log Always'': Errors and information will be logged. | + | |
Latest revision as of 17:39, 23 September 2020
Contents
- 1 Salesforce
- 1.1 Purpose
- 1.2 Overview of Icertis Experience for Salesforce
- 1.3 Salesforce Side Configuration
- 1.3.1 Prerequisites
- 1.3.2 Compatibility
- 1.3.3 Installing ICI in Salesforce
- 1.3.4 Creating and Managing the Canvas App
- 1.3.5 Configuring ICI EndPoint
- 1.3.6 Creating a Field Set
- 1.3.7 Viewing the Fields in Salesforce
- 1.3.8 Setting up a new Remote Site (whitelisting of ICI instance)
- 1.3.9 Configuring Page Layout
- 1.3.10 Configuring Data Sync
- 1.3.11 Data Sync (Salesforce to ICI) Configuration
- 1.3.12 Service User Authentication Token
- 1.3.13 Configure Entity Process Builder
- 1.4 ICI Side Configuration
- 1.5 Configuration for allowing user to be redirected to ICI Details page in Salesforce
- 1.6 Integrating ICI Tasks with Salesforce
- 1.7 Working with Saved Searches
- 1.8 Updating Saved Search Configuration
- 1.9 Configuring Global Search
- 1.10 Enabling Single Sign-On
- 1.11 Multiple Salesforce Instances
- 1.11.1 Viewing ICI Dashboard widgets in Salesforce
- 1.11.2 Simplified UX Actions in Grid
- 1.11.3 Creating a Contract Request from an Account
- 1.11.4 Creating a Contract from an Account
- 1.11.5 Adding Amendment to a Contract
- 1.11.6 Creating a Contract Request from an Opportunity
- 1.11.7 Creating a Contract from an Opportunity
- 1.11.8 Creating a Contract Request from a Quote
- 1.11.9 Creating a Contract from a Quote
- 1.11.10 Configuring Auto-creation of Contracts and Tasks in Salesforce
Salesforce
Purpose
The purpose of this Wiki is to document the process of:
- Configuring ICI in Salesforce.
- Performing Salesforce related configuration in ICI for mapping data entities and saved searches.
It also describes the process of using the Icertis Experience for Salesforce with the standard scenarios.
The document is primarily intended for:
- Administrator users who configure Icertis Experience for Salesforce on Salesforce.com.
- ICI Administrator Users who work on ICI Side Configuration.
- Other users who work with Agreements.
Prerequisites
- The user must have an account on Salesforce and ICI.
- Icertis CLM must be installed on Salesforce.com from Salesforce AppExchange. It is compatible with Group, Professional, Enterprise, Unlimited, Force.com Developer and Performance Editions.
- The user must have admin privileges for ICI and Salesforce in case the user is configuring ICI on Salesforce.
Overview of Icertis Experience for Salesforce
Icertis Experience for Salesforce is a native Salesforce application that allows you to access the full suite of ICI functionality from Salesforce, including the following capabilities:
- Manage end-to-end contract lifecycle from the familiar Salesforce platform.
- Create Contract Requests with pre-populated data from Salesforce objects.
- Track contract progress and status updates within Salesforce.
- View contract notifications as part of chatter feed messages.
- Automatically transfer and synchronize data between Salesforce objects and ICI.
- Map Salesforce objects (standard and custom) with ICI entities.
ICI and Salesforce integration is required to port data from ICI to Salesforce. This integration avoids the need for re-entering the data manually in Salesforce which you have already created in ICI.
To use ICI from within Salesforce:
- The ICI sections must be embedded in the Salesforce pages.
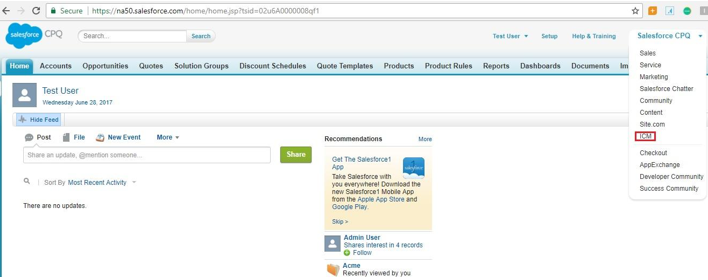
- After logging on to Salesforce, select ICI in the top right corner of your Salesforce page to use ICI through Salesforce.
Icertis Experience for Salesforce has the following key concepts:
- Account is a label for business. It is a company or a business entity, you might already be working with, or one that you hope to work with. In simple words, an Account is an actual business or company.
- Opportunity is a pending deal with a monetary value associated with it. It helps to track the pending deals and sales.
- Quote is the data showing the proposed prices for the products or services. Quotes can be created by using the data that is saved in the Opportunities and shared with the prospective customers. Every opportunity can have multiple associated quotes linked to it.
After integrating ICI with Salesforce, you can do the following contract management tasks in Salesforce:
- Create and edit a Contract Request from an existing Account.
- Create and edit a Contract Request from an existing Opportunity.
- Create and edit a Contract Request from an existing Quote.
- Create and edit a Contract from an Account when a prospective sales lead is qualified and a corresponding account is created.
- Create and edit a Contract from an existing Opportunity.
- Create and edit a Contract from an existing Quote.
Salesforce Side Configuration
Prerequisites
- You must have a Salesforce account.
- You must have administrator privileges to install ICI in Salesforce.
- You must have ICI administrator privileges to configure ICI in Salesforce.
Compatibility
ICI is compatible with the following editions of Salesforce:
- Professional
- Enterprise
- Unlimited
- Developer
- Performance
For more information about the different editions of Salesforce, refer to:
https://help.salesforce.com/articleView?id=overview_edition.htm&type=0
Installing ICI in Salesforce
To install ICI in Salesforce:
1. Log on to Salesforce.
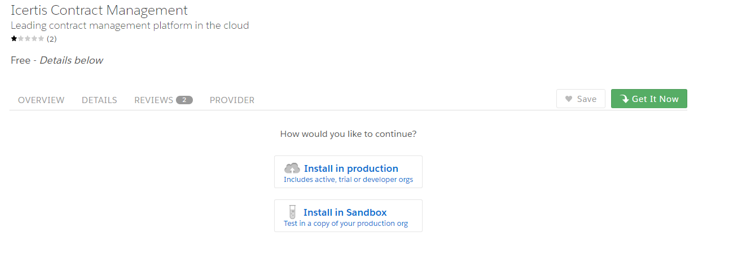
2. Open a new browser instance and go to Salesforce AppExchange to download the ICI application.
- Log in to AppExchange: Logon to AppExchange using your Salesforce credentials to proceed with the installation.
- I don’t have a login: Install ICI in Salesforce as a guest user.
- Install in production
- Install in Sandbox
- Install for Admins only: install ICI for Salesforce Administrators who can install ICI in Salesforce.
- Install for All Users: install ICI for all users of Salesforce.
- Install for Specific Profiles: install ICI for specific profiles only.
Creating and Managing the Canvas App
Creating the Canvas App
Follow these steps to create a Canvas App:
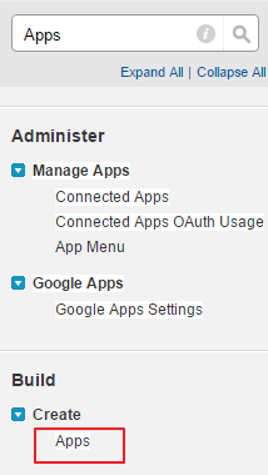
1. In Salesforce, under Setup, search for Apps in the Quick Find box and select Apps.
4. Accept the default API Name. This is the internal name of the Canvas App and you cannot change the name after saving it.
5. In the Contact Email field, type your valid email address.
6. In the Logo Image URL field, type the Logo URL that you want to provide.
7. In the Icon URL field, type the Icon URL that you want to provide.
9. In the Callback URL field, type your Callback URL.
10. In the Selected OAuth Scopes field, select Full Access.
11. In the Canvas App Settings section, select Force.com Canvas.
12. In the Canvas App URL field, type the application URL that you want to sync with Salesforce. This is the application URL, which is integrated with Salesforce.
13. In the Access Method field, select Signed Request (Post)
14. In the Locations field, select Visualforce Page.
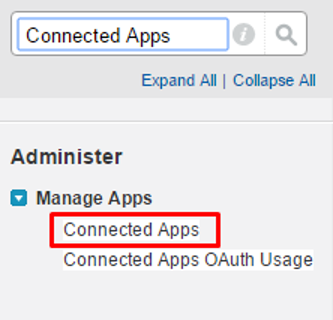
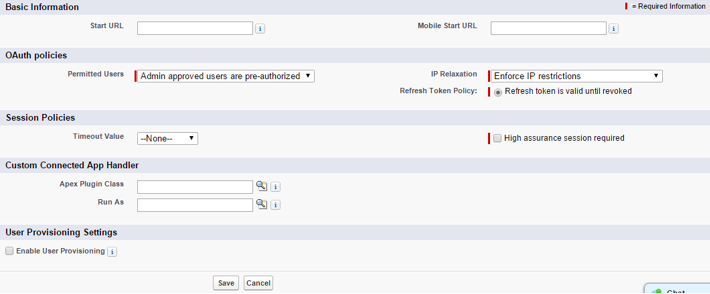
1. In Salesforce, under Setup, search for Connected Apps in the Quick Find box and then select the option for managing Connected Apps.
pop-up message that opens.
4. Click Save.
To understand the following example, consider that you want to give access to the System Administrator profile.
1. In the Profiles related list, click Manage Profiles.
2. Select the System Administrator profile and click Save.
Configuring ICI EndPoint
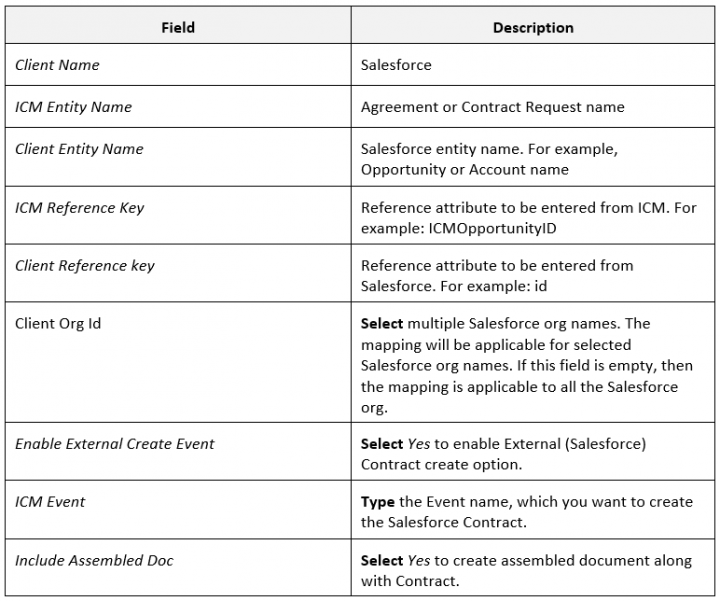
You can perform ICI EndPoint Configuration only after you have installed Salesforce ICI from AppExchange.
2. Provide relevant information in the respective fields:
Creating a Field Set
The Field set are fields that have been grouped together for creating the Field Set. For example, Opportunity name, Close Date, Opportunity Owner etc. A user with Administrator privileges can create or edit a Field Set.
To create a Field Set:
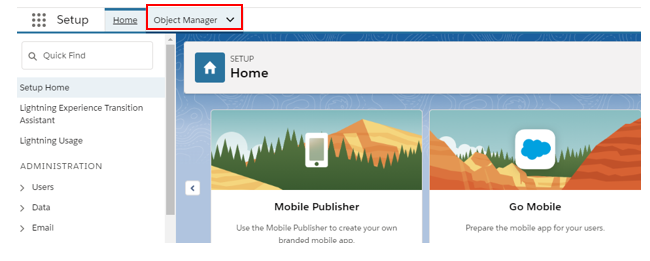
1. Click the Settings icon on the Settings page, and then click Setup. The Setup page opens.
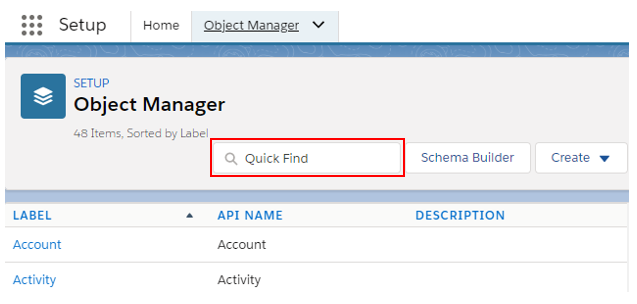
2. Click Object Manager. The Object Manager page opens.
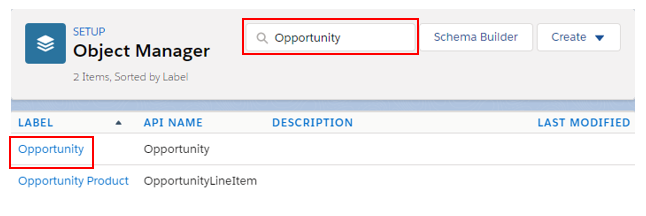
3. Enter the entity name in the Quick Find box to search for the entity that you want to create the Field Set. For example, Opportunity.
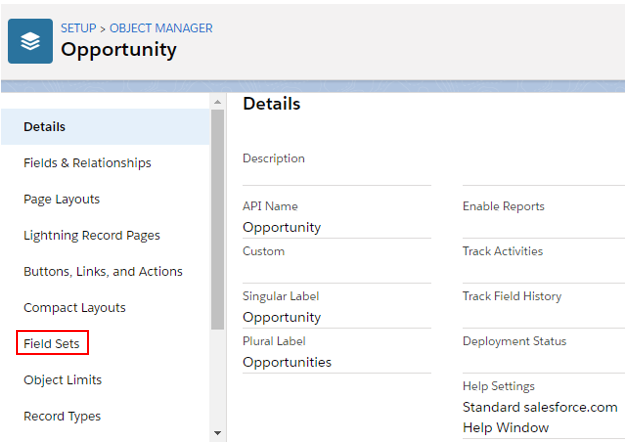
4. Click an Opportunity from the filtered list. The respective Opportunity page opens.
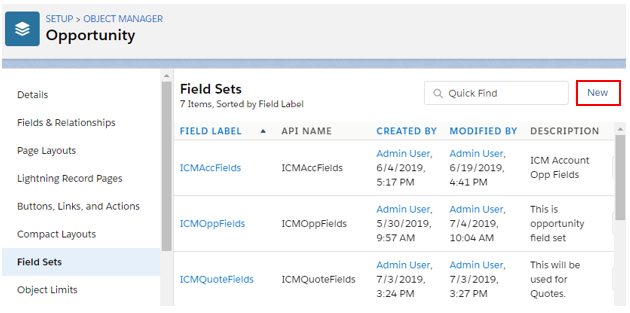
5. Click Field Sets in the left navigation pane. The Field Sets page opens.
6. Click New on the Field Sets tab. The New Field Set page opens.
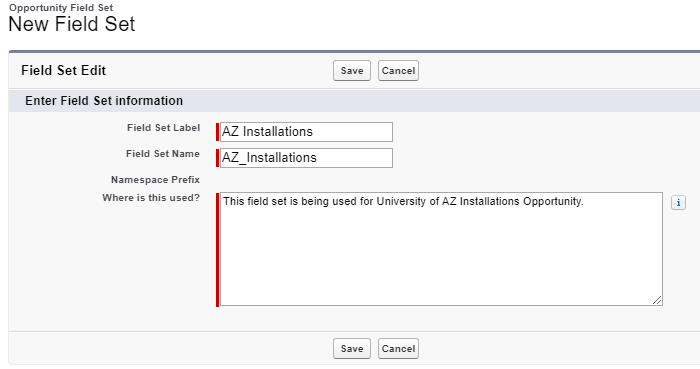
7. Enter the description for the following fields on the New Field Set page.
- Field Set Label: The name for the Field Set.
- Field Set Name: This is auto-populated based on the Field Set label above.
- Where is this used? : A brief description of the Salesforce pages where the Field Set will be used, and for what purpose.
8. Drag and drop the Fields from the Quick Find section to the In the Field Set section to add the Fields to the Field Set.
Viewing the Fields in Salesforce
The Fields added in the Field Set can be viewed when creating a Contract from Salesforce using an Account, Opportunity or Quote.
To view the Fields:
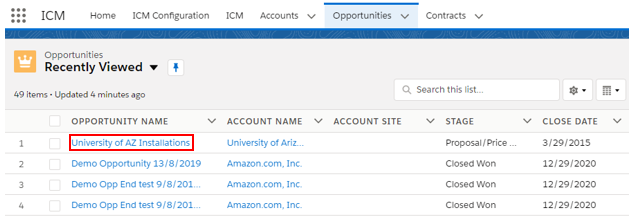
1. Click Opportunities on the Home page in Salesforce. The Opportunities page opens displaying the list of Opportunities.
2. Click the Opportunity from which you want to create a Contract. The Opportunity Details page opens.
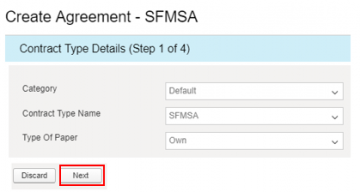
3. Click New Contract in the Icertis Contracts section. The Create page opens displaying the details to be entered for creating the Contract.
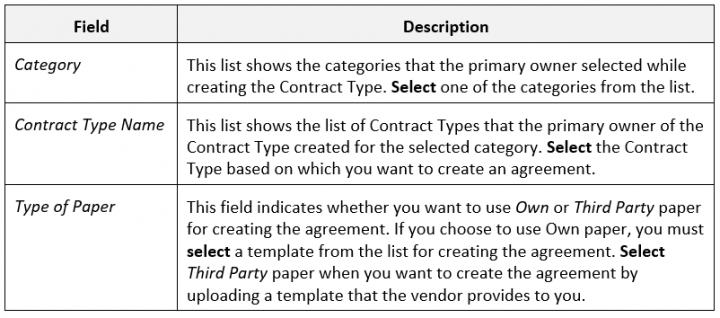
- Category: Select the Category from this dropdown. For example, Default.
- Contract Type Name: Select the Contract Type based on which you want to create the Contract. For example, SFMSA.
- Type of Paper: Select Own if you want to use the system generated Template. Select Third Party if you want to upload and use your own Template.
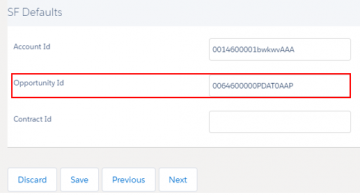
5. Click Next. The Attributes page opens showing the list of Fields added in the Field Set. For example, Opportunity Id, Opportunity Name.
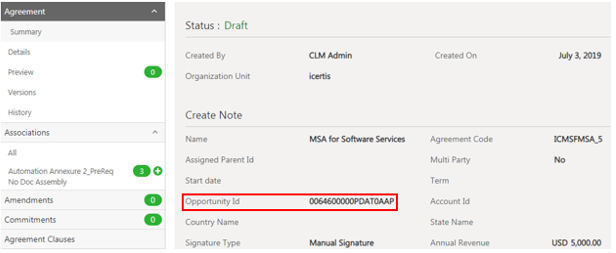
Note: After the Contract is created in Salesforce, it is displayed in ICI along with the Fields added in the Field Set.
Setting up a new Remote Site (whitelisting of ICI instance)
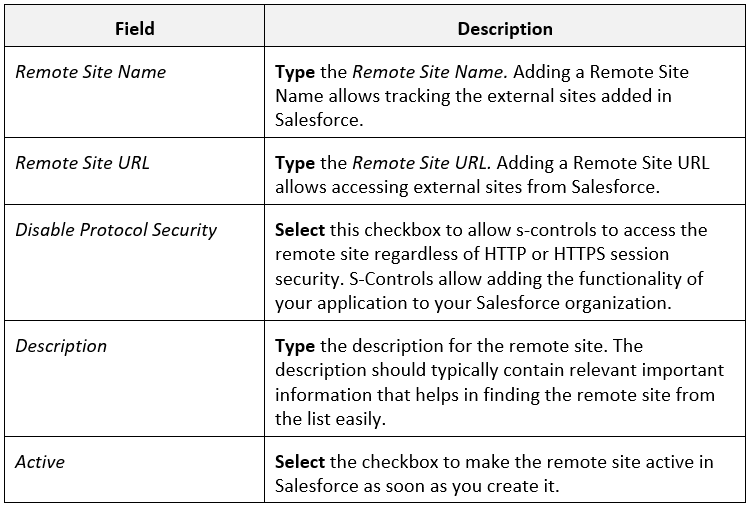
Adding a remote site or whitelisting the ICI domain is an optional step. The Application automatically creates or adds the remote site settings but if the application does not create remote site automatically, follow the steps below to create remote site settings. You can view added remote site by navigating to Setup, Remote Site Settings and search for ICI URL, which you added by following the steps in the earlier section.
To setup a new remote site:
2. Click Security Controls in the Administer menu in the left pane and then click Remote Site Settings. Alternatively, you can type Remote Site Settings in the Quick Find/Search box. As you type the text, the relevant search result opens. Select Remote Site Settings under Security Controls. The All Remote Sites page opens showing the list of Remote sites.
3. Click New Remote Site. The Remote Site Edit page opens.
After you add the above information on the Remote Site Edit page, you can do the following:
- Save the Remote Site you created.
- Click Save and New to save the Remote Site you created and open the Remote Site Edit page to continue creating a new Remote Site.
- Click Cancel to cancel the process of creating the Remote Site.
Configuring Page Layout
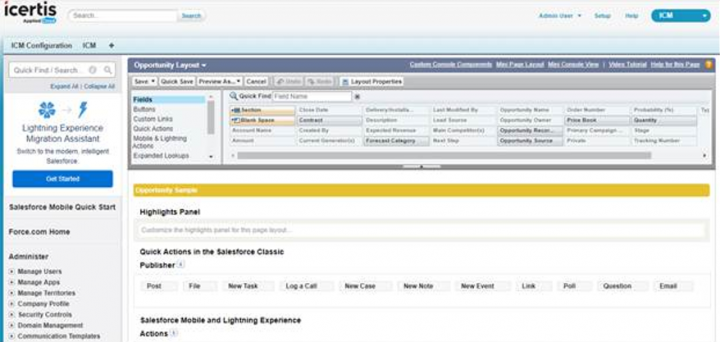
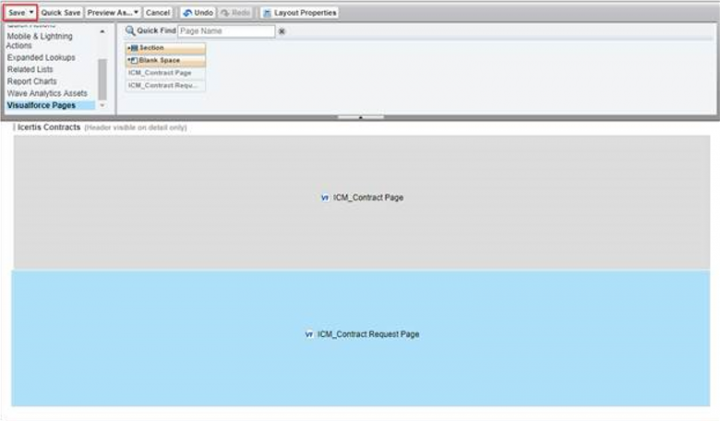
To Enable ICI sections on the added entity (as per the ICI Configuration section) you need to add the ICI custom pages into page layouts. By using the Page Layout Configuration, Admin assigns user access to Contract or Contract Request Related Sections. For example, if you have enabled the ICI Configuration for Opportunity in Salesforce, you need to enable ICI custom pages in Opportunity Layout:
Opportunity (Opportunity Page Layout)
1. You can Edit your existing Page layout (Opportunity Layout) and add two Visualforce pages inside the page layout as follows:
2. On the Opportunity Layout page, click Edit to edit the page layout where you want to add Visualforce pages.
Configuring Data Sync
Once the Contract and Contract Request is created from Salesforce, the data is synced to ICI entities. If the Salesforce entity is edited or changed, user need to update mapped fields in ICI. Ideally, this process is automated. The system should automatically sync the data in the background, without user intervention.
To enable this feature in Salesforce, ICI Service User Authentication Token should be configured and create a process in Process Builder for specific entities. Selected entities will have Data sync functionality. To know more about the Process Builder, visit: https://help.salesforce.com/articleView?id=process_overview.htm&type=0
Data Sync (Salesforce to ICI) Configuration
- Configure Service User Authentication Token
- Configure Entity Process Builder
Service User Authentication Token
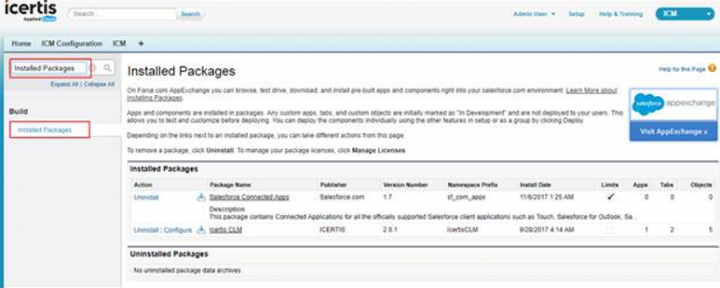
To configure Service User Token in Salesforce, follow these steps:
1. In Salesforce, under Setup, search Installed Packages in the Quick Find box and select Installed Packages.
- Disable DS Interval Flow: Click this checkbox to deactivate the Data Sync Interval Flow. Default value false.
- Sync Time Duration: It denotes the sync time duration (in seconds). Default value 10.
- ICI Service User Auth Token: It is the Service User Authentication Token. Contact DevOps team to get this token. and it is existed in ICI, if you want this token contact ICI Configurator.
4. Click Save.
Configure Entity Process Builder
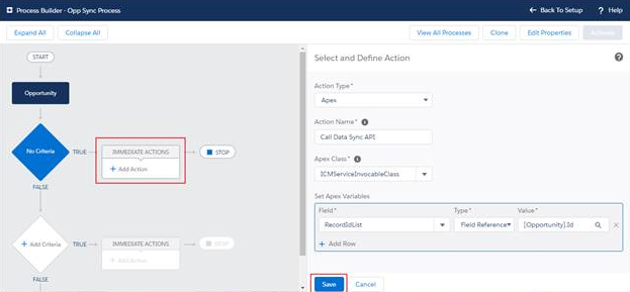
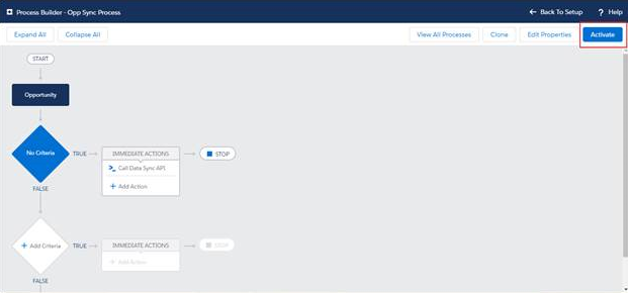
Process Builder configuration is an entity-specific configuration. To configure Process Builder in Salesforce, go through the following steps. In this case, the Opportunity entity will be configured.
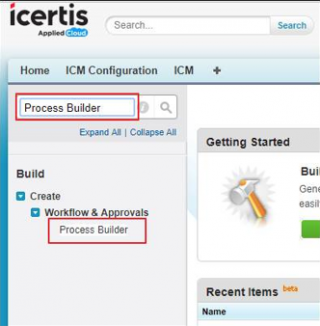
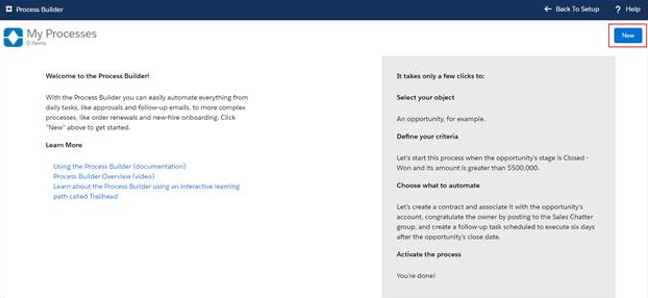
1. In Salesforce, under Setup, search for Process Builder in the Quick Find box and select Process Builder.
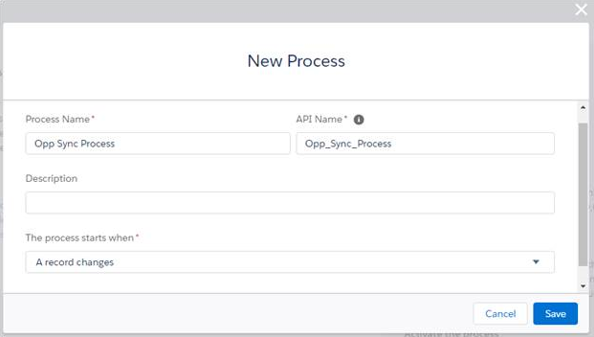
3. On the New Process popup window, enter Process Name and API Name.
4. Set The process starts when field value to A record changes and click Save.
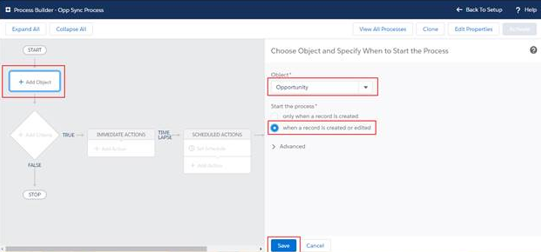
5. Opp Sync process configuration page opens. Click Add Object, Select Object Name and select when record is created or edited and click Save.
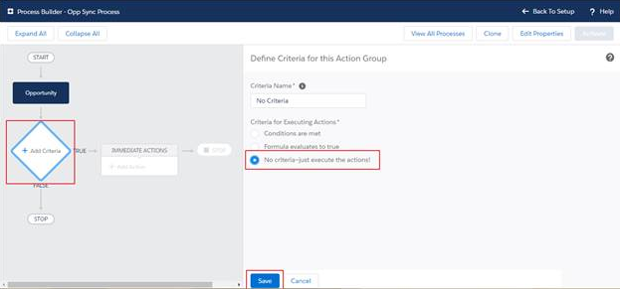
6. Click Add Criteria, enter Criteria Name and select Conditions are met, formula evaluates true or No Criteria and click Save.
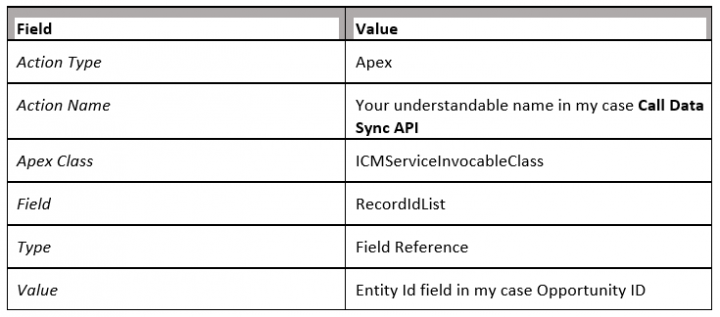
7. To configure Immediate Actions, click Add Action, enter the data as per the table below and click Save.
ICI Side Configuration
Mapping Data between Salesforce and ICI
Use the Configuration tile in the ICI application to specify the mapping details between Salesforce and ICI by creating Masterdata records for mapping entities.
Creating Masterdata records for mapping entities
Creating Client App Cross Reference Mapping
- Log on to the ICI application
- Click Configuration > Masterdata > Create Masterdata on ICI Dashboard. The Create Masterdata page opens.
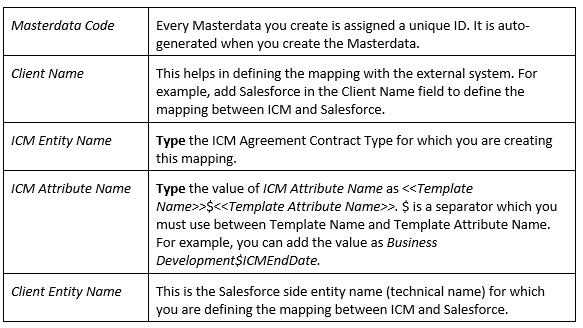
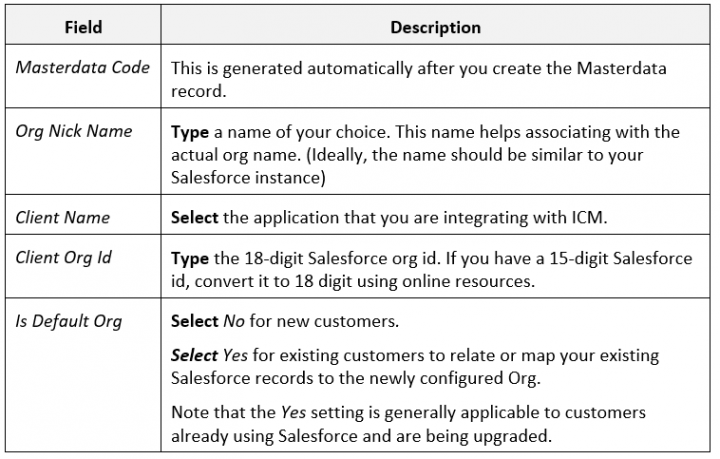
- Provide relevant information in the respective fields:
- Click Next. The Attributes page opens.
- Provide relevant information in the respective fields:
Creating Masterdata for mapping the entities
You can create a Masterdata record for the Contract Type Masterdata that you created earlier. This helps in mapping the entities between Salesforce and ICI. ICI allows mapping this data from any Salesforce entities like opportunity, account, or quote to a Contract Request or agreement by creating the Masterdata record in ICI.
To create a Masterdata record:
- Click Configuration > Masterdata > Create Masterdata on ICI Dashboard. The Create Masterdata page opens.
2. Complete the information in the following sections.
- Masterdata Details
- Attributes
2. Select the Contract Type Masterdata that you created earlier. For the purpose of mapping the data between ICI and Salesforce, select Client App Entity Mapping.
3. Click Next. The Attributes page opens.
5. Click Save to save the Masterdata record and enable mapping between ICI and Salesforce.
Configuration for allowing user to be redirected to ICI Details page in Salesforce
When creating Contracts, Contract Requests and Amendments from Salesforce, Administrators can now configure whether the users should be redirected to the ICI Contract details page or the Salesforce Record page from where creation process was initiated. This can be configured by selecting the Allow Redirect checkbox on the ICI Endpoint Configuration page. By default, the checkbox is unchecked. When checked, the user is redirected to the Salesforce Record page, else to the ICI Contract detail page.
Integrating ICI Tasks with Salesforce
With this release, Salesforce users can now manage ICI tasks from within Salesforce. ICI Administrators can configure ICI task integration with Salesforce so that the tasks created in ICI are pushed to Salesforce. This allows users to view task details with the attributes such as Task Name, Status, Priority, Due Date within Salesforce itself.
Based on configuration, users can receive task notifications in Salesforce for any action taken on agreements, templates, contract requests, clauses or masterdata in ICI.
To integrate ICI Tasks with Salesforce Tasks:
Creating Client App Cross Reference
- Click Configuration > Masterdata > Create Masterdata on the Home page. The Masterdata Details tab is displayed.
- Select the Category from the drop-down. For example, Default.
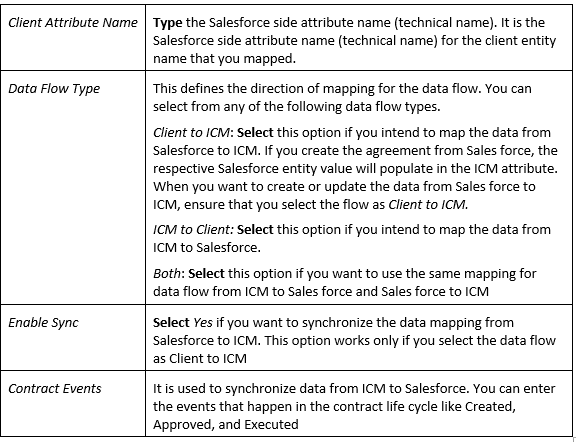
- Select the Masterdata Contract Type. In order to map ICI entities with entities in Salesforce, you must select Client App Cross Reference from the drop-down.
- Click Next. The Attributes tab opens.
- Enter the relevant attribute values. Enter ICI Entity Name and Client Entity Name as Task.
When the user takes any of the workflow action selected in the Task Notification Actions field in ICI, the corresponding task gets generated in Salesforce. For example, if Request Review action is taken on an agreement and a user (Reviewer) is selected, then the same task will appear in the Tasks section of Salesforce.
Viewing ICI Tasks in Salesforce
For example, if the agreement is approved in ICI for which Send for Approval action was taken, then the agreement status in ICI changes to Approved and in Salesforce changes to Completed.Working with Saved Searches
You can use advanced search option to search for existing entities. You can save these searches and pin them as favorites for easy access. Saved searches can be opened for easy access to the search results.
Performing a Search to Save
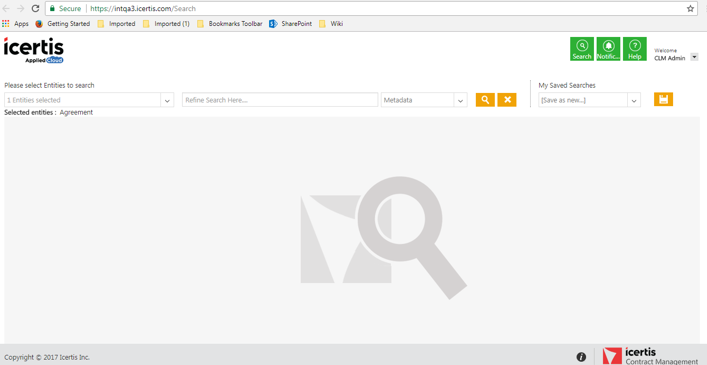
1. Click the Search icon tile on the top right corner on My Dashboard page. The Advanced Search page opens.
2. In the Please select Entities to Search field, enter or select appropriate entities from the list and type the keywords to search in the Enter Search here field.
4. After selecting either of the above options, click the Search icon. The list of search results opens.
5. To narrow down your search further, navigate to Search For field. Click Select Field and select an option from the list provided. The number in the bracket indicates the number of items available containing that search term. You can select multiple options. For example, selecting the field Status displays the number of Agreements that have the Status as Draft, Approved, Terminated, Superseded and so on. If you select the status as Draft (select the checkbox next to Draft), all Agreements in the Draft state are displayed.
6. A list of these Agreements opens as search result in a tabular format. Enhance your search using wild cards as follows:
Saving a Search
If you have the search criteria defined and need same search criteria repeatedly, it is advisable to save the search. For Configuring Saved Search in Salesforce, we need some of the Data Mapping which includes Salesforce Account and Opportunity Id (which is 18 digit of alphanumeric reference value). That means, if you are defining a mapping of Salesforce Opportunity with Contract Request, then in that contract request create a field/attribute which will hold the salesforce Opportunity id, in the same manner you can create for the account id reference. So create these required mapping to start with Saved Search.
For example, after you map data, attribute like Opportunity ID can be mapped in ICI and Salesforce.
To save the search:
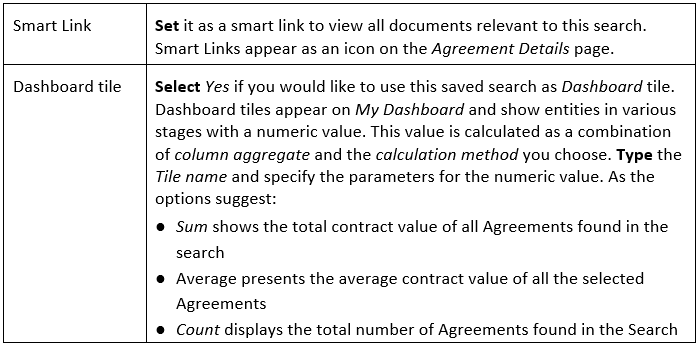
1. Click the Save icon. This opens the Save Search window. Set the parameters for this Saved Search.
2. Type a name for the search. Use a name that you can easily associate with this search.
Click Yes to make it a global search, which means all users of the selected Security Groups and Organization units can view it. Select No to save this search locally, which will not be visible to any other person than the person who is creating it.
3. Specify the Advanced parameters as follows:
You can also save your searches and use the saved search Uniform Resource Identifier (URI) in the ICI Endpoint Settings in Salesforce. You can create saved searches for the following fields that are displayed in Salesforce ICI Config Settings > ICI Endpoint Settings:
Following is an example of creating a saved search for Contract Opportunity Search URI:
1. On the upper right corner of your ICI page, click Search icon. The Search page opens.
2. In the Please select Entities to search list, select the entity that you want to search such as Agreement or Contract Request and then type the entity that you want to display in the search text box. The relevant search results open.
3. On the upper right corner of the search results, click Save icon to save your search. The Save Search window is displayed.
4. In the Save search as box, type the name of the saved search as a URI such as SF_OPP_CR for a contract request, or SF_OPP_Contract for a contract request.
Similarly, you can create saved searches for the remaining entities. The entity and field to filter will be different.
Within Salesforce, ICI will be accessible as per the ICI based User context so if there is anything which you need to control at the user end, please control the user settings from core ICI product.
Updating Saved Search Configuration
With this feature, Salesforce administrator can map any of the entity level attribute for executing the Saved Search, provided it is created in ICI as per the attribute configured in Salesforce.
If you do not configure the attribute in Salesforce, the Saved Search still executes based on the Salesforce record ID.
Configuring Global Search
Previously, there were 2 separate sub-tabs, 1 each for Contracts and Contract Requests, under the ICI tab within Salesforce. The previous Search page when rendered from within an iFrame inside Salesforce, gives the user a perception that they are working outside of Salesforce application.
With the SFDC experience enhancement, the user will have the ability to:
To configure the Global Search tab:
Enabling Single Sign-On
You need to setup single sign-on for Salesforce to work seamlessly with ICI. For more information about setting up single sign-on, refer https://help.salesforce.com/articleView?id=sso_saml.htm&type=0
Multiple Salesforce Instances
With this feature, you can connect multiple Salesforce instances of your organization or organization groups to a single ICI instance. For using this feature, the user needs to create a new `Masterdata record which can be used to define the multiple Salesforce instances. The user needs to add the login details of the configured Salesforce instance machine configuration. Contact Dev Ops team for assistance.
To support Multiple Salesforce instances, you need to add multiple records in Client App Org Reference Contract Type. If the Contract Type is not listed in the system, then it needs to be created.
If the Client Org Reference Contract Type is not already created, create it using the following steps:
To create a Masterdata record:
1. On the My Dashboard page, click Configuration and then click Masterdata. The Masterdata page opens
2. Click Create Masterdata. Provide relevant information in the respective fields and click Next. The Attributes page opens. Provide relevant information in the respective fields:
3. Provide relevant information in the respective fields:
After adding the Org Reference mapping in Client App Entity mapping and Cross-reference mapping, there will be an extra attribute where the user selects the Org for which that particular mapping is synced.
After the Salesforce instance is configured, you can use that Reference Org to define Client App Entity Mapping and Client App Cross Reference mapping.
If Client App Org Reference Contract Type is not installed, you need to create this Contract type, with exactly the same name and attributes. Refer this link for details.
Viewing ICI Dashboard widgets in Salesforce
To view widgets on the Salesforce Home page, the user needs to have Widget Dashboard enabled in ICI Preferences. If the Widget Dashboard is not configured or if there is no data in the widgets, then the No data found message is displayed.
Using Performance Metrices in Salesforce
Click the saved search link on the Performance Metrices widget, for example, Mobile Agreement Search. The Saved Search page is displayed in Salesforce.
Using My Recent Activities in Salesforce
Click a record in the My Recent Activities widget, for example Acme Supplier Contract. The agreement opens in Salesforce.
Viewing Notifications
1. Go to the Salesforce Home page.
Simplified UX Actions in Grid
The Icertis Experience for Salesforce already provides the capability for Salesforce users to perform agreement-related tasks from within Salesforce. ICI is now improving the user experience such that Salesforce users can perform their tasks more seamlessly by taking actions on agreements with fewer clicks than required earlier.
The user will now be able to view a contract record by double-clicking the row, instead of the earlier option of clicking the View hyperlink. They will be able to take Download, Assemble Contract and Send for Approval actions directly from the Action column of the Contract grid on Salesforce entity forms, without opening the agreement record. These actions will be displayed to the user based on the workflow state of the agreement.
- Click on the Opportunities tab. The Opportunity home page opens.
- Click on an Opportunity link.
- Click the Details tab.
- Scroll to the Icertis Contract Intelligence section.
- Click an icon in the Action column to Download, Assemble Contract, Request Review: Internal, Request Review: External, Send for Approval or Upload Document.
- Double-click the row to view the Agreement.
Creating a Contract Request from an Account
You can create a Contract Request if your organization does not provide the privileges to create a contract directly.
To create a Contract Request from an account:
1. Log on to Salesforce using your ICI credentials.
2. Select ICI in the top right corner of your Salesforce page to use ICI through Salesforce.
3. Click Account in the top navigation, and click the Account for which you want to create a Contract Request.
4. On the Account Detail page, scroll down to the Icertis Contracts section.
5. Click New Contract Request. The Create Contract Request page opens in Salesforce. The options available on this page indicate the type of contract for which you are creating this request.6. Select the Category and Request Typebased on the request you are creating and click Next.
7.Specify the details of the request on the various sections of this page
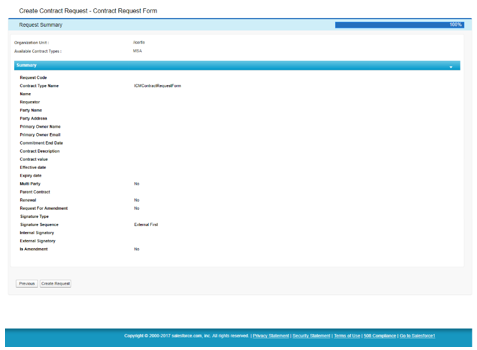
8. Click Next. The Request Summary page opens. You can also click Save if you want to save the changes and create the request later.
9. Click Create Request. The Accounts page opens showing the Contract Request you created in Draft state.
10. Click ICI in the top navigation bar and then click Contract Requests. The Contract Request page opens and it shows the list of available requests.
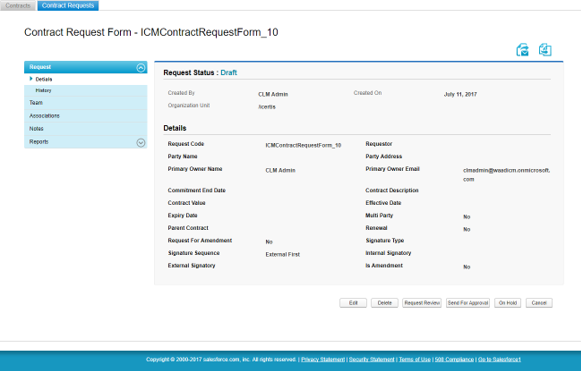
11.Click View next to the Request you created. The Request Details page opens.
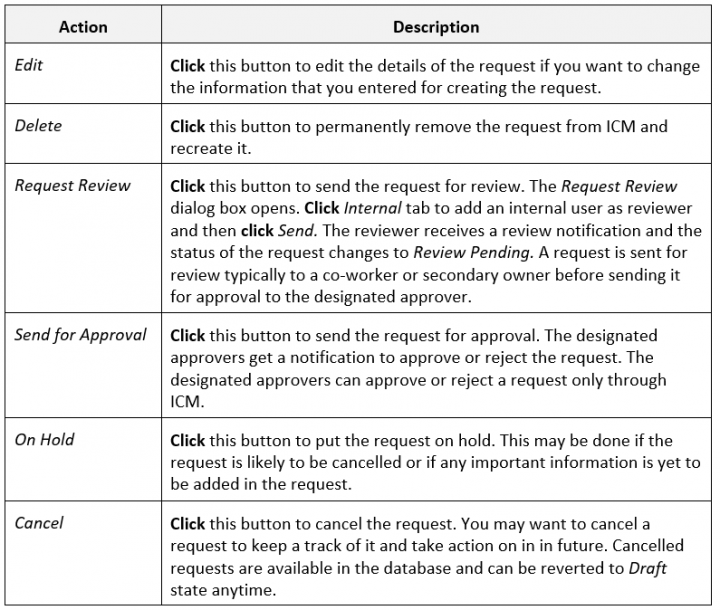
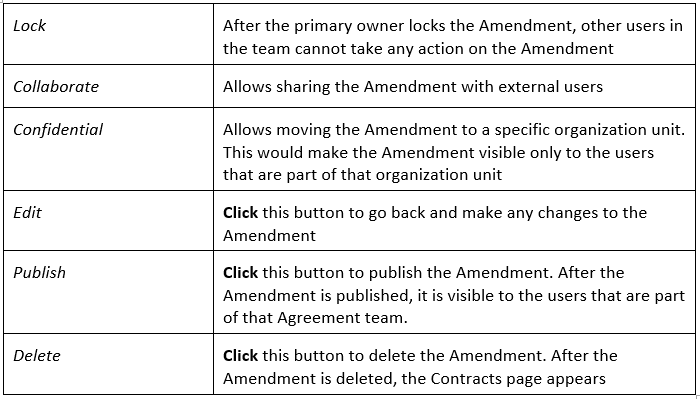
12. Use the buttons in the table below to perform a desired action:
Creating a Contract from an Account
The process of creating a contract from ICI in Salesforce is dependent on the workflow that is implemented in your organization.
To create a Contract from an Account:
1. Log on to Salesforce using your ICI credentials.
2. Select ICI in the top right corner of your Salesforce page to use ICI through Salesforce
3. Click Accounts in the top navigation, and click the Account for which you want to create a contract.
4. On the Account Detail page, scroll down to the Icertis Contracts section.
5. ClickNew Contract. This opens the Create Contract page in Salesforce.
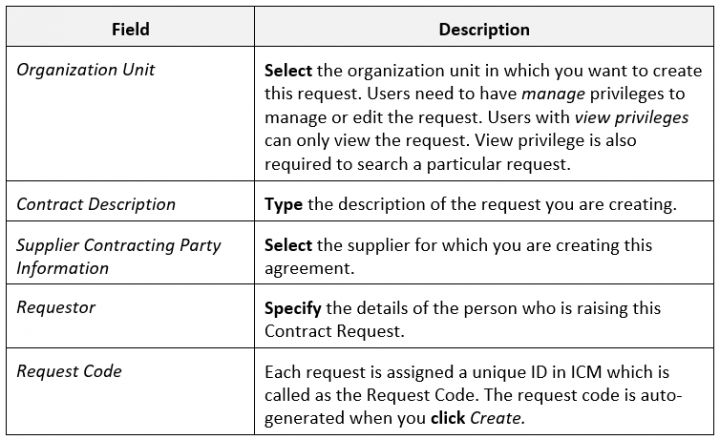
5. Complete the details in the sections below and click Next. Contract Type Details. Enter the following information in this section:
Attributes

This section contains the attributes that the primary owner selected while creating the Contract Type for the agreement, which you are creating. You can also save the details at any stage and return to this page to complete the agreement later. The attributes displayed in this section vary based on the Contract Type you select.
Below is the description of some of the attributes.
  Template

  This section shows the templates that you created for the selected Contract Type. This section opens only if you select Own type of paper to create the agreement. Select the template from the list.
Verify
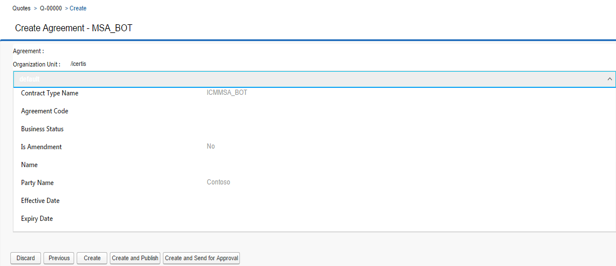
This is the final step in the agreement creation process. The details in this section open based on the attributes and sections you used to create this agreement.
You can perform the following actions on this page:
- Click Previous to go back and make any changes to the agreement. Click Next to return to this section after making the required changes.
- Click Create to create the Agreement. After the agreement is created it is not visible to all users until it is published by its primary owner.
- Click Create and Publish to create and publish the agreement. After the agreement is published it becomes visible to other users and a Draft watermark opens on the agreement in all states until it is approved by the designated approver.
- Click Create and Send for Approval to create and send the agreement for approval. The agreement is sent to the approvers that are set by rule for the Contract Type selected for this agreement.
- Click Discard to stop the agreement creation process. A discarded agreement is no longer available in ICI. You can discard the agreement from any section while creating the agreement. After the Agreement is created in Salesforce, it is available in ICI in the Draft state. You can send the agreement for approval through Salesforce, however, the approve and reject actions on the agreement can only happen through ICI.
Adding Amendment to a Contract
After the Contract is executed, it cannot be edited. However, the primary owner can add an amendment to the Contract that is in the Executed state only.
Amendments are added to a Contract due to following reasons:
- Payment terms of the Contract have changed.
- Scope of work in the Contract has changed.
- The terms and conditions of the Contract have changed due to the introduction of the new regulation.
To add an amendment to a Contract:
1. Log on to Salesforce with your credentials.
2. Click ICI in the top navigation. The ICI page showing the list of Contracts and Contract Requests opens.
3. Select and open the Contract that is in the Executed state. The Contract page opens.
4. Click Add Amendment on the Contract page. The Add Amendment page opens.
5. Make the required changes to the Contract on the Initial Attributes tab and click Next.
6. Click Create. The Amendment moves to the Draft state and opens the Amendment Details page.
7. You can perform the following actions on the Amendment Details page:'
After adding an Amendment, it goes through the similar flow of Agreement from Draft till execution.
Creating a Contract Request from an Opportunity
You can create a Contract Request if your organization does not provide the privileges to create a contract from ICI in Salesforce. To create a Contract Request from an Opportunity:
1. Log onto Salesforce using your ICI credentials.
2. Select ICI in the top right corner of your Salesforce page to use ICI through Salesforce.
3. Click Opportunities in the top navigation, and click the Opportunity for which you want to create a Contract Request.
4. On the Opportunity Detail page, scroll down to the Icertis Contracts section.
5. Click New Contract Request. The Create Contract Request page opens in Salesforce. The options available on this page indicate the type of contract for which you are creating this request.
6. The rest of the process to create a Contract Request from an Opportunity is same as Creating a Contract Request from an Account.
Creating a Contract from an Opportunity
The process of creating a contract from ICI in Salesforce is dependent on the workflow implemented in your organization.
To create a Contract from an Opportunity:
1. Log on to Salesforce using your ICI credentials.
2. Select ICI in the top right corner of your Salesforce page to use ICI through Salesforce.
3. Click Opportunities in the top navigation, and click the Opportunity for which you want to create a contract.
4. On the Opportunity Detail page, scroll down to the Icertis Contracts section.
5. ClickNew Contract. The Create Contract page opens in Salesforce. The options available on this page indicate the type of contract for which you are creating this request.
The rest of the process to create a Contract Request from an Opportunity is same as Creating a Contract from an Account.
Creating a Contract Request from a Quote
You can create a Contract Request if your organization does not provide the privileges to create a contract from ICI in Salesforce.
To create a Contract Request from a Quote:
1. Log on to Salesforce using your ICI credentials.
2. Select ICI in the top right corner of your Salesforce page to use ICI through Salesforce.
3. ClickQuotes in the top navigation, and click the Quotes for which you want to create a Contract Request.
4. On the Quote Detail page, scroll down to the Icertis Contracts section.
5. ClickNew Contract Request. The Create Contract Request page opens in Salesforce. The options available on this page indicate the type of contract for which you are creating this request.
6. The rest of the process to create a Contract Request from a Quote is same as Creating a Contract Request from an Account.
Creating a Contract from a Quote
The process of creating a contract from ICI in Salesforce is dependent on the workflow implemented in your organization.
To create a Contract from a Quote:
1. Log on to Salesforce using your ICI credentials.
2. Select ICI in the top right corner of your Salesforce page to use ICI through Salesforce.
3. ClickQuotes in the top navigation, and clickthe Quotesfor which you want to create a contract.
4. On the Quote Detail page, scroll down to the Icertis Contracts section.
5. ClickNew Contract. The Create Contract page opens in Salesforce. The options available on this page indicate the type of contract for which you are creating this request.
The rest of the process to create a Contract from a quote is the same as Creating a Contract from an Account.
Configuring Auto-creation of Contracts and Tasks in Salesforce
With this release, the contract creation process has been automated based on Opportunity or Quote status, thus increasing the productivity of Salesforce users.
Salesforce Administrators can now:
- Configure the Opportunity or Quote status which can automatically trigger the contract creation.
- Configure the contract type which should be used to create the contract based on data from an Opportunity or Quote.
- Define the Type of Paper to be used as Own or Third Party.
- Configure automated contract creation or automated task creation to initiate the contract creation process:
- For auto creation of contracts, the ICI Experience for Salesforce will determine the dependencies for the contract. For example, if the opportunity is for an extension, the existing master agreement for the account will be identified and an appropriate contract type such as an order form will be selected and associated with it.
- For auto creation of tasks, Salesforce users will be able to create a contract using a single button click that will assemble all necessary documents for the type of contract to be created.
Configuring Logs
1. Go to the ICI Configuration tab in Salesforce. The ICI Endpoint Configuration page opens.
2. Enter Duration for logs in days, for example 60.0 days. The number of days for which the logs will be preserved can be defined here.
3. Set the Logging Level:
a. "Log Error: Only errors will be logged.
b. "Log Info: Only information will be logged, for example request and response.
c. "Log Always: Errors and information will be logged.


