| (18 intermediate revisions by 4 users not shown) | |||
| Line 1: | Line 1: | ||
| − | |||
| − | + | = Approving/Rejecting a Template = | |
| − | <div> | + | <div><div style="float:left;width:68%;"> |
| − | + | Every Template has a team consisting of a primary owner, a secondary owner, an approver, and so on. The approver can approve or to reject a Template. | |
| − | + | To approve a Template: | |
| − | + | 1. C'''lick''' the ''Tasks ''tile on the Dashboard. The ''User Tasks'' page opens displaying a list of tasks pending for your action. | |
| − | ''' | + | 2. '''Click '''the ''Template ''name link that you want to approve. The ''Template Details ''page opens. |
| + | <div class="image-green-border">[[File:Approve or reject a template 7.8.PNG|560px|RTENOTITLE]]</div> | ||
| + | 3. '''Click'''''<i>Download</i>'''to download the Template and Edit to edit the Template. | ||
| − | + | 4. '''Click '''''Approve''. The ''Add Note'' window opens. | |
| − | + | 5. '''Enter '''your comments if any. | |
| − | + | ||
| − | + | 6. '''Click '''''Add''. The status of the Template changes to ''Approved.'' | |
| − | < | + | <div class="image-green-border">[[File:Approve or reject a template Add Note window 7.8.PNG|720px|RTENOTITLE]]</div> <div class="image-green-border"> </div> </div> <div class="image-green-border" style="clear: both;">To reject a Template:</div> <div class="image-green-border" style="clear: both;">1. '''Click '''''Reject. ''The ''Add Note ''window opens. </div> <div class="image-green-border" style="clear: both;">2. Enter your comments if any.</div> <div class="image-green-border" style="clear: both;">3. '''Select '''a reason for rejecting the template from the ''Reason Code'' drop-down (This is a mandatory step).</div> <div class="image-green-border" style="clear: both;">4. '''Click '''''Add''. The status of the Template changes to ''Draft'' and the Template has to go through the approval process again.</div> <div class="image-green-border"> </div> <div class="image-green-border">[[File:Approve or reject a template reason code 7.8.PNG|720px|RTENOTITLE]]</div> |
| − | + | | |
| − | + | | |
| − | + | ||
| − | + | ||
| − | + | | |
| − | + | ||
| − | + | ||
| − | + | ||
| − | + | '''Related Topics: '''[[Template_Management|Template Management]] | [[Create_a_Template_in_ICM_Word_Add-in|Create a Template in ICI Word Add-in]] | [[Rule|Rule]] | [[Agreement_Management|Agreement Management]] | [[Clause_Management|Clause Management]] | [[Bilingual_Templates|Bilingual_Templates]] | |
| − | + | </div> | |
| − | + | ||
| − | + | ||
| − | + | ||
| − | [[ | + | |
| − | + | ||
| − | + | ||
| − | + | ||
| − | + | ||
| − | + | ||
| − | + | ||
Latest revision as of 13:07, 11 September 2020
Approving/Rejecting a Template
Every Template has a team consisting of a primary owner, a secondary owner, an approver, and so on. The approver can approve or to reject a Template.
To approve a Template:
1. Click the Tasks tile on the Dashboard. The User Tasks page opens displaying a list of tasks pending for your action.
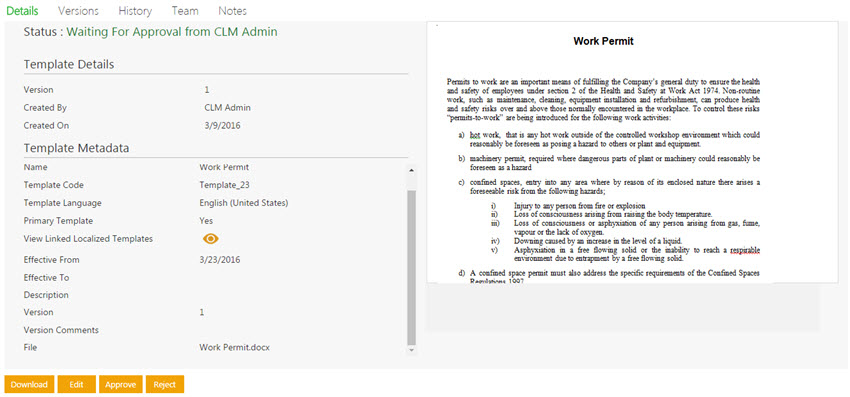
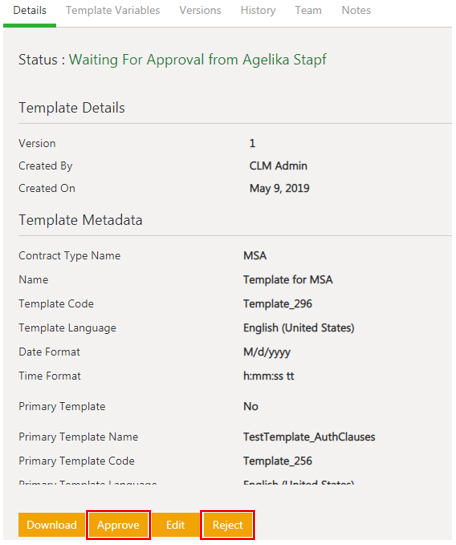
2. Click the Template name link that you want to approve. The Template Details page opens.
3. ClickDownload'to download the Template and Edit to edit the Template.
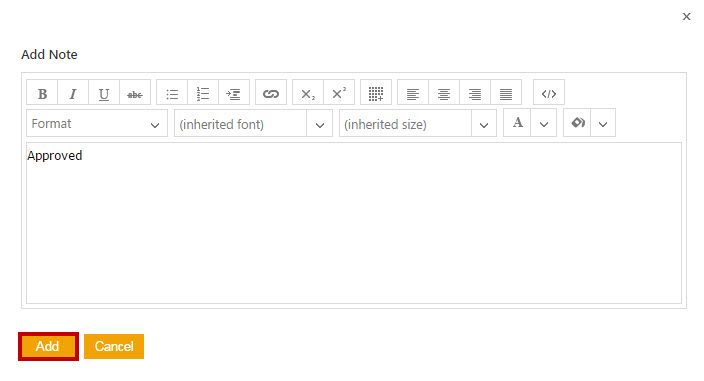
4. Click Approve. The Add Note window opens.
5. Enter your comments if any.
6. Click Add. The status of the Template changes to Approved.
Related Topics: Template Management | Create a Template in ICI Word Add-in | Rule | Agreement Management | Clause Management | Bilingual_Templates


