| (50 intermediate revisions by 5 users not shown) | |||
| Line 1: | Line 1: | ||
| + | |||
| + | | ||
= Template Management = | = Template Management = | ||
| Line 7: | Line 9: | ||
*Create and upload a Template through Create Template page. | *Create and upload a Template through Create Template page. | ||
*Create Template through Word Add-ins. | *Create Template through Word Add-ins. | ||
| − | + | <div class="image-green-border">[[File:7.12 Template Management.PNG|720px|7.12 Template Management]]</div> | |
== Templates == | == Templates == | ||
Navigate to the ''Templates'' page by clicking on the ''Template Management'' tile. This page displays all the Templates that you are associated with- you may have created a Template or are a part of the team working on it. This page displays the most current version of a Template regardless of its status. | Navigate to the ''Templates'' page by clicking on the ''Template Management'' tile. This page displays all the Templates that you are associated with- you may have created a Template or are a part of the team working on it. This page displays the most current version of a Template regardless of its status. | ||
| − | <div class="image-green-border">[[File:Templates page 1.png| | + | <div class="image-green-border">[[File:Templates page 1 gr action.png|720px|Templates page 1 gr action.png]]</div> |
From this page you can: | From this page you can: | ||
*search templates in a variety of ways. You can search templates from this page or use the Advanced Search. | *search templates in a variety of ways. You can search templates from this page or use the Advanced Search. | ||
| − | *view details of a template by clicking on the ''View Record | + | *view details of a template by clicking on the ''View Record ''icon. The details are displayed in the Template ''Details ''page. |
| − | *view the template in word document format by clicking on the ''View Document | + | *view the template in word document format by clicking on the ''View Document ''icon. |
== Template Access Management == | == Template Access Management == | ||
| Line 28: | Line 30: | ||
Additionally, you can add members to the Template team through Event Rules, thus saving time of manually adding users to the Team. The support for the Observer role is extended to the Template Library as well through Role Action Mapping. | Additionally, you can add members to the Template team through Event Rules, thus saving time of manually adding users to the Team. The support for the Observer role is extended to the Template Library as well through Role Action Mapping. | ||
| − | <div class="note-box">Note: This feature is applicable to | + | <div class="note-box">Note: This feature is applicable to ICI Web UI and the .JS version of Word Add-in. </div> |
== Searching Templates == | == Searching Templates == | ||
| Line 42: | Line 44: | ||
*Saved Searches | *Saved Searches | ||
*Searches pinned as Favorites | *Searches pinned as Favorites | ||
| − | <div class="image-green-border"> | + | <div class="image-green-border"> </div> |
=== Category Search === | === Category Search === | ||
Follow these steps to search for templates using the Category drop down: | Follow these steps to search for templates using the Category drop down: | ||
| − | 1. '''Click''' the ''Template''' '''Management'' tile on | + | 1. '''Click''' the ''Template''' '''Management'' tile on Home page. This opens the Templates Page displaying all the existing Templates. |
2. Use the ''Categories'' drop down to narrow down the templates and find the exact one you are looking for. For example, search by status, created by or the status changed, date, among many other options. This displays all the options that match the selected category. | 2. Use the ''Categories'' drop down to narrow down the templates and find the exact one you are looking for. For example, search by status, created by or the status changed, date, among many other options. This displays all the options that match the selected category. | ||
| Line 65: | Line 67: | ||
Follow these steps to use your saved searches: | Follow these steps to use your saved searches: | ||
| − | 1. '''Click''' the ''Template Management ''tile on | + | 1. '''Click''' the ''Template Management ''tile on Home page. This opens the Templates page displaying all the existing templates. |
2. '''Click''' the ''Saved Searches'' drop down and select the desired saved search. Refer to Using Advanced Search for details on saving a search. This displays the templates matching the criteria defined in the saved search. | 2. '''Click''' the ''Saved Searches'' drop down and select the desired saved search. Refer to Using Advanced Search for details on saving a search. This displays the templates matching the criteria defined in the saved search. | ||
| Line 75: | Line 77: | ||
Follow these steps to search using a favorite search: | Follow these steps to search using a favorite search: | ||
| − | 1. '''Click''' the ''Template Management'' tile on | + | 1. '''Click''' the ''Template Management'' tile on the Home page. This opens the Templates page displaying all the existing templates. |
2. '''Click''' one of the searches defined as favorite, just below the feature tiles. Refer to Using Advanced Search for details on adding searches as favorites. This displays the templates matching the criteria defined in favorite search. | 2. '''Click''' one of the searches defined as favorite, just below the feature tiles. Refer to Using Advanced Search for details on adding searches as favorites. This displays the templates matching the criteria defined in favorite search. | ||
| − | + | | |
| − | + | === Searching Templates based on the extended template metadata === | |
| − | + | Users have flexibility to use attributes of masterdata as extensions to any template, agreement or associated document while creating or editing the instance. | |
| − | 2. '''Click '''the ''Create Template'' tile. The ''Create Template'' page. Type the required details in the following sections | + | Users can search and retrieve required templates using these extended attributes as search parameters through ''Template'' index page search, ''Advanced Search'', ''Global Search'' and ''Saved Search''. Extended attributes are available in search facets drop-downs along with regular attributes. This considerably improves the efficiency of search facility. |
| + | |||
| + | To search templates on ''Template'' Index page: | ||
| + | |||
| + | #'''Click''' ''Template Management > Templates'' on the ''Home ''page. The ''Templates'' page opens with all existing templates. | ||
| + | #'''Type''' extended attribute in the ''Refine Search here…'' search box. The list of relevant ''Templates'' opens. | ||
| + | #'''Select''' extended attribute as search parameter in the ''Categories'' drop-down. All matching ''Templates ''are displayed. For example, select extended attribute ''MSL Country Name'' and attribute value containing ''Canada ''in ''Categories''. All ''Templates ''with ''MSL Country Name'' containing ''Canada'' are displayed on template index page. | ||
| + | #'''Filter''' your search further by selecting and typing specific extended attribute value in the ''Custom keyword'' field and then '''click '''''Apply''. For example, select ''Custom keyword as India'' with operator ''Exactly''. Only ''Templates'' containing ''MSL Country Names as Canada'' and ''India'' are displayed. | ||
| + | <div class="image-green-border">[[File:7.12 Template Management Search 1 gr action.png|720px|7.12 Template Management Search 1 gr action.png]]</div> | ||
| + | Users can search templates by extended attributes using the ''Advanced Search'' and ''Saved Search''.<br/> On ''Advanced Search'' page, '''select '''''Template ''in ''Entity ''drop-down and '''type '''extended attribute in the ''Refine Search here…'' search box. Refer to ''Using Advanced Search'' for details on using search filters, operators, and options.<br/> Users can save the search criteria with extended attributes as search parameters and use as ''global or local Saved Search''. Refer to ''Saved Searches'' for details on saving a search. Refer to ''Using Advanced Search'' for details on retrieving a ''Saved Search''. | ||
| + | <div class="image-green-border">[[File:7.12 Template Management Search 2 gr action.png|720px|7.12 Template Management Search 2 gr action.png]]</div> | ||
| + | == Creating a Template in ICI == | ||
| + | |||
| + | To create a Template in ICI: | ||
| + | |||
| + | 1. '''Click''' the ''Template Management'' tile on the Home page The Templates page opens. | ||
| + | |||
| + | 2. '''Click '''the ''Create Template'' tile. The ''Create Template'' page. Type the required details in the following sections: | ||
*Details | *Details | ||
| Line 92: | Line 111: | ||
*Verify | *Verify | ||
| − | '''Note''': (*) denotes a mandatory field. | + | '''Note''': (*) denotes a mandatory field. ICI displays an error message if a mandatory field is left empty. |
| + | |||
| + | | ||
| − | + | === Details === | |
| − | The ''Details'' section consists of some mandatory fields, while rest of the sections are optional. | + | The ''Details'' section consists of some mandatory fields, while rest of the sections are optional. The extended attributes are available under ''Template Additional Attributes'' if configured in your instance. |
Enter the basic details in the following fields: | Enter the basic details in the following fields: | ||
| Line 105: | Line 126: | ||
*Template Language: '''Select''' the language for the Template. | *Template Language: '''Select''' the language for the Template. | ||
*Primary Template: '''Select''' ''Yes'' if this is the Primary Template. '''Select''' ''No'' if it is not a Primary Template. This feature helps define the primary Template in a specific language, and you can define secondary Templates in other languages if needed. | *Primary Template: '''Select''' ''Yes'' if this is the Primary Template. '''Select''' ''No'' if it is not a Primary Template. This feature helps define the primary Template in a specific language, and you can define secondary Templates in other languages if needed. | ||
| − | *Linked Primary Template: This section | + | *Linked Primary Template: This section opens when you '''select''' ''No'' for Primary Template option. '''Select''' a ''Primary Template'' from the drop-down menu to link this Template to it. |
*Effective From: '''Type''' or '''select''' the ''Effective From'' date using the calendar window. | *Effective From: '''Type''' or '''select''' the ''Effective From'' date using the calendar window. | ||
*Effective To: '''Type''' or '''select''' the ''Effective To'' date using the calendar window. | *Effective To: '''Type''' or '''select''' the ''Effective To'' date using the calendar window. | ||
| Line 114: | Line 135: | ||
'''Click''' ''Next'' to go to the ''Template Variables'' tab. | '''Click''' ''Next'' to go to the ''Template Variables'' tab. | ||
| − | + | | |
| + | |||
| + | === Template Variable === | ||
Template Variables are the attributes that are part of the template. | Template Variables are the attributes that are part of the template. | ||
| − | On this tab you can | + | On this tab, you can either select the attributes from the Available Attribute section or Add new Attributes. The user can also set a Template Variable as conditional to the value of the Contract Type Attributes by setting ''Is Conditional'' flag ''On''. For further information on Is Conditional flag, please refer the section Adding conditional dependency on Template Variables. |
To select the attributes from the already existing attributes: | To select the attributes from the already existing attributes: | ||
| Line 126: | Line 149: | ||
2. The attribute is added to the ''Selected Attribute'' section. | 2. The attribute is added to the ''Selected Attribute'' section. | ||
| − | 3. '''Click '''the attribute that is added to the''Selected Attributes'' section. The details of that attribute are populated in the ''Edit Attribute'' section. | + | 3. '''Click '''the attribute that is added to the ''Selected Attributes'' section. The details of that attribute are populated in the ''Edit Attribute'' section. |
4. '''Edit '''the details of the attribute if required. For example, Display Name, Help Message etc. | 4. '''Edit '''the details of the attribute if required. For example, Display Name, Help Message etc. | ||
| − | <div class="image-green-border">[[File:Template Management Template Variables 7.8.PNG|RTENOTITLE]]</div> | + | <div class="image-green-border">[[File:Template Management Template Variables 7.8.PNG|720px|RTENOTITLE]]</div> |
5. '''Define '''the attribute with the help of flags such as ''Is Default, Is Editable'' etc. | 5. '''Define '''the attribute with the help of flags such as ''Is Default, Is Editable'' etc. | ||
6. '''Click '''''Save. ''The Template Variable is added in the Template that you are creating. | 6. '''Click '''''Save. ''The Template Variable is added in the Template that you are creating. | ||
| − | <div class="image-green-border">[[File:Template Management attribute flags 7.8.PNG|RTENOTITLE]]</div> <div class="image-green-border"> </div> <div class="image-green-border">7. '''Click '''''Next''. The ''Team ''tab opens.</div> | + | <div class="image-green-border">[[File:Template Management attribute flags 7.8.PNG|560px|RTENOTITLE]]</div> <div class="image-green-border"> </div> <div class="image-green-border">7. '''Click '''''Next''. The ''Team ''tab opens.</div> |
| − | + | === Team === | |
This section helps you in selecting different roles for your Template. You can add 3 roles which are: | This section helps you in selecting different roles for your Template. You can add 3 roles which are: | ||
| Line 144: | Line 167: | ||
To add different roles: | To add different roles: | ||
| − | *'''Click''' the ''Add'' icon. This opens the ''Add User'' | + | *'''Click''' the ''Add'' icon. This opens the ''Add User'' window. |
*Select the role from the drop down, and the users for that specific role. | *Select the role from the drop down, and the users for that specific role. | ||
*Selecting a role of an approver, displays a ''step number'' field. This step number is mandatory and controls the sequence of approvals if there are multiple approvers. The approval flows sequentially according to the step number. | *Selecting a role of an approver, displays a ''step number'' field. This step number is mandatory and controls the sequence of approvals if there are multiple approvers. The approval flows sequentially according to the step number. | ||
*'''Click''' ''Add'''''. '''The users just added will be seen under Team. | *'''Click''' ''Add'''''. '''The users just added will be seen under Team. | ||
| − | + | === Verify === | |
Here you can review and verify all the information for the Template before clicking on ''Create''. If you wish to edit anything, click ''Previous''. Once created the template gets into Draft state. | Here you can review and verify all the information for the Template before clicking on ''Create''. If you wish to edit anything, click ''Previous''. Once created the template gets into Draft state. | ||
| Line 157: | Line 180: | ||
The Approver gets a notification about the Template, who can then review and approve it. Once approved, the Template is ready for use. | The Approver gets a notification about the Template, who can then review and approve it. Once approved, the Template is ready for use. | ||
| − | == Editing a Template in | + | |
| + | |||
| + | == Adding conditional dependency on Template Variables == | ||
| + | |||
| + | The functionality of the conditional dependency on Template Variables for Agreement Attributes can be achieved by any user with Manage access on Template Management tile by enabling the ''Is Conditional'' flag for each Template Variable when creating or editing a Template. When Is Conditional is On, a user is able to set a dependent condition on the Template Variable by using ''Depends on Contract Type Attribute'' flag ''On ''and its related ''Depends On Attribute'' drop-down and ''Depends On Value'' field. | ||
| + | |||
| + | The following conditions decide the dependency between the Template Variable and Contract Type Attribute: | ||
| + | |||
| + | *When ''Depends on Contract Type Attribute'' is ''On'' then it displays the Contract Type Attribute in the ''Depends On Attribute'' drop-down list. | ||
| + | *When ''Depends on Contract Type Attribute'' is ''Off'' then it displays the Template Variable in the ''Depends On Attribute'' drop-down list. | ||
| + | |||
| + | For each selected Attribute from ''Depends On Attribute'' drop-down list, the user can then enter the ''Depends On Value'' that will drive the dependency. | ||
| + | |||
| + | | ||
| + | |||
| + | === Adding the dependency between Contract Type Attributes and Template Variables === | ||
| + | |||
| + | To add dependency between Contract Type Attributes and Template Variables:<br/> <br/> 1. '''Click '''the ''Template Management'' tile on the Home page. The ''Template Management'' page opens. <br/> 2. '''Click '''the ''Create Template'' tile. The ''Create Template'' page opens.<br/> 3. '''Select''' the Contract Type from the ''Contract Type Name'' drop-down list. For example, ''Teaming Agreement''. <br/> 4. '''Enter '''a Template name in the ''Name'' field. For example, ''Purchase''.<br/> 5. The ''Template Code'' is auto-generated. <br/> 6. '''Select''' the ''Template Language'' from the drop-down list. For example, ''English (United States)''.<br/> 7. '''Click''' ''Yes'' to make it ''Primary Template''.<br/> 8. '''Enter''' all the details on ''Create Template Details'' page. <br/> 9. '''Click''' ''Next''. The ''Template Variables'' section opens. <br/> 10. '''Select '''the desired Variables from the ''Available Attribute'' section. For example, ''A Boolean'', ''A Choice'', ''A Currency'', ''A Date'', ''A Percentage'', ''A Number'', and ''A MultiSelectChoice''. <br/> 11. '''Click '''the arrow to move Variable to the ''Selected Attribute'' section.<br/> 12. '''Click '''the Variable that is added to the ''Selected Attribute'' section. The details of the Variable are populated in the ''Edit Attribute'' section. For example, ''A Choice''. <br/> | ||
| + | <div class="image-green-border">[[File:12-Tem.PNG|720px|12-Tem.PNG]]</div> | ||
| + | 13. '''Toggle '''the ''Is Conditional'' flag ''On'' for the selected Variable to add the conditional dependence between the Template Variable and Contract Type Attribute. <br/> 14. '''Toggle''' the ''Depends on Contract Type Attribute'' flag On to view the Contract Type Attributes in the ''Depends On Attribute'' drop-down list. <br/> 15. '''Select '''the Attribute from the ''Depends On Attribute'' drop-down list where you want to add Contract Type Attribute level dependency for a Template Variable. For example, ''Choice1''. | ||
| + | <div class="note-box">'''Note''': For each selected Attribute, the user can enter the Depends On Value which will drive the dependency.</div> | ||
| + | 16. '''Enter '''the dependent value in the ''Depends On Value'' field or '''toggle '''the ''Depends On Value'' flag ''On'' based on the selected Attribute ''Data Type''. For example, ''Choice 1, Choice 2, ''and ''Choice 3''. This means the ''A Choice'' Template Variable depends on Contract Type Attribute ''Choice1'' with the following dependent values: ''Choice 1'', ''Choice 2'', and ''Choice 3''.<br/> 17. '''Click '''''Save''. The ''Attribute updated successfully'' message is displayed. | ||
| + | <div class="note-box">'''Note''': If you want to change the Contract Type after saving a Template Variable by going back to the Details tab of Create Template page, a message is displayed indicating that Template Variables are conditional on the selected Contract Type and changing the Contract types will clear Template related date.</div> <div class="image-green-border"> </div> <div class="image-green-border">[[File:17-Tem.PNG|RTENOTITLE]]</div> | ||
| + | <br/> 18. '''Click '''''Next''. The Team tab opens. <br/> 19. '''Click '''''Create''. The Template gets created. <br/> 20. '''Click '''''Send For Approval'' to initiate the approval process. | ||
| + | <div class="note-box">'''Note''': While editing a Contract Type, if you remove a Parent Attribute on which a Template Variable is dependent, a message is displayed indicating that if the attribute is removed it may impact rules, templates, template variables, and clauses etc. </div> | ||
| + | When defining the Template Variables, a user needs to consider the following rendering conditions: | ||
| + | <div class="image-green-border">[[File:20-Tem.PNG|720px|20-Tem.PNG]]<br/> </div> | ||
| + | === <br/> The dependency of Template Variables on an Agreement === | ||
| + | |||
| + | To view the dependency of Template Variables on an Agreement:<br/> 1. '''Click '''the ''Agreement Management'' tile on the Home page. The ''Agreement Management'' page opens.<br/> 2. '''Click''' the ''Create Agreement'' tile. The ''Create Agreement'' page opens.<br/> 3. '''Select''' the Contract Type ''Category ''from the drop-down list. For example, ''Default''.<br/> 4. '''Select''' the Contract Type from the ''Contract Type Name'' drop-down list. For example, ''Teaming Agreement''.<br/> 5. '''Select''' the ''Type Of Paper ''from the drop-down list. For example, ''Own''.<br/> 6. '''Click''' ''Next''. The ''Create Agreement – Teaming Agreement'' Attribute page opens, which displays all Contract Type Attributes.<br/> 7. '''Select '''the ''Choice 1'' option from the drop-down list as defined in the ''Purchase''. | ||
| + | <div class="image-green-border"><br/> [[File:7-Tem-dep.PNG|720px|7-Tem-dep.PNG]]</div> <div class="image-green-border"> </div> <div class="note-box">'''Note''': When an inherited Attribute is used, the visibility of Template Variable, depends on the inherited values of the Agreement Attribute.</div> | ||
| + | 8. '''Enter''' all the details on ''Page1'' of ''Create Agreement – Teaming Agreement'' page. <br/> 9. '''Click '''''Next''. The ''Select Template'' page opens.<br/> 10. '''Select '''the ''Template'' from the ''Select Template'' page. For example, ''Purchase''. | ||
| + | <div class="image-green-border">[[File:10-Tem-dep.PNG|720px|10-Tem-dep.PNG]]<br/> <br/> 11. '''Click '''''Next''. The ''Template Variables'' section opens displaying the values of the Attribute ''A Choice'' defined while creating the Template ''Purchase''.<br/> </div> <div class="note-box">'''Note''': The Template Variables are displayed based on the Contract Type Attribute you selected and when the condition is satisfied. The variables in Purchase are visible, and this is enabled by Is Conditional flag, which determines the Template Variable dependency at the Agreement level Attributes. </div> | ||
| + | | ||
| + | <div class="image-green-border">[[File:11-Tem-dep.PNG|720px|11-Tem-dep.PNG]]</div> | ||
| + | == Editing a Template in ICI == | ||
| − | You can edit a template at any state, to make changes to effective date, team, and so on. However, when you edit an approved Template, you have to get it approved again. | + | You can edit a template at any state, to make changes to the effective date, team, and so on. However, when you edit an approved Template, you have to get it approved again. |
To edit the existing Template: | To edit the existing Template: | ||
| − | 1. On the ''Template Management'' page''', Click '''the ''View Record'' | + | 1. On the ''Template Management'' page''', Click '''the ''View Record'' icon next to the Template. The ''Template Details'' page opens providing the summary of the template. |
| − | <div class="image-green-border">[[File:Template management editing a template 7.8.PNG|RTENOTITLE]]</div> | + | <div class="image-green-border">[[File:Template management editing a template 7.8.PNG|720px|RTENOTITLE]]</div> |
| − | 2. '''Click '''''Edit. ''The ''Edit Template ''wizard with the ''Details ''tab | + | 2. '''Click '''''Edit. ''The ''Edit Template ''wizard with the ''Details ''tab opens. '''Edit '''the desired fields. You can edit the existing description or version comments information. You can upload a new template file or replace an existing template as well. |
| − | 3. '''Click''' ''Next''. The ''Team'' tab | + | 3. '''Click''' ''Next''. The ''Team'' tab opens. Add or delete the team members, if required. |
| − | 4. '''Click '''''Next. ''The ''Verify ''tab | + | 4. '''Click '''''Next. ''The ''Verify ''tab opens. Verify the changes made to the Template. |
5. '''Click '''''Save ''to save the changes made to the Template. | 5. '''Click '''''Save ''to save the changes made to the Template. | ||
| Line 177: | Line 235: | ||
*'''Click''' ''Previous'' to go back and make changes to the information that you have entered. | *'''Click''' ''Previous'' to go back and make changes to the information that you have entered. | ||
*'''Click''' ''Update'' to update the Template. | *'''Click''' ''Update'' to update the Template. | ||
| − | <div class="image-green-border">[[File:Template Management Update Template 7.8.PNG|RTENOTITLE]]</div> | + | <div class="image-green-border">[[File:Template Management Update Template 7.8.PNG|450px|RTENOTITLE]]</div> |
| − | The details of the updated Templates are displayed. Preview of the Template | + | The details of the updated Templates are displayed. Preview of the Template opens on the right side of the page. |
| − | Choose from the following options that | + | Choose from the following options that open below the contract summary and details: |
*Download Document: '''Click''' to save the Template to your local computer. | *Download Document: '''Click''' to save the Template to your local computer. | ||
*Edit: '''Click''' to make changes to the Template. | *Edit: '''Click''' to make changes to the Template. | ||
| − | *Send For Approval: '''Click''' to send the Template to approver. | + | *Send For Approval: '''Click''' to send the Template to the approver. |
'''Note''': The options that are displayed vary according to the type of Template and privileges assigned to your user id. | '''Note''': The options that are displayed vary according to the type of Template and privileges assigned to your user id. | ||
| Line 192: | Line 250: | ||
You can authorize users to tag an Attribute inside another choice or multi-select Attribute, so that the same Attribute tag can be used within the Agreement or Template. | You can authorize users to tag an Attribute inside another choice or multi-select Attribute, so that the same Attribute tag can be used within the Agreement or Template. | ||
| − | <br/> In | + | <br/> In ICI, you can: |
*Tag an Attribute inside the values of choice and multi-select type of Attributes | *Tag an Attribute inside the values of choice and multi-select type of Attributes | ||
| Line 205: | Line 263: | ||
<u>'''Remember:'''</u> | <u>'''Remember:'''</u> | ||
| − | *In | + | *In ICI, the internal name ($abc) for the choice Attribute will be displayed and this value will not get resolved. |
*When this field is used in the Agreement/ Template as a tagged Attribute, the tagging is resolved during document assembly and the mapped variable is displayed in the document. The document will always display the actual value of the referred Attribute. | *When this field is used in the Agreement/ Template as a tagged Attribute, the tagging is resolved during document assembly and the mapped variable is displayed in the document. The document will always display the actual value of the referred Attribute. | ||
*If the referred Attribute has no available value and it is selected from the choice list, then no value will be displayed in the document during document assembly. | *If the referred Attribute has no available value and it is selected from the choice list, then no value will be displayed in the document during document assembly. | ||
*If the referred Attribute is removed from the Contract Type, a notification message is displayed stating that the Attribute may be tagged somewhere else. | *If the referred Attribute is removed from the Contract Type, a notification message is displayed stating that the Attribute may be tagged somewhere else. | ||
| − | == | + | == Sending a Template for Approval == |
After you create a Template, it is in ''Draft'' state. The Template must be approved to be able to use it to create an agreement. | After you create a Template, it is in ''Draft'' state. The Template must be approved to be able to use it to create an agreement. | ||
| Line 219: | Line 277: | ||
2. '''Scroll down''' the page and click the ''Send for Approval'' button to send the Template for approval. The status of the Template changes to ''Waiting for Approval''. | 2. '''Scroll down''' the page and click the ''Send for Approval'' button to send the Template for approval. The status of the Template changes to ''Waiting for Approval''. | ||
| − | <div class="note-box">'''Note''': | + | <div class="image-green-border">[[File:Template Management send for approval 7.8.PNG|450px|RTENOTITLE]]</div> <div class="image-green-border"> </div> <div class="note-box">'''Note''': Ensure that you have added an approver from the team tab before sending the Template for approval. You can add one of multiple approvers.</div> |
| + | | ||
| + | |||
| + | | ||
| + | |||
| | ||
| − | ''' | + | '''Related Topics: '''[[Create_a_Template_in_ICM_Word_Add-in|Create a Template in ICI Word Add-in]] | [[Approve/Reject_a_Template|Approve/Reject a Template]] | [[Rule|Rule]] | [[Agreement_Management|Agreement Management]] | [[Clause_Management|Clause Management]] | [[Bilingual_Templates|Bilingual Templates]] | [[ICI_Add-ins|ICI Add-ins ]]| [[Release_Notes]] | |
Latest revision as of 11:21, 16 September 2020
Contents
- 1 Template Management
Template Management
Template is a framework that represents a standard layout for an Agreement. The Template Management tile enables you to manage all aspects of creating and editing Templates from a single page. From here, you can:
- View and manage all your Templates on Templates page.
- Create and upload a Template through Create Template page.
- Create Template through Word Add-ins.
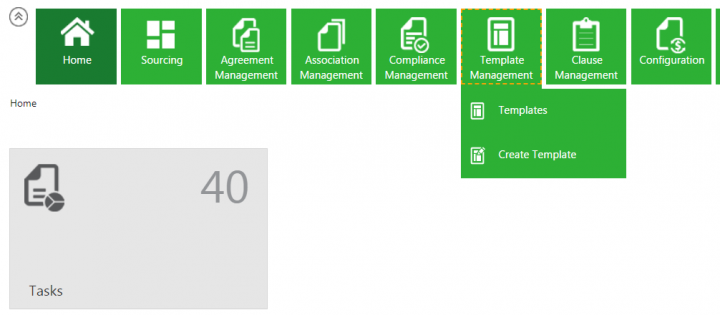
Templates
Navigate to the Templates page by clicking on the Template Management tile. This page displays all the Templates that you are associated with- you may have created a Template or are a part of the team working on it. This page displays the most current version of a Template regardless of its status.
From this page you can:
- search templates in a variety of ways. You can search templates from this page or use the Advanced Search.
- view details of a template by clicking on the View Record icon. The details are displayed in the Template Details page.
- view the template in word document format by clicking on the View Document icon.
Template Access Management
Template Access Management is now enhanced and is available through a technical configuration. When turned On, the access control for Templates is driven by the Organization Unit (OU) or the Team.
OU can be configured in 2 ways:
- Template access is dependent on the highest level of the OU and since everyone belongs to the OU so they have access by default, if they are part of the team.
- Through a technical configuration, you now have the ability to change the access based on the OU of the user who is creating the Template. For example, if user John Doe is part of the Sales OU and the team, then Templates created by John Doe can be accessed by all users in the Sales OU and those belonging to the Template team.
Additionally, you can add members to the Template team through Event Rules, thus saving time of manually adding users to the Team. The support for the Observer role is extended to the Template Library as well through Role Action Mapping.
Searching Templates
You can search for templates either from advanced search page or from Templates Page to:
- view its details
- check the status
- edit it
You can find a specific template you are looking for from the Templates page using one of these 3 methods:
- Category Search
- Saved Searches
- Searches pinned as Favorites
Category Search
Follow these steps to search for templates using the Category drop down:
1. Click the Template Management tile on Home page. This opens the Templates Page displaying all the existing Templates.
2. Use the Categories drop down to narrow down the templates and find the exact one you are looking for. For example, search by status, created by or the status changed, date, among many other options. This displays all the options that match the selected category.
3. Select the desired criteria by marking the boxes next to that option. Only the templates matching this specified criteria are displayed.
4. Narrow your search further by typing specific keywords in the Custom Keyword field and then click Apply. You can use Boolean operators such as AND/OR or search by wildcards to filter the results. For example:
- APP*: displays agreements only in the APPROVED and WAITING FOR APPROVAL states
- ?PP* : displays agreements only in the APPROVED and WAITING FOR APPROVAL states
- APP*: OR DRA* - displays agreements only in the APPROVED, WAITING FOR APPROVAL and DRAFT states
5. You can also type free text in the Refine Search Here... search box. A list of relevant agreements are displayed.
Saved Searches
Follow these steps to use your saved searches:
1. Click the Template Management tile on Home page. This opens the Templates page displaying all the existing templates.
2. Click the Saved Searches drop down and select the desired saved search. Refer to Using Advanced Search for details on saving a search. This displays the templates matching the criteria defined in the saved search.
Refer to Saved Searches for details on saving a search.
Searches pinned as Favorites
Follow these steps to search using a favorite search:
1. Click the Template Management tile on the Home page. This opens the Templates page displaying all the existing templates.
2. Click one of the searches defined as favorite, just below the feature tiles. Refer to Using Advanced Search for details on adding searches as favorites. This displays the templates matching the criteria defined in favorite search.
Searching Templates based on the extended template metadata
Users have flexibility to use attributes of masterdata as extensions to any template, agreement or associated document while creating or editing the instance.
Users can search and retrieve required templates using these extended attributes as search parameters through Template index page search, Advanced Search, Global Search and Saved Search. Extended attributes are available in search facets drop-downs along with regular attributes. This considerably improves the efficiency of search facility.
To search templates on Template Index page:
- Click Template Management > Templates on the Home page. The Templates page opens with all existing templates.
- Type extended attribute in the Refine Search here… search box. The list of relevant Templates opens.
- Select extended attribute as search parameter in the Categories drop-down. All matching Templates are displayed. For example, select extended attribute MSL Country Name and attribute value containing Canada in Categories. All Templates with MSL Country Name containing Canada are displayed on template index page.
- Filter your search further by selecting and typing specific extended attribute value in the Custom keyword field and then click Apply. For example, select Custom keyword as India with operator Exactly. Only Templates containing MSL Country Names as Canada and India are displayed.
Users can search templates by extended attributes using the Advanced Search and Saved Search.
On Advanced Search page, select Template in Entity drop-down and type extended attribute in the Refine Search here… search box. Refer to Using Advanced Search for details on using search filters, operators, and options.
Users can save the search criteria with extended attributes as search parameters and use as global or local Saved Search. Refer to Saved Searches for details on saving a search. Refer to Using Advanced Search for details on retrieving a Saved Search.
Creating a Template in ICI
To create a Template in ICI:
1. Click the Template Management tile on the Home page The Templates page opens.
2. Click the Create Template tile. The Create Template page. Type the required details in the following sections:
- Details
- Template Variable
- Team
- Verify
Note: (*) denotes a mandatory field. ICI displays an error message if a mandatory field is left empty.
Details
The Details section consists of some mandatory fields, while rest of the sections are optional. The extended attributes are available under Template Additional Attributes if configured in your instance.
Enter the basic details in the following fields:
- Contract Type Name: Select a Contract type from the drop-down list for which you want to create a Template.
- Name: Type an appropriate name for the Template.
- Template Code: The Template Code is auto-generated.
- Template Language: Select the language for the Template.
- Primary Template: Select Yes if this is the Primary Template. Select No if it is not a Primary Template. This feature helps define the primary Template in a specific language, and you can define secondary Templates in other languages if needed.
- Linked Primary Template: This section opens when you select No for Primary Template option. Select a Primary Template from the drop-down menu to link this Template to it.
- Effective From: Type or select the Effective From date using the calendar window.
- Effective To: Type or select the Effective To date using the calendar window.
- Description: Type a description for the Template.
- Version Comments: Type relevant comments for this version, such as what changes were made and why, who they were approved by or any other comments you may wish to add specific to this version.
- File: Click Select File to upload a Template from your local folder.
Click Next to go to the Template Variables tab.
Template Variable
Template Variables are the attributes that are part of the template.
On this tab, you can either select the attributes from the Available Attribute section or Add new Attributes. The user can also set a Template Variable as conditional to the value of the Contract Type Attributes by setting Is Conditional flag On. For further information on Is Conditional flag, please refer the section Adding conditional dependency on Template Variables.
To select the attributes from the already existing attributes:
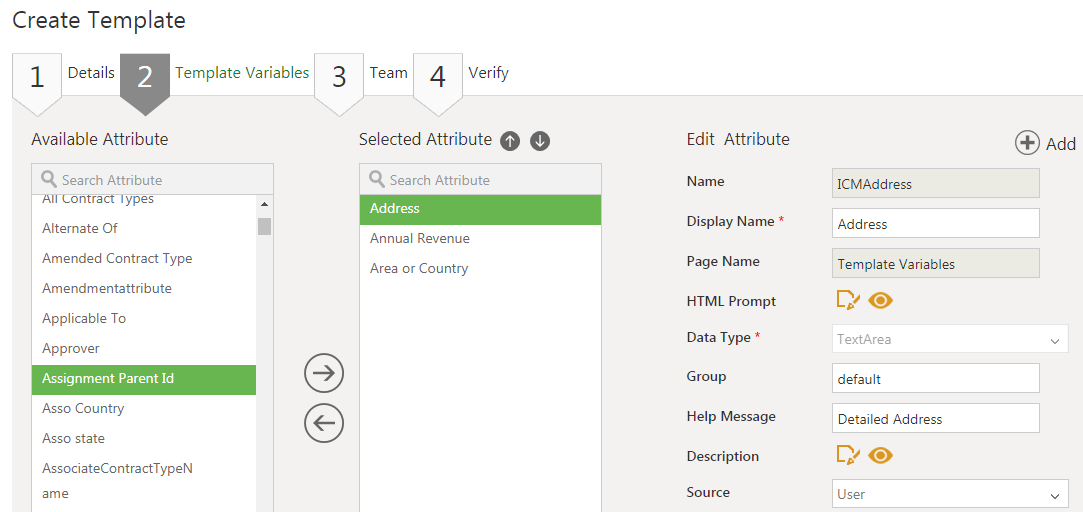
1. Select a desired attribute from the Available Attributes section then click the icon.
2. The attribute is added to the Selected Attribute section.
3. Click the attribute that is added to the Selected Attributes section. The details of that attribute are populated in the Edit Attribute section.
4. Edit the details of the attribute if required. For example, Display Name, Help Message etc.
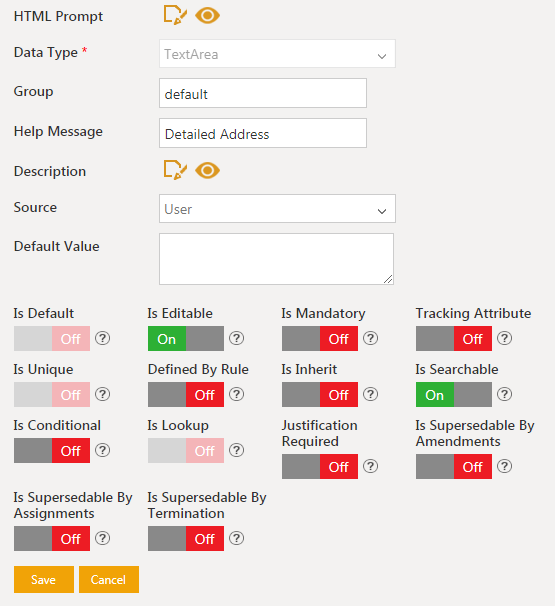
5. Define the attribute with the help of flags such as Is Default, Is Editable etc.
6. Click Save. The Template Variable is added in the Template that you are creating.
Team
This section helps you in selecting different roles for your Template. You can add 3 roles which are:
- Approver : approves or rejects the Template after reviewing it.
- Secondary Owner : works with the Primary owner or alone if the Primary owner is not available. Both these roles have the same privileges.
- Contributor : can review the Template, but can’t make any changes or take action. Any comments related to it are sent to the Primary owner or Secondary owner.
To add different roles:
- Click the Add icon. This opens the Add User window.
- Select the role from the drop down, and the users for that specific role.
- Selecting a role of an approver, displays a step number field. This step number is mandatory and controls the sequence of approvals if there are multiple approvers. The approval flows sequentially according to the step number.
- Click Add. The users just added will be seen under Team.
Verify
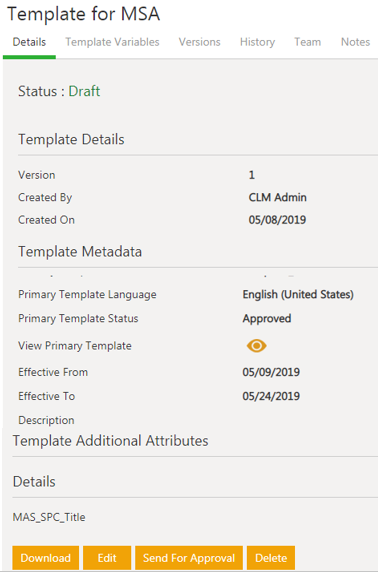
Here you can review and verify all the information for the Template before clicking on Create. If you wish to edit anything, click Previous. Once created the template gets into Draft state.
After that click on Send for Approval, to send it further for approvals, or click Edit if you want to update any field.
The Approver gets a notification about the Template, who can then review and approve it. Once approved, the Template is ready for use.
Adding conditional dependency on Template Variables
The functionality of the conditional dependency on Template Variables for Agreement Attributes can be achieved by any user with Manage access on Template Management tile by enabling the Is Conditional flag for each Template Variable when creating or editing a Template. When Is Conditional is On, a user is able to set a dependent condition on the Template Variable by using Depends on Contract Type Attribute flag On and its related Depends On Attribute drop-down and Depends On Value field.
The following conditions decide the dependency between the Template Variable and Contract Type Attribute:
- When Depends on Contract Type Attribute is On then it displays the Contract Type Attribute in the Depends On Attribute drop-down list.
- When Depends on Contract Type Attribute is Off then it displays the Template Variable in the Depends On Attribute drop-down list.
For each selected Attribute from Depends On Attribute drop-down list, the user can then enter the Depends On Value that will drive the dependency.
Adding the dependency between Contract Type Attributes and Template Variables
To add dependency between Contract Type Attributes and Template Variables:
1. Click the Template Management tile on the Home page. The Template Management page opens.
2. Click the Create Template tile. The Create Template page opens.
3. Select the Contract Type from the Contract Type Name drop-down list. For example, Teaming Agreement.
4. Enter a Template name in the Name field. For example, Purchase.
5. The Template Code is auto-generated.
6. Select the Template Language from the drop-down list. For example, English (United States).
7. Click Yes to make it Primary Template.
8. Enter all the details on Create Template Details page.
9. Click Next. The Template Variables section opens.
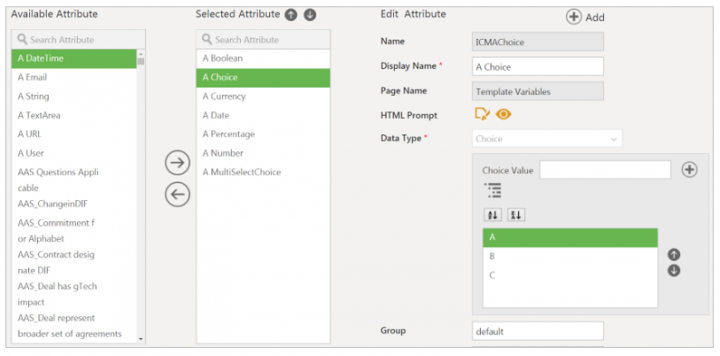
10. Select the desired Variables from the Available Attribute section. For example, A Boolean, A Choice, A Currency, A Date, A Percentage, A Number, and A MultiSelectChoice.
11. Click the arrow to move Variable to the Selected Attribute section.
12. Click the Variable that is added to the Selected Attribute section. The details of the Variable are populated in the Edit Attribute section. For example, A Choice.
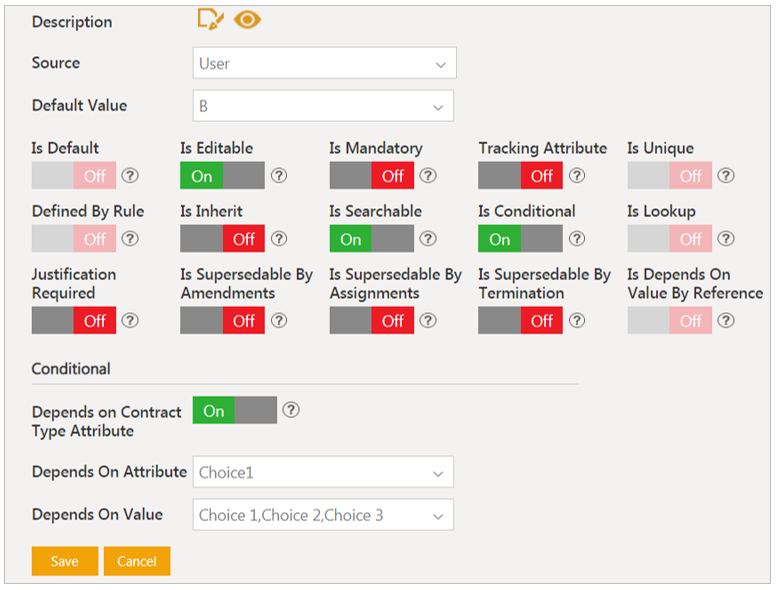
13. Toggle the Is Conditional flag On for the selected Variable to add the conditional dependence between the Template Variable and Contract Type Attribute.
14. Toggle the Depends on Contract Type Attribute flag On to view the Contract Type Attributes in the Depends On Attribute drop-down list.
15. Select the Attribute from the Depends On Attribute drop-down list where you want to add Contract Type Attribute level dependency for a Template Variable. For example, Choice1.
16. Enter the dependent value in the Depends On Value field or toggle the Depends On Value flag On based on the selected Attribute Data Type. For example, Choice 1, Choice 2, and Choice 3. This means the A Choice Template Variable depends on Contract Type Attribute Choice1 with the following dependent values: Choice 1, Choice 2, and Choice 3.
17. Click Save. The Attribute updated successfully message is displayed.
18. Click Next. The Team tab opens.
19. Click Create. The Template gets created.
20. Click Send For Approval to initiate the approval process.
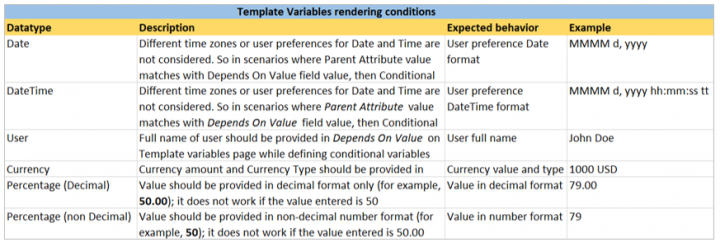
When defining the Template Variables, a user needs to consider the following rendering conditions:
The dependency of Template Variables on an Agreement
To view the dependency of Template Variables on an Agreement:
1. Click the Agreement Management tile on the Home page. The Agreement Management page opens.
2. Click the Create Agreement tile. The Create Agreement page opens.
3. Select the Contract Type Category from the drop-down list. For example, Default.
4. Select the Contract Type from the Contract Type Name drop-down list. For example, Teaming Agreement.
5. Select the Type Of Paper from the drop-down list. For example, Own.
6. Click Next. The Create Agreement – Teaming Agreement Attribute page opens, which displays all Contract Type Attributes.
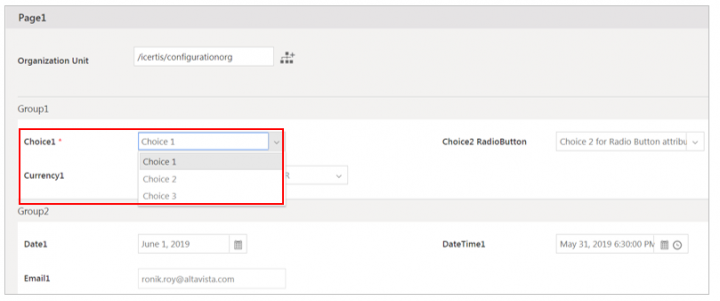
7. Select the Choice 1 option from the drop-down list as defined in the Purchase.
8. Enter all the details on Page1 of Create Agreement – Teaming Agreement page.
9. Click Next. The Select Template page opens.
10. Select the Template from the Select Template page. For example, Purchase.
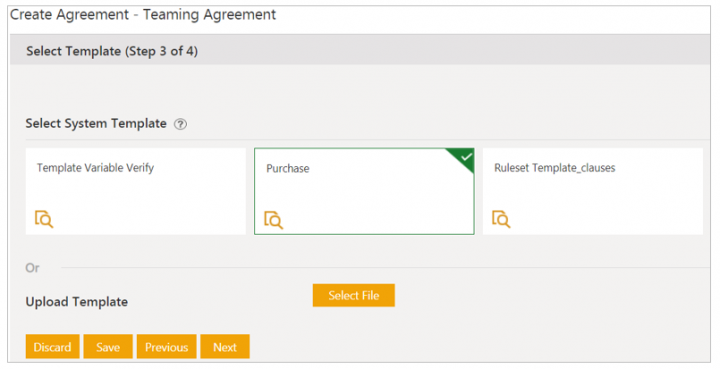
11. Click Next. The Template Variables section opens displaying the values of the Attribute A Choice defined while creating the Template Purchase.
Editing a Template in ICI
You can edit a template at any state, to make changes to the effective date, team, and so on. However, when you edit an approved Template, you have to get it approved again.
To edit the existing Template:
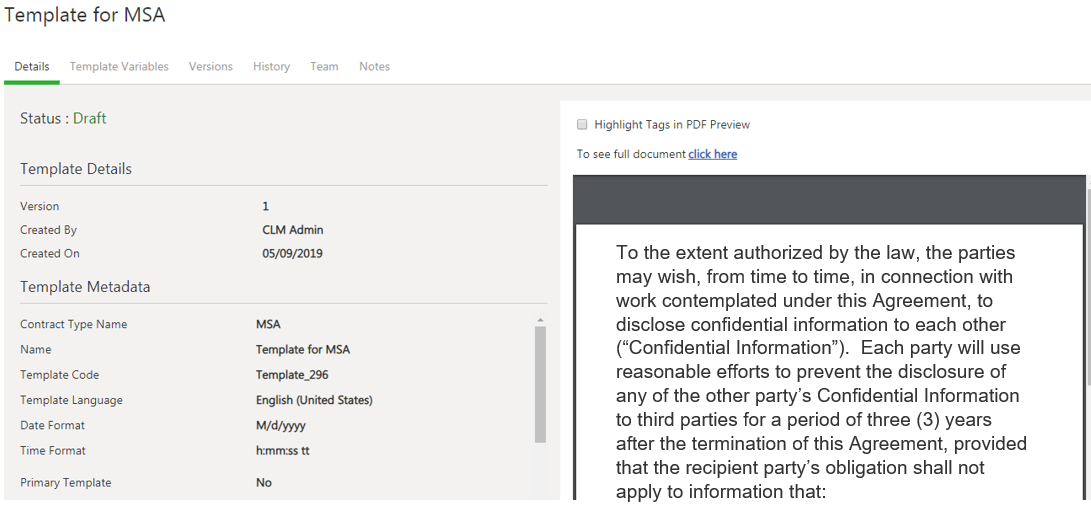
1. On the Template Management page, Click the View Record icon next to the Template. The Template Details page opens providing the summary of the template.
2. Click Edit. The Edit Template wizard with the Details tab opens. Edit the desired fields. You can edit the existing description or version comments information. You can upload a new template file or replace an existing template as well.
3. Click Next. The Team tab opens. Add or delete the team members, if required.
4. Click Next. The Verify tab opens. Verify the changes made to the Template.
5. Click Save to save the changes made to the Template.
6. Choose one of the following:
- Click Previous to go back and make changes to the information that you have entered.
- Click Update to update the Template.
The details of the updated Templates are displayed. Preview of the Template opens on the right side of the page.
Choose from the following options that open below the contract summary and details:
- Download Document: Click to save the Template to your local computer.
- Edit: Click to make changes to the Template.
- Send For Approval: Click to send the Template to the approver.
Note: The options that are displayed vary according to the type of Template and privileges assigned to your user id.
Tagging Attributes inside another Attribute value in Templates
You can authorize users to tag an Attribute inside another choice or multi-select Attribute, so that the same Attribute tag can be used within the Agreement or Template.
In ICI, you can:
- Tag an Attribute inside the values of choice and multi-select type of Attributes
- Tag Attributes at the Template Variable, Contract Type and Attribute Library levels
- Search for other Attribute types that can be nested or tagged and have been configured for the selected Contract Type
- Append prefix and postfix text to the tagged Attribute
- Tag for nested Attributes using Bulk Upload and Excel Add-in.
- Tag for nested attributes is resolved during Document Assembly using Word Add-in
- Reverse sync which is driven by the same flag that is currently used for tagged Attributes
- Have only one level nesting
Remember:
- In ICI, the internal name ($abc) for the choice Attribute will be displayed and this value will not get resolved.
- When this field is used in the Agreement/ Template as a tagged Attribute, the tagging is resolved during document assembly and the mapped variable is displayed in the document. The document will always display the actual value of the referred Attribute.
- If the referred Attribute has no available value and it is selected from the choice list, then no value will be displayed in the document during document assembly.
- If the referred Attribute is removed from the Contract Type, a notification message is displayed stating that the Attribute may be tagged somewhere else.
Sending a Template for Approval
After you create a Template, it is in Draft state. The Template must be approved to be able to use it to create an agreement.
To send a Template for approval:
1. Click the View Record icon on next to the template you want to send for approval. The Template Details page opens.
2. Scroll down the page and click the Send for Approval button to send the Template for approval. The status of the Template changes to Waiting for Approval.
Related Topics: Create a Template in ICI Word Add-in | Approve/Reject a Template | Rule | Agreement Management | Clause Management | Bilingual Templates | ICI Add-ins | Release_Notes |


