| Line 1: | Line 1: | ||
| − | |||
| − | + | = Create Notification Categories = | |
| − | As an administrator, you can create various notification categories. These categories are then visible to the respective users under the ''' | + | <font face="Segoe UI">As an administrator, you can create various notification categories. These categories are then visible to the respective users under the Notifications tile.</font> |
| + | <div class="note-box">'''Note''': While creating a subscription, you can place your subscription in the appropriate notification category. </div> | ||
| + | <font face="Segoe UI">'''To create a notifications category:'''</font> | ||
| − | + | <font face="Segoe UI">1. On the '''User Administration''' page, click the '''Notification Settings''' tile. The '''Notification Settings''' page appears.</font> | |
| − | + | ||
| − | + | ||
| − | + | <font face="Segoe UI">[[File:Admin- Notification Settings.png|RTENOTITLE]]</font> | |
| − | + | <font face="Segoe UI">[[File:Create Notification Categoy New.png|RTENOTITLE]]</font> | |
| − | + | <font face="Segoe UI">2. Click '''Create Notification Category''' at the bottom of the page.</font><br/> | |
| − | [[File:Create Notification | + | <font face="Segoe UI">[[File:Create Notification Category-bottom.png|RTENOTITLE]]</font><br/> |
| − | + | <font face="Segoe UI">3. The '''Details''' tab appears.</font> | |
| − | + | <font face="Segoe UI">4. The created category appears on the '''All Notifications Category''' page. </font><br/> | |
| − | 3. | + | <font face="Segoe UI">[[File:Create New Notification category 3.png|RTENOTITLE]]</font><br/> |
| − | + | <font face="Segoe UI">In the '''Category Name''' box, type an appropriate category name and click '''Save'''.</font> | |
| − | [[ | + | <font face="Segoe UI">'''Related Topics:'''<br/> [[Edit_Notification_Categories|Edit Notification Categories]]</font> |
| − | + | <link-page pageafter="Edit_Notification_Categories| Edit Notification Categories" pagebefore="Edit_Application_Settings|Edit Application Settings"></link-page> | |
| − | + | ||
| − | + | ||
| − | + | ||
| − | + | ||
| − | + | ||
| − | + | ||
| − | <link-page | + | |
Revision as of 06:12, 6 June 2017
Create Notification Categories
As an administrator, you can create various notification categories. These categories are then visible to the respective users under the Notifications tile.
To create a notifications category:
1. On the User Administration page, click the Notification Settings tile. The Notification Settings page appears.
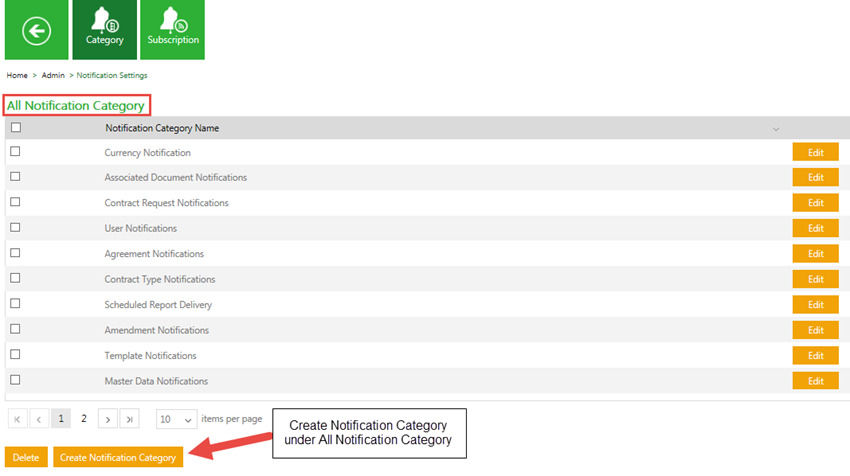
2. Click Create Notification Category at the bottom of the page.
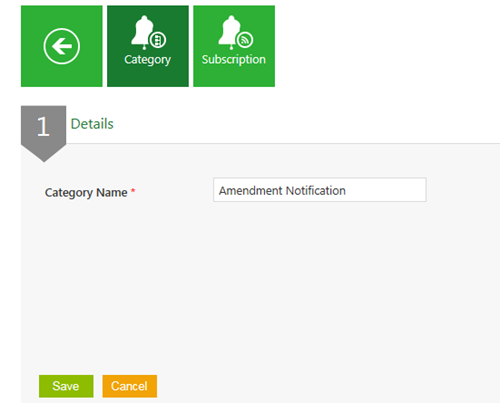
3. The Details tab appears.
4. The created category appears on the All Notifications Category page.
In the Category Name box, type an appropriate category name and click Save.
Related Topics:
Edit Notification Categories


