| Line 62: | Line 62: | ||
*Create new instances of the Associations for the uploaded Agreement | *Create new instances of the Associations for the uploaded Agreement | ||
| − | '''Note:''' | + | '''Note:''' Both .docx and .pdf formats are supported. |
== Discovering Tables in an Agreement == | == Discovering Tables in an Agreement == | ||
| Line 81: | Line 81: | ||
1. '''Click''' the ''Table Discovery'' tab on the uploaded Agreement ''Details'' page.<br/> 2. ICM displays a list of the ''Discovered Tables'' for that Agreement Document. | 1. '''Click''' the ''Table Discovery'' tab on the uploaded Agreement ''Details'' page.<br/> 2. ICM displays a list of the ''Discovered Tables'' for that Agreement Document. | ||
| − | <div class="image-green-border">[[File:7. | + | <div class="image-green-border">[[File:7.10 Table Discovery 1.png|720px]]</div> <div class="image-green-border"> </div> |
=== Editing Table Data === | === Editing Table Data === | ||
| Line 93: | Line 93: | ||
5. '''Click '''''Save Changes ''to save changes if you want to review or edit them later. The Table data saved message is displayed. | 5. '''Click '''''Save Changes ''to save changes if you want to review or edit them later. The Table data saved message is displayed. | ||
| − | <div class="image-green-border">[[File:7. | + | <div class="image-green-border">[[File:7.10 Table Discovery 2.png|720px]]</div> |
6. '''Select '''the Association for which you want to create this data from the Select Association drop-down. For example, Payment Details. | 6. '''Select '''the Association for which you want to create this data from the Select Association drop-down. For example, Payment Details. | ||
<div class="image-green-border">[[File:7.9 Edit Table Data 5.png|720px|.9 Edit Table Data 5]]</div> | <div class="image-green-border">[[File:7.9 Edit Table Data 5.png|720px|.9 Edit Table Data 5]]</div> | ||
| Line 105: | Line 105: | ||
11. A message is displayed indicating that the table data is saved and the Associations are being created. '''Click '''''Yes'' if you are sure that you want to update the table and proceed, else click ''No''. | 11. A message is displayed indicating that the table data is saved and the Associations are being created. '''Click '''''Yes'' if you are sure that you want to update the table and proceed, else click ''No''. | ||
| − | <div class="image-green-border">[[File:7. | + | <div class="image-green-border">[[File:7.10 Table Discovery 3.png|720px]]</div> |
12. You can view the associations on the ''Associations ''tab. | 12. You can view the associations on the ''Associations ''tab. | ||
| Line 121: | Line 121: | ||
1.''' Click''' the ''Table Discovery'' tab on the uploaded Agreement Details page.<br/> 2. In the ''Discovered Tables'' window when matching data is present, the give the exact Association with that table are discovered. For example, the ''Payment Details'''' '''''<b>are discovered. These are associated and the names of the header are also discovered. </b> | 1.''' Click''' the ''Table Discovery'' tab on the uploaded Agreement Details page.<br/> 2. In the ''Discovered Tables'' window when matching data is present, the give the exact Association with that table are discovered. For example, the ''Payment Details'''' '''''<b>are discovered. These are associated and the names of the header are also discovered. </b> | ||
| − | <div class="image-green-border">[[File:7. | + | <div class="image-green-border">[[File:7.10 Table Discovery 4.png|720px]]</div> |
| − | + | 3. You can select whether the table should have a header or not by enabling the ''Has Header ''flag to ''Yes''. <br/> By doing this, the first row of the table will be marked as the header and Associations will not be created for it. If there are 2 rows other than the header, then 2 Associations will be created. A green tick mark will be displayed next to them which means that they are successfully created in the Table Discovery tab. <br/> 4. In the ''Discovered Tables'' window, make changes in the table as required. For example, '''select''' 3 rows and columns. | |
| | ||
| Line 131: | Line 131: | ||
1. '''Click''' ''Save Changes''. The ''Table data saved'' message is displayed. | 1. '''Click''' ''Save Changes''. The ''Table data saved'' message is displayed. | ||
| − | <div class="image-green-border">[[File:7. | + | <div class="image-green-border">[[File:7.10 Table Discovery 5.png|720px]]</div> |
| − | + | ||
| − | + | ||
| | ||
| Line 141: | Line 139: | ||
<div class="image-green-border">[[File:7.9 Table Discovery 7.png|720px|7.9 Table Discovery 7]]</div> | <div class="image-green-border">[[File:7.9 Table Discovery 7.png|720px|7.9 Table Discovery 7]]</div> | ||
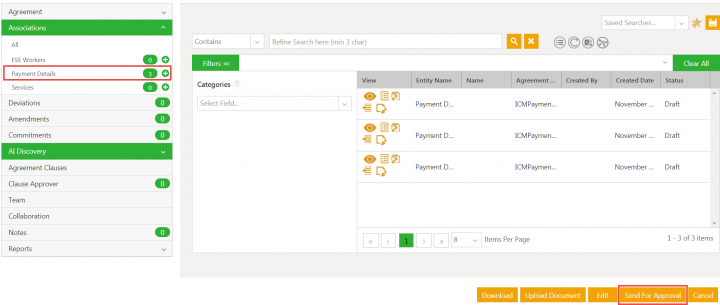
<br/> 2.'''Click'''''<i>Yes</i> if you are certain that you want to make the changes, else you can save changes and review them later. <br/> 3. '''Click''' the ''Associations''tab to see the Associations that are discovered. As 3 rows were selected, 3 ''Payment Details''Associations are created. '' | <br/> 2.'''Click'''''<i>Yes</i> if you are certain that you want to make the changes, else you can save changes and review them later. <br/> 3. '''Click''' the ''Associations''tab to see the Associations that are discovered. As 3 rows were selected, 3 ''Payment Details''Associations are created. '' | ||
| − | <div class="image-green-border">[[File:7. | + | <div class="image-green-border">[[File:7.10 Table Discovery 6.png|720px]]</div> |
4. '''Click '''the ''Payment Details ''association to view the details and send for approval.<br/> 5. '''Click''' ''Export to Excel'' if you want to export the table that has been discovered. | 4. '''Click '''the ''Payment Details ''association to view the details and send for approval.<br/> 5. '''Click''' ''Export to Excel'' if you want to export the table that has been discovered. | ||
Revision as of 11:32, 5 December 2019
DiscoverAI
Bulk Upload with Clause Discovery
To upload Agreements in bulk:
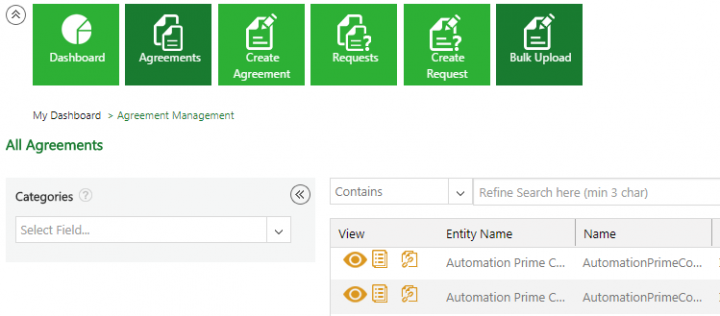
1. Click the Agreements tile. The Agreement Management page opens. Let us take an example of an Agreement Contract Type (CT1) that should have already been created and published.
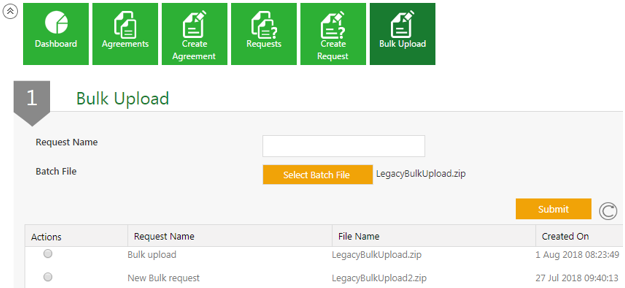
2. Click the Bulk Upload tile. The Bulk Upload page opens.
3. Enter the Request Name.
4. Click the Select Batch File button to select the file for a bulk upload. In this example, we are selecting the LegacyBulkUpload.zip file.
- The Meta.xlsx files contains data related to ContractType (CT1 in this case), CTTypeofContract (Agreement Contract Type), Technical Name of the Attributes present in the Contract and Display Name of the Attributes.
- The Data.xlsx files contains all the Attributes in Contract Type (CT1) as a column name in which the data gets auto-populated from the PDF/docx file. User needs to add the Bulk Upload Business Status is Executed and the file name under File Path column in Data.xlsx file. 5. Click the Submit button. The File Uploaded Successfullymessage is displayed.
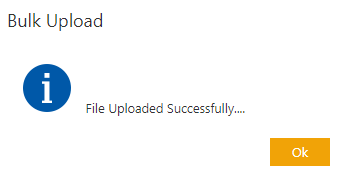
5. Click the Submit button. The File Uploaded Successfully message is displayed.
6. Click OK. The file is now displayed in the Grid view with the status Not Started.
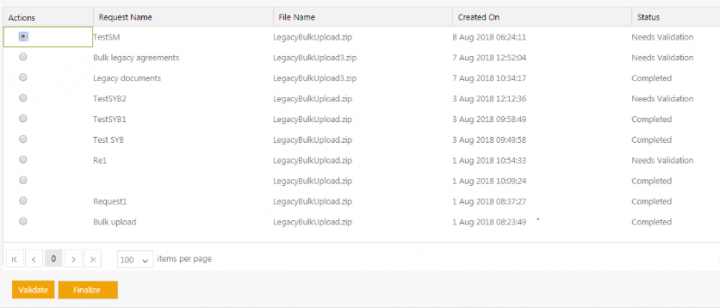
7. Click Refresh icon twice. On first Refresh, the Status changes to In Progress and then to Needs Validation.
8. Select an Actions radio button for the file that you want to finalize. The Validate and Finalize buttons are enabled.
9. Click the Validate button to download the PopulatedData.xlsx file. The values of the Attributes can be edited in this file.
Note: The data in the Excel sheet that is marked green signifies the highest confidence level, data in yellow indicates medium confidence level and data in red indicates lowest confidence level. You can then make any changes to the Attribute values. (In this example, you can make changes to the Attribute value from the downloaded PopulatedData.xlsx file).
10. Click Save to save the changes.
11. Click the Finalize button, the PopulatedData.xlsx file can be uploaded. The Finalized File Uploaded Successfully message is displayed.
12. The Needs Validation status changes to Completed.
13. Click the Agreements tile to view the Agreements which will be in the Draft state.
Table Discovery
With this release, the Discover AI app has been further enhanced to include Table discovery. Along with Clause and metadata, ICM now also extracts tables (including information such as SLAs, price list, etc.) in Agreements and displays them on the Table Discovery tab (on the Details page). ICM tries to match the discovered table(s) with the Associated Contract Types of the Agreement. If a strong match is found, then the table is tagged with that Associated Contract Type, and the table columns are also matched with the Attributes of that Associated Contract Type.
You can then take relevant action such as creating new instances of the Associations. Automatically recognizing table data inside the Agreements saves a lot of manual labor of identifying and tagging the data correctly.
The table discovery allows you to:
- Identify and discover the table(s) in the Agreement Document
- Update the data in the discovered table as required
- Create new instances of the Associations for the uploaded Agreement
Note: Both .docx and .pdf formats are supported.
Discovering Tables in an Agreement
To discover tables in an Agreement:
1. Create an Agreement (Third Party Type Of Paper).
2. Ensure that the Clause Discovery functionality is turned On and the Contract Type is enbled for table discovery.
3. Create and Publish the Agreement. ICM automatically queues the Agreement for table discovery.
Viewing Discovered Tables in an Agreement
You can view all the discovered tables in an Agreement, so that you can review them and take actions as needed (based on whether they meet the criteria for creating an associated document or not).
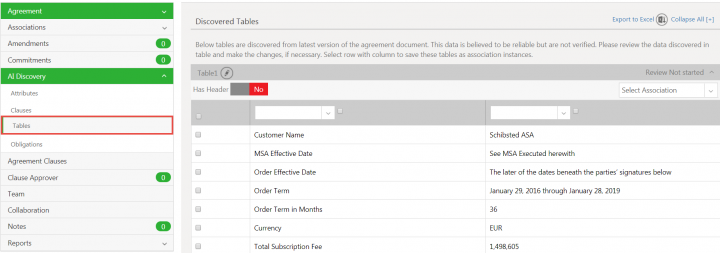
1. Click the Table Discovery tab on the uploaded Agreement Details page.
2. ICM displays a list of the Discovered Tables for that Agreement Document.
Editing Table Data
1. Click the Edit Table Name icon next the table that you want to edit. For example, Table 2.
2. Toggle the Has Header button toYes if you want the table to have a header.
3. Click inside the header box to add the header name. For example, PSE Workers, Term, etc.
4. Click inside each of the boxes to add data in the columns. For example, 3.0 (Version), 09 Sep, 2019 (Date Released), etc.
5. Click Save Changes to save changes if you want to review or edit them later. The Table data saved message is displayed.
6. Select the Association for which you want to create this data from the Select Association drop-down. For example, Payment Details.
7. A validation message is displayed to check if you want to save the updated data. Click Save to update the data in the table, else click Discard.
8. Select the checkbox for the rows and columns that you want to update.
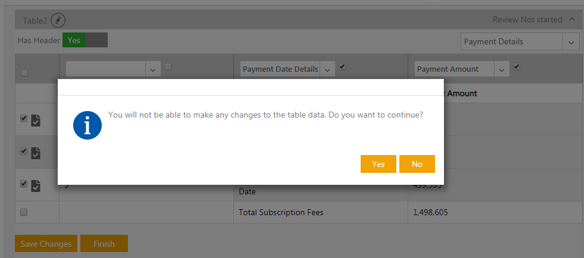
9. Click Finish. A validation message is displayed informing you that you will not be able to make any changes to the table data after this.
10. Click Yes if you are sure that you want to update the table and proceed.
11. A message is displayed indicating that the table data is saved and the Associations are being created. Click Yes if you are sure that you want to update the table and proceed, else click No.
12. You can view the associations on the Associations tab.
13.Click View Record to view the details of the individual records.
14. You can take further action as needed. For example, send it for Approval.
Selecting the Type of Table to be able to create Associations for it
You can create Associated Documents using the data in the discovered tables. You are basically discovering the Associated Document type and the columns associated with that document type.
To do so:
1. Click the Table Discovery tab on the uploaded Agreement Details page.
2. In the Discovered Tables window when matching data is present, the give the exact Association with that table are discovered. For example, the Payment Details' are discovered. These are associated and the names of the header are also discovered.
3. You can select whether the table should have a header or not by enabling the Has Header flag to Yes.
By doing this, the first row of the table will be marked as the header and Associations will not be created for it. If there are 2 rows other than the header, then 2 Associations will be created. A green tick mark will be displayed next to them which means that they are successfully created in the Table Discovery tab.
4. In the Discovered Tables window, make changes in the table as required. For example, select 3 rows and columns.
Saving the changes of the Table Discovery for the Agreement
You can save the interim progress of the Table Discovery for an Agreement, so that you can review it later by:
1. Click Save Changes. The Table data saved message is displayed.
Finishing the Table Identification for an Agreement
You can complete the Table identification for an Agreement, so that the identified tables become part of the Agreement.
1. Click Finish. A message will be displayed indicating that you will not be able to make any changes to the table data.
2.ClickYes if you are certain that you want to make the changes, else you can save changes and review them later.
3. Click the Associationstab to see the Associations that are discovered. As 3 rows were selected, 3 Payment DetailsAssociations are created.
4. Click the Payment Details association to view the details and send for approval.
5. Click Export to Excel if you want to export the table that has been discovered.
Note:
- Once the Associations are creates, you cannot make any changes to the table. The table is disabled and the status changes to Review Completed.
- It is not necessary to match every table to one of the association contract type. You can still make changes to such tables and download them using ‘Export to excel’ functionality.
Related Topics: Create Agreement | Managing US Federal Contracts using ICM | Contract Digitalization | NegotiateAI | ObligationAI | VisualizeAI
