Home
An agreement is a type of contract that your organization signs with third party. An agreement can be for legal or procedural purpose.
You can do the following tasks relating to your agreements using the Agreements feature. Let us understand these tasks in detail.
Contents
- 1 Requests
- 2 Create a Request
- 3 Review and Approve/Reject a Request
- 4 Edit a Request
- 5 Search Contracts/Agreements
- 6 Set Up Smart link for agreement
- 7 Create a Contract/Agreement
- 8 Edit a Contract/Agreement
- 9 Delete a Contract/Agreement
- 10 Cancel a Contract/Agreement
- 11 Add Team to Your Contract/Agreement
- 12 Review and Approve/Reject a Contract/Agreement
- 13 Deviation in Clauses
- 14 Execute a Contract/Agreement
- 15 Terminate a Contract/Agreement
- 16 Add Amendment to a Contract/Agreement
- 17 Upload Agreements Using MS Excel
- 18 System Requirements
- 19 Installing ICM Excel Add-in
- 20 Upload agreements to ICM
- 21 Association Management
Requests
Search an Existing Request
View Request Status
Create a Request
Create a New Request
Copy an Existing Request
Download and Print Request Information
Review and Approve/Reject a Request
Send a Request for Review
Review a Request
Send a Request for Approval
Approve a Request
Add Notes
Edit a Request
Search Contracts/Agreements
Search Contracts/Agreements
Home > Agreement Management > Search Contracts/Agreements
In ICM, you can search an existing agreement for multiple reasons such as:.
- To know the details of the agreement created.
- To know the status of the agreement created.
- To copy an existing agreement.
- To edit an existing agreement.
In ICM, you can use multiple options to search an agreement. Here is the process to search an existing agreement:

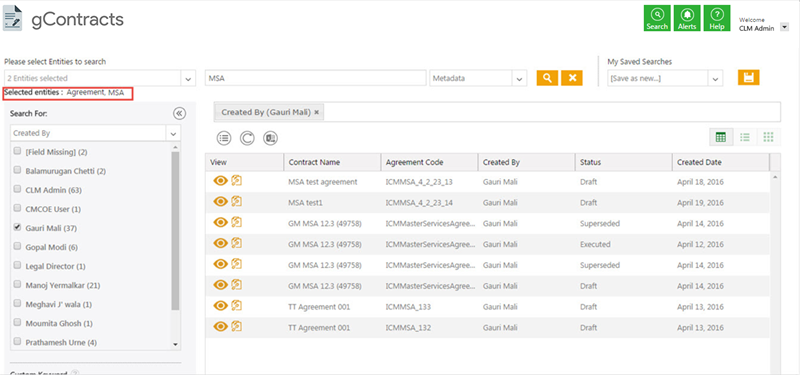
1. Click the Agreements tile on navigation bar on the Home page. The agreements page that lists the existing agreements is displayed.
Search for a specific agreement by using any of the following options:,
Option 1:
Under Search For,
- Click the Select Field list, and then select appropriate value/item from the list. The results that are relevant to the item appear. You can select multiple values at once. For example, if you select Created by (it means you want to filter agreements according to various users who created agreements), list of users who created agreements appears. You can then select appropriate user to filter your search.
- The number in the bracket denotes the number of available items. You can also select multiple options.
- Click the Select Field list, and then select appropriate value/item from the list. The results that are relevant to the item appear. You can select multiple values at once. For example, if you select Created by (it means you want to filter agreements according to various users who created agreements), list of users who created agreements appears. You can then select appropriate user to filter your search.
- To narrow your search, type free text in the Custom Keyword box, and then click Apply. You can use operators like AND/OR to filter the results. For example:
- To narrow your search, type free text in the Custom Keyword box, and then click Apply. You can use operators like AND/OR to filter the results. For example:
Option 2:
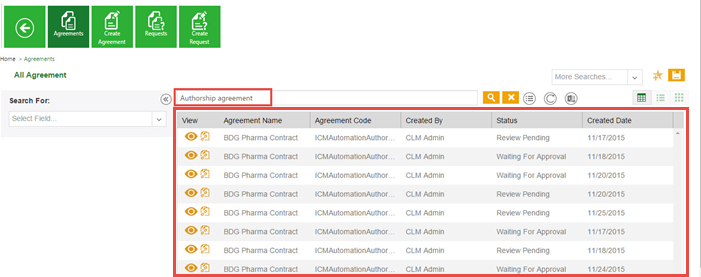
Alternatively, type free text in the search box that is provided above the list of existing agreements. A list of relevant agreements is displayed.
You can further narrow your search by using any of the following characters:
| Search Term | Result
|
| "..." | Type the search term in double quotation marks. It shows existing agreements that include the exact search term. |
| *...* | Type the search term in star characters. It shows existing agreements that include the exact search term. |
| *... | Prefix * to the search term. It shows existing agreements that end with this term. |
| ...* | Suffix * to the search term. It shows existing agreements that start with this term.
|
Viewing the saved search terms and mark search as a Favorite
You can view your saved search terms by doing the following:
- a. In the More Searches box, select your saved search.
To learn how to save your search, click Save Your Search Results.
To learn how to convert your favorite search result into a KPI, click Save Your Search Results.
Related Topics:
Download and Print Contract/Agreement Information
Copy an Existing Agreement
Edit a Contract/Agreement
Save Your Search Results
Home > Agreement Management > Save Your Search Results
In ICM, you can use advance search option to search various existing entities of agreement. You can save this search result and use it as favorites.
Here is the process to save your search.
To save your search:
1. On the ICM Dashboard, in the top right corner, click ![]() . The Search page appears.
. The Search page appears.
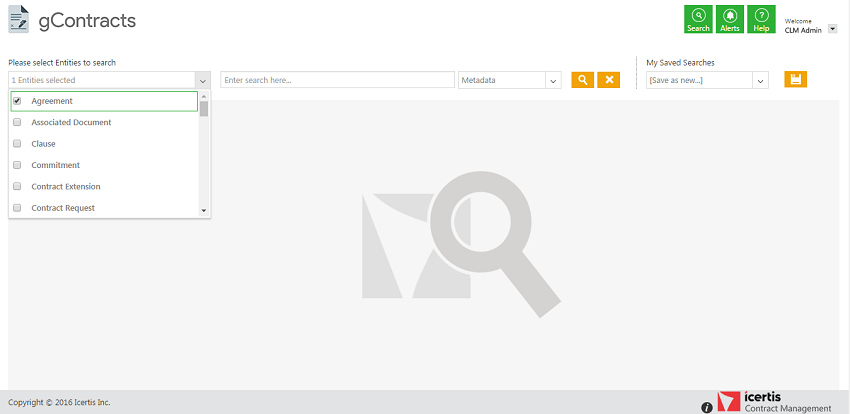
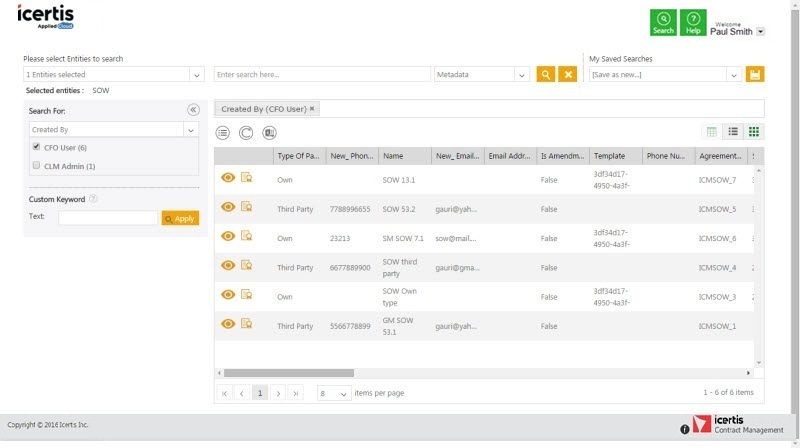
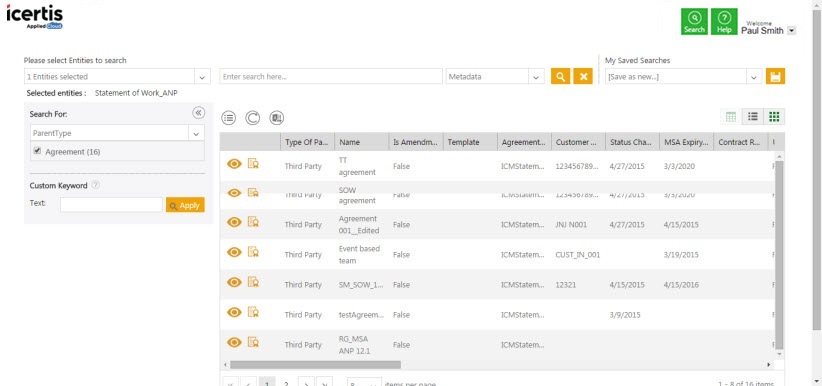
2. In the Please select Entities to search field, enter or select appropriate entities from the provided list, and then type related keywords in Enter Search here field.
3. Once done, select the required option in the very next field:
- Metadata – if selected the search will be done in the Metadata of the selected Agreement.
- Full Text – if selected the search will be done in the Document of the selected Agreement.
- Combined – if selected the search will be done including both Metadata and Document of the selected Agreement.
- Metadata – if selected the search will be done in the Metadata of the selected Agreement.
4. Click Search ![]() icon, the results matching to your keywords will be displayed.
icon, the results matching to your keywords will be displayed.
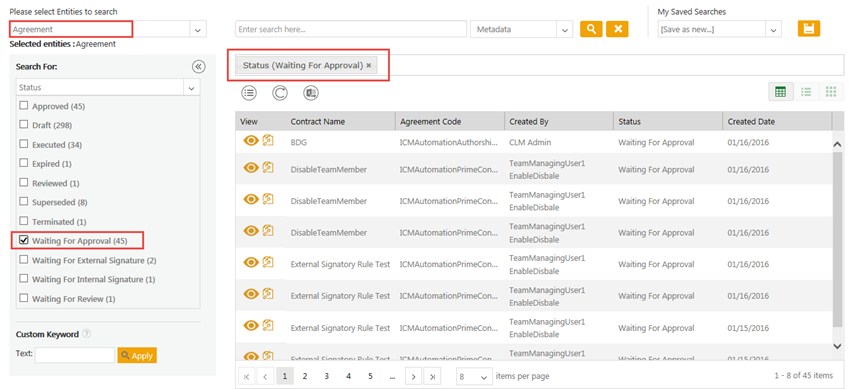
5. To narrow your search further, under Search For, click Select Field and select an appropriate option from the list provided. The number in the bracket denotes the number of available items which contain the search term. You can also select multiple options..
For example, when you select the field Status; the application displays the count of agreements that have status as Draft, Approved, Terminated, Superseded and so on.
If you select the status as Draft ( you enable the check box next to 'Draft'); the application displays all the agreements having a status as Draft.
A list of these agreements is displayed as a search result in the tabular format.
How to enhance your search.
You can enhance your search by using any of the following methods:
| Field | Action |
|---|---|
| *...* | Type a search term in between the star characters. It shows existing items which include the respective search term |
| *... | Prefix * to a search term. It shows existing items which end with this term |
| ...* | Suffix * to a search term. It shows existing items which start with this term |
| "..." | Type a search term in double quotes. It shows existing items which include the search term |
| ...(space)... | Type multiple search terms with a space in between. It shows existing items which include the search terms |
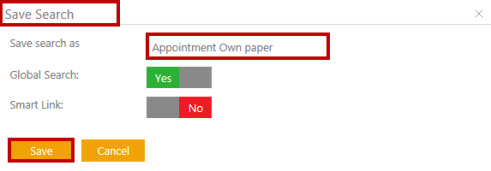
6. Click ![]() to save your search. Save Search dialog box appears.
to save your search. Save Search dialog box appears.
7. In the Save search as box, type a name for the search.
8. In Global Search, select Yes to make the search available to everyone. Select No to keep the search restricted.
9. Click Save to save your search. The saved search appears as favorite on the Home page.
Converting search result into a KPI
You can convert your favorite search result into a KPI so that it can be directly accessed from the ICM homepage.
When you save a search result as a favorite, you will see the control tower matrix. You can save your favorite search result as a KPI tile from here.
When you enable the Control Tower Matrix check box as Yes, the matrix name you enter appears on the KPI tile.
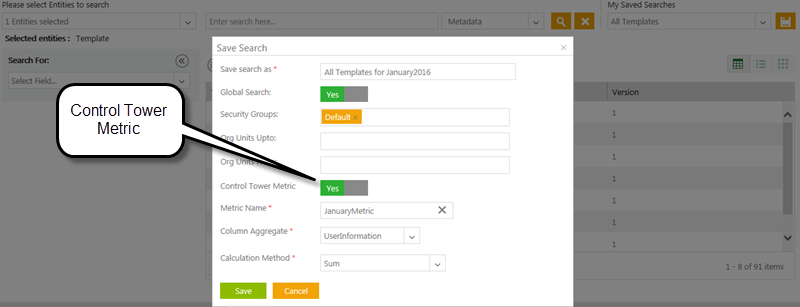
Once you save the control tower metrics, you need to give the view privilege for the local user or global users. You need to give the privileges from Admin tile.
To learn how to create a smart link, click Create Smart Links
Related Topics:
Create Smart Link for Agreement
Create Smart Link for Association
Export Search Results
Home > Agreement Management > Save Your Search Results
In ICM, you can export search results in Excel (.xlsx) and Comma Separated Value file (.csv).
Exporting search results in a CSV file will help users who do not have Microsoft Office installed on their computer.
To export search results:
1. On ICM Dashboard, at the top right corner, click Search ![]() .
.
2. Now on Search page, under Please select Entities to search, select the required entities.
3. As per the selections made the result will be displayed below.
4. Click Export option ![]() and select Excel or CSV file format as per the requirement.
and select Excel or CSV file format as per the requirement.
5. The search result will be exported in the selected file format.
Create Smart Link for Agreement
Home >Agreement Management > Create Smart Link for Agreement
Smart link displays all the agreements/associations that are relevant to a particular search criteria (on the Agreement Details page). You can search specific agreements, save your search, and then create a smart link that appears on the Agreement Details page.
For example, you are searching MSA Agreement and search result displayed twenty five MSA agreements. You can now save this search result as a smart link. It will appear on the Agreement Detail page. Whenever you click the smart link icon on the Agreement Details page, you will see all these twenty five agreements.
Your search parameters can be anything as per your business requirements. This you can convert to smart links.
Thus, a Smart Link saves the time and efforts in logging out of the current agreement and searching the other agreement records by entering the relevant information.
Smart Links can be created for agreements and associations.
Set Up Smart link for agreement
3. Under Search For, click Select Field list. Select an appropriate attribute from the list. The number in the bracket denotes the number of available items which contain the search term.
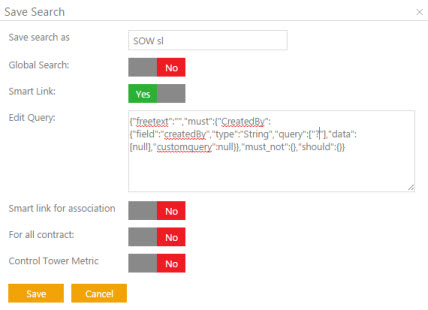
4. Click ![]() on the top right corner of the page. The Save Search dialogue box appears.
on the top right corner of the page. The Save Search dialogue box appears.
5. In the Save search as box, type an appropriate name for your search.
6. In the Smart Link box, select Yes to set up a smart link.
7. In the Edit Query box, replace the value of the text in the query bracket with ? (question mark) for example, "query"["SOW"] with "query"["?"].
8. Click Save to set up a smart link.
9. To view the smart link, click Agreements tile. The Agreements page appears.
10. In the Enter Search here box, type the particular agreement type name, and then click ![]()
11. In the Search For list, select an attribute value. A list of agreements appear. Click ![]() . The particular agreement Details page appears.
. The particular agreement Details page appears.
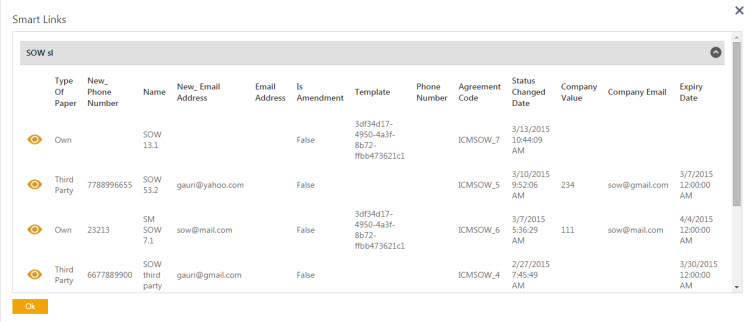
12. On the Details page, click ![]() . The Smart Links dialogue box appears that displays a list of smart links.
. The Smart Links dialogue box appears that displays a list of smart links.
Create Smart Link for Association
Home >Agreements > Create Smart Link for Association
Smart link displays all the agreements/associations that are relevant to a particular search criteria (on the Agreement Details page). You can search specific agreements, save your search, and then create a smart link that appears on the Agreement Details page.
For example, you are searching SOW (statement of work) associated document and search result displayed twenty five associated documents. You can now save this search result as a smart link. It will appear on the Agreement Details page. Whenever you click the smart link icon on the Agreement Details page, you will see all these twenty five associated documents.
Your search parameters can be anything as per your business requirements. This you can convert to smart links.
Thus, a Smart Link saves the time and efforts in logging out of the current agreement and searching the other agreement records by entering the relevant information.
Smart Links can be created for agreements and associations.
To set up a smart link for an association we need to select an associated document for a parent contract type and then set up a smart link.
1. Click ![]() . The Search page appears.
. The Search page appears.
2. In the Please select Entities to search list, type or select a particular associated document contract type, and then click ![]()
3. Under Search For, click Select Field list. Select an appropriate common attribute (common to agreement) from the list.
The number in the bracket denotes the number of available items which contain the search term.
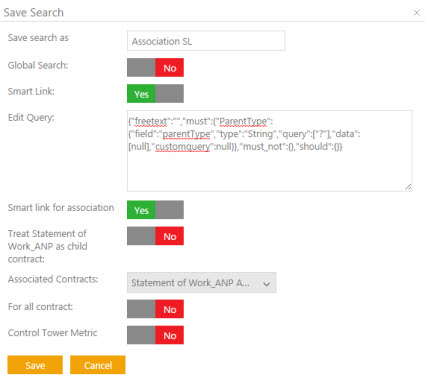
4. Click ![]() on the top right corner of the page. The Save Search dialogue box appears.
on the top right corner of the page. The Save Search dialogue box appears.
5. In the Save search as box, type an appropriate name for your search.
6. In the Smart Link box, select Yes to set up a smart link.
7. In the Edit Query box, replace the value of the text in the query bracket with ? (question mark) for example, "query"["..."] with "query"["?"].
8. In the Smart link for association box, select Yes to set up an association smart link.
9. In the Associated Contracts list, select relevant contract category, and then click Save to set up a smart link.
10. To view the smart link, click Agreements tile. The Agreements page appears.
11. In the Enter Search here box, type the particular agreement type name, and then click ![]()
12. In the Search For list, select an attribute value. A list of agreements appear. click ![]() . The particular agreement Details page appears.
. The particular agreement Details page appears.
13. On the Details page, click ![]() . The Smart Links dialogue box appears that displays a list of smart links.
. The Smart Links dialogue box appears that displays a list of smart links.
Create a Contract/Agreement
Create a Fresh Contract/Agreement
Home > Agreement Management > Create a Fresh Contract/Agreement
An Agreement is a type of contract that your organization signs with third party for legal or business purpose.
You can create agreement in following ways:
- Copy an existing agreement to create a new agreement.
- Create a new agreement by using the Create Agreement feature.
- Create an agreement from a contract request.
This section explains the process of creating an agreement using the Create Agreement feature.
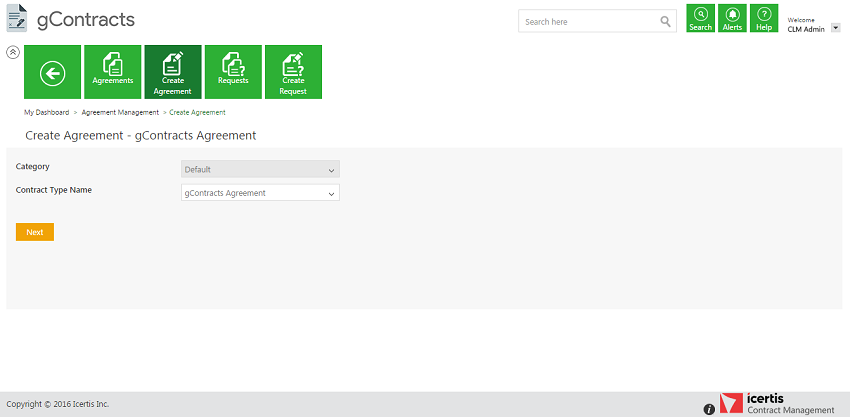
To create an agreement:
To create an agreement:
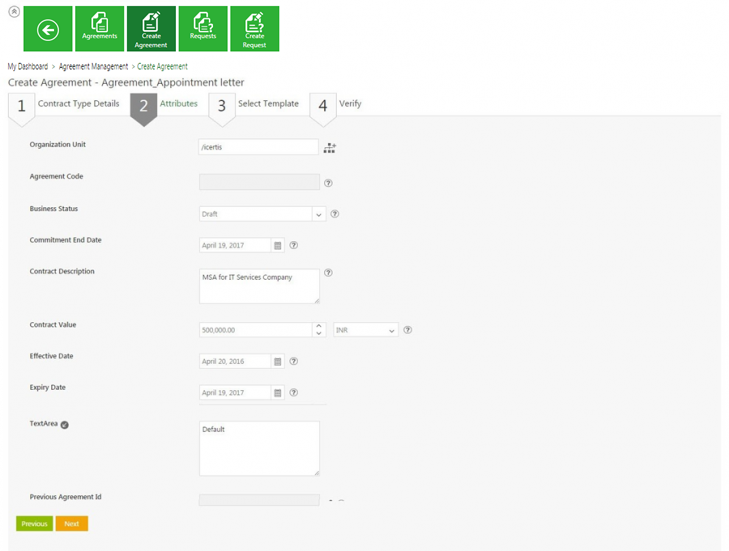
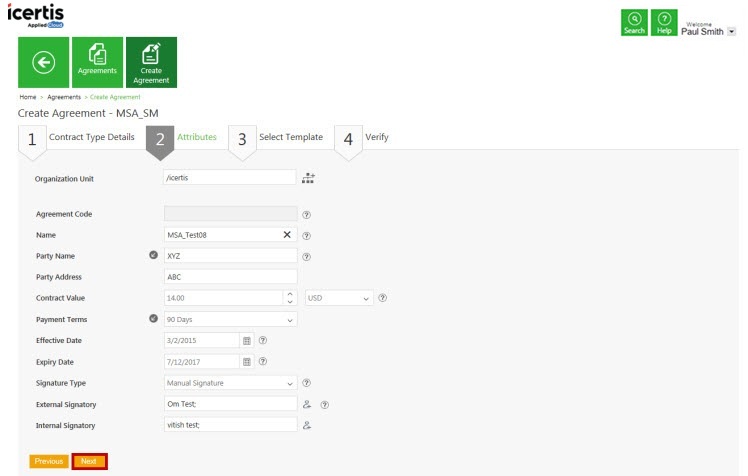
2. Provide appropriate information on each tab as follows, and then click Next to go to the next page:
Let us go through each tab in detail:
A] Contract Type Details
| Field | Action |
|---|---|
| Category | Select relevant category |
| Contract Type Name | Select appropriate contract type name |
| Type Of Paper | Select appropriate type of paper |
| Note: Depending on the type of paper you select, tabs appear differently: - If you select the Type Of Paper as Own, the Select Template tab appears. The tab displays the relevant templates for the selected contract type. |
B] Attributes
| Note: The fields that appear on the Attributes tab vary based on the contract type you select. The fields marked with * are mandatory. |
- a. In the Associate and Inherit, click
 next to document name to inherit the attributes of associated agreement.
| Note: The Associate and Inherit field appears only for those contract types that have association with any other contract types. |
- b. In the Organization Unit box, select the organization unit you belong to.
- c. In the Name box, type name for the agreement you want to create.
- d. In the Party Name box, type the name of the contract party.
- e. In the Party Address box, type the address of the contract party.
- f. In the Contract Value box, type or select the value of the contract deal. In the Select Currency list, select the currency of the contract value.
- g. In the Payment Terms list, select the payment term in days.
- h. In the Effective Date box, enter the date from which the contract will be effective from.
- i. In the Expiry Date box, enter the date the contract expires.
- j. In the Signature Type list, select from the following options:
- - Select Electronic Signature, to send an agreement for an electronic signature to External and Internal Signatory.
- - Select Manual Signature, to send an agreement for a manual signature to External and Internal Signatory.
- - Select Electronic Signature, to send an agreement for an electronic signature to External and Internal Signatory.
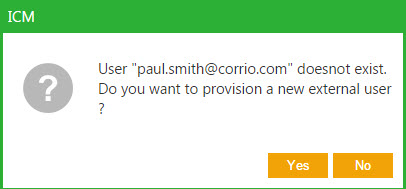
- k. In the External Signatory box, type the e-mail address of the external signatory, and then press Enter.
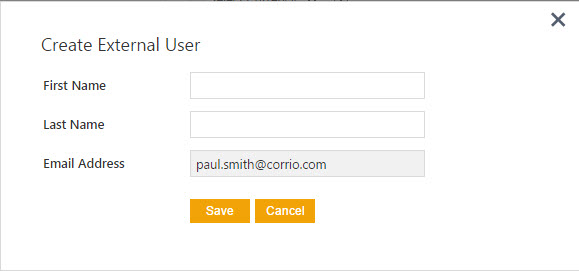
The User (e-mail address) doesnot exist. Do you want to provision a new external user? message appears.
- l. Click Yes. The Create External User dialog box appears.
- m. In the First Name and the Last Name box, type the first name and last name of the external user.
- n. In the Email Address box, type the e-mail address of the external user, and then click Save.
The user appears in the External Signatory box.
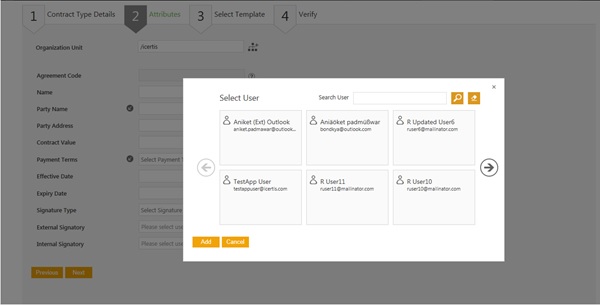
- o. In the Internal Signatory box, click
 to select an internal user. The Select User dialog box appears.
- p. Under Select User, select appropriate user as an internal signatory. Alternatively, in the Search User box, type the name of the desired user, and click
 .
.
Use the scroll arrows to scroll through users. Click Add to add the user.
| Note: If you select the type of paper as Third Party on the Contract Type Details tab, the File Path field appears on the Attributes tab. In the File Path, click Select File to select third party agreement. |
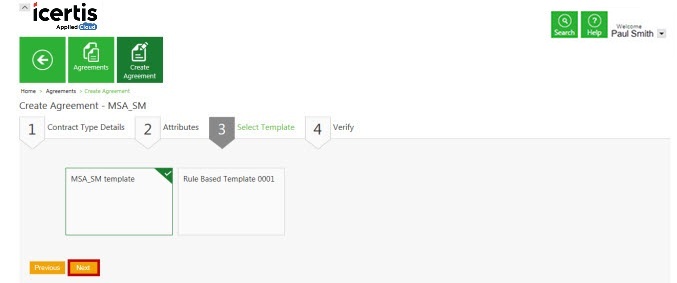
C]Select Template tab.
The tab displays templates that you have created for a particular contract type. Select an appropriate template.
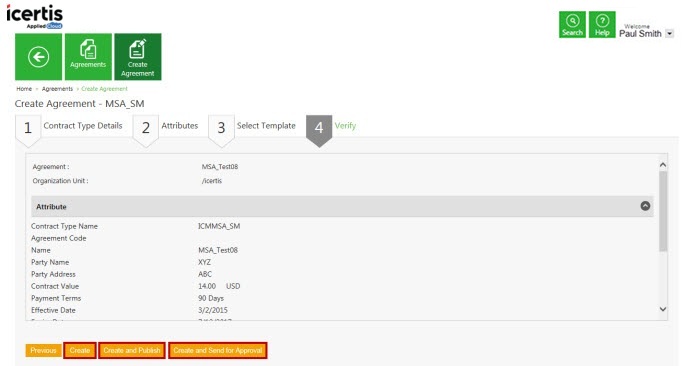
D] Select Verify tab.
a. On the Verify tab, do one of the following:
- Click Previous to go back and make changes.
- Click Create to create agreement.
- Click Create and Publish to create and then publish agreement.
- Click Create and Send for approval to create and then send agreement for approval.
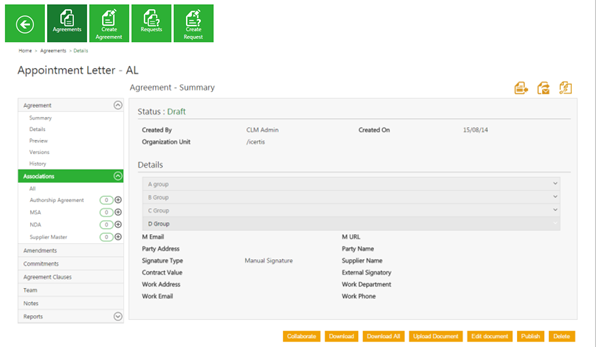
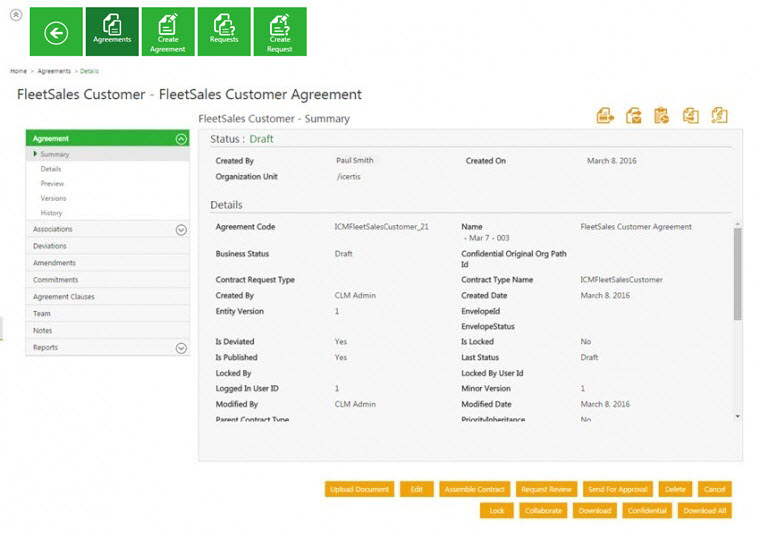
3. Click Create. The agreement with the Draft status is displayed. To learn more about the Tabs that appear on the Agreement Details page, click Tabs.
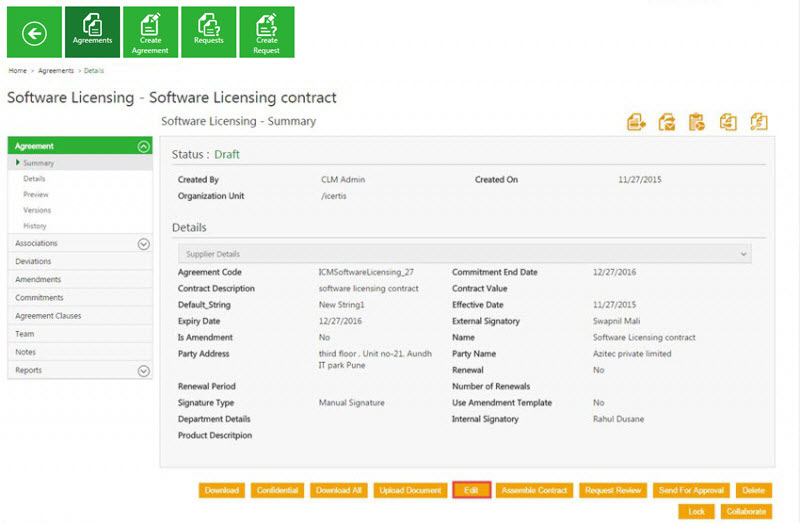
4. Choose from the following options available on the contract summary and details:
- Click Upload Document to upload the document in the ICM application.
- Click Edit to make changes to the agreement.
- Click Publish to publish the agreement.
| Note: After you publish an agreement, the Draft watermark appears on the agreement. It appears on the agreement in all the states until the agreement is approved. The watermark disappears when the agreement is approved. |
- Click Delete to delete the agreement from the ICM application.
If you publish the agreement, the following options appear. Click the appropriate option:
- Download to save an agreement to your local computer.
- Download All to save an agreement and associated documents on your local computer
- Upload Document to upload the document in the ICM application.
- Lock to lock an agreement to restrict others to take action on it.
- Edit to make changes to an agreement.
- Confidential to move an agreement to the confidential organization unit.
- Assemble Contract to include the associated documents (example - annexure), if any, along with the agreement.
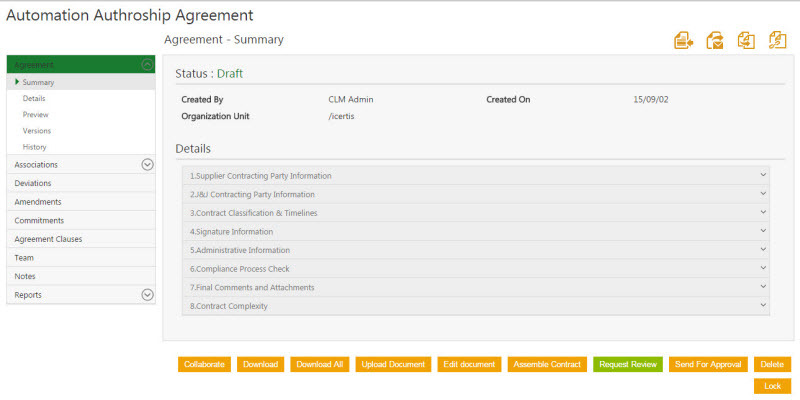
- Request Review to send the agreement to the reviewer for review. To learn more about the Request Review process, click Send a Contract/Agreement for Review.
- Send For Approval to send the agreement to the approver for approval.
| Note: When you click Send For Approval, the agreement is sent to the approver that is set by a rule. If no rules are set on a particular contract type, the agreement status changes to Approved. |
To create a new agreement from contract request, see Create a Contract/Agreement from Contract Request.
To learn how to edit an agreement, click Edit an agreement
Related Topics:
Add Supporting Documents to Your Contract/Agreement
Add and Remove Approvers
Enable and Disable Approvers
Send a Contract/Agreement for Review
Add Notes
Create a Contract/Agreement from Contract Request
Home > Agreements > Create a Contract/Agreement from Contract Request
A user role defines controls or permissions given to a user. ICM has the following predefined user roles for the Agreements feature:
- Contract Admin
- Primary owner
- Approver
- Reviewer
- Deviation approver
You can create an agreement from a Contract Request if you are assigned a role of a Contract Admin.
While creating a request, the requestor (primary owner) adds the contract admin to the team.
After the request is approved, you receive the notification for the same. You can check this notification under the Notifications tile. Then, click the appropriate request name link to review the request information and create the agreement.
Here is the process to create an agreement from a request:
To create an agreement from a request:
1. Click the Notifications tile on the Home page, and then click the Tasks tab. A list of tasks and notifications appears.
2. Select the requests that are awaiting your action.
3. Review the information and then click Create Contract.
| Note: If you click Return to Requester, the request goes back to the business partner. |
4. The Create Agreement page consists of four tabs:
- A. Contract Type Details
- B. Attributes
- C. Select Template
- D. Verify
5. Provide appropriate information on each tab as follows, and click Next to go to the next tab.
- a. Contract Type Details tab
| Field | Action |
|---|---|
| Category | Default |
| Contract Type Name | MSA2 |
| Type of Paper | Own |
- b. Attributes tab
The attributes and the information entered in the Attributes tab is inherited from the Contract Request.
Enter appropriate information in the respective fields.
- c. Select Template tab
The Select Template tab displays the templates that you have created for a particular contract type.
- d. Select Verify tab. Verify the details you have entered to create an agreement.
6. Select an appropriate template. Verify all the agreement information.
7. Click Create to create a contract.
- - Click Create and Publish to create the contract and publish it at the same time.
- - Click Create and Send for approval to create and then send a contract for approval.
| Note: If you click Create, a contract is created even if you do not enter details in the mandatory attributes. However, if you have not entered details in the mandatory attributes; and you click Create and Publish, a message appears as: 'Value for field (field name) is mandatory.' |
Copy an Existing Agreement
Home > Agreements > Copy an Existing Agreement
You can copy an existing agreement to create a new agreement. You can reuse the data of an existing agreement, and create a new agreement.
Here is the process to copy an existing agreement:
To copy an agreement from an existing agreement:
1. On the Agreements page, click ![]() to open the agreement that you want to copy. The Agreement Details page appears.
to open the agreement that you want to copy. The Agreement Details page appears.
2. Click ![]() on the upper right corner of Agreement Details. The message 'This will create copy of an existing agreement. Do you want to continue?' appears.
on the upper right corner of Agreement Details. The message 'This will create copy of an existing agreement. Do you want to continue?' appears.
3. Click OK. The Create Agreement page appears.
4. Provide/update the appropriate information on each page, and then click Next to go to the next page.
5. On the Verify page, verify the information you have entered, and then click Create Agreement to create a copy of the existing agreement.
Tutorials:
Copy an Existing Agreement
Related Topics:
Search Contracts/Agreements
View a Contract/Agreement
Home > Agreements > View a Contract/Agreement
In ICM, you can view the Agreement/Contract in read mode after publishing it.
To view the Agreement/Contract:
1. Click the Agreements tile on the Home page. The Agreements page appears.
2. On the Agreements page, click ![]() to view the details of the appropriate agreement. The Agreement Details page appear.
to view the details of the appropriate agreement. The Agreement Details page appear.
3. Under the Agreement section, click Preview option.
4. The selected Agreement will appear in read only mode.
5. The meta data values in the Contract/Agreement will be highlighted if it is manually tagged.
| Note: The meta data values will be highlighted only in read mode, and not if downloaded or printed.. |
Add Supporting Documents to Your Contract/Agreement
Home > Agreements > Add Supporting Documents to Your Contract/Agreement
In ICM, you can add associations and supporting documents to your agreements.
To add an association:
1. Click the Agreements tile on the Home page. The Agreements page appears.
2. On the Agreements page, click ![]() to view the details of the appropriate agreement. The Agreement Details page appears.
to view the details of the appropriate agreement. The Agreement Details page appears.
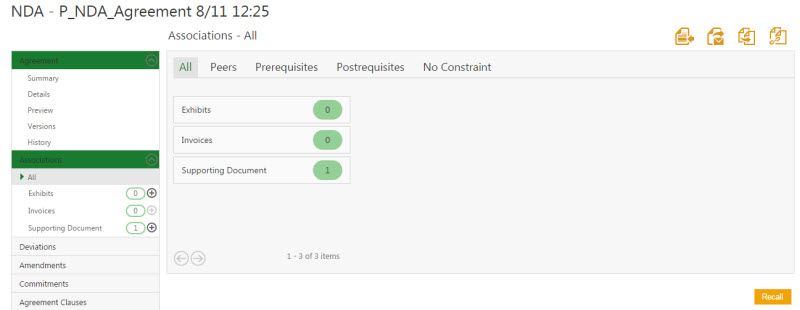
3. Click the Association tab. All the associations for that agreement appear by default.
| Note: There are two types of associations for an agreement. • Peer to Peer Association: In the peer to peer association, a Select Association dialogue box appears where you can select an appropriate association for your agreement. |
Peer to Peer Association
- b. In the Select Association dialogue box, select an appropriate association, and then click Select. The selected Association appears added in the Association tab, with an increment in the association number.
Parent to Child Association
- c. Click
 to add an association. The Create Associated Document page appears with the parent agreement name on the right side of the page.
- d. Enter appropriate information in the respective fields, and then click Create to create a child association for an agreement.
The association appears in the Association tab, with an increment in the association number.
Add Commitments to Your Contract/Agreement
Home > Agreements > Add Commitments to Your Contract/Agreement
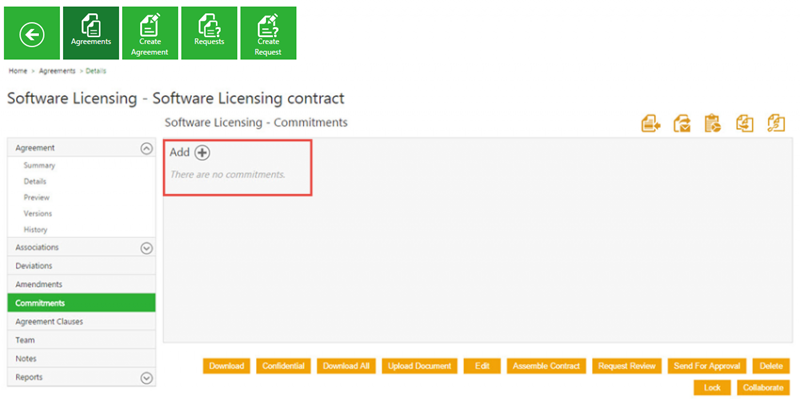
Every agreement or contract has obligations associated with it which are know as commitments. The obligations are towards the transactions, clauses, and so on. Commitment is a reminder to fulfil these obligations. For example, reminding supplier about contract expiry.
Adding a commitment is optional.
While creating an agreement, you (primary owner) can add commitment using the Commitments tab.
Here is the process to add a commitment:
To add a commitment:
1. On the agreement details page, click the Commitments tab.
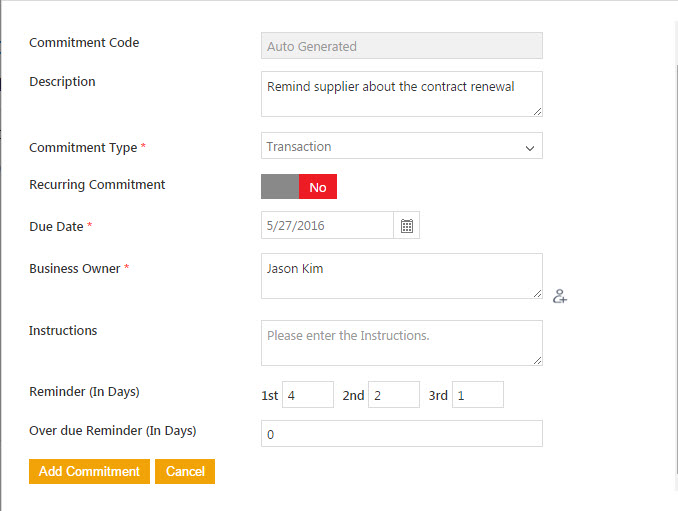
2. Click ![]() next to Add. The Add Commitment dialog box appears.
next to Add. The Add Commitment dialog box appears.
- a. In the Description box, type description for the commitment.
- b. In the Commitment Type list, select the type of commitment.
- c. In Recurring Commitment field, select Yes if it is a recurring commitment. Select No if it is a one time commitment.
- d. In Due Date, select a due date for the commitment.
- e. In the Business Owner box, click
 next to the box. The Select User dialog box appears.
- i. Click the desired user name, and then click Add.
- i. Click the desired user name, and then click Add.
- f. In the Instructions box, type the instructions for the commitment.
- g. In Reminders, type respective reminders for the commitment in days.
- h. In Over due Reminder, type an over due reminder.
- i. Click Add Commitment. The added commitment appears under Commitments.
3. The event is displayed on the History tab- Commitment was created by (user name) on (date and time) with due date (the due date).
The following icons are available next to each commitment text:
4. To add more commitments, repeat steps 1 to 3 as required.
Set Auto-Expiry of a Contract/ Agreement
Home > Agreements > Set Auto-Expiry of a Contract/Agreement
Auto expiry of an agreement
While creating an agreement, you ( primary owner) can specify an expiry date of an agreement. Once an agreement expiry date is specified, it expires on that day.
You can also set the expiry date of an agreement while editing the agreement.
Expiry date should be a future date. It cannot be the present or past date.
Set the auto expiry date for an agreement while creating the agreement
To set the expiry date:
1. On the ICM Home Page, click Create Agreement tile. The Create Agreement page opens.
2. Enter the Contract Type Details under Contract Type Details tab.
3. Click Next to go to Attributes tab.
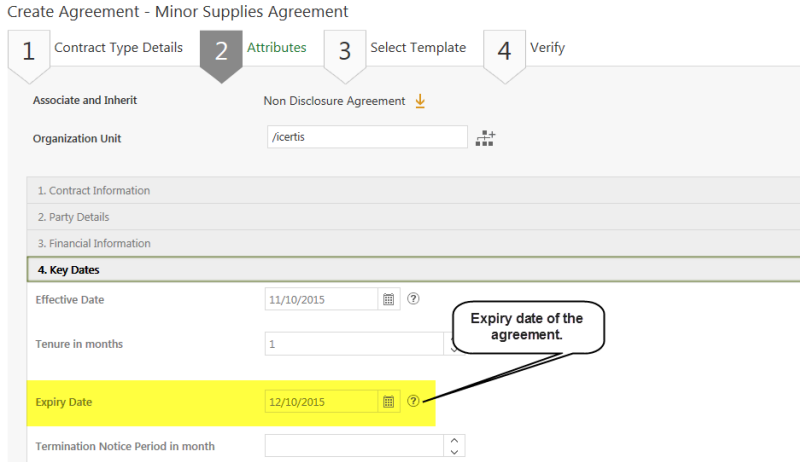
4. Open the Key Dates section under Attributes tab.
5. Select the Effective Date of the contract.
6. In the Tenure in months box, select or enter the tenure of the agreement.
7. In the Expiry Date box, select the appropriate expiry date for the agreement.
Set the auto expiry date for an agreement while editing the agreement
To set the auto expiry of an agreement:
1. Click the Agreements tile on the home page. The Agreements page displays the list of existing agreements.
2. In the agreements list, click ![]() to open the agreement that you want to edit. The agreement details page appears.
to open the agreement that you want to edit. The agreement details page appears.
3. Click Edit .
4. Open the Key Dates section under Attributes tab.
5. Select the Effective Date of the contract.
6. In the Tenure in months box, select or enter the appropriate tenure of the agreement.
7. In the Expiry Date box, select the appropriate expiry date for the agreement.
8. Click Update.
Download and Print Contract/Agreement Information
To download and print agreement/contract information:
1. On the Home page, click Agreements. The Agreements page appears.
2. Click ![]() to view a particular agreement/contract. The Agreement Details page appears.
to view a particular agreement/contract. The Agreement Details page appears.
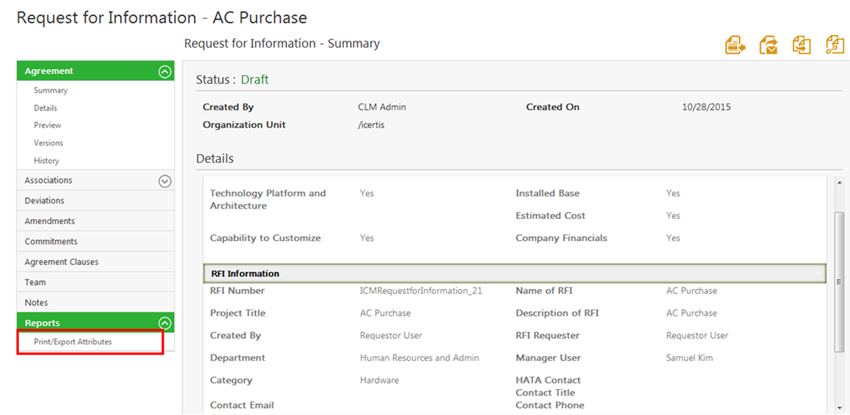
3. Click the Reports tab, and then click Print/Export Attributes. The agreement report PDF is downloaded to your computer.
Open the PDF file and use Print menu to take the printout of the agreement information.
Send a Message
Home > Agreements > Send a Message
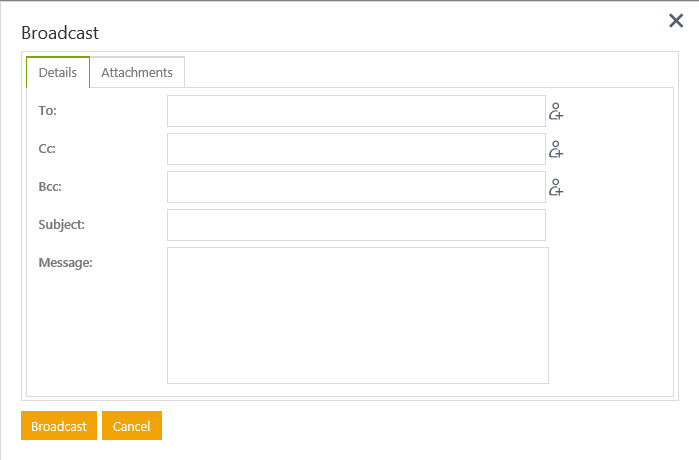
A message that you send to an identified (internal or third party) user is called as Broadcast. By using the Broadcast feature, you can send ad hoc messages and important messages relating to an agreement through ICM UI .
To broadcast an agreement:
1. On the ICM Home page, click the Agreements tile. The Agreement page displays a list of agreements.
2. Click ![]() next to the agreement that you want to broadcast to other users. The Agreement Details page appears.
next to the agreement that you want to broadcast to other users. The Agreement Details page appears.
3. Click ![]() on the upper right corner above agreement details. The Broadcast dialog box appears.
on the upper right corner above agreement details. The Broadcast dialog box appears.
The Broadcast dialog box cosists of two tabs:
- Details
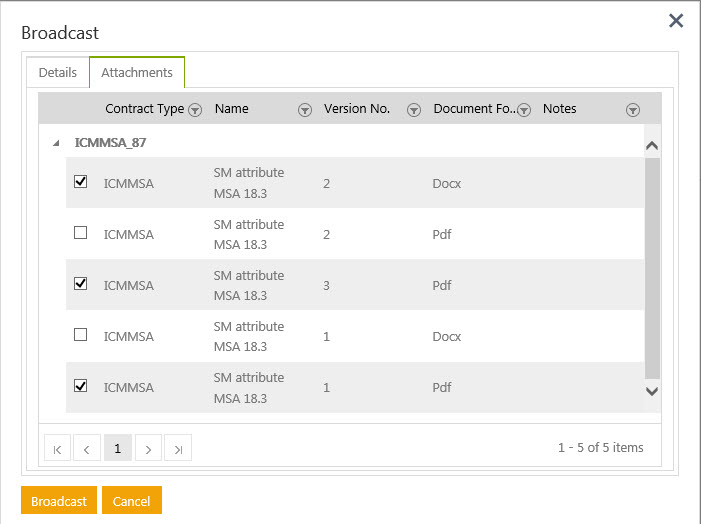
- Attachements
Details
On this tab, you can add users, and type the subject line and your message.
a. In the To, Cc, and Bcc fields, click to add users. The Select Users dialog box appears.
The Select User dialog box displays the following tabs:
- • Internal: Add internal users.
- • Third Party: Add third party users.
- • Role: Add users according to role. Includes External Signatory.
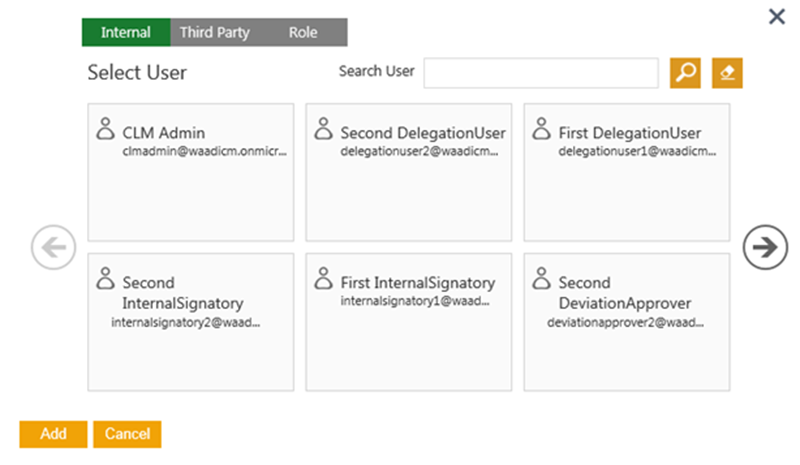
b. In the Subject field, type the subject of the message.
c. In the Message field, ype the message or comments and then click Broadcast. The message Broadcast Successful appears.
d. Click OK. The system sends an email notification with the attached documents.
Attachments
On this tab, you can attach the agreement document. The tab displays documents with their version number and document format. The tab displays the following:
The tab displays the agreements in the form of a table. The table has the following columns:
- Checkbox to select the agreement
- Name
- Version No
- Document Format
- Version comments for document version
Click to select the appropriate agreement document.
Related Topics:
Agreements
ICM Help
Edit a Contract/Agreement
Edit a Contract/Agreement
Home > Agreements > Edit a Contract/Agreement
In ICM, you can Search Contracts/Agreements, and edit specific agreements.
You can add or remove, and make the appropriate changes in the existing agreements. You can edit an agreement at any stage. For example, you can edit an approved agreement.
However, you cannot edit an agreement when it is at the Executed state. When you edit an agreement, you have to go through the approval process again.
To edit the existing agreement:
1. In the agreements list, click ![]() . The agreement details page appears.
. The agreement details page appears.
2. Click Edit. The Edit Agreement wizard with the Attributes tab appears. Edit the required fields.
3. Click Next. Verify tab appears.
4. In the Verify tab, choose one of the following:
- - Previous to go back and make changes to the information that you have entered.
- - Update to update the agreement.
Related Topics:
Search Contracts/Agreements
Delete a Contract/Agreement
Delete a Contract/Agreement
Home > Agreements > Delete a Contract/Agreement
You (primary owner) can delete an existing agreement at any stage. For example, you can delete an agreement that is in Approved state. You cannot delete an agreement when it is in the Executed state.
Users having Manage permissions can delete an agreement.
In ICM, there are certain user privileges regarding managing the ICM features and functions. These privileges are provided by ICM Administrator.
To delete an agreement:
1. Click the agreement name link that you want to delete. The Agreement Details page appears.
2. Click ![]() next to the desired agreement record to view the agreement details. The Delete button on agreement details page is located at the bottom right corner of the page.
next to the desired agreement record to view the agreement details. The Delete button on agreement details page is located at the bottom right corner of the page.
3. Click Delete to delete the agreement. The application asks for your confirmation.
The message is displayed as "Are you sure you want to delete?" . Click Yes to proceed. The agreement will be deleted.
When an agreement is deleted, it is removed from the system completely.
Related Topics:
Search Contracts/Agreements
Cancel a Contract/Agreement
Cancel a Contract/Agreement
Home > Agreements > Cancel a Contract/Agreement
You (primary owner) can cancel an agreement in the Draft state of an agreement. The Cancel button is visible after the agreement is published.
To cancel an agreement:
1. On the Agreement Details page, click Cancel.
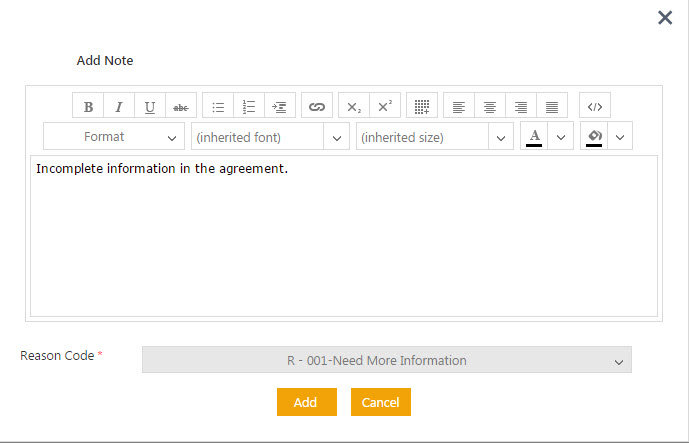
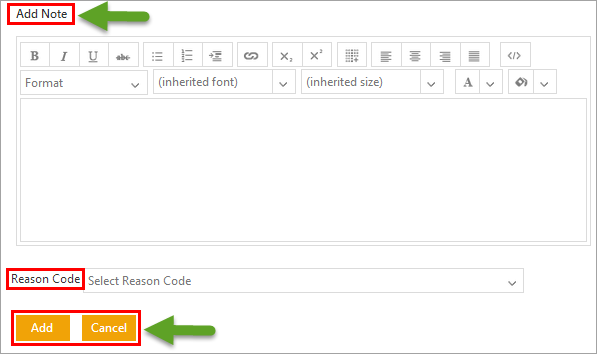
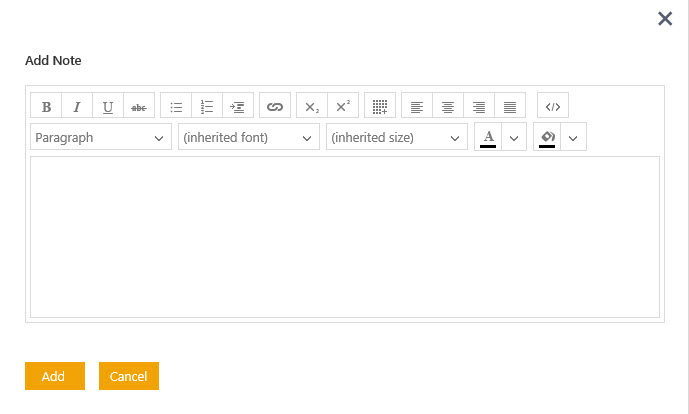
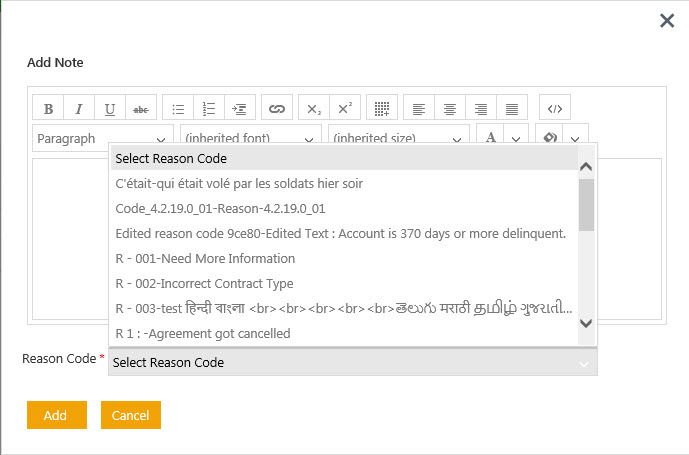
2. In the Add Note dialog box, type your comments, in the Reason Code list, select the reason for cancellation, and then click Add. The status of the agreement changes to Cancelled.
The cancellation action appears in History. The cancelled agreement is visible in the agreement search. In the Cancelled state, you can see the Revert button on the Agreement Details page. You can activate the cancelled agreement using this button.
Related Topics:
Search Contracts/Agreements
Add Team to Your Contract/Agreement
Add or Remove Approvers after Contract/Agreement is Published
Home > Agreement Management > Add and Remove Approvers
You can Add, Remove Approvers and arrange them sequentially if you have privilege to Add/Remove Team.
In ICM, there are certain user privileges regarding managing the ICM features and functions. These privileges are provided by ICM Administrator.
After an Agreement is published, you can Add or Remove an Approver in Draft and Waiting for Approval state.
Add an Approver
To add an Approver:
1. On the home page, click the Agreements tile.
2. Now on the Agreements page, view ![]() the Agreement either in Draft state or Waiting For Approval state, to add the Approver.
the Agreement either in Draft state or Waiting For Approval state, to add the Approver.
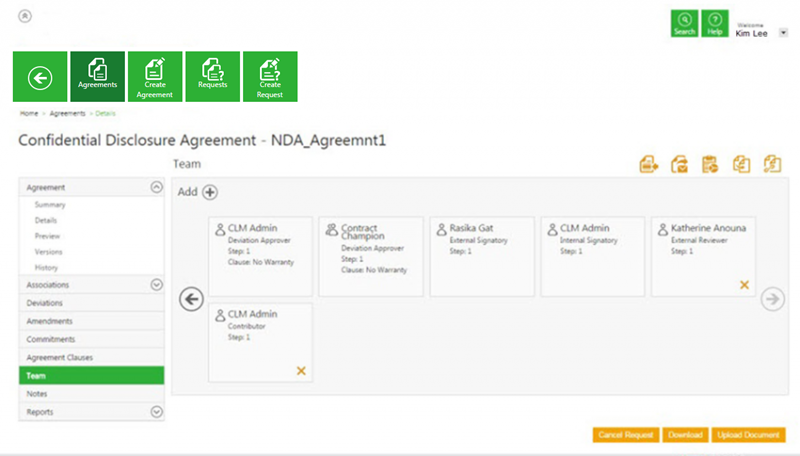
3. Click the Team option in the left pane. All the team members for the Agreement will appear.
4. Now click ![]() next to Add. The Add User dialog box will pop up.
next to Add. The Add User dialog box will pop up.
5. In Add User dialog box Select Role field consists of nine types of Approver and other roles as well which are:
- Business Function Approver
- Compliance
- Compliance Approver
- Contract Admin
- Finance Approver
- Legal Approver
- Marketing Approver
- Observer
- Other Approver
- Product Approver
- Sales Approver
- Secondary Owner
- Technical Approver
- Business Function Approver
Select the type of Approver as per the requirement.
| Note: When Agreement is in Draft or Waiting For Approval state, only the Approvers can take action. |
6. After that under Select User, select appropriate user or search the user by entering the initials in Search User field.You can select multiple users as Approver.
7. The hierarchy number of the user appears in the Step Number box. You can change the step number according to your agreement flow or keep it as it is.
8. The Step Number can be earlier, current or higher, irrespective of User step. The Agreement approval flows sequentially according to the step number.
9. Once the Users are selected, enter the required comments in the Comments box.
10. By default Send Notification check box will be checked, so all the users added as Approver will receive a notification regarding it. If you don't want to send notification to the added users, uncheck the Send Notification box.
| Note: Only the User added manually will receive Notification. |
11. Click Add. The added user will appear in Team option.
Remove an Approver
You can remove only those Approvers that you have added manually. Approvers that are defined by rule cannot be removed.
To remove an Approver:
1. Click ![]() next to the Approver name. A dialogue box will pop up with the message You are about to remove a team member! in it.
next to the Approver name. A dialogue box will pop up with the message You are about to remove a team member! in it.
2. Enter the required comments in Comments box.
3. By default Send Notification check box will be checked, so the user getting removed will receive a notification regarding it. If you don't want to send notification to the user, uncheck the Send Notification box.
| Note: At a time only one user can be removed. |
4. Click Submit, the user will be removed.
Enable and Disable Approvers
Home > Agreement Management > Enable and Disable Approvers
You can Enable, Disable approvers, if you have Enable/Disable Team privilege. In ICM there are certain user privileges regarding managing the ICM features and functions. These privileges are provided by ICM Administrator.
After an Agreement is published, you can Enable or Disable an Approver in Draft and Waiting for Approval state.
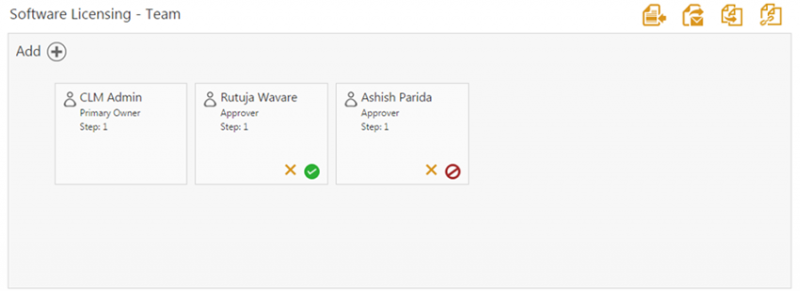
1. On the Agreements page, click the Team option in the left pane. All the team members for the Agreement will appear.
2. Click ![]() to disable a user.
to disable a user.
The message 'Are you sure you want to disable user?' appears.
Click Yes to disable the user tile.
3. Click ![]() to enable a user.
to enable a user.
The message 'Are you sure you want to enable user?' appears.
Click Yes to enable the user tile.
| Note: If you have the necessary privileges, you can add or remove Approvers as well. |
Trigger Notification
Home > Agreement Management > Trigger Notification
Notifications keep you informed about the contract activities carried out by various users. It provides updates on all contract activities in the form of notifications. You can view these notifications under the Notifications tab.
Trigger Notification feature allows sending a notification to the member that is added or removed from an agreement team.
Before triggering a notification, you need to create an agreement and add members to the agreement team.
To create an agreement:
1. On the ICM Dashboard, click Agreement Management.
2. On the Agreement Management page, click Create Agreement.
3. The Create Agreement page consists of four tabs.
A. Contract Type Details
B. Attributes
C. Select Template
D. Verify
A.Contract Type Details
| Field | Action |
|---|---|
| Category | Select relevant category |
| Contract Type Name | Select appropriate contract type name |
| Type Of Paper | Select appropriate type of paper |
| Note: Depending on the type of paper you select, tabs appear differently: - If you select the Type Of Paper as Own, the Select Template tab appears. The tab displays the relevant templates for the selected contract type. |
B. Attributes
  The fields that appear in Attributes tab depend on the Contract Type you selected.
  Enter the necessary information on this page and click Next.
C. Select Template
Select the appropriate template from the available list.
D. Verify
The Verify page consists of four buttons.
-Previous: Click this button to go back to the earlier screen.
- Create: Click this button to create the agreement.
-Create and Publish: Click this button to create and publish the agreement.
-Create and Send for Approval: Click this button to create and send the agreement for approval.
Let us understand how to trigger a notification.
To trigger a notification:
1.On the Agreement Details page, in the left pane, click Team.
2.On the Agreement Teampage, click along Add.
3.On the Add User page, select the appropriate user and the role of the user.
3.Select the Send Notification checkbox to send the notification to the user you added.
Note: You can select the Send Notification checkbox to send notification to the user you may have removed.
Review and Approve/Reject a Contract/Agreement
Send a Contract/Agreement for Review
Home > Agreements > Send a Contract/Agreement for Review
ICM has strong review and approval processes. After the agreement is created, you (primary owner) send it for internal and external review. The third party review process is carried out off-premises. The Reviewer can suggest the changes wherever necessary.
To send a document for a review:
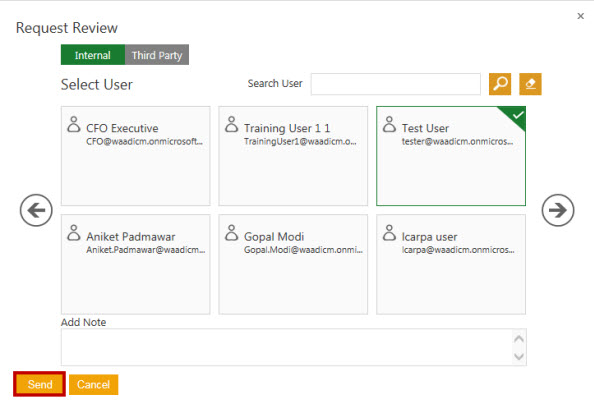
1. On the details page of an agreement, click Request Review.
The Request Review dialog box appears.
| Note: The Third Party tab displays a user that you have added as an external signatory while creating an agreement. |
Make the appropriate selection:
- a. Select Internal to add internal user as a reviewer.
- b. Select Third party to add external user as a reviewer. This tab displays a user that you have added as an external signatory while creating an agreement.
2. Under Select User, select appropriate user as a reviewer. Alternatively, in the Search User box, type the name of the appropriate user, and then click ![]() .
.
Use the scroll arrows ![]() to scroll through users.
to scroll through users.
3. Click Send. The reviewer receives a notification for review. The status of the document changes to Review Pending.
To learn how to review a agreement, click Review a Contract/Agreement.
Review a Contract/Agreement
Home > Agreements > Review a Contract/Agreement
There are two ways to review an agreement:
- Internal Review.
- Third party review.
A user role defines controls or permissions given to a user. ICM has the following predefined user roles for the Agreements feature:
- Contract Admin
- Primary owner
- Approver
- Reviewer
- Deviation approver
You can review an agreement as an internal reviewer if you are assigned a role of a Reviewer. Third party review is done by the external parties of an agreement. Let us understand the process to review an agreement as a Internal Reviewer
Review as an internal reviewer
To review an agreement as an internal reviewer:
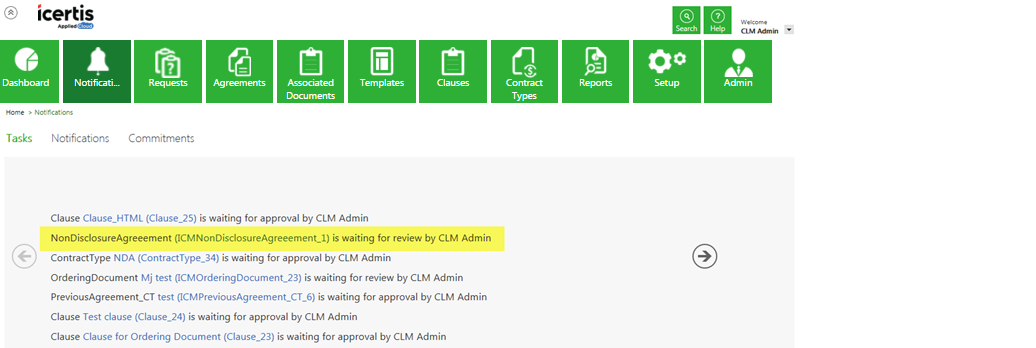
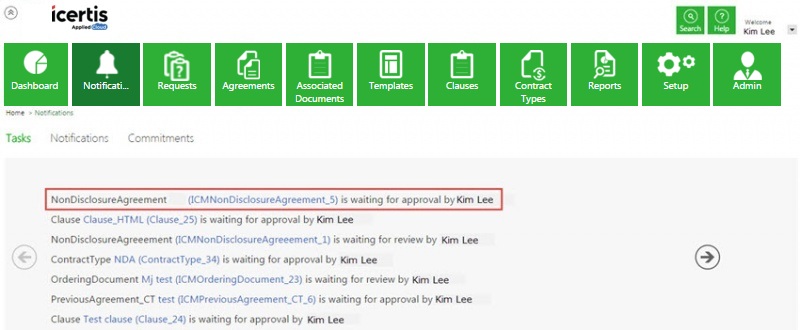
1. Click the Notifications tile on the Home page, and then the Tasks tab. A list of tasks appear.
2. Click the agreement name. The agreement details and preview page appears.
- a. Click the appropriate buttons:
- - Download Document to download the agreement.
- - Cancel Request to cancel the review.
- - Upload Document to upload the reviewed document.
- - Approve to approve the review.
- - Reject to reject the request.
- - Download Document to download the agreement.
- b. Click Approve to approve the request. The Add Note dialog box appears.
- c. Type appropriate comments, and then click Add. The status of the agreement changes to Draft.
Once an agreement is sent for the review using Request Review; this action can be cancelled as well.
3. Subsequently, you can perform certain tasks as required.
- - Download Document to download the agreement.
- - Upload document to upload the agreement.
- - Edit to edit the agreement document.
- - Assemble Contract to assemble multiple contracts.
- - Request Review to send the agreement for review.
- - Send For Approval to send the agreement for approval to the respective approver.
- - Delete to delete the agreement.
Review as a third party reviewer
To review an agreement as a third party reviewer:
- 1. Download the document that you have received by e-mail from the primary owner.
- 2. Review the document, and then send it to the primary owner by e-mail.
If you are a primary owner:
When you receive the document from the reviewer, incorporate the changes, if any, and upload the document.
Related Topics:
Delegate an Agreement Approval/Review
Recall an Approval
Home > Agreements > Recall an Approval
In ICM, user (primary owner) also has an ability to Recall an Approval, which will roll back the Agreement sent for approval, into Draft state. It helps the user to make basic changes required in the Agreement and trigger back the approval workflow again.
To Recall an Approval:
1. On an Agreement page view ![]() the Agreement which is in Waiting for Approval state.
the Agreement which is in Waiting for Approval state.
2. Now on the Agreement Details page, click Send for Approval to send the Agreement further for approval.
3. Once you click Send For Approval, Recall button will appear.
4. You can click Recall if you want to make any changes to the Agreement which is required and was not done before sending the Agreement for approval.
5. When clicked on Recall, Add Note dialog box pops up. If required enter the relevant description and select the appropriate reason code in the Reason Code field from the list provided.
6. Once done click Save. The Agreement will be back in Draft state.
Approve a Contract/Agreement
Home > Agreements > Approve a Contract/Agreement
A user role defines controls or permissions given to a user. ICM has the following predefined user roles for the Agreements feature:
2. Click the agreement name link. The Agreement Details page appears.
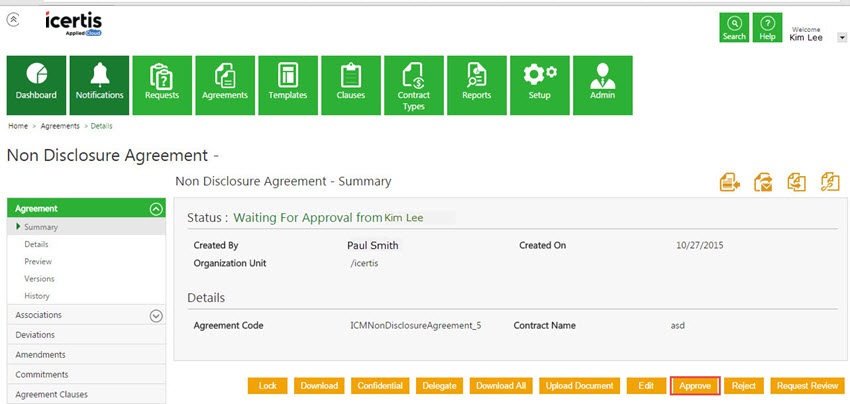
3. Click Approve. The Add Note dialog box opens.
4. Type appropriate note, and click Add. The status of the agreement changes to Approved.
To learn how to send an agreement for review, click Send a Contract/Agreement for Review
Tutorials:
Approve Agreement
Related Topics:
Delegate an Agreement Approval/Review
Reject a Contract/Agreement
Home > Agreements > Reject a Contract/Agreement
A user role defines controls or permissions given to a user. ICM has the following predefined user roles for the Agreements feature:
- Contract Admin
- Primary owner
- Approver
- Reviewer
- Deviation approver
You can approve/reject an agreement if you are assigned a role of a Approver. If you reject an agreement, you have to provide the appropriate reasons for it.
To reject an agreement:
1. On the ICM Home page, click the Notifications tile, and then click the Tasks tab. List of tasks waiting for your action appears.
2. Click the agreement name link that you want to approve. The Agreement Details page appears.
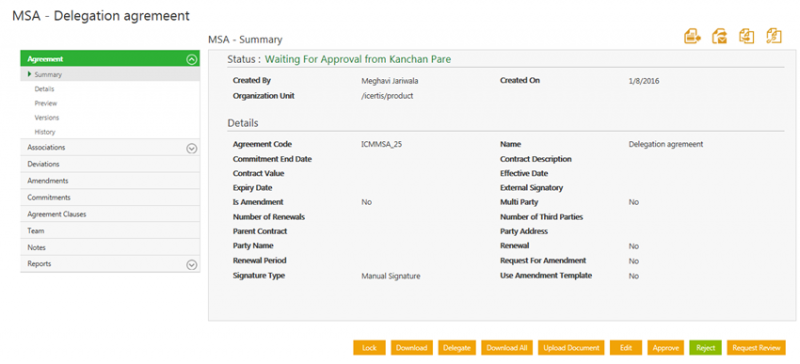
3. Review the agreement, and then click Reject to reject and agreement. The Add Note dialog box appears.
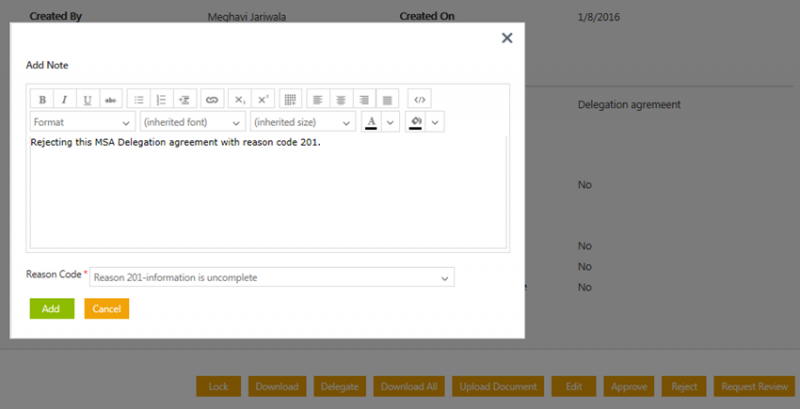
4. Type your comments or details explaining why you are rejecting the agreement.
5. In the Reason Code list, select the appropriate reason, and then click Add. The agreement goes back to the Draft state.
Tutorials:
Reject Agreement
Add Notes
Home > Agreements > Add Notes
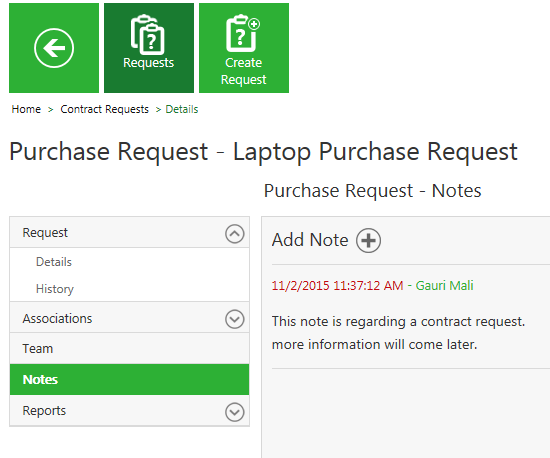
Notes are the comments added to a contract request or a template.
You (primary owner) can add your comments while creating or editing a contract request.
To add notes while creating or editing a request:
1. On the contract Requests Details page, click the Notes tab, then click Add Note. The Add Note dialog box appears.
2. In the Add Note dialog box , type the appropriate note.
Delegate an Agreement Approval/Review
Home > Agreements > Delegate an Agreement Approval/Review
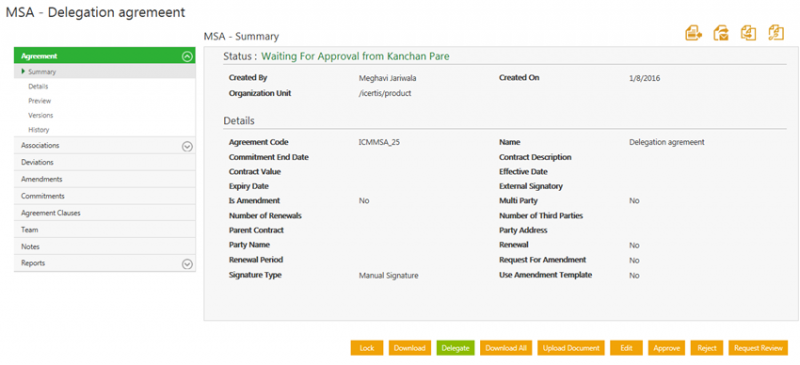
If you are an approver, you can delegate your task of approving, reviewing, or signing an agreement to another user.
To delegate an agreement:
1. On the Home page, click the Notifications tile , and then click the Tasks tab. A list of tasks appears.
2. Click the agreement name link. The Agreement Details page appears.
3. Click Delegate. The Select User dialog box appears.
4. Select a user, and click Add. Alternatively, in the Search User box, type the name of the desired user, and click ![]() .
.
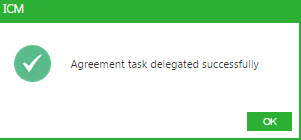
Use the scroll arrows ![]() to scroll through users. The Agreement task delegated successfully message appears.
to scroll through users. The Agreement task delegated successfully message appears.
5. Click OK. The delegated user receives a notification.
| Note: After delegating a task, the Recall Delegation button is visible on the Agreement Details page using which the approver can recall the delegation. |
Tutorials:
Delegate an Agreement
Deviation in Clauses
Review Deviated Clauses
Home > Agreements > Review Deviated Clauses
The third party/supplier makes modifications to contract and sends it to you (Primary Owner).
Being a Primary Owner, you then review deviated clauses and send it for deviation approval to the Deviation Approver.
To review deviated clauses:
1. Upload the agreement/contract in ICM.
2. Click ![]() located on the upper right corner of the Agreement Details page. ICM identifies the changes made by the third party/supplier and displays them
located on the upper right corner of the Agreement Details page. ICM identifies the changes made by the third party/supplier and displays them
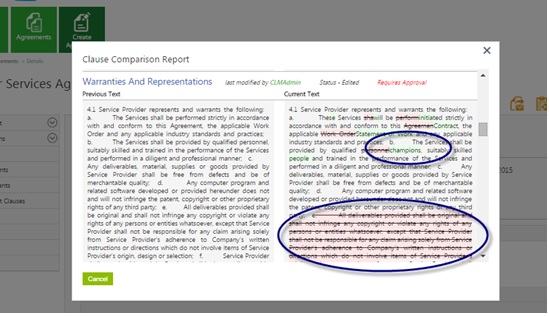
in the Clause Comparison Report. The modified clauses are flagged as Deviated Clauses.
The Clause Comparison Report displays the following:
- The Previous Text column displays the original clause text.
- The Current Text column displays the modified text. Scroll down to see the complete list of changes done for different clauses.
- The newly added text is highlighted in green.
- Strike through represents the text that is removed.
- The History tab displays the deviation information.
3. On the Deviations tab, click ![]() to view the deviation details of a clause.
to view the deviation details of a clause.
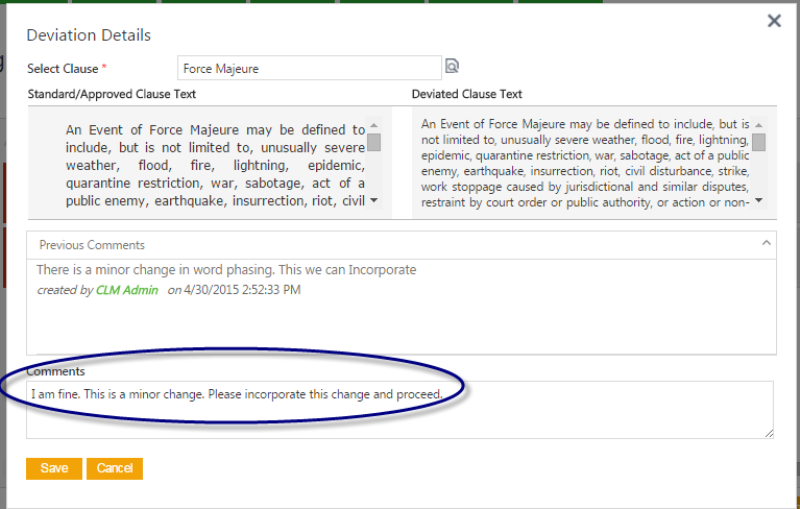
On the Deviation Details dialog box, you can take the following actions:
- View the changes done in the Comments box.
- Review the changes done for clauses, and add a comment for each clause.
These comments will be visible to Deviation Approvers which will help them decide whether they should approve or reject a clause.
4. Add Deviation Approvers to the Team.
| Note: If the Deviation Approval Rule is defined, deviation approvers are automatically added in the Team tab. |
Related Topics:
Add Manual Deviation
Approve Deviated Clauses
Home > Agreements > Approve Deviated Clauses
A user role defines controls or permissions given to a user. ICM has the following predefined user roles for the Agreements feature:
- Contract Admin
- Primary owner
- Approver
- Reviewer
- Deviation approver
You (primary owner) send the reviewed agreement/contract to Deviation Approver. As a Deviation Approver, you can approve or reject individual clauses inside the agreement if a Deviation Approver role is assigned to you.
To approve/reject deviated clauses:
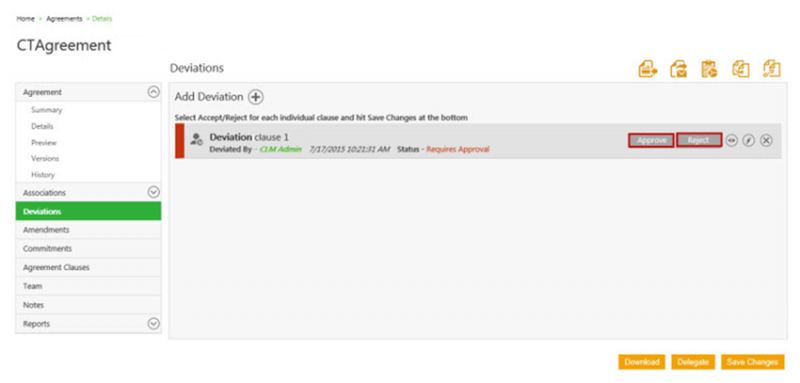
1. Click the agreement/contract link that you have received in the email notification. The system navigates you to the Deviations tab of agreement details page.
4. Click ![]() to view comments provided by other users in the team or other stakeholders.
to view comments provided by other users in the team or other stakeholders.
2. Click ![]() . The Deviation Details dialog box displays the comments provided by other users. You can add your own comments too.
. The Deviation Details dialog box displays the comments provided by other users. You can add your own comments too.
3. After your review, click one of the following buttons:
- Approve to approve the clause.
- Reject to reject the clause.
- Delegate to delegate the task to another user.
To learn more, click Delegate an agreement.
The History tab displays all the events and actions related to the Clause deviations and the approval flow.
Add Manual Deviation
Home > Agreements > Add Manual Deviation
In the third party review, the Third party/Supplier makes modifications to agreement/contract and sends it to the Primary Owner. Primary Owner (you) check for the deviated clause text that might need approval. After reviewing, primary owner(you) add the deviated clause text manually by using the Deviations tab. Then, primary owner(you) send the contract for further approval.
4. On the Add Deviation dialog box, add deviation to agreement clauses as follows:
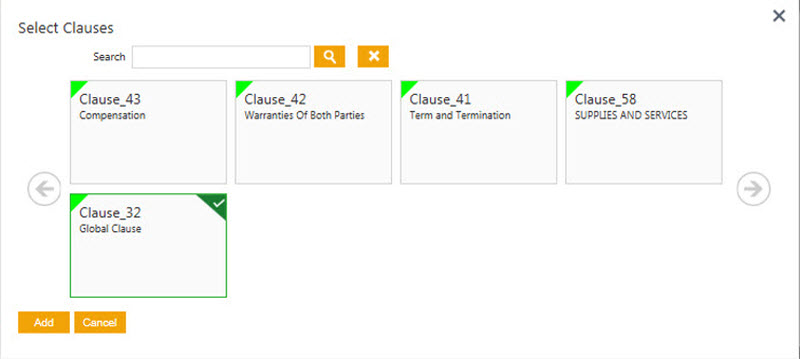
- a. In the Select Clause box, select the desired clause using the select icon. The Select Clauses dialog box appears.
- b. Select the clause to which you want to add deviation. Alternatively, you can type the clause name, and click
 to search a clause.
 - c. Click Add. The clause name appears in the Select Clause box.
- d. In the Deviated Text box, type the new/updated text.
- e. In the Comments box, type comments related to deviated clause that you want other users to see.
- f. Click Save. The 'Deviation added successfully.' message appears.
- g. Click OK. The deviation appears in the Deviation tab.
Related Topics:
Review Deviated Clauses
Execute a Contract/Agreement
Fulfil a Commitment
Home > Agreements > Fulfil a Commitment
Every agreement or contract has obligations associated with it. The obligations are towards the transactions, clauses, and so on. Commitment is like a reminder to fulfil these obligations. For example, reminding supplier about contract expiry.
The Primary Owner creates a commitment to keep a track of a certain tasks relating to an agreement. The commitment owner on the due date of commitment, takes the appropriate action to fulfil the commitment. For example, a commitment may be to remind a supplier to provide necessary information on time , or to renew a contract, and so on.
To fulfill a commitment:
1. On the Home page, click the Notifications tile, and then the Commitments tab. List of commitments that you need to fulfil appears.
2. Click next to the commitment that is pending for you.
3. In the Add Action Details tab, enter the following information:
- a. In the Action Taken box, type the details of the action you have taken on the commitment.
- b. In the Action Date box, type or select the action date from calendar.
- c. In the Remarks box, type your remarks, if any.
- d. In the Commitment Status list, select one of the following:
- • Cancelled
- • Failed
- • Postponed
- • Succeeded
- • Cancelled
If you select the status as Postponed, the New Expected Completion Date box appears.
Type or select the new date from calendar.
- e. In the File field, click Select File to upload supporting documents.
- f. Click Save. The message appears as follows:
'Commitment will not be editable anymore. Do you want to continue?'
- g. Click Save.
Send an Agreement to External/Third Party Signature
Home > Agreements > Send an Agreement to External/Third Party Signature
After an agreement is approved and signed internally, the agreement status changes to Waiting for External Signature. Then, you (primary owner) send it for external signature using the Send for External Signature button.
External signatory can sign the agreement manually or electronically.
When an agreement is sent for electronic signature; it is sent through electronic signature software. ICM is integrated with Electronic Signature Software (EchoSign/DocuSign). In case of manual signature, the agreement is sent by an e-mail to the external signatory.
Here is the process to send an agreement for external signature:
To send an agreement to external signatory:
- 1. Click the agreement that you want to send to external signatory. The Details page appears.
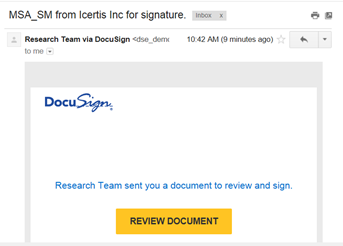
- 2. Click Send For External Signature. An e-mail is sent to the external signatory from Docusign. The status of the agreement changes to Waiting For External Signature.
In case of manual signature, the document is sent by an e-mail to the external signatory.
Electronic Signature for Own Paper
Home > Agreements > Electronic Signature for Own Paper
ICM is integrated with Electronic Signature Software (EchoSign/DocuSign). An external signatory can review an agreement and then electronically sign it by using Docusign.
You may want to read Send an Agreement to External/Third Party Signature before you begin the following task.
To sign an agreement electronically:
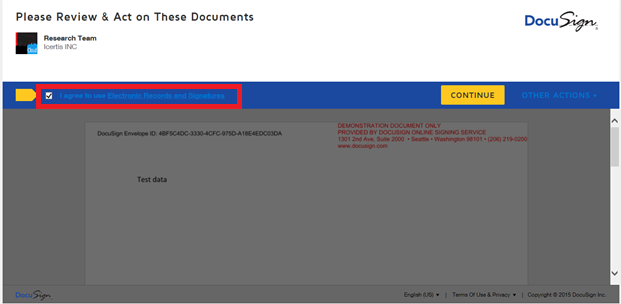
1. Open the e-mail that you have received from Electronic Signature Software (EchoSign/DocuSign), and then click Review Document. The Please review & Act on These Documents window appears.
2. Click to select the I agree to use Electronics Records and Signatures check box, and click Continue. The Fields menu is enabled on the left panel.
If you are using Internet Explorer, docusign.net wants to track your physical location message appears on screen. Click Allow.
| Note: In the document, sender may mark few fields that appear with a text box next to the field name. Fill the appropriate information in appropriate text box. e.g. title, company. |
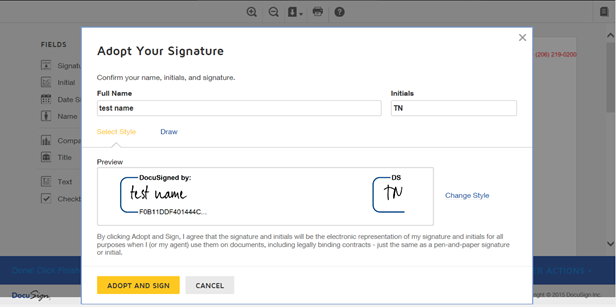
3. Click Sign next to Signature. If you are signing the document for the first time, the Adopt Your Signature dialog box appears.
| Note: If you are a regular signer (signing a document more than once), the system inserts the signature that you have used while signing for the first time. |
4. Verify your Full Name, Initials, and Signature. Your Full Name and Initials appear as they are entered at the time of your user creation process.
5. On the Select Style tab, verify your signature.
6. Click Change Style to change the style of your signature and initials. A list of alternate styles appear. Use scroll arrows to scroll through the signatures.
You can select from the list of styles.
7. Alternatively, click the Draw tab to draw your own signature. Click Clear to clear the signature.
8. Click Adopt And Sign. The Signature and Initials appear onto the document.
| Note: Once the signature appears onto the document, you cannot go back and change the style of the signature. |
9. Click Finish. You receive a notification stating your signature process is completed.The status of the agreement changes to Waiting For Internal Signature.
An e-mail is sent to the internal signatory.
Internal Signatory follows steps 1 to 9 to electronically sign the agreement. Once the Internal Signator signs the agreement, the status changes to Executed.
A notification e-mail is sent to the primary owner, internal signatory, and external signatory.
Electronic Signature for Third Party Paper
Home > Agreements > Electronic Signature for Third Party Paper
ICM is integrated with Electronic Signature Software (EchoSign/DocuSign) that enables external signatory to review and electronically sign an agreement.
You may want to read Send an Agreement to External/Third Party Signature before you begin the following task.
To sign an agreement electronically:
1. Open the email that you have received from Electronic Signature Software (EchoSign/DocuSign), and then click Review Document. The Please review & Act on These Documents window appears.
2. Click to select the I agree to use Electronics Records and Signatures check box, and click Continue. The Fields menu is enabled on the left panel.
| Note: If you are using Internet Explorer, docusign.net wants to track your physical location message appears. Click Allow. |
In the Fields menu, you can use the following options:
- Signature: Drag and drop your signature onto the document.
- Initial: Drag and drop your initials onto the document.
- Date Signed: Drag and drop the Date onto the document. Displays current date by default.
- Name: Drag and drop the Name box. Type your name into the box.
- Company: Drag and drop the Company box. Type the name of your company into the box.
- Title: Drag and drop the Title box. Type the title into the box.
- Text: Drag and drop Text box. Type additional text into the box.
- Checkbox: Drag and drop Checkbox into the document.
3. Drag the Signature onto the document. The Adopt Your Signature dialog box appears. Verify your Full Name, Initials, and Signature.
Your Full Name and Initials appear as they are entered at the time of your user creation process.
4. On the Select Style tab, verify your signature.
5. Click Change Style to change the style of your signature and initials. A list of alternate styles appear. Use scroll arrows to scroll through the signatures.
You can select from the list of styles.
6. Alternatively, click the Draw tab to draw your own signature. Click Clear to clear the signature.
7. Click Adopt And Sign. The Signature and Initials appear onto the document.
| Note: Once the signature appears onto the document, you cannot go back and change the style of the signature. |
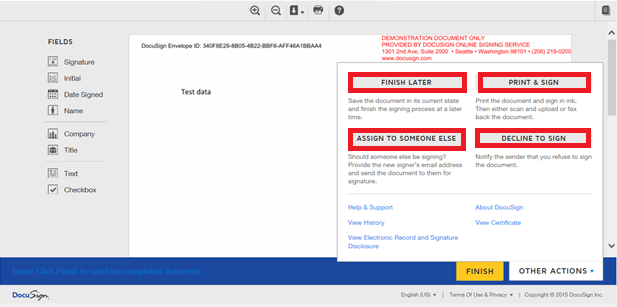
8. Click the Other Actions menu.
In the dialog box that appears, select from the following options:
- A. Click FINISH LATER to save the document in its current state, and finish the signing process at a later time.
- B. Click PRINT & SIGN to print the document, and sign it in ink. You can scan and upload, or fax the document.
- C. Click ASSIGN TO SOMEONE ELSE to assign a third person as a signatory.
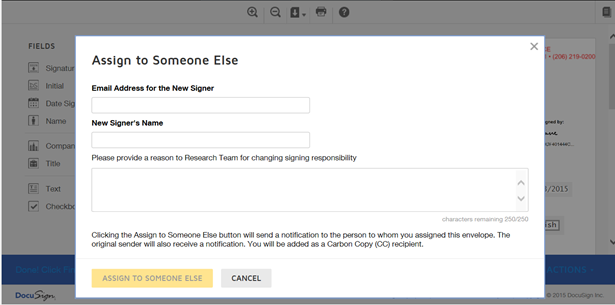
In the Assign to Someone Else dialog box, fill in the following:
- 1. In the Email Address for the New Signer box, type the email address of the person you want to assign the envelope.
- 2. In the New Signer's Name box, type the name of the new signor.
- 3. In the Please provide a reason to Research Team for changing signing responsibility box, type the reason for changing the signing responsibility.
- 4. Click ASSIGN TO SOMEONE ELSE. The new signor and the original sender receives a notification with you as a Carbon Copy (CC) recipient.
- 1. In the Email Address for the New Signer box, type the email address of the person you want to assign the envelope.
- D. Click DECLINE TO SIGN to notify the sender that you refuse to sign the document.
9. Click FINISH to complete the signature process. You receive a notification stating your signature process is completed.
The status of the agreement changes to Waiting For Internal Signature. An email is sent to the internal signatory.
Internal Signatory follows steps 1 to 9 to electronically sign the agreement. Once an Internal Signatory signs the agreement, the status of the agreement changes to Executed.
A notification email is sent to the primary owner, internal signatory, and external signatory.
Manual Signature
Home > Agreements > Manual Signature
An external signatory can review an agreement and then manually sign it by downloading the attachment received in email.
You may want to read Send an Agreement to External/Third Party Signature before you begin the following task.
To sign an agreement manually:
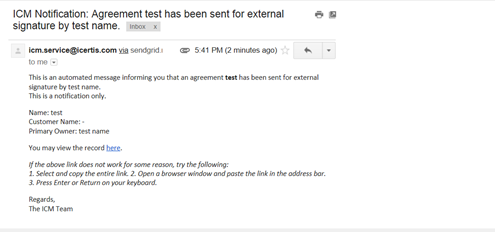
1. Open the e-mail that you have received from ICM, and then click Download to download the attachment that you have received in the mail.
2. Sign the hard copy of the agreement, and then scan the copy.
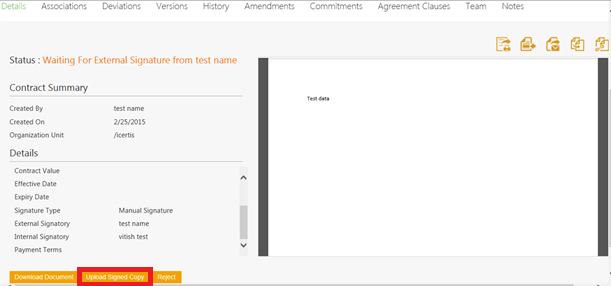
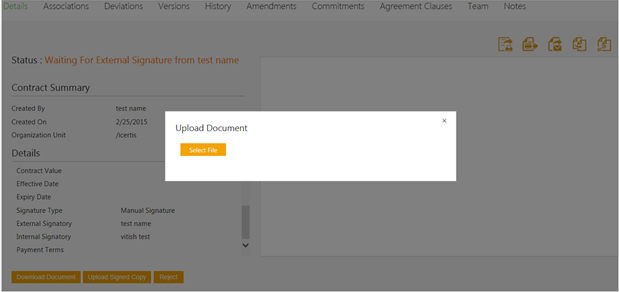
3. On the Details tab of the agreement, click Upload Signed Copy . The Upload Document dialog box appears.
4. Click Select File, and then upload the signed copy of the agreement. The status of the agreement changes to Waiting For Internal Signature.
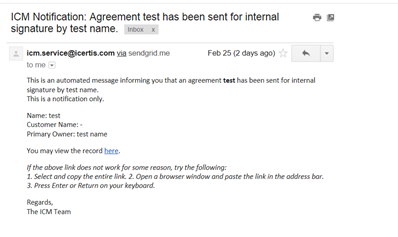
Once the external signatory signs an agreement, an e-mail is sent to the internal signatory for signature.
5. The internal signatory follows steps 1 to 4 for the manual signature.
Once the internal signatory uploads the signed copy of the agreement, the status of the agreement changes to 'Executed'.
A notification e-mail is sent to the primary owner, internal signatory, and external signatory.
Terminate a Contract/Agreement
Post - Execution Review of an Agreement/Contract
Home > Agreements > Post - Execution Review of an Agreement/Contract
The primary owner (you) initiates the post - execution review before terminating an agreement. For more details refer topic Terminate an Agreement.
In the post execution review, the authorized reviewer reviews the agreement. The reviewer verifies the clauses, terms and conditions,commitments of the agreement.
Let us see now how to initiate the post - execution review:
1. On the ICM Home page, click the Agreements tile. The list of existing agreements is displayed on the Agreements page.
2. Enter the Search For parameter as Status.
3. Select the status as Executed. The list of executed agreements is displayed in a tabular format.
4. Click the View Record icon next to the appropriate agreement record to view the agreement details.
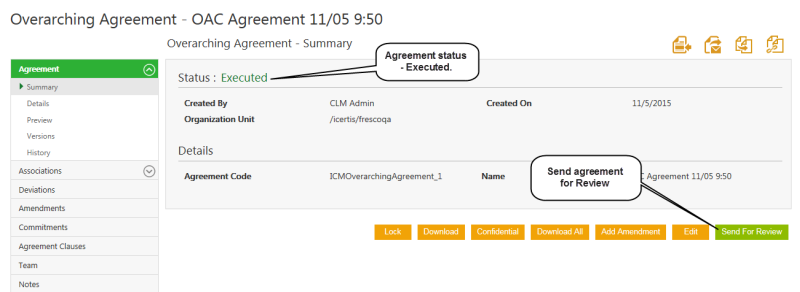
5. Click on Send for Review button to send the agreement for a post-execution review.
As per the rule, contract will be sent to the person who is added in a Team as a Reviewer.
Terminate an Agreement
Home > Agreements > Terminate an Agreement
Terminate an agreement means putting an end to the existing executed agreement. You can terminate an agreement for various business reasons.
Prerequisite to terminate an agreement:
The primary owner (you) initiates the post - execution review before terminating the agreement. The authorized reviewer in the team reviews the agreement. After the agreement is reviewed, the status of the agreement changes to Reviewed. Thereafter, primary owner (you) can terminate the agreement.
Refer topic Post - execution review of an agreement for more details.
Let us see now how to terminate an agreement:
1. On the ICM Home page, click the Agreements tile. The list of existing agreements is displayed on the Agreements page.
2. Enter the Search For parameter as Status. Agreements having various status are displayed along with the count of agreements having respective status.
3. Select the status as Executed. A list of executed agreements is displayed in a tabular format.
4. Click the agreement name link that you want to send for the post execution review. The Agreement Details page appears,click Send for Review. After the agreement is reviewed by the authorized reviewer in the team, the agreement status changes to Reviewed
5. Click the agreement name link to open the agreement, the Agreement Details page appears. Click Terminate to terminate the agreement. The agreement status changes to Terminated .


Add Amendment to a Contract/Agreement
Add Amendment to a Contract/Agreement
Home > Agreements > Add Amendment to a Contract/Agreement
Once an agreement is executed, you cannot edit it. However, you can add amendment to an executed agreement.
To add amendment to an agreement:
1. On the Agreement Details page, click Add amendment. The Add amendment page appears.
2. On the Attributes tab, make changes to the information that you want to update, and then click Next. The Verify tab appears.
3. On the Verify tab, verify the information that you have updated, and then click Create. The Amendment Details page appears. The amendment moves to the Draft state.
4. On the Amendment Details page, do the following:
Click the buttons as appropriate:
- Download Document to download the document for review.
- Upload Document to upload the document.
- Edit to edit the amendment.
- Publish to publish the amendment.
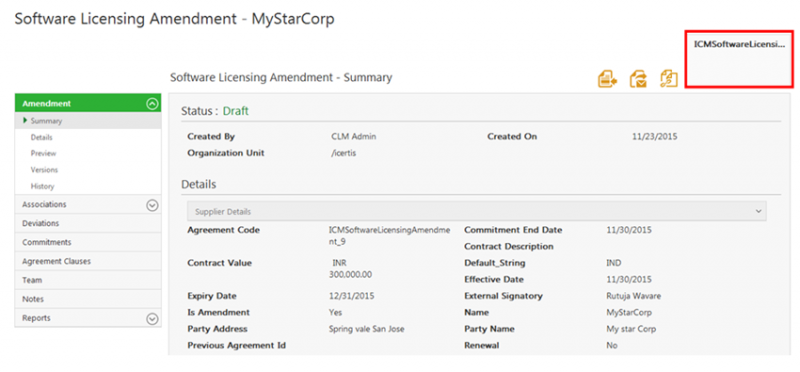
The parent agreement appears on the upper right corner above the amendment summary.
Click the name of the agreement (for example, ICMMSATest_28) to view the parent agreement.
The amendment appears on the Amendment tab on the Agreement Details page (of the parent agreement).
5. Click ![]() to view the amendment.
to view the amendment.
| Note: After adding an amendment to an agreement, it has to go through the similar flow of agreement from draft until execution. When the amendment is executed, it supersedes the original agreement and the status changes to Superseded. |
Upload Agreements Using MS Excel
Install ICM Excel Add-In
Home > Agreements > Install ICM Excel Add-In
ICM Excel Add-in is a software program that adds ICM functionality to Microsoft Excel. Once you install the Add-in, it gets integrated with Microsoft Excel.
System Requirements
- Microsoft Office 2010 and above
- Microsoft .NET Framework 4.5 and above
- Visual Studio 2012 Tools for Office Runtime package
Installing ICM Excel Add-in
To install the ICM Excel Add-In
1. Double-click the setup.exe program file on your hard disk to start the Setup program.
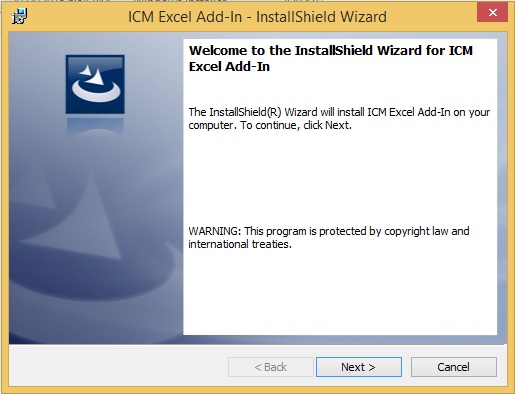
2. In the ICM Excel Add-In - InstallShield Wizard, Click Next.
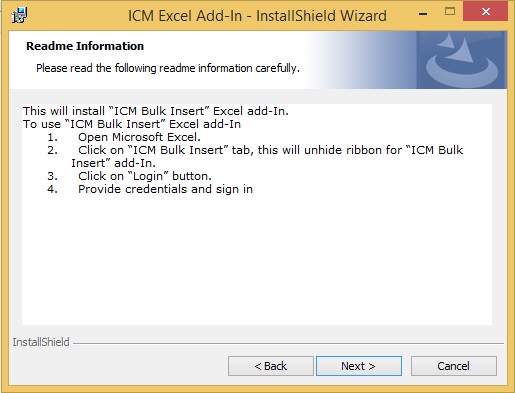
3. Read the Readme information, and then click Next.
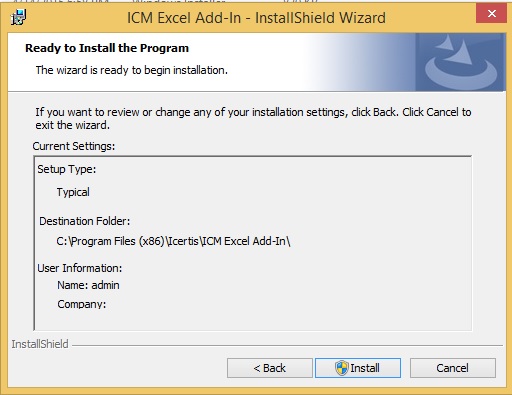
4. Check the settings before you begin the installation, and then click Install. If you want to review or change any of your installation settings, click Back.
Click Cancel to exit the wizard.
5. In the Do you want to allow the following program from an unknown publisher to make changes to this computer? message, Click Yes.
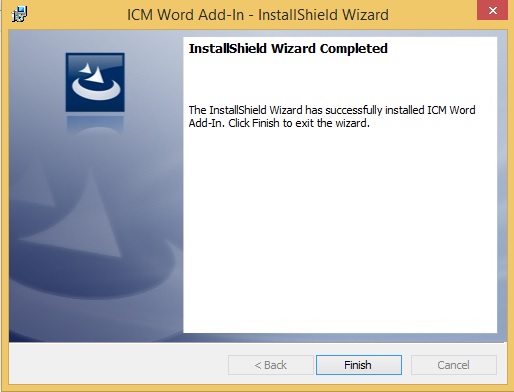
Once the installation completes, the InstallShield Wizard Completed message appears.
6. Click Finish.
Once you install the ICM Excel Add-in, the ICM Bulk Insert tab appears on the Microsoft Excel toolbar.
To learn how to log on to the ICM Excel Add-in, click [Log In to ICM Excel Add-In | Login to the ICM Excel Add-In.
Log In to ICM Excel Add-In
This text is hidden, user can see this text by clicking on expand button. Demo text demo text demo text demo text demo text demo text demo text demo text demo text demo text demo text demo text demo text demo text demo text demo text demo text demo text demo text demo text demo text
Upload Agreements Using ICM Bulk Insert
Home > Agreements > Upload Agreements Using ICM Bulk Insert
With Microsoft Excel Add-in, you can create and upload agreements in your central ICM repository using the familiar Microsoft Excel interface.
You can use ICM Excel Add-in to create agreements in bulk, and upload them into ICM at once.
Upload agreements to ICM
By using ICM Excel Add-In, you can upload bulk of agreements at once.
To upload agreements:
1. On the ICM Bulk Insert tab, in the Selections group, click Contract Type list, and then select appropriate contract type.
2. In the Action list, select from the following actions:
- Create Agreement: Click to create a new agreement.
- Create Agreement With Association: Click to create agreement and add associations (associated document/agreement) to it.
- Update Agreement: Click to update an existing agreement.
- Add Associations To Existing Agreements: Click to add associations to already created agreements.
- Update Associations Of Existing Agreements: Click to update the associations of already created agreements.
- Add Amendment: Click to add amendments to agreements.
- Update Amendment: Click to update existing amendment.
- Update Associations Of Existing Amendments: Click to add/update associations of existing amendments.
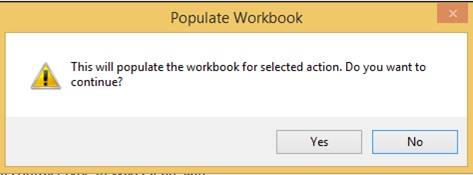
3. In the Actions group, click Populate Workbook. The 'This will populate workbook for selected action. Do you want to continue?' message appears.
4. Click Yes. All the attributes related to the selected contract type appear as column headers in the excel sheet.
5. Fill appropriate information in the attributes.
| Note: The attributes that appear in red color are mandatory. For example, in the Status attribute, you must select the status from Draft, Publish, Send For approval, and DirectByPass (execute). |
6. Click Upload. The Agreements created successfully message appears. The agreement appears in ICM as well as gets listed in the excel sheet.
<
Association Management
Create an Associated Document
Home > Agreement Management > Create an Associated Document
In ICM, now you can create the associated documents separately.
To create an associated document:
1. On the ICM Home page, click the Associated Documents tile. The Associated Documents page appears.
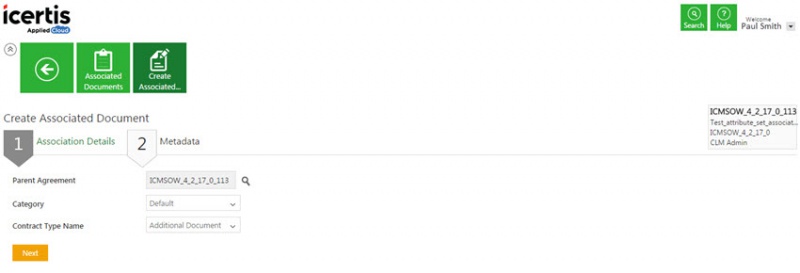
2. Click the Create Associated Document tile. The Create Associated Document wizard opens.
The wizard consists of two tabs:
- Associated Details
- Metadata
Enter the data in each tab as follows and click Next to go to the next tab.
- Associated Details
1. In the Parent Agreement field, click ![]() to select the agreement for which you want to create the associated document.
to select the agreement for which you want to create the associated document.
2. In the Category list, select the category of the associated document.
3. In the Contract Type Name, select the contract type for which you want to create the associated document.
- Metadata
In the Metadata tab, enter the appropriate information in the attributes, in the File Path field upload the associated document, and then click Create. The Associated Document gets created.
Search an Associated Document
Home > Agreement Management > Search an Associated Document
Use Search feature to get relevant search results. You can use various methods to narrow down your search and locate the associated document you are looking for.
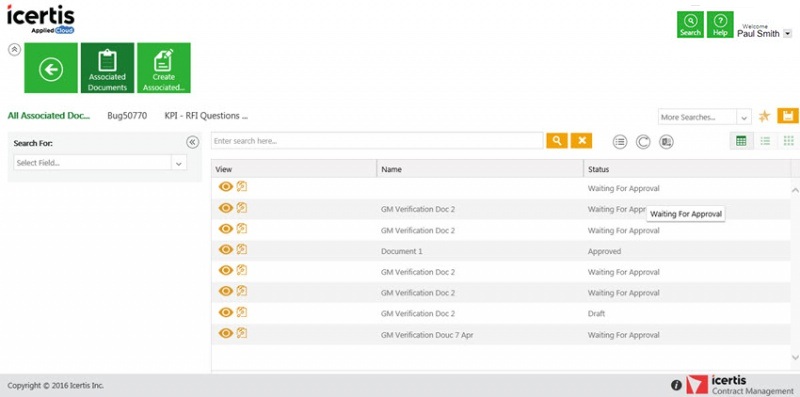
To search associated documents:
1. On the ICM Home page, click the Associated Document tile. The Associated Document page appears.
Search for a specific associated document by using any of the following options:
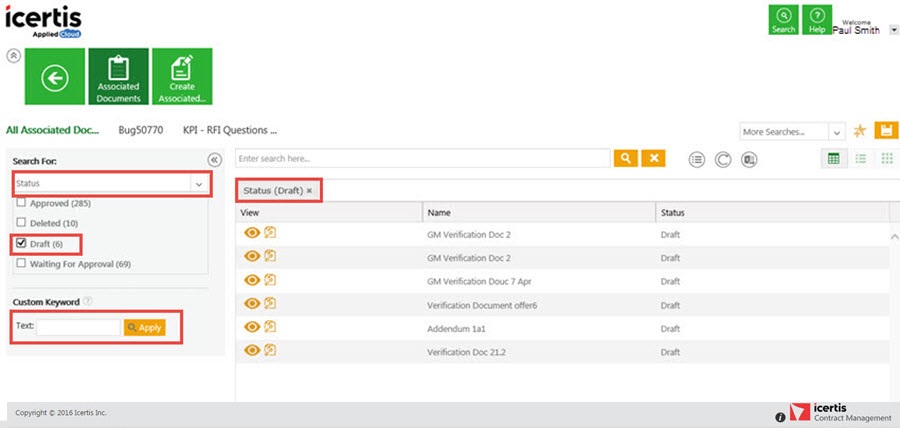
2. Under Search For,
- Click the Select Field list, and then select appropriate item from the list. The results that are relevant to the item appear. For example, if you select Status (to filter associations according to various status' pf associated documents), list of various status' of associated documents appear. You can then select appropriate status to filter your search.
- The number in the bracket denotes the number of available items which contain the search term. You can also select multiple options.
- Click the Select Field list, and then select appropriate item from the list. The results that are relevant to the item appear. For example, if you select Status (to filter associations according to various status' pf associated documents), list of various status' of associated documents appear. You can then select appropriate status to filter your search.
- To narrow your search, type free text in the Custom Keyword box, and then click Apply.
3. Alternatively, type keywords in the search box that is provided above the list of existing associated documents. A list of relevant associated documents appears.
4. You can further narrow your search by using any of the following methods:
| Search Term | Result |
| "..." | Type the search term in double quotation marks. It shows existing associated documents that include the exact search term. |
| *...* | Type the search term in star characters. It shows existing associated documents that include the exact search term. |
| *... | Prefix * to the search term. It shows existing associated documents that end with this term. |
| ...* | Suffix * to the search term. It shows existing associated documents that start with this term. |
Viewing the saved search terms and mark search as a Favorite
You can view your saved search terms by doing the following:
- a. In the More Searches box, select your saved search.
To learn how to save your search, click Save Your Search Results.
Approve an Associated Document
Home > Agreement Management > Approve an Associated Document
When the associated document is created, the approval rule triggers, and the document is sent to the approvers that are set by the approver rule. If you are an approver, you can approve or reject the associated document.
To Approve an associated document:
1. On your Home page, click the Notifications tile. The Tasks tab appears by default.
2. Click the association name link that you want to approve. The Associated Document Details page appears.
3. To Approve the document, click Approve. To reject the document, click Reject.
4. If you click:
- Approve: The Add Note dialog box appears. Type your comments and then click Add. The associated document gets approved.
- Reject: The Add Note dialog box appears. Type your comments, select the appropriate reason code, and then click Add. The associated document gets rejected and goes into the Draft state.
