Contents
- 1 Rule
- 1.1 Create a Rule
- 1.2 Using Masterdata Value options in Rules Actions
- 1.3 Changes in Document Assembly will replace tags with Metadata value
- 1.4 View or Edit a Rule
- 1.5 Create a Contract Type Selection Rule
- 1.6 Create a Template Selection Rule
- 1.7 Creating an Approval Rule
- 1.8 Create a Dynamic Attribute Rule
- 1.9 Create a Dynamic Association Rule
- 1.10 Create an Event Rule
- 1.11 Create a Contract Admin Rule
- 1.12 Create a Notification Rule
- 1.13 Create a Mandatory Association Rule
- 1.14 Create an Auto-attachment Rule
- 1.15 Create a Clause Assembly Rule
- 1.16 Create an Extension Selection Rule
Rule
You can work with Rules in several ways.
Create a Rule
You can create rules to create Requests or Agreements using the Rules tile. For example, you can create a Rule for an Agreement to get the Supporting Documents auto attached at the predefined state. The user who is provided with administrative privileges can only create Rules from Rule tile.
Using Rules you can ensure that:
- The Agreements/Contracts contain appropriate data depending on the type
- The Agreements/Contracts get executed as required
With ICI, you can create Rules for Contract Types. You can create various types of Rules only for the published Contract Types.
To create a Rule:
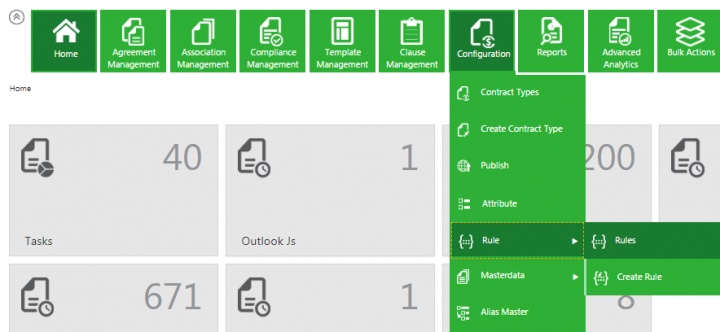
1. Click Home > Configuration > Create Rule.
2. Click Create Rule On the Rules page. The Create Rule page opens.
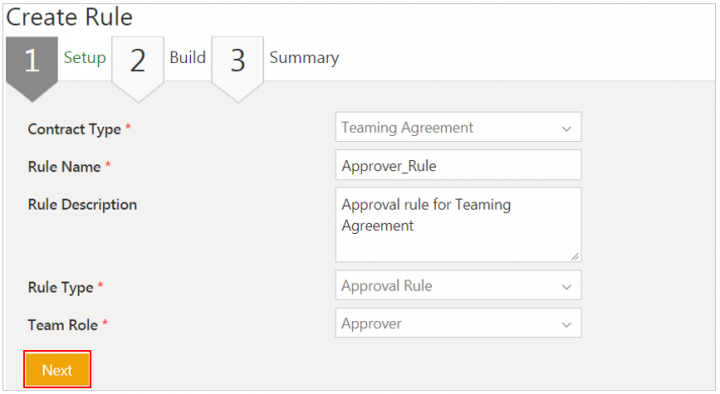
The Create Rule page consists of the following tabs:
- Setup
- Build
- Summary
Let us understand each tab one by one.
Setup
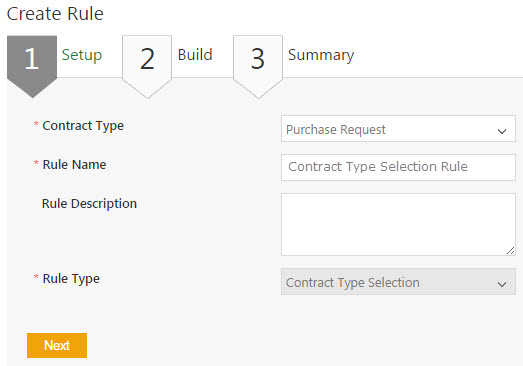
1. Select the Contract Type for which you want to create a Rule in the Contract Type list.
2. Type a name of the rule in the Rule Name box.
3. Type a description for the rule in the Rule Description box.
4. Select the type of the rule in the Rule Type from the Rule Type list.
For each type of a Rule, you need to select an approver role from the drop-down options.
- Approval Rule : To build a Rule that defines the conditions in which a specific user will be the approver for the Agreement.
- If you select the Rule Type as Approval Rule, the Team Role field is displayed. You can configure multiple approval rule sets, thus enabling greater flexibility in creating approval rules
Select the appropriate role of an approver from the following list of team roles:
- Approver
- Deviation Approver
- External Signatory
- Internal Signatory
- Reviewer
- Clause Assembly: To build a Rule that defines the conditions in which a specific clause will open in an Agreement.
- Contract Type Selection: To build a Rule that defines the conditions in which a specific contract type will be selected while creating an Agreement.
- Dynamic Association: To build a Rule that defines the conditions in which a specific Agreement/Associated Document will be selected while creating an Agreement.
- Dynamic Attribute: To build a Rule that defines the conditions in which a specific attribute will open while creating an Agreement.
- Set Attribute Value: Define the value of the attribute.
- Template Selection: To build a Rule that defines the conditions in which a specific template will be selected while creating an Agreement.
5. Click Next. The Build tab opens.
Build
The Build tab has the following two panes:
- Builder: You can add a Rule in this pane.
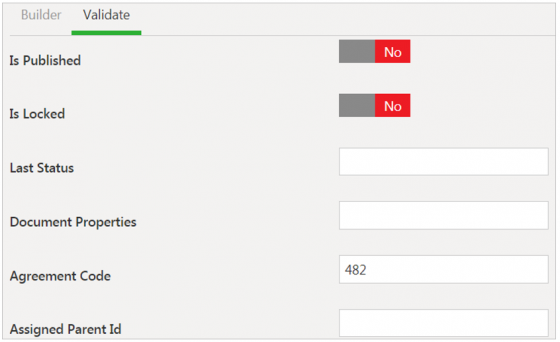
- Validate: You can type the information that is used to validate the Rule you create.
Builder
To add a Rule:
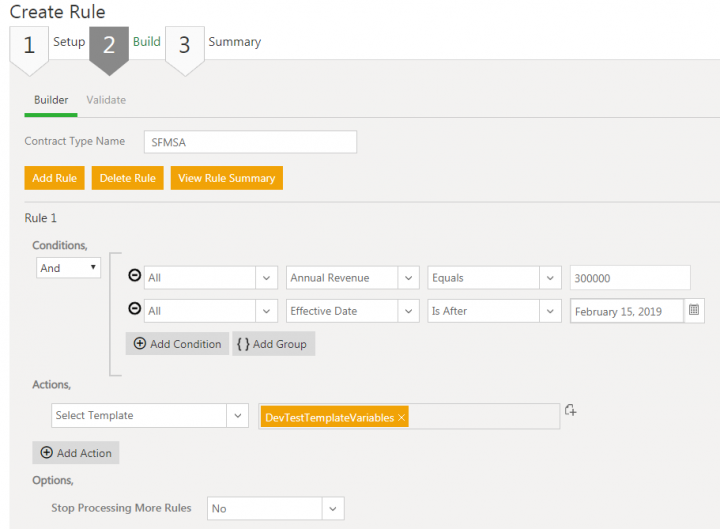
1. Click Add Rule.
2. Under Conditions, select the appropriate condition:
-
- And: All the conditions have to be fulfilled to satisfy the rule.
- Or: One of the conditions have to be fulfilled to satisfy the rule.
3. Next to the icon , in theSelect Value field select the appropriate attribute from the list provided:
-
- Parent Contract Type
- Priority
- Priority Inheritance
- Simba Reference ID
- Status
- Status Changed Date
- Template Name
- Type Of Paper
4. Based on the attribute you have selected, select appropriate value in the very next Select Value field from the list provided:
-
- Contains
- Equals
- Not Equals
- Starts With
- Greater Than
- Greater Than or Equals
- Less Than
- Less Than or Equals
- Not Equals
- Subset Of: the Rule is satisfied where the user wants a Rule to be executed only if the entity field contains a subset of the configured values. This operator is applicable for multi select lookup that supports evaluation of string, number, user, percentage and email data types only. For better understanding, please refer to the subsequent section on Subset Of operator.
- Has No Value: the Rule is satisfied when no value is selected for the attribute. For example, if the Contract value is 0, then the Agreement is automatically put on hold (or cancelled).
- Has A Value: the Rule is satisfied as long as the attribute has some value. This includes all Data Types and system-defined Attributes such that Rules can be set up for an Attribute having any value. For example, you want to set up a Rule so that an Approver John Doe should approve the Contract if a discount is applicable to it, irrespective of the value of the discount. Then, user can add a Rule using the Has A Value condition such that John Doe is added as an Approver if the discount has a value of 5%, 10% or whatever value is desired.
- Not Contains: the Rule is satisfied when the value of an attribute is blank. For example, if the City value is blank, a Rule will be triggered, which will default the name of the city to the city of the head office.
Once selected, enter an appropriate value in the Enter Value field.
5. Click the Add icon to add another condition.
6. Click {} to add another group of conditions. When you add a group, all the conditions in the group should be fulfilled to satisfy the rule.
7. Under Actions, in the Select Action list, select from the list actions.
- For example:
- Require Approval From All
- Require Approval From Any
- Select User From Attribute
8. Select actions consequent to the conditions you have set, and then enter their value. For example, under Conditions, if you select Created By Equals x User, then under Actions you may select Require Approval From Any, and then type appropriate value. that is if the user x creates an Agreement using the selected Contract Type, then it will require approval from any of the selected approvers.
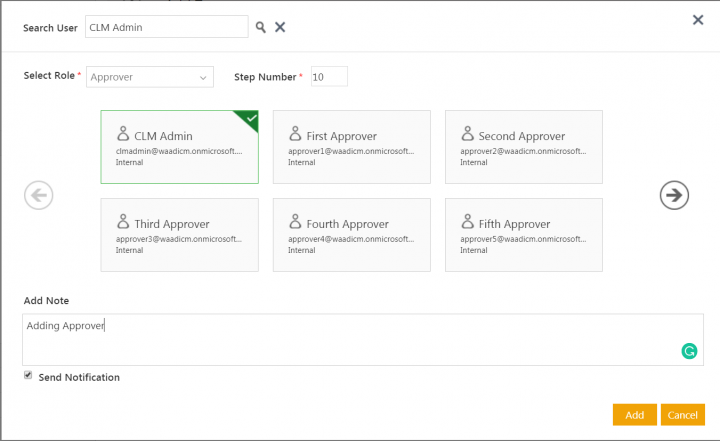
9. Type the number of approvers required in the MinimumApprovers text box, and then type appropriate Step Number for those Approvers. The Agreement approval process flows sequentially according to the Step Number of the approver. When Approvers are defined based on the user attribute, the Administrator can specify a minimum number of approvals required for an Agreement before it can move to the next step in the workflow. As a result, not all Approvers configured for the specific user attribute are required to approve the Agreement.
Validate
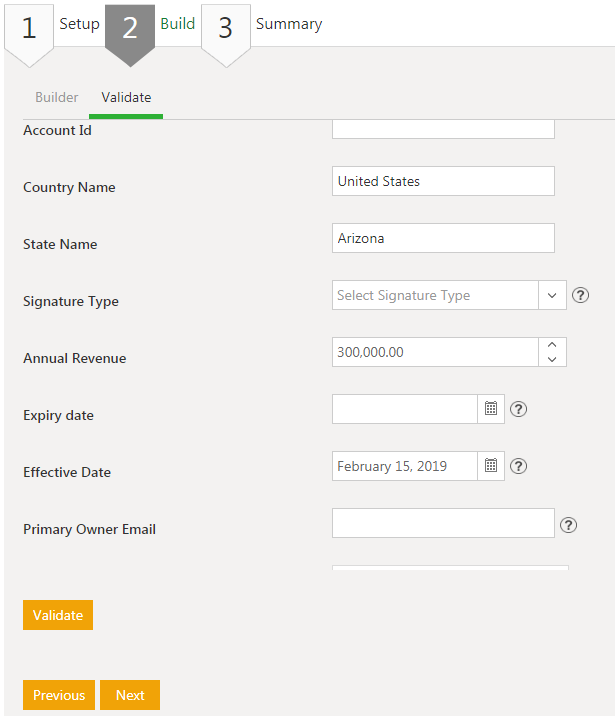
Based on the Contract Type you select in the Setup section, relevant attributes are displayed in the Validate pane. The information you type in this pane validates the Rule that you create.
Click Next. The Summary tab opens.
Has A Value Condition
The Has A Value condition has been enhanced to include all Data Types and system-defined Attributes such that Rules can be set up for an Attribute having any value.
Let's apply Has A Value condition on Agreement Code Attribute of Contract Type Teaming Agreement having Auto Data Type.
1. Click theHome > Configuration tile > Create Rule on the Dashboard. The Create Rule page opens.
3. Enter a Rule name in the Rule Name field.
4. Enter a description for the Rule in the Rule Description box.
5. Select the type of the Rule from the Rule Type drop-down list. For example, Approval Rule.
6. Select the role for team member from the Team Role drop-down list. For example, Approver.
7. Click Next. The Builder tab of Create Rule page opens.
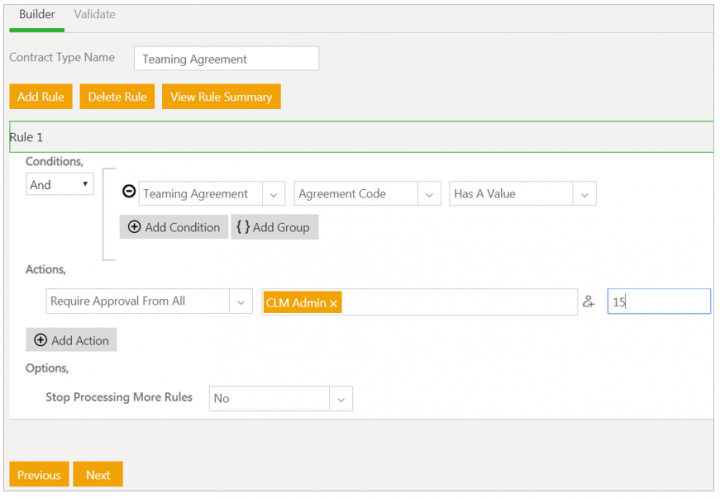
8. Select the Attribute (system or user defined) for which you want to apply the condition from the Select Value drop-down list. For example, Agreement Code.
9. Select the Has A Value condition from the next drop-down list.
10. Select the Action that you want to take from the Actions drop-down list. For example, Require Approval From All.
11. Select the User in the Select User field.
12. Select the corresponding Step Number of the selected User.
13. Click Add Action to add another condition.
14. Select Yes or No in the Stop Processing More Rules drop-down list.
17. Click the Validate tab to validate the Rule. For example, enter code in the Agreement Code field as per the defined Rule.
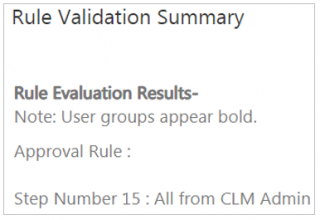
18. Click the Validate button to validate the Rule you created. The Rule Validation Summary window opens.
Subset Of Operator
With a Subset of operator, user can configure conditions for power sets (i.e. cases where the user wants a Rule to be executed only if the entity field contains a subset of the configured values). This new operator, Subset of, which is applicable to only multiselect lookup supports evaluation of string, number, user, percentage and email data types only. Let's consider an example to define a Template Selection Rule with the Subset Of operator using Number Data Type.
1. Click the Configuration tile on the Dashboard. The Configuration page opens.

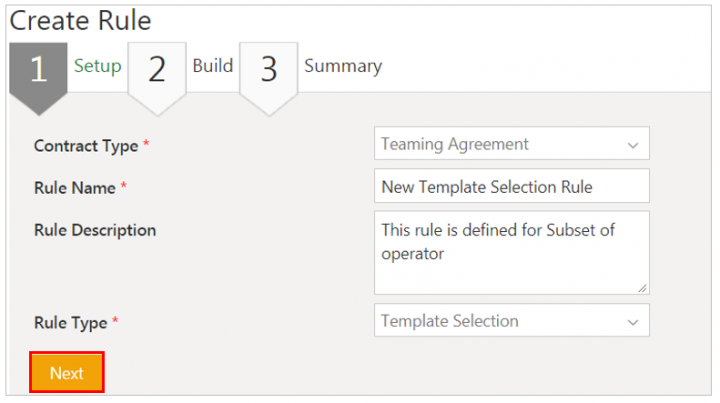
4. Select the Contract Type from the Select Contract Type dropdown list in the Setup tab. For example, Teaming Agreement.
5. Enter a Rule name in the Rule Name field.
6. Enter a description for the Rule in the Rule Description box.
7. Select the type of the Rule from the Rule Type drop-down list. For example, Template Selection.
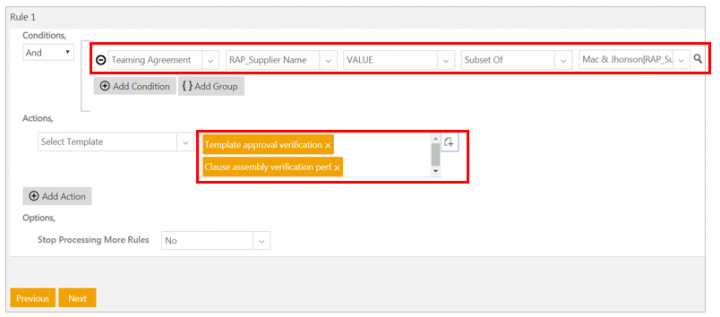
- Select the Contract Type from the drop-down list, which helps you to select the Attribute set for which you want to create the Rule. For example, Teaming Agreement.
- Select the Multi-Select Lookup Attribute for which you want to apply the condition from the Select Value drop-down list. For example, RAP_Supplier Name.
RAP_Supplier Name is an Attribute of Teaming Agreement with Number Data Type having Is Multi Select flag enabled.
- Select VALUE condition from the drop-down list.
- Select the Subset Of operator from the drop-down list.
- Select the options where you want to apply the Subset Of operator. For example, Mac & Jhonson and RAP_Supplier1. This means the Template Selection Rule will only trigger when a RAP_Supplier Name field has either of Mac & Jhonson and RAP_Supplier1 or both names.
10. Select the Action that you want to take from the Actions drop-down list. For example, Select Template.
11. Select the Template to be available when the defined conditions are met. For example, Template approval verification and Clause assembly verification perf.
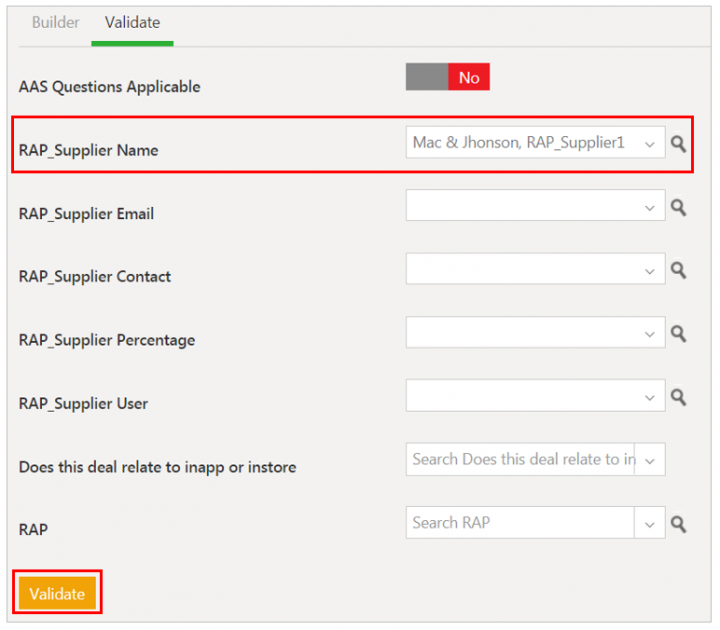
13. Click the Validate tab to validate the Rule.
14. Enter the required value as per the defined Rule. For example, enter Mac & Jhonson and RAP_Supplier1 in the RAP_Supplier Name field.
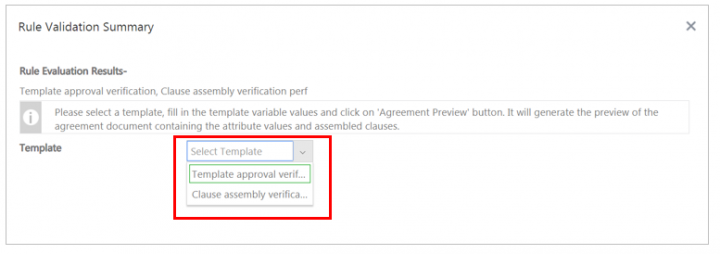
15. Click the Validate to validate the Rule you created. The Rule Validation Summary window opens.
Summary
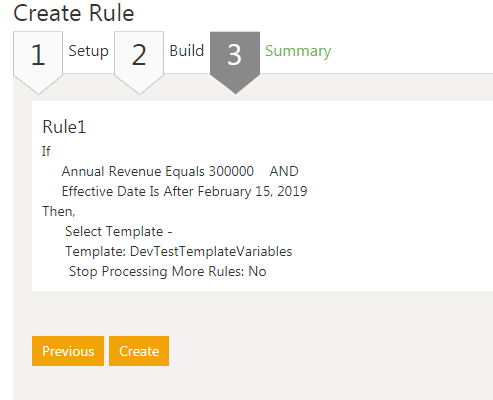
Verify the summary of the rule, and then click Create.
The Rule created successfully message is displayed. The Rule is displayed in the Rule list of the specific Contract Type.
Creating Count Based Rules
ICI allows you to set the Rules based on the total number of selected values (count of selected values) in multi-select type Attributes.
For example, for an attribute Country Name, if the user selects more than two countries i.e. Count is Greater Than 2, then the Agreement can be sent for approval to the selected users.
The supported operators are: Equals, Greater Than, Greater Than or Equals, Less Than, Less Than or Equals, and Not Equals.
Using Masterdata Value options in Rules Actions
You can define Rules based on the Masterdata in the following ways:
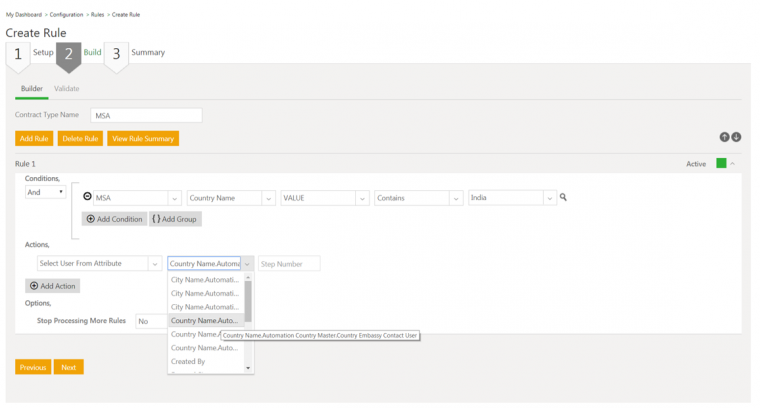
- You can define Rules on Masterdata columns when lookup to the Masterdata is added as an Agreement Attribute. You can configure the list of Lookup and/or Cascade Attributes as conditions for Agreement or Contract Request Contract Types Rules, thus improving flexibility in Rules. For example, you may have a supplier Masterdata being referred in MSA Agreement Type via Supplier Country Name lookup. But, there may be scenarios where Rules are required to be configured on basis of Supplier City Name and is not available as an Attribute in the Agreement, which is now made possible.
- ICI also supports Masterdata value options in theActions section of Rules, so that you can define Rules without having the Cascade Attribute on the Contract Type where the Rule is being written. For example, if multiple signatories are part of a Lookup Masterdata record, we can now define the Rule (such as – Select User From Attribute) on the Masterdata record itself and use them in the Rule directly, instead of defining Cascade Lookup Attributes in the Agreement. This drastically reduces the time and effort to create and maintain a large number of Attributes for Agreement Contract Types.
Create Rules for Multi-party Agreements
Rules can be written for individual attributes of an Association (as done for parent Contract Types). All attributes for Associations are available for the given Rule conditions. You can search selected values on an Agreement or an Associated Document. Depending on the type of the attribute, standard operators are applicable. For example, Contains, Starts With, Equals, Greater Than, and so on.
Rules can also accommodate the count of the Associations so that you can add Clauses based on the count of the Associations. If you Select All or Select Any, there is no need to specify the count of the Associations to satisfy the rule. However, when selecting the option Select Count, you need to specify the number of Associations, irrespective of the attribute value, that should meet the condition and satisfy the Rule. This rule applies to any type of Association, parent/child or peer.
However, if the attribute belongs to an Association, the following additional filter Conditions are available for all the Rules:
- Select All: If all the Associations satisfy the condition
- Select Any: If any Association satisfies the condition
- Select Count: If the number of Associations specified satisfy the condition
For a multi-division Agreement, you can write Rules based on individual instances of the multi-value attributes.
Rules can accommodate the count of the Associations, besides Select All and Select Any Conditions. If you Select All or Select Any, there is no need to specify the count of the Associations to satisfy the Rule. However, when you Select Count, then you need to specify the number of Associations, irrespective of the attribute value, that should meet the condition and satisfy the Rule.
If you have more than two Associations, the values of the attributes are irrelevant. The count of the Association takes precedence.
Changes in Document Assembly will replace tags with Metadata value
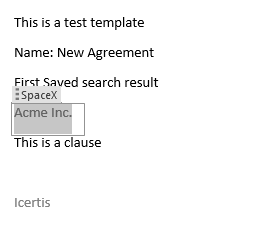
When Rules are written based on the Attributes of the Association, the Rules support tagging of the Metadata that belongs to the Association. The Associations may either be parent-child or peer. After the content control tag is entered, the value of the associated instances’ metadata is placed in the content control as shown in the example below.
Example:
1. The saved search for the Agreement is sorted based on the Agreement Code.
2. After the content control tag is entered, the value of the associated instances metadata is placed in the content control.
3. If the value taken from the Agreement above was Acme Inc. for the first instance, then it will be displayed as shown in the figure after Edit or Publish.
View or Edit a Rule
In ICI, you can View, Edit, Copy, Activate, Deactivate, or Lock a Rule. Follow these steps to View or Edit a Rule:
1. Click the Configuration tile on My Dashboard.
2. Click Rule. The Rules page opens.
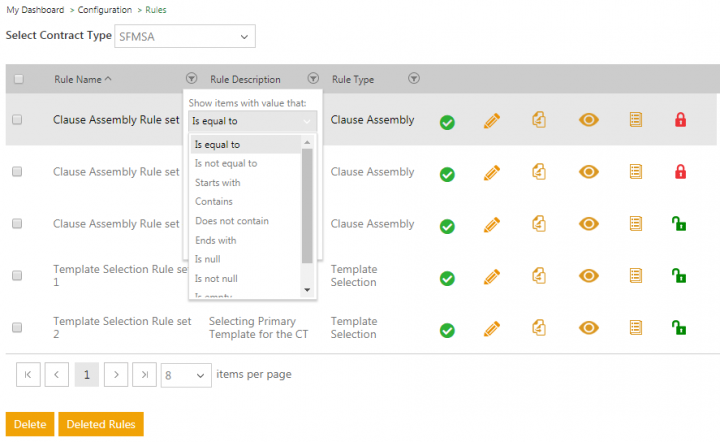
3. Select the appropriate Contract Type from the Select Contract Type drop-down. A list of Rules that are created for the selected Contract Type is displayed. You can use the filters provided in each column to find the desired Rule.
4. Select the check box next to the Rule name, and then click Delete to delete the Rule.
Choose one of the following icons:
- Activate/Deactivate icon: To activate or deactivate a Rule. The Rule will no more be applicable to the associated Contract Type.
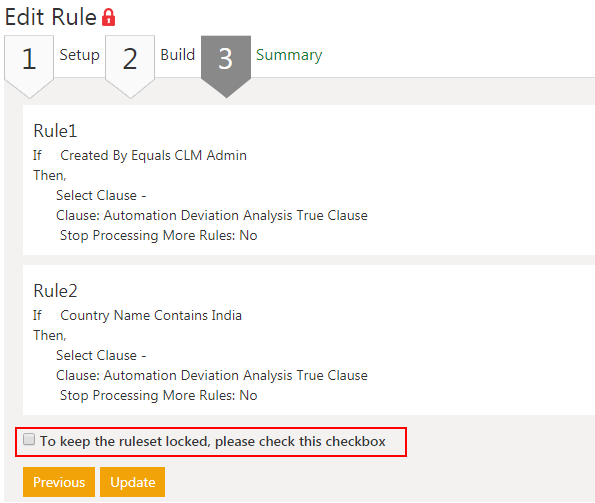
- Edit: To edit the selected Rule. On the Edit Rule page, edit the appropriate information. and click Update. Editing the Rule automatically locks it. When updating the Rule, there is a checkbox option (default – unchecked) on the Edit Rule page, indicating that the Rule will be unlocked on update. If checked, the Rule stays locked for the other users.
- Copy: To copy the selected Rule for another Contract Type. In the Copy Rule dialog box, select Contract Type, type the Rule name and then click Copy. The Rule becomes applicable for another Contract Type that you selected.
- View: To view the details of the selected Rule. The Rule Summary page opens where you can view the Rule details of the selected Rule.
- Audit Log: To view the Audit Logs of the Rule. Audit Logs screen contains the complete history of the specific Rule. Here, you can track all the changes made to the Rules, including the deletion. Editing a rule set inside a Rule creates a hyperlink Hide/Show All Changes next to that log. Click the hyperlink to see the Old and New values.
- Lock Rule: This icon indicates that the Ruleset is available for editing. Click to lock a Rule or a Ruleset, so that other users can not edit the Rule until you unlock it.
- Unlock Rule: This icon indicates that the Ruleset is locked. When a user hovers over the icon the name of the user who has locked the Rule is displayed.
Create a Contract Type Selection Rule
When you are creating an Agreement from a Contract Request, the Contract Type Selection rule defines which Contract Type should be selected.
With ICI, you can create Rules for Contract Types. You can create various types of Rules only for the published Contract Types.
To create a Contract Type Selection Rule:
1. Click Configuration on My Dashboard. The Attributes page opens.
2. Click Rule. The Rules page opens.
3. Click Create Rule. The Create Rule page opens.
The Create Rule page consists of the following tabs:
- Setup
- Build
- Summary
Let us understand each tab one by one.
Setup
1.Select the Contract Type for which you want to create a Rule in the Contract Type list.
2.Type a name of the Rule in the Rule Name box.
3. Type a description of the Rule in the Rule Description box.
4. Select Contract Type Selection in the Rule Type list.
5. Click Next. The Build tab opens.
Build
The Build tab has the following panes:
- Builder: You can add a rule in this pane.
- Validate: You can type the information that is used to validate the rule you create.
Builder
To add a Rule:
1. Click Add Rule.
2. Under Conditions, select from the following options:
- And: All the conditions have to fulfilled to satisfy the Rule.
- Or: One of the conditions have to be fulfilled to satisfy the Rule.
3. In the Select Value drop-down list next to the icon, select an attribute. Based on the attribute you have selected, select the appropriate value. For example, you have selected Created By as an attribute, you have to select from Equals and Not Equals. Then, type the appropriate value in the text box says Mr. Someone.
4. Click the Add icon to add another condition.
5. Click the Add Group icon to add another group of conditions. When you add a group, all the conditions in the group should be fulfilled to satisfy the Rule.
Click the icon next to Select Contract Type under Actions to select the Contract Type that you want to be selected by default (while creating a contract/agreement from request), that is if a request is Created By Mr. Someone, then while creating a Contract/Agreement from the request, the given Contract Type will be selected by default.
Validate
Based on the Contract Type you select in the Setup tab, relevant attributes are displayed in the Validate pane. The information you type in this pane validates the Rule that you create.
Click Next. The Summary tab opens.
Summary
Verify the summary of the Rule, and then click Create. The Rule created successfully message is displayed.
The Rule is displayed in the Rule list of the specific Contract Type.
Create a Template Selection Rule
You can select Templates to use them in the agreement creation process. Using Template Selection Rules, you can specify which Templates should appear under specific conditions. The Templates appear in the Templates tab in the Agreement Creation process.
You can create multiple sets of Template Selection Rules allowing you to manage similar Rules with ease.
To create a Template Selection Rule:
1. Click Configuration on My Dashboard.
2. Click Rule. The Rules page opens.
3. Click Create Rule. The Create Rule page opens.
The Create Rule page consists of the following tabs:
- Setup
- Build
- Summary
Setup
1. Select the Contract Type for which you want to create a Rule from the Contract Type list.
2. Type a name of the Rule in the Rule Name box. It must be a unique name. Two Rules or Rulesets cannot have the same name.
3. Type a description for the Rule in the Rule Description box.
4. Select Template Selection in the Rule Type list.
5. Click Next to go to the Build tab.
Build
The Build tab has the following tabs:
- Builder : You can add a Rule here.
- Validate : You can type the information that is used to validate the Rule you create.
Builder
1. Click Add Rule.
2. Under Conditions, select from the following :
- And: All the conditions have to be fulfilled to satisfy the Rule.
- Or: One of the conditions have to be fulfilled to satisfy the Rule.
3. In the Select Value drop-down list next to the icon, select a condition. Based on the condition you have selected, select the subsequent effect in the next drop-down list. For example, you have selected Contract Type Name, then you can select from Contains, Equals, Not Equals, and Starts With. Then, type the appropriate value in the text box say (name of the Contract Type).
4. Click the Add icon to add another condition.
5. Click the Add Group icon to add a group of conditions. When you add a group, all the conditions in the group should be fulfilled to satisfy the Rule.
6. Under Actions, in the Select Action list, click Select Template, and then click the Add icon to select appropriate Template. Click Select Template By Condition under Actions to select a Template based on certain metadata such as Created By, Created On, and Effective From.
The Stop Processing More Rules option within a Ruleset allows you to stop evaluating further Rules for the Ruleset, if you select Yes for this option.
Validate
Click the Validate tab. Based on the Contract Type you select in the Setup tab, relevant attributes appear in this tab. You can type information that is relevant to the Rule(s) you just specified.
Click the Validate button to validate the Rule that you created. You can also see the preview of the selected Template and Template Variables values provided in the Validation tab.
Summary
Verify the summary of the Rule, and then click Create. The Rule created successfully message appears.
The Rule appears in the list of Rules of the specific Contract Type.
Creating an Approval Rule
In the Approval Rule, you can define conditions in which a certain user will be the Approver of an Agreement.
You can create the Approval Rule for:
- Agreements
- Clauses
- Templates
To create an Approval Rule:
1. Click Configuration on My Dashboard. The Configuration page opens.
2. Click Rule. The Rules page opens.
3. Click Create Rule. The Create Rule page opens.
The Create Rule page consists of the following tabs:
- Setup
- Build
- Summary
Setup
1. Select the Contract Type for which you want to create a Rule from the Contract Type list.
2. Type a name of the Rule in the Rule Name box.
3. Type a description for the Rule In the Rule Description box.
4. Select the Approval Rule in the Rule Type list. The Team Role field is displayed.
5. Select the appropriate role of an approver from the following list of roles:
-
-
- Approver
- Deviation Approver
- External Signatory
- Internal Signatory
- Reviewer
-
6. Click Next. The Build tab appears.
Build
The Build tab has the following two tabs:
- Builder: You can add a Rule here.
- Validate: You can type the information that is used to validate the Rule you create.
Builder
Follow the procedure below to add a Rule:
1. Click Add Rule.
2. Under Conditions, select from the following:
- And: All the conditions have to fulfilled to satisfy the rule.
- Or: One of the conditions have to be fulfilled to satisfy the rule.
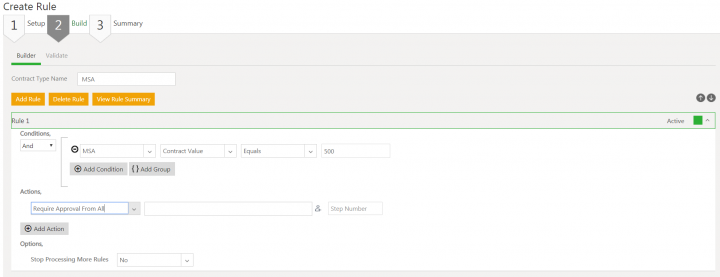
3. In the Select Value drop-down list next to the icon, select an attribute. Based on the attribute you have selected, select the appropriate value. For example, under Conditions, you have selected Contract Type Name. Now, you have to select from Contains, Equals, Not Equals, and Starts With. Then, type the appropriate value in the text box say MSA.
4. Click the Add icon to add another condition.
5. Click the Add Groupicon to add another group of conditions. When you add a group, all the conditions in the group should be fulfilled to satisfy the rule.
6. Under Actions, in the Select Action list, select from the list of actions.
For example:
- Require Approval From All
- Require Approval From Any
- Require Approval From All By Condition
- Require Approval From Any By Condition
- Select User From Attribute
7. Select actions consequent to the conditions you have set, and then type their value.
- For example, under Conditions, if you select Created By Equals x User, then under Actions you may select Require Approval From Any, and then type the appropriate value.
that is if the user x creates agreement using the selected contract type, then it will require approval from any of the selected approvers.
8. Type the number of approvers required in the MinimumApprovers text box, and then type the appropriate Step Number for those approvers.
The Agreement approval process flows sequentially according to the Step Number of the approver.
b] Validate
Based on the Contract Type you select in the Setup tab, relevant attributes appear in the Validate pane.
The information you type in this pane validates the rule that you create.
Click Next. The Summary tab appears.
Summary
Verify the summary of the Rule, and then click Create. The Rule created successfully message appears.
The Rule appears in the list of Rules of the specific Contract Type.
Create a Dynamic Attribute Rule
In the Dynamic Attribute rule, you can define conditions in which a certain attribute appears while creating an Agreement.
To create a dynamic attribute rule:
1. Click Configuration on My Dashboard. The Configuration page opens.
2. Click Rule. The Rules page opens.
3. Click Create Rule. The Create Rule page opens.
The Create Rule page consists of the following tabs:
- Setup
- Build
- Summary
Let us understand each tab one by one.
Setup
1. Select the Contract Type for which you want to create a rule from the Contract Type list.
2. Type a name of the rule in the Rule Name box.
3. Type a description for the rule in the Rule Description box.
4. Select Dynamic Attribute from the Rule Type list.
5. Click Next. The Build tab appears.
Build
The Build tab has the following panes:
- Builder : You can add a rule in this pane.
- Validate : You can type the information that is used to validate the rule you create.
Builder
1. Click Add Rule.
2. Under Conditions, select from the following:
-
- And: All the conditions have to fulfilled to satisfy the rule.
- Or: One of the conditions have to be fulfilled to satisfy the rule.
- In the Select Value drop-down list next to the icon, select an attribute. Based on the attribute you have selected, select the appropriate value. For example, under Conditions, you have selected Created By, you have to select from Equals and Not Equals. Then type the appropriate value in the text box.
- Click the Add icon to add another condition.
- Click the Add Groupicon to add another group of conditions. When you add a group, all the conditions in the group should be fulfilled to satisfy the rule.
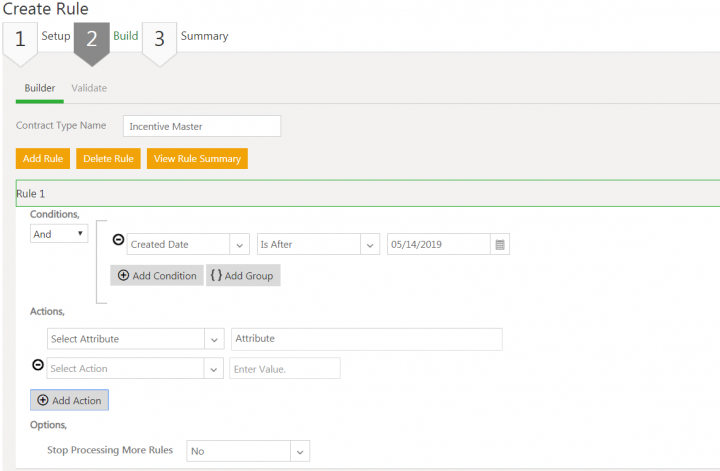
- Under Actions, click in the box next to Select Attribute to select attribute/s that you want to be selected by default (while creating a request/contract/agreement).that is if Mr. Someone is creating a request/contract/agreement, then A, B, C attributes should be displayed in ICI.
b] Validate
Based on the Contract Type you select in the Setup tab, relevant attributes appear in the Validate pane.The information you type in this pane validates the rule that you create.
Click Next. The Summary tab appears.
Summary
Verify the summary of the rule, and then click Create. The Rule created successfully message appears.
The rule appears in the rule list of the specific Contract Type.
Create a Dynamic Association Rule
The Dynamic Association Rule enables you to associate supporting documents for a particular Contract Type.
To create a dynamic association rule:
1. Click Configuration on My Dashboard . The Attributes page opens.
2. Click Rule. The Rules page opens.
3. Click Create Rule.
The Create Rule page opens which consists of the following tabs.
- Setup
- Build
- Summary
Let us understand each tab one by one.
Setup
1. Select the Contract Type for which you want to create a rule from the Contract Type list.
2. Type a name of the rule in the Rule Name box.
3. Type a description for the rule in the Rule Description box.
4. Select Contract Type Selection In the Rule Type list.
5. Click Next. The Build tab opens.
Build
The Build tab has the following two panes:
- Builder: You can add a Rule in this pane.
- Validate: You can type the information that is used to validate the Rule you create.
Builder
1. Click Add Rule.
2. Under Conditions, select from the following:
- And: All the conditions have to fulfilled to satisfy the Rule.
- Or: One of the conditions have to be fulfilled to satisfy the Rule.
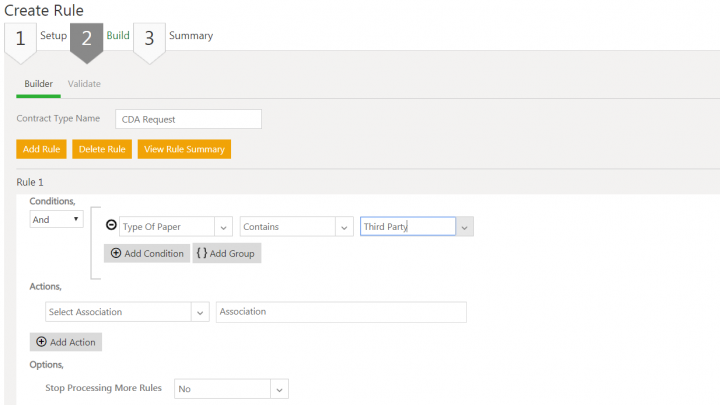
3. In the Select Value drop-down list next to the icon, select an attribute. Based on the attribute you have selected, select the appropriate value. For example, you have selected Created By as an attribute, you have to select from Equals and Not Equals, and then, type the appropriate value in the text box.
4. Click the Add icon to add another condition.
5. Click the Add Group icon to add another group of conditions. When you add a group, all the conditions in the group should be fulfilled to satisfy the Rule.
6. Click the icon next to Select Contract Type under Actions to select the Contract Type that you want to be selected by default (while creating an Agreement from a Request) that is if a request is created by any user, then while creating an Agreement from the Request, the given Contract Type will be selected by default.
Validate
Based on the Contract Type you select in the Setup tab, relevant attributes appear in the Validate pane. The information you type in this pane validates the Rule that you create.
Click Next. The Summary tab opens.
Summary
Verify the summary of the rule, and then click Create. The Rule created successfully message appears. The rule appears in the list of Rules of the specific Contract Type.
Create an Event Rule
With ICI, you can define an Event Rule for a Contract Request, Agreement, and an Associated Document. The Event Rule helps you to setup a condition that triggers when that particular event occurs. You can define an Event Rule for an entity at different stages such as create, send for approval, approve, update, delegate, and so on.
An administrator can now:
- Create multiple rulesets for event rules for any entity per event
- Copy event rules to target entity. However, a new rule is created for the target entity and it does not override the existing one, if any. The name of the ruleset remains unique throughout the system
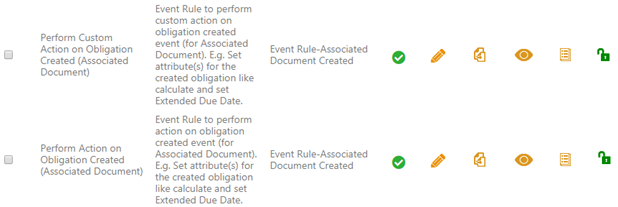
For example, you can create multiple rulesets for event rules for any entity as displayed in the image below.
When multiple Event rules are defined, ICI ensures all event rules are executed. The Stop Processing More Rules option when selected as Yes allows users to stop evaluating the rules within the ruleset.
To create an Event Rule:
1. Click Configuration tile on My Dashboard. The Attributes page opens.
2. Click Rule. The Rules page opens.
3. Click Create Rule. The Create Rule page opens.
The create rule page consists of the following tabs:
- Setup
- Build
- Summary
Setup
1. Select the Contract Type for which you want to create a rule in the Contract Type list.
2. Type a name of the Rule in the Rule Name box.
3. Type a description for the Rule in the Rule Description box.
4. Select the Event Rule in the Rule Type list. The Event list appears.
5. Select an appropriate category in the Event list.
6. Click Next. The Build tab appears.
Build
Under Build tab, you can add conditions of the rule as well as validations.
The Build tab has the following two panes:
- Builder : You can add a Rule in this pane.
- Validate : You can type the information that is used to validate the Rule you create.
Builder
1. Click Add Rule.
2. Under Conditions, select from the following:
- And: All the conditions have to fulfilled to satisfy the Rule.
- Or: One of the conditions have to be fulfilled to satisfy the Rule.
3. Select an appropriate attribute value in the Select Value list. Based on your selection the value field is populated.
For example: In the Select Value list if you select Created By, then you can select value as either Equals or Not Equals. Click the Select User icon to add a new user.
4. Click the Add icon to add another condition.
5. Click the Add Group icon to add another group of conditions. When you add a group, all the conditions in the group should be fulfilled to satisfy the Rule.
6. Under Actions, in the Select Action list, select from following the list of actions.
For example:
- Add to Team
- Set Attribute Value
- Select User From Attribute
Add to Team
Add to Team condition is addition of users to a team after the particular event occurs. For example, addition of approvers after the Agreement Created event occurs.
Select an appropriate user role from the User Role list, and then click the Add User icon. The Select User window opens.
In the Select User window, select the relevant user, and then click Add.
Set Attribute Value
Set Attribute Value condition is setting an attribute value that appears after the particular event occurs.
Click Set Values. The Set Attribute Value dialogue box appears. In the Set Attribute Value dialogue box, you can set a specific attribute value for that event. For example, you can regulate an event for a specific organization unit by selecting an appropriate organization department. This ensures that only those department users will have access to the event.
In the Organization Unit box, click ![]() . The Select Organization Unit window opens. Select a department and click OK.
. The Select Organization Unit window opens. Select a department and click OK.
Select User From Attribute
Select User From Attribute condition is addition of users from the user attributes. For example, addition of approvers from the attribute Modified By after the Agreement Created event occurs.
Select an appropriate user role from the User Role list, and then select an appropriate category in the UserTypeAttribute list.
Validate
Based on the Contract Type you select in the Setup tab, relevant attributes appear in the Validate pane.
The information you type in this pane validates the rule that you create.
7. Click Next. The Summary tab appears.
Summary
8. Verify the summary of the Rule, and then click Update. The Rule created successfully message appears.
The Rule appears in the list of Rules for the specific Contract Type.
Create a Contract Admin Rule
In the ICI, you can create various types of Rules for various Contract Types. Rules can only be created for published Contract Types.
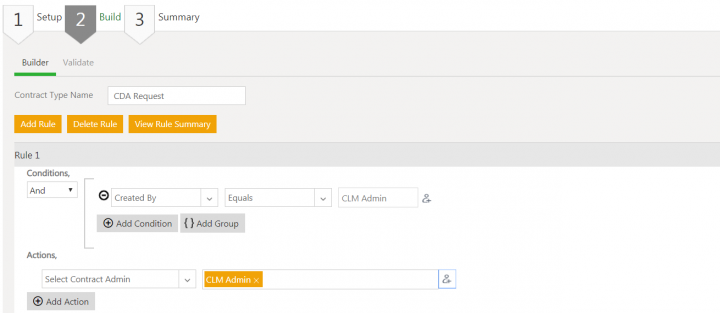
In the Contract Admin Rule, you can define a Contract Admin user through any of the user attributes of that Contract Request, by using the Select User From Attribute option. This provides more flexibility in identifying the Contract Admin user who creates Agreement based on the Contract Request.
To create a Contract Admin Rule:
1. Click Configuration on My Dashboard. The Configuration page opens.
2. Click Rule. The Rules page opens.
3. Click Create Rule. The Create Rule page opens.
The Create Rule page consists of following tabs:
- Setup
- Build
- Summary
Let us understand each tab one by one.
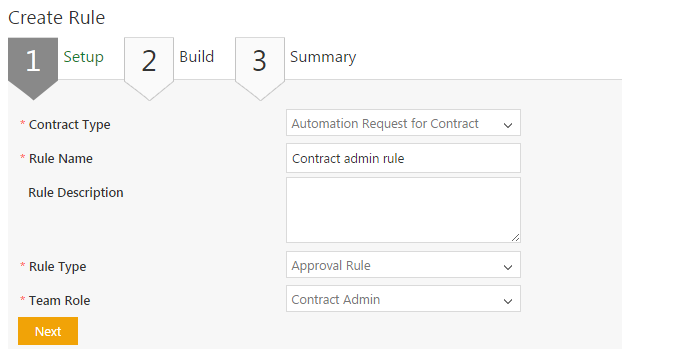
1. Select the Contract Type for which you want to create a rule in the Contract Type list.
2. Type a name of the rule in the Rule Name box.
3. Type a description for the rule in the Rule Description box.
4. Select Approval Rule in the Rule Type list.
5. Select Contract Admin in the Team Role list.
6. Click Next. The Build tab appears.
Build
- Builder: In this pane, you add a Rule.
- Validate: In this pane,you type the information that is used to validate the Rule you create.
Builder
To add a Rule,
1. Click Add Rule.
2. Under Conditions, select from the following options:
- And: All the conditions have to fulfilled to satisfy the Rule.
- Or: One of the conditions have to be fulfilled to satisfy the Rule.
3. In the Select Value drop-down list next to the icon, select an attribute. Based on the attribute you have selected, select the appropriate value. For example, you have selected Created By as an attribute, you have to select from Equals and Not Equals. Then, type the appropriate value in the text box.
4. Click the Add icon to add another condition.
5. Click the Add Group icon to add another group of conditions. When you add a group, all the conditions in the group should be fulfilled to satisfy the Rule.
6. Click the icon next to Select Contract Type under Actions to select the contract type that you want to be selected by default (while creating an Agreement from Request).that is if a request is created by any user, then while creating an Agreement from the Request, the given Contract Type will be selected by default.
Validate
Based on the Contract Type you select in the Setup tab, relevant attributes appear in the Validate pane. The information you type in this pane validates the Rule that you create.
Click Next. The Summary tab appears.
Summary
Verify the summary of the Rule, and then click Create. The Rule created successfully message appears.
The Rule appears in the list of Rules of the specific Contract Type.
Create a Notification Rule
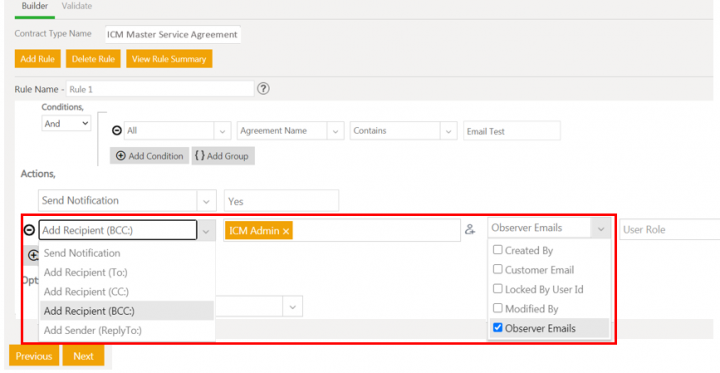
Notifications are sent to the users added in a Team. However, they may sometimes be sent to users who are not a part of the conventional team. To do this, a Rule must be created and to do so, a subscription must be added.
Users can also send the notification emails to the email addresses captured while creating an agreement instance by configuring a Notification rule. Users can also set the email type for the notifications sent.
To create a Notification Rule:
1. Click Configuration > Rule > Create Rule on the Home page. The Create Rule page opens.
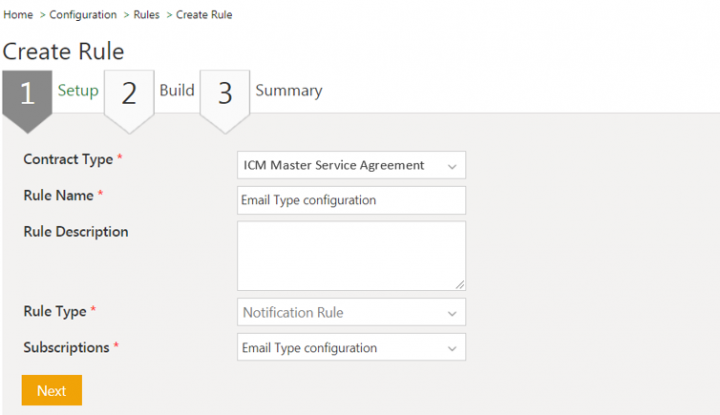
2. Select the Contract Type. For example, ICI Master Service Agreement.
3. Enter the Rule Name. For example, Email Type configuration.
4. Select the Rule Type. For example, Notification Rule. The Subscriptions field is displayed.
5. Select the subscription. For example, Email Type configuration.
6. Click Next. The Build tab opens.
7. Click the Add Rule button. The section to add rule conditions opens.
8. Select email type in the Select Action field in the Actions section. For example, Add Recipient (BCC:).
To add users provisioned in the system:
9. Click theSearch User icon to select a user. The Search User window opens.
10. Select the user and click Add. For example, ICI Admin. The user is added to the rule.
To add user emails captured during runtime while creating the agreement instance:
11. Select Attributes. For example, Observer Emails.
12. Select No in Stop Processing More Rules field. The further evaluation of Rules within a Ruleset continues.
13. Click Validate. The page to validate the rule by entering attributes values of the selected Contract Type opens.
14. Click Next. The rule Summary tab opens.
15. Click Create. The Rule created successfully message appears. The Rule is displayed in the list of Rules of the specific Contract Type.
The notification will be sent to the user upon satisfying the rule conditions.
Create a Mandatory Association Rule
In a mandatory Association rule, you can define certain conditions to evaluate whether any associations are mandatory for an agreement.
To create a Mandatory Associations rule:
1. Click Configuration on My Dashboard. The Configuration page opens.
2. Click Rule. The Rules page opens.
3. Click Create Rule. The Create Rule page opens.
The Create Rule page consists of the following tabs:
- Setup
- Build
- Summary
Let us understand each tab one by one.
Setup
1. Select the Contract Type for which you want to create a rule from the Contract Type list.
2. Type a name of the rule in the Rule Name box.
3. Type a description for the rule In the Rule Description box.
4. Select Mandatory Association from the Rule Type list.
5. Click Next. The Build tab appears.
Build
The Build tab has the following two panes:
- Builder: You can add a rule in this pane.
- Validate: You can type the information that is used to validate the rule you create.
Builder
Follow the procedure below to add a rule:
1. Click Add Rule.
2. Under Conditions, select from the following:
- And: All the conditions have to fulfilled to satisfy the rule.
- Or: One of the conditions have to be fulfilled to satisfy the rule.
3. In the Select Value drop-down list next to, select an attribute. Based on the attribute you have selected, select the appropriate value. For example, under Conditions, you have selected Contract Type Name as MSA. Now define your condition. For example, if the selected MSA agreement, has an attribute Country and it's value India.
4. Click to add another condition.
5. Click to add another group of conditions. When you add a group, all the conditions in the group should be fulfilled to satisfy the rule.
6. Under Actions, in the Select Action list, select from the list of actions. Select actions consequent to the conditions you have set, and then type their value. For example, then select Association as MSA peer.
Validate
Based on the Contract Type you select in the Setup tab, relevant attributes appear in the Validate pane.
The information you type in this pane validates the rule that you create.
Click Next. The Summary tab appears.
Summary
Verify the summary of the rule, and then click Create. The Rule created successfully message appears.
The rule appears in the list of Rules of the specific Contract Type.
Create an Auto-attachment Rule
Users can configure the Event Rule for agreements and amendments to attach standard documents automatically when certain actions such as Create, Publish and Update occur. The rule is configured using association name and standard document's saved search.
To configure an event rule for agreement:
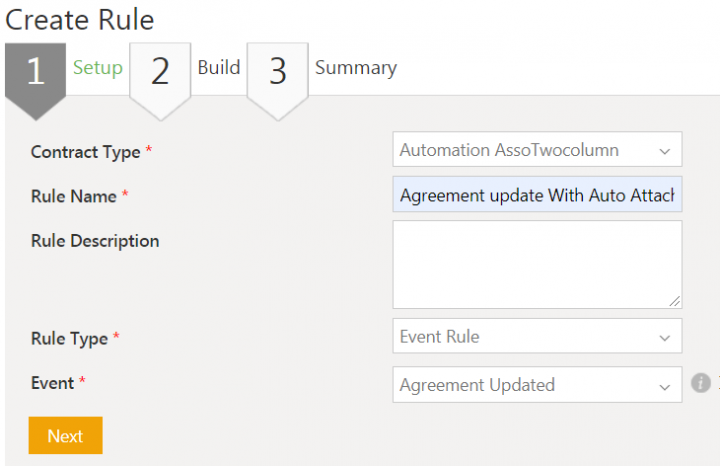
- Click Configuration > Rule > Create Rule on the Home page. The Setup tab on Create Rules page opens.
- Select the Contract Type for which you want to create a rule. For example, Automation AssoTwoColumn.
- Enter a name in the Rule Name field. For example, Agreement update With Auto Attachment.
- Select Event Rule in the Rule Type field.
- Select type of event in Event field. For example, Agreement Updated.
- Click Next. The Build tab opens.
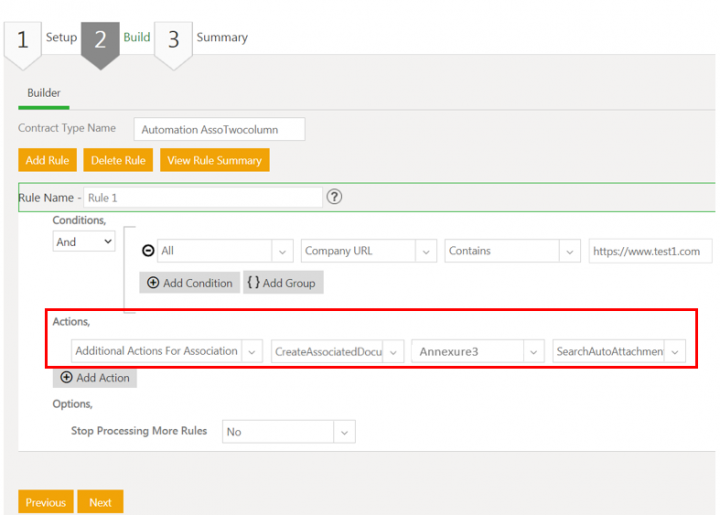
- Click Builder tab. The page to configure a rule opens.
- Click Add Rule. The Add Rule section opens.
- Enter Conditions.
- Select Additional Actions for Associations in first drop-down in Actions field.
- Select CreateAssociatedDocumentInstancesEventHook in next drop-down.
- Select the Associated Document Contract Type from which you want to auto-attach the documents in next drop-down. For example, Annexure3.
- Select the saved search name in the next drop-down. For example,SearchAutoAttachment.
- Select No in Stop Processing More Rules field. The further evaluation of rules within a ruleset continues.
- Click Validate. The page to validate the rule by entering attributes values of the selected Contract Type opens.
- Click Next. The rule Summary tab opens.
- Click Create. The Rule created successfully message appears. The rule is displayed in the list of Rules of the selected contract type.
Create a Clause Assembly Rule
The Agreement Templates use Clauses. Clauses can be manually added to the Agreement Template or a Clause Assembly Rule can be created to add all the relevant clauses to the Templates.
You can create multiple sets of Clause Assembly Rules allowing you to manage similar Rules with ease.
To create a Clause Assembly Rule:
1. Click Configuration on My Dashboard.
2. Click Rule. The Rules page opens.
3. Click Create Rule. The Create Rule page opens.
The Create Rule page consists of the following tabs:
- Setup
- Build
- Summary
Setup
1. Select the Contract Type for which you want to create a Rule from the Contract Type list.
2. Type a name of the Rule in the Rule Name box. It must be a unique name. Two Rules or Rulesets cannot have the same name.
3. Type a description for the Rule in the Rule Description box.
4. Select Clause Assembly in the Rule Type list.
5. Click Next to go to the Build tab.
Build
The Build tab has the following tabs:
- Builder: You can add a Rule here.
- Validate: You can type the information that is used to validate the Rule you create.
Builder
1. Click Add Rule.
2. Under Conditions, select from the following :
- And: All the conditions have to be fulfilled to satisfy the Rule.
- Or: One of the conditions have to be fulfilled to satisfy the Rule.
3. In the Select Value drop-down list next to , select a condition. Based on the condition you have selected, select the subsequent effect in the next drop-down list. For example, you have selected Contract Type Name, then you can select from Contains, Equals, Not Equals, and Starts With. Then, type the appropriate value in the text box say (name of the Contract Type).
4. Click to add another condition.
5. Click to add a group of conditions. When you add a group, all the conditions in the group should be fulfilled to satisfy the Rule.
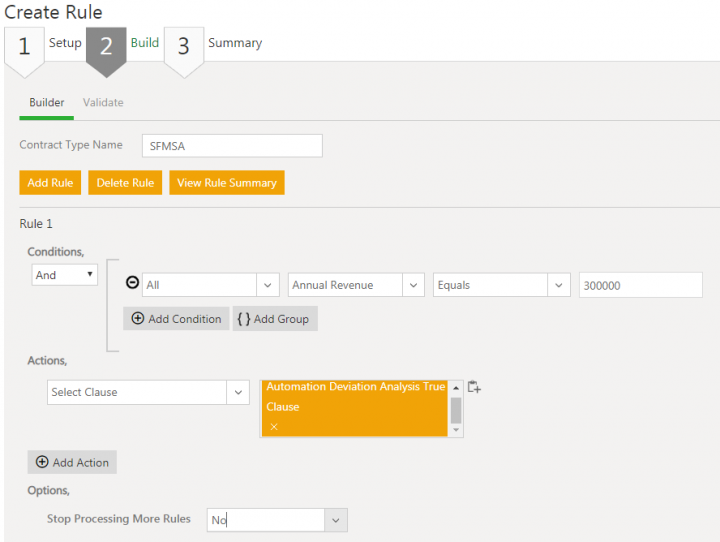
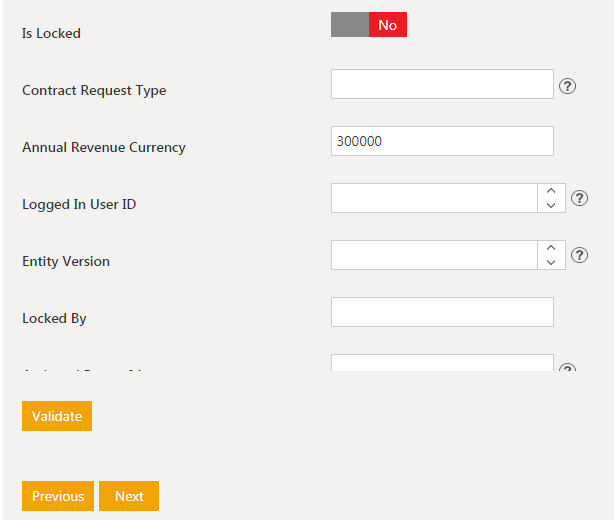
6. Under Actions, in the Select Action list, click Select Clause, and then click to select appropriate clause. For example, for the selected Contract type, if the Annual Revenue Equals 300000, then (this is the condition) the Action is Select the Deviation Analysis Clause.
7. The Stop Processing More Rules option within a Ruleset allows you to stop evaluating further Rules for the Ruleset, if you select Yes for this option.
Validate
Click the Validate tab. Based on the Contract Type you select in the Setup tab, relevant attributes appear in this tab. You can type information, validate the Rule that you created. For example, find the Attribute (Annual Revenue, in this case) that you had entered in the Rule Builder, insert the same value there (30000).
The system evaluates the Rule and displays the Rule Validation Summary. Click Next. The Summary tab opens.
Summary
Verify the summary of the Rule, and then click Create. The Rule created successfully message appears.
The Rule is displayed in the list of Rules of the specific Contract Type.
Create an Extension Selection Rule
Users have the flexibility to use attributes of masterdata as extensions to any agreement or associated document. These extended attributes can be selected and added when user is actually creating the instance. This considerably improves usability and simplifies the process for users who deal with hundreds of items and need to have multiple configurations.
Users now:
- Can create rules to attach masterdata attributes (single or multiple) to your associated documents and agreements based on certain conditions
- Have flexibility to select (add or remove) and use any masterdata attributes as extensions at the time of agreements/associated documents creation
Configuring Extension Rules for Agreements and Associated Documents
Users need to create an Extension Selection Rule Type on Contract Types.
To create Extension Selection Rule Type for Agreements and Associated Documents:
1. Click the Configuration tile on the Dashboard. The Configuration menu opens.
2. Click the Rule menu. The Rule menu opens.
3. Click the Create Rule menu.
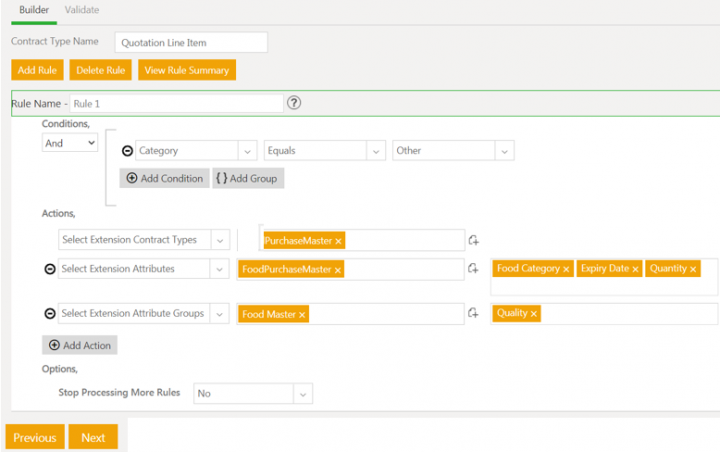
4. Select the Contract Type. For example, Quotation for Agreement andQuotation Line Item for Associated Document.
5. Enter a name in the Rule Name field.
6. Enter a description in the Rule Description field.
7. Select Extension Selection in the Rule Type drop-down list.

8. Click Next. The Create Rule window opens.
9. Click Add Rule.
10. Select the Category from the Select Value drop-down list.
11. Select the Equals condition from the next drop-down list.
12. Select the other from the next drop-down list.
* Select Extension Contract Types: all attributes of selected Masterdata Contract Types are available when creating an agreement/associated document. * Select Extension Attributes: selected attributes of the Masterdata Contract Types are available when creating an agreement/associated document. * Select Extension Attribute Groups: selected attributes group of the Masterdata Contract Types are available when creating an agreement/associated document.
13. Select the action Select Extension Contract types from the drop-down list.
14. Click the plus icon to add the attributes of all contract type. For example, PurchaseMaster.

Let us create a second rule for Select Extension Attributes, Select Extension Attribute Groups and Select Extension Contract Type.
15. Click Add Rule.
16. Select the Category from the Select Value drop-down list.
17. Select the Equals condition from the next drop-down list.
18. Select the Food from the next drop-down list.
19. Select the action Select Extension Contract types from the drop-down list.
20. Click the plus icon to add all attributes of the contract type. For example, PurchaseMaster.
21. Click Add Action.
22. Select the action Select Extension Attributes from the drop-down list.
23. Click the plus icon to add attributes of the contract type. For example, FoodPurchaseMaster.
24. Select the Attributes in the next field. For example, Food Category, Expiry Date, and Quantity.
26. Select the action Select Extension Attribute Groups from the drop-down list.
27. Click the plus icon to add attributes groups of the contract type. For example, FoodMaster.
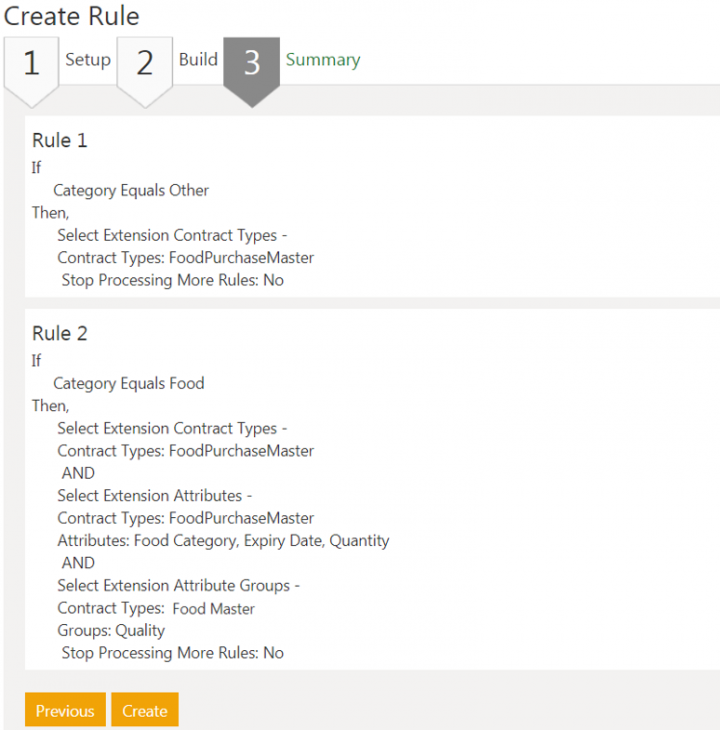
29. Click Create. The Information window opens indicating that the rule created successfully.
30. Click Ok.
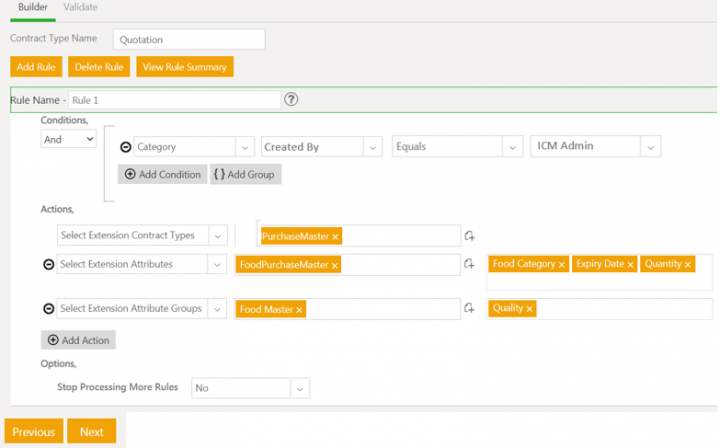
Similarly, we can create an Extension Selection Rule for Quotation Agreement.
We have created an Extension Selection Rule Type using the attributes of PurchaseMaster, Food Master and FoodPurchaseMaster Masterdata Contract Types.
For more information, see Creating Agreement and Associated Document instances with flexible entity attributes
Related Topics: Agreement Management | Configuration | Template Management | Clause Management |
