| (6 intermediate revisions by 2 users not shown) | |||
| Line 260: | Line 260: | ||
If you are an approver of the Associations for Agreements and Amendments, you can request more information for an Association that is in ''Waiting for Approval'' state using the ''Need More Info ''button''. ''You can also remove yourself as an Approver using the ''Remove Me''button for an Association that is Waiting for Approval. | If you are an approver of the Associations for Agreements and Amendments, you can request more information for an Association that is in ''Waiting for Approval'' state using the ''Need More Info ''button''. ''You can also remove yourself as an Approver using the ''Remove Me''button for an Association that is Waiting for Approval. | ||
<div class="image-green-border">[[File:Create an associated document action buttons 7.8.PNG|720px|RTENOTITLE]]</div> | <div class="image-green-border">[[File:Create an associated document action buttons 7.8.PNG|720px|RTENOTITLE]]</div> | ||
| + | | ||
| + | |||
| | ||
| Line 275: | Line 277: | ||
ICI supports virus scanning of large files if the virus scan feature is enabled. | ICI supports virus scanning of large files if the virus scan feature is enabled. | ||
| − | <div class="note-box">'''Note:''' | + | <div class="note-box">'''Note: '''This is not applicable for contract requests, agreements, or associations with large files in the DocuSign/Adobe Sign association selection pop-up, document assembly, bulk actions, legacy upload, integrations (Salesforce, Workday, etc.), and APIs.</div> |
| − | + | | |
| − | + | ||
| − | + | ||
| − | + | ||
| − | + | ||
=== To upload a large file: === | === To upload a large file: === | ||
| Line 287: | Line 285: | ||
2. '''Select''' ''Type of Contract'' from the drop-down. | 2. '''Select''' ''Type of Contract'' from the drop-down. | ||
| − | + | <div class="image-green-border">[[File:Large File 1.png|720px|Large File 1]]</div> | |
3. '''Select''' the contract type where you want to enable this functionality. | 3. '''Select''' the contract type where you want to enable this functionality. | ||
| − | 4. On the ''Attributes ''tab of the ''Edit Contract Type'' page, select | + | 4. On the ''Attributes ''tab of the ''Edit Contract Type'' page, '''select '''any ''File Selection'' data type attribute such as ''File Path'' in the ''Selected Attributes'' column. |
| − | 5. Enter a ''Display Name ''for the attribute. | + | 5. '''Enter '''a ''Display Name ''for the attribute. |
| − | + | <div class="image-green-border">[[File:Large File 2.png|720px|Large File 2]]</div> | |
| − | 6. Toggle the'' Enable Large File Upload'' to ''Yes''. This | + | 6. '''Toggle''' the'' Enable Large File Upload'' to ''Yes''. This flag provides support for large files in ''File Selection ''and ''File Path'' attributes. |
'''Note:''' | '''Note:''' | ||
| Line 302: | Line 300: | ||
*The attribute is always disabled for contract requests and agreements as they are not supported. | *The attribute is always disabled for contract requests and agreements as they are not supported. | ||
| − | 7. '''Click '''''Save'' to save your changes. | + | 7. '''Click '''''Save'' to save your changes and Publish. |
8. '''Click''' ''Association Management > Create Association''. | 8. '''Click''' ''Association Management > Create Association''. | ||
| − | 9. On the Meta Data tab, | + | 9. On the ''Meta Data'' tab, '''click''' ''Select File'' in the ''File Path'' field. |
| − | + | <div class="image-green-border">[[File:Large File 3.png|720px|Large File 3]]</div> | |
10. '''Select '''the file that you want to upload. | 10. '''Select '''the file that you want to upload. | ||
*If the file size does not exceed the configured limit (4GB), then the file will be uploaded and displayed on the page. | *If the file size does not exceed the configured limit (4GB), then the file will be uploaded and displayed on the page. | ||
*If the file size exceeds the configured limit, a message will be displayed that the maximum allowed size had exceeded. | *If the file size exceeds the configured limit, a message will be displayed that the maximum allowed size had exceeded. | ||
| − | + | <div class="image-green-border">[[File:Large File 6.png|720px|Large File 6]]</div> | |
11. '''Select '''the file that you want to upload in the associated document (Annexure Document) field. | 11. '''Select '''the file that you want to upload in the associated document (Annexure Document) field. | ||
| Line 320: | Line 318: | ||
*Uploading a file may take some time depending on the network bandwidth, connection speed, file size, etc. | *Uploading a file may take some time depending on the network bandwidth, connection speed, file size, etc. | ||
| − | + | | |
| − | + | === To download a large file: === | |
| − | 12. '''Click '''the ''Download'' icon to download the large file that has been uploaded. | + | 11. When the association is created, '''click '''the ''Versions ''tab on the association ''Details'' page. |
| + | <div class="image-green-border">[[File:Large File 4.png|720px|Large File 4]]</div> | ||
| + | 12. '''Click '''the ''Download'' icon to download the large file that has been uploaded. | ||
13. '''Click''' ''Preview ''if you want to preview the file. The ''Preview not supported for document type'' message will be displayed. | 13. '''Click''' ''Preview ''if you want to preview the file. The ''Preview not supported for document type'' message will be displayed. | ||
| − | + | <div class="image-green-border">[[File:Large File 5.png|720px|Large File 5]]</div> | |
'''Note:''' For file path attributes, the ''Preview'' can be generated. However, for large files, restrictions have been added to avoid performance impact. However, the files can be viewed on the ''Versions'' tab and the audit history. | '''Note:''' For file path attributes, the ''Preview'' can be generated. However, for large files, restrictions have been added to avoid performance impact. However, the files can be viewed on the ''Versions'' tab and the audit history. | ||
| − | = | + | <div class="image-green-border"> </div> |
| − | + | ||
=== To download all (large) files: === | === To download all (large) files: === | ||
| − | + | 15. '''Click '''the ''Download All ''button. | |
| + | <div class="image-green-border">[[File:Large File 8.png|720px|Large File 8]]</div> | ||
| + | 16. On the ''Download ''window, select the files that you want to download in a zip format. | ||
| − | + | *If the file size does not exceed the configured limit (6GB), then the files will be downloaded in a zip format. | |
| − | + | ||
| − | *If the file size does not exceed the configured limit ( | + | |
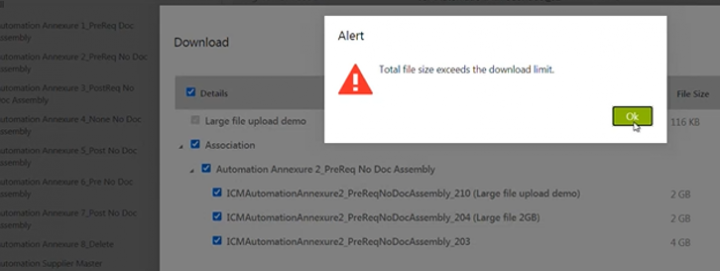
*If the file size exceeds the configured limit, a message will be displayed that the total file size exceeds the download limit. | *If the file size exceeds the configured limit, a message will be displayed that the total file size exceeds the download limit. | ||
| − | + | <div class="image-green-border">[[File:Large File 7.png|720px|Large File 7]]</div> | |
'''Note:''' Creating the zip file may take some time. A message will be displayed when the download starts. | '''Note:''' Creating the zip file may take some time. A message will be displayed when the download starts. | ||
| − | + | 17. '''Click''' ''Download All''. The files will be downloaded in a zip format. | |
| − | + | <div class="image-green-border">[[File:Large File 9.png|720px|Large File 9]]</div> | |
| | ||
Latest revision as of 08:57, 27 January 2021
Contents
- 1 Association Management
- 1.1 Searching an Associated Document
- 1.2 Creating an Associated Document
- 1.3 Creating associations on create/edit wizard of agreement
- 1.4 Assembly of Associated documents based on a defined order
- 1.5 Understanding Multi-Party Agreements
- 1.6 Highlighting changes in Associations tagged as a file
- 1.7 Approving an Associated Document
- 1.8 Uploading and downloading large files with the File Path attribute
Association Management
Associated documents are additional legal documents or supplementary materials added to an Agreement.
Associated documents can be:
- Created using a Template
- Uploaded into ICI
- Prepared from the Associated Document Contract Type model
From the Association Management tile you can:
- Search an Associated document
- Create an Associated document
- Approve an Associated document
Searching an Associated Document
Use Search feature to get relevant search results. You can use various methods to narrow down your search and locate the specific Associated Document you are looking for.
To search Associated Documents:
1. Click the Association Management > Associations on the Home page. The Association Management page opens.
2. Search for a specific Associated Document by using any of the following options:
- Under Search For:
- Click the Select Field list, and then select the appropriate item from the list. The relevant results are populated. For example, if you select Status (to filter Associations according to various status' of associated documents), list of various states of Associated Documents is displayed. You can then select appropriate status such as Approved, draft.
- The number in the bracket denotes the number of available items which contain the search term. You can select multiple options at the same time.
- To narrow your search, type free text in the Custom Keyword box, and then click Apply.
- Alternatively, type keywords in the Refine Search here box. A list of relevant Associated Documents opens.
- You can further narrow your search by using any of the following methods:
- "..." - Type the search term in double quotation marks. It shows existing Associated Documents that include the exact search term.
- ...* - Type the search term in star characters. It shows existing Associated Documents that include the exact search term.
- ... - Prefix * to the search term. It shows existing Associated Documents that end with this term.
- ...* - Suffix * to the search term. It shows existing Associated Documents that start with this term.
- "..." - Type the search term in double quotation marks. It shows existing Associated Documents that include the exact search term.
Creating an Associated Document
In ICI, you can create the Associated documents separately.
To create an Associated document:
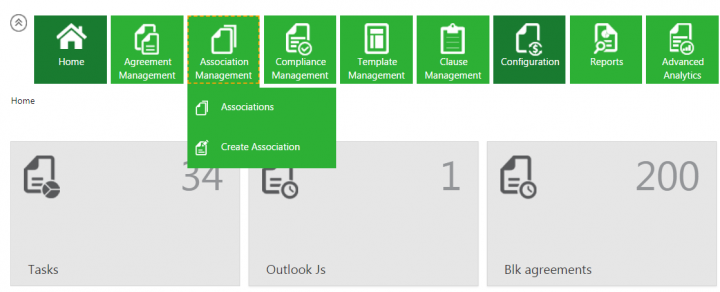
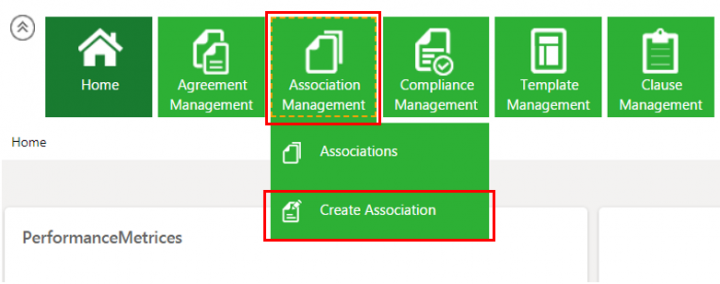
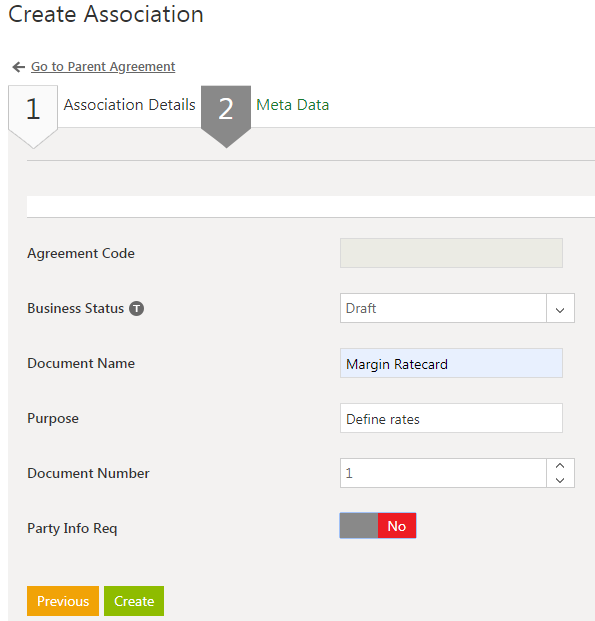
1. Click the Association Management tile on the Home page. The drop-down with options Associations and Create Association opens.
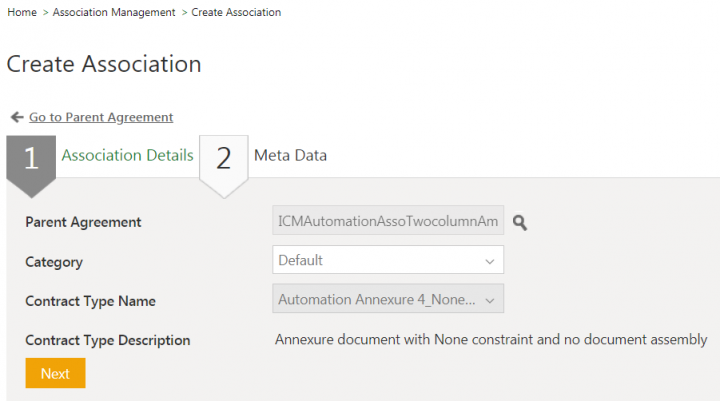
2. Click Create Association. The Create Association page opens.
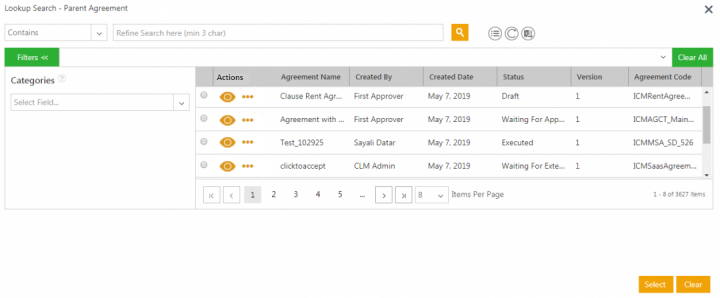
3. Select Parent Agreement by clicking the icon. The Lookup Search window opens.
4. Select the parent Agreement that you want the document to be associated with. You can select only Parent Agreement.
5. Click Select. This takes you back to the Create Associated Document page with the selected document displayed in the Parent Contract field.
6. Select the Category.
7. Select the Contract Type Name.
8. Click Next. Metadata section of the Create Association page opens. Click the Go to Parent Agreement link to access the relevant Parent Agreement.
9. In the Metadata tab, enter the appropriate information for the attributes.
10. Select the File Path field to upload the Associated document.
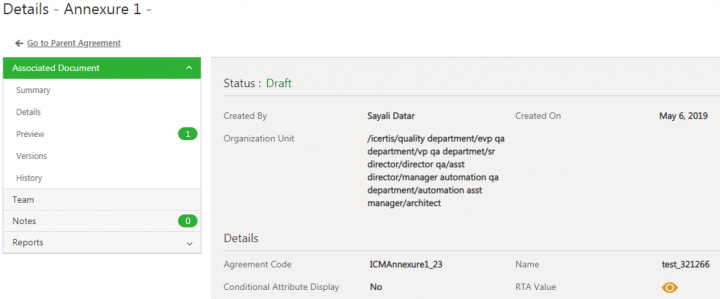
11. Click Create. The Associated Document gets created and the Agreement Details page opens. You can see the Associations here. ICI allows you to assemble both text and images in the Association file in the main Agreement document.
Using parent’s Organization Unit path when creating associated document
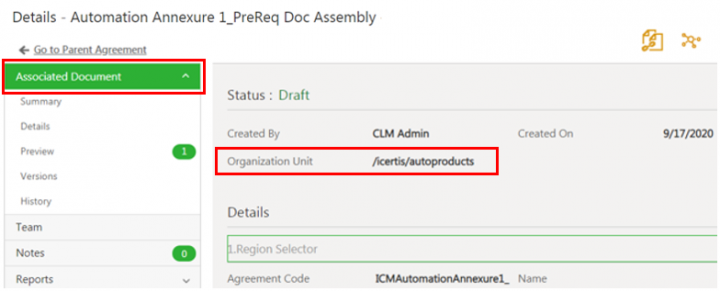
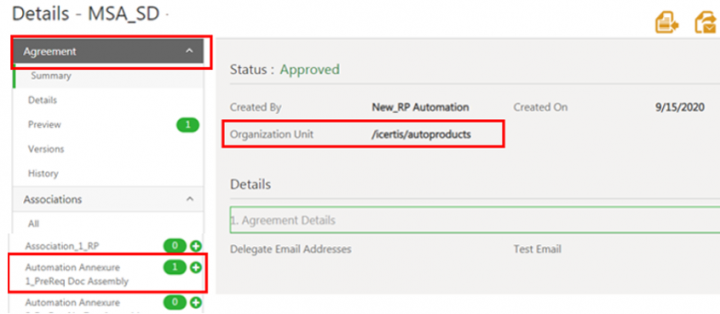
During creation, the organization unit path of the parent document will be displayed by default as the org path for the associated document, thus improving the usability.
- Import of Association (Line item)
- Auto Attachment Association
- Obligation/Fulfillment (Association of Association)
Creating associations on create/edit wizard of agreement
The ability to create association instances as part of agreement creation or update wizard is being introduced in this release. A separate page is displayed, when creating or updating the agreement or amendment, for the user to create, view or delete inline associations. The user also has an option to select the columns and their order in the association grid.
Configuring Inline Associations
As a prerequisite to enable Inline Associations for an agreement, the agreement’s contract type must be configured. To configure the agreement contract type for inline associations:
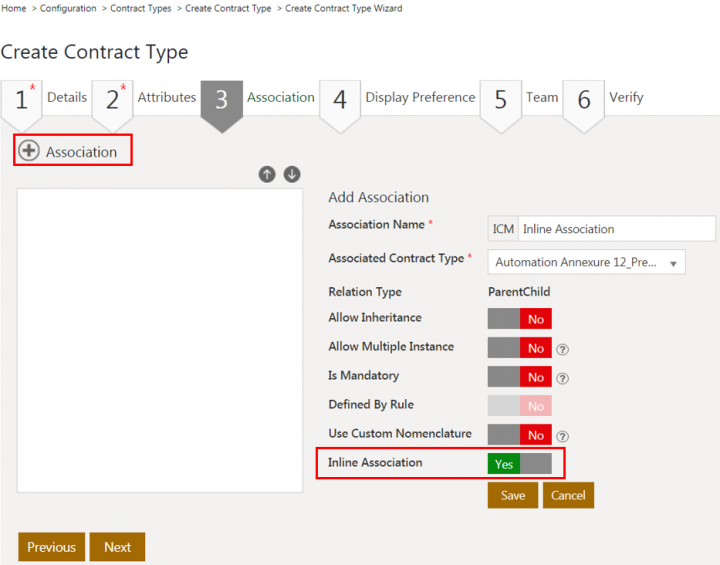
1. Go to the Association tab of the agreement contract type, for example Automation Non Editable Agreement.
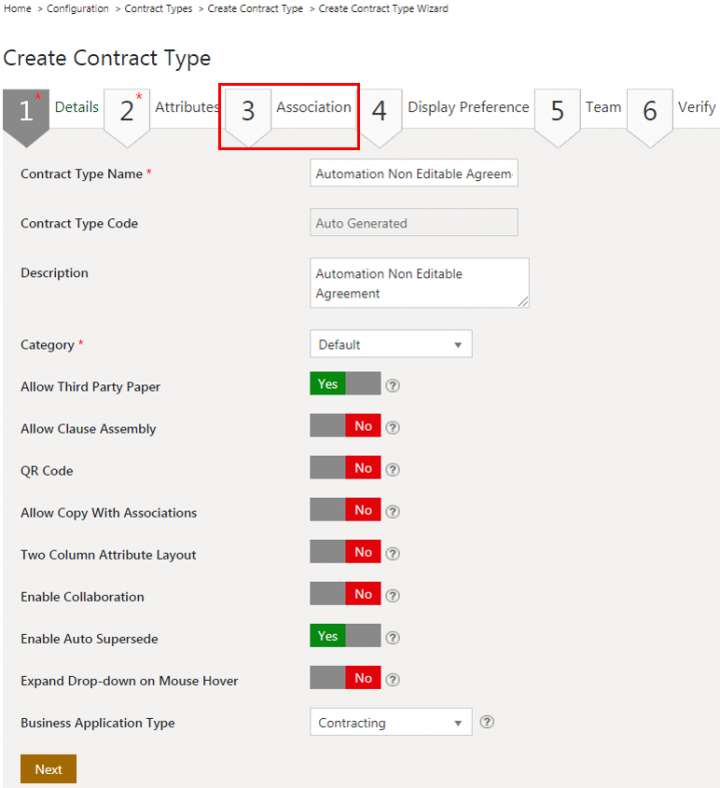
2. Click the plus icon next to Association. The Add Association content will be displayed.
3. Set the appropriate flags. In order to enable Inline Associations, the Inline Association flag must be set to Yes.
4. As an option you can configure a Rule on this contract type with Copy Attribute Value condition for select attributes, for example for the Contract Value.
Using Inline Associations
1. Go to Agreement Management > Create Agreement on the Home page. The Create Agreement page opens.
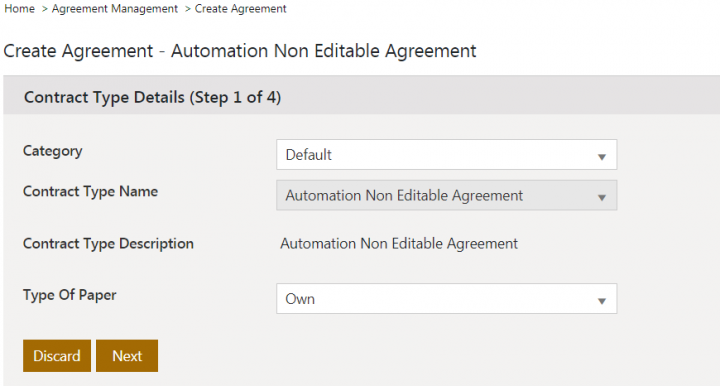
2. Select the Contract Type Name which has the Inline Associations flag enabled. For example, Automation Non Editable Agreement.
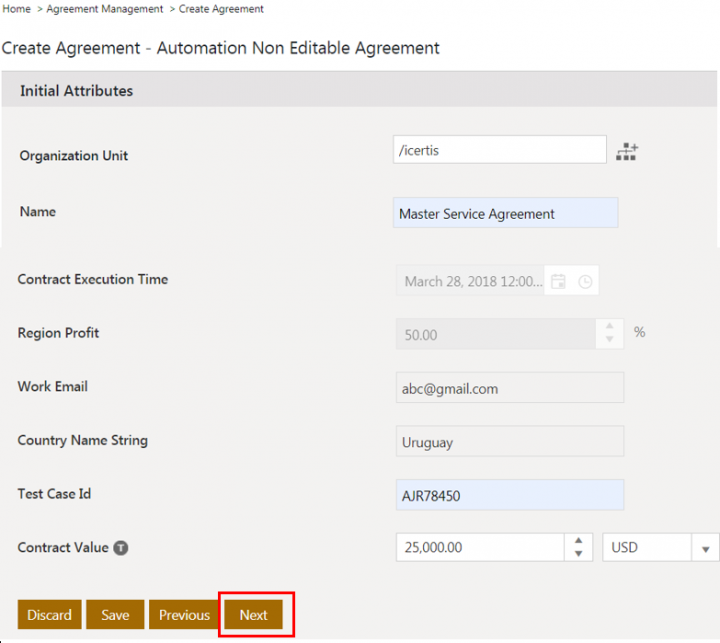
3. Click Next. The Initial Attributes page opens.
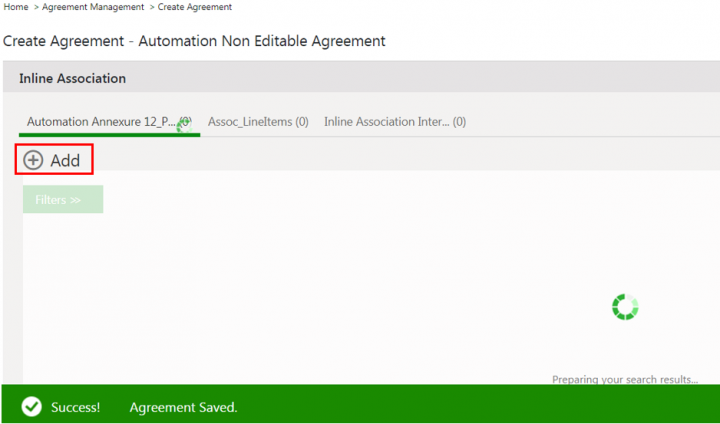
5. Click Next. The Auto-saving agreement and loading inline associations message is displayed and the page reloads displaying the Inline Association page.
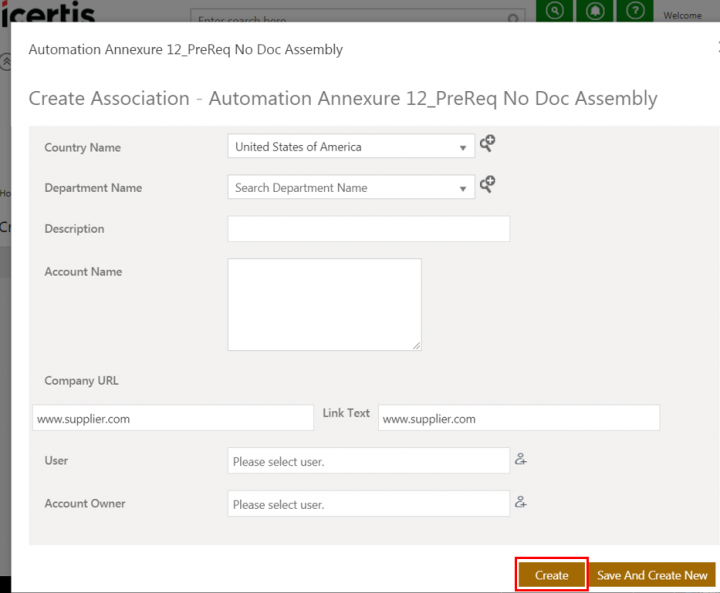
7. Enter the appropriate attribute values.
8. Click Create. The page reloads and the Association count is updated to 1. Alternatively you can click Save And Create New to create one association and to refresh the page for another association to be created. The “Save and Create New” action is only applicable for adding new associations and will not be available for updating or copying existing association.
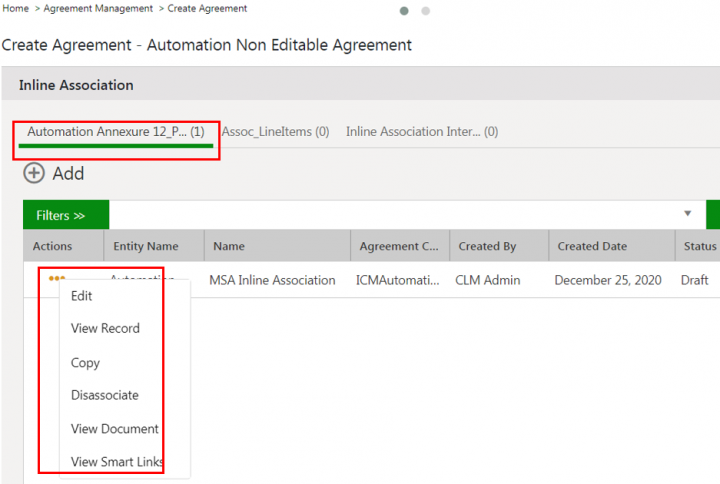
9. Click the More icon in the Actions column. The actions available are:
- Edit: Select to open the Edit Association page in the same tab.
- View Record: Select to open the Associated Document details page in a new tab.
- Copy: Select to create a copy of the association.
- Disassociate: Select to disassociate the Association.
- View Document: Select to view an uploaded document, if any.
- View Smart Links: Select to view smart links if available.
Assembly of Associated documents based on a defined order
ICI enables users to define the format for assembly of associations tagged as a Table or file in the main Agreement using Saved Search. This is accomplished by tagging Saved Searches of associated documents in an agreement.
Defining the order of Associated documents using Save Search
To define the order of associations using Saved Search:
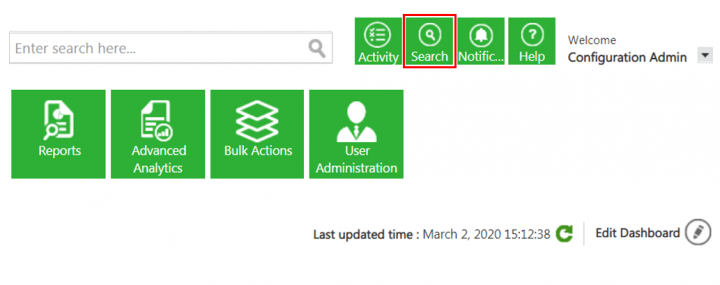
1. Click Search. The Search window opens.
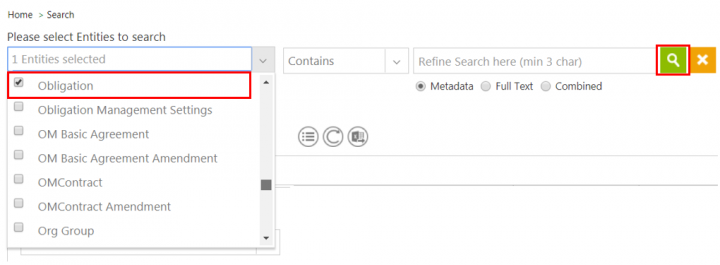
2. Select Obligation from the Please select Entities to search drop-down list.
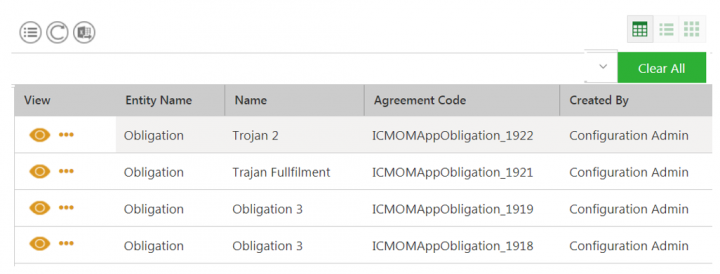
3. Click the search icon to search all Obligation. All Obligations are displayed.
4. Click Select Columns to add columns as per requirement for example, Team Member: User Name. The Select Columns window opens.
6. Enter a category or select one from the Categories drop-down. For example, Created By.
7. Select the checkbox next to the users for which you want to view the Obligation. For example, Configuration Admin. All Agreements created by the Configuration Admin are displayed.
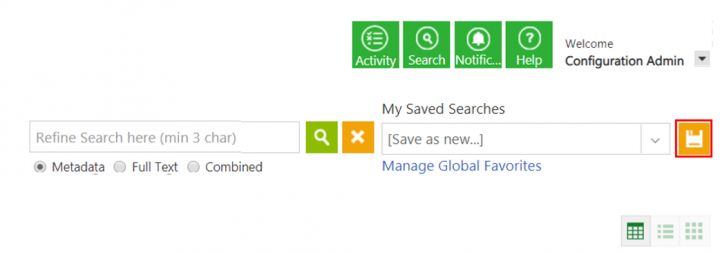
8. Click the Save Search icon. The Save Search window opens.
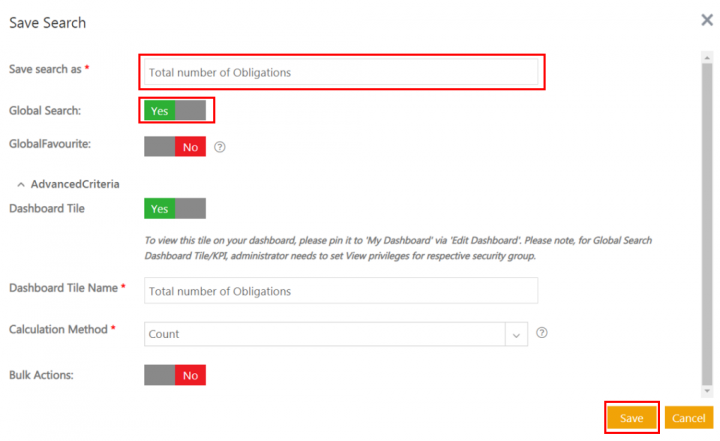
9. Enter a name in the Save search as field. For example, Total number of Obligations.
10. Toggle Yes for the Global Search field.
11. Toggle Yes for the Dashboard Tile field.
12. Enter a name in the Dashboard Tile Name field. For example, Total number of Obligations.
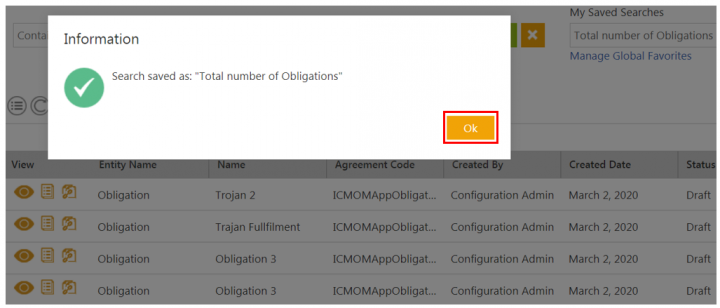
13. Click Save. The Information window opens indicating that search is saved as Total number of Obligations.
14. Click Ok to save the search.
Tagging of Associated Documents in the Agreement Template with Saved Search
2. Click Create to create a Template.
3. Select the contract type. For example, MSA_OM. The MSA_OM has Obligation as Associated Contract Type.
4. Enter a name for the template. For example, MSA_template.
5. Click Save. The template is saved.
6. Click the Library tab.
7. Click the Associations button.
8. Click the more actions icon. A window opens with options such as Add as file, Add as file with page break, Add as table, Add as table with page break and Add with Saved Search.
9. Click Add with Saved Search. The Select Saved Search and tag window opens.
10. Select Total number of Obligations from the drop-down list.
11. Click Add as table to add associations as a table.
12. The Obligation added to document window opens.
13. Click Save. The template is saved.
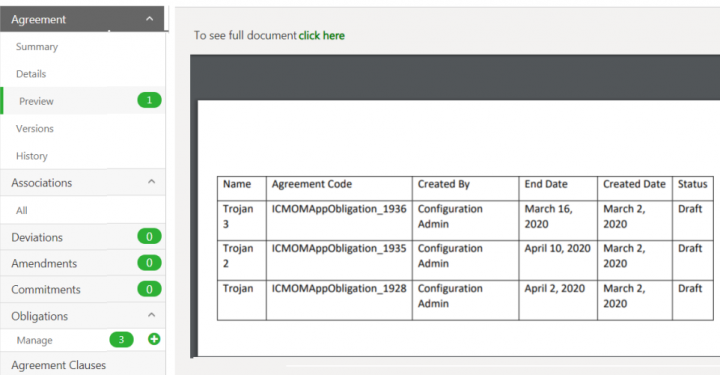
14. In the Agreement details page of ICI, let us now add some Obligations. For example, Trojan, Trojan 2 and Trojan 3.
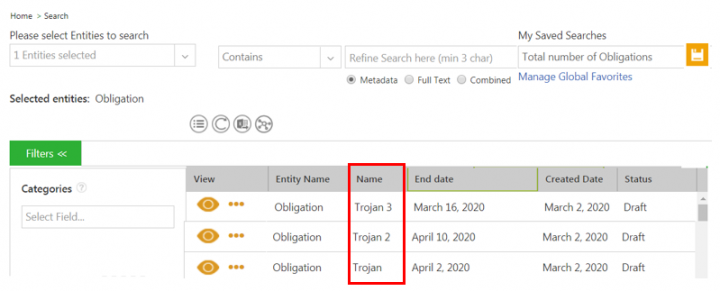
15. Go to the Saved Searches (Total number of Obligations) and sort the Obligations of based on the descending order of End date column.
16. Click the Save Search icon to save the revised Saved Searches.
17. Click Assemble Contract on the Agreement Details page to assemble the associated document as per the revised Saved Searches.
18. Click Preview.
Understanding Multi-Party Agreements
Additional platform support for Associations have been added. These enhancements support full platform functionality for Association metadata that was previously available only for Agreement metadata. The additional enhancements fall into three main areas:
- Ability to use Association Attributes in Rules
- Ability to tag Association Attributes in Agreement and Clause Templates
- Ability to use faceted search for Association Attributes from the main Search page
- Ability to compare Association tagged as a table across versions
One of the primary functional drivers for these new capabilities is to enable full functionality for Multi-party Agreements.
Making the Association type itself available while selecting Attributes
Building on the functionality around one-to-many relationships in Associations, ICI provides the ability to reference Association counts in Rule criteria. Since Rules can now be written for individual Attributes of an Association, it enables Admins to write Rules based on the count of Associations that have been added of a specific type. All attributes for Associations are available for the given Rule conditions and every Association has a specific sequence number so that the metadata of that sequence is tagged in the Template. You can search selected values of an Agreement or an Associated Document. For a multi-division Agreement, ICI supports writing Rules based on individual instances of the multi-value attributes.
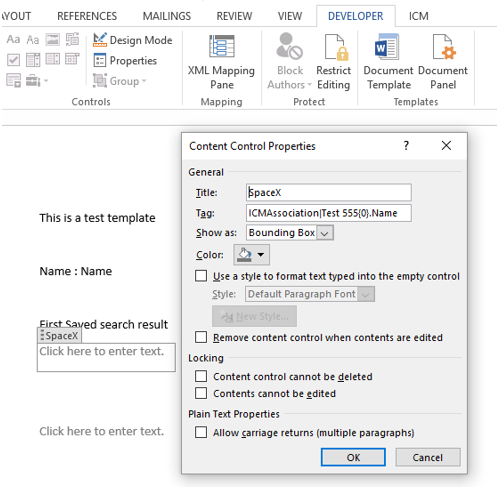
When Rules are written based on the Attributes of the Association, the rules support tagging of the Metadata that belongs to the association. The associations may either be parent-child or peer. After the content control tag is entered, the value of the associated instances’ metadata is placed in the content control as shown in the example below.
Introducing a Content Control tag for Association Metadata
You can create a saved search to get the Association attribute and assemble it in the Agreement. You can sort any of the available columns. The name of the saved search is used to tag that association’s Metadata into the Template. This feature works only on Publish Agreement and Edit Agreement.
These changes to the attribute are done by editing the content control in Word manually. The example below shows the content control tag.
Note: This is not available in ICI Word Add-in.
Example:
Editing a content control tag
- To tag the association’s metadata to the clause, edit the control tag as follows:
ICMAssociation|AssociationSavedSearchName{0}.ICMClientContactPerson
where,
- The selected Contact Person from the Contract Party association’s sequence is 1.
- The index is a zero based index. 0 means 1st instance, 1 means 2nd instance, and so on.
- The sample content control will look as follows:
Click here to enter text.
Adding a content control tag
- Check if the Developer ribbon is available in the Word menu. To enable it, go to:
File -> Options -> Customize Ribbon -> Enable Developer
- Select Plain Text Content Control -> Properties and add the attribute’s display name in the Title.
- Add ICMAssociation|AssociationSavedSearchName{index}.{Attribute’s Technical Name}
where,
- ICMAssociation: This is static and does not change.
- AssociationSavedSeachName: As explained above.
- Index: This is a zero based index. 0 means 1st instance, 1 means 2nd instance, and so on.
- Attribute’s Technical Name: The technical name of the attribute of Association, such as, ICMCountryName, ICMPartyName, and so on.
Comparing Association tagged as a table across Agreement versions
The functionality of alerting users on redlining of changes in Association tagged as a table is visible through the Versions tab of the Agreement document. Let’s see an example where the user edits a table tagged as Association and then uploads a revised Agreement to ICI and how ICI alerts the user regarding the changes made in the table tagged as an Association.
To edit an existing Agreement where a table is tagged as an Association:
1. Click the Agreement Management tile on the Home page. The Agreement Management page opens.
2. Click the View Record icon next to the Agreement in which you want to edit the Associated Document table. The Agreement Details page opens. For example, Main Sales Order 2.
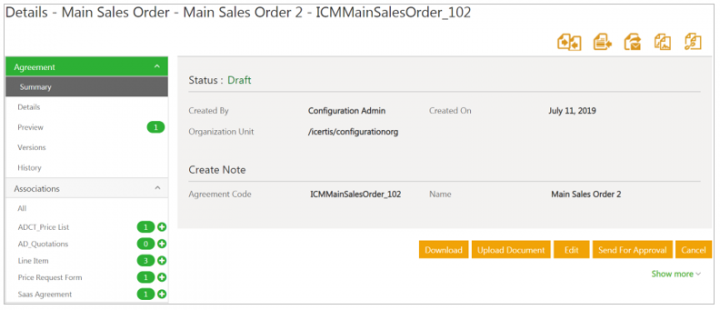
3. Click Download to download the Agreement. The Agreement gets downloaded in Microsoft Word document (.Docx) format.
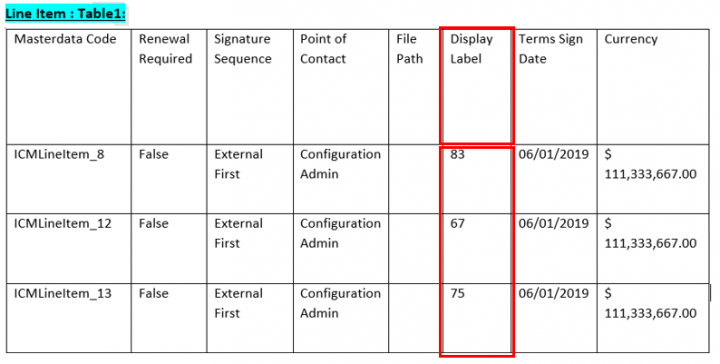
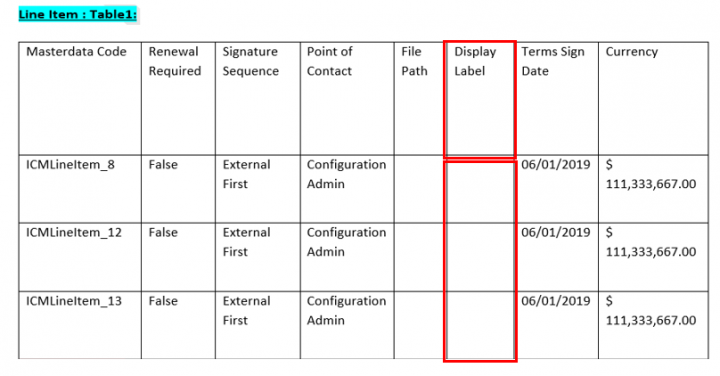
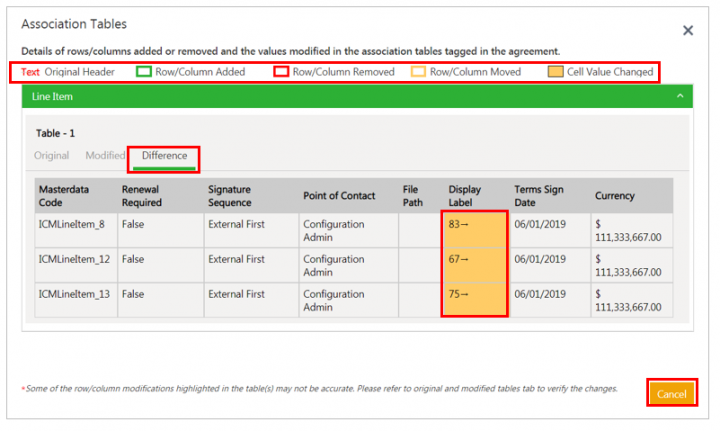
4. Edit the Associated Document table. For example, let’s remove existing numbers 83, 67, and 75 from the cells of the Display Label column of Line Item: Table1.
5. Click Save.
6. Click Upload Document in ICI. The Upload Document window opens.
7. Click Select File to select the revised Template.
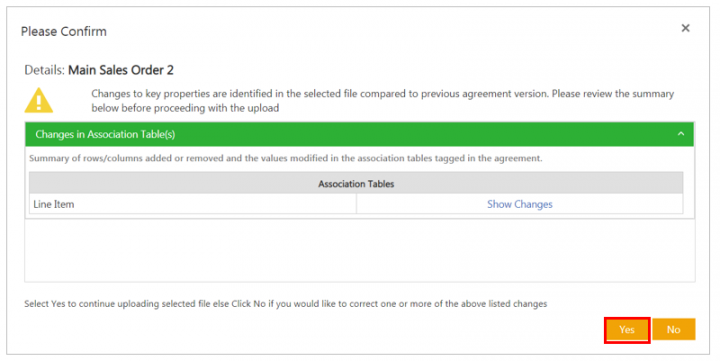
8. Click Upload File to upload the revised file. The Please Confirm window opens with a message Changes in Association Table(s).
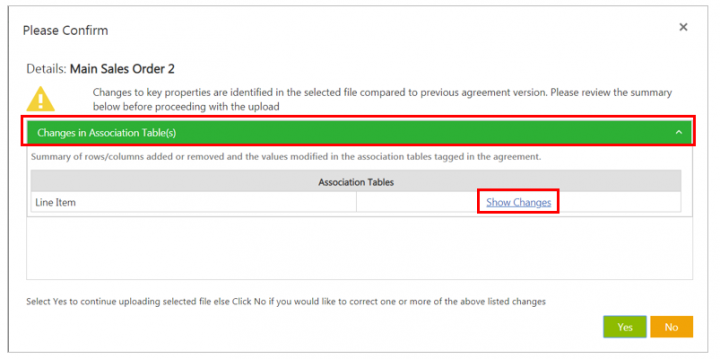
9. Click the Show Changes link to view the changes made in the Association Tables. The Association Tables window opens highlighting the removed values (83,67 and 75) in the Display Labelcolumn.
10. Click Cancel to return to the Please Confirm window.
11. Click Yes to upload the revised Associated Document.
12. Click the Versions tab to view the different Agreement documents with revised Associated tables.

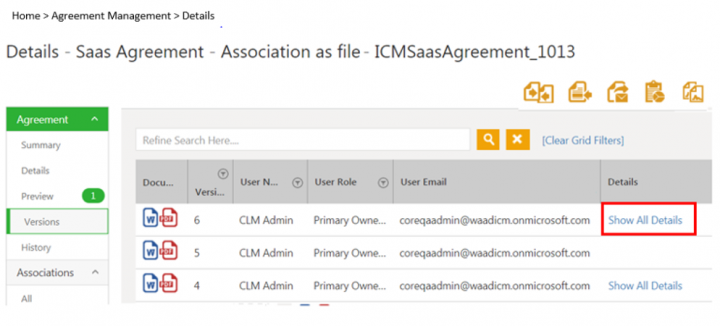
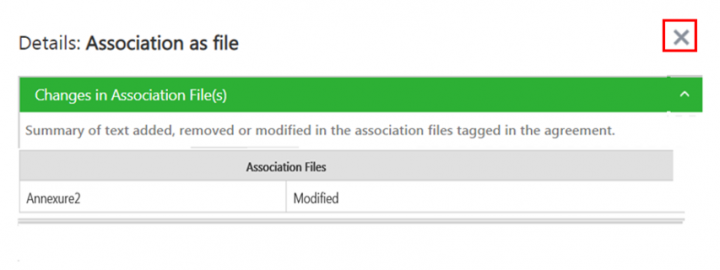
13. Click the Show All Details link to view the changes in the Association Table(s).
To view Associated table changes through Icertis Experience for Word
When modifications are made using the Icertis Experience for Word, a user can view the changes in the Associated table of the published Agreement.
Highlighting changes in Associations tagged as a file
ICI alerts the user and presents a summary of any text that is added or modified in association(s) tagged as file(s).
The following actions take place as soon as a new agreement version is uploaded:
- The version being uploaded is compared with the latest version available in ICI
- A window is displayed alerting the changes made in associations
Highlighting changes in Associations using Icertis Experience for Word
To view changes in Associations tagged as a file:
1. Click Download in ICI. The agreement document is downloaded.
2. Click Enable Editing to edit the agreement document.
3. Log on to Icertis Experience for Word.
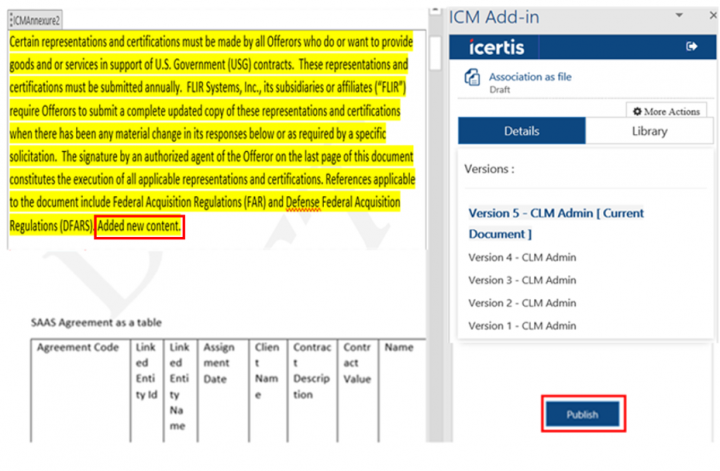
4. Edit the agreement document. For example, let us edit Annexure2, which is tagged as an association as a file.
5. Click Publish. The Publish Agreement window opens.
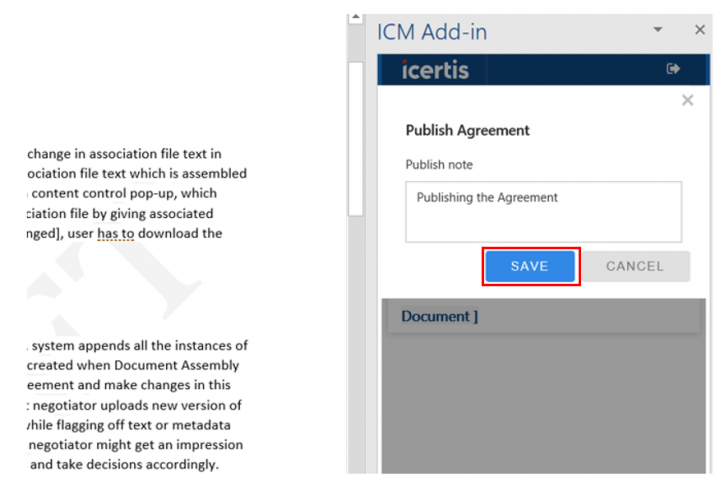
7. Click Save. A validation message window opens indicating the warnings or errors so that you can take appropriate actions to proceed.
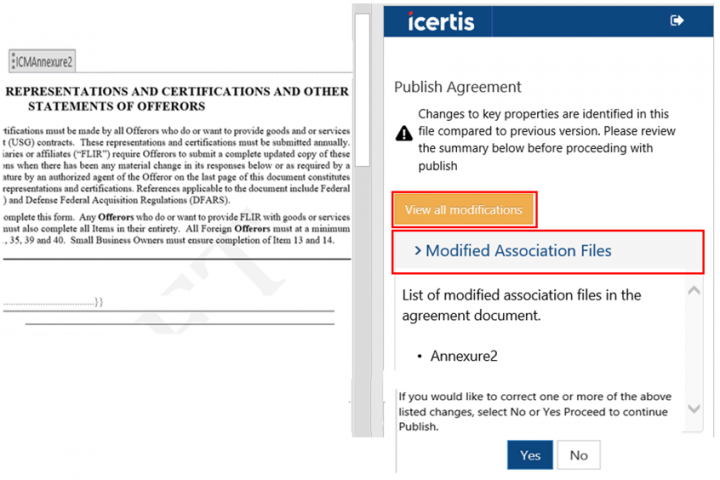
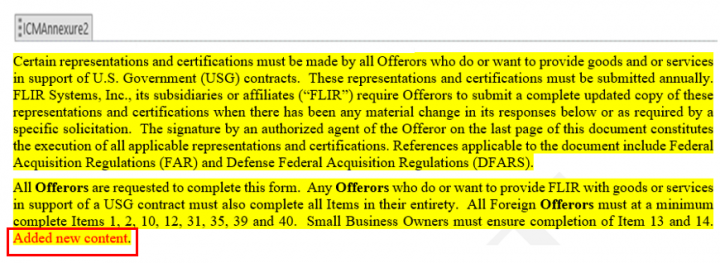
8. Click View all modifications. The ICI Web page opens displaying the modifications made in the association files. For example, Annexure2 association files.
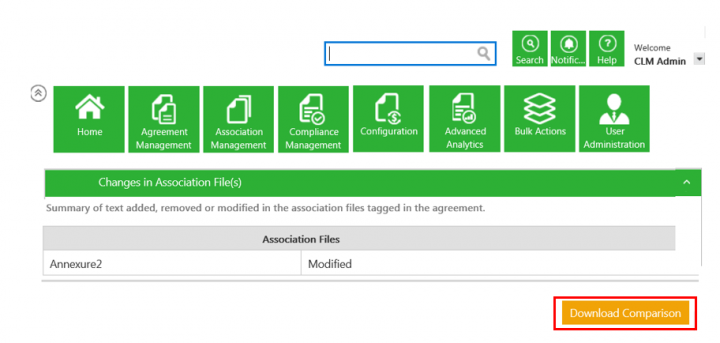
9. Click Download Comparison to view the comparison between the previous agreement version and the current version. This document highlights the modifications made.
10. Go to Icertis Experience for Word.
11. Click Yes to continue uploading the document.
Highlighting changes in Associations using ICI
1. Click Download in ICI. The agreement document is downloaded.
2. Click Enable Editing to edit the agreement document.
3. Log on to Icertis Experience for Word.
4. Edit the agreement document. For example, let us edit Annexure2, which is tagged as an association as a file.
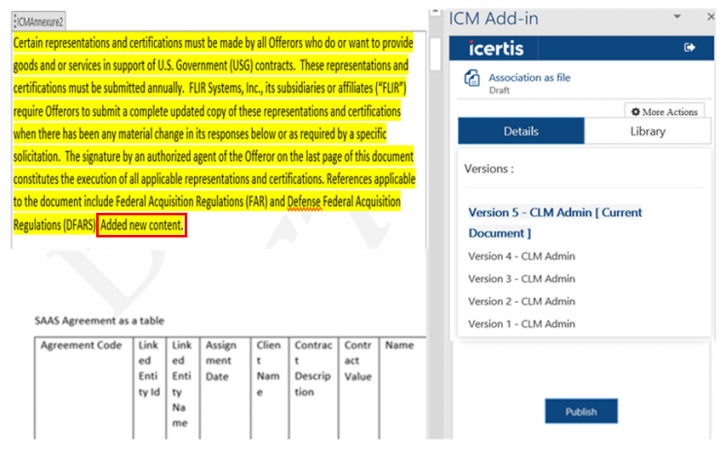
5. Save the agreement document.
6. Click Upload Document. The Upload Document window opens.
7. Click Select File. For example, ICISaasAgreement.Docx.
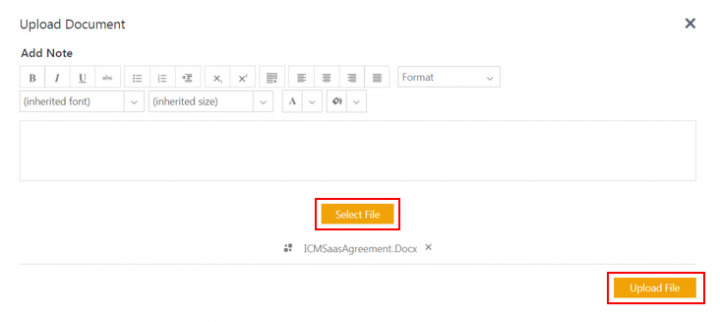
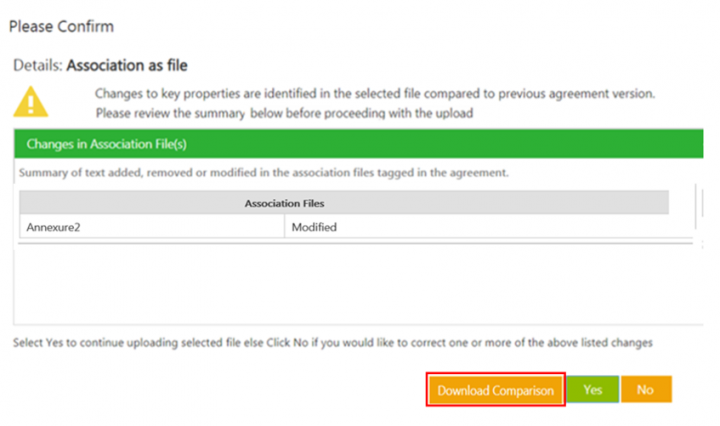
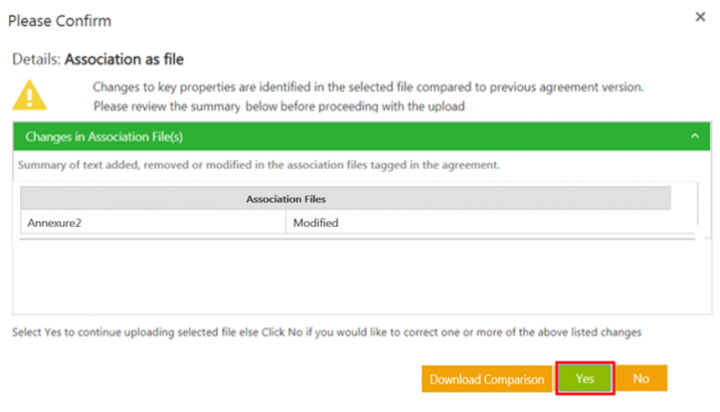
8. Click Upload File. The Please Confirm window opens indicating the changes in the Association File(s).
9. Click Download Comparison to view the comparison between the latest available version of the agreement and the version being uploaded. This document highlights the modifications made.
10. Click Yes to continue uploading the document.
Approving an Associated Document
When the Associated Document is created, the approval rule triggers, and the document is sent to the approvers that are set by the approver rule. If you are an approver, you can approve or reject the associated document.
To approve an Associated Document:
1. Click the Tasks tile on the Home page. The User Tasks page opens.
2. Click the Association name link that you want to approve. The Associated Document Details page opens.
3. To Approve the document, click Approve. To reject the document, click Reject. A notification is sent to the Primary and Secondary Owner of the document every time an approver approves or rejects a document.
4. If you click:
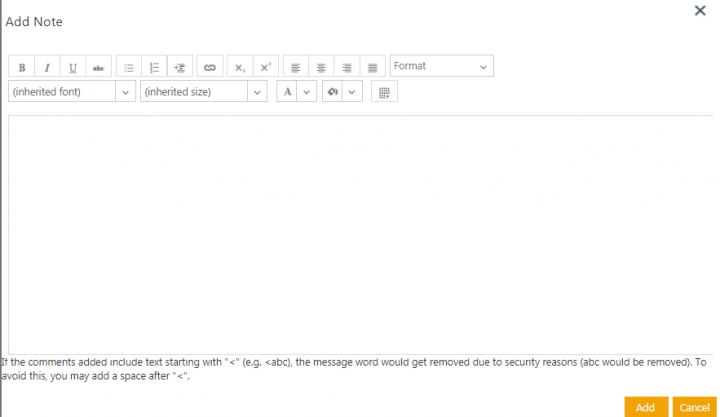
- Approve: The Add Note window opens. Type your comments and then click Add. The associated document gets approved.
- Reject: The Add Note window opens. Type your comments, select the appropriate reason code, and then click Add. The Associated Document gets rejected and goes into the Draft state.
You can enable, disable, reassign, or remove approvers using the respective buttons from the Team tab of the Association after it is created. This can be done for the Associations that are in Approved or Waiting for Approval states.
If you are an approver of the Associations for Agreements and Amendments, you can request more information for an Association that is in Waiting for Approval state using the Need More Info button. You can also remove yourself as an Approver using the Remove Mebutton for an Association that is Waiting for Approval.
Uploading and downloading large files with the File Path attribute
ICI now provides support for larger files.
Users can now:
- Large file support is added in masterdata and association only.
- Upload files up to 4GB under the file selection attribute.
- Upload files with all supported file extensions allowed in the file selection attribute.
- Download All/Download Package up to 6 GB.
- Only Azure and Windows store are supported.
ICI supports virus scanning of large files if the virus scan feature is enabled.
To upload a large file:
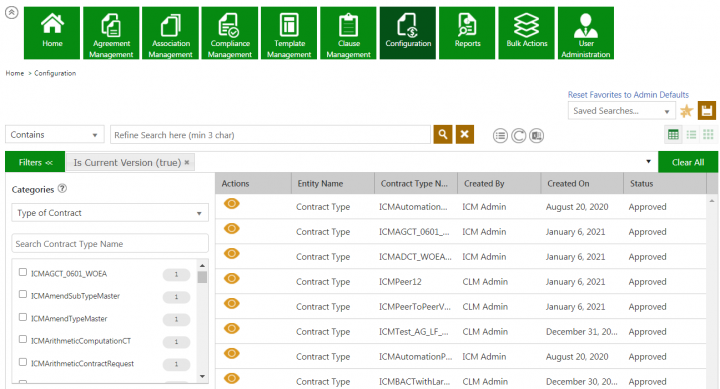
1. Click Configuration > Contract Types > Categories.
2. Select Type of Contract from the drop-down.
3. Select the contract type where you want to enable this functionality.
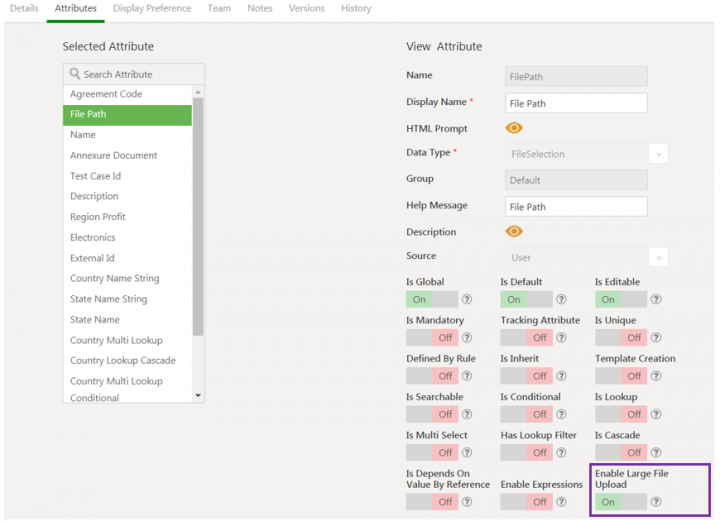
4. On the Attributes tab of the Edit Contract Type page, select any File Selection data type attribute such as File Path in the Selected Attributes column.
5. Enter a Display Name for the attribute.
6. Toggle the Enable Large File Upload to Yes. This flag provides support for large files in File Selection and File Path attributes.
Note:
- Depending on the data type, the Enable Large File Upload attribute will be enabled.
- Once this flag is enabled, it cannot be disabled.
- The attribute is always disabled for contract requests and agreements as they are not supported.
7. Click Save to save your changes and Publish.
8. Click Association Management > Create Association.
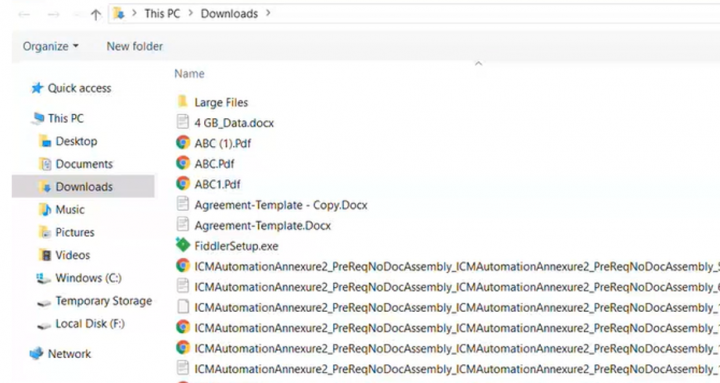
9. On the Meta Data tab, click Select File in the File Path field.
10. Select the file that you want to upload.
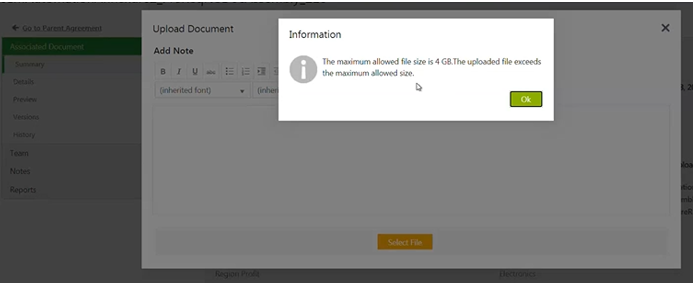
- If the file size does not exceed the configured limit (4GB), then the file will be uploaded and displayed on the page.
- If the file size exceeds the configured limit, a message will be displayed that the maximum allowed size had exceeded.
11. Select the file that you want to upload in the associated document (Annexure Document) field.
Note:
- For file attributes, you have to explicitly upload the file by clicking the Upload File button, unlike the file path attribute. You can also view the progress of the upload. When the file is uploaded, the progress bar turns green.
- Uploading a file may take some time depending on the network bandwidth, connection speed, file size, etc.
To download a large file:
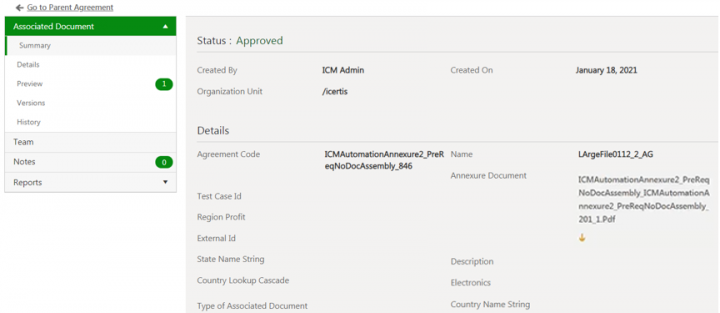
11. When the association is created, click the Versions tab on the association Details page.
12. Click the Download icon to download the large file that has been uploaded.
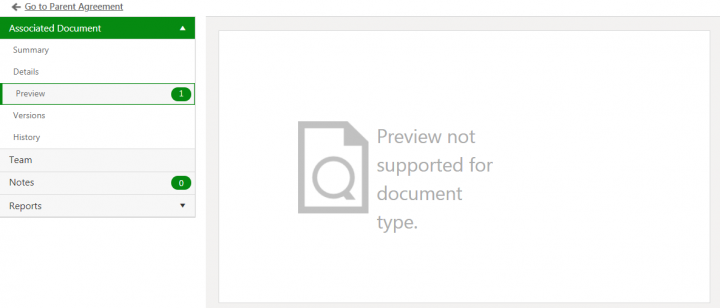
13. Click Preview if you want to preview the file. The Preview not supported for document type message will be displayed.
Note: For file path attributes, the Preview can be generated. However, for large files, restrictions have been added to avoid performance impact. However, the files can be viewed on the Versions tab and the audit history.
To download all (large) files:
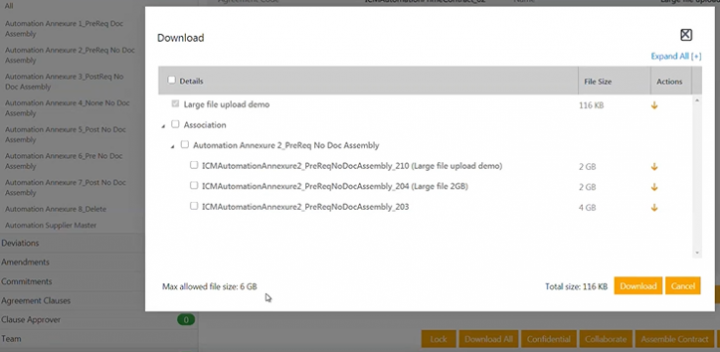
15. Click the Download All button.
16. On the Download window, select the files that you want to download in a zip format.
- If the file size does not exceed the configured limit (6GB), then the files will be downloaded in a zip format.
- If the file size exceeds the configured limit, a message will be displayed that the total file size exceeds the download limit.
Note: Creating the zip file may take some time. A message will be displayed when the download starts.
17. Click Download All. The files will be downloaded in a zip format.
Related Topics: Agreement Management | Agreements | Contract Type | Saved Searches | Adding Supporting Documents to an Agreement | Obligation Management
