| (9 intermediate revisions by 3 users not shown) | |||
| Line 1: | Line 1: | ||
| − | |||
= Self-Serve Tools = | = Self-Serve Tools = | ||
| Line 20: | Line 19: | ||
== Search Sync Tool == | == Search Sync Tool == | ||
| − | The Search Sync tool gets data from | + | The Search Sync tool gets data from Icertis Search for a given instance’s ''Sys Id ''and synchronizes it if required. Using the fetched ES value, the tool validates if the Sys Id is the latest for the respective instance or if a sync is required. This tool can be accessed by the Administrator from the ''Admin Task'' on ''User Administration'' tile. |
If the key exists, the latest value from ES will be displayed. If the key does not exist, the system displays an error message indicating that the value could not be fetched for the provided Sys Id. The Sys Id can be provided as input CSV file or as comma separated. Either comma separated Sys Ids can be entered or a CSV file can be uploaded. | If the key exists, the latest value from ES will be displayed. If the key does not exist, the system displays an error message indicating that the value could not be fetched for the provided Sys Id. The Sys Id can be provided as input CSV file or as comma separated. Either comma separated Sys Ids can be entered or a CSV file can be uploaded. | ||
| Line 33: | Line 32: | ||
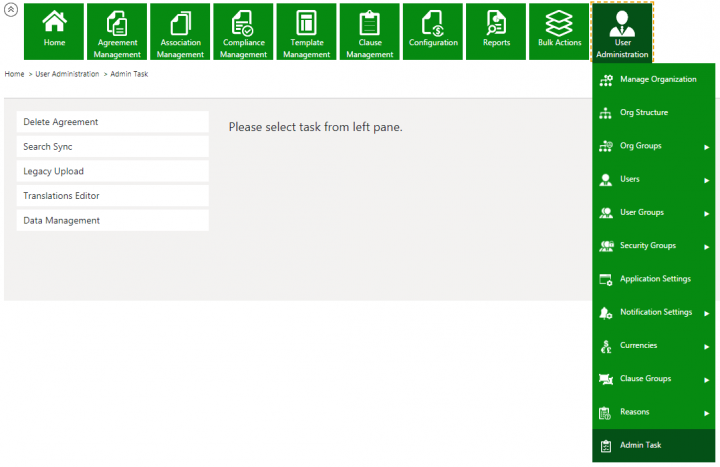
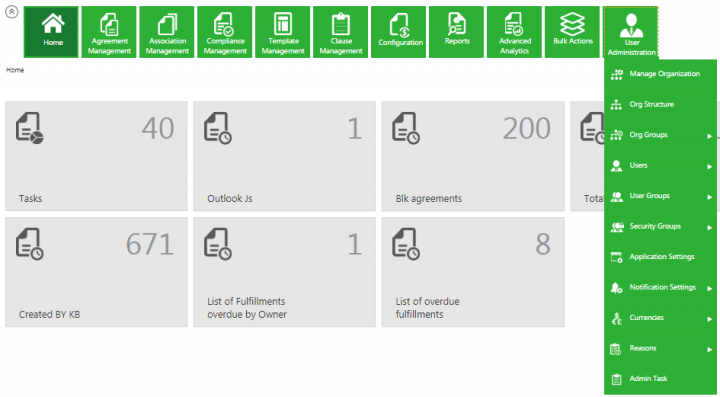
1. '''Click''' Home > User Administration > ''Admin Task''. The ''Admin Task'' page opens. | 1. '''Click''' Home > User Administration > ''Admin Task''. The ''Admin Task'' page opens. | ||
| − | <div class="image-green-border">[[File: | + | <div class="image-green-border">[[File:Self Serve Tool 5.1.png|720px|Self Serve Tool 5.1]]</div> |
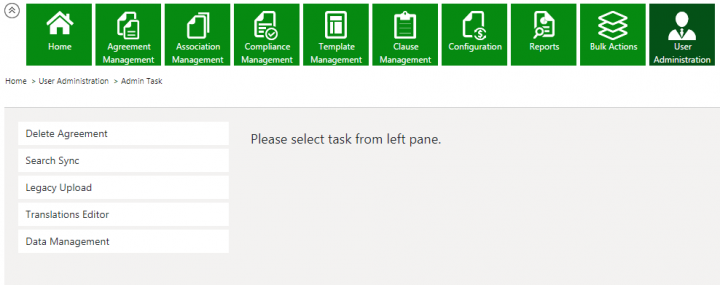
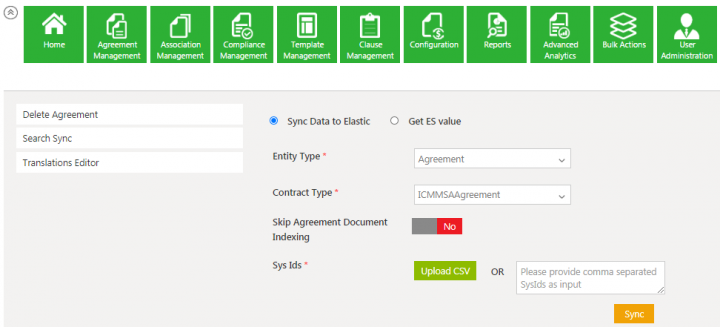
2. '''Click''' the ''Search Sync ''task from the left pane. | 2. '''Click''' the ''Search Sync ''task from the left pane. | ||
| − | <div class="image-green-border">[[File: | + | <div class="image-green-border">[[File:Self Serve Tool 5.2.png|720px|Self Serve Tool 5.2]]</div> |
| − | 4. '''Select''' the ''Entity Type ''from the drop-down to sync data to the | + | 4. '''Select''' the ''Entity Type ''from the drop-down to sync data to the Icertis Search. For example, Agreement. |
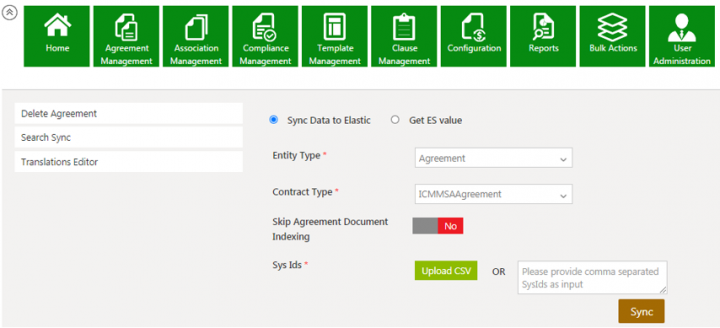
5. '''Select''' the ''Contract Type ''from the drop-down''.'' | 5. '''Select''' the ''Contract Type ''from the drop-down''.'' | ||
| Line 42: | Line 41: | ||
5. '''Toggle '''''Skip Agreement Document Indexing ''to ''Yes/No'' as required. | 5. '''Toggle '''''Skip Agreement Document Indexing ''to ''Yes/No'' as required. | ||
| − | 6. To get the ''Sys Ids,'' '''click''' the ''Upload CSV button'' to upload the .CSV Agreement or enter the Sys Id using comma separated value in the box. | + | 6. To get the ''Sys Ids,'' '''click''' the ''Upload CSV button'' to upload the .CSV Agreement or enter the Sys Id using comma-separated value in the box. |
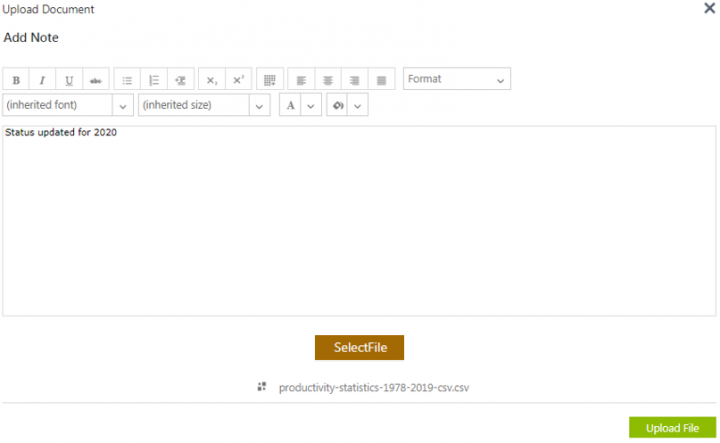
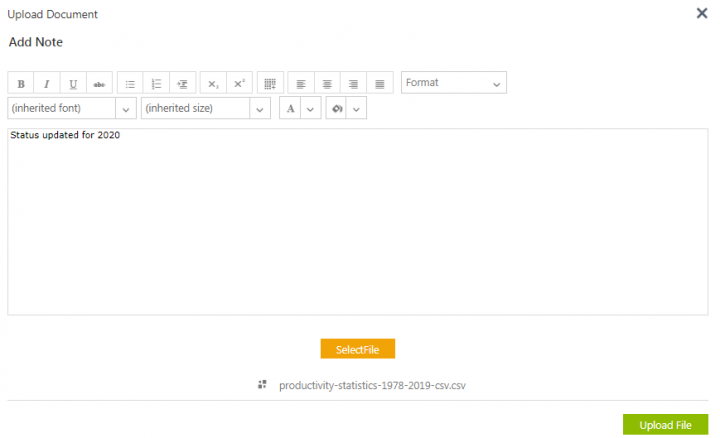
7. '''Click''' the ''Upload CSV'' button to upload the CSV document. The ''Upload Document'' window opens. | 7. '''Click''' the ''Upload CSV'' button to upload the CSV document. The ''Upload Document'' window opens. | ||
| − | <div class="image-green-border">[[File: | + | <div class="image-green-border">[[File:Self Serve Tool 5.3.png|720px|Self Serve Tool 5.3]]</div> |
8. '''Click''' ''SelectFile'' to upload a CSV file and add a note if required. | 8. '''Click''' ''SelectFile'' to upload a CSV file and add a note if required. | ||
| − | <div class="image-green-border">[[File: | + | <div class="image-green-border">[[File:Self Serve Tool 5.4.png|720px|Self Serve Tool 5.4]]</div> |
9. '''Click''' ''Upload File''. The file is uploaded to the ''File Path ''displayed.If the uploaded file format is incorrect, an alert message is displayed. The supported file formats will be also be displayed. | 9. '''Click''' ''Upload File''. The file is uploaded to the ''File Path ''displayed.If the uploaded file format is incorrect, an alert message is displayed. The supported file formats will be also be displayed. | ||
| − | + | <div class="image-green-border">[[File:Self Serve Tool 5.5.png|720px|Self Serve Tool 5.5]]</div> | |
If the uploaded file format is incorrect, an alert message is displayed. The supported file formats will be also be displayed. | If the uploaded file format is incorrect, an alert message is displayed. The supported file formats will be also be displayed. | ||
| − | <div class="image-green-border">[[File: | + | <div class="image-green-border">[[File:Self Serve Tool 5.6.png|720px|Self Serve Tool 5.6]]</div> |
10. '''Click''' ''Sync''. The ''Sync Request Accepted'' message is displayed. | 10. '''Click''' ''Sync''. The ''Sync Request Accepted'' message is displayed. | ||
| − | <div class="image-green-border">[[File: | + | <div class="image-green-border">[[File:Self Serve Tool 5.7.png|720px|Self Serve Tool 5.7]]</div> |
11. '''Click''' ''Ok''. Users can now get data from ES for a given instance’s SysId and can check if it has the latest value or if a sync is needed. | 11. '''Click''' ''Ok''. Users can now get data from ES for a given instance’s SysId and can check if it has the latest value or if a sync is needed. | ||
| Line 59: | Line 58: | ||
13. Enter the SysId and '''click''' ''Go''. If the key exists, the latest value from ES will be displayed. If the key does not exist, the error message ''Please enter valid SysId'' is displayed. | 13. Enter the SysId and '''click''' ''Go''. If the key exists, the latest value from ES will be displayed. If the key does not exist, the error message ''Please enter valid SysId'' is displayed. | ||
| − | <div class="note-box">'''Note''': Data can be fetched from only one instance at a time.</div> <div class="image-green-border">[[File: | + | <div class="note-box">'''Note''': Data can be fetched from only one instance at a time.</div> <div class="image-green-border"> </div> <div class="image-green-border">[[File:Self Serve Tool 5.8.png|720px|Self Serve Tool 5.8]]</div> <div class="image-caption"> </div> <div class="image-caption"> </div> <div class="image-caption"><span style="color:#008000;">'''''Icertis Search Sync'''''</span></div> |
| − | Users can now get data from | + | Users can now get data from Icertis search for a given instance’s ''SysId'' so that they can look up the value and identify whether it is the latest or if a sync is needed. If the key exists, the latest value from ES will be displayed. If the key does not exist, the system will display the error message “Could not fetch value for provided SysId”. |
| − | <div class="note-box">'''Note''': Data can be fetched from only one instance at a time.</div> <div class="image-green-border"> | + | <div class="note-box">'''Note''': Data can be fetched from only one instance at a time.</div> <div class="image-green-border"> </div> <div class="image-green-border"> </div> <div class="image-green-border"> </div> |
== Translations Editor Tool == | == Translations Editor Tool == | ||
The ICI platform is available in different languages and different languages label text are available for localization. However, to make any changes to the localization values, users had to reach out to the Solutions Engineering or Database teams. Sometimes, these changes were minor and of low complexity, but the turnaround time was substantial. | The ICI platform is available in different languages and different languages label text are available for localization. However, to make any changes to the localization values, users had to reach out to the Solutions Engineering or Database teams. Sometimes, these changes were minor and of low complexity, but the turnaround time was substantial. | ||
| − | Hence, a self-service ''Translations Editor'' tool has been introduced that contains all strings that are localized. | + | Hence, a self-service ''Translations Editor'' tool has been introduced that contains all strings that are localized. The Translations Editor tool supports adding localized values in different languages for Reason Codes as well. |
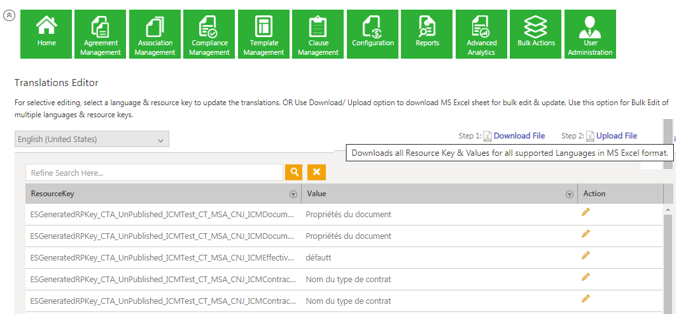
Users can now download all keys and their localization values as an Excel file, modify multiple values, and upload the modified changes to ICI. Once the values are updated in ICI, the caches are updated automatically to avoid the cache flush and server restart. This has significantly enhanced productivity as the turnaround time to update the Resource Key values has been eradicated. | Users can now download all keys and their localization values as an Excel file, modify multiple values, and upload the modified changes to ICI. Once the values are updated in ICI, the caches are updated automatically to avoid the cache flush and server restart. This has significantly enhanced productivity as the turnaround time to update the Resource Key values has been eradicated. | ||
| Line 82: | Line 81: | ||
2. '''Select '''''Admin Task'' from the drop-down. The ''Admin Task'' page opens. | 2. '''Select '''''Admin Task'' from the drop-down. The ''Admin Task'' page opens. | ||
| − | <div class="image-green-border">[[File: | + | <div class="image-green-border">[[File:Self Serve Tool 6.1.png|720px|Self Serve Tool 6.1]]</div> |
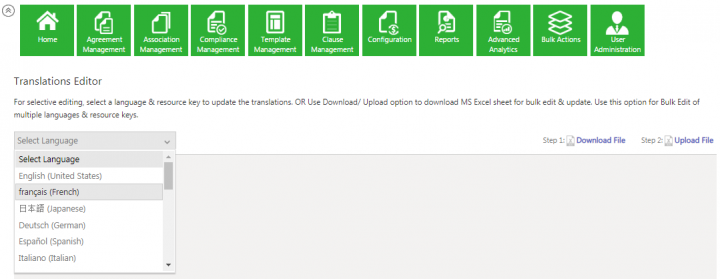
3. '''Select''' the ''Translation Editor ''task from the left pane. | 3. '''Select''' the ''Translation Editor ''task from the left pane. | ||
| − | <div class="image-green-border">[[File: | + | <div class="image-green-border">[[File:Self Serve Tool 6.2.png|720px|Self Serve Tool 6.2]]</div> |
Users can update translations in the following ways: | Users can update translations in the following ways: | ||
| Line 96: | Line 95: | ||
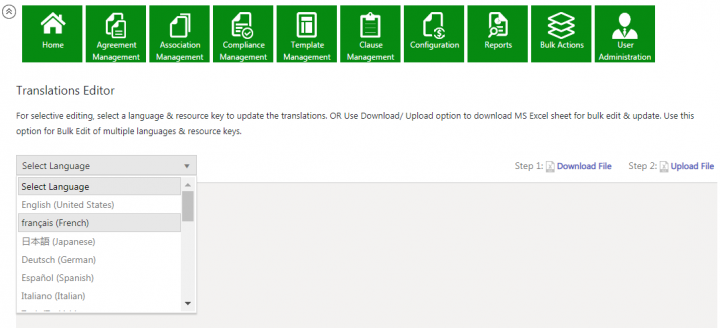
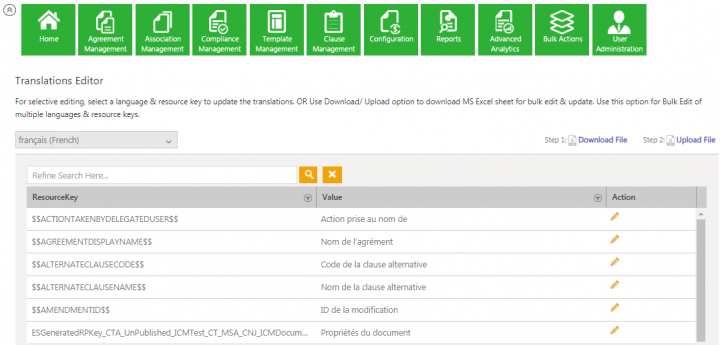
1. From the ''Select Language'' drop-down, select a language in which you want to edit the labels. For example, français (French). | 1. From the ''Select Language'' drop-down, select a language in which you want to edit the labels. For example, français (French). | ||
| − | <div class="image-green-border">[[File: | + | <div class="image-green-border">[[File:Self Serve Tool 6.3.png|720px|Self Serve Tool 6.3]]</div> |
The Resource Key and respective values of the selected language are displayed. | The Resource Key and respective values of the selected language are displayed. | ||
| − | <div class="image-green-border">[[File: | + | <div class="image-green-border">[[File:Self Serve Tool 6.4.png|720px|Self Serve Tool 6.4]]</div> |
| − | 2. '''Ente'''r a ''ResourceKey ''value in the''Search'' field to edit. For example, default. All ResourceKey(s) with the ''Par défaut (default)'' values from the French language are displayed. | + | 2. '''Ente'''r a ''ResourceKey ''value in the ''Search'' field to edit. For example, default. All ResourceKey(s) with the ''Par défaut (default)'' values from the French language are displayed. |
'''Note:''' ResourceKey is a unique key by which the application gets its label text for different languages. | '''Note:''' ResourceKey is a unique key by which the application gets its label text for different languages. | ||
| − | <div class="image-green-border">[[File: | + | <div class="image-green-border">[[File:Self Serve Tool 6.5.png|720px|Self Serve Tool 6.5]]</div> |
3. '''Click '''the ''Edit this Resource Key for Multiple Languages '''''icon '''in the ''Actions'' column. | 3. '''Click '''the ''Edit this Resource Key for Multiple Languages '''''icon '''in the ''Actions'' column. | ||
You can change the key for a single language or for multiple languages as required. For example, change ''Par défaut'' to ''défaut'' in French or ''Predeterminado'' in Español (Spanish) to ''Defecto''. | You can change the key for a single language or for multiple languages as required. For example, change ''Par défaut'' to ''défaut'' in French or ''Predeterminado'' in Español (Spanish) to ''Defecto''. | ||
| − | <div class="image-green-border">[[File: | + | <div class="image-green-border">[[File:Self Serve Tool 6.6.png|720px|Self Serve Tool 6.6]]</div> |
4. '''Click''' ''Update''. The ResourceKey value for ''default ''is updated to ''défaut ''for French and to ''Defecto'' in Spanish. | 4. '''Click''' ''Update''. The ResourceKey value for ''default ''is updated to ''défaut ''for French and to ''Defecto'' in Spanish. | ||
5. The ''Resources Updated Successfully'' message is displayed. '''Click''' ''Ok''. | 5. The ''Resources Updated Successfully'' message is displayed. '''Click''' ''Ok''. | ||
| − | <div class="image-green-border">[[File: | + | <div class="image-green-border">[[File:Self Serve Tool 6.7.png|720px|Self Serve Tool 6.7]]</div> |
You can select the respective languages (French or Spanish) to verify that the resources have been successfully updated. | You can select the respective languages (French or Spanish) to verify that the resources have been successfully updated. | ||
| − | <div class="image-green-border">[[File: | + | <div class="image-green-border">[[File:Self Serve Tool 6.8.png|720px|Self Serve Tool 6.8]]</div> <div class="image-caption"> </div> <div class="image-caption"> </div> <div class="image-caption">'''<span style="color:#008000;">Bulk Editing in Multiple Languages</span>'''</div> |
For editing Resource Key values of multiple languages in bulk: | For editing Resource Key values of multiple languages in bulk: | ||
1. '''Click''' ''Download File''. A Microsoft Excel file (named BulkActionWorkBookStringResource) that contains all the Resource keys and values for all supported languages in ICI is downloaded. | 1. '''Click''' ''Download File''. A Microsoft Excel file (named BulkActionWorkBookStringResource) that contains all the Resource keys and values for all supported languages in ICI is downloaded. | ||
| − | <div class="image-green-border">[[File: | + | <div class="image-green-border">[[File:Self Serve Tool 6.9.png|720px|Self Serve Tool 6.9]]</div> |
2. '''Open''' the downloaded Microsoft Excel file. | 2. '''Open''' the downloaded Microsoft Excel file. | ||
| Line 141: | Line 140: | ||
== ICI Health Check Tool == | == ICI Health Check Tool == | ||
| − | The ICI platform hosted on Azure Cloud uses services such as | + | The ICI platform hosted on Azure Cloud uses services such as Icertis Search, Redis along with internal components such as APIs and Task services. However, no services were used to provide an insight on the application health except for the ICI Health Check page that provided regular application health checks and application monitoring to be able to detect issues before they became full-fledged outages. |
The ICI Health Check page has been further extended to cover additional parameters to help identify potential outages and diagnose issues. The health insights will provide information on how well the ICI Instance and its service is performing, its overall health, as well as its usefulness to users. Users will now be able to access a dashboard (without logging into ICI) that tracks application health alongside usage metrics and application crash data. | The ICI Health Check page has been further extended to cover additional parameters to help identify potential outages and diagnose issues. The health insights will provide information on how well the ICI Instance and its service is performing, its overall health, as well as its usefulness to users. Users will now be able to access a dashboard (without logging into ICI) that tracks application health alongside usage metrics and application crash data. | ||
| Line 148: | Line 147: | ||
*''Warning ''- This is indicated with a yellow warning icon | *''Warning ''- This is indicated with a yellow warning icon | ||
| − | *''Healthy ''- This is indicated with a green | + | *''Healthy ''- This is indicated with a green checkmark icon |
*''Unhealthy ''- This is indicated with a red warning icon | *''Unhealthy ''- This is indicated with a red warning icon | ||
The following details are displayed in the Health Check: | The following details are displayed in the Health Check: | ||
| − | *''' | + | *'''Icertis '''''S'''earch Health''': This displays the Status (yellow/green/red), the Icertis Search version and the Uptime, and so on.'' |
*'''Redis Cache Health''': This displays the Redis version, Uptime In Days, CPU usage, Connections Received and Commands Processed, and so on. | *'''Redis Cache Health''': This displays the Redis version, Uptime In Days, CPU usage, Connections Received and Commands Processed, and so on. | ||
| Line 164: | Line 163: | ||
<div class="image-green-border">To view the Health Check, add "Health/ViewHealth" (without quotes) to your ICI URL. </div> | <div class="image-green-border">To view the Health Check, add "Health/ViewHealth" (without quotes) to your ICI URL. </div> | ||
To check the health of your system:<br/> 1. Enter '''''/health/viewhealth''''' at the end of the URL of your ICI instance. For example, [https://apexorg.icertis.com/health/viewhealth https://apexorg.icertis.com/health/viewhealth]. The various tools and their health are displayed. | To check the health of your system:<br/> 1. Enter '''''/health/viewhealth''''' at the end of the URL of your ICI instance. For example, [https://apexorg.icertis.com/health/viewhealth https://apexorg.icertis.com/health/viewhealth]. The various tools and their health are displayed. | ||
| − | <div class="image-green-border">[[File: | + | <div class="image-green-border">[[File:Self Serve Tool 7.1.png|720px|Self Serve Tool 7.1]]</div> <div class="image-green-border"><br/> 2. '''Click''' the + icon next to the tool to view details regarding its health. The details for each of the tools are displayed in 2 columns with the Keys and their respective values as shown below.</div> |
| − | ''' | + | '''Icertis Search Health'''<br/> The details for the Icertis Search Health include the status, node total, primary and relocating shards, version, heap percent, uptime, and so on. For example, the Status is green. |
<div class="image-green-border">[[File:Health Check 2.png|720px|Health Check 2]]</div> | <div class="image-green-border">[[File:Health Check 2.png|720px|Health Check 2]]</div> | ||
'''Redis Cache Health'''<br/> The details for the Redis Cache Health include the uptime in days. Connected or blocked clients, rejected connections, CPU usage, and so on. For example, the Uptime in Days is 28. | '''Redis Cache Health'''<br/> The details for the Redis Cache Health include the uptime in days. Connected or blocked clients, rejected connections, CPU usage, and so on. For example, the Uptime in Days is 28. | ||
| Line 191: | Line 190: | ||
The ''Redis Flush'' is a self-service tool which allows Administrators to flush the cache or look up a particular key for its value of ''Delete a Key''. The tool can also be used to perform ''Role Restart'' on the instances to which the user has access. | The ''Redis Flush'' is a self-service tool which allows Administrators to flush the cache or look up a particular key for its value of ''Delete a Key''. The tool can also be used to perform ''Role Restart'' on the instances to which the user has access. | ||
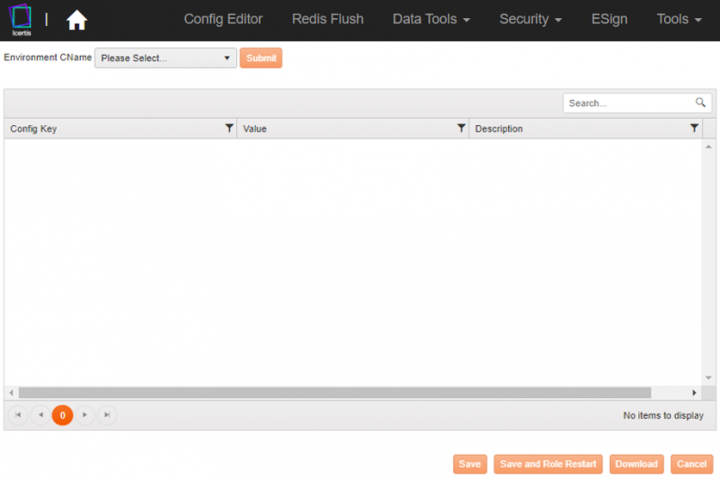
| − | <div class="note-box">'''Note:''' The user must have access privileges to an Environment CName in Config Editor.</div> <div class="image-green-border">[[File: | + | <div class="note-box">'''Note:''' The user must have access privileges to an Environment CName in Config Editor.</div> <div class="image-green-border"> </div> <div class="image-green-border">[[File:Self Serve Tool 8.1.png|720px|Self Serve Tool 8.1]]</div> |
To use the Configuration Key Editor Tool:<br/> 1. Login to the ICI Tools portal (icmtools.icertis.com) with your ICI credentials. | To use the Configuration Key Editor Tool:<br/> 1. Login to the ICI Tools portal (icmtools.icertis.com) with your ICI credentials. | ||
| − | <div class="image-green-border">[[File: | + | <div class="image-green-border">[[File:Self Serve Tool 8.2.png|720px|Self Serve Tool 8.2]]</div> <div class="image-green-border"> </div> <div class="image-green-border">2. '''Click '''the ''Config Editor'' tab on the ''Home ''page.</div> <div class="image-green-border"> </div> <div class="image-green-border">[[File:Self Serve Tool 8.3.png|720px|Self Serve Tool 8.3]]</div> |
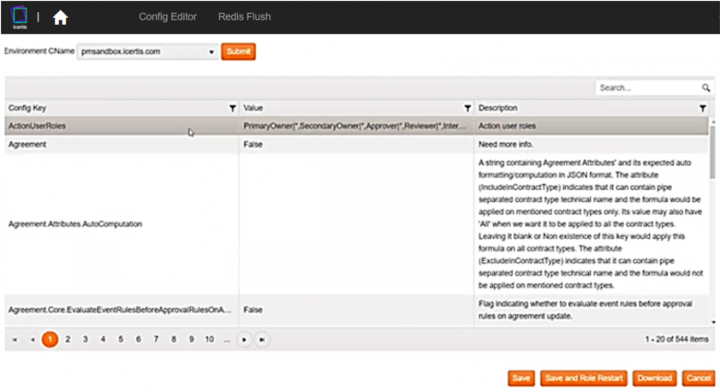
3. '''Select '''the environment from the ''Environment CName'' drop-down that you need to access for configuration. All the instances that have you have access to will be displayed. | 3. '''Select '''the environment from the ''Environment CName'' drop-down that you need to access for configuration. All the instances that have you have access to will be displayed. | ||
| − | 4. '''Click '''Submit after selecting the environment. The configuration json files for the selected environment are displayed for all available features, security details, database connections, and so on related to the selected instance. | + | 4. '''Click'''''<i>Submit </i>after selecting the environment. The configuration json files for the selected environment are displayed for all available features, security details, database connections, and so on related to the selected instance. |
| − | <div class="image-green-border">[[File: | + | <div class="image-green-border">[[File:Self Serve Tool 8.4.png|720px|Self Serve Tool 8.4]]</div> |
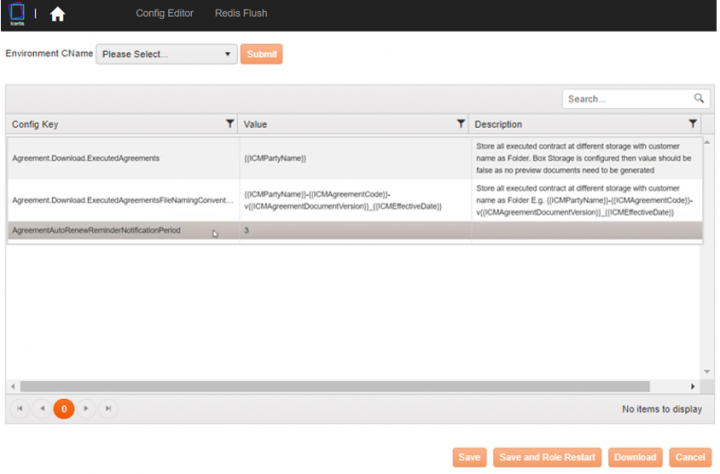
5. '''Select''' a Config Key from the list to change its value as required. For example, the Config Key AgreementAutoRenewReminderNotificationPeriod has the reminder period set at 3 days may be changes to 2 days. | 5. '''Select''' a Config Key from the list to change its value as required. For example, the Config Key AgreementAutoRenewReminderNotificationPeriod has the reminder period set at 3 days may be changes to 2 days. | ||
| − | <div class="image-green-border">[[File: | + | <div class="image-green-border">[[File:Self Serve Tool 8.5.png|720px|Self Serve Tool 8.5]]</div> |
| − | 6. '''Click '''''Save and Role Restart'' to save the new value of 2 days. The specific json file for the respective CName will be reset (i.e. perform a role restart). This means that the configuration is reset in the | + | 6. '''Click '''''Save and Role Restart'' to save the new value of 2 days. The specific json file for the respective CName will be reset (i.e. perform a role restart). This means that the configuration is reset in the Icertis search and the server is restarted, so that the new value is reflected on the instance. |
| + | |||
| + | 7. '''Click''' ''Download'' to download the entire file so that you can edit it offline and then upload it directly to the instance. | ||
| | ||
| − | |||
| − | |||
== Promote Configurations (P2P) Tool == | == Promote Configurations (P2P) Tool == | ||
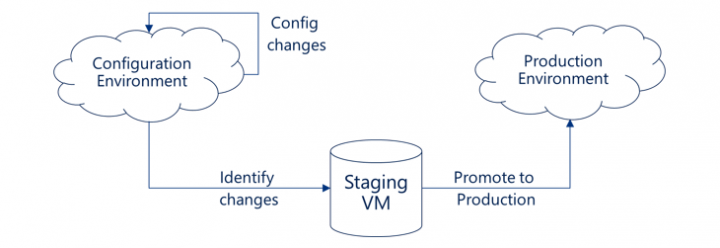
| − | The Promote to Production (P2P) process of the ICI platform helps to move ICI Configuration from source (Config/UAT) environment to target | + | The Promote to Production (P2P) process of the ICI platform helps to move ICI Configuration from source (Config/UAT) environment to target environment, thus reducing the manual efforts to do so. P2P process enables to selectively move ICI configuration. The Promote Configuration Tool or P2P is designed to accomplish just that. |
| − | + | The tool already supported contract types, contract type attributes, clauses and templates (along with the documents), notification templates, rules, masterdata, users, user groups and security groups. The Icertis search sync is also supported by the tool. | |
| − | + | With the 7.15 release, to provide a seamless P2P experience, enhancements have been made in ICI to support the following additional entities : | |
| − | + | ||
| − | + | ||
| − | + | ||
| − | + | *Organizations (Orgs), Organization Groups (Org Groups) | |
| − | <div class="note-box">'''Note:''' | + | *Users, User Groups, Security Groups |
| + | *Role Action Mapping | ||
| + | *Currencies | ||
| + | *Reasons | ||
| + | *SLA Matrix | ||
| + | *Notification Category | ||
| + | *Default Search Columns | ||
| + | *Application Settings | ||
| + | *Global/Admin Saved Searches | ||
| + | <div class="note-box">'''Note:''' Customers using ICI versions before 7.15 will need to upgrade to use this feature.</div> | ||
Here is an overview of the P2P process: | Here is an overview of the P2P process: | ||
<div class="image-green-border">[[File:P2P 1.png|720px|P2P 1]]</div> | <div class="image-green-border">[[File:P2P 1.png|720px|P2P 1]]</div> | ||
| | ||
| − | + | === <span style="color:#008000;">''Accessing P2P Tool''</span> === | |
| − | === Accessing P2P Tool === | + | |
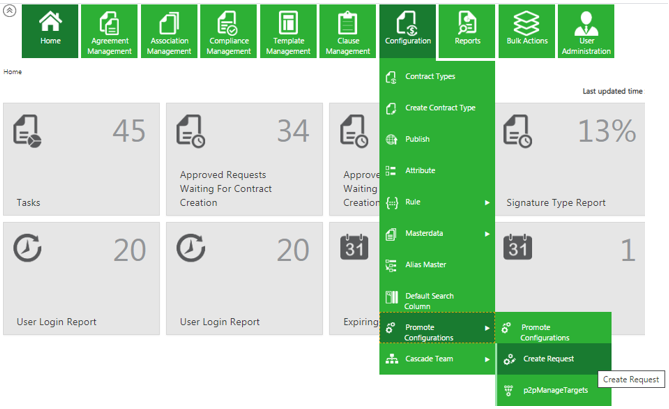
To access the P2P tool: | To access the P2P tool: | ||
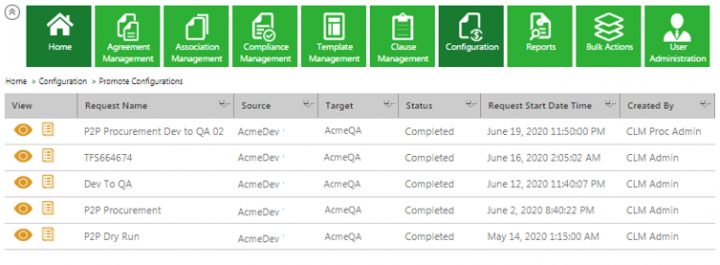
| Line 233: | Line 237: | ||
'''Note: '''Users cannot edit a request that is in ''Completed'' state. | '''Note: '''Users cannot edit a request that is in ''Completed'' state. | ||
| − | <div class="image-green-border">[[File: | + | <div class="image-green-border">[[File:Self Serve Tool 9.1.png|720px|Self Serve Tool 9.1]]</div> <div class="image-caption"> </div> <div class="image-caption"> </div> |
| + | === <span style="color:#008000;">''Creating a P2P Request''</span> === | ||
| + | |||
To create a P2P Request: | To create a P2P Request: | ||
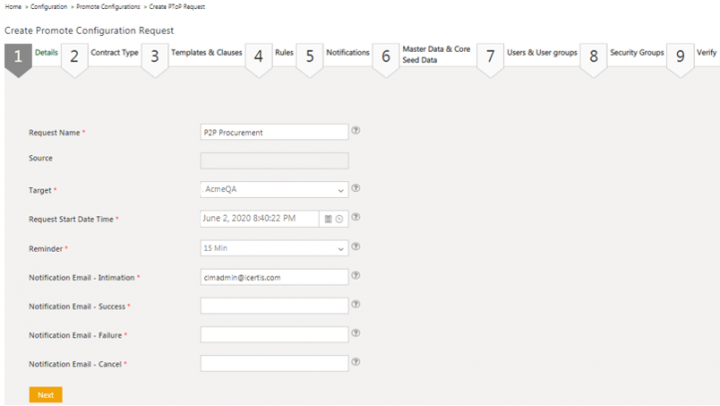
1. '''Click''' ''Configurations > Promote Configurations > Create Request''. The ''Create P2P Request'' page opens. | 1. '''Click''' ''Configurations > Promote Configurations > Create Request''. The ''Create P2P Request'' page opens. | ||
| − | <div class="image-green-border">[[File: | + | <div class="image-green-border">[[File:Self Serve Tool 9.2.png|720px|Self Serve Tool 9.2]]</div> |
2. '''Enter''' a ''Request Name''. For example, ''Procurement''. | 2. '''Enter''' a ''Request Name''. For example, ''Procurement''. | ||
| Line 253: | Line 259: | ||
9. '''Enter''' the notification recipient email Id in the ''Notification Email – Cancel ''field. | 9. '''Enter''' the notification recipient email Id in the ''Notification Email – Cancel ''field. | ||
| + | |||
| + | Toggle ''Resume P2P From Last Successful Step'' to Yes/No, as required. | ||
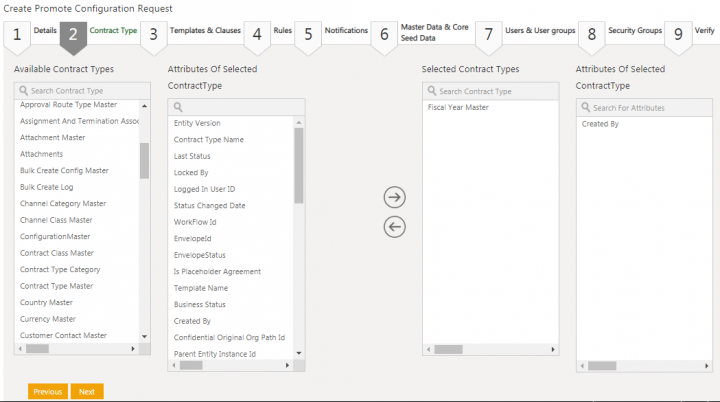
10. '''Click''' ''Next. ''The ''Contract Type'' tab opens. | 10. '''Click''' ''Next. ''The ''Contract Type'' tab opens. | ||
| − | + | <div class="note-box">'''Note: '''As stated in the disclaimer, while promoting configuration, the target environment will be down during contract type publish. This tool must be used responsibly under the project team’s approvals to avoid inconsistency and downtime.</div> | |
11. '''Select''' the ''Contract Type ''from the ''Available Contract Types''. For example, ''Fiscal Year Master''. The selected Contract Type attributes are available in the ''Attributes Of Selected Contract Type'' columns. | 11. '''Select''' the ''Contract Type ''from the ''Available Contract Types''. For example, ''Fiscal Year Master''. The selected Contract Type attributes are available in the ''Attributes Of Selected Contract Type'' columns. | ||
| Line 261: | Line 269: | ||
13. '''Click '''the right arrow to move the selected contract type and attribute to ''the Selected Contract Types'' and ''Attributes Of Selected Contract Type'' columns respectively. | 13. '''Click '''the right arrow to move the selected contract type and attribute to ''the Selected Contract Types'' and ''Attributes Of Selected Contract Type'' columns respectively. | ||
| − | <div class="image-green-border"> | + | <div class="image-green-border">14. '''Click''' ''Next''. The ''Templates and Clauses tab'' opens.</div> |
| − | 14. '''Click''' ''Next''. The ''Templates and Clauses tab'' opens. | + | |
| − | + | ||
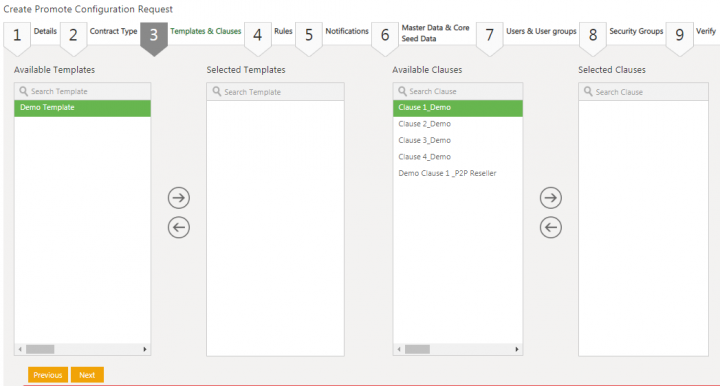
15. '''Select''' a template from the ''Available Templates'' columns. For example, ''Demo Template''. | 15. '''Select''' a template from the ''Available Templates'' columns. For example, ''Demo Template''. | ||
16. '''Click '''the arrow key to move the selected template to the S''elected Templates'' column. | 16. '''Click '''the arrow key to move the selected template to the S''elected Templates'' column. | ||
| − | + | <div class="image-green-border">[[File:Self Serve Tool 9.4.png|720px|Self Serve Tool 9.4]]</div> | |
17. '''Select''' a clause from the'' Available Clauses'' columns. For example, ''Clause 1_Demo''. | 17. '''Select''' a clause from the'' Available Clauses'' columns. For example, ''Clause 1_Demo''. | ||
18. '''Click '''the arrow key to move the selected clause to the S''elected Clauses'' column. | 18. '''Click '''the arrow key to move the selected clause to the S''elected Clauses'' column. | ||
| − | <div class="image-green-border"> | + | <div class="image-green-border">19. '''Click '''''Next. ''The ''Rules'' tab opens.</div> |
| − | 19. '''Click '''''Next. ''The ''Rules'' tab opens. | + | |
| − | + | ||
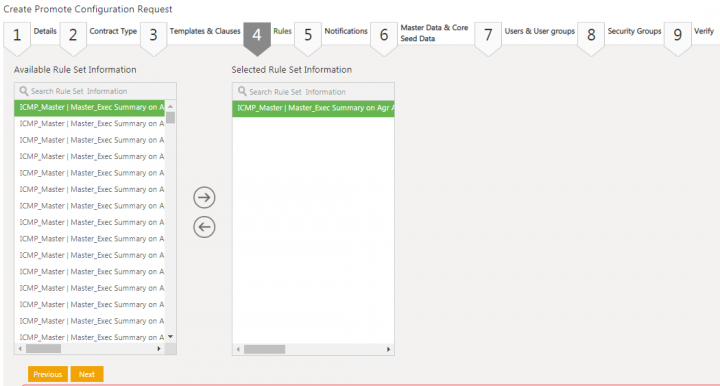
20. '''Select''' a Rule from the ''Available Rule Set Information'' column. For example, ''ICI_Master I Master_Exec Summary on Agr Add Association''. | 20. '''Select''' a Rule from the ''Available Rule Set Information'' column. For example, ''ICI_Master I Master_Exec Summary on Agr Add Association''. | ||
21. '''Click '''the arrow key to move the selected rule to the S''elected Rule Set Information'' column. | 21. '''Click '''the arrow key to move the selected rule to the S''elected Rule Set Information'' column. | ||
| − | <div class="image-green-border">[[File: | + | <div class="image-green-border">[[File:Self Serve Tool 9.5.png|720px|Self Serve Tool 9.5]]</div> |
22. '''Click '''''Next''. The ''Notifications ''tab opens. | 22. '''Click '''''Next''. The ''Notifications ''tab opens. | ||
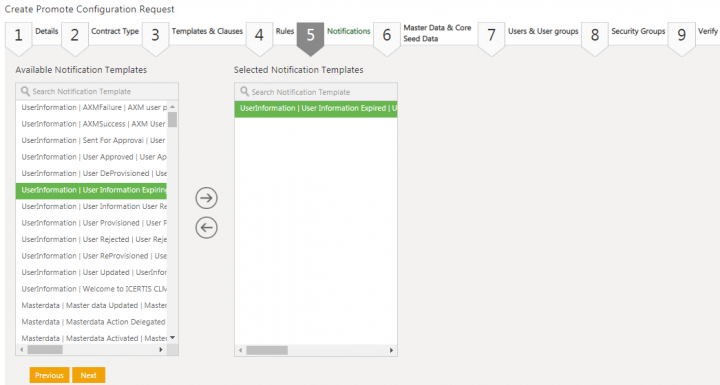
| Line 283: | Line 287: | ||
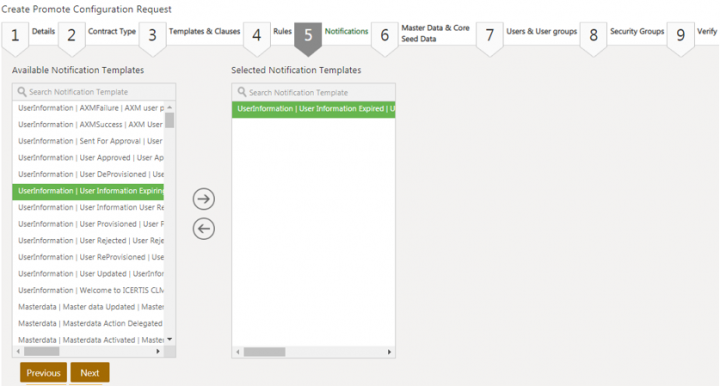
24. '''Click '''the arrow key to move the selected template to the S''elected Notification Templates'' column. | 24. '''Click '''the arrow key to move the selected template to the S''elected Notification Templates'' column. | ||
| − | <div class="image-green-border">[[File: | + | <div class="image-green-border">[[File:Self Serve Tool 9.6.png|720px|Self Serve Tool 9.6]]</div> |
25. '''Click''' ''Next''. The ''Master Data & Core Seed Data'' tab opens. | 25. '''Click''' ''Next''. The ''Master Data & Core Seed Data'' tab opens. | ||
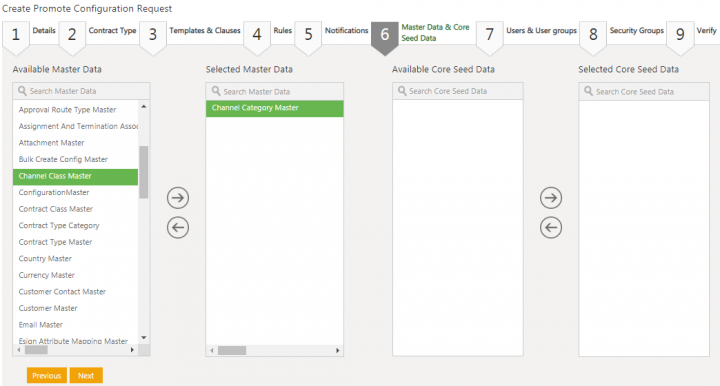
<div class="note-box">'''''Note''''': Users can use the ''P2P tool Master Data'' tab for the faster transition of Master Data to production than the Bulk utility tool option.</div> | <div class="note-box">'''''Note''''': Users can use the ''P2P tool Master Data'' tab for the faster transition of Master Data to production than the Bulk utility tool option.</div> | ||
27. '''Click '''the arrow key to move the selected rule to the S''elected Master Data'' column. | 27. '''Click '''the arrow key to move the selected rule to the S''elected Master Data'' column. | ||
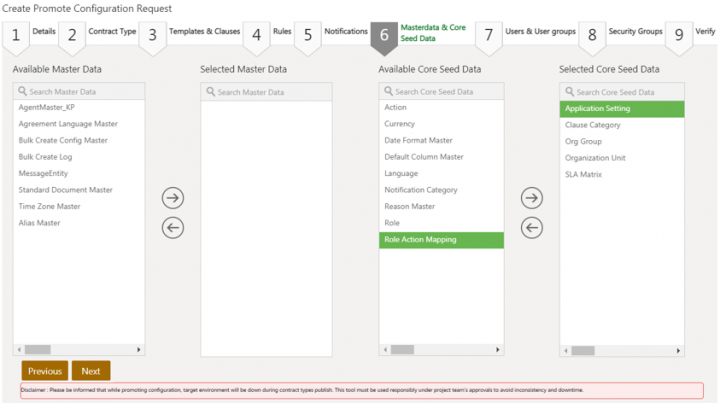
| − | 28. '''Select '''the seed data from the ''Available Core Seed Data'' column. | + | 28. '''Select '''the seed data from the ''Available Core Seed Data'' column. The entities supported such as ''Org Group, Role Action Mapping, SLA Matrix,'' etc. will be available for selection. |
29. '''Click '''the arrow key to move the selected master data to the S''elected Core Seed Data ''column. | 29. '''Click '''the arrow key to move the selected master data to the S''elected Core Seed Data ''column. | ||
| − | <div class="image-green-border">[[File: | + | <div class="image-green-border">[[File:Self Serve Tool 9.7.png|720px|Self Serve Tool 9.7]]</div> |
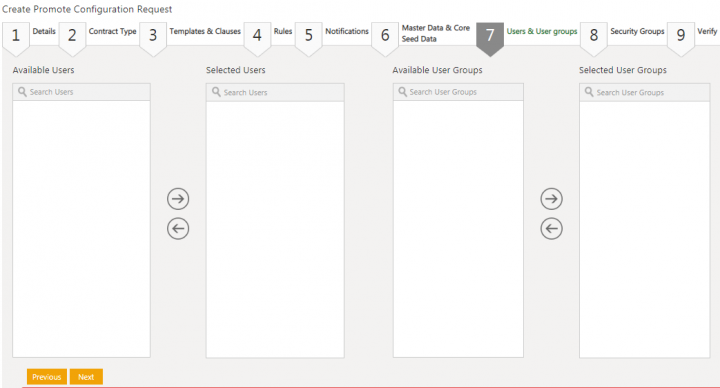
30. '''Click '''''Next. ''The ''Users & User groups'' tab opens. | 30. '''Click '''''Next. ''The ''Users & User groups'' tab opens. | ||
| − | 31. '''Select''' the users | + | 31. '''Select''' the users on the ''Select Users'' page. For example, ''01ux user, 02ux 2, 05ux 2''. |
| − | 32. '''Click ''' | + | 32. '''Click '''''Selected Users'' to view the list of users that have been selected. |
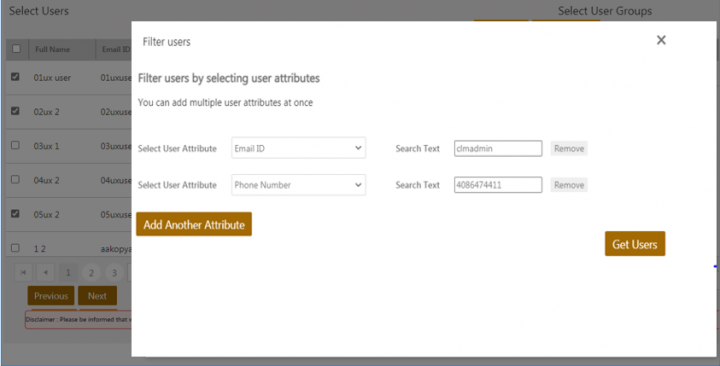
| − | 33. ''' | + | 33. '''Click '''''Filter Users ''to view the list of users by an attribute or click ''Add Another Attribute ''to filter users by additional attributes. For example, ''Email ID, Phone Number''. |
| + | <div class="image-green-border">[[File:Self Serve Tool 9.8.png|720px|Self Serve Tool 9.8]]</div> | ||
| + | 34. '''Click '''''Remove'' to remove an added attribute. | ||
| − | |||
| − | |||
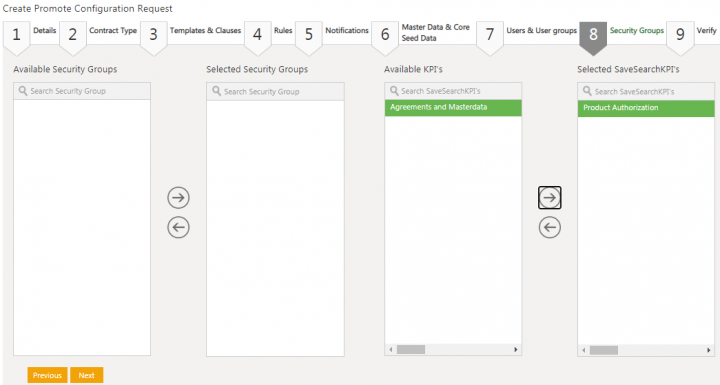
35. '''Click''''' Next'' if any or no user or user group is selected. The ''Security Groups'' tab opens. | 35. '''Click''''' Next'' if any or no user or user group is selected. The ''Security Groups'' tab opens. | ||
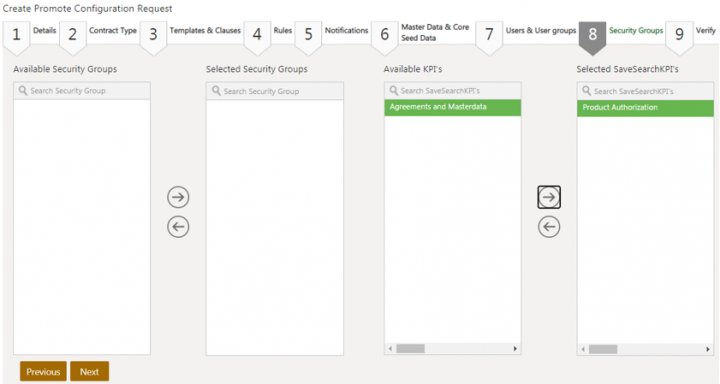
| Line 311: | Line 315: | ||
39. '''Click '''the arrow key to move the selected KPI to the S''elected SaveSearchKPIs'' column. For example, ''Product Authorization''. | 39. '''Click '''the arrow key to move the selected KPI to the S''elected SaveSearchKPIs'' column. For example, ''Product Authorization''. | ||
| − | <div class="image-green-border">[[File: | + | <div class="image-green-border">[[File:Self Serve Tool 9.9.png|720px|Self Serve Tool 9.9]]</div> |
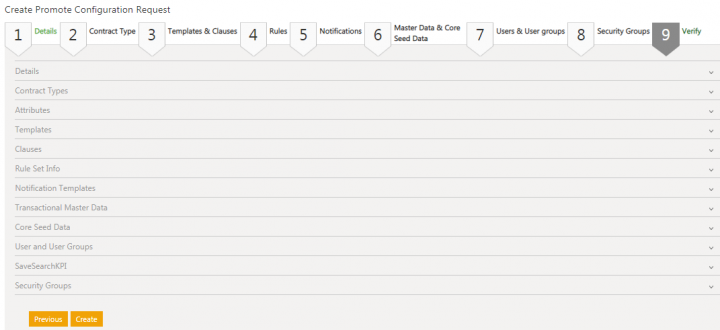
40. '''Click''' ''Next''. The'' Verify'' tab opens. | 40. '''Click''' ''Next''. The'' Verify'' tab opens. | ||
| − | 41. '''Verify''' details of the contract types, attributes, templates, clauses, | + | 41. '''Verify''' details of the contract types, attributes, templates, clauses, ruleset information, notification templates, transactional master data, core seed data, user and user groups, save search KPI, and security groups that you have selected. |
| − | <div class="image-green-border">[[File: | + | <div class="image-green-border">[[File:Self Serve Tool 9.10.png|720px|Self Serve Tool 9.10]]</div> |
42. '''Click '''''Create''. The ''Please Confirm'' window opens indicating that downtime is required for this request. | 42. '''Click '''''Create''. The ''Please Confirm'' window opens indicating that downtime is required for this request. | ||
| − | <div class="note-box">'''''Note''''': The P2P tool verifies all the information entered by the user before creating a P2P request.</div> | + | <div class="image-green-border">[[File:Self Serve Tool 9.11.png|720px|Self Serve Tool 9.11]]</div> <div class="image-green-border"> </div> <div class="note-box">'''''Note''''': The P2P tool verifies all the information entered by the user before creating a P2P request.</div> |
43. '''Click '''''Yes ''if you wish to proceed. The ''Information ''window opens indicating that the P2P request created successfully. | 43. '''Click '''''Yes ''if you wish to proceed. The ''Information ''window opens indicating that the P2P request created successfully. | ||
| Line 323: | Line 327: | ||
45. On completion of the P2P request, the status changes to ''Completed''. | 45. On completion of the P2P request, the status changes to ''Completed''. | ||
| − | <div class="note-box">'''Note''': Users cannot edit a request that is in ''Completed'' state.</div> <div class="image-green-border"> </div> <div class="image-green-border">[[File: | + | <div class="note-box">'''Note''': Users cannot edit a request that is in ''Completed'' state.</div> <div class="image-green-border"> </div> <div class="image-green-border">[[File:Self Serve Tool 9.12.png|720px|Self Serve Tool 9.12]]</div> |
| | ||
Latest revision as of 13:48, 26 January 2021
Contents
[hide]Self-Serve Tools
Self-Serve tools include tools and features of ICI that can be used out-of-the-box by authorized users. Besides serving ICI users with specific feature and performance goals, being self-sufficient is the primary goal of these tools. These tools are user-friendly and time-saving, enabling users to perform tasks by themselves instead of reaching out to Icertis Solutions Engineering, Database or Support teams based on the requirement. Sometimes, these changes were minor and of low complexity, but the turnaround time was substantial.
The ICI Self-Serve tools include:
- Search Sync Tool
- Translations Editor Tool
- Improved ICI Health Check Tool
- Configurations Key Editor Tool
- Promote to Production (P2P) Tool
- The ICI application, version 7.11 and above
- The user must have valid credentials to access ICI and the User Administration tile.
Search Sync Tool
The Search Sync tool gets data from Icertis Search for a given instance’s Sys Id and synchronizes it if required. Using the fetched ES value, the tool validates if the Sys Id is the latest for the respective instance or if a sync is required. This tool can be accessed by the Administrator from the Admin Task on User Administration tile.
If the key exists, the latest value from ES will be displayed. If the key does not exist, the system displays an error message indicating that the value could not be fetched for the provided Sys Id. The Sys Id can be provided as input CSV file or as comma separated. Either comma separated Sys Ids can be entered or a CSV file can be uploaded.
This helps to make the entity search more streamlined and efficient. Users can quickly refer to related agreements at the time of deals or audits.
Note: Data can be fetched from only one instance at a time. A dedicated key must exist for ES sync to work with Sys ID.
You can search the documents that an Agreement is linked to.
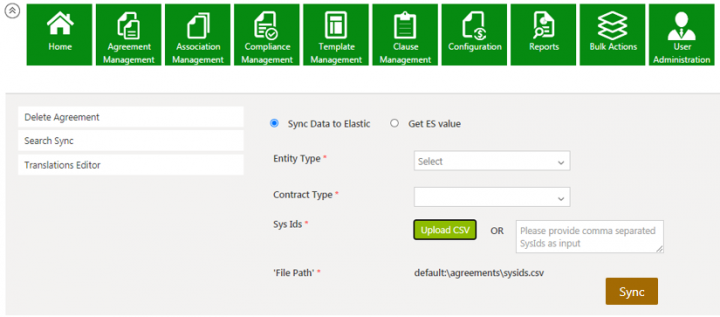
To use the Search Sync Tool:
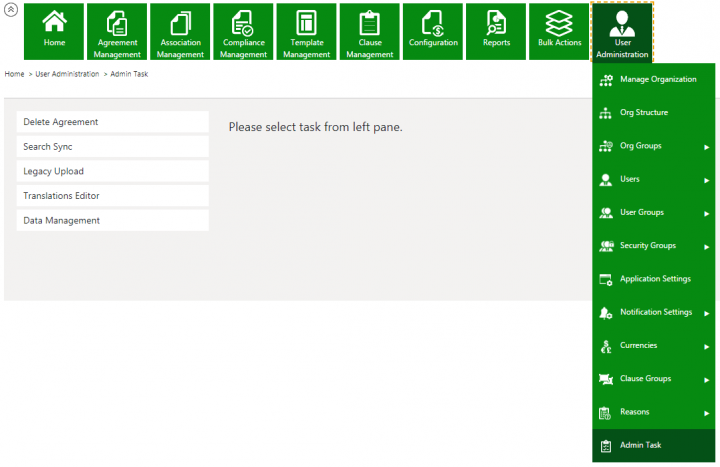
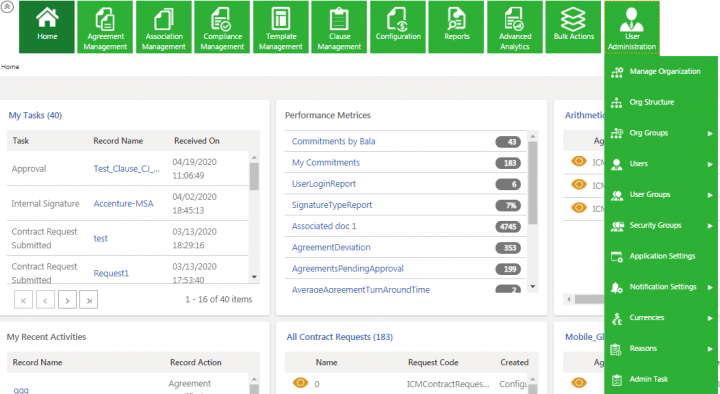
1. Click Home > User Administration > Admin Task. The Admin Task page opens.
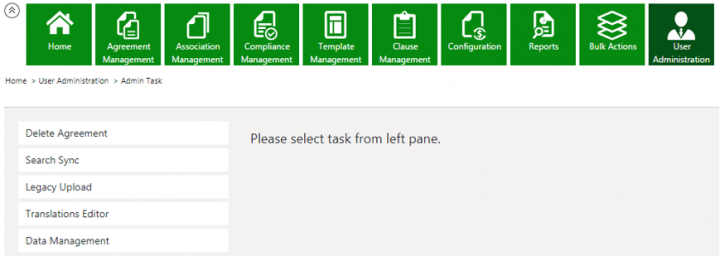
2. Click the Search Sync task from the left pane.
4. Select the Entity Type from the drop-down to sync data to the Icertis Search. For example, Agreement.
5. Select the Contract Type from the drop-down.
5. Toggle Skip Agreement Document Indexing to Yes/No as required.
6. To get the Sys Ids, click the Upload CSV button to upload the .CSV Agreement or enter the Sys Id using comma-separated value in the box.
7. Click the Upload CSV button to upload the CSV document. The Upload Document window opens.
8. Click SelectFile to upload a CSV file and add a note if required.
9. Click Upload File. The file is uploaded to the File Path displayed.If the uploaded file format is incorrect, an alert message is displayed. The supported file formats will be also be displayed.
If the uploaded file format is incorrect, an alert message is displayed. The supported file formats will be also be displayed.
10. Click Sync. The Sync Request Accepted message is displayed.
11. Click Ok. Users can now get data from ES for a given instance’s SysId and can check if it has the latest value or if a sync is needed.
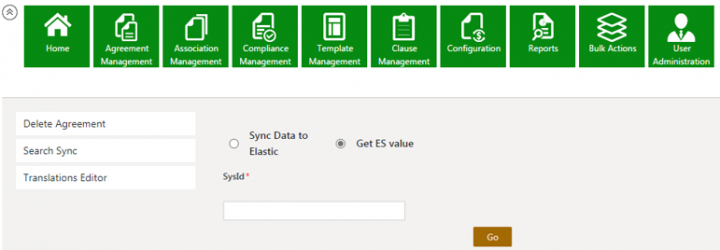
12. Select Get ES Value.
13. Enter the SysId and click Go. If the key exists, the latest value from ES will be displayed. If the key does not exist, the error message Please enter valid SysId is displayed.
Users can now get data from Icertis search for a given instance’s SysId so that they can look up the value and identify whether it is the latest or if a sync is needed. If the key exists, the latest value from ES will be displayed. If the key does not exist, the system will display the error message “Could not fetch value for provided SysId”.
Translations Editor Tool
The ICI platform is available in different languages and different languages label text are available for localization. However, to make any changes to the localization values, users had to reach out to the Solutions Engineering or Database teams. Sometimes, these changes were minor and of low complexity, but the turnaround time was substantial.
Hence, a self-service Translations Editor tool has been introduced that contains all strings that are localized. The Translations Editor tool supports adding localized values in different languages for Reason Codes as well.
Users can now download all keys and their localization values as an Excel file, modify multiple values, and upload the modified changes to ICI. Once the values are updated in ICI, the caches are updated automatically to avoid the cache flush and server restart. This has significantly enhanced productivity as the turnaround time to update the Resource Key values has been eradicated.
Using this tool, users can now:
- Search for a specific string using the search bar and update the Resource Key value for Language and Locale.
- Update multiple language strings by selecting and saving the Resource Key value.
- Download and upload the localization key values using Microsoft Excel.
- View the modified values in the ICI instance immediately.
To use the Translations Editor Tool:
1. Click the User Administration tile on the Home page.
2. Select Admin Task from the drop-down. The Admin Task page opens.
3. Select the Translation Editor task from the left pane.
Users can update translations in the following ways:
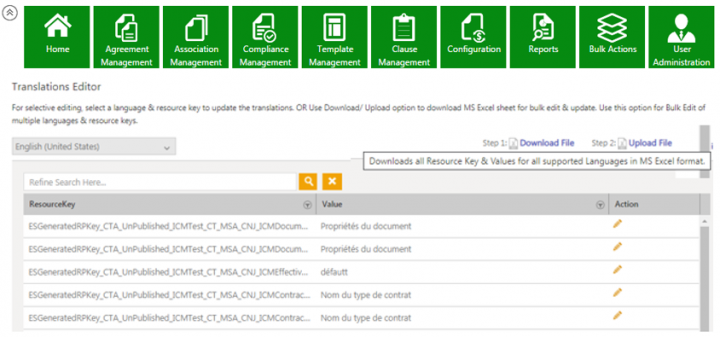
1. For selective editing, select a language and a resource key to update the translations.
2. For bulk editing and updation of multiple languages and resource keys, use the Download / Upload option to download an MS Excel sheet.
For editing Resource Key values selectively:
1. From the Select Language drop-down, select a language in which you want to edit the labels. For example, français (French).
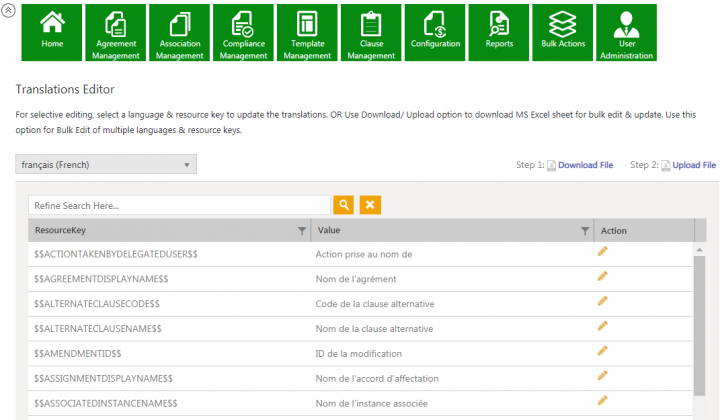
The Resource Key and respective values of the selected language are displayed.
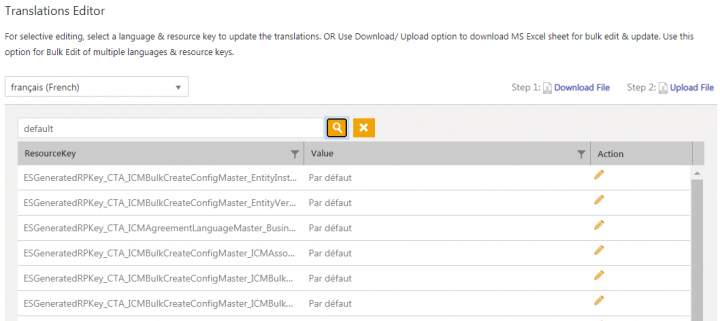
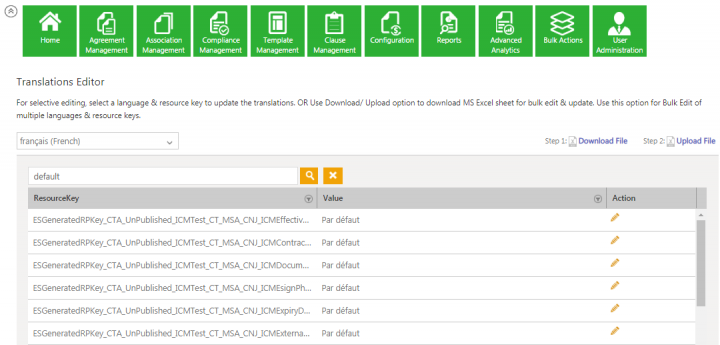
2. Enter a ResourceKey value in the Search field to edit. For example, default. All ResourceKey(s) with the Par défaut (default) values from the French language are displayed.
Note: ResourceKey is a unique key by which the application gets its label text for different languages.
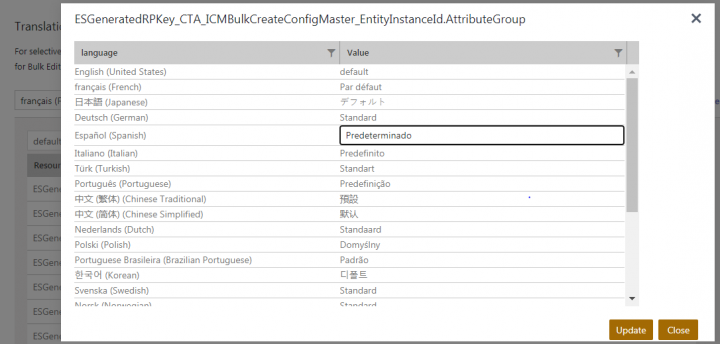
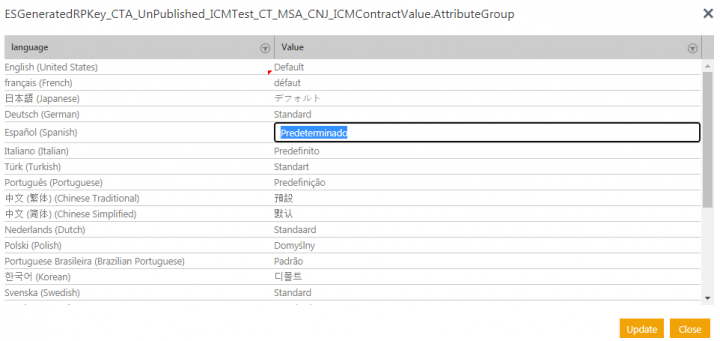
3. Click the Edit this Resource Key for Multiple Languages icon in the Actions column.
You can change the key for a single language or for multiple languages as required. For example, change Par défaut to défaut in French or Predeterminado in Español (Spanish) to Defecto.
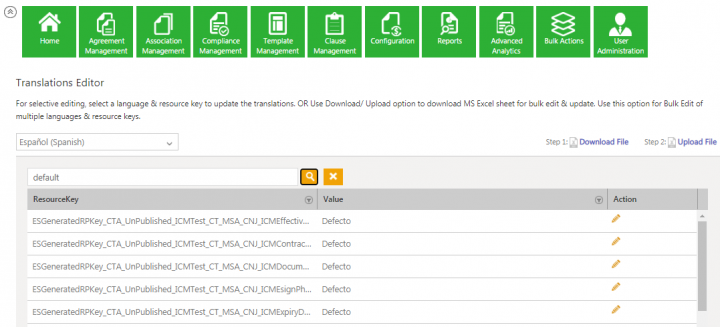
4. Click Update. The ResourceKey value for default is updated to défaut for French and to Defecto in Spanish.
5. The Resources Updated Successfully message is displayed. Click Ok.
You can select the respective languages (French or Spanish) to verify that the resources have been successfully updated.
For editing Resource Key values of multiple languages in bulk:
1. Click Download File. A Microsoft Excel file (named BulkActionWorkBookStringResource) that contains all the Resource keys and values for all supported languages in ICI is downloaded.
2. Open the downloaded Microsoft Excel file.
3. Click Enable Editing. All ICI supported language Resource keys and their respective values are displayed.
4. Edit the ResouceKey of multiple languages as required.
5. Save the Excel file.
6. Click Upload File. The Upload Translations window opens.
7. Click SelectFile. The Open window opens.
8. Select the updated Excel file.
9. Click Open. A warning window opens indicating that this is a heavy operation and can potentially affect overall application performance.
10. Click Ok. The Upload Summary displays the number of Records Uploaded, Records Processed, andRecords Updated Successfully values.
11. Click Close. The label translations have been achieved for multiple languages in bulk.
ICI Health Check Tool
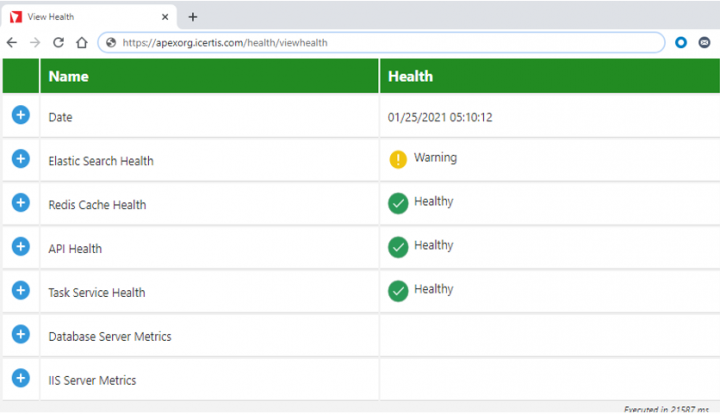
The ICI platform hosted on Azure Cloud uses services such as Icertis Search, Redis along with internal components such as APIs and Task services. However, no services were used to provide an insight on the application health except for the ICI Health Check page that provided regular application health checks and application monitoring to be able to detect issues before they became full-fledged outages.
The ICI Health Check page has been further extended to cover additional parameters to help identify potential outages and diagnose issues. The health insights will provide information on how well the ICI Instance and its service is performing, its overall health, as well as its usefulness to users. Users will now be able to access a dashboard (without logging into ICI) that tracks application health alongside usage metrics and application crash data.
The health statuses are classified into three categories:
- Warning - This is indicated with a yellow warning icon
- Healthy - This is indicated with a green checkmark icon
- Unhealthy - This is indicated with a red warning icon
The following details are displayed in the Health Check:
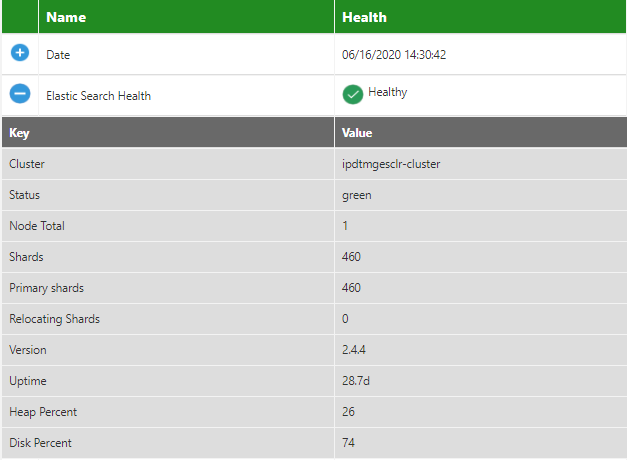
- Icertis Search Health: This displays the Status (yellow/green/red), the Icertis Search version and the Uptime, and so on.
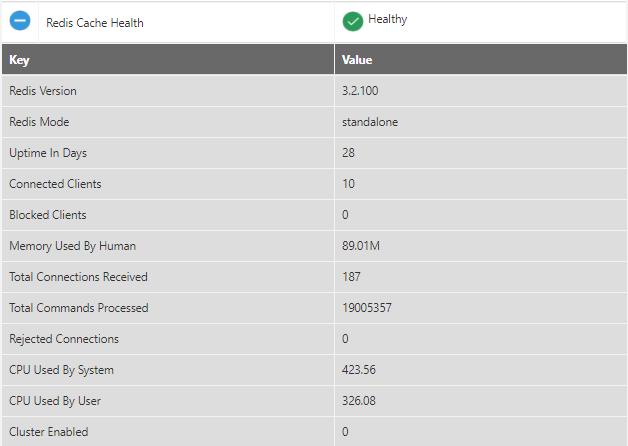
- Redis Cache Health: This displays the Redis version, Uptime In Days, CPU usage, Connections Received and Commands Processed, and so on.
- API Health: This displays the API Response Time, Status and Issues and so on.
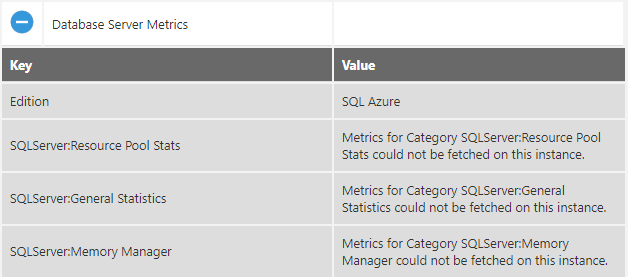
- Database Server Metrics: This displays the CPU usage percentage, User Connections, Total Server Memory, Disk Read/Write IO/Sec and so on.
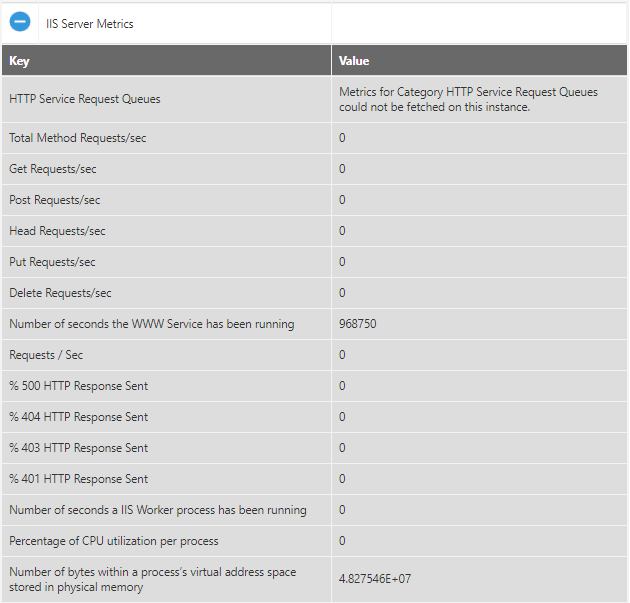
- IIS Server Metrics: This displays % 404 HTTP Response Sent, % 500 HTTP Response Sent, percentage of CPU utilization per process, Requests/sec, and so on.
To check the health of your system:
1. Enter /health/viewhealth at the end of the URL of your ICI instance. For example, https://apexorg.icertis.com/health/viewhealth. The various tools and their health are displayed.
2. Click the + icon next to the tool to view details regarding its health. The details for each of the tools are displayed in 2 columns with the Keys and their respective values as shown below.
Icertis Search Health
The details for the Icertis Search Health include the status, node total, primary and relocating shards, version, heap percent, uptime, and so on. For example, the Status is green.
Redis Cache Health
The details for the Redis Cache Health include the uptime in days. Connected or blocked clients, rejected connections, CPU usage, and so on. For example, the Uptime in Days is 28.
API Health
The API Health provides the response time. For example, 94 ms.
Task Service Health
The Task Service Health provides the failed count for keys and when it was last successful.
Database Server Metrics
The details for the Database Server Metrics Health include the edition, SQL server resource pool stats, and so on.
IIS Server Metrics
The details for the IIS Server Metrics Health include the total method requests/sec, number of seconds an IIS Worker process has been running, the percentage of CPU utilization per process, and so on.
Configuration Key Editor Tool
The Configuration Key Editor tool facilitates a logged-in user (who has access to Azure subscription) to search and update configuration keys, as and when required. It has been introduced for easier instance management and improved productivity, thus reducing the dependency on the Engineering and DevOps teams.
It includes:
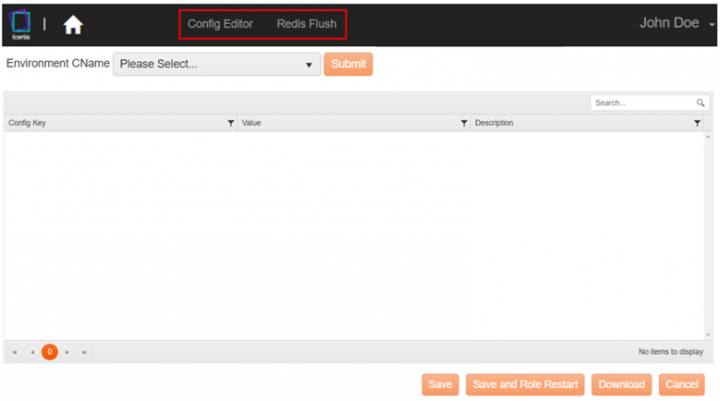
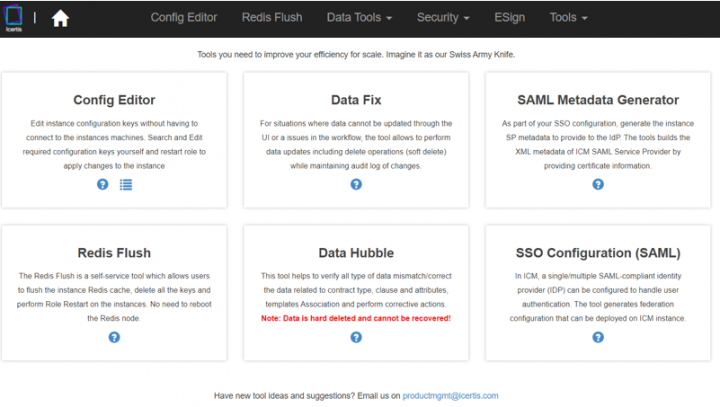
- The Config Editor
- The Redis Flush
The Config Editor is a self-service tool that allows teams to edit instance configurations without having to connect to the instance machines. Once the key values are changed, the cache is automatically updated to avoid the server restart. The tool only works for non-production environments. The production environment configuration changes are controlled by Operations team, and the tool would not be available for production environment.
The Redis Flush is a self-service tool which allows Administrators to flush the cache or look up a particular key for its value of Delete a Key. The tool can also be used to perform Role Restart on the instances to which the user has access.
To use the Configuration Key Editor Tool:
1. Login to the ICI Tools portal (icmtools.icertis.com) with your ICI credentials.
3. Select the environment from the Environment CName drop-down that you need to access for configuration. All the instances that have you have access to will be displayed.
4. ClickSubmit after selecting the environment. The configuration json files for the selected environment are displayed for all available features, security details, database connections, and so on related to the selected instance.
5. Select a Config Key from the list to change its value as required. For example, the Config Key AgreementAutoRenewReminderNotificationPeriod has the reminder period set at 3 days may be changes to 2 days.
6. Click Save and Role Restart to save the new value of 2 days. The specific json file for the respective CName will be reset (i.e. perform a role restart). This means that the configuration is reset in the Icertis search and the server is restarted, so that the new value is reflected on the instance.
7. Click Download to download the entire file so that you can edit it offline and then upload it directly to the instance.
Promote Configurations (P2P) Tool
The Promote to Production (P2P) process of the ICI platform helps to move ICI Configuration from source (Config/UAT) environment to target environment, thus reducing the manual efforts to do so. P2P process enables to selectively move ICI configuration. The Promote Configuration Tool or P2P is designed to accomplish just that.
The tool already supported contract types, contract type attributes, clauses and templates (along with the documents), notification templates, rules, masterdata, users, user groups and security groups. The Icertis search sync is also supported by the tool.
With the 7.15 release, to provide a seamless P2P experience, enhancements have been made in ICI to support the following additional entities :
- Organizations (Orgs), Organization Groups (Org Groups)
- Users, User Groups, Security Groups
- Role Action Mapping
- Currencies
- Reasons
- SLA Matrix
- Notification Category
- Default Search Columns
- Application Settings
- Global/Admin Saved Searches
Here is an overview of the P2P process:
Accessing P2P Tool
To access the P2P tool:
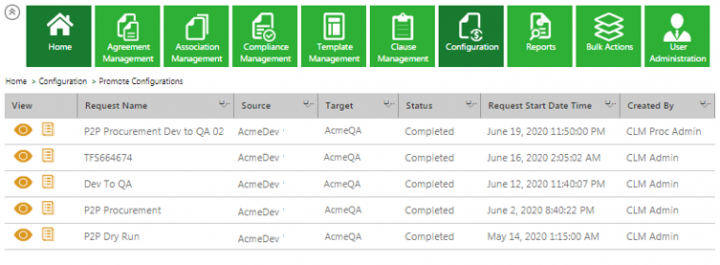
1. Click Home > Configuration tile. The Configuration page opens.
2. Click the Promote Configurations tile. The Promote Configuration page opens. The Promote Configurations displays the current status of P2P requests and their status.
Note: Users cannot edit a request that is in Completed state.
Creating a P2P Request
To create a P2P Request:
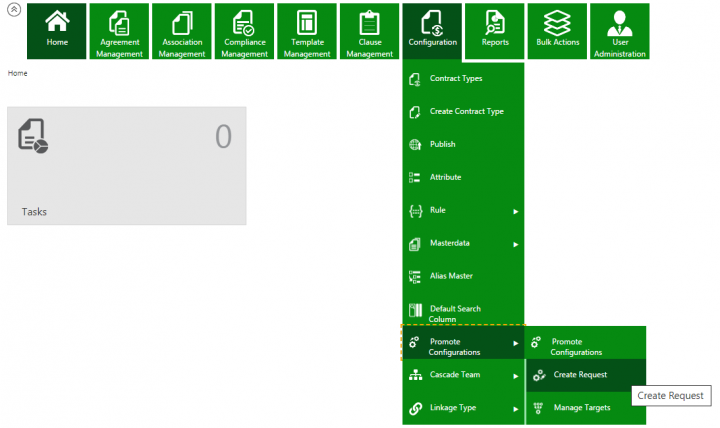
1. Click Configurations > Promote Configurations > Create Request. The Create P2P Request page opens.
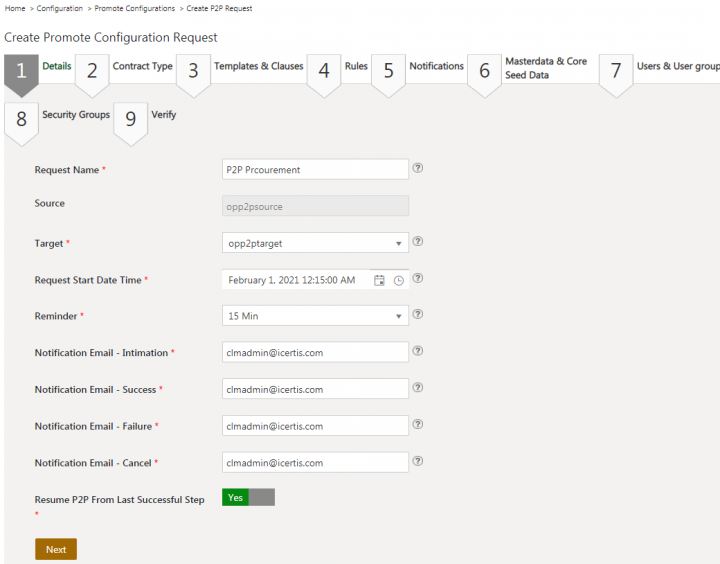
2. Enter a Request Name. For example, Procurement.
3. Select a Target from the drop-down. For example, Acme Dev.
4. Select the P2P Request Start Date Time.
5. Select the time to trigger an email to the recipient from the Intimation Email minutes before P2P Starts drop-down list. For example, 15 Min.
6. Enter the intimation recipient Email Id in the Notification Email – Intimation field.
7. Enter the notification recipient Email Id in the Notification Email – Success field.
8. Enter the notification recipient email Id in the Notification Email – Failure field.
9. Enter the notification recipient email Id in the Notification Email – Cancel field.
Toggle Resume P2P From Last Successful Step to Yes/No, as required.
10. Click Next. The Contract Type tab opens.
11. Select the Contract Type from the Available Contract Types. For example, Fiscal Year Master. The selected Contract Type attributes are available in the Attributes Of Selected Contract Type columns.
12. Select the attributes for the selected contract type. For example, Created By.
13. Click the right arrow to move the selected contract type and attribute to the Selected Contract Types and Attributes Of Selected Contract Type columns respectively.
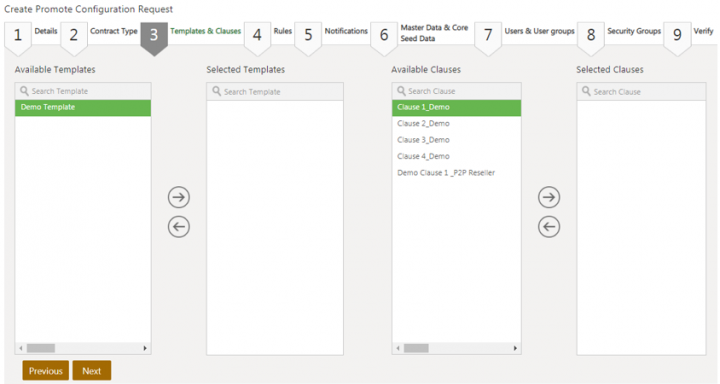
15. Select a template from the Available Templates columns. For example, Demo Template.
16. Click the arrow key to move the selected template to the Selected Templates column.
17. Select a clause from the Available Clauses columns. For example, Clause 1_Demo.
18. Click the arrow key to move the selected clause to the Selected Clauses column.
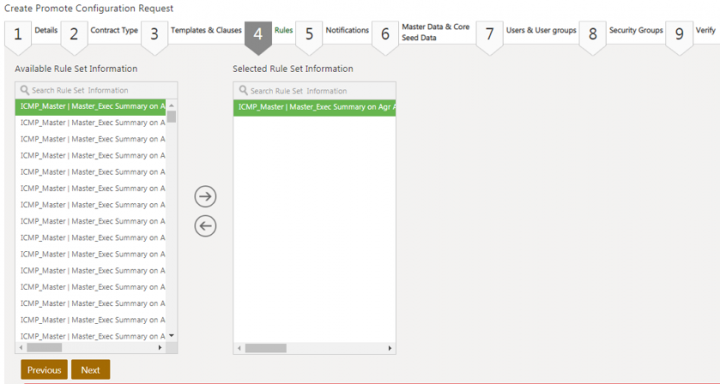
20. Select a Rule from the Available Rule Set Information column. For example, ICI_Master I Master_Exec Summary on Agr Add Association.
21. Click the arrow key to move the selected rule to the Selected Rule Set Information column.
22. Click Next. The Notifications tab opens.
23. Select the notification template from the Available Notification Template columns. For example, UserInformation I User Information Expired I UserInformationExpired I User Notifications.
24. Click the arrow key to move the selected template to the Selected Notification Templates column.
25. Click Next. The Master Data & Core Seed Data tab opens.
27. Click the arrow key to move the selected rule to the Selected Master Data column.
28. Select the seed data from the Available Core Seed Data column. The entities supported such as Org Group, Role Action Mapping, SLA Matrix, etc. will be available for selection.
29. Click the arrow key to move the selected master data to the Selected Core Seed Data column.
30. Click Next. The Users & User groups tab opens.
31. Select the users on the Select Users page. For example, 01ux user, 02ux 2, 05ux 2.
32. Click Selected Users to view the list of users that have been selected.
33. Click Filter Users to view the list of users by an attribute or click Add Another Attribute to filter users by additional attributes. For example, Email ID, Phone Number.
34. Click Remove to remove an added attribute.
35. Click Next if any or no user or user group is selected. The Security Groups tab opens.
36. Select the security group from the Available Security Groups columns.
37. Click the arrow key to move the selected security group to the Selected Security Groups column.
38. Select the KPI from the Available KPI’s columns.
39. Click the arrow key to move the selected KPI to the Selected SaveSearchKPIs column. For example, Product Authorization.
40. Click Next. The Verify tab opens.
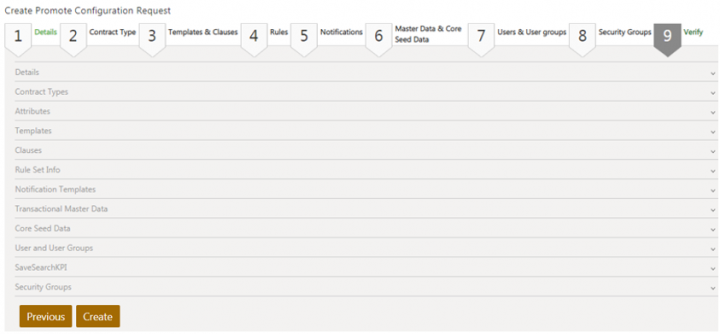
41. Verify details of the contract types, attributes, templates, clauses, ruleset information, notification templates, transactional master data, core seed data, user and user groups, save search KPI, and security groups that you have selected.
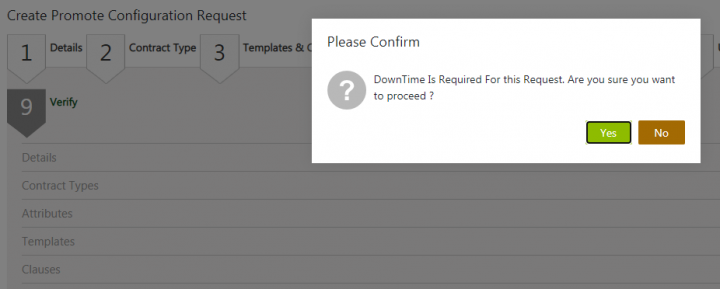
42. Click Create. The Please Confirm window opens indicating that downtime is required for this request.
43. Click Yes if you wish to proceed. The Information window opens indicating that the P2P request created successfully.
44. Click Ok. The P2P request status changes to ADDED.
45. On completion of the P2P request, the status changes to Completed.
AI Apps Rules Engine
Related Topics: Agreement Management | Association Management | Compliance Management | Template Management | Clause Management | Configuration | Reports | Localizing ICI |
