| (46 intermediate revisions by 4 users not shown) | |||
| Line 1: | Line 1: | ||
| − | |||
| − | + | = Creating a Subscription = | |
| − | + | | |
| − | + | ||
| − | + | ||
| − | + | ||
| − | + | ||
| − | + | ||
| − | + | ||
| − | + | Using Subscriptions, you can create user notifications and assign appropriate recipients. When creating a subscription: | |
| − | + | *Define the entity or a task for which the notification to be sent. | |
| + | *Define the event for which it will be sent. | ||
| + | <div><div style="float:left;"> | ||
| + | To create a subscription: | ||
| − | + | '''1. Click '''the ''Notification Settings'' tile on the ''User Administration'' page. The ''All Notifications Category'' page opens. All the existing notification categories are displayed on this page such as Agreement Notifications, Clause Notifications. Each notification category groups various notification templates of various events that fit into the respective category. You can also edit or delete the displayed categories. | |
| − | 2. Click | + | 2.''' Click''' the ''Subscription'' tile. The ''Subscriptions'' page opens. On this page you can see a list of all the existing Notification Templates and their details such as Template Name, Entity Name, Event and Category Name etc. You can also edit, delete, create, enable or disable a subscription using the respective buttons. |
| + | <div class="image-green-border">[[File:Creating Subscription Subscriptions page 7.8.png|1000px|Subscriptions page]]</div> | ||
| + | 3. '''Click '''the ''Create Subscription ''button''. ''The ''Create Subscription ''page opens. | ||
| − | + | There are four tabs on this page: | |
| + | <ul style="margin-left: 40px;"> | ||
| + | <li>Details</li> | ||
| + | <li>Template</li> | ||
| + | <li>Recipient</li> | ||
| + | <li>Verify</li> | ||
| + | </ul> | ||
| + | <div class="note-box">'''Note''': When creating or editing a subscription, the Administrator must make sure that the language preferences are set to English (United States). Otherwise an information message is displayed. Subscriptions can be created in English only. If you need your subscription in various languages, you can provide the localized content to the ICI configuration team to add it to the database through scripts. </div> | ||
| + | | ||
| − | + | '''Details''' | |
| − | ''' | + | Fill in the mandatory fields: |
| − | ''' | + | <ul style="margin-left: 40px;"> |
| − | ''' | + | <li>'''Type''' an appropriate Template Name for the subscription.</li> |
| − | ''' | + | <li>'''Select''' an Entity Name such as ''Agreement''.</li> |
| + | <li>'''Select''' an Event Name, such as ''Agreement Approved.''</li> | ||
| + | <li>'''Select''' a Category Name such as ''Agreement Notifications''.</li> | ||
| + | <li>'''Click''' ''Next''. The ''Template'' tab opens.</li> | ||
| + | </ul> | ||
| + | </div> | ||
| + | | ||
| − | + | | |
| − | + | ||
| − | + | | |
| − | <div | + | <div class="image-green-border"><br/> [[File:Creating Subscription Create Subscription page 7.8.png|Create Subscription]]</div> <div class="image-green-border"> </div> |
| − | ''' | + | '''Template''' |
| − | + | On the ''Template'' tab, define a template for user notifications and email notifications: | |
| + | <ul style="margin-left: 40px;"> | ||
| + | <li>'''Type '''appropriate subject in the ''Template Subject'' box. All the notification emails using this template would have this content in the subject line.</li> | ||
| + | <li>'''Type''' an appropriate message in the T''emplate Body.'' '''Click''' the ''Attributes'' list to tag respective attributes in the template body. You can also format the selected attributes by using menu options.</li> | ||
| + | <li>'''Click''' ''Next''. The ''Recipient'' tab open.</li> | ||
| + | </ul> | ||
| + | <div class="image-green-border">[[File:Creating Subscription templates tab 7.8.png|1000px|Templates tab]]</div> <div class="image-green-border"> </div> | ||
| + | '''Recipient''' | ||
| − | : | + | To add recipients: |
| − | + | ||
| − | + | 1. '''Click '''the [[File:Add icon.jpeg|RTENOTITLE]] ''Add Recipients ''icon. The ''Add Recipients'' window opens. | |
| − | + | 2. '''Select''' ''User Roles ''such as Approver, Internal Reviewer etc. | |
| − | + | 3. '''Select '''''User Attributes'' such as Created By, Modified by etc. | |
| − | ''' | + | 4. '''Check '''the ''Action User'' box if necessary. |
| − | + | 5. '''Select '''a desired user from the displayed list or search a user using the search bar. | |
| − | + | 6. '''Click''' ''Add''. The user name and role get added in the list. | |
| + | <div class="image-green-border">[[File:Creating Subscription Add recipients 7.8.png|1000px|Recipients tab]]</div> | ||
| + | | ||
| + | <div class="note-box">'''Note''': You can tag users in the Notifications Template using their usernames or Email IDs.</div> | ||
| + | 7. '''Click''' ''Next''. The ''Verify'' tab opens. | ||
| − | + | | |
| − | + | '''Verify''' | |
| − | + | On this tab, verify all the information you entered for the Subscription. | |
| − | + | <div class="image-green-border">'''Click''' ''Save'' to create the Subscription. Notifications will be sent as and when the respective event occurs.</div> <div class="image-green-border">Notification can be sent in multiple languages. If there are multiple recipients with different language preferences for the respective event. The language is identified from the language set by the Internal User and External user with login privileges in their ''Preferences''. One single email is sent to all the selected recipients with the content in different languages. The recipients can simply scroll through the email and read the content drafted in their preferred language.</div> <div class="image-green-border"> </div> <div class="image-green-border"> </div> <div class="image-green-border">[[File:7.11-NotificationTemplatespage.png|RTENOTITLE]]</div> <div class="image-green-border"> </div> <div class="image-green-border">'''Related Topics''': [[User_Administration|User_Administration]] | [[Create_Notification_Categories|Creating Notification Categories]] | [[Create_a_Notification_Rule|Create_a_Notification_Rule]]</div> </div> | |
| − | ''' | + | |
| − | + | ||
| − | + | ||
| − | + | ||
| − | + | ||
| − | + | ||
| − | + | ||
| − | + | ||
| − | + | ||
| − | + | ||
| − | + | ||
| − | + | ||
| − | + | ||
| − | + | ||
| − | + | ||
| − | + | ||
| − | + | ||
| − | + | ||
| − | + | ||
| − | + | ||
| − | + | ||
| − | + | ||
| − | + | ||
| − | + | ||
| − | [[File: | + | |
| − | + | ||
| − | + | ||
| − | + | ||
| − | + | ||
| − | + | ||
| − | '''Related Topics | + | |
| − | [[ | + | |
| − | + | ||
| − | + | ||
| − | < | + | |
Latest revision as of 11:10, 18 November 2020
Creating a Subscription
Using Subscriptions, you can create user notifications and assign appropriate recipients. When creating a subscription:
- Define the entity or a task for which the notification to be sent.
- Define the event for which it will be sent.
To create a subscription:
1. Click the Notification Settings tile on the User Administration page. The All Notifications Category page opens. All the existing notification categories are displayed on this page such as Agreement Notifications, Clause Notifications. Each notification category groups various notification templates of various events that fit into the respective category. You can also edit or delete the displayed categories.
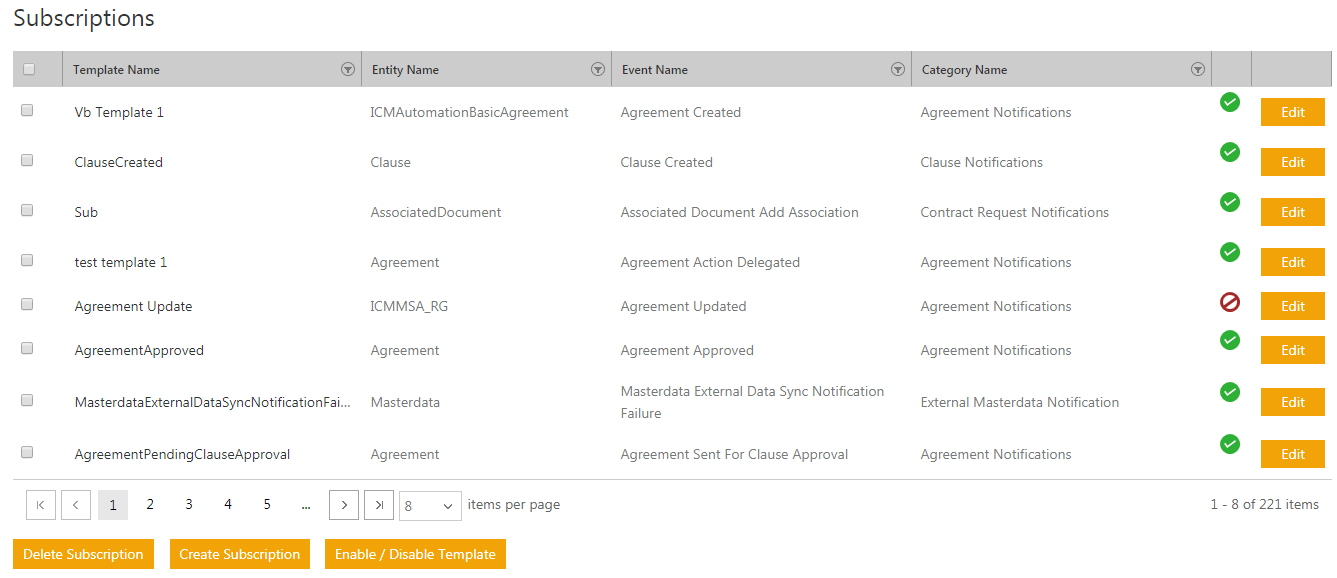
2. Click the Subscription tile. The Subscriptions page opens. On this page you can see a list of all the existing Notification Templates and their details such as Template Name, Entity Name, Event and Category Name etc. You can also edit, delete, create, enable or disable a subscription using the respective buttons.
3. Click the Create Subscription button. The Create Subscription page opens.
There are four tabs on this page:
- Details
- Template
- Recipient
- Verify
Details
Fill in the mandatory fields:
- Type an appropriate Template Name for the subscription.
- Select an Entity Name such as Agreement.
- Select an Event Name, such as Agreement Approved.
- Select a Category Name such as Agreement Notifications.
- Click Next. The Template tab opens.

Template
On the Template tab, define a template for user notifications and email notifications:
- Type appropriate subject in the Template Subject box. All the notification emails using this template would have this content in the subject line.
- Type an appropriate message in the Template Body. Click the Attributes list to tag respective attributes in the template body. You can also format the selected attributes by using menu options.
- Click Next. The Recipient tab open.

Recipient
To add recipients:
1. Click the ![]() Add Recipients icon. The Add Recipients window opens.
Add Recipients icon. The Add Recipients window opens.
2. Select User Roles such as Approver, Internal Reviewer etc.
3. Select User Attributes such as Created By, Modified by etc.
4. Check the Action User box if necessary.
5. Select a desired user from the displayed list or search a user using the search bar.
6. Click Add. The user name and role get added in the list.

7. Click Next. The Verify tab opens.
Verify
On this tab, verify all the information you entered for the Subscription.


