From ICIHelp7.15
| (8 intermediate revisions by 3 users not shown) | |||
| Line 2: | Line 2: | ||
= Approving a Request = | = Approving a Request = | ||
| − | A user role defines controls or permissions given to a user. | + | A user role defines controls or permissions given to a user. ICI has the following three predefined user roles for the '''Requests''' feature: |
*Requester: The person who generates the request (primary owner). | *Requester: The person who generates the request (primary owner). | ||
| Line 12: | Line 12: | ||
*from Notifications Dashboard | *from Notifications Dashboard | ||
*from your Tasks Dashboard | *from your Tasks Dashboard | ||
| − | |||
| − | |||
=== To approve a request from Notifications Dashboard: === | === To approve a request from Notifications Dashboard: === | ||
| − | + | 1. '''Click '''the ''Notifications ''tile on the ''Home'' page. The Notifications Dashboard page opens. | |
| − | + | <div class="image-green-border">2. '''Click '''the ''Contract Request Notifications'' category. This displays a list of all Contract Request notifications.[[File:NotificationsDashboard.JPG|RTENOTITLE]]</div> <div class="image-green-border"> </div> <div class="image-green-border">3. '''Click '''''Contract Request Sent for Approval'' and view the automated message displayed on the right side of the page with a link to that particular request page.</div> <div class="image-green-border">4.'''Click '''''Approve ''to approve the request. This opens the ''Add Note'' dialog box.</div> <div class="image-green-border">5. '''Type '''an appropriate note and '''click '''''Add''. The status of the Request changes to ''Approved'''''.'''</div> <div class="image-green-border"> </div> <div class="note-box">'''Note: '''When the approver rejects the request, the status of the request changes to ''Draft ''and the request has to go through the approval process again.</div> | |
| − | < | + | |
| − | < | + | |
| − | + | ||
| − | + | ||
| − | </ | + | |
| − | <div class="note-box">'''Note: '''When the approver rejects the request, the status of the request changes to | + | |
| − | + | ||
| − | + | ||
=== To approve a request from Tasks Dashboard: === | === To approve a request from Tasks Dashboard: === | ||
| − | + | 1. '''Click '''on the Tasks tile on the ''Home ''page. The Tasks Dashboard opens with a list of all you tasks. | |
| − | + | ||
| − | + | 2. '''Click '''the task link. The '''Contract Request''' page opens. | |
| + | |||
| + | 3. '''Click '''the buttons as appropriate: | ||
<ul style="margin-left: 80px;"> | <ul style="margin-left: 80px;"> | ||
| − | <li>Edit</li> | + | <li>''Edit''</li> |
| − | <li>Approve</li> | + | <li>''Approve''</li> |
| − | <li>Reject</li> | + | <li>''Reject''</li> |
| − | <li>Request Review</li> | + | <li>''Request Review''</li> |
</ul> | </ul> | ||
| Line 43: | Line 35: | ||
| | ||
| − | '''Related Topics:''' [[ | + | '''Related Topics:''' [[Requests|Requests]] | [[Searching_agreements_and_requests|Searching agreements and requests]] | [[Contract_Type|Contract Type]] |
| − | + | ||
| − | + | ||
Latest revision as of 10:06, 18 November 2020
Approving a Request
A user role defines controls or permissions given to a user. ICI has the following three predefined user roles for the Requests feature:
- Requester: The person who generates the request (primary owner).
- Approver: The person who approves the request.
- Reviewer: The person who reviews the request.
An approver can approve a request from these two locations:
- from Notifications Dashboard
- from your Tasks Dashboard
To approve a request from Notifications Dashboard:
1. Click the Notifications tile on the Home page. The Notifications Dashboard page opens.
2. Click the Contract Request Notifications category. This displays a list of all Contract Request notifications.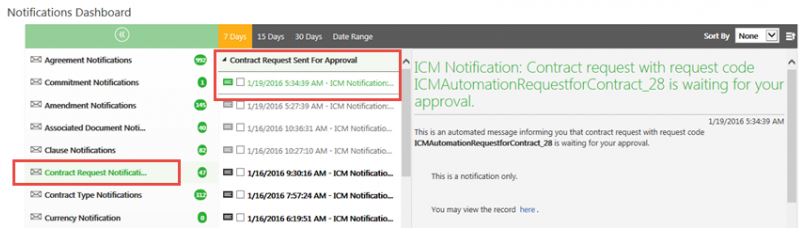

3. Click Contract Request Sent for Approval and view the automated message displayed on the right side of the page with a link to that particular request page.
4.Click Approve to approve the request. This opens the Add Note dialog box.
5. Type an appropriate note and click Add. The status of the Request changes to Approved.
Note: When the approver rejects the request, the status of the request changes to Draft and the request has to go through the approval process again.
To approve a request from Tasks Dashboard:
1. Click on the Tasks tile on the Home page. The Tasks Dashboard opens with a list of all you tasks.
2. Click the task link. The Contract Request page opens.
3. Click the buttons as appropriate:
- Edit
- Approve
- Reject
- Request Review
Related Topics: Requests | Searching agreements and requests | Contract Type