| (12 intermediate revisions by 2 users not shown) | |||
| Line 2: | Line 2: | ||
= Using DocuSign = | = Using DocuSign = | ||
| + | == Sending an Own Paper Agreement for Electronic Signature == | ||
| − | + | Electronic signatures are done through ''Docu''''Sign ('''''<b>or ''DocuSign)''. External signatories can choose one of these applications if they wish to do electronic signatures. </b> | |
| − | + | To sign an Agreement electronically: | |
| − | + | 1. '''Open '''the e-mail you receive from ''DocuSign (or Adobe Sign).'' | |
| − | < | + | 2. '''Click '''''Review Document.'' The ''Please review & Act on These Documents ''window opens. |
| − | <div class="image-green-border"> | + | <div class="image-green-border">[[File:Signature mail.png|360px|RTENOTITLE]]</div> |
| − | < | + | 3. '''Select '''''the ''I agree...''check box'''''<i> </i>'''''and '''''click '''''Continue'''''<i>.</i>'''This enables the ''Fields'' menu in the left panel. |
| + | <div class="image-green-border">'''[[File:I agree.png|720px|RTENOTITLE]]'''</div> <div class="note-box">'''Note: If you are using Internet Explorer, '''''click '''''Allow ''at ''the tracking physical location message'''''. In the document, sender may mark few fields that appear with a text box next to the field name. Fill the appropriate information in appropriate text box. e.g. title, company.''</div> | ||
| + | 4. '''Click '''''Sign''' '''''<i>next to </i>Signature''. The ''Adopt Your Signature window'' is displayed if you are signing the document for the first time.'' | ||
| + | <div class="image-green-border">''[[File:Sign1.jpg|720px|RTENOTITLE]]''</div> | ||
| + | '''Note''': If you have signed before, the system inserts the signature that you used when you signed for the first time. | ||
| − | + | 5. Verify your ''Full Name'', ''Initials'', and ''Signature''. Your Full Name and Initials appear as they are entered at the time of your user creation process. | |
| − | <div class="image-green-border | + | <div class="image-green-border">[[File:Adopt your signature.png|720px|RTENOTITLE]]</div> |
| − | + | | |
| − | + | '''Note''': You cannot change the signature style once it appears on the document. | |
| − | + | ||
| − | + | ||
| − | + | ||
| − | + | ||
| − | + | ||
| − | + | ||
| − | + | ||
| − | + | 6. '''Click '''''Finish''. You receive a notification stating your signature process is completed. The status of the agreement changes to ''Waiting For Internal Signature''. An e-mail is sent to the internal signatory. | |
| − | + | ||
| − | + | ||
| − | + | '''Note''': Internal Signatory can follow steps 1 to 9 to sign the Agreement electronically. Once signed, the status of the Agreement changes to ''Executed''. A notification email is sent to the Primary Owner, Internal Signatory and External Signatory. | |
| − | + | ||
| − | + | 7. '''Verify''' your signature on the ''Select Style'' tab: | |
| − | + | ||
| − | + | ||
| − | + | *'''Click''' ''Change Style'' to change the style of your signature and initials. This displays a list of alternate styles. Use scroll arrows to scroll through the signatures. Select from the list of styles. | |
| + | *Alternatively, '''click''' the ''Draw'' tab to draw your own signature. '''Click''' ''Clear'' to clear the signature. | ||
| − | + | 8. '''Click''' ''Adopt And Sign''. The Signature and Initials appear on the document. | |
| − | + | ||
| − | + | ||
| − | + | All ''Executed'' Agreements signed using Adobe Sign, include an audit log of key details in the signature flow, such as: | |
| − | * | + | *The specific actions performed, such a document created, emailed, viewed and electronically signed |
| − | * | + | *Name of the user that performed these actions |
| − | * | + | *Time stamp of when those actions were completed |
| + | *IP address of the user that completed the actions | ||
| − | + | This feature is disabled by default and can be enabled from the Global Account Settings of DocuSign. | |
| − | + | == Electronic Signature for Third Party Paper == | |
| − | + | Electronic signatures are done through DocuSign or (Adobe Sign). External signatories can choose one of these applications if they wish to do electronic signatures. | |
| − | + | To sign an Agreement electronically: | |
| − | + | 1. '''Open''' the e-mail you receive from DocuSign (or Adobe Sign). | |
| + | <div class="image-green-border"><font face="Segoe UI">[[File:Signature mail.png|360px|RTENOTITLE]]</font></div> | ||
| + | 2. '''Click '''''Review Document''. This opens the'' Please review & Act on These Documents'' window. | ||
| + | |||
| + | 3. '''Select '''the I agree...checkbox and click Continue. This enables the Fields menu in the left panel. | ||
| + | <div class="image-green-border">'''<font face="Segoe UI">[[File:I agree.png|720px|RTENOTITLE]]</font>'''</div> <div class="image-green-border"> </div> <div class="note-box">'''Note: '''If you are using Internet Explorer, click Allow at the tracking physical location message.</div> | ||
| + | In the ''Fields ''menu, you can use the following options: | ||
| + | |||
| + | *Signature: Drag and drop your signature onto the document. | ||
| + | *Initial: Drag and drop your initials onto the document. | ||
| + | *Date Signed: Drag and drop the Date onto the document. Displays current date by default. | ||
| + | *Name: Drag and drop the Name box. Type your name into the box. | ||
| + | *Company: Drag and drop the Company box. Type the name of your company into the box. | ||
| + | *Title: Drag and drop the Title box. Type the title into the box. | ||
| + | *Text: Drag and drop Text box. Type additional text into the box. | ||
| + | *Checkbox: Drag and drop Checkbox into the document. | ||
| + | |||
| + | 4. '''Drag t'''he Signature onto the document. This opens the ''Adopt Your Signature'' window. Verify you full name, initials and signature. Your full name and signature appear as they were entered. | ||
| + | <div class="image-green-border"><font face="Segoe UI">[[File:Adopt your signature.png|720px|RTENOTITLE]]</font></div> <div class="image-green-border"> </div> <div class="note-box">'''Note:''' Internal Signatory can follow the above steps to sign the agreement electronically. Once signed, the status of the agreement changes to Executed. A notification email is sent to the primary owner, internal signatory and external signatory.</div> | ||
| + | 5. Verify your signature on the Select Style tab: | ||
| + | |||
| + | *'''Click''' ''Change Style'' to change the style of your signature and initials. This shows a list of alternate styles. Use the arrows to scroll through the signatures and select from the list of styles. | ||
| + | *''Alternatively, '''''click '''''Draw'' tab to draw your own signature. ClickClear to clear the signature. | ||
| + | |||
| + | 6. '''Click '''''Adopt And Sign''. The signature and initials appear on the document. | ||
| + | <div class="image-green-border"><font face="Segoe UI">[[File:Other actions.png|720px|RTENOTITLE]]</font></div> | ||
| + | 7. '''Click''' the''Other Actions ''menu. | ||
| + | |||
| + | 8. Select from the following options in the window that appears: | ||
| + | |||
| + | *'''Click''' ''FINISH LATER'' to save the document in its current state and finish the signing process at a later time. | ||
| + | *'''Click '''''PRINT & SIGN ''to print the document and sign it in ink. After signing it, scan and upload or fax the document. | ||
| + | *'''Click''' ''ASSIGN TO SOMEONE ELSE'' to assign a third person as a signatory. | ||
| + | |||
| + | 9. In the ''Assign to Someone Else'' window: | ||
| + | |||
| + | *''Email Address for the New Signer:'' type the email address of the person you want to assign the envelope. | ||
| + | *''New Signer's Name:'' type the name of the new signor. | ||
| + | |||
| + | Please provide a reason to Research Team for changing signing responsibility: type the reason for changing the signing responsibility. | ||
| + | |||
| + | 10. '''Click '''''ASSIGN TO SOMEONE ELSE''. The new signatory and the original sender receive a notification with you in the Cc. | ||
| + | |||
| + | 11. '''Click''' ''DECLINE TO SIGN'' to notify the sender that you refuse to sign the document and put in the reason for declining it in the Comment box. The comments can be seen under Notes on the Agreement Details Page. | ||
| + | |||
| + | 12. '''Click''' ''FINISH ''to complete the signature process. You will receive a notification stating that your signature process is completed. The status of the agreement changes to ''Waiting For Internal Signature''. An email is sent to the internal signatory. | ||
| + | |||
| + | == Sending Associated documents for Signatures along with the main Agreement == | ||
| + | |||
| + | ICI allows the Primary Owner to select and attach individual copies of the Associated documents along with the main Agreement and send them for signatures via DocuSign, after adding the signatory tags. The Signatories can not only view but also sign these Associated Documents. Thus, the signatory can have all the information required to sign the Agreement at once, so that they do not need to download each of the associated documents separately to find the required information. | ||
<div class="note-box">'''Note:''' DocuSign supports only PDF and .docx format. This feature is not supported by Adobe Sign. </div> | <div class="note-box">'''Note:''' DocuSign supports only PDF and .docx format. This feature is not supported by Adobe Sign. </div> | ||
To select and share Associated documents with the Agreement for e-signature using DocuSign: <br/> 1. Ensure that you have a script type of Attribute DocuSignAssociatedDocuments in the Contract Type. <br/> 2. '''Open''' the Agreement with the Associations to be sent for signature using DocuSign. | To select and share Associated documents with the Agreement for e-signature using DocuSign: <br/> 1. Ensure that you have a script type of Attribute DocuSignAssociatedDocuments in the Contract Type. <br/> 2. '''Open''' the Agreement with the Associations to be sent for signature using DocuSign. | ||
| − | <div class="image-green-border">[[File:DocuSign 1.PNG| | + | <div class="image-green-border">[[File:DocuSign 1.PNG|720px|SP7 DocuSign 1]]</div> |
3. '''Click '''the ''View Document'' icon to preview the Association. | 3. '''Click '''the ''View Document'' icon to preview the Association. | ||
| − | <div class="image-green-border"> [[File:DocuSign 2.PNG|SP7 DocuSign 2]]</div> | + | <div class="image-green-border"> [[File:DocuSign 2.PNG|720px|SP7 DocuSign 2]]</div> |
4. '''Click''' ''Preview'' to view the associations to verify the ones that you want to send. Only Associations which are in the .pdf and .docx format can be previewed. If you try to preview a document in any other format (for example, XLSX), then a message will be displayed that the format is not supported. | 4. '''Click''' ''Preview'' to view the associations to verify the ones that you want to send. Only Associations which are in the .pdf and .docx format can be previewed. If you try to preview a document in any other format (for example, XLSX), then a message will be displayed that the format is not supported. | ||
| − | <div class="image-green-border">[[File:DocuSign 3.PNG|SP7 DocuSign 3]]</div> | + | <div class="image-green-border">[[File:DocuSign 3.PNG|720px|SP7 DocuSign 3]]</div> |
5. '''Click''' the ''Upload Document ''button. | 5. '''Click''' the ''Upload Document ''button. | ||
| − | <div class="image-green-border">[[File:DocuSign 4.PNG|SP7 DocuSign 4]]</div> | + | <div class="image-green-border">[[File:DocuSign 4.PNG|720px|SP7 DocuSign 4]]</div> |
| − | <br/> 6. '''Click '''''Select File'' in the Upload Document window to upload a file to the association. | + | <br/> 6. '''Click '''''Select File'' in the''Upload Document'' window to upload a file to the association. |
| − | + | <div class="note-box">'''Note:''' You can associate Masterdata Contract Types and create instances for the Masterdata Contract Type. You can also associate peer associations. However, only the Association instances that contain .pdf and .docx files are displayed. Other formats are not supported when using DocuSign and cannot be previewed.</div> | |
| − | '''Note:''' You can associate Masterdata Contract Types and create instances for the Masterdata Contract Type. You can also associate peer associations. However, only the Association instances that contain .pdf and .docx files are displayed. Other formats are not supported when using DocuSign and cannot be previewed. | + | |
| − | + | ||
7. '''Click''' the ''Send For Approval'' button to send the Agreement for approval. | 7. '''Click''' the ''Send For Approval'' button to send the Agreement for approval. | ||
| − | <div class="image-green-border">[[File:DocuSign 5.PNG|SP7 DocuSign 5]]</div> | + | <div class="image-green-border">[[File:DocuSign 5.PNG|720px|SP7 DocuSign 5]]</div> |
8. '''Click''' the ''Send for External Signature'' button to send the Agreement with associated documents for e-signatures using DocuSign. The DocuSign Mail Details window opens. This option is available only if the DocuSign Associated Document attribute is configured at the Agreement Contract Type level. | 8. '''Click''' the ''Send for External Signature'' button to send the Agreement with associated documents for e-signatures using DocuSign. The DocuSign Mail Details window opens. This option is available only if the DocuSign Associated Document attribute is configured at the Agreement Contract Type level. | ||
| − | <div class="image-green-border">[[File:DocuSign 6.PNG|SP7 DocuSign 6]]</div> | + | <div class="image-green-border">[[File:DocuSign 6.PNG|720px|SP7 DocuSign 6]]</div> |
| | ||
| − | <div class="image-green-border">[[File:DocuSign 7.PNG|SP7 DocuSign 7]]</div> | + | <div class="image-green-border">[[File:DocuSign 7.PNG|720px|SP7 DocuSign 7]]</div> |
10. Fill in the necessary details. '''Click '''the ''Attachment'' icon. The ''Send For signature'' window opens. This displays Association instances for Parent as well as peer association that contain the DocuSign Associate Documents script attribute. | 10. Fill in the necessary details. '''Click '''the ''Attachment'' icon. The ''Send For signature'' window opens. This displays Association instances for Parent as well as peer association that contain the DocuSign Associate Documents script attribute. | ||
11. '''Select''' the required associations from the list. The Signatories defined for the Main Agreement are applicable for its Associated Documents too. Signatories can sign the Parent-Child type of Associations along with the main Agreement Document . If signature tags are not present in any of the Parent-Child Association, then signing is not mandatory. | 11. '''Select''' the required associations from the list. The Signatories defined for the Main Agreement are applicable for its Associated Documents too. Signatories can sign the Parent-Child type of Associations along with the main Agreement Document . If signature tags are not present in any of the Parent-Child Association, then signing is not mandatory. | ||
| − | <div class="image-green-border">[[File:Sending agreement for external signatures Send for signature window 7.8.PNG|RTENOTITLE]]</div> | + | <div class="image-green-border">[[File:Sending agreement for external signatures Send for signature window 7.8.PNG|360px|RTENOTITLE]]</div> |
After signing, Version and History of only the signed Parent Child Association and main Agreement is uploaded and generated with name of the last signatory. <br/> The tags for Peer Association don't get render and the version doesn’t get synched back. Status of Parent Child Association does not change irrespective of the action taken by signatories. After the agreement is executed, only the signed copy of the Agreement gets uploaded. | After signing, Version and History of only the signed Parent Child Association and main Agreement is uploaded and generated with name of the last signatory. <br/> The tags for Peer Association don't get render and the version doesn’t get synched back. Status of Parent Child Association does not change irrespective of the action taken by signatories. After the agreement is executed, only the signed copy of the Agreement gets uploaded. | ||
| − | == == | + | |
| + | |||
| + | == Appending the DocuSign Certificate of Completion in the Executed Agreements == | ||
| + | |||
| + | DocuSign creates a ''Certificate of Completion'' at the completion of the signature process. Users can obtain this certificate from the DocuSign portal. It provides details of each signatory on the agreement document, including the signatory IP address, signatory image, key event timestamps, and so on. It helps users to resolve objections that customers may have regarding transaction rejections. | ||
| + | |||
| + | ICI allows users to append the DocuSign ''Certificate of Completion'' to the final executed agreement, so that it could be retained for the lifecycle of the contract. This is achieved by a technical configuration which when enabled, the ''Certificate of Completion ''will be appended to the final executed PDF agreement and synced back to ICI. By default, the setting is disabled. | ||
| + | |||
| + | '''DocuSign Limitation:'''<br/> While attaching the Certificate of Completion to the main agreement, all the associated documents get attached to the main agreement within the DocuSign envelope. Hence, when using the Certificate of Completion and Document Bundling features in a single implementation, the associated documents will also be appended to the main agreement document file from DocuSign. | ||
| + | <div class="note-box">'''Note: '''Ensure that ONLY one of these features - either Certificate of Completion or Document Bundling - is enabled using ICI settings. As these are mutually exclusive features, if both are enabled then they will not work as expected. </div> | ||
| + | | ||
| | ||
| − | '''Related Topics:''' [[ | + | '''Related Topics:''' [[Agreement_Management|Agreement Management]] | [[Configuration|Configuration]] | [[Integrations|Integrations]] | [[Icertis_Adapter_for_Coupa_Integration|Icertis_Adapter_for_Coupa_Integration]] | [[Salesforce|Salesforce]] | [[Using_Adobe_Sign|Using_Adobe_Sign]] | |
Latest revision as of 09:24, 12 September 2020
Contents
Using DocuSign
Sending an Own Paper Agreement for Electronic Signature
Electronic signatures are done through Docu'Sign (or DocuSign). External signatories can choose one of these applications if they wish to do electronic signatures.
To sign an Agreement electronically:
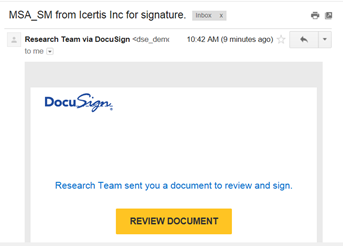
1. Open the e-mail you receive from DocuSign (or Adobe Sign).
2. Click Review Document. The Please review & Act on These Documents window opens.
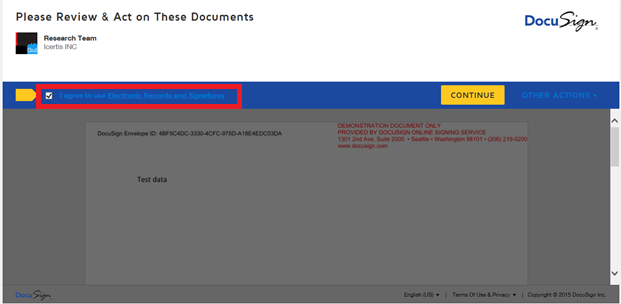
3. Select the I agree...check box and click Continue.This enables the Fields menu in the left panel.
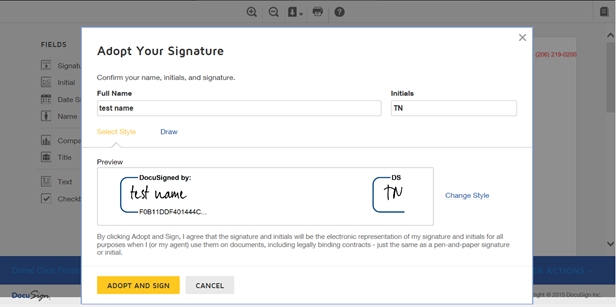
4. Click Sign next to Signature. The Adopt Your Signature window is displayed if you are signing the document for the first time.
Note: If you have signed before, the system inserts the signature that you used when you signed for the first time.
5. Verify your Full Name, Initials, and Signature. Your Full Name and Initials appear as they are entered at the time of your user creation process.
Note: You cannot change the signature style once it appears on the document.
6. Click Finish. You receive a notification stating your signature process is completed. The status of the agreement changes to Waiting For Internal Signature. An e-mail is sent to the internal signatory.
Note: Internal Signatory can follow steps 1 to 9 to sign the Agreement electronically. Once signed, the status of the Agreement changes to Executed. A notification email is sent to the Primary Owner, Internal Signatory and External Signatory.
7. Verify your signature on the Select Style tab:
- Click Change Style to change the style of your signature and initials. This displays a list of alternate styles. Use scroll arrows to scroll through the signatures. Select from the list of styles.
- Alternatively, click the Draw tab to draw your own signature. Click Clear to clear the signature.
8. Click Adopt And Sign. The Signature and Initials appear on the document.
All Executed Agreements signed using Adobe Sign, include an audit log of key details in the signature flow, such as:
- The specific actions performed, such a document created, emailed, viewed and electronically signed
- Name of the user that performed these actions
- Time stamp of when those actions were completed
- IP address of the user that completed the actions
This feature is disabled by default and can be enabled from the Global Account Settings of DocuSign.
Electronic Signature for Third Party Paper
Electronic signatures are done through DocuSign or (Adobe Sign). External signatories can choose one of these applications if they wish to do electronic signatures.
To sign an Agreement electronically:
1. Open the e-mail you receive from DocuSign (or Adobe Sign).
2. Click Review Document. This opens the Please review & Act on These Documents window.
3. Select the I agree...checkbox and click Continue. This enables the Fields menu in the left panel.
In the Fields menu, you can use the following options:
- Signature: Drag and drop your signature onto the document.
- Initial: Drag and drop your initials onto the document.
- Date Signed: Drag and drop the Date onto the document. Displays current date by default.
- Name: Drag and drop the Name box. Type your name into the box.
- Company: Drag and drop the Company box. Type the name of your company into the box.
- Title: Drag and drop the Title box. Type the title into the box.
- Text: Drag and drop Text box. Type additional text into the box.
- Checkbox: Drag and drop Checkbox into the document.
4. Drag the Signature onto the document. This opens the Adopt Your Signature window. Verify you full name, initials and signature. Your full name and signature appear as they were entered.
5. Verify your signature on the Select Style tab:
- Click Change Style to change the style of your signature and initials. This shows a list of alternate styles. Use the arrows to scroll through the signatures and select from the list of styles.
- Alternatively, click Draw tab to draw your own signature. ClickClear to clear the signature.
6. Click Adopt And Sign. The signature and initials appear on the document.
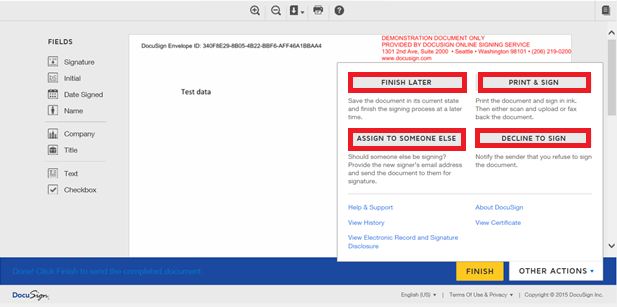
7. Click theOther Actions menu.
8. Select from the following options in the window that appears:
- Click FINISH LATER to save the document in its current state and finish the signing process at a later time.
- Click PRINT & SIGN to print the document and sign it in ink. After signing it, scan and upload or fax the document.
- Click ASSIGN TO SOMEONE ELSE to assign a third person as a signatory.
9. In the Assign to Someone Else window:
- Email Address for the New Signer: type the email address of the person you want to assign the envelope.
- New Signer's Name: type the name of the new signor.
Please provide a reason to Research Team for changing signing responsibility: type the reason for changing the signing responsibility.
10. Click ASSIGN TO SOMEONE ELSE. The new signatory and the original sender receive a notification with you in the Cc.
11. Click DECLINE TO SIGN to notify the sender that you refuse to sign the document and put in the reason for declining it in the Comment box. The comments can be seen under Notes on the Agreement Details Page.
12. Click FINISH to complete the signature process. You will receive a notification stating that your signature process is completed. The status of the agreement changes to Waiting For Internal Signature. An email is sent to the internal signatory.
Sending Associated documents for Signatures along with the main Agreement
ICI allows the Primary Owner to select and attach individual copies of the Associated documents along with the main Agreement and send them for signatures via DocuSign, after adding the signatory tags. The Signatories can not only view but also sign these Associated Documents. Thus, the signatory can have all the information required to sign the Agreement at once, so that they do not need to download each of the associated documents separately to find the required information.
To select and share Associated documents with the Agreement for e-signature using DocuSign:
1. Ensure that you have a script type of Attribute DocuSignAssociatedDocuments in the Contract Type.
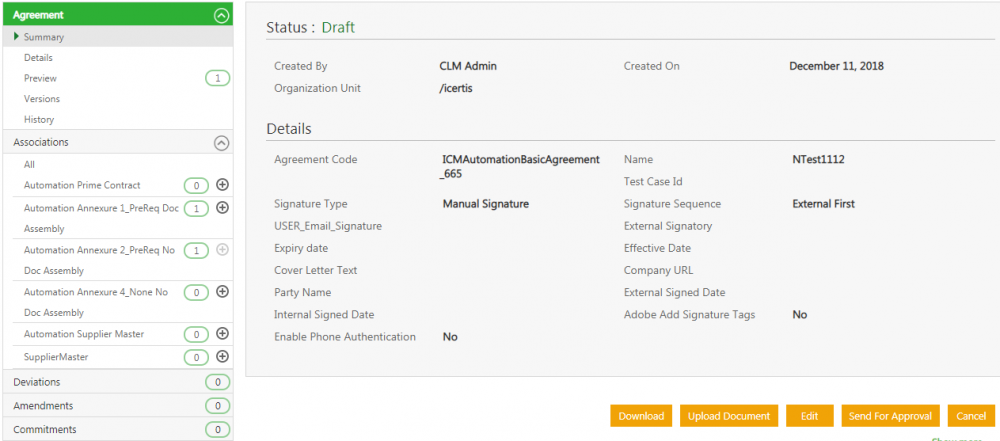
2. Open the Agreement with the Associations to be sent for signature using DocuSign.
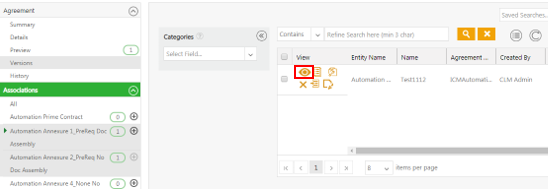
3. Click the View Document icon to preview the Association.
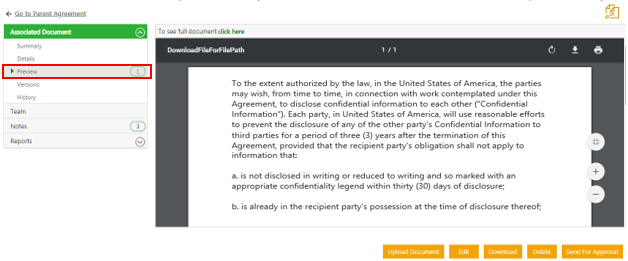
4. Click Preview to view the associations to verify the ones that you want to send. Only Associations which are in the .pdf and .docx format can be previewed. If you try to preview a document in any other format (for example, XLSX), then a message will be displayed that the format is not supported.
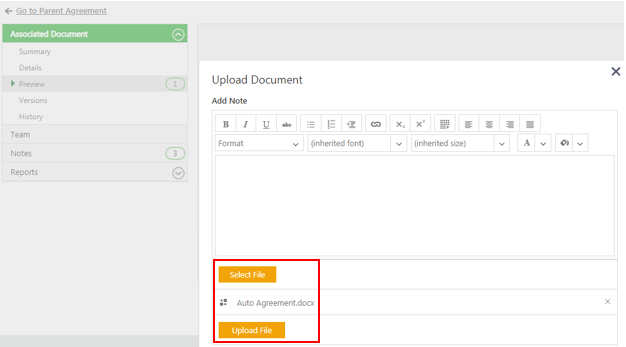
5. Click the Upload Document button.
6. Click Select File in theUpload Document window to upload a file to the association.
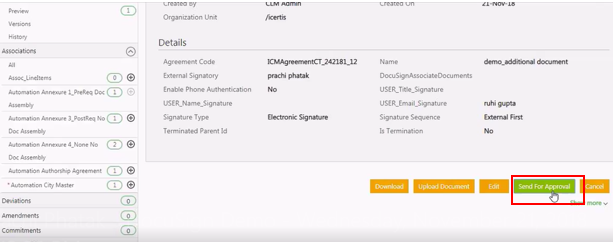
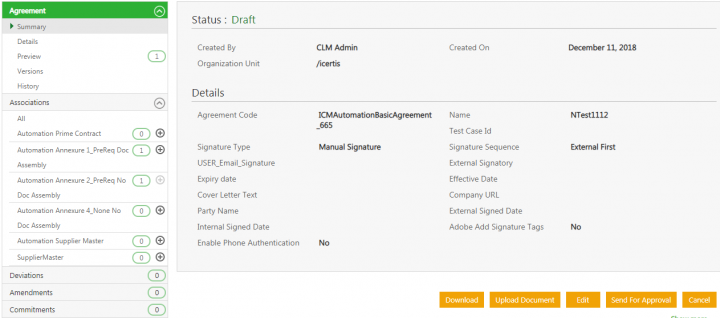
7. Click the Send For Approval button to send the Agreement for approval.
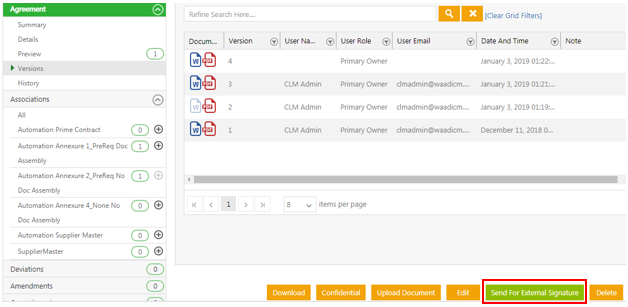
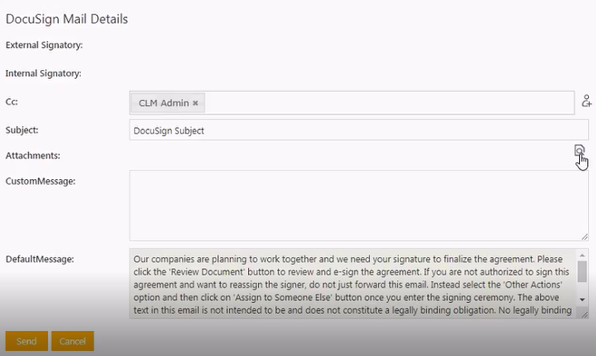
8. Click the Send for External Signature button to send the Agreement with associated documents for e-signatures using DocuSign. The DocuSign Mail Details window opens. This option is available only if the DocuSign Associated Document attribute is configured at the Agreement Contract Type level.
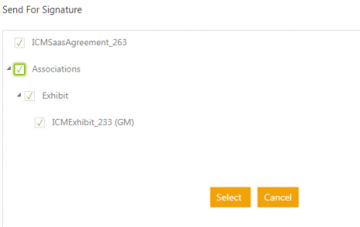
10. Fill in the necessary details. Click the Attachment icon. The Send For signature window opens. This displays Association instances for Parent as well as peer association that contain the DocuSign Associate Documents script attribute.
11. Select the required associations from the list. The Signatories defined for the Main Agreement are applicable for its Associated Documents too. Signatories can sign the Parent-Child type of Associations along with the main Agreement Document . If signature tags are not present in any of the Parent-Child Association, then signing is not mandatory.
After signing, Version and History of only the signed Parent Child Association and main Agreement is uploaded and generated with name of the last signatory.
The tags for Peer Association don't get render and the version doesn’t get synched back. Status of Parent Child Association does not change irrespective of the action taken by signatories. After the agreement is executed, only the signed copy of the Agreement gets uploaded.
Appending the DocuSign Certificate of Completion in the Executed Agreements
DocuSign creates a Certificate of Completion at the completion of the signature process. Users can obtain this certificate from the DocuSign portal. It provides details of each signatory on the agreement document, including the signatory IP address, signatory image, key event timestamps, and so on. It helps users to resolve objections that customers may have regarding transaction rejections.
ICI allows users to append the DocuSign Certificate of Completion to the final executed agreement, so that it could be retained for the lifecycle of the contract. This is achieved by a technical configuration which when enabled, the Certificate of Completion will be appended to the final executed PDF agreement and synced back to ICI. By default, the setting is disabled.
DocuSign Limitation:
While attaching the Certificate of Completion to the main agreement, all the associated documents get attached to the main agreement within the DocuSign envelope. Hence, when using the Certificate of Completion and Document Bundling features in a single implementation, the associated documents will also be appended to the main agreement document file from DocuSign.
Related Topics: Agreement Management | Configuration | Integrations | Icertis_Adapter_for_Coupa_Integration | Salesforce | Using_Adobe_Sign |
