| (19 intermediate revisions by 5 users not shown) | |||
| Line 2: | Line 2: | ||
= Attribute = | = Attribute = | ||
| − | Attributes | + | Attributes or metadata are the key components of an Agreement. Attribute data is displayed on contracts and associated documents. |
| − | + | Attributes are of two types: | |
*Global: These Attributes are used for all Contract Types. | *Global: These Attributes are used for all Contract Types. | ||
*Local: These Attributes are used for specific Contract Types. | *Local: These Attributes are used for specific Contract Types. | ||
| − | + | To view available Attributes: | |
| − | 1. '''Click''' | + | 1. '''Click''' ''Home > ''''Configuration'''''<b>. The ''Atrributes'' page opens. On this page you can view a list of all the available attributes, Edit, or Add Attributes.</b> |
| − | <div class="image-green-border">[[File:Attribute Page.PNG| | + | <div class="image-green-border">[[File:Attribute Page.PNG|720px|RTENOTITLE]]</div> |
== Adding and Editing an Attribute == | == Adding and Editing an Attribute == | ||
| − | With | + | With ICI, you can create an attribute and use it while creating a Contract Type. |
To create an attribute: | To create an attribute: | ||
| − | 1. '''Click''' ''Configuration'' on My Dashboard. The ''Configuration ''page opens. | + | 1. '''Click''' ''Configuration'' on ''My Dashboard''. The ''Configuration ''page opens. |
2. '''Click''' the ''Attribute ''tile. | 2. '''Click''' the ''Attribute ''tile. | ||
| − | 3. '''Click''' | + | 3. '''Click''' the ''Add ''icon on the ''Attribute'' Library page. The ''Add Attribute'' page opens. The Attribute Code is displayed by default. |
| − | + | <div class="image-green-border">[[File:Add Attribute.jpg|720px|RTENOTITLE]]</div> | |
| − | + | ||
| − | <div class="image-green-border">[[File:Add Attribute.jpg|RTENOTITLE]]</div> | + | |
*Display Name: '''Type '''the appropriate name of the attribute. For example, corporate office. | *Display Name: '''Type '''the appropriate name of the attribute. For example, corporate office. | ||
| − | *Data Type list: '''Select '''the appropriate option from the list. | + | *Data Type list: '''Select '''the appropriate option from the list. Additional related fields are displayed based on the selected Data Type option. For example, when the data type is selected as Number, the related Total Length and Number of Decimals fields are displayed. When the data type is selected as Choice, the option to select the UI Control Type between Dropdown and Radio buttons is displayed. When the data type is selected as MultiSelectChoice, the option to select the UI Control Type between Dropdown and Checkbox is displayed. The selected user control will be rendered on browser.The page length will increase as the number of options in Radio button/Checkbox list increase. Hence, it’s recommended to select Radio button or Check box list when the options are less than eight, else select the Dropdown if there are more options. |
| + | <div class="image-green-border">[[File:573336-Attribute-1.png|720px|573336-Attribute-1.png]]</div> | ||
*Help Message: '''Type '''the appropriate help message of the attribute. For example, enter the address of the corporate office. | *Help Message: '''Type '''the appropriate help message of the attribute. For example, enter the address of the corporate office. | ||
*Source List: '''Select '''from the following: | *Source List: '''Select '''from the following: | ||
| Line 42: | Line 41: | ||
<div class="note-box"> '''Note''': If you select ''On'' in the ''Is Editable ''field''', '''the ''Tracking Attribute'' and the ''Is Unique'' fields are available.</div> | <div class="note-box"> '''Note''': If you select ''On'' in the ''Is Editable ''field''', '''the ''Tracking Attribute'' and the ''Is Unique'' fields are available.</div> | ||
*Is Mandatory: '''Click''' ''On'' to make the attribute mandatory. | *Is Mandatory: '''Click''' ''On'' to make the attribute mandatory. | ||
| − | *Tracking Attribute:'''Click '''''On'' to make the attribute editable throughout the Agreement lifecycle. | + | *Tracking Attribute: '''Click '''''On'' to make the attribute editable throughout the Agreement lifecycle. |
*Is Unique: '''Click''' ''On'' to make the attribute unique for a Contract Type. | *Is Unique: '''Click''' ''On'' to make the attribute unique for a Contract Type. | ||
*Defined by Rule: '''Click''' ''On'' to make the attribute editable throughout the Agreement lifecycle. | *Defined by Rule: '''Click''' ''On'' to make the attribute editable throughout the Agreement lifecycle. | ||
| Line 48: | Line 47: | ||
*Is Searchable: '''Click''' ''On'' to make the attribute easy to search. | *Is Searchable: '''Click''' ''On'' to make the attribute easy to search. | ||
*Is Supersedable: '''Click '''''On ''to make the updated or amended attribute supersede the earlier one. | *Is Supersedable: '''Click '''''On ''to make the updated or amended attribute supersede the earlier one. | ||
| − | *Is Conditional: '''Click''' ''On'' to make the attribute dependent on another attribute. The ''Conditional ''section | + | *Is Conditional: '''Click''' ''On'' to make the attribute dependent on another attribute. The ''Conditional ''section opens. In the ''Depend on Attribute'' list, select the attribute on which the new attribute is dependent. In the ''Depends On Value'' box, type the value of the selected attribute. '''Select '''the values from the ''Depends on Value ''field which are automatically fetched based on the attribute selected in ''Depends On Attribute'' field, if the data type of that attribute is Lookup, Choice, MultiChoice, or Boolean. |
| − | <div class="image-green-border">[[File:SP7 Conditional Attributes & Rules 1.png|SP7 Conditional Attributes & Rules 1]]</div> | + | <div class="image-green-border">[[File:SP7 Conditional Attributes & Rules 1.png|720px|SP7 Conditional Attributes & Rules 1]]</div> |
| | ||
| − | <div class="image-green-border">[[File:SP7 Conditional Attributes & Rules 2.png|SP7 Conditional Attributes & Rules 2]]</div> | + | <div class="image-green-border">[[File:SP7 Conditional Attributes & Rules 2.png|720px|SP7 Conditional Attributes & Rules 2]]</div> |
| − | 4. '''Click''' ''Save''. The attribute | + | 4. '''Click''' ''Save''. The attribute is displayed in the ''Available Attribute'' list. |
| − | <div class="image-green-border">[[File:AttributeCreationSuccessful.jpg|RTENOTITLE]]<br/> </div> | + | <div class="image-green-border">[[File:AttributeCreationSuccessful.jpg|720px|RTENOTITLE]]<br/> </div> |
| − | === Editing an | + | === Editing an Attribute === |
| − | In | + | In ICI, you can edit an existing attribute. Editing the attribute doesn't have any effect on the Contract Types where it is used.<br/> You can use the edited attribute to create new contract types. |
'''Note: '''To edit an attribute in all the entities where it is used (Clauses, Templates, Agreements), go to the ''Attributes'' tab of appropriate Contract Type, edit the attribute, and then publish it. | '''Note: '''To edit an attribute in all the entities where it is used (Clauses, Templates, Agreements), go to the ''Attributes'' tab of appropriate Contract Type, edit the attribute, and then publish it. | ||
| Line 62: | Line 61: | ||
To edit an attribute: | To edit an attribute: | ||
| − | 1.'''Click''' ''Configuration ''on | + | 1.'''Click''' ''Configuration ''on the Home page. The ''Configuration'' page opens. |
2. '''Click''' ''Attribute ''on the ''Configuration'' page. In the ''Available Attribute'' list, select an attribute that you want to edit. | 2. '''Click''' ''Attribute ''on the ''Configuration'' page. In the ''Available Attribute'' list, select an attribute that you want to edit. | ||
| Line 68: | Line 67: | ||
Alternatively, you can type the name of the attribute in the ''Search'' box, and then '''select''' the attribute. The ''Edit Attribute'' page opens. | Alternatively, you can type the name of the attribute in the ''Search'' box, and then '''select''' the attribute. The ''Edit Attribute'' page opens. | ||
| − | 3. Modify the existing information as required, and then '''click''' ''Save''. The ''Success! Attribute updated successfully'' message | + | 3. Modify the existing information as required, and then '''click''' ''Save''. The ''Success! Attribute updated successfully'' message is displayed at the bottom of the page. You can modify all the field values except attribute code and attribute name. |
| − | + | ||
| − | You can modify all the field values except attribute code and attribute name. | + | |
| − | + | == Arithmetic Operations and Logical Validations on Attributes == | |
| − | + | Users can configure arithmetic calculations, logical validations and visibility conditions for attributes using the Enable Expressions attribute property at the agreement, contract request, association and masterdata contract type level. | |
| − | + | === Configuring Expressions for attributes === | |
| + | |||
| + | To configure arithmetic calculations and logical validations for attributes at the contract type level (agreement, contract request, association and masterdata): | ||
| + | |||
| + | 1. '''Click '''the ''Configuration > Create Contract Type ''on the Home page. The ''Select Contract Type ''page opens. | ||
| + | <div class="image-green-border">[[File:Create Contract Type.PNG|720px|Create Contract Type.PNG]]</div> | ||
| + | 3. '''Select '''the ''Contract Type'' you want to create. For example, ''AGREEMENT''. | ||
| + | <div class="image-green-border">[[File:7.10 Arithmatic 3.png|720px|7.10 Arithmatic 3.png]]</div> | ||
| + | 4. '''Click '''''Next. ''The ''Create Contract Type ''page opens. <br/> 5. '''Enter '''a name in the ''Contract Type Name ''field. <br/> 6. '''Enter '''all the details on the ''Details ''tab. <br/> 7. '''Click '''''Next. ''The ''Attributes ''tab opens. | ||
| + | <div class="note-box">'''Note''': The arithmetic calculations are supported for attributes like Currency, Date, Number and Percentage data types.</div> <div class="image-green-border"> </div> <div class="image-green-border">[[File:7.10 Arithmatic 4.png|720px|7.10 Arithmatic 4.png]]</div> | ||
| + | For example, if you want to calculate the ''Total Price'' of a commodity, you need to multiply the attribute values in the fields ''Product Price'' and ''No Of Units''. You can also set validation messages on its outcome so that the ''Total Price'' value must be greater than 100. | ||
| + | |||
| + | 8. '''Select '''the attribute ''Total Price ''from the ''Available Attribute ''list and move it to the ''Selected Attribute'' list.<br/> 9. '''Toggle''' the ''Enable Expressions'' flag ''On'' for the attribute Total Price. The ''Expressions'' tab opens. | ||
| + | |||
| + | Calculations are performed through the default expression field denoted as ''EXPR1''. | ||
| + | <div class="note-box">'''Note''': The ''Expression'' field cannot be removed. The new expression can be added or removed by ''NEW ROW'' and ''REMOVE ROW'' buttons. Each expression such as ''EXPR1, EXPR2, EXPR3, ''and so on contains ''Function ''and ''Parameters ''fields. Based on arithmetic and logical operators selected through the ''Function ''field, parameters are set in the ''Parameters ''field.</div> | ||
| + | The available functions include Constants (NUMBER, BOOLEAN, DATE, STRING), Arithmetic operations (ADD, SUBSTRACT, MULTIPLY, DEVIDE, PERCENT), Date operations (such as DATE ADD, DATE DIFFERENCE), Logical operations (such as GREATER THAN, LESS THAN, EQUALS, ALL, ANY, NOT) and String operations (CONTAINS, IN, STARTS WITH, HAS VALUE). | ||
| + | |||
| + | 10. '''Select''' an expression (for example, ''MULTIPLY'') from the ''Function'' drop-down of ''EXPR1''. <br/> 11. '''Select''' ''Product Price'' and ''No Of Units'' from the Parameters field to multiply product price and no of units attribute values to get the total price.<br/> 12. '''Click''' ''NEW ROW'' to add a new expression. For example, ''EXPR2 ''and ''EXPR3''.<br/> 13. '''Select''' a ''Function CONSTANT'' (''NUMBER'', ''BOOLEAN'', ''DATE'', and ''STRING'') from the ''Function'' drop-down of ''EXPR2'' if you want that to be a constant value.<br/> 14. '''Enter''' a value (for example, 100) in the Parameters field to set the value of ''Total Price''. A validation message will be displayed if this value is greater than the total price.<br/> 15. '''Select''' another function (''GREATER THAN'') from the ''Function ''drop-down of ''EXPR3''.<br/> 16. '''Select''' ''Total Price'' and ''EXPR2 ''in the ''Parameters ''drop-down of ''EXPR3''.<br/> The ''Result Expression'' field is used to reflect the result of the selected expression field (''EXPR1, EXPR2, EXPR3,'' and so on). | ||
| + | |||
| + | ==== Configuring the validation message for an attribute: ==== | ||
| + | |||
| + | The ''Validate Expression'' field is used to validate the evaluation based on the selected expression (''EXPR1, EXPR2, EXPR3,'' and so on). The ''Validate Message'' field is linked to the ''Validate Expression'' field and triggers a user-entered message in case of an invalid expression. | ||
| + | <div class="image-green-border">17. '''Select''' ''EXPR1 ''in the Result Expression drop-down.<br/> 18. '''Select''' ''EXPR3'' in the Validate Expression drop-down.<br/> 19. '''Enter''' ''Total price'' ''must be greater than 100'' in the ''Validate Message ''field.<br/> <br/> [[File:7.10 Arithmatic 5.png|720px|7.10 Arithmatic 5.png]]</div> | ||
| + | | ||
| + | |||
| + | ==== Configuring the visibility conditions for an attribute: ==== | ||
| + | |||
| + | You can set a ''Visibility Expression'' for displaying an attributes dynamically on ICI UI instance, based on business conditions. For example, attribute ''Cost Surcharge Percentage'' can be displayed when the calculated ''Total Price'' is less than ''100.00''. | ||
| + | <div class="image-green-border"> </div> <div class="image-green-border">20. '''Click '''''Add ''on the ''Attribute'' page. The ''Add Attribute'' section opens.<br/> 21. '''Enter '''''Display Name''. For example, ''Cost Surcharge Percentage.''<br/> 22. '''Enter '''details for the attribute.<br/> 23. '''Toggle '''the ''Enable Expressions'' to ''On''. The ''Expressions'' section opens.<br/> 24. '''Set '''the ''EXPR1'' and ''EXPR2'' same as attribute ''Total Price''.<br/> 25. '''Click '''''NEW ROW'' to add a new expression. For example, ''EXPR3''. Here you can set the condition for attribute’s visibility. <br/> 26. '''Select '''a ''Function''. For example, ''LESS THAN''.<br/> 27. '''Select '''''Parameters''. For example, ''Total Price'' and ''EXPR2''.<br/> 28. '''Select '''''EXPR3 ''in the ''Visibility Expression'' drop-down. The attribute ''Cost'' ''Surcharge Percentage ''will be displayed on UI only upon satisfying conditions for ''EXPR3''.<br/> </div> <div class="image-green-border">[[File:7.15 618345 1.png|720px|7.15 618345 1.png]]</div> <div class="image-green-border"> </div> <div class="image-green-border"> </div> <div class="image-green-border"><div class="note-box">'''Note:''' In case of ''String'' ''Function-'' ''IN'', the first ''Parameters'' drop-down will display only multi-select choice attributes from the current contract type and users can select multiple attributes in a second dropdown to configure the expression.</div> </div> | ||
| + | 29. '''Click''' ''Save''. | ||
| + | <div class="note-box">Note: Arithmetic calculations, logical validations and visibility expressions for attribute values are supported at the following contract type levels: agreement, contract request, associated document, and masterdata.</div> | ||
| + | 30. '''Enter '''the details in the ''Association'', ''Display Preference ''and ''Team'' tabs.<br/> 31. '''Verify '''the details and click ''Create''.<br/> 32. '''Publish '''and ''Approve'' the ''Contract'' ''Type ''following standard ICI workflows. | ||
| + | <div class="image-green-border"> </div> | ||
| + | == Arithmetic Operations Evaluation at Agreement level == | ||
| + | |||
| + | The attributes will be displayed on the ICI UI instance as per the configured ''Enabled Expressions'' while creating an agreement, contract request, associated document, and masterdata contract type instances. | ||
| + | |||
| + | To create agreement contact type instance: | ||
| + | |||
| + | 1. '''Click''' the ''Agreement Management'' tile on the ''Dashboard''. The ''Agreement Management'' page opens. <br/> 2. '''Click''' the ''Create Agreement'' tab. The ''Create Agreement'' page opens.<br/> 3. '''Enter '''all the details in the ''Create Agreement'' page.<br/> 4. '''Enter''' a name in the ''Contract Type Name'' field.<br/> 5. '''Select''' ''Own'' in the Type Of Paper drop-down. <br/> 6. '''Click''' ''Next''. The ''Attributes'' tab opens.<br/> 7. '''Enter''' the value in the attribute ''Product Price''. For example, 9.<br/> 8. '''Enter''' the value in the attribute ''No Of Units''. For example, 10. ''Total Price'' is calculated as 90 by multiplying the ''Product Price'' (9) and ''No Of Units'' (10). | ||
| + | <div class="image-green-border">Since the ''Total Price'' is less than 100, a validation message will be displayed indicating that ''Total Price'' must be greater than 100 and the attribute ''Cost Surcharge'' ''Percentage'' is displayed on the UI.</div> <div class="image-green-border"><br/> [[File:7.15 618345 2.png|720px|7.15 618345 2.png]]<br/> </div> | ||
| + | === Configuring Event Rule for Reverse-sync in Word Add-in === | ||
| + | |||
| + | You need to create an event rule to evaluate the Arithmetic calculation, where users have made changes in the tagged attribute value of the document. For example, the following steps help you to set an event rule at the agreement document upload level. | ||
| + | |||
| + | '''Creating an Event Rule''' | ||
| + | <div class="image-green-border">1. '''Click''' ''Configuration'' tile on the ''Dashboard''. The ''Attributes'' page opens.<br/> 2. '''Click''' ''Rule''. The ''Rules'' page opens.<br/> 3. '''Click''' ''Create Rule''. The ''Create Rule'' page opens.<br/> <br/> [[File:7.10 Arithmatic 8.png|720px|7.10 Arithmatic 8.png]]</div> | ||
| + | 4. '''Select''' the ''Contract Type'' for which you want to create a rule in the ''Contract Type'' list. For example, ''Purchase Agreement''.<br/> 5. '''Enter''' a name of the Rule in the ''Rule Name'' field. <br/> 6. '''Enter''' a description for the Rule in the ''Rule Description'' box.<br/> 7. '''Select''' the ''Event Rule'' in the ''Rule Type'' drop-down. <br/> 8. '''Select''' an appropriate category in the ''Event ''drop-down. For example, ''Agreement Document Uploaded''. <br/> 9. '''Click''' ''Next''. The ''Build'' tab opens.<br/> 10.'''Click''' ''Add Rule'' in the ''Builder'' tab.<br/> 11. '''Select''' ''And'' from the ''Conditions'' drop-down. <br/> 12. '''Select''' an appropriate attribute value in the ''S''''elect Value'''''<b>drop-down. For example, ''Created Date''.<br/> 13. </b>Select'''an appropriate attribute value in the ''Select Value'' drop-down. For example, ''Is After''.<br/> 14. '''Enter'''a value in the ''Enter Value'' field. For example, ''01-Nov-19''.<br/> 15. '''Select'''''Calculate Expression'' in the ''Select Action'' drop-down in the Actions tab.<br/> 16. '''Click'''''Next''. <br/> 17. '''Click'''''Create''.''' | ||
| + | <div class="image-green-border">[[File:7.10 Arithmatic 9.png|720px|7.10 Arithmatic 9.png]]</div> | ||
| + | The event rule gets triggered to calculate the value that will be displayed in the ''Expression ''section of the Contract Type ''Purchase Agreement'' when the ''Created Date'' is after ''1-Nov-19''. | ||
| + | |||
| + | == Arithmetic Operations Evaluation through Reverse Sync in Word Add-in == | ||
| + | |||
| + | 1. '''Click''' the ''Agreement Management'' tile on the ''Dashboard''. The ''Agreement Management'' page opens. <br/> 2. '''Click''' the ''Create Agreement'' tab. The ''Create Agreement'' page opens.<br/> 3. '''Enter''' all the details on the ''Create Agreement'' page.<br/> 4. '''Select''' ''Purchase Agreement'' for Contract Type Name.<br/> 5. '''Select''' ''Own'' in the ''Type Of Paper'' drop-down. <br/> 6. '''Click''' ''Next''. The ''Attributes'' tab opens.<br/> 7. '''Enter''' the value in the attribute ''Unit Price''. For example, ''2''.<br/> 8. '''Enter''' the value in the attribute ''No Of Units''. For example, 100. ''Total Price'' is calculated as 200, by multiplying the ''Unit Price'' and ''No Of Units'' as per the Contract Type configuration.<br/> 9. '''Select''' a date in the Effective Date field. For example, ''1-Nov-19''.<br/> 10. '''Enter''' ''Duration In Days''. For example, ''2''.<br/> 11. The ''Expiry date'' is calculated as per contract type configuration. For example, ''4-Nov-19''.<br/> 12. '''Click''' ''Next''. The ''Select Template'' page opens.<br/> 13. '''Select''' a template. For example, ''Purchase Template''.<br/> 14. '''Click''' ''Next''. <br/> 15. '''Click''' ''Create and Publish''. The ''Purchase Agreement'' state becomes ''Draft''. | ||
| + | <div class="image-green-border">[[File:7.10 Arithmatic 10.png|720px|7.10 Arithmatic 10.png]]<br/> <br/> 16. '''Click''' ''Download''. The ''Purchase Agreement'' gets downloaded.</div> <div class="image-green-border"> </div> <div class="image-green-border">[[File:7.10 Arithmatic 11.png|720px|7.10 Arithmatic 11.png]]</div> | ||
| + | Now, change the tagged attribute values of ''No of Units'' to ''3'' and ''Effective Date'' to ''03-Nov-19''. | ||
| + | |||
| + | 17. '''Click''' ''Save'' to save the Word document. | ||
| + | <div class="image-green-border">[[File:7.10 Arithmatic 12.png|720px|7.10 Arithmatic 12.png]]</div> | ||
| + | 18. '''Click''' the ''Select File'' to select the updated document.<br/> 19. '''Click''' ''Upload File''.<br/> 20. '''Click''' the ''Details'' tab. The attribute values of ''No Of Units'' and ''Effective Date'' are changed through reverse sync (from the Word Add-in to ICI) and also calculations are evaluated accordingly. | ||
| + | <div class="image-green-border">[[File:7.10 Arithmatic 13.png|720px|7.10 Arithmatic 13.png]]</div> | ||
| + | 21. '''Click''' ''Assemble Contract'' to be able to view the updated values in the document. | ||
| + | <div class="image-green-border">[[File:7.10 Arithmatic 14.png|720px|7.10 Arithmatic 14.png]]</div> | ||
| + | | ||
| − | '''Related Topics''': [[Configuration]] | [[Contract_Type|Contract Type]] | + | '''Related Topics''': [[Agreement_Management|Agreement Management]] | [[Configuration|Configuration]] | [[Contract_Type|Contract Type]] |[[Template_Management|Template Management]] |
Latest revision as of 12:05, 27 January 2021
Contents
Attribute
Attributes or metadata are the key components of an Agreement. Attribute data is displayed on contracts and associated documents.
Attributes are of two types:
- Global: These Attributes are used for all Contract Types.
- Local: These Attributes are used for specific Contract Types.
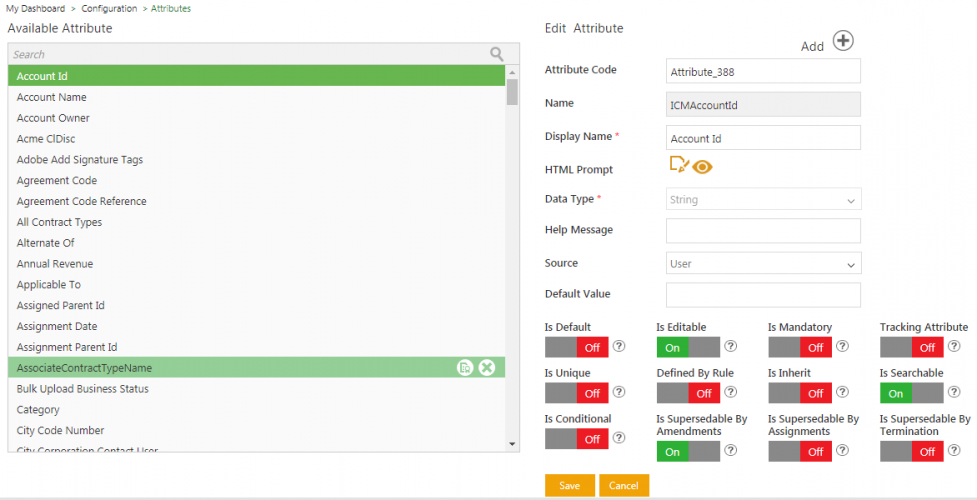
To view available Attributes:
1. Click Home > 'Configuration. The Atrributes page opens. On this page you can view a list of all the available attributes, Edit, or Add Attributes.
Adding and Editing an Attribute
With ICI, you can create an attribute and use it while creating a Contract Type.
To create an attribute:
1. Click Configuration on My Dashboard. The Configuration page opens.
2. Click the Attribute tile.
3. Click the Add icon on the Attribute Library page. The Add Attribute page opens. The Attribute Code is displayed by default.
- Display Name: Type the appropriate name of the attribute. For example, corporate office.
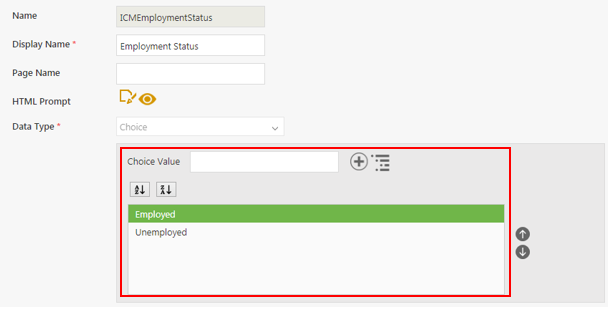
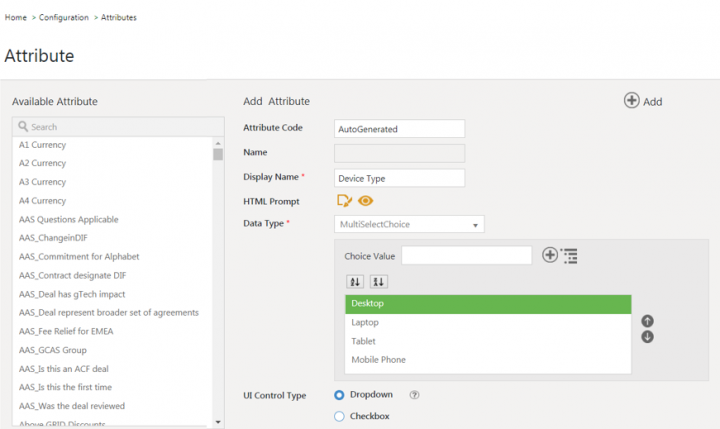
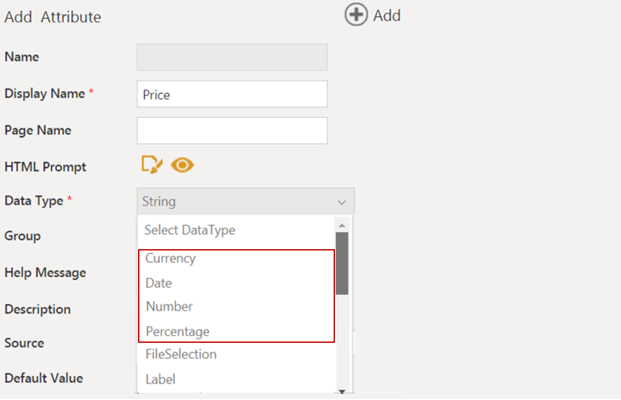
- Data Type list: Select the appropriate option from the list. Additional related fields are displayed based on the selected Data Type option. For example, when the data type is selected as Number, the related Total Length and Number of Decimals fields are displayed. When the data type is selected as Choice, the option to select the UI Control Type between Dropdown and Radio buttons is displayed. When the data type is selected as MultiSelectChoice, the option to select the UI Control Type between Dropdown and Checkbox is displayed. The selected user control will be rendered on browser.The page length will increase as the number of options in Radio button/Checkbox list increase. Hence, it’s recommended to select Radio button or Check box list when the options are less than eight, else select the Dropdown if there are more options.
- Help Message: Type the appropriate help message of the attribute. For example, enter the address of the corporate office.
- Source List: Select from the following:
- User
- Integrated
- Script
For example, select Integrated if source is inherited.
- Default Value: Type the default value of the attribute. The value that you type will be displayed on creating a new agreement.
- Is Default: Click On to enable rules to be set on the attribute.
- Is Editable: Click On to make the attribute editable in the Agreement, else select Off.
- Is Mandatory: Click On to make the attribute mandatory.
- Tracking Attribute: Click On to make the attribute editable throughout the Agreement lifecycle.
- Is Unique: Click On to make the attribute unique for a Contract Type.
- Defined by Rule: Click On to make the attribute editable throughout the Agreement lifecycle.
- Is Inherit: Click On if you want the attribute to inherit the data from Associated Documents.
- Is Searchable: Click On to make the attribute easy to search.
- Is Supersedable: Click On to make the updated or amended attribute supersede the earlier one.
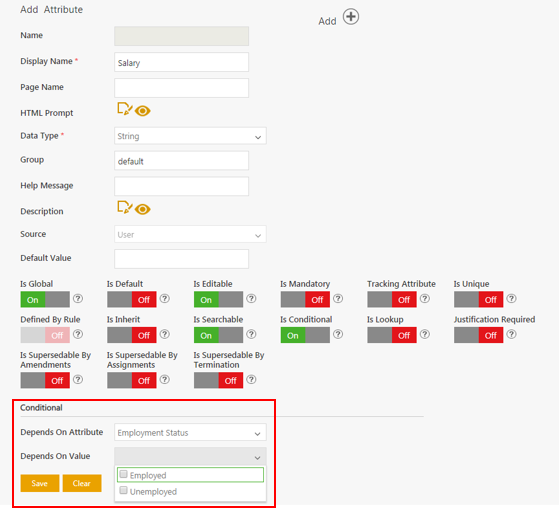
- Is Conditional: Click On to make the attribute dependent on another attribute. The Conditional section opens. In the Depend on Attribute list, select the attribute on which the new attribute is dependent. In the Depends On Value box, type the value of the selected attribute. Select the values from the Depends on Value field which are automatically fetched based on the attribute selected in Depends On Attribute field, if the data type of that attribute is Lookup, Choice, MultiChoice, or Boolean.
4. Click Save. The attribute is displayed in the Available Attribute list.
Editing an Attribute
In ICI, you can edit an existing attribute. Editing the attribute doesn't have any effect on the Contract Types where it is used.
You can use the edited attribute to create new contract types.
Note: To edit an attribute in all the entities where it is used (Clauses, Templates, Agreements), go to the Attributes tab of appropriate Contract Type, edit the attribute, and then publish it.
To edit an attribute:
1.Click Configuration on the Home page. The Configuration page opens.
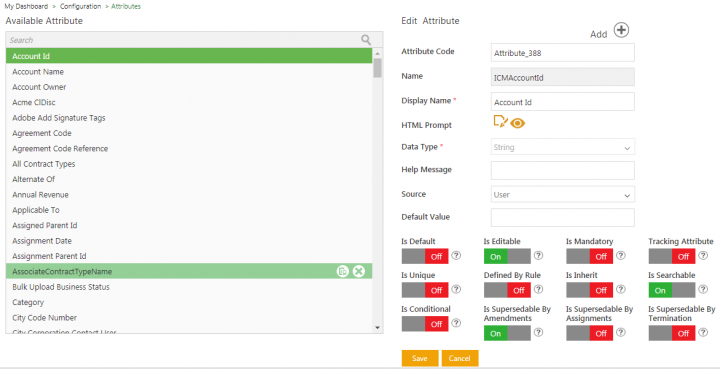
2. Click Attribute on the Configuration page. In the Available Attribute list, select an attribute that you want to edit.
Alternatively, you can type the name of the attribute in the Search box, and then select the attribute. The Edit Attribute page opens.
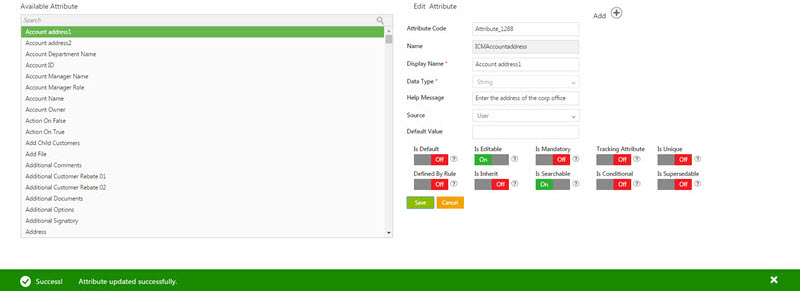
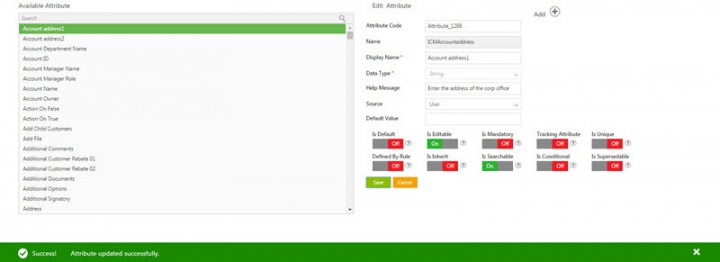
3. Modify the existing information as required, and then click Save. The Success! Attribute updated successfully message is displayed at the bottom of the page. You can modify all the field values except attribute code and attribute name.
Arithmetic Operations and Logical Validations on Attributes
Users can configure arithmetic calculations, logical validations and visibility conditions for attributes using the Enable Expressions attribute property at the agreement, contract request, association and masterdata contract type level.
Configuring Expressions for attributes
To configure arithmetic calculations and logical validations for attributes at the contract type level (agreement, contract request, association and masterdata):
1. Click the Configuration > Create Contract Type on the Home page. The Select Contract Type page opens.
3. Select the Contract Type you want to create. For example, AGREEMENT.
4. Click Next. The Create Contract Type page opens.
5. Enter a name in the Contract Type Name field.
6. Enter all the details on the Details tab.
7. Click Next. The Attributes tab opens.
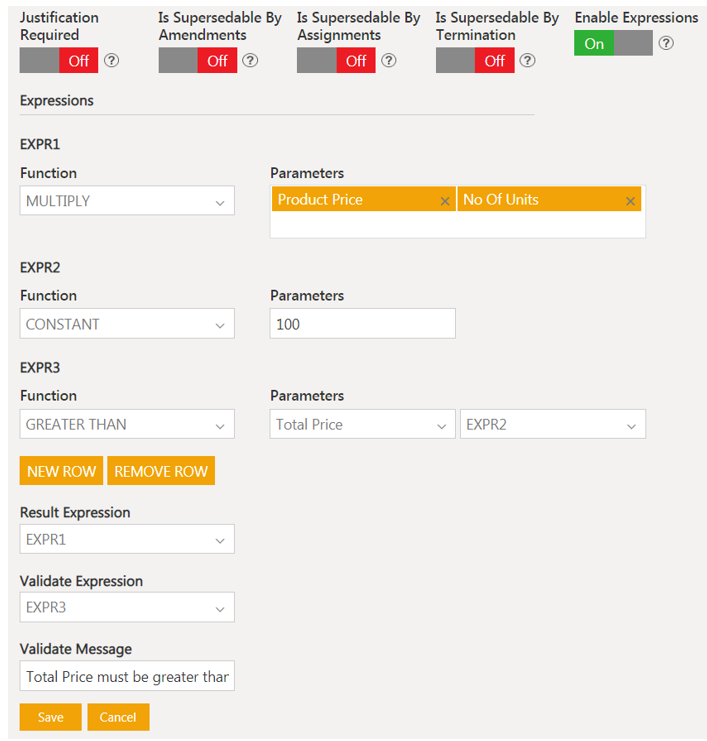
For example, if you want to calculate the Total Price of a commodity, you need to multiply the attribute values in the fields Product Price and No Of Units. You can also set validation messages on its outcome so that the Total Price value must be greater than 100.
8. Select the attribute Total Price from the Available Attribute list and move it to the Selected Attribute list.
9. Toggle the Enable Expressions flag On for the attribute Total Price. The Expressions tab opens.
Calculations are performed through the default expression field denoted as EXPR1.
The available functions include Constants (NUMBER, BOOLEAN, DATE, STRING), Arithmetic operations (ADD, SUBSTRACT, MULTIPLY, DEVIDE, PERCENT), Date operations (such as DATE ADD, DATE DIFFERENCE), Logical operations (such as GREATER THAN, LESS THAN, EQUALS, ALL, ANY, NOT) and String operations (CONTAINS, IN, STARTS WITH, HAS VALUE).
10. Select an expression (for example, MULTIPLY) from the Function drop-down of EXPR1.
11. Select Product Price and No Of Units from the Parameters field to multiply product price and no of units attribute values to get the total price.
12. Click NEW ROW to add a new expression. For example, EXPR2 and EXPR3.
13. Select a Function CONSTANT (NUMBER, BOOLEAN, DATE, and STRING) from the Function drop-down of EXPR2 if you want that to be a constant value.
14. Enter a value (for example, 100) in the Parameters field to set the value of Total Price. A validation message will be displayed if this value is greater than the total price.
15. Select another function (GREATER THAN) from the Function drop-down of EXPR3.
16. Select Total Price and EXPR2 in the Parameters drop-down of EXPR3.
The Result Expression field is used to reflect the result of the selected expression field (EXPR1, EXPR2, EXPR3, and so on).
Configuring the validation message for an attribute:
The Validate Expression field is used to validate the evaluation based on the selected expression (EXPR1, EXPR2, EXPR3, and so on). The Validate Message field is linked to the Validate Expression field and triggers a user-entered message in case of an invalid expression.
18. Select EXPR3 in the Validate Expression drop-down.
19. Enter Total price must be greater than 100 in the Validate Message field.
Configuring the visibility conditions for an attribute:
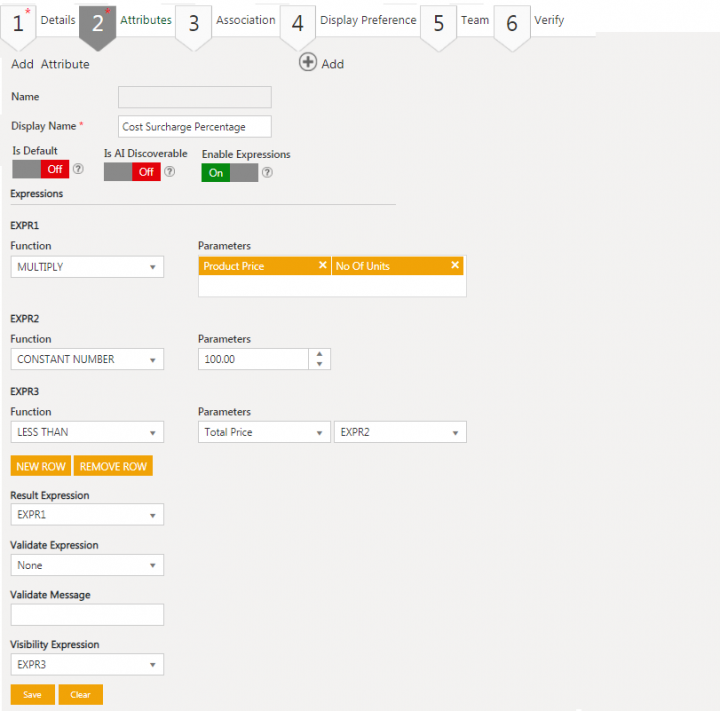
You can set a Visibility Expression for displaying an attributes dynamically on ICI UI instance, based on business conditions. For example, attribute Cost Surcharge Percentage can be displayed when the calculated Total Price is less than 100.00.
21. Enter Display Name. For example, Cost Surcharge Percentage.
22. Enter details for the attribute.
23. Toggle the Enable Expressions to On. The Expressions section opens.
24. Set the EXPR1 and EXPR2 same as attribute Total Price.
25. Click NEW ROW to add a new expression. For example, EXPR3. Here you can set the condition for attribute’s visibility.
26. Select a Function. For example, LESS THAN.
27. Select Parameters. For example, Total Price and EXPR2.
28. Select EXPR3 in the Visibility Expression drop-down. The attribute Cost Surcharge Percentage will be displayed on UI only upon satisfying conditions for EXPR3.
29. Click Save.
30. Enter the details in the Association, Display Preference and Team tabs.
31. Verify the details and click Create.
32. Publish and Approve the Contract Type following standard ICI workflows.
Arithmetic Operations Evaluation at Agreement level
The attributes will be displayed on the ICI UI instance as per the configured Enabled Expressions while creating an agreement, contract request, associated document, and masterdata contract type instances.
To create agreement contact type instance:
1. Click the Agreement Management tile on the Dashboard. The Agreement Management page opens.
2. Click the Create Agreement tab. The Create Agreement page opens.
3. Enter all the details in the Create Agreement page.
4. Enter a name in the Contract Type Name field.
5. Select Own in the Type Of Paper drop-down.
6. Click Next. The Attributes tab opens.
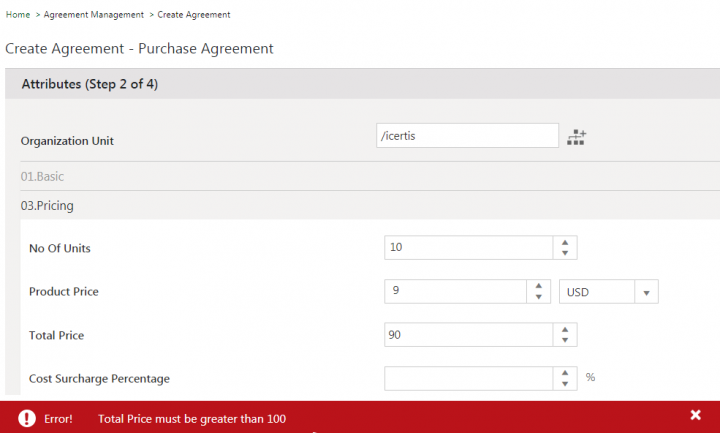
7. Enter the value in the attribute Product Price. For example, 9.
8. Enter the value in the attribute No Of Units. For example, 10. Total Price is calculated as 90 by multiplying the Product Price (9) and No Of Units (10).
Configuring Event Rule for Reverse-sync in Word Add-in
You need to create an event rule to evaluate the Arithmetic calculation, where users have made changes in the tagged attribute value of the document. For example, the following steps help you to set an event rule at the agreement document upload level.
Creating an Event Rule
2. Click Rule. The Rules page opens.
3. Click Create Rule. The Create Rule page opens.
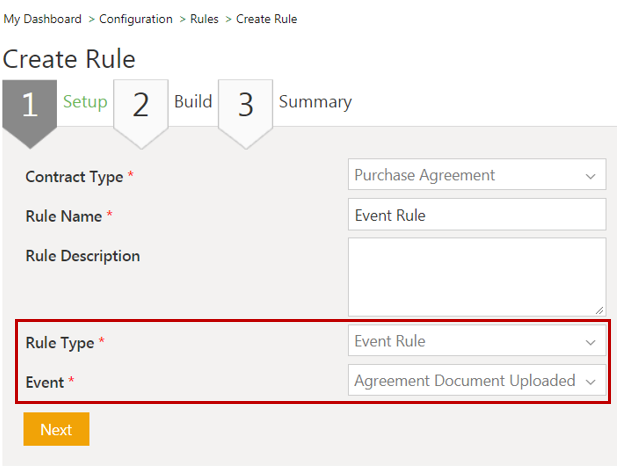
4. Select the Contract Type for which you want to create a rule in the Contract Type list. For example, Purchase Agreement.
5. Enter a name of the Rule in the Rule Name field.
6. Enter a description for the Rule in the Rule Description box.
7. Select the Event Rule in the Rule Type drop-down.
8. Select an appropriate category in the Event drop-down. For example, Agreement Document Uploaded.
9. Click Next. The Build tab opens.
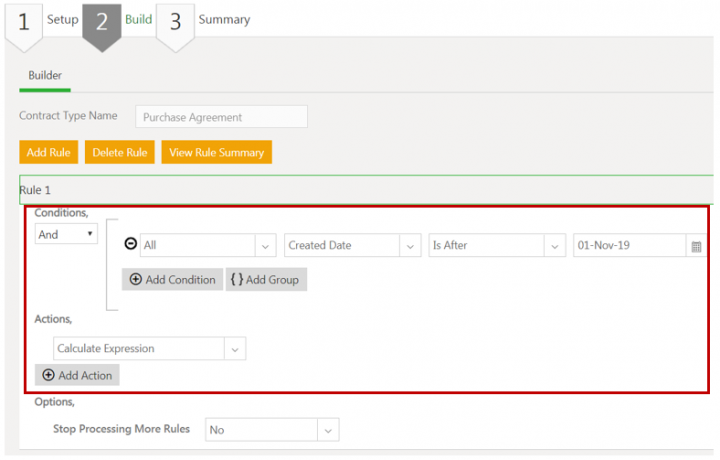
10.Click Add Rule in the Builder tab.
11. Select And from the Conditions drop-down.
12. Select an appropriate attribute value in the S'elect Valuedrop-down. For example, Created Date.
13. Selectan appropriate attribute value in the Select Value drop-down. For example, Is After.
14. Entera value in the Enter Value field. For example, 01-Nov-19.
15. SelectCalculate Expression in the Select Action drop-down in the Actions tab.
16. ClickNext.
17. ClickCreate.
The event rule gets triggered to calculate the value that will be displayed in the Expression section of the Contract Type Purchase Agreement when the Created Date is after 1-Nov-19.
Arithmetic Operations Evaluation through Reverse Sync in Word Add-in
1. Click the Agreement Management tile on the Dashboard. The Agreement Management page opens.
2. Click the Create Agreement tab. The Create Agreement page opens.
3. Enter all the details on the Create Agreement page.
4. Select Purchase Agreement for Contract Type Name.
5. Select Own in the Type Of Paper drop-down.
6. Click Next. The Attributes tab opens.
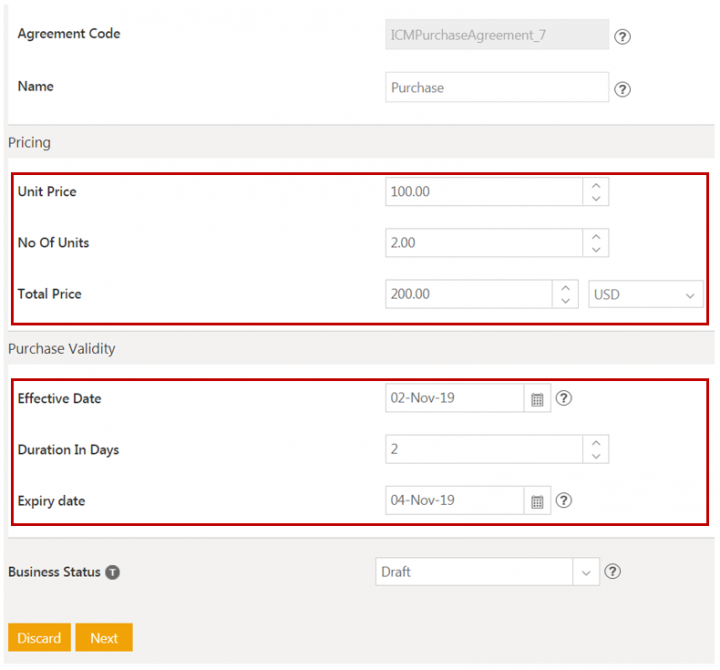
7. Enter the value in the attribute Unit Price. For example, 2.
8. Enter the value in the attribute No Of Units. For example, 100. Total Price is calculated as 200, by multiplying the Unit Price and No Of Units as per the Contract Type configuration.
9. Select a date in the Effective Date field. For example, 1-Nov-19.
10. Enter Duration In Days. For example, 2.
11. The Expiry date is calculated as per contract type configuration. For example, 4-Nov-19.
12. Click Next. The Select Template page opens.
13. Select a template. For example, Purchase Template.
14. Click Next.
15. Click Create and Publish. The Purchase Agreement state becomes Draft.
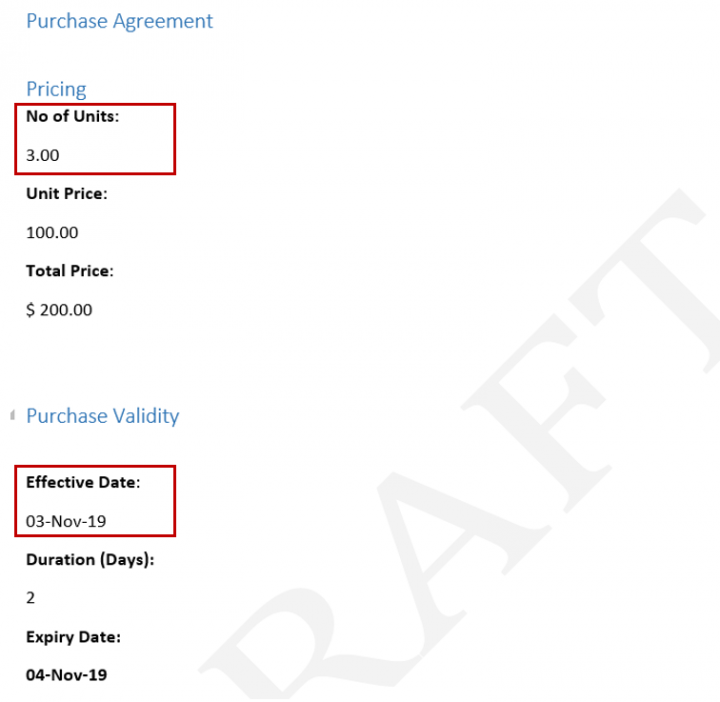
Now, change the tagged attribute values of No of Units to 3 and Effective Date to 03-Nov-19.
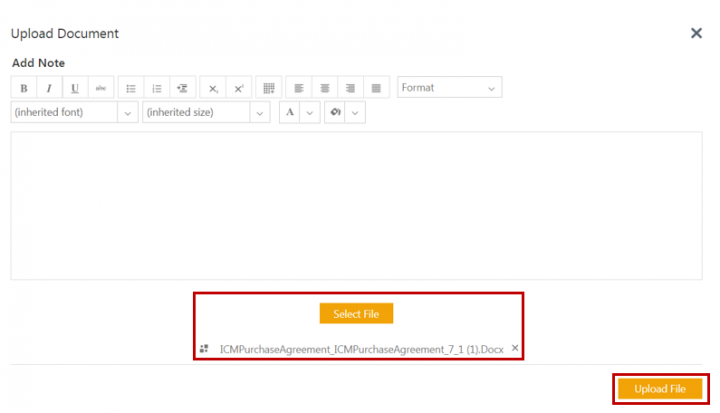
17. Click Save to save the Word document.
18. Click the Select File to select the updated document.
19. Click Upload File.
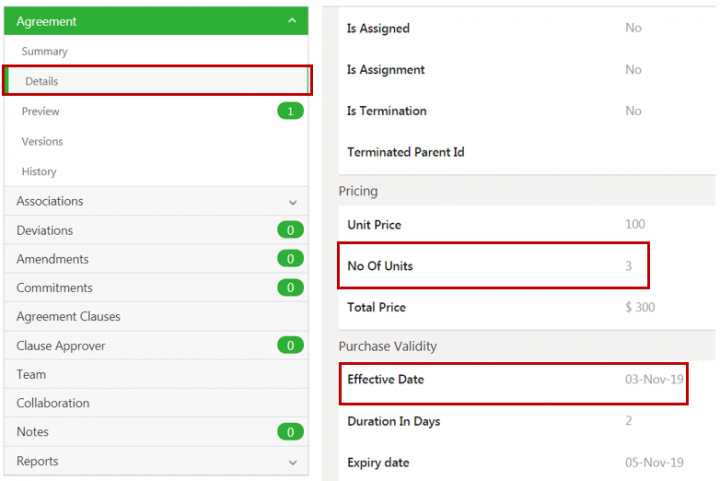
20. Click the Details tab. The attribute values of No Of Units and Effective Date are changed through reverse sync (from the Word Add-in to ICI) and also calculations are evaluated accordingly.
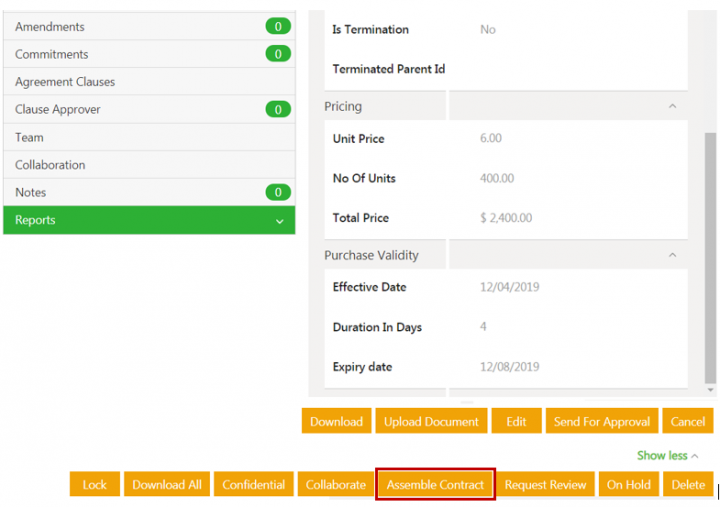
21. Click Assemble Contract to be able to view the updated values in the document.
Related Topics: Agreement Management | Configuration | Contract Type |Template Management
