| Line 325: | Line 325: | ||
<div class="image-green-border">[[File:7.12 Auto Attachment 5.png|720px|7.12 Auto Attachment 5.png]]</div> | <div class="image-green-border">[[File:7.12 Auto Attachment 5.png|720px|7.12 Auto Attachment 5.png]]</div> | ||
| | ||
| + | |||
=== Associating Standard Document Master with Associated Document Contract Type === | === Associating Standard Document Master with Associated Document Contract Type === | ||
| − | The attribute (Master Data Instance Reference Id) is added to the Associated Documents Contract Type to associate with the Standard Document Master. The Master Data Instance Reference Id is a script attribute that refers to the unique sysId of the Standard Document | + | The attribute (''Master Data Instance Reference Id'') is added to the ''Associated Documents Contract Type'' to associate with the ''Standard Document Master''. The ''Master Data Instance Reference Id ''is a script attribute that refers to the unique ''sysId ''of the ''Standard Document Masterdata.'' |
| − | To add the attribute to the Associations contract type: | + | To add the attribute to the ''Associations ''contract type: |
| − | #Click Configuration > Contract Types on the Home page. The Contract Types index page opens. | + | #'''Click '''''Configuration ''> ''Contract Types ''on the ''Home ''page. The ''Contract Types ''index page opens. |
| − | #Click View Record next to the association contract type you want to edit. The contract type Details page opens. | + | #'''Click '''''View Record icon ''next to the association contract type you want to edit. The contract type ''Details ''page opens. |
| − | #Click Edit. | + | #'''Click '''''Edit''. The ''Edit Contract Type ''page opens. |
| − | #Select and add Master Data Instance Reference Id to Selected Attribute. | + | #'''Select '''and '''add '''''Master Data Instance Reference Id'' to the ''Selected Attribute ''section''.'' |
| − | #Click Save. The Attribute added successfully message appears. | + | #'''Click '''''Save''. The ''Attribute added successfully'' message appears. |
| − | <div class="image-green-border">[[File:7.12 Auto Attachment 6.png|720px]]</div> <ol start="6"> | + | <div class="image-green-border">[[File:7.12 Auto Attachment 6.png|720px|7.12 Auto Attachment 6.png]]</div> <ol start="6"> |
| − | <li>Verify and | + | <li>'''Verify '''and '''click '''''Update''. The associated document contract type is updated.</li> |
</ol> | </ol> | ||
| | ||
| − | |||
=== Configuring a Rule for auto-attaching documents === | === Configuring a Rule for auto-attaching documents === | ||
Revision as of 15:16, 9 July 2020
Contents
- 1 Adding Supporting Documents to an Agreement
- 1.1 Ability to define parent-child relationship for peer associations
- 1.1.1 Configuring Contract Type to enable parent-child relationship for peer associations
- 1.1.2 Creating the single-linked associations for agreements
- 1.1.3 Creating the unidirectional associations for agreements
- 1.1.4 Creating the bidirectional associations for agreements
- 1.1.5 Creating the peer associations for amendments
- 1.1.6 Dissociating two-way linked associations
- 1.1.7 Copying the Agreement with selected associations
- 1.1.8 Configuring the contract type for inheritance
- 1.1.9 Creating agreements by inheriting the agreement
- 1.2 Auto-attachment of Associated documents
- 1.3 Tagging Saved Search of Associated documents in an Agreement
- 1.1 Ability to define parent-child relationship for peer associations
Adding Supporting Documents to an Agreement
You can add Associations and supporting documents to an Agreement after it is created. Supporting documents are not necessarily part of the agreement, but are used to capture miscellaneous details, like email threads, minutes of meetings, and so on. There are two types of associations:
- Peer to Peer: when an agreement is associated with another agreement or Masterdata. The peer associations can be in Executed, Waiting for Review and Reviewed states. This works only for the configured state(s).
- Parent to Child: when an agreement and its supporting documents are linked through associations that are defined in a contract type. Inheritance is possible only when the data type of attributes defined for Parent and child agreements are the same.
To add an Association:
1. Click the Agreement Management tile on My Dashboard. The Agreements Page opens.
2. Click the Details icon to view the details of the selected Agreement. The Agreement Details Page opens.
3. Click the Associations option in the left navigation to see a list of all associations that have been added to the agreement.
4. Click ![]() icon to add a peer to peer association. The Select Association page opens.
icon to add a peer to peer association. The Select Association page opens.
5. Select an appropriate association and then click Select. The selected Association gets added under theAssociation section with an incremented association number.
6. Click ![]() to add a parent to child association. The Create Associated Document dialog box opens with the parent agreement name on the right side of the page.
to add a parent to child association. The Create Associated Document dialog box opens with the parent agreement name on the right side of the page.
7. Type the appropriate information in the respective fields and click Create to create a child association for that agreement.
8. The Association gets added under the Association section with an incremented association number.
Two types of Masterdata must be created:,
* for Mapping: it will consist of Contract type, Associations, Event which is the state when you want the supporting document to get attach with the Agreement and the Smart Link saved search name.
* for Document Repository: it will consist of information such as Document Name, Effective date and Validity.
The Rule needs to be created for the Agreement to get the Supporting Documents auto attached at the predefined state.
Ability to define parent-child relationship for peer associations
ICM provides the functionality to attach associations to agreement entities. This functionality has now been enhanced with the ability to define the type of relationship (association) as Parent, Child or Peer.
With this release, agreements can have only one association as a parent and all existing related agreements will be tagged as peer associations.
Configuring Contract Type to enable parent-child relationship for peer associations
Users need to configure the contract type and define default associations to enable the parent child linkage for peer associations.
To set the associations in Contract Type:
- Click Configuration > Create Contract Type > Agreement on the Home page. The Select Contract Type page opens.
- Click Next. The Create Contract Type page opens.
- Enter the Contract Type Name. For example, PK_SOW.
- Enter remaining details on the Details tab.
- Click Next. The Attribute tab opens.
- Enter the details on the Attributes tab.
- Click Next. The Association tab opens.
- Click Add Association icon. The Add Association section is displayed.
- Add Association Name. For example, ICMPK_MSA.
- Select the Contract Type. For example, PK_MSA.
- Toggle the Multiple Instances field to Yes.
- Toggle the Allow two-way linkage field to Yes.
- Click Save. The association is added to the contract type.
- Enter the details on the Display Preference and Team tabs.
- Verify the details and click Create. The agreement contract type is created.
You can also edit and configure the associations in the existing agreement contract type.
Creating the single-linked associations for agreements
User can link the masterdata instance as an association to the agreement. In such case, the Linkage Type drop-down will not be displayed on the Lookup Search window and the association will be added as peer.
Note: The self-reference linkage is enabled through technical configuration.
To create the self-linked masterdata association for the agreement:
- Click Agreement Management > Agreement on the Home page. The agreement index page opens.
- Click View Record icon next to the contract type for which you want to create associations. For example, Icertis Statement of work (agreement created with PK_SOW contract type). The agreement Details page opens.
All the configured associations for the contract type will be visible by default on the left panel configuration under Associations tab on the agreement Details page.
- Click Create Associations icon next to the masterdata contract type for which you want to create the single-link association. For example, Product Masterdata. The Lookup Search window opens. All the masterdata instances for the selected masterdata contract type are displayed.
- Select the masterdata instance. For example, Ads Data Hub.
The linkage type field on the Lookup Search window is not visible while creating associations for masterdata and the associations are linked as Peer by default.
- Click Select. The masterdata will be linked to the agreement with the linkage type as Peer.
Creating the unidirectional associations for agreements
The Allow Two-Way Linkage field is set to No for the associations in the contract type to create the unidirectional associations.
To create the association for the agreement:
- Click Create Associations icon next to the contract type you want to link to the agreement. For example, Base CT (This association is configured with the two way linkage disabled at the contract type level).
The Lookup Search window opens. All the agreements for the selected contract type (Base CT) are displayed irrespective of their states.
- Select the agreement instance. For example, ICMBaseCT_5.
The association will not be allowed and the validation messages will be displayed if the user tries to:
- Relink the already associated agreement
- Link the parent agreement with its child agreement as peer association
- Link the same agreement to itself ( self-linking the agreement)
- Link more than one agreement with the linkage type as parent to the agreement
- Link the agreement as child which already has a parent association
For example, validation message is displayed when the user associates the agreement as child which already has parent:
- Select the Linkage Type as:
- Peer
- Parent
- Child
For example, Parent.
Note: the Linkage Type field is enabled through technical configuration.
- Click Select. The agreement will be associated with the linkage type as Parent.
- Click View Record icon next to the association. For example, ICMBaseCT_5. The association Details page opens. The original agreement (Icertis statement of work) will not be associated with the current agreement.
Creating the bidirectional associations for agreements
Users need to set the Allow Two-Way Linkage field to Yes for the associations in the contract type to create the bidirectional associations.
To create the association for the agreement:
- Click Create Associations icon next to the contract type you want to link to the agreement. For example, PK_MSA. The Lookup Search window opens. All the agreements for the selected contract type are displayed irrespective of their states.
- Select the agreement instance. For example, ICMPK_MSA_18.
- Select the Linkage Type. For example, Parent.
- Click Select. The agreement will be associated with the linkage type as Parent.
- Click View Record icon next to the association created. For example, ICMPK_MSA_18. The association Details page opens. The original agreement (Icertis Statement of work) will be displayed with the linkage type as child on the association grid of the current agreement.
Note:
- When associations are linked with linkage type as peer, both linked agreements will be displayed on the respective association grids with the linkage type as peer.
- Users can modify the existing linkage type of associations.
Creating the peer associations for amendments
To create the association for the amendment:
- Click Agreement Management > Agreement on the Home page. The agreement index page opens.
- Click View Record icon next to the amendment for which you want to create associations. For example, Icertis SOW Amendment. The amendment Details page opens.
- Click Create Associations icon next to the contract type you want to link to the agreement. For example, PK_MSA. The Lookup Search window opens. All the agreements for the selected contract type are displayed.
- Select the agreement instance. For example, ICMPK_MSA_17.
- Click Select. The agreement will be associated with the linkage type as peer.
When the amendment is created for the agreement, all associations from parent agreement will be copied to the amendment with the relation type as peer.
Dissociating two-way linked associations
In case of two-way linkage, if one of the association is dissociated, it will be removed in the other associated agreement as well.
To dissociate the association for SOW agreement:
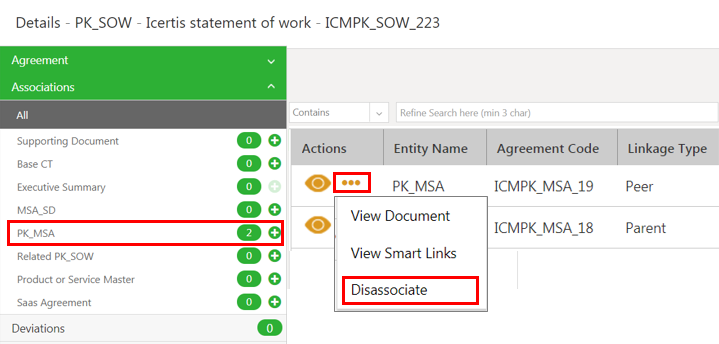
- Click on the Associations you want view on the left panel configuration on the agreement Details page. For example, PK_MSA. The association grid opens.
- Click on the three dots next to the agreement you want to disassociate. For example, ICMPK_MSA_19. The action drop-down opens.
- Select Disassociate. The confirmation window is displayed.
- Click Yes. The association will be removed from the agreement.
When user dissociates the association in the agreement, the association is removed from the linked (parent/child or peer) association as well for two-way linkage type. For example, ICMPK_SOW_223 is removed from ICMPK_MSA_19.
Copying the Agreement with selected associations
User can copy the existing agreement and create a new copy with Copy Record functionality.
To copy the agreement:
- Click Agreement Management > Agreement on the Home page. The agreement index page opens.
- Click View Record icon next to the agreement for which you want to create a copy. For example, Icertis Statement of Work (agreement created with PK_SOW contract type). The agreement Details page opens.
- Click Copy Record action icon.
The agreement will be copied if its associations are of peer and parent linkage type. The agreement with associations with linkage type as child cannot be copied and the validation error is displayed.
For example, the agreement Icertis Statement of Work has the association ICMPK_MSA_20 with linkage type as child, so the agreement cannot be copied.
The validation message is displayed.
Configuring the contract type for inheritance
Users can configure the contract type to associate and inherit all its attributes while creating the agreement. User need to set the attributes as global and there Is_inherited property to Yes at contract type level to enable the inheritance of the agreement.
To set the attribute properties in agreement contract type:
- Click Configuration > Create Contract Type > Agreement on the Home page. The Select Contract Type page opens.
- Click Next. The Create Contract Type page opens.
- Enter the Contract Type Name. For example, ICMPK_MSA.
- Enter remaining details on Details tab.
- Select the attribute you want to localize. For example, GS_Mobile_Company.
- Toggle On theIs_inherited field.
- Click Save. The Attribute updated successfully message is displayed. The Association tab opens.
- Click Next. The Association page opens.
- Enter details in the Association, Display Preference and Team tabs.
- Verify and click Create. The agreement contract type is created.
Similarly, configure the contract type which inherits thisICMPK_MSA contract type.
- Click Configuration > Create Contract Type > Agreement > Next on the Home page. The Select Contract Type page opens.
- Click Next. The Create Contract Type page opens.
- Enter the Contract Type Name. For example, PK_SOW.
- Enter remaining details on the Details and Attributes tab.
- Click Next. The Association page opens.
- Select the association you want to inherit. For example, ICMPK_MSA.
- Toggle the Allow Inheritance field to Yes.
- Click Save. The association is added to the contract type.
- Enter details in the Display Preference and Team tabs.
- Verify and click Create. The agreement contract type is created.
You can edit and configure the existing agreement contract type to allow the inheritance.
Creating agreements by inheriting the agreement
- Click Agreement Management > Create Agreement on the Dashboard. The Create Agreement page opens.
- Select the Contract Type. For example, PK_SOW.
- Click Next. The Attributes page opens.
- Click Inherit action icon next to the contract type you want to inherit in Associate and Inherit field. For example, PK_MSA. The Lookup Search window opens. The agreement instances of the selected contract type are displayed.
- Select the agreement instance. For example, statement of work.
- Click Select. The agreement will be inherited into the agreement you are creating.
The attributes in the parent agreement with Is_Inherit property set to yes will be inherited in the current agreement.
- Click Next. The Select Template page opens.
- Select the template and click Next. The Verify page opens.
- Verify and click Create and Publish. The agreement will be created.
The inherited agreement will be associated with the current agreement with the linkage type as peer and displayed on the association grid of the agreement.
For example, the inherited agreement ICMPK_MSA_20 is associated with the current agreement ICMPK_SOW_225 as Peer.
Auto-attachment of Associated documents
As part of RFQ creation process, users need to add several documents as mandatory attachments to RFQs that may not change frequently. Previously, users had to attach multiple such documents manually to every RFQ which was a tedious and time consuming process.
ICM now has simplified the process by allowing users to attach predefined standard documents automatically to agreement / amendment based on defined event rules.
Users can now:
- Maintain a repository of standard documents in masterdata.
- Define global saved searches of standard documents masterdata instances
- Define event rules using global saved search and association name to trigger the auto-attachment process.
Configuring masterdata (Standard Document Master) to store attachments
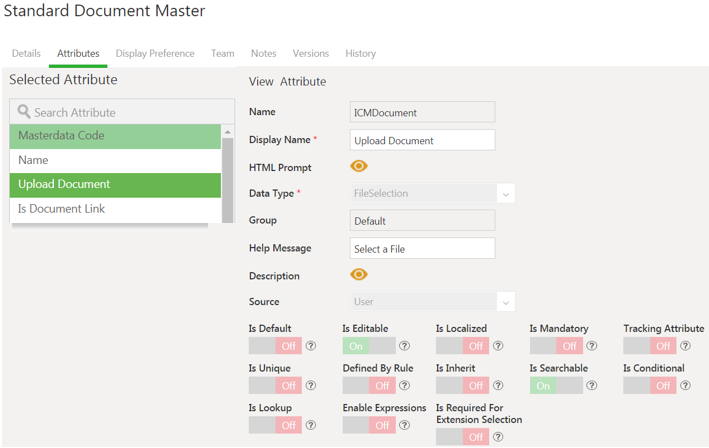
The Standard Document Master stores the documents to attach to an agreement based on the configured event rule. This Standard Document Master is a seeded masterdata with defined attributes for uploading the documents to the masterdata instance.
- Upload Document: File Selection attribute to upload a document to the masterdata.
- Is Document Link: The Boolean attribute to decide whether the copy of the document is created for attachment. When the Is Document Link attribute is set to No, then the new copy of the document will be created each time to associate with the agreement. When the Is Document Link is Yes, then the original copy of the document created from masterdata for the first time to associate will be linked to the agreement.
Administrators can edit and add additional attributes to the existing Standard Document Master as per the business requirements.
To add attributes to masterdata contract type:
- Click Configuration > Contract Type on the Home page. The Contract Type index page opens.
- Click View Record icon next to the Standard Document Master. The masterdata Details page opens.
- Add attributes on Attributes tab and click Save. The Attributes saved successfully message appears.
- Click Next.
- Verify the details and click Update. The Masterdata Contract Type (Standard Document Master) is updated with additional attributes.
Storing attachments in masterdata instances
Users can upload files for auto-attachment by creating instances of the Standard Documents Master.
To create masterdata instances:
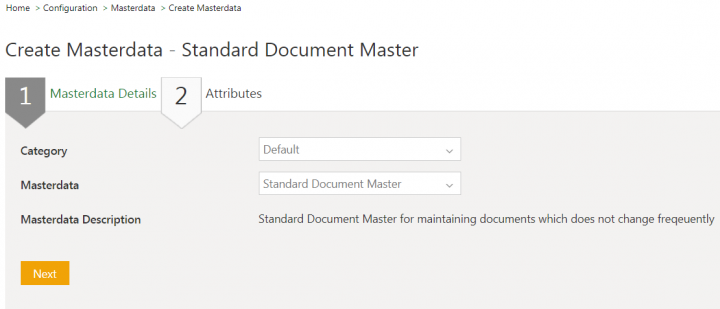
- Click Configuration > Masterdata > Create Masterdata on the Home page. The Create Masterdata page opens.
- Select Standard Document Master in Masterdata field on the Masterdata Details tab.
- Click Next. The Attributes tab opens.
- Click Select File. The window to browse a file opens.
- Select the file and click Open. For example, file Standard Association.pdf.
- Click Upload File. The file is uploaded to the Standard Document Master.
- Toggle Is Document Link to Yes / No as per the requirement.
- Enter the details in the remaining fields.
- Click Save. The Standard Document Master instance is created with uploaded file.
You can edit Standard Document Master to add, delete or modify stored documents.
Click Remove to delete the existing file in the Standard Document Master.
Create a global saved search using Standard Document Master
Administrators can create a global saved search using Standard Document Master instances as auto-attached documents through Save Search functionality.
For example, the SearchAutoAttachment search is saved as global search.
Associating Standard Document Master with Associated Document Contract Type
The attribute (Master Data Instance Reference Id) is added to the Associated Documents Contract Type to associate with the Standard Document Master. The Master Data Instance Reference Id is a script attribute that refers to the unique sysId of the Standard Document Masterdata.
To add the attribute to the Associations contract type:
- Click Configuration > Contract Types on the Home page. The Contract Types index page opens.
- Click View Record icon next to the association contract type you want to edit. The contract type Details page opens.
- Click Edit. The Edit Contract Type page opens.
- Select and add Master Data Instance Reference Id to the Selected Attribute section.
- Click Save. The Attribute added successfully message appears.
- Verify and click Update. The associated document contract type is updated.
Configuring a Rule for auto-attaching documents
Users can configure the Event Rule for Agreements and Amendments to attach standard documents automatically when certain actions such as Create, Publish and Update occur. The rule is configured using association name and standard document saved search.
To configure an event rule for agreement:
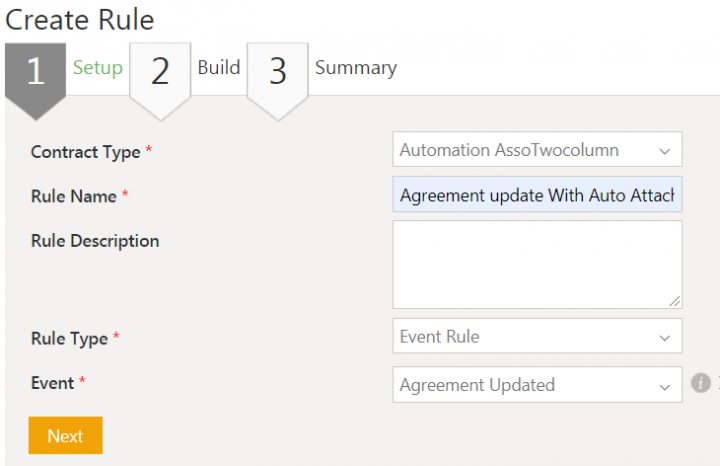
- Click Configuration > Rule > Create Rule on the Home page. The Setup tab on Create Rules page opens.
- Select the Contract Type for which you want to create a rule. For example, Automation AssoTwoColumn.
- Enter the unique name in the Rule Name field. For example, Agreement update With Auto Attachment.
- Select Event Rule in the Rule Type.
- Select type of event in Event field. For example, Agreement Updated.
- Click Next. The Build tab opens.
- Click Builder tab. The page to configure a rule opens.
- Click Add Rule. The Add Rule section opens.
- Enter Conditions.
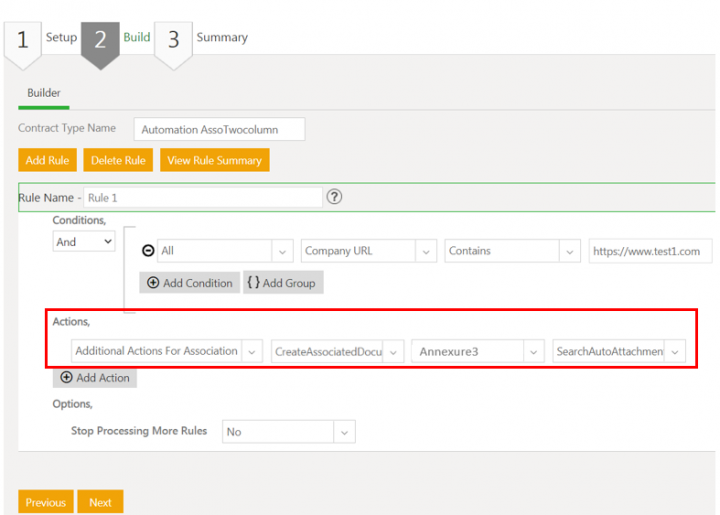
- Select Additional Actions for Associations in first drop-down in Actions field.
- Select CreateAssociatedDocumentInstancesEventHook in next drop-down.
Note: The option CreateAssociatedDocumentInstancesEventHook is enabled through technical configuration.
- Select the Associated Document Contract Type from which you want to auto-attach the documents in next drop-down. For example, Annexure3.
Note: Associated Document Contract types that are in a parent-child relationship with the selected Agreement Contract Type will only be available in the drop-down. Also the Associated Document Contract types which have document assembly and mandatory attributes will not be available.
- Select the saved search name in the next drop-down. For example, SearchAutoAttachment.
- Select No in Stop Processing More Rules field. The further evaluation of rules within a ruleset continues.
- Click Validate. The page to validate the rule by entering attributes values of the selected Contract Type opens.
- Click Next. The rule Summary tab opens.
- Click Create. The Rule created successfully message appears. The rule is displayed in the list of Rules of the selected contract type.
Auto-Attaching documents to the agreement
Documents will be attached to the agreement under selected associations automatically as per the configured event rule.
To auto-attach documents to the agreement when the agreement is updated:
- Click Agreement Management > Agreement on the Home page. The agreement index page opens.
- Click View Record next to the agreement to open. For example, agreement AutomationAssoTwocolumn_382. The agreement Details page opens.
- Click Edit. The Edit Agreement page opens.
- Edit desired fields.
- Click Update. The agreement is updated.
When the agreement is updated, event rule Agreement update With Auto Attachment will be evaluated. The three associations will be created for Annexure3 as per the saved search SearchAutoAttachment.
- Modify the saved search SearchAutoAttachment to have two more documents PDF File1 and PNG File1 and remove a document DOT File1.
- Dissociate the document PPT File1 on Annexure3 details page from the agreement.
The agreement ICMAutomationAssoTwocolumn_382 will now have two auto-attached documents.
- Update the agreement again and the event rule Agreement update With Auto Attachment will also be evaluated again. The agreement will now have five attachments in Annexure3 associations.
- New documents PDF File1 and PNG File1 will be attached to the agreement.
- Existing attachment JPEG File1 will not be duplicated.
- Existing attachment DOT File1 will not be removed from agreement’s associations even if it is removed from saved search.
- The deleted association PPT File1 from the agreement will be attached again with the current metadata from masterdata.
The documents will be attached to agreements when the certain event occurs as per the criteria:
- The existing attached documents will not be modified or duplicated.
- The missing / manually deleted attachment will be attached again to the agreement with its latest version from the masterdata.
- Any additional document present in the Saved Search will be attached to the existing documents of the agreement.
Tagging Saved Search of Associated documents in an Agreement
There are two ways to add an Associated document Saved search to an Agreement.
- Adding the Saved search tag to the Template
- Adding the Saved search tag to the Agreement document
Note: A Saved Search needs to be created in ICM of the required association data.
To tag Associated Document Saved Search:
You can add the rich text content control to tag the saved search in the Template or Agreement document using Word:
1. Select the Plain Text Content Control from the Developer menu.
2. Click Properties. TheContent Control Prpoerties winow opens.
3. Enter the Title and tag as ICMAssociation|AssociatedSavedSearchName. For example, ICMAssociation|Country Master.
4. Click Ok. The Saved Search is now tagged in the Template/Agreement document in the form of a table.
Note: This template is uploaded in ICM to be available while creating a document. The Saved Search is visible after assembling the contract.
Upon publishing the Agreement you can add more instances to the Associated document Saved Search in the Agreement document from the Agreement's Details page:
1. Click the Associations tab on the Agreement's Details page.
2. Click the Create Association icon in the Associations tab. The Create Association page opens.
3. Enter the necessary details on the Meta Data tab. For example, Name, Contract Value.
4. Click Next. The Templates tab opens.
4. Select the appropriate template.
5. Click Create. The association instance is added. The Agreement's Details page opens. The number next to the association is updated in the Associations tab.Erlier there were 2 instances of the associations and now there are 3.
6. Click the Assemble Contract button on the Details page. The newly added instance get's updated in the Agreement document.
Note: The Associated document saved search instances can also be updated in the document by Edit and Update actions.
Related Topics: Agreement Details Page | Association Management | Saved Searches


