| Line 570: | Line 570: | ||
<div class="image-green-border"> </div> <div class="image-green-border">Template Variables are the Attributes specific to the Agreement Template. The Template Variable tab is enabled only if the Template Variables are added to the Agreement Template in ICI Web when creating or editing.<br/> To tag Template Variables:<br/> 1. '''Click''' the Template Variable tab. A list of all the available Template Variables is displayed.<br/> 2. '''Select''' the Display Tagged Template Variables checkbox to view already added tags.<br/> 3. '''Enter''' a search criterion in the Search variable by name box to search a specific variable.<br/> 4. '''Click''' the corresponding [[File:Scribe-vertical icomn.PNG|RTENOTITLE]] icon, then click Add to add the tag of the variable. The count is updated denoting the number of tags present in the document.</div> <div class="image-green-border"><br/> 5. '''Click''' ''Identify''. The ''Identify Template Variable'' window opens. <br/> 6. '''Select''' the ''Language'',''date format'',''and date''.<br/> 7. '''Click''' the ''Identify ''button. The changes you made to the Template Variable are synced back to ICI Web.</div> <div class="image-green-border"> </div> <div class="note-box">'''Note''': The process of identifying a Template variable may slightly vary depending upon the variable.</div> <div class="image-green-border"><br/> 8. '''Click''' ''Remove'' to remove one or more tags.</div> | <div class="image-green-border"> </div> <div class="image-green-border">Template Variables are the Attributes specific to the Agreement Template. The Template Variable tab is enabled only if the Template Variables are added to the Agreement Template in ICI Web when creating or editing.<br/> To tag Template Variables:<br/> 1. '''Click''' the Template Variable tab. A list of all the available Template Variables is displayed.<br/> 2. '''Select''' the Display Tagged Template Variables checkbox to view already added tags.<br/> 3. '''Enter''' a search criterion in the Search variable by name box to search a specific variable.<br/> 4. '''Click''' the corresponding [[File:Scribe-vertical icomn.PNG|RTENOTITLE]] icon, then click Add to add the tag of the variable. The count is updated denoting the number of tags present in the document.</div> <div class="image-green-border"><br/> 5. '''Click''' ''Identify''. The ''Identify Template Variable'' window opens. <br/> 6. '''Select''' the ''Language'',''date format'',''and date''.<br/> 7. '''Click''' the ''Identify ''button. The changes you made to the Template Variable are synced back to ICI Web.</div> <div class="image-green-border"> </div> <div class="note-box">'''Note''': The process of identifying a Template variable may slightly vary depending upon the variable.</div> <div class="image-green-border"><br/> 8. '''Click''' ''Remove'' to remove one or more tags.</div> | ||
| | ||
| + | |||
===== Viewing Agreement Clauses ===== | ===== Viewing Agreement Clauses ===== | ||
| − | <div class="image-green-border"> </div> <div class="image-green-border">Agreement Clauses are the used Clauses in the Agreement.</div> <div class="image-green-border"><br/> To view the Agreement Clauses:</div> | + | <div class="image-green-border"> </div> <div class="image-green-border">Agreement Clauses are the used Clauses in the Agreement.</div> <div class="image-green-border"><br/> To view the Agreement Clauses:</div> <div class="image-green-border">1. '''Click '''''Edit Agreement''. The options to view and edit agreement components opens.</div> <div class="image-green-border"> </div> <div class="image-green-border">[[File:7.15 514643 1.png|720px]]</div> <div class="image-green-border"> </div> <div class="image-green-border">2. '''Click''' ''View Clause''. The page to view and edit agreement clauses opens.</div> <div class="image-green-border"> </div> <div class="image-green-border">[[File:7.15 514643 2.png|720px]]</div> <div class="image-green-border"> </div> |
| − | + | 3. '''Click''' the ''Agreement Clauses'' tab. A list of all the ''Agreement Clauses'' is displayed. | |
| − | + | ||
| − | + | The Clauses are displayed in the same order as they are tagged inside the agreement. For example, ''Use'' ''Rights Clause'' is displayed first in a list as it is the first clause tagged in the document. Then the ''Instance'' ''Rights Clause'' is displayed second, ''Application Use Rights Clause'' is displayed third and ''License Terms'' is displayed fourth as per their tagging order in the document. The page displays first 30 clauses in the list. | |
| − | <div class="image-green-border"> | + | |
| − | + | 4. '''Click '''previous and next action arrows to display and navigate through the sets of 30 clauses. | |
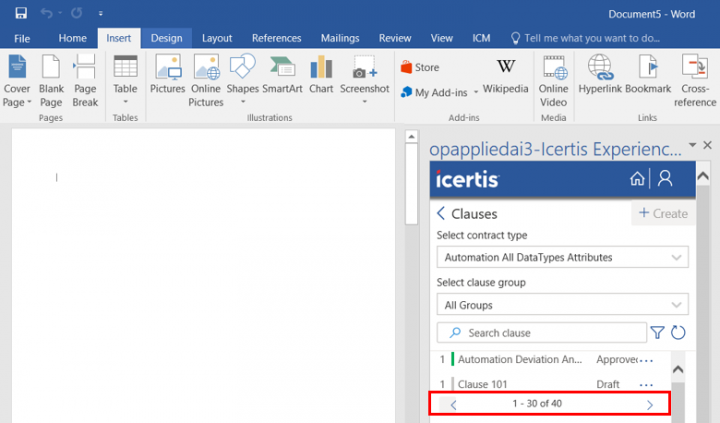
| − | < | + | <div class="image-green-border">[[File:7.15 514643 3.png|720px]]</div> <div class="image-green-border"> </div> <div class="image-green-border">5. '''Enter '''a search criteria in the ''Search Clause'' ''by name'' box to search for a specific Clause.</div> <div class="image-green-border">6. '''Click''' the ''Refresh/Reload'' list icon to view the updated list. This feature enables multiple users to work on an entity at the same time using Icertis Experience for Word as well as ICI Web without having to lose any updates. It also helps to view the updated count of the entity, since the count may not refresh automatically. </div> <div class="image-green-border">7. '''Click''' the ''Delete'' icon to delete a Clause from the document.</div> <div class="image-green-border">8.'''Click''' the ''Search'' icon to search a Clause in the document.</div> <div class="image-green-border"> </div> |
| − | < | + | |
| − | + | ||
| − | <div class="image-green-border"> </div> | + | |
===== Viewing Deviations ===== | ===== Viewing Deviations ===== | ||
Revision as of 10:14, 27 January 2021
Contents
- 1 Icertis Experience for Word
- 1.1 Prerequisites and System Requirements
- 1.2 Setting up Icertis Experience for Word
- 1.3 Logging on to Icertis Experience for Word
- 1.4 Basic Guidelines
- 1.5 Managing Access Privileges for using Icertis Experience for Word
- 1.6 Using Icertis Experience for Word
- 1.7 Working with Agreements
- 1.7.1 Discovering Attributes and Clauses
- 1.7.2 Document Usability with Content Control tagging in Clauses
- 1.7.3 Creating a Rule
- 1.7.4 Finding Similar Clauses
- 1.7.5 Finding Similar Agreements
- 1.7.6 Viewing Existing Agreements
- 1.7.6.1 Editing an Agreement
- 1.7.6.2 Using Agreement Operation/Actions
- 1.7.6.3 Triggering AI discovery manually
- 1.7.6.4 Using Library
- 1.7.6.5 Using Design Preview
- 1.7.7 Publishing an Agreement
- 1.8 Working with Templates
- 1.9 Working with Clauses
- 1.10 Activity-wise Differentiation of Using Icertis Experience for Word (.JS Word Add-in) and ICI Web
- 1.11 Troubleshooting
Icertis Experience for Word
Prerequisites and System Requirements
Download the installer for the Icertis Experience for Word on your local machine. Your IT Administrator can get the version details from Icertis Support.
The minimum system requirements for Icertis Experience for Word are:
- macOS Catalina 10.15.4 or later
- Windows 10 (1909 OS Build 18363.836)
- Microsoft Office 2016 for Desktop
- Build 16.0.4390.1000 or later
- Office 365 (Desktop)
- Version 1612 (Build 7668.1000) or later for Windows 10
- 15.32 or later for macOS Catalina
- The Icertis Experience for Word installation (manifest) file
- Browser support:
- Microsoft Internet Explorer version 11 or later
- Microsoft Edge 83
- macOS Safari 13.1
- Google Chrome 83
Setting up Icertis Experience for Word
This section describes the process of setting up Icertis Experience for Word, both on macOS and Microsoft Windows.
Icertis Experience for Word can be deployed in two ways:
- Centralized deployment: For this method, refer guidelines published by Microsoft : https://docs.microsoft.com/en-us/office/dev/add-ins/publish/centralized-deployment.
- Local deployment
Setting up Icertis Experience for Word on macOS
This section describes the process of setting up Icertis Experience for Word on macOS and Microsoft Windows locally.
To install ICI Experience for Word:
1. Obtain the ICI Experience for Word manifest file.
2. Close all Microsoft Word instances.
3. Remove cache from following folder: /Users/<username>~/Library/Containers/osfMicrosoft.com/Data
4. Click Go on your desktop and then select the Go to Folder.
5. Copy the following path in the field:
/Users/<username>/Library/Containers/com.microsoft.Word/Data/Documents/wef
6. Copy the ICI Experience for Word installation file (.xml extension) into the wef folder. Once the file is placed on the wef folder, do not modify it manually. Contact ICI support for modifying the installation file.
7. Launch Microsoft Word 2016.
8. Click the Insert tab.
9. Click the My Add-ins drop-down. Select the Icertis Experience for Word icon from the drop-down to enable it on the Home tab.
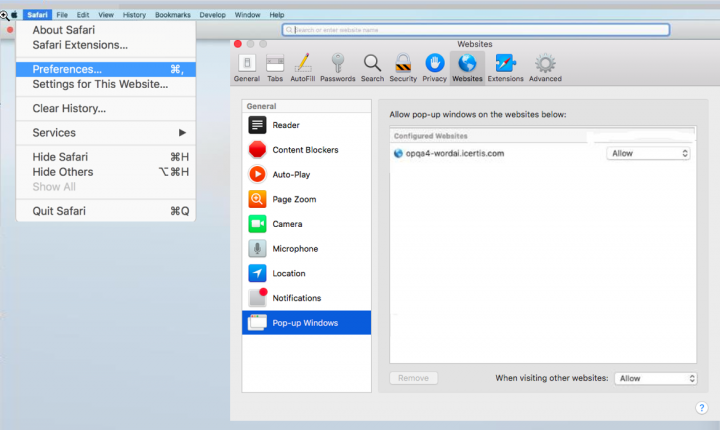
Additionally, ensure the following settings are enabled while using Icertis Experience for Word on macOS:
Setting up Icertis Experience for Word on Microsoft Windows
1. Create a new folder on your C: drive. You can name it as per your preferences, such as Icertis Experience for Word. If you are using a shared machine and want other users to be able to use Icertis Experience for Word on it, share this folder as follows:
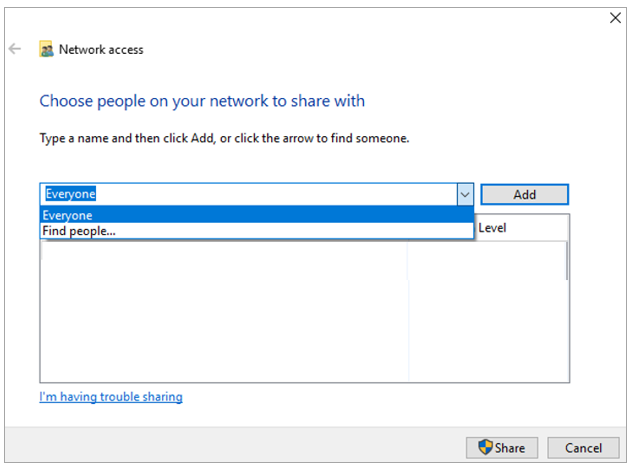
- Right-click the folder and select Give access to, and then Specific People. The File Sharing window opens.
- Share the folder either with Everyone or yourself:
- Select Everyone from the drop-down and click Add, if you want anyone using this system to be able to use the Icertis Experience for Word. Click Share to display the URL (Web address) below the folder you created. This URL will be required later in the process.
- Select Everyone from the drop-down and click Add, if you want anyone using this system to be able to use the Icertis Experience for Word. Click Share to display the URL (Web address) below the folder you created. This URL will be required later in the process.
2. Copy the manifest file provided to you in this folder.
3. Copy steps 5 to 9 in any text-editing tool, such as Notepad, before proceeding to the next steps.
4. Open a new document in Microsoft Word.
5. Click File menu and then click Options to open the Word Options window.
6. Click Trust Center to view the Trusted Center Settings.
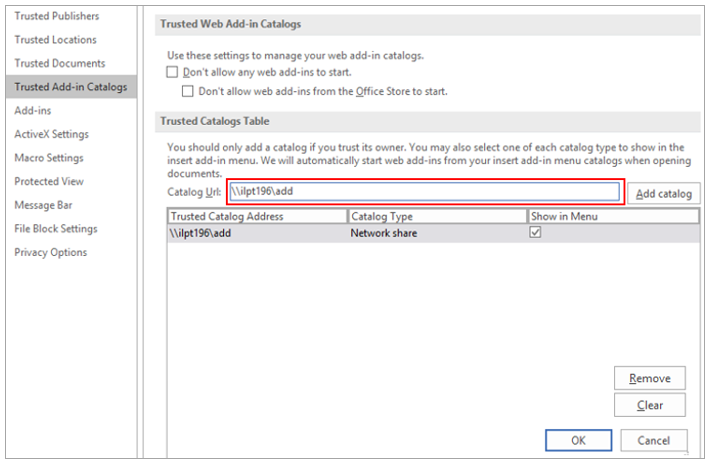
7. Click Trusted Add-in Catalogs, and then in the Catalog URL field.
8. Enter the complete network path to the shared folder that you created.
9. Click Add Catalog. The added network path is displayed under Trusted Catalog Address column in the table as shown below.
10. Select the checkbox under the Show in Menu. The option to add the Icertis Experience for Word icon on the Microsoft Word ribbon is displayed.
11. Click OK to save and close the Trusted Web Add-in Catalogs window.
12. Click OK to close the Trust Center window.
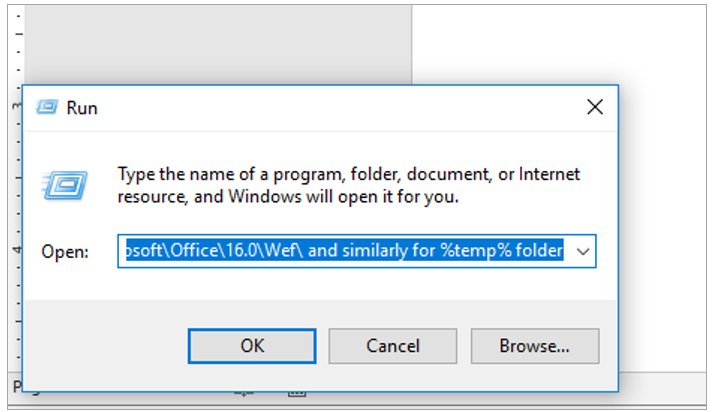
13. Clear all the files from %LOCALAPPDATA%\Microsoft\Office\16.0\Wef\ and similarly for %temp% folder.
14. Open Windows Internet Explorer, Press Ctrl + Shift + Delete.
15. Click Delete to clear cache.
16. Restart Microsoft Word for your changes to take effect.
17. Click the Insert tab.
18. Click My Add-ins in the Add-ins group.
19. Click the SHARED FOLDER tab, and then click the Icertis Experience for Word icon.
20. Click Insert to insert the Icertis Experience for Word to the Microsoft Word document.
Logging on to Icertis Experience for Word
- Open a new Microsoft Word document.
- Click the Icertis Experience for Word icon on the Home tab. A default Login browser window opens.
- Enter the ICI username and password.
- Click Sign in. You are now logged in to Icertis Experience for Word and can access the add-in’s dashboard.
Basic Guidelines
Here are some helpful tips to have a better experience with Icertis Experience for Word:
- Reload Icertis Experience for Word every time your system goes into Sleep mode or you are not using Icertis Experience for Word for a long time.
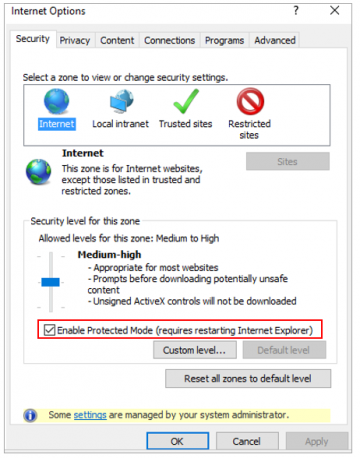
- Clear System cache before loading Icertis Experience for Word for better performance or if you hit any blocker as mentioned in previous section.
- Icertis Experience for Word is a Web client application, so you may face some glitches while accessing it for the first time as Office.JS creates primary folders in the backend and it is normal behavior. Icertis Experience for Word will work as expected once it is completely set.
Managing Access Privileges for using Icertis Experience for Word
Each ICI user plays a specific role in the Agreement workflow. An Administrator assigns roles, and they can be customized as per the business requirements.
You can provide complete access to creating, editing and removing Templates and Clauses from either Icertis Experience for Word or the ICI user interface. This is achieved by managing privileges of entities such as Agreements, Clauses and Contract Types for the selected Security Group from ICI. You can also set the Org Path for specific Security Group users to Root Level.
To manage access privileges for an ICI user:
1. Click User Administration on the Dashboard.
2. Click Users. The list of currently set up users is displayed on the Users page.
3. Click the View Record icon to display the selected user record.
4. Click the Edit button. The Edit User page opens.
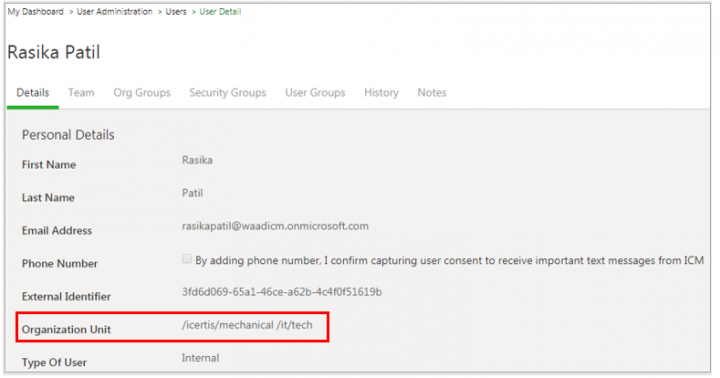
5. Click the Organization Unit icon to set the Org Path. The Select Organization Unit page opens.
6. Set the Org Path to Root.
7. Click Ok.
8. Click User Administration on the Dashboard.
9. Click Security Groups. The list of current Security Group settings is displayed on the Security Group Details page.
10. Click the View Record icon for the settings that you want to change. The Security Group details page opens. Use Configuration Admins as the Security Group.
11. Click the Edit button, and then click the Privileges tab.
12. Click the radio button under the Manage column for Template and Clause entities to provide the user complete access to Clauses and Templates.
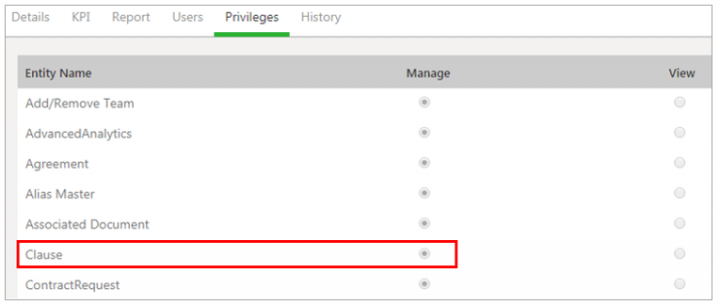
13. Click the radio button under the View column giving users viewing privileges to only view Clause and Template; they will not be able to edit and make any changes to a Clause or Template.
14. Click the radio button under the None column to prevent the user from accessing Clause and Template.
15. Click Next. The Verify page opens.
16. Click Previous to go back and make changes on the Privileges page, if required.
17. Click the Update button to update and save your changes to the Security Group.
Using Icertis Experience for Word
You can use Icertis Experience for Word to create and edit ICI and third-party agreement documents.
- Log on to Icertis Experience for Word, the dashboard displays the actions you can perform using the add-in.
If you open a third-party agreement or a blank document and log in to the plug-in, the Looks like you are editing a non-ICI document, do you want to continue? message will be displayed.
- Click Yes. The Select Contract Type drop-down is displayed.
- Select the contract type of your choice, for example, MSA. The Edit Agreement page opens.
- Click No to be redirected to the Dashboard page.
The Dashboard page displays the following options:
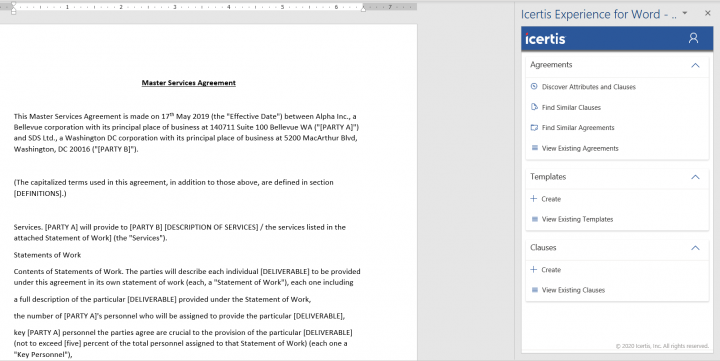
- Discover Attributes and Clauses
- Find Similar Clauses
- Find Similar Agreements
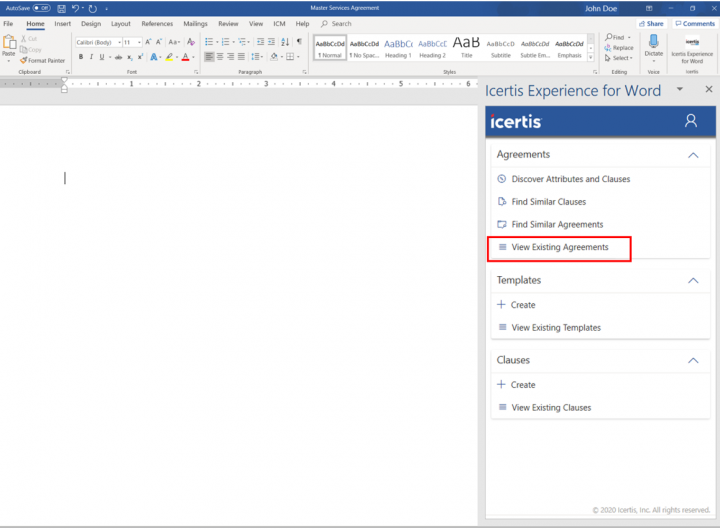
- View Existing Agreements: Click to view and edit existing agreements in ICI.
- Create Template: Click to start creating a new Template. A Template contains Clauses, Attributes, Associations, and Signatories. There are two types of Attributes:
- Contract Type Attributes: These Attributes are Contract Type-specific and can be tagged within the Template.
- Template Variables: These Attributes are Template specific.
- View Existing Templates: Click to view and edit existing Templates.
- Create Clause: Click to create a Clause in Icertis Experience for Word.
- View Existing Clauses: Click to view and edit existing Clauses.
- User Details: Displays details such as username, email ID, link to the Help section, About Icertis Experience for Word, Version and so on.
- Help: Click the Help icon to access ICI Help.
- Visit ICI: Click Visit ICI to get redirected to ICI Web UI.
- Logout: Click the Logout icon to log out of Icertis Experience for Word.
Working with Agreements
Using Icertis Experience for Word, you can perform the below tasks for agreements:
- Discover Attributes and Clauses
- Find Similar Clauses
- Find Similar Agreements
- View Existing Agreements
Discovering Attributes and Clauses
When you initiate the discovery process using the Icertis Experience for Word, the system triggers the discovery of attributes and clauses for both - own and third party type of paper. However, only non-tagged attributes and clauses are discovered. If a clause from the ICI Clause Library is already tagged in the agreement document, it will not be discovered during the process again.
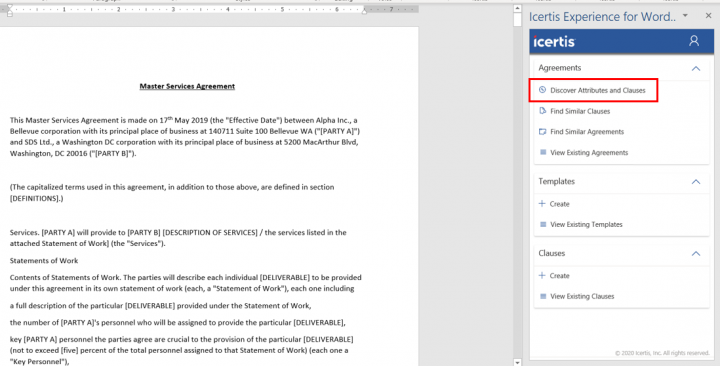
To use the attributes and clause discovery features in Icertis Experience for Word:
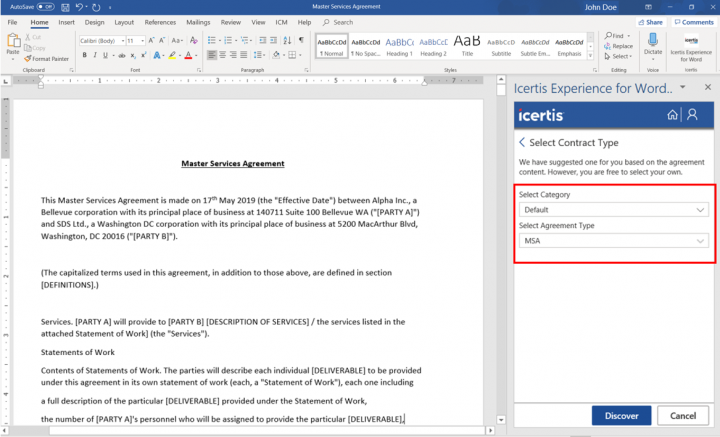
- Click Discover Attributes and Clauses.
- Select the Category and Agreement Type.
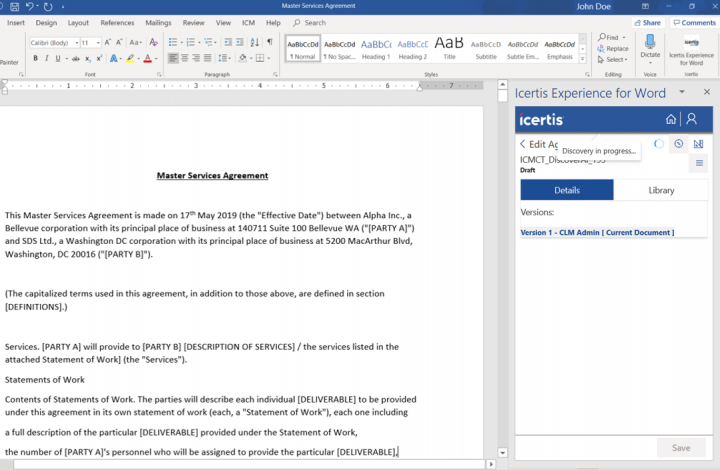
- Click Discover. The Discovery in progress… loading icon is displayed while the Clauses are being discovered and the Attributes are being identified to tag them to the Imported Agreements automatically.
The Review Agreement Discovery Now message appears.
Agreement Clauses
- Click the AI Discovered tab to review and select from the discovered clauses.
The blue bars next to the clause category names indicate the discovery confidence level (High, Medium, Low) of the discovered clauses.
- Click the dots to display the actions that can be taken on the clauses, such as Select Matched Clause, Find Similar Clause, Ignore Clause and Remove Identification.
- Click the clause to see the location on the document.
The following actions can be taken on selected Clause:
- Click Select Matched Clause. The actions available on the matched clause are displayed: Compare, Confirm with deviation, Confirm, Review Later and Replace Clause.
- Click Compare to compare the clause based on the match from the Clause Library.
- Click Confirm with deviation if you want to track the clause deviations.
- Click Review Later if you are unsure and want to review a clause later.
- Click Replace Clause if you want to replace the clause with another one.
Sort the Search by:
- Document Order
- Category Order
- Click SAVE to save your work in the Draft status.
- Click PUBLISH. A new agreement is created, and the clauses will be displayed on the Clauses tab on the agreement Details page. The remaining workflow continues as expected.
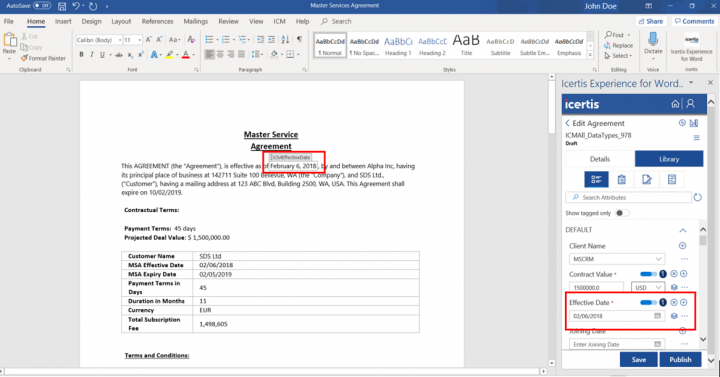
- Click the Show tagged only toggle to review and select from the detected attributes.
All the discovered attributes (such as Contract Value, Effective Date, Expiry Date and so on) are displayed as shown in the screenshot below. The Contract Value is present with the supported currencies. The grouping of attributes is based on the grouping preferences applied at the time of Contract Type creation.
The blue bars next to the attributes indicate the discovery confidence level of each attribute. The number next to a blue bar indicates the number of times the attribute is present in the document.
- Click the attribute name to see the location on the document.
- Click the dots to display the actions that can be taken, such as Ignore Attribute and Identify Attribute.
- Identify Attribute: Select this to assign selected text as a value of the attribute
- Ignore Attribute: Select this to ignore the discovered attribute
- Click the Show Matched icon to view the additional attribute value options discovered by AI.
- Edit the attributes as required. For example, you can select an External Signatory or change the Effective Date/Expiry Date.
- Click PUBLISH. This checks for any validation error in mandatory and invalid attribute values.
Document Usability with Content Control tagging in Clauses
ICI places each content control in a separate paragraph line. Dynamic clauses are added inside the blank content control which are satisfied through rules.
Clauses are tagged with content controls as follows:
- All the content controls are put together in a single paragraph on any line with valid content.
- One paragraph is added after the resolved clauses, so that it does not affect the deviation analysis of the previous clause.
- An empty paragraph following the clause is added if the preceding content is a clause. This will contain all the clauses that are not satisfied by the clause assembly rules.
- If all the content controls are together, they appear in Icertis Experience for Word as part of the main paragraph.
- Clauses removed in the previous version are marked as deleted in the Clause Comparison Report and the user can insert a comment when editing the document.
Note:
- Only file-based clauses are supported.
- Custom fonts (font type and font size) at content control level of the rule based clauses are currently not supported in the template.
- Location-specific (such as center justified) rule based clauses cannot be tagged.
- Numbering at template level is not supported.
- One paragraph will be added after the resolved clauses, so that it does not affect the deviation analysis of the previous clause.
- Clause with only comments will not be reassembled after approved state unless the agreement is edited. This is handled through a technical configuration.
Creating a Rule
To create a Rule and build your own repository of ICI contracts within which similar Clauses (or Agreements) can be extracted:
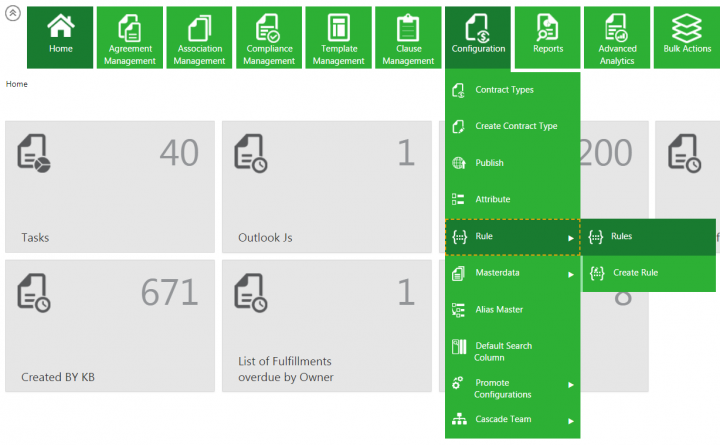
- Click Configuration > Rule > Rules on the ICI Home page. The Rules page opens.
- Click Select Contract Type. For example, Negotiate AI.
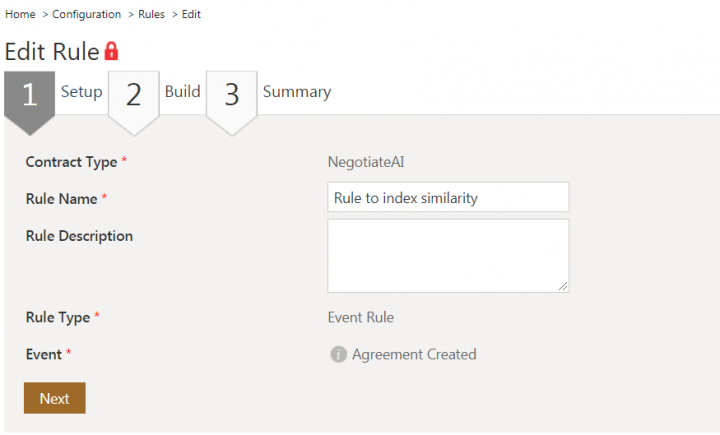
- Click the edit icon for the rule that you want to edit. The Edit Rule wizard opens.
- Enter the Rule Name. For example, Rule to index similarity.
- Enter the Rule Description. The Contract Type, Rule Type and Event are auto populated.
- Click Next and complete the Edit Rule wizard.
- Click Update.
- The Rule updated successfully message is displayed. Click OK.
Finding Similar Clauses
Let’s consider an example of finding similar Clauses.
- Open the Agreement Document and load the Icertis Experience for Word add-in.
- Select a clause text in the Agreement Document.
- Click Find Similar Clauses.
To find similar clauses specific to a contract type, set the Apply filter option to On.
Choose the Contract Type from the Choose Contract Type drop-down to further refine your search.
- Click Proceed. Clauses that are similar to the selected one will be displayed.
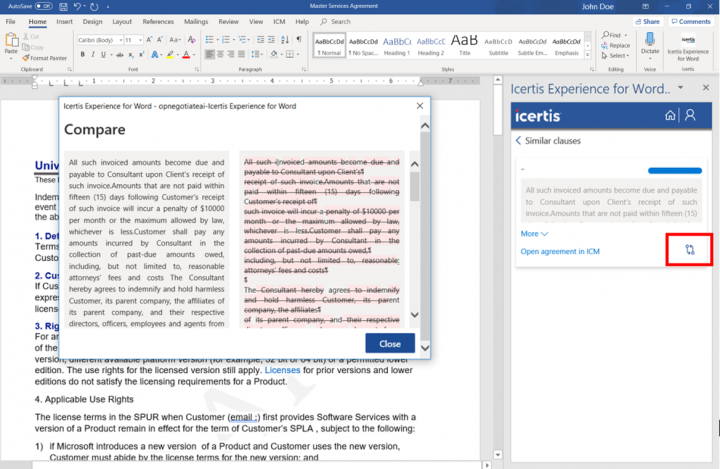
- Click Compare icon to get a comparison of the Clauses.
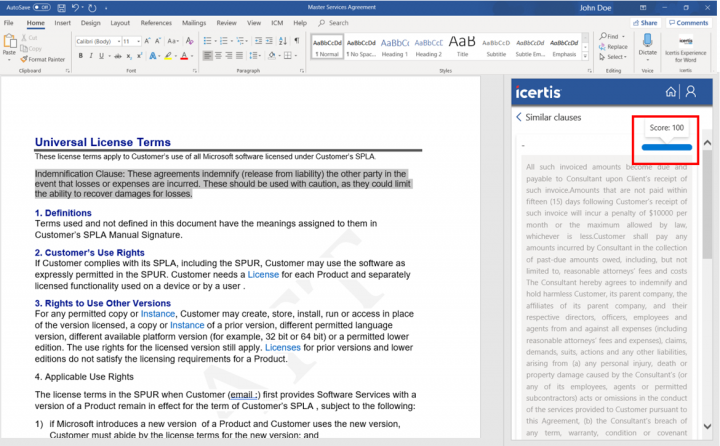
A score is displayed to indicate similarity between the selected clause and the clause from the Clause Library.
Finding Similar Agreements
To find similar Agreements from ICI repository that may have been created for other customers:
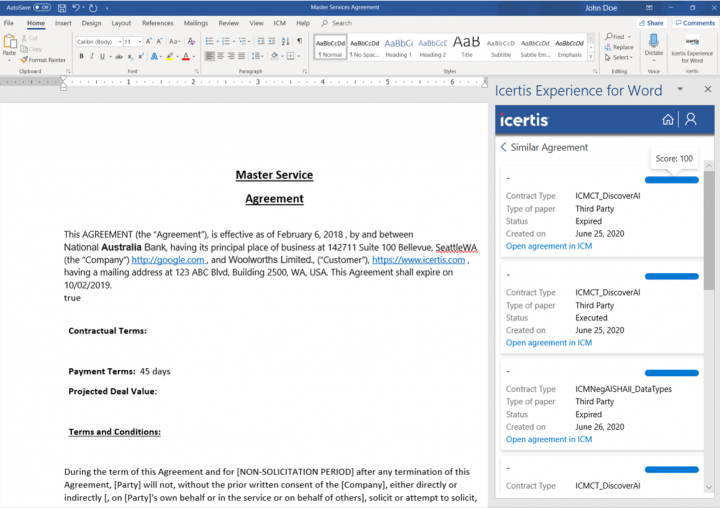
- Click Find Similar Agreements. The Similarity Filter page opens.
To further refine your search set the Apply filter option to On and choose the Contract Type from the Select contract type drop-down.
- Click Proceed.
It may take some time to find similar data if there are many Agreements. You can see the score indicating how much the Agreements match.
Viewing Existing Agreements
You can view the agreements in Icertis Experience for Word provided you have Manage privileges on the agreement and can edit it in Icertis Experience for Word.
To view an existing agreement:
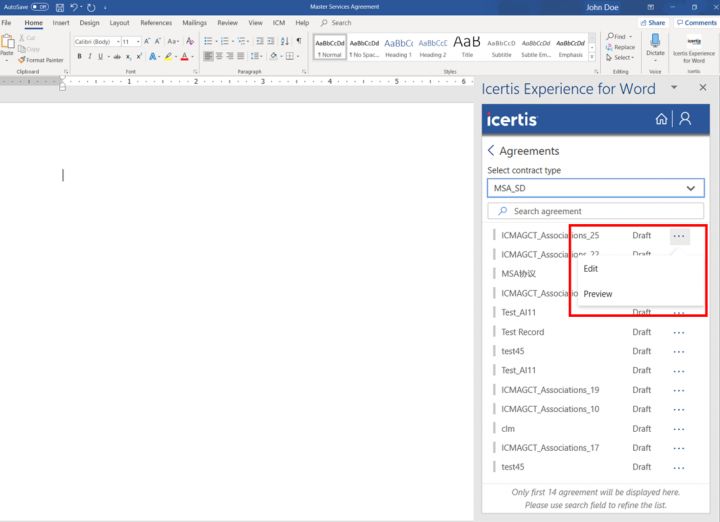
- Click View Existing Agreements on the Icertis Experience for Word dashboard page. The list of agreements is displayed.
- Click the three-dots icon next to the agreement to edit or preview the agreement.
- Edit: Click Edit to open the document in Word.
- Preview: Click Preview to open the latest version of the agreement in PDF.
Select the Agreement contract type from the Select contract type drop-down to filter the displayed agreements by contract types. For example, MSA_SD. Agreements created with MSA_SD contract type are displayed.
You can also search for an agreement by entering a search criteria in the Search agreement field.
Editing an Agreement
Any user who has Manage privileges on the agreement can edit the agreement in Icertis Experience for Word.
To edit an agreement:
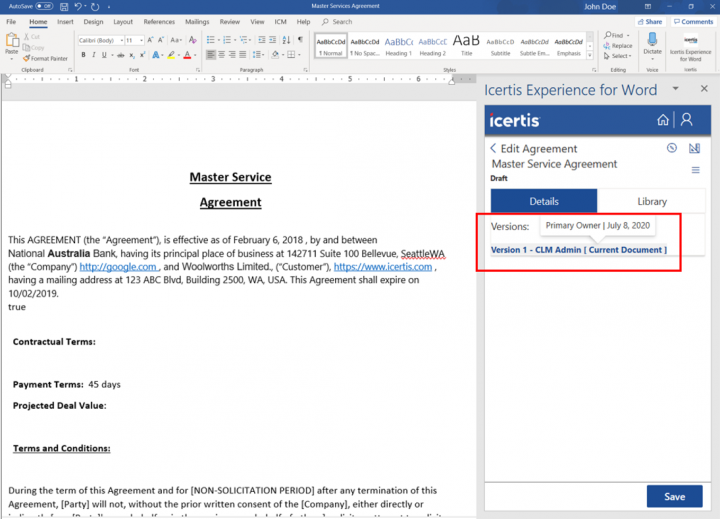
- Click Edit. The agreement document opens in Word.
- Click Details tab on the Icertis Experience for Word panel. The Details tab displays the agreement document version and the username of the contract author.
You can hover the cursor on the version number (for example, Version 1) to view the ICI role of the username displayed and the date when the version was created.
Using Agreement Operation/Actions
The Agreement operation/actions button gives access to a few more functions you can perform on the Agreement. For example, Identify Attribute, Identify Clause, Add Deviation and Add Commitment.
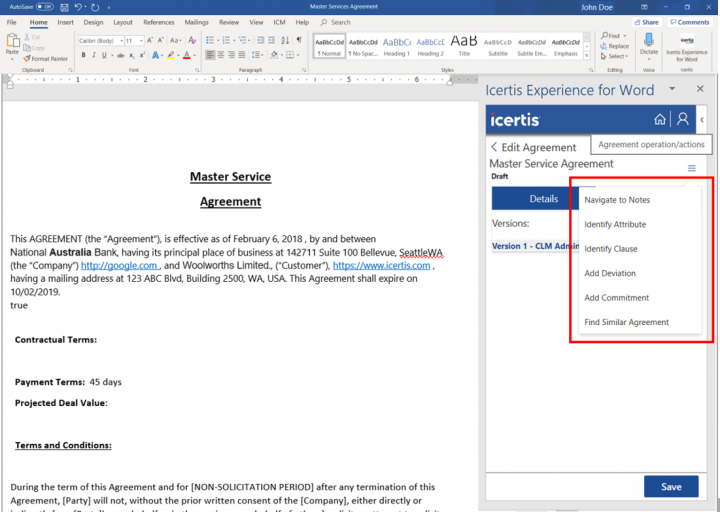
Click the accordion menu next to the agreement name on the Edit Agreement page. Using this menu, you can:
- Navigate to Notes: Select this to view the agreement Notes.
- Identify Attribute: Select this to identify the selected text as an attribute.
- Identify Clause: Select this to identify the selected text as a clause.
- Add Deviation: Select this to add a deviation.
- Add Commitment: Select this to add a commitment.
- Find Similar Agreement: Select this to find agreements similar to the current one.
Click this option to open to the Notes tab of the agreement in Web ICI.
Identifying Attribute
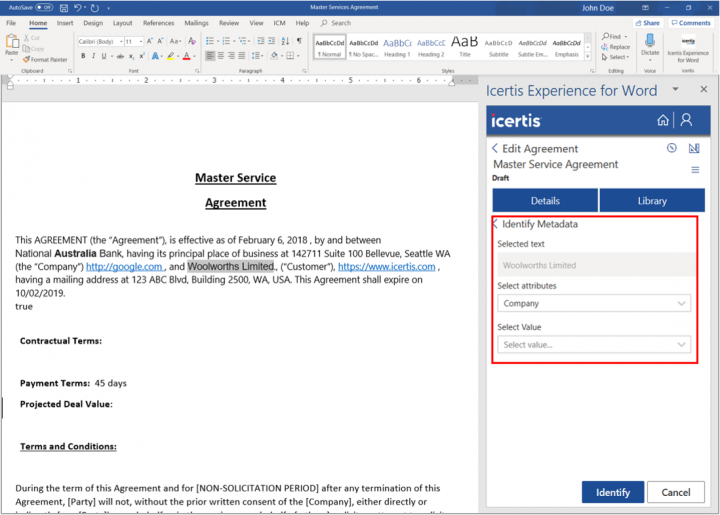
The Identify attribute feature enables the user to select a value in the document as an Attribute and link it to an Attribute that is present in the ICI global Attributes list.
For example, if you select the Attribute-Assignment Date, you can make changes in the date format or in the actual date of the assignment. Icertis Experience for Word would identify these changes and update the same in Agreement on ICI Web.
To identify metadata (attribute):
- Click the Agreement operation/actions button. A list of options is displayed.
- Click Identify metadata. The Identify metadata page opens.
- Select an Attribute from the Select Attributes drop-down. More fields will be displayed based on the selected Attribute.
- Enter or select the alternate value for the Attribute.
- Click Identify. The changed value of the Attribute is added to the Agreement.
Identifying Clauses
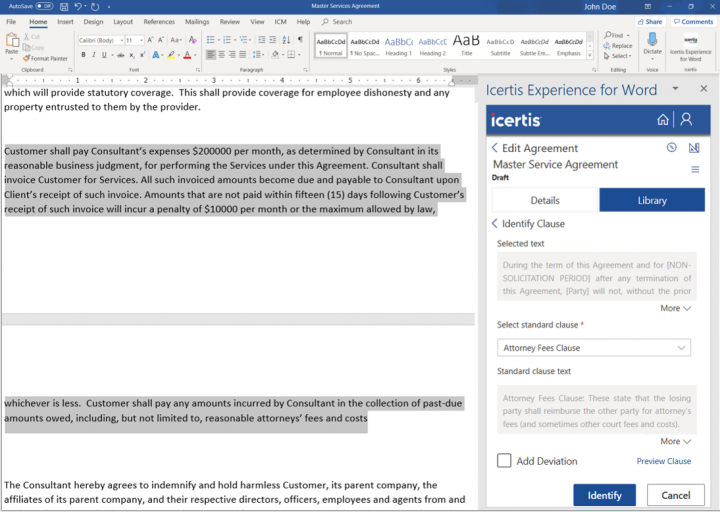
The Identify Clause enables the user to identify static text in the document as a Clause and link it to a Clause that is present in the ICI Clause Library.
To identify a Clause:
- Click the Agreement operation/actions button. A list of options is displayed.
- Click Identify Clause. The Identify Clause page opens. The selected text from the Agreement is displayed in the Select Text field.
- Select a Clause from the Select Standard Clause drop-down. You can view the Clause text in the Standard Clause Text field.
- Select the Add Deviation checkbox if you want to create a deviation to the Clause. The Comments section is displayed.
- Enter the notes in the Comments section, addressing the changes you want to make to the Clause.
- Click Identify. The deviation you want to create is sent for approval. The standard deviation workflow is followed through ICI Web UI.
Adding Deviations
You can add deviation to the Clauses in the Agreement using the Add deviation feature.
To add a deviation:
- Click the Agreement operation/actions button. A list of options opens.
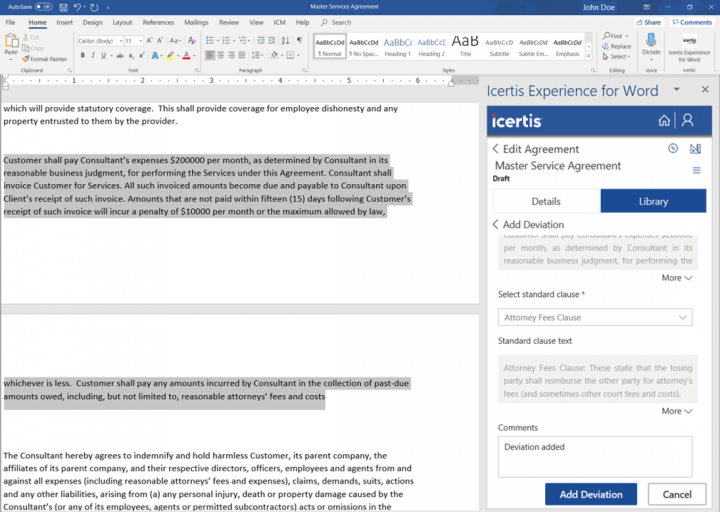
- Click Add deviation. The Add Deviation page opens. If you have selected any text from the Agreement, it is displayed in the Selected Text field.
- Select a Clause from the Select Standard Clause drop-down. The Clause text is displayed in the Standard Clause Text field.
- Enter notes for adding deviation in the Comments field.
- Click the Add Deviation button. The deviation added successfully message is displayed. The deviation is sent for approval to follow the standard deviation workflow through ICI Web UI.
- Click Done. The Details tab opens.
Viewing Deviations
- Download the latest version of an agreement from ICI.
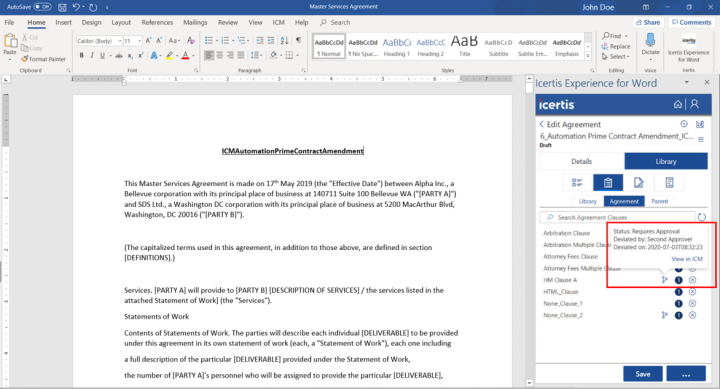
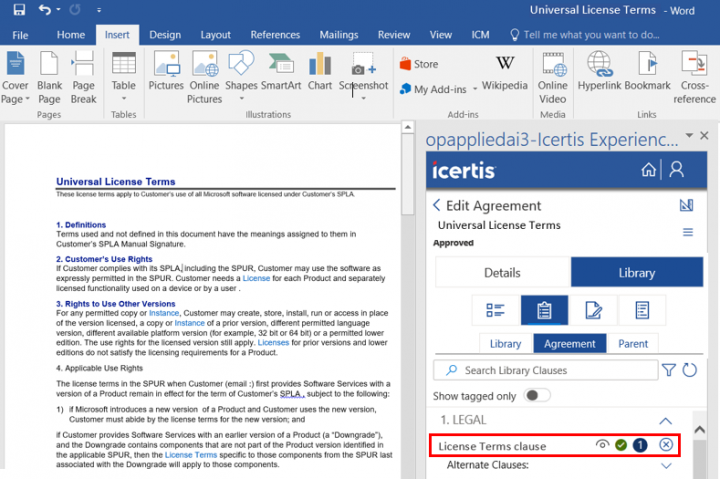
- Navigate to the agreement clauses tab in the Library section. Any clause that has a deviation will be marked as a deviated clause with the deviation icon.
- Hover the cursor over the deviation icon to view the following details:
- Status: Shows the status of the clause, for example Requires Approval.
- Deviated by: Shows the username who deviated the clause, for example Second Approver.
- Deviated on: Shows the date and time the deviation was created.
- View in ICI: Click this link to open the agreement deviation list tab in ICI Web.
Taking actions on deviated clauses
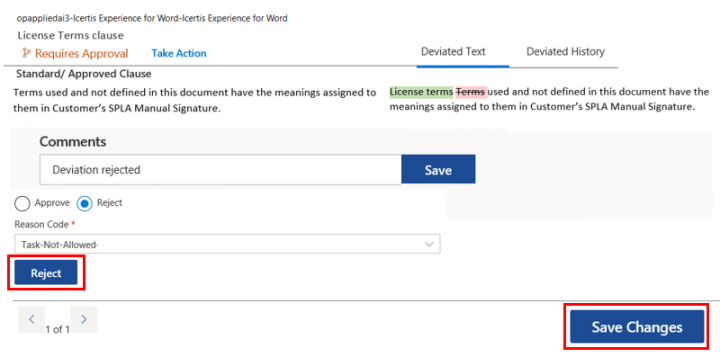
Approvers can approve or reject the deviations in a clause.
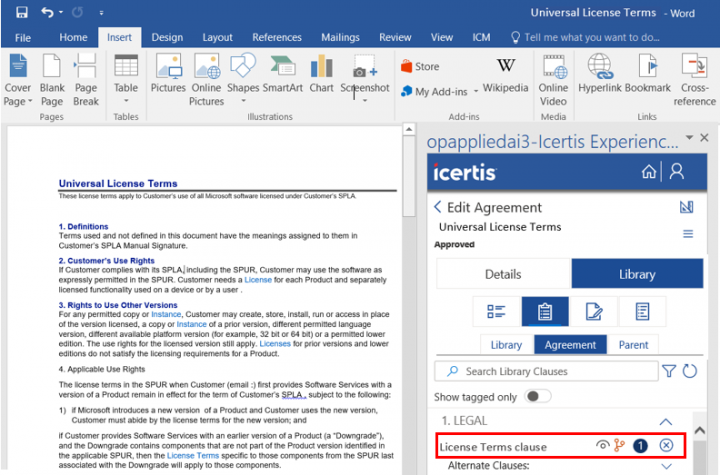
- Download the latest version of an agreement from ICM. For example, Universal License Terms.
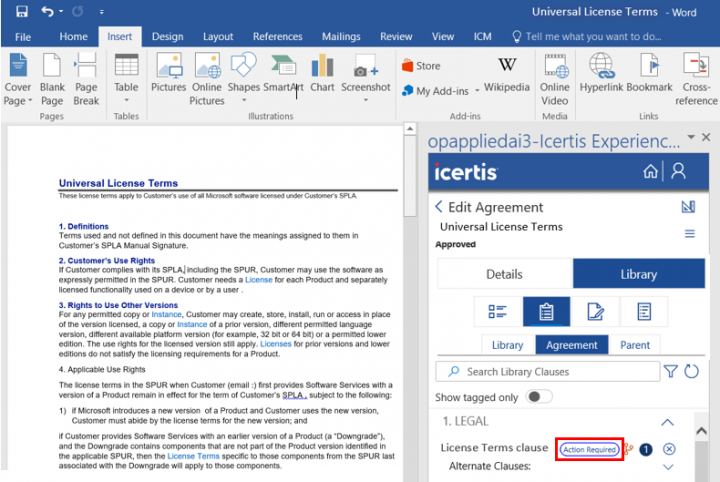
- Navigate to the agreement Clauses tab in the Library section. Any clause that has a deviation will be marked as a deviated clause with the deviation icon.
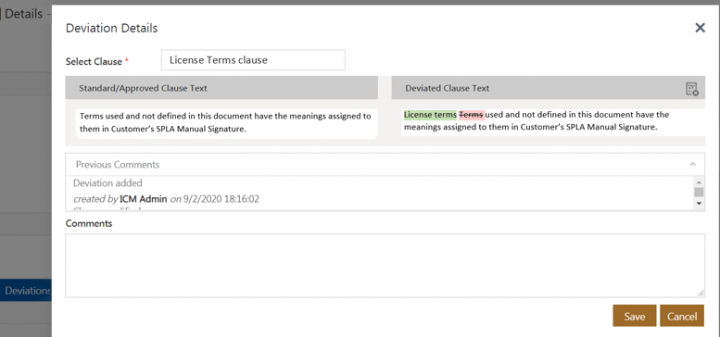
- Click Action Required next to the clause you want to approve. For example, License Terms Clause. The deviation details window opens.
The Action Required button is only visible to Approvers.
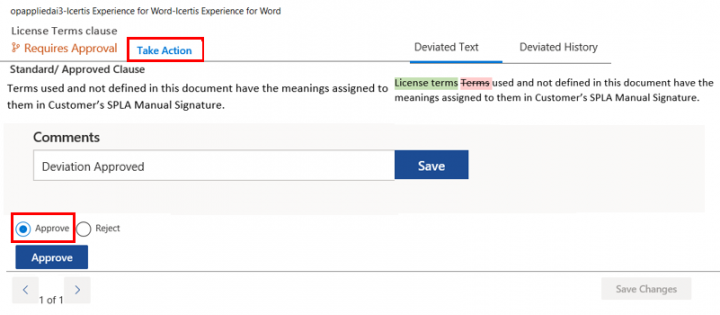
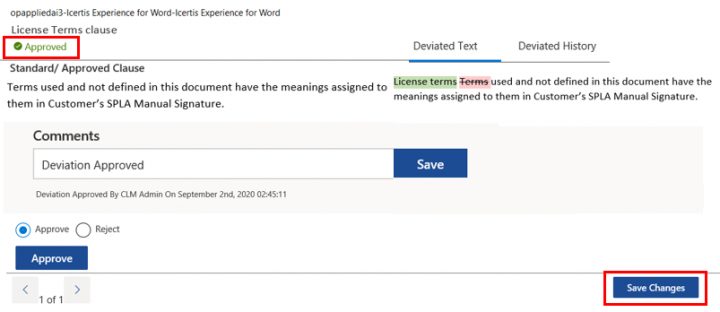
Approving the deviation
- Select Approve option. The clause is marked to be approved and the status changes to Approved in the deviation details window.
- Click Approve button. The Save Changes action button is enabled.
- Click Save Changes. The Confirm Deviation Changes window opens. The window shows all the tagged clauses in the agreement with their states.
- Click Confirm. The clause will be approved.
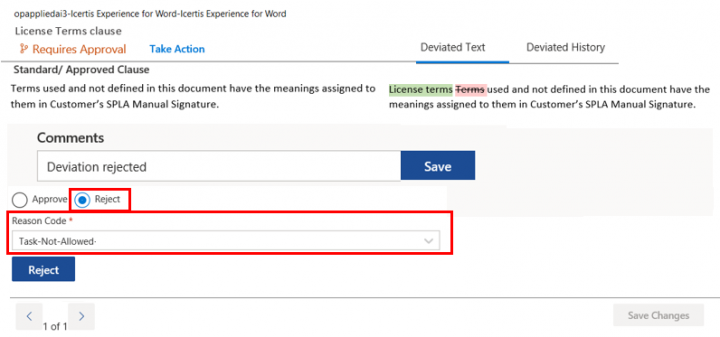
Rejecting the deviation
- Select Reject option. The clause is marked to be rejected.
- Select Reason Code.
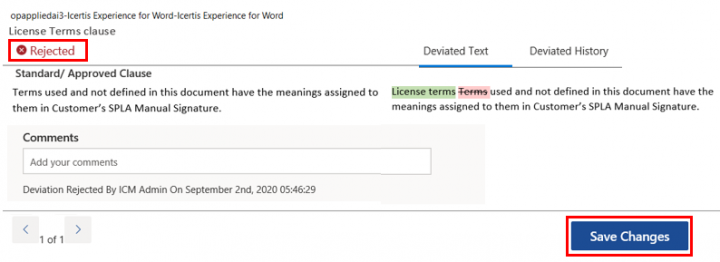
- Click Reject button. The status changes to Rejected in the deviation details window and the Save Changes action button is enabled.
- Click Save Changes. The Confirm Deviation Changes window opens.
The window shows all the tagged clauses in the agreement with their states.
- Click Confirm. The clause will be rejected. The deviations in the clause will reflect on the ICM UI.
Reviewing deviated clauses and adding comments
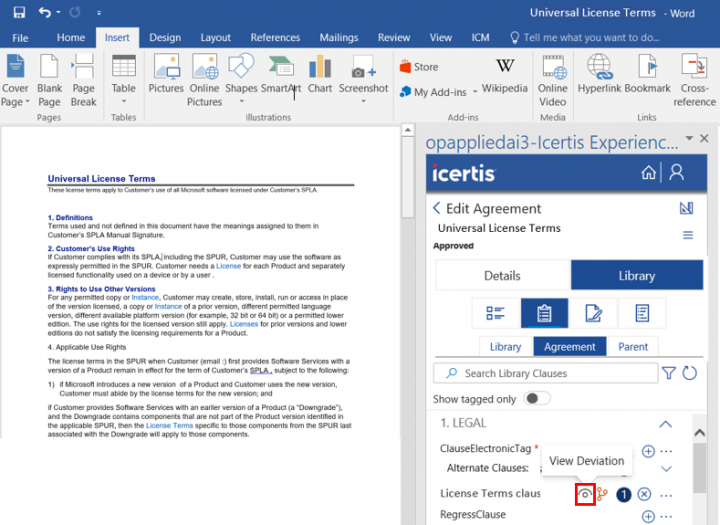
Non-approver users can view the clause deviation and also add a note from within the Icertis experience for Word.
- Download the latest version of an agreement from ICM. For example, Universal License Terms.
- Navigate to the agreement Clauses tab in the Library section. Any clause that has a deviation will be marked as a deviated clause with the deviation icon.
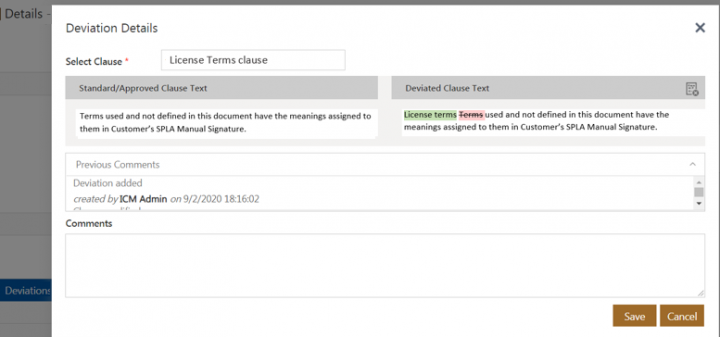
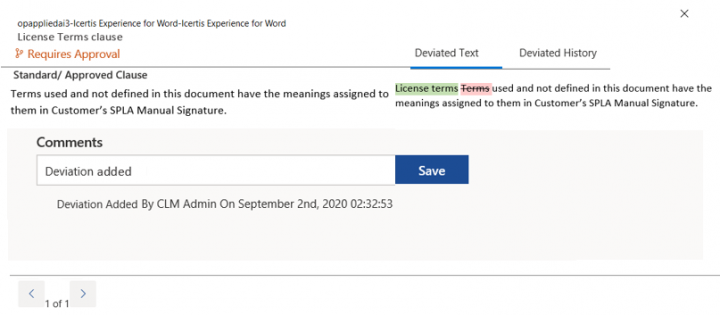
- Click View Deviation icon next to the clause you want to add a comment for. For example, License Terms Clause. The deviation details window opens.
- Enter text in the Comments field. For example, Deviation added.
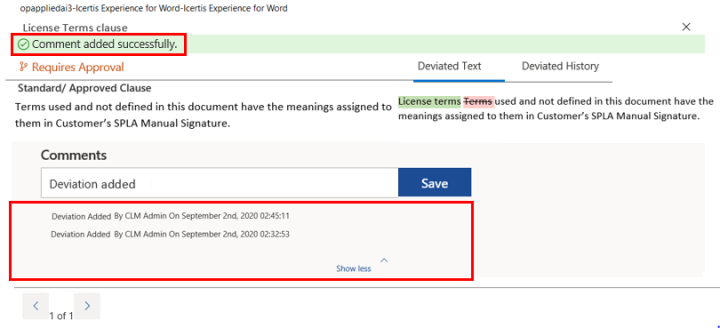
- Click Save. The Comment added successfully message is displayed and the comment is shown under the Comments field.
- Click Show more. All the comments added to the clause are displayed.
The Show more button will be available:
- For comments: when more than one comments are added for a clause
- For Deviated Text: when the clause text is long
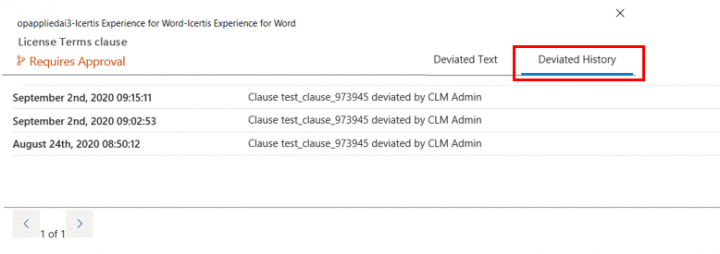
- Click Deviated History. All the deviations made to the clause are displayed.
Adding Commitments
You can add commitments to the Agreement using Icertis Experience for Word.
To add a Commitment:
- Click the Agreement operation/actions button. A list of options opens.
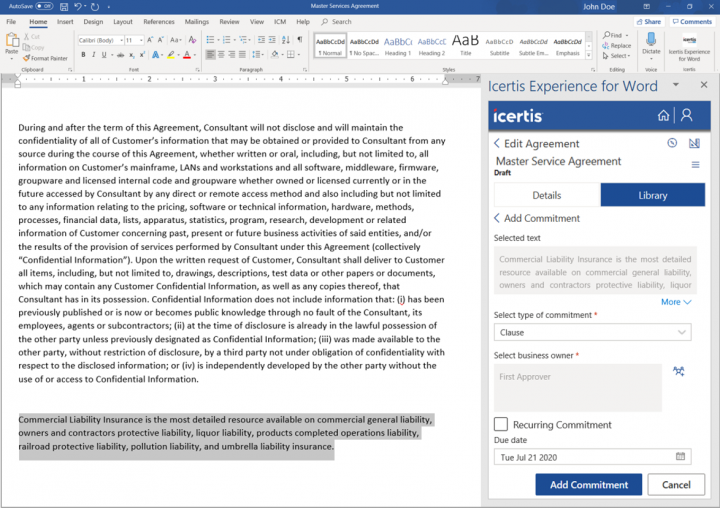
- Click Add commitment. The Add Commitment page opens. If you have selected any text from the Agreement, it is displayed in the Selected Text field.
- Select the Commitment type from the Selected type of commitment drop-down. For example, Transaction.
- Click the Add User icon in the Select business owner field to search or select a user. The Select Business Owner window opens displaying a list of all the available users.
- Enter a user's name in the Search Business Owner box or select a checkbox next to the desired user from the list.
- Click Select. The user is added to the Select business owner field.
- Select the Recurring Commitment checkbox if you want this commitment to repeat. A few more fields are displayed.
- Select the frequency. For example, monthly, quarterly, etc.
- Select the Start date and End date.
- Enter days for reminder in the Set reminder and Set overdue reminder fields.
- Enter comments and instructions in the corresponding fields.
- Click the Add Commitment button. The Commitment has been successfully added message is displayed.
- Click Done. The Details tab opens.
Triggering AI discovery manually
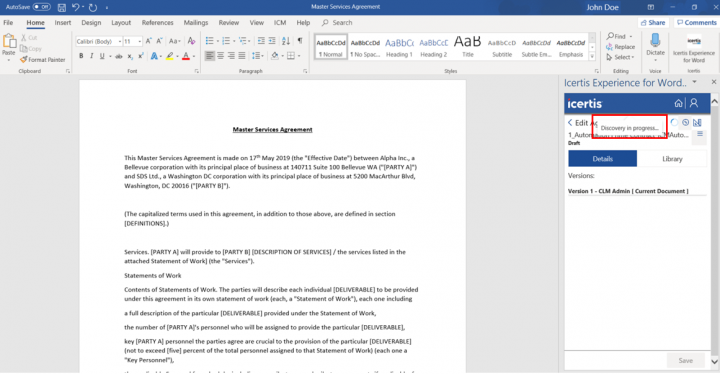
Click the Trigger AI discovery icon. The discovery process starts, and the loading icon is displayed with a Discovery in progress… tool-tip.
Once the discovery process is complete, discovered attributes are tagged in the document and populated in the attribute fields.
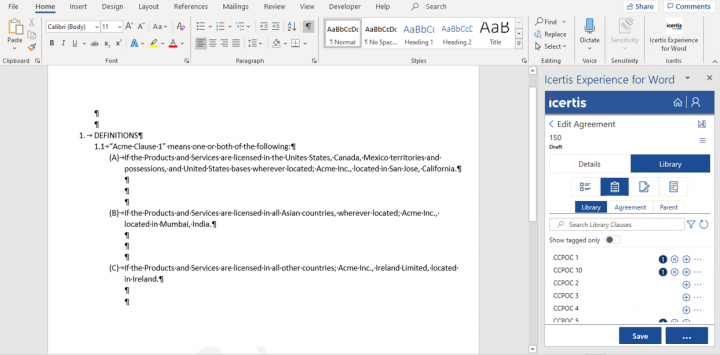
Using Library
Within the Library page, you can tag Attributes, Clauses, Signatories, Template Variables, Agreement Clauses, and Parent Agreement Clauses (if applicable).
Click the Library tab on the Edit Agreement page. The Library page opens.
Tagging Attributes
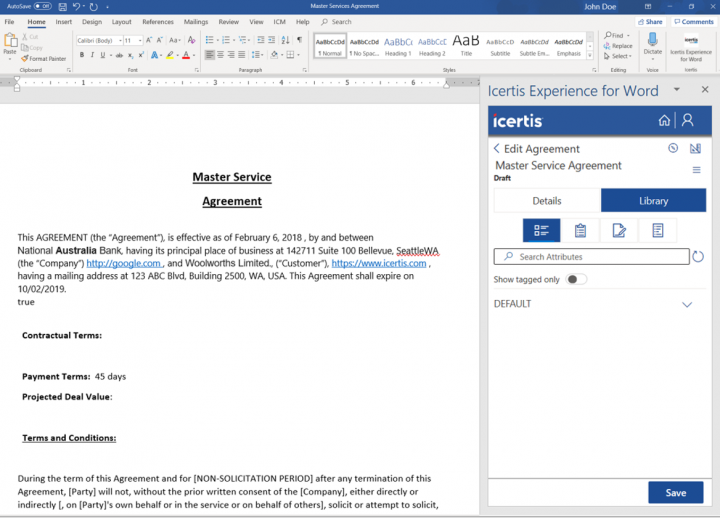
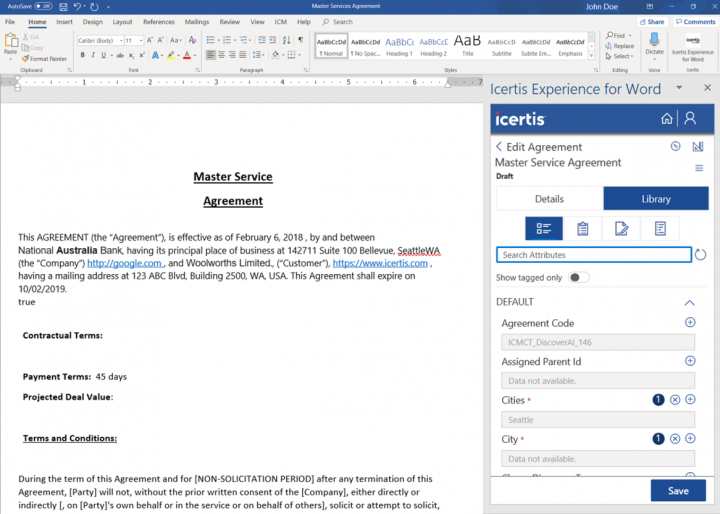
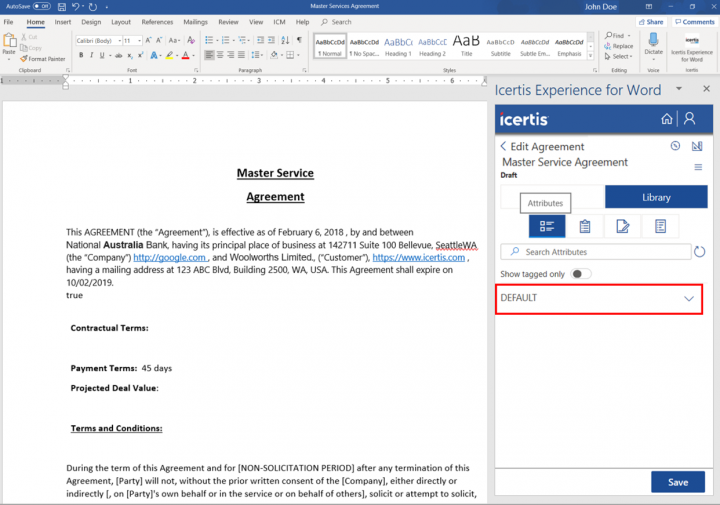
1. Click the Attributes tab in the Library section. A list of Attributes related to the Agreement are displayed. You can see a number next to the Attribute if it is already tagged in the document. The Attributes are usually grouped under relevant sections.
2. Enter the search criteria in the Search bar.
3. Click the Search icon. The top 10 results are displayed.
4. Click the Advanced Search Filter icon, if you are not able to find the desired Clause.
6. Hover over an Attribute to view its tag.
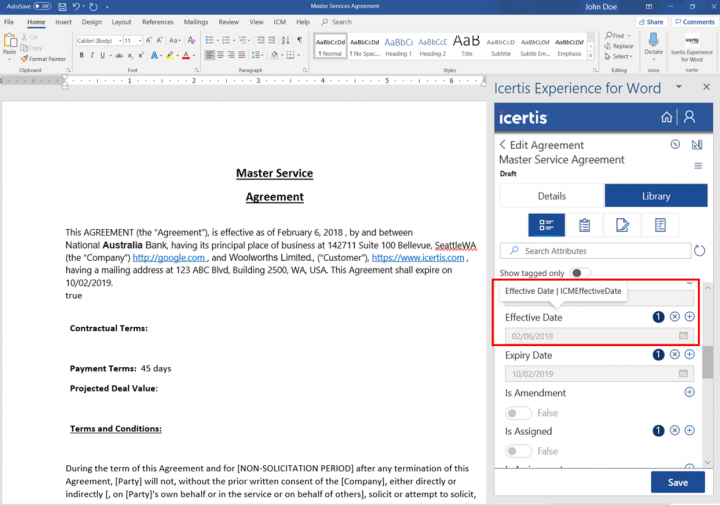
7. Click the Add icon. The Attribute's tag is added to the Agreement document. A number is displayed next to the Attribute when it is tagged. This number denotes the number of times that Attribute has been tagged in the document.
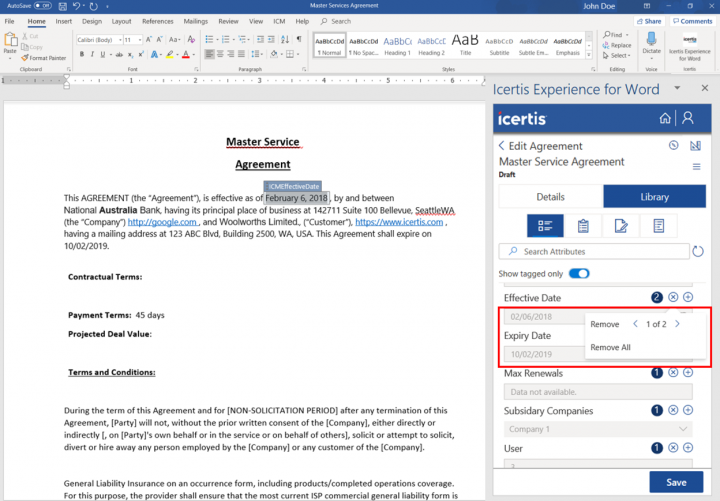
8. Select the Display Tagged Attributes checkbox to view all the tagged Attributes in the Template.
9. Click the Delete icon to remove the Attribute from the Agreement.
Tagging Clauses
All the Clauses that are used in the chosen Contract Type are displayed under different Clause groups that are assigned to the Clause when it is created.
To tag Clauses:
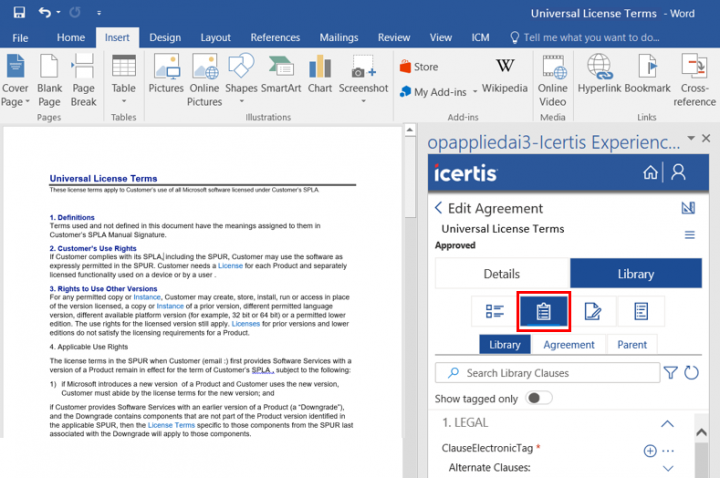
- Click the Clauses tab in the Library section. A list of Clauses related to the Agreement is displayed.
- Enter the search criteria in the Search bar.
- Click the Search icon. Top 10 results are displayed.
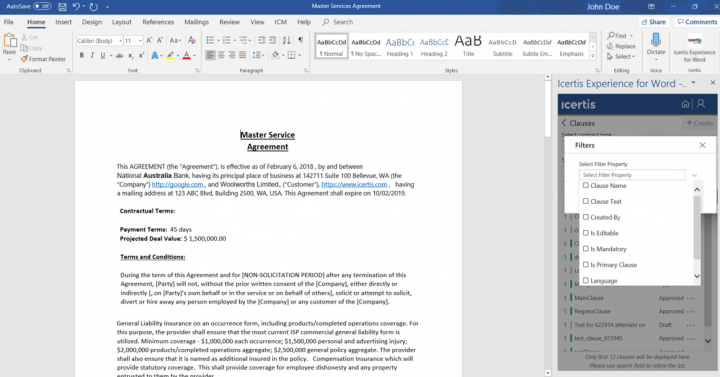
- Click the Advanced Search Filter icon, if you are not able to find the desired Clause.
- Toggle Show tagged only field to view only tagged Clauses in the document.
- Click the corresponding arrow to expand a Clause groups and view the Clauses that are specific to that group.
- Click the three dots Select Actions icon. The available actions open in a drop down.
- Select the appropriate action:
- Direct: Adds the selected Clause to the Template.
- Rule based: Adds the selected Clause in the Template. However, the Clause text is hidden. Only when the condition defined in the Clause Assembly Rule is satisfied, the Clause text is displayed in the Agreement document.
- Rule based with page break: Adds the selected Clause in the Template with a page break. However, the Clause text is hidden. Only when the condition defined in the Clause Assembly Rule is satisfied, the Clause text is displayed in the Agreement document on a new page.
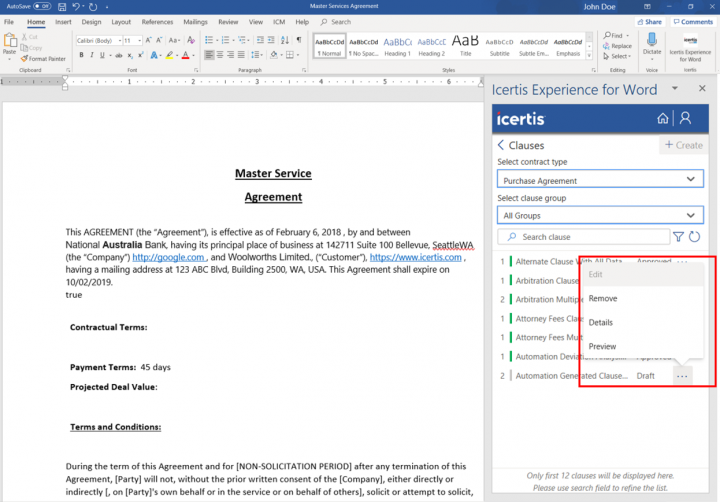
- Preview: Clicking Preview downloads the Clause document in .PDF format only when the Clause is file based. If the Clause is created in ICM Web UI then the preview of the Clause text is displayed.
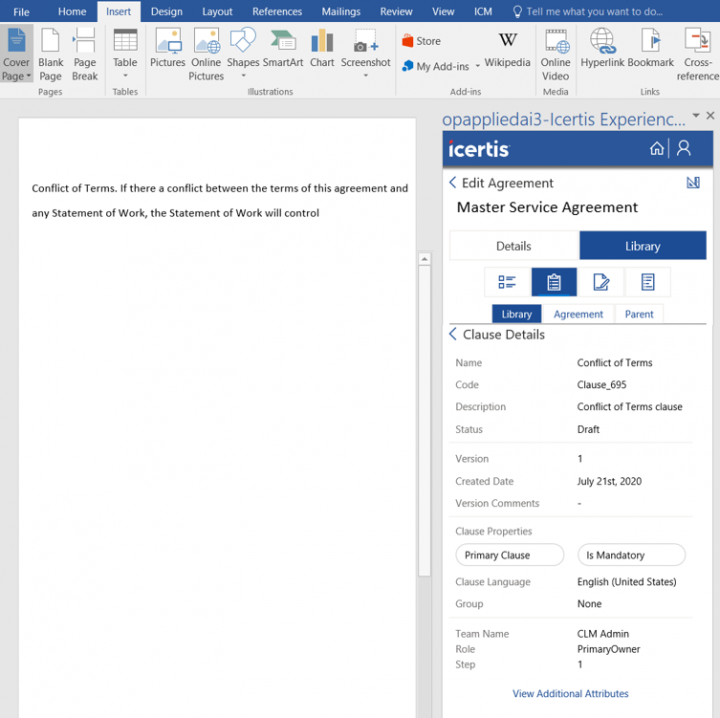
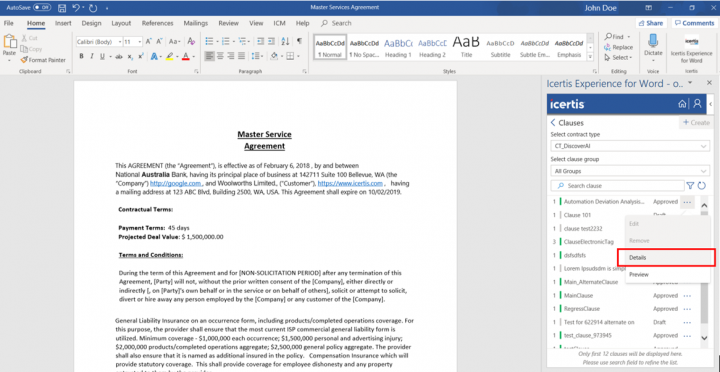
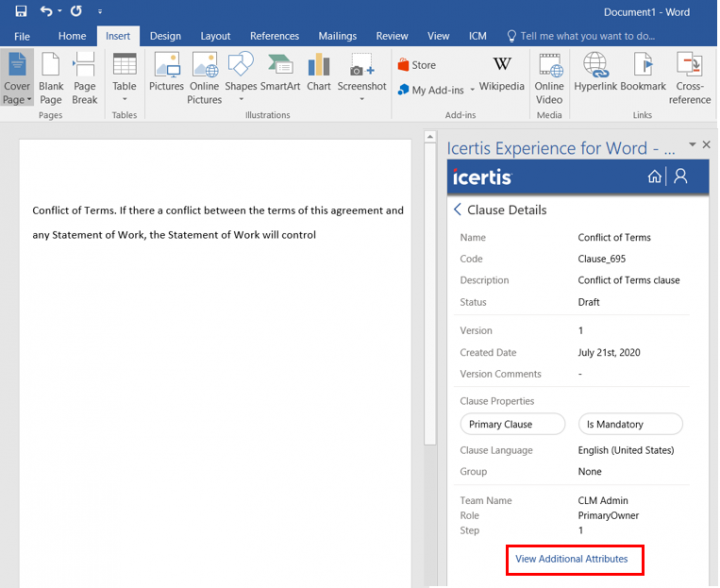
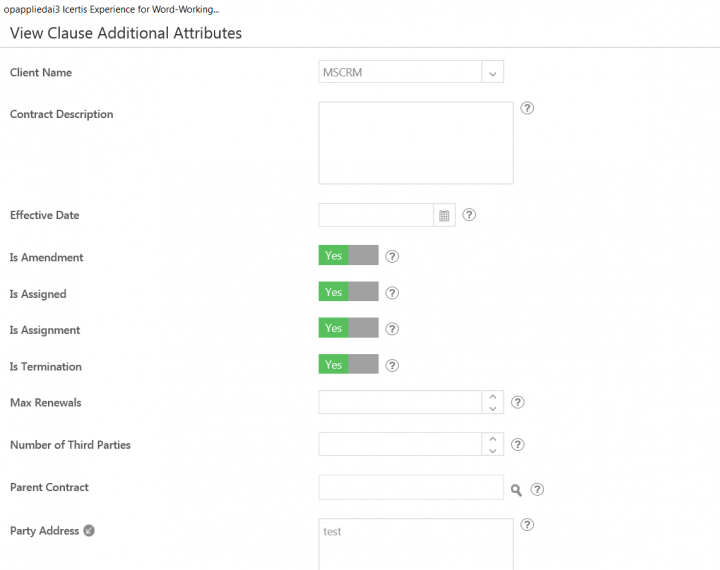
- Details: Displays the Clause text and basic details of the Clause. The hyperlink View Additional Attributes is available which opens the View Clause Additional Attributes window upon clicking if the external attributes are configured for the current clause.
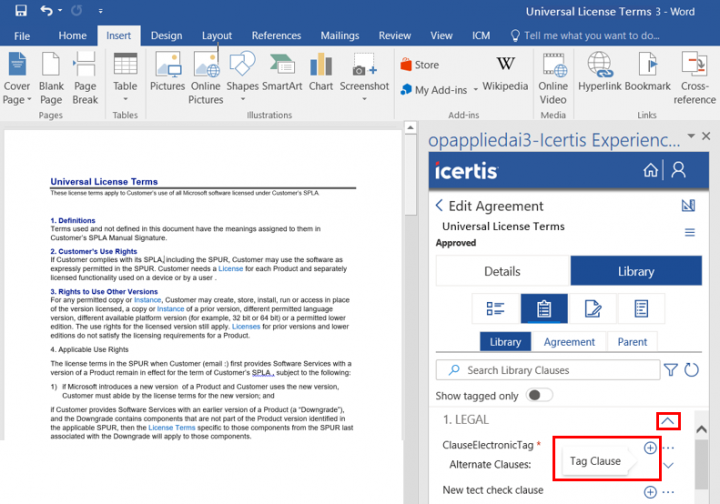
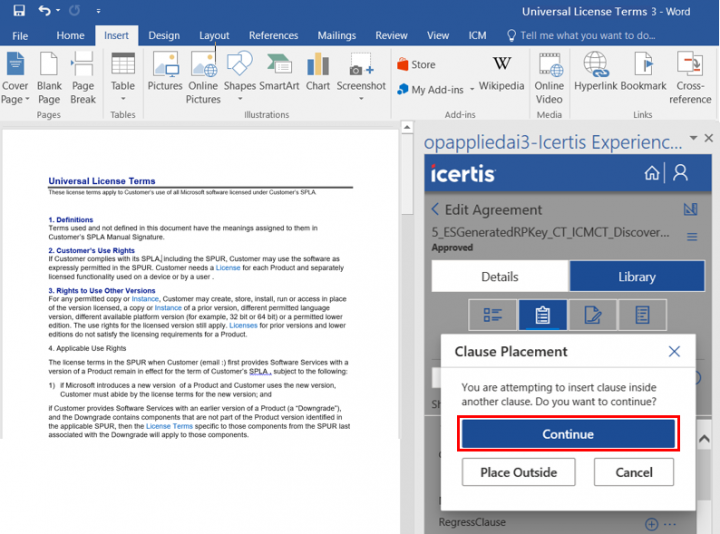
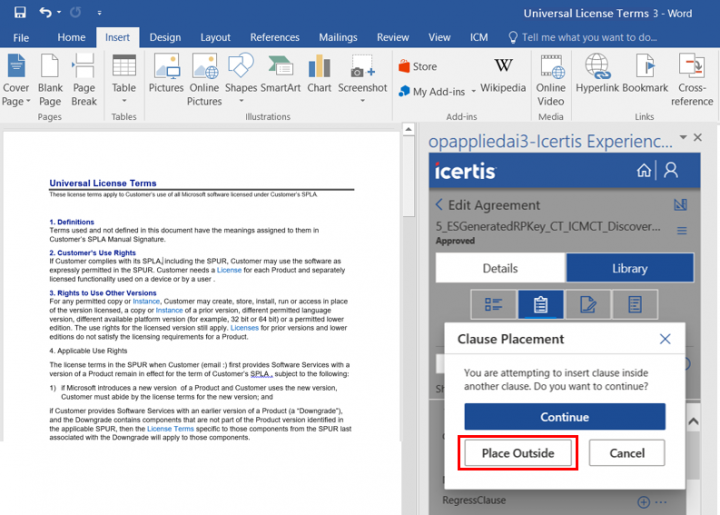
- Click Tag Clause action icon next to the clause you want to add in the agreement.
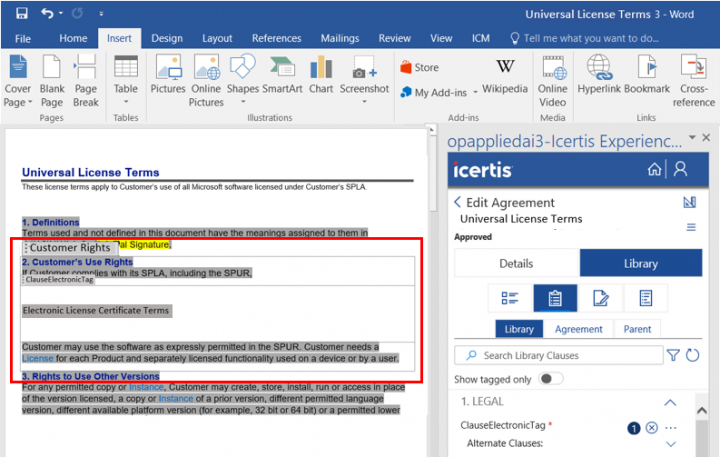
- Click Continue to insert the clause inside the current clause.
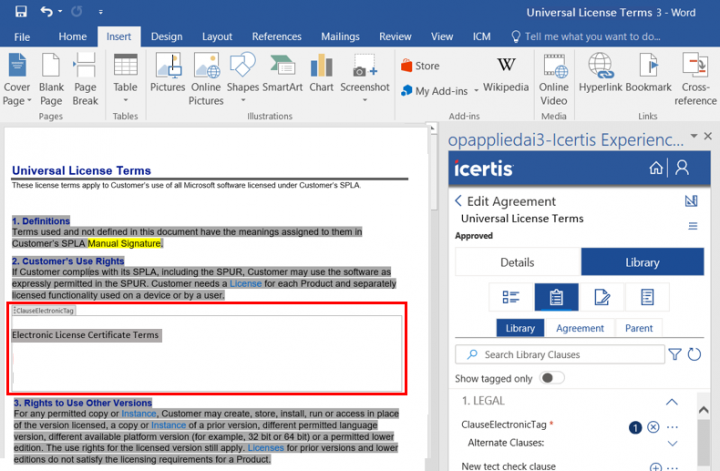
- Click Place Outside.
- Number next to the Clause indicates the number of times the Clause is tagged in the document. It is updated when you add or remove the Clause. No number is displayed for the Clauses that are not tagged.
- After you add or remove Clauses, click the Refresh/Reload list icon. This feature enables multiple users to work on an entity at the same time using Icertis Experience for Word as well as ICI Web, without having to lose any updates. It also helps to view the updated count of the entity, since the count may not refresh automatically.
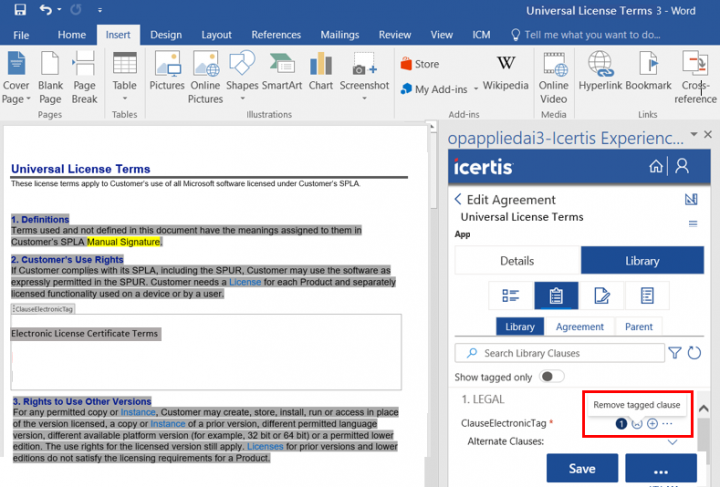
- Click Remove tagged clause. The tagged Clause is removed from the agreement. This option is available once the clause is added.
- Click Save. The agreement is saved with the tagged clauses.
Notes:
- When the authorized users remove the parent clause from the agreement, only parent clause is removed while the child clause remains tagged in the agreememnt.
- Users can choose to add the dependent clauses along with the parent clause while tagging the dependent clauses in the agreemnt.
The clauses can also be tagged in the Templates following the same process.
Tagging Signatories
To tag Signatories:
- Internal Signatories
- External Signatories
2. Click the corresponding arrow to expand Internal or External Signatories and view the available signatory tags. You can add a maximum of three internal or external signatories.
- Signatory 1: Add the signature location to the document where the signatory must sign. When you add a signatory, a confirmation message is displayed.
- Date 1: Add the Date box to the Agreement for the signatory to specify the date of signature.
- Textbox 1: Keep this field optional or mandatory for Internal and External signatory, depending on your organization's preference. Click Textbox. A popup window opens where you can specify the following:
- Tag label: Enter the text for your tooltip, if any.
- Select Attribute: Select the Attribute the value of which you want to map to this textbox.
- Is Mandatory: Select Yes if you want the signatory to specify the required information to finish the task.
- Is ReadOnly: Select Yes if you want the value to be auto-populated (when received by signatory) according to the mapped field. You cannot change this value.
- To Sync: Select Yes if you want the information provided in the Template to get updated in ICI.
- Checkbox 1: Add the checkbox for specific signatories to agree to certain Terms and Conditions. They can accept or deny by selecting or unselecting this option. The checkbox is only visible to the specific signatory for whom it was added. Click Checkbox 1 a popup opens where you can add the tag and specify whether the checkbox is conditional or not.
Tagging Template Variables
To tag Template Variables:
1. Click the Template Variable tab. A list of all the available Template Variables is displayed.
2. Select the Display Tagged Template Variables checkbox to view already added tags.
3. Enter a search criterion in the Search variable by name box to search a specific variable.
4. Click the corresponding
5. Click Identify. The Identify Template Variable window opens.
6. Select the Language,date format,and date.
7. Click the Identify button. The changes you made to the Template Variable are synced back to ICI Web.
8. Click Remove to remove one or more tags.
Viewing Agreement Clauses
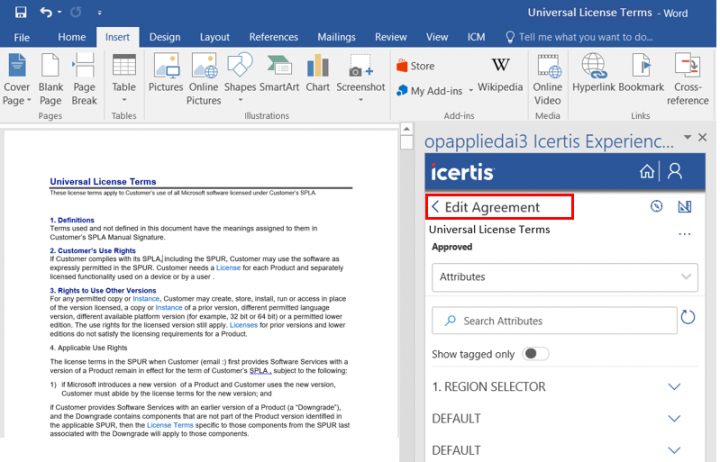
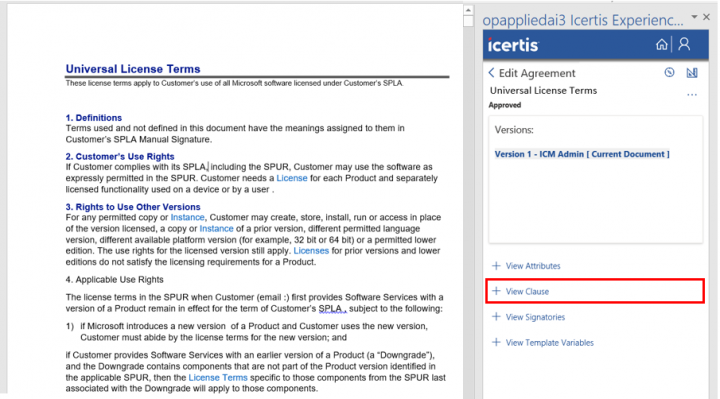
To view the Agreement Clauses:
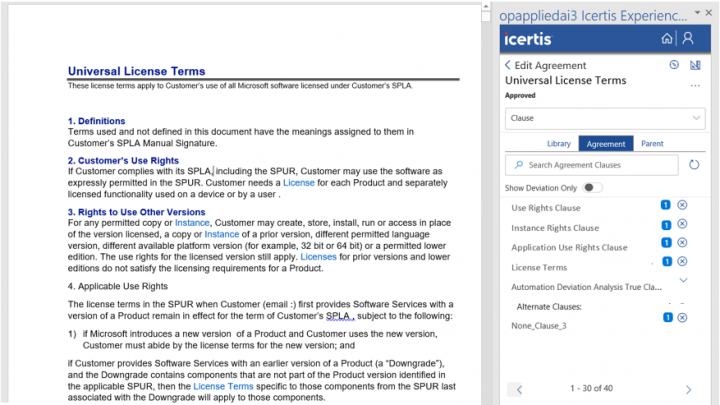
3. Click the Agreement Clauses tab. A list of all the Agreement Clauses is displayed.
The Clauses are displayed in the same order as they are tagged inside the agreement. For example, Use Rights Clause is displayed first in a list as it is the first clause tagged in the document. Then the Instance Rights Clause is displayed second, Application Use Rights Clause is displayed third and License Terms is displayed fourth as per their tagging order in the document. The page displays first 30 clauses in the list.
4. Click previous and next action arrows to display and navigate through the sets of 30 clauses.
Viewing Deviations
With this release, for the latest version of an agreement, any deviations for clauses will be highlighted directly within the Icertis Experience for Word.
- Download the latest version of an agreement from ICI.
- Navigate to the agreement clauses tab in the Library section. Any clause that has a deviation will be marked as a deviated clause with the deviation icon.
- Hover over the deviation icon to view the following details.
- Status: Shows the status of the clause, for example Requires Approval.
- Deviated by: Shows the username who deviated the clause, for example Second Approver.
- Deviated on: Shows the date and time the deviation was created.
- View in ICI: Click this link to open the agreement deviation list tab in ICI Web.
Tagging Parent Agreement Clauses
If the Agreement is a child Agreement or an Amendment, the Parent Agreement Clauses tab displays the Clauses associated with the Parent Agreement.
To view Parent Agreement Clauses:
1. Click the Parent Agreement Clauses tab. A list of all the Clauses used in the Parent Agreement is displayed.
2. Click Add to add the Clause in the Agreement.
3. Click Clause Text to view or read the Clause
Using Design Preview
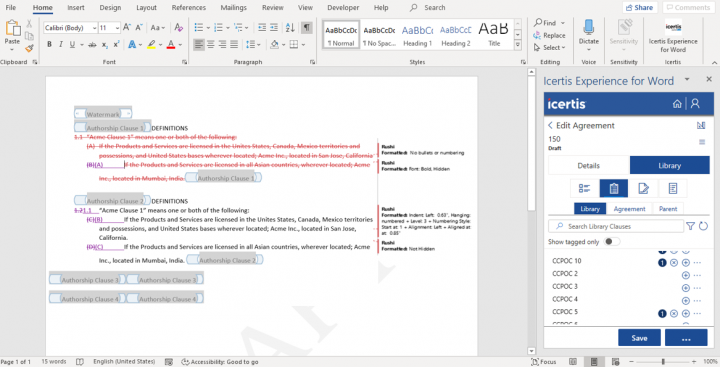
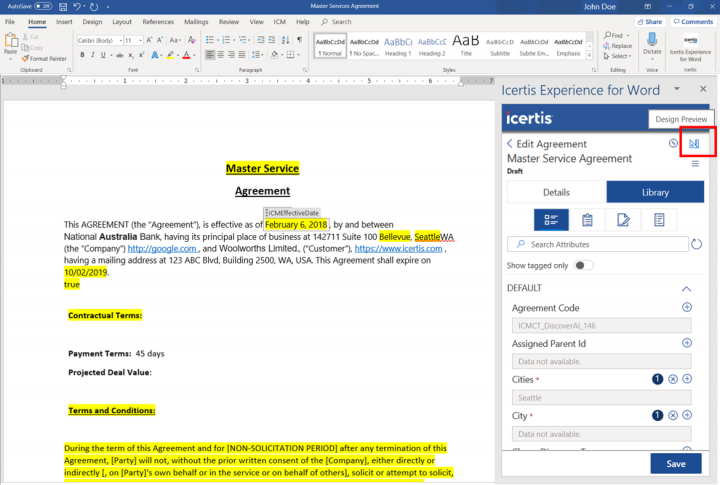
This feature helps you easily identify the tagged elements in the Agreement document.
Click the Design Preview icon to highlight the Attributes, Clauses, and Signatory elements on the Template.
Publishing an Agreement
After editing the Agreement, you can publish it to be able to share the updates.
To publish the Agreements:
- Click the Publish button. The Publish Agreement window opens.
- Enter relevant comments in the Publish note section.
- Click Save. The Agreement is uploaded to ICI Web instance.
Modifying the Agreement using Icertis Experience for Word (.JS Word Add-in)
To view the modifications made to an agreement document:
- Click the Publish button. The Publish Agreement window opens.
The Add-in notifies users about modifications done along with additions and deletions in the tagged attributes, clauses, template variables, and associations of the current agreement before actually publishing it.
- Enter a relevant message in the Publish note section indicating the update made to the agreement document.
- Click Save. The validation message opens warning the user of the modifications made to the agreement document to be able to take appropriate actions before proceeding.
- Click CONTINUE TO SAVE. The Publish Agreement window opens indicating that changes have been identified in the current agreement document with respect to its previous version. The user can review the summary and make informed decisions before actually creating a new version the agreement.
- Click View all modifications to see the modifications in the agreement document. The differences in the document are displayed in the Content Control Differences window.
- Click Yes in the Publish Agreement window of Add-in to save the changes in the document. The validation message opens warning the user of the modifications made to the agreement document to be able to take appropriate actions before proceeding.
- Click CONTINUE TO SAVE to save the document. The Agreement has been saved successfully message is displayed.
Taking Workflow Actions using Icertis Experience for Word
Sending an agreement for approval and/or recalling an agreement sent for approval
- Open the agreement document (downloaded from ICI) in MS Word.
Note: Any action taken on the agreement will reflect only when the document is published in ICI.
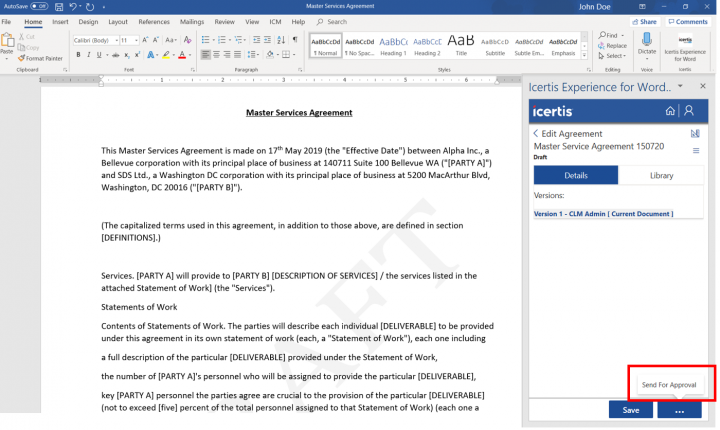
- Log on to Icertis Experience for Word from within the document. Actions will be available to the user in the add-in as per the role-action mapping in ICI. For example, Send for Approval action will be available to a Primary Owner.
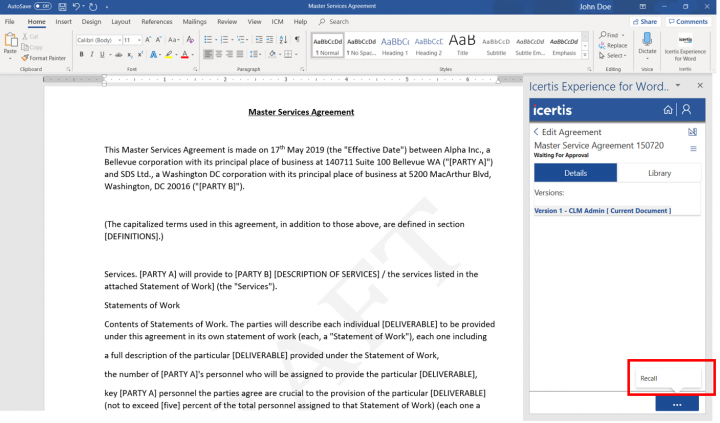
- Click the Send for Approval option on the more options button. The message Agreement has been successfully sent for approval will be displayed and the agreement status will be updated to Waiting for Approval.
- To recall the agreement, for example in order to make modifications, click the Recall option. The Agreement has been successfully recalled message is displayed and the agreement status changes back to Draft.
You can make changes to the agreement and resend the agreement for approval using the Send for Approval option.
Approving/Rejecting an agreement
- Open the agreement document (downloaded from ICI) in MS Word.
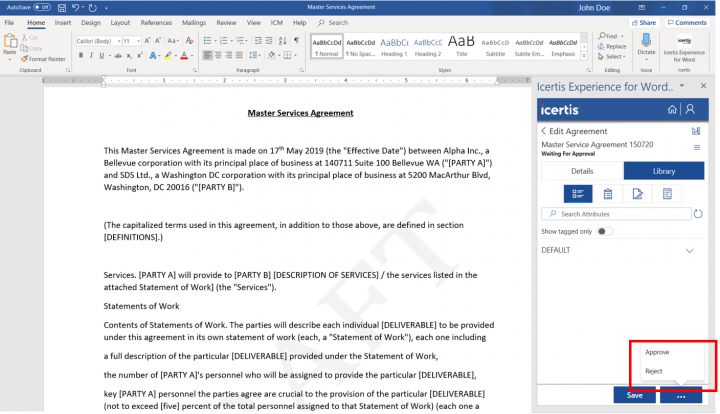
- Log on to Icertis Experience for Word from within the document. The agreement Details tab loads and agreement status is displayed as Waiting for Approval.
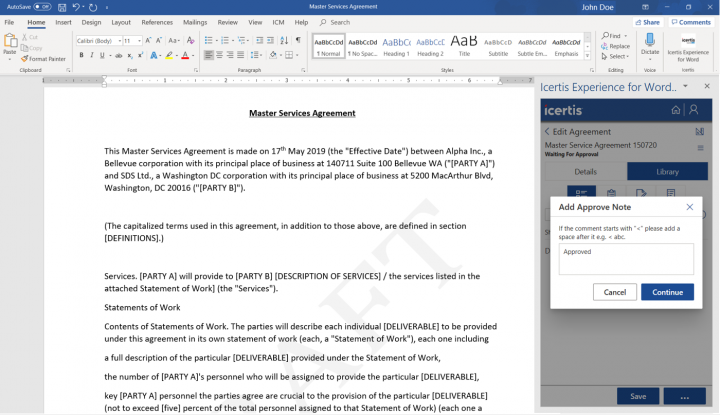
- Click the Approve option on the more options button. The Add Approve Note window is displayed.
- Enter a note on the approval.
- Click Continue. The Agreement has been successfully Approved message is displayed and the agreement status is updated as Approved.
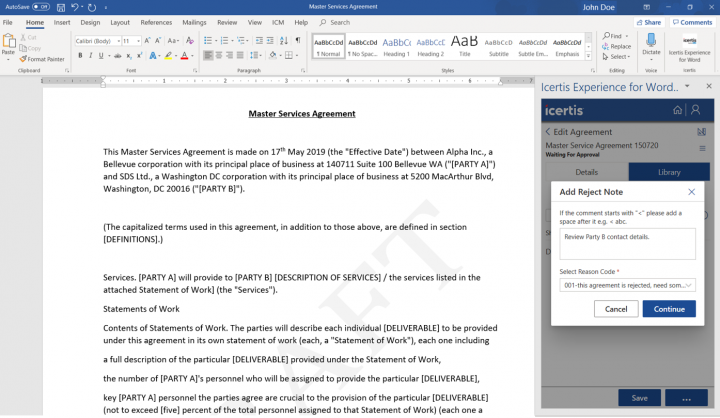
- To reject the agreement, click the Reject option on the more options button. The Add Approve Note window is displayed.
- Click Continue. The Agreement has been successfully Rejected message is displayed and the agreement status is updated as Draft.
The Primary Owner can make changes and resend the agreement for approval.
Working with Templates
You can create a Template by using ICI Web UI as well as Icertis Experience for Word. Using Icertis Experience for Word, you can:
- Perform different tasks such as creating, editing and deleting Templates.
- Tag Attributes, Clauses, Associations, Signatories and Template Variables.
Creating a Template
To create a Template:
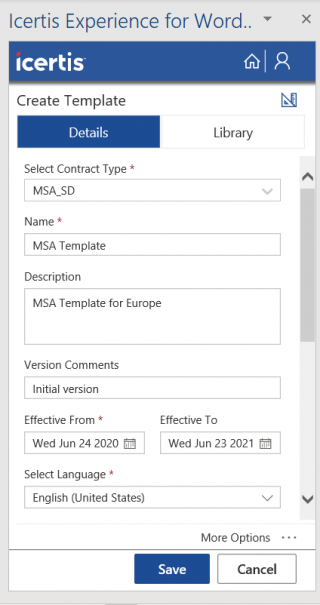
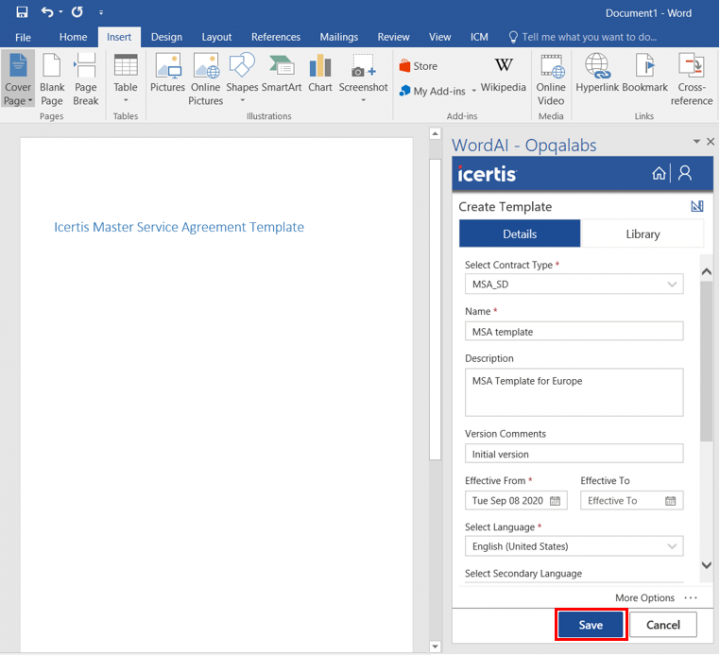
1. Click the Create Template button on Icertis Experience for Word Home page. The Create Template page opens. There are two tabs on this page.
- Details
- Library
(a) Template Details
- Select Contract Type: Select a Contract Type from the list of Contract Types available in the system.
- Name: Type a name for this Template, such as MSA Template or NDA-EU Template.
- Description: Type a description for this Template, such as NDA Template for Europe.
- Version Comments: Type specific details about the version, if required.
- Effective From: Select a date from which this Template will be effective. The date cannot be a past date.
- Effective To: Select a date, when the Template will expire.
- Select Language: Select a language for this Template. The default language is set to English.
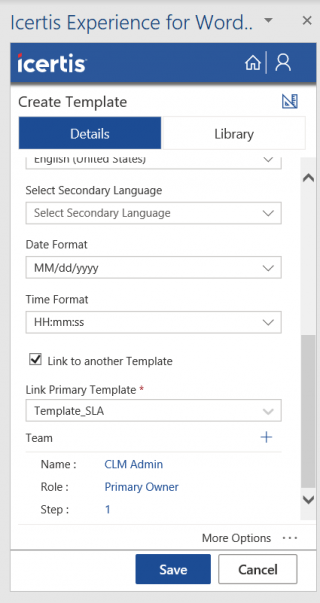
- Select Secondary Language: Select a secondary language for the template, if required.
- Date Format: Select the desired date format from the drop-down depending upon the accepted convention in your area.
- Time Format: Select the appropriate time patterns. The same pattern will be displayed in the Template.
- Link to another Template: Select this checkbox to link this Template to another Template. Clearing the checkbox makes this a primary Template.
- Link Primary Template: Select the Link to another Template checkbox, a drop-down is displayed where you can choose a Primary Template, which you can link to the Template you are creating.
This is an optional step. You can add one user or a User Group as Secondary Owners or Approvers to the Team. This can also be done using ICI Web.
To add Team members:
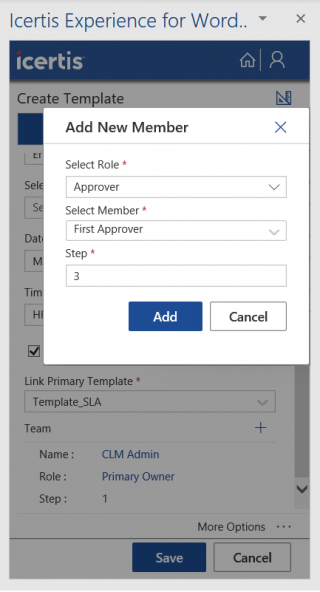
1. Click the Add new member button. The Add New Member window opens.
The available roles are:
- Approver: Approves or rejects the Template after reviewing it. These actions are available only through ICI Web and not from Icertis Experience for Word. If approved, the Template is ready to be used in any Agreement. If rejected, the Template returns to the Draft state for the Primary Owner to make the necessary changes and resend it for approval
- Secondary Owner: Has the same privileges as the Primary Owner
- Contributor: Can make suggestions and review the Template
3. In the Select Member field, select an appropriate User or a User Group for the role.
4. Type the Step on which the person will approve or reject the Template. Mentioning the step number is important, since there can be multiple approvers and the step number defines the signing sequence. This field is displayed only when you select Approver as the Role.
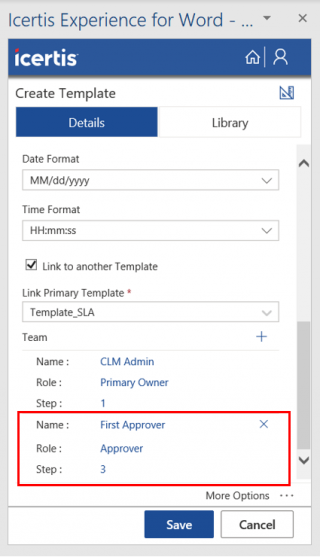
5. Click Add. The member is added to the team. You can see the name of the person along with the other details under the Team section. Repeat steps 1 to 5 to add more members.
(c) Using Library
After entering, the necessary Template details you can add the Attributes, Clauses, Associations, Signatories, and Template Variables tags from the Library section.
You can navigate to the Library section by clicking the Go to library on the More Actions menu or by clicking the Library tab.
(d) Tagging Attributes
1. Click the Attributes tab in the Library section. You can search for desired Attribute using the Search Attribute by name box. The top 10 results are displayed. The Attributes are grouped under different sections. For example, Contract Documents,Suppler Details, etc.
3. Hover an Attribute to view its tag.
5. Select the Show Tagged Only toggle to view all the tagged Attributes in the Template.
6. Click the Delete icon next to the tagged Attribute. The Remove and Remove all options are displayed. If an Attribute is added multiple times in the Template, the Remove all option removes all the instances of the Attribute from the Template. However, the Remove option removes a single instance of Attribute tagged in the Template at a specific position.
(e) Tagging Clauses
All the Clauses that are used in the selected Contract Type are displayed under different Clause groups that are assigned to the Clause when it is created.
To tag Clauses:
1. Click the Clauses tab in the Library section. You can search for a Clause using the Search bar. The top 10 results are displayed.
2. Click the Advanced Search Filter icon if you are not able to find the desired Clause.
3. Expand each Clause group and view the Clauses that are specific to that group.
- Direct: Adds the selected Clause to the Template.
- As rule: Adds the selected Clause in the Template. However, the Clause text is hidden. Only when the condition defined in the Clause Assembly Rule is satisfied, the Clause text is displayed in the Agreement document.
- As rule with page break: Adds the selected Clause in the Template with a page break. However, the Clause text is hidden. Only when the condition defined in the Clause Assembly Rule is satisfied, the Clause text is displayed in the Agreement document on a new page.
- Details: Displays the Clause text and basic details of the Clause.
- Preview: Clicking Preview downloads the Clause document in .PDF format only when the Clause is file based. If the Clause is created in ICI Web UI then the preview of the Clause text is displayed.
- Remove: Removes the tagged Clause from the Template. This option is available after the Clause is added.
- The number next to the Clause indicates the number of times the Clause is tagged into a Template. It is updated when you add or remove the Clause. No number is displayed for non-tagged Clauses.
- After you add or remove Clauses, click the Refresh/Reload list icon to view the updated count, since the count may not refresh automatically. This feature enables multiple users to work on an entity at the same time using Icertis Experience for Word as well as ICI Web without having to lose any updates.
5. Select the Display Tagged Clauses checkbox to view a list of only the Clauses tagged in the Template.
(f) Tagging Associations
To tag associations in your Template:
1. Click the Associations tab in the Library section. You can search for an Association using the Search Associations by name box.
2. Click the corresponding icon to select the appropriate option for the desired Association:
- Association as File: Adds the Association tag to the Template, but it will be displayed in the Agreement only when the contract is assembled.
- Association as file with page break: Adds the Association to the Template, but it will be displayed in the Agreement on a new page only when contract is assembled.
- Association as table: Adds the Association tag to the Template, but the table is displayed in the Agreement only when Assemble Contract action is done. If multiple Associated Documents are added for the same Association, they are added as multiple rows in the table.
- Association as table with page break: Adds the Association tag to the Template, but the table is displayed in the Agreement on a new page only when the Contract is assembled.
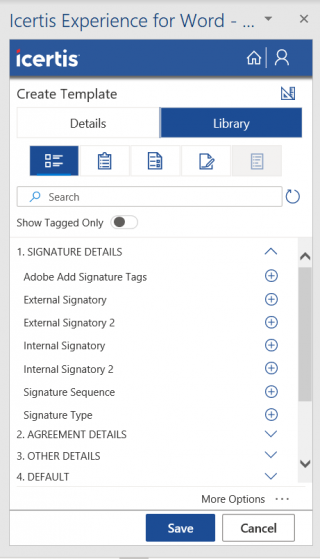
(g) Tagging Signatories
- Internal Signatories
- External Signatories
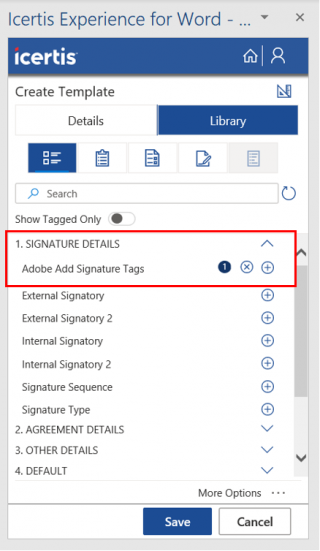
- Signatory 1: Add the signature location to the Template where the signatory must sign. When you add a signatory, a confirmation message is displayed.
- Date 1: Add the date box to the Template for the signatory to specify the date of signature.
- Textbox 1: Keep this field optional or mandatory for Internal and External signatory, depending on the preference of your organization. Click Textbox. A popup opens where you can specify the following information:
- Tag label: Enter the text for your tooltip, if any.
- Select Attribute: Select the Attribute the value of which you want to map to this text box.
- Is Mandatory: Select Yes if you want the signatory to specify the required information to finish the task.
- Is ReadOnly: Select Yes if you want the value to be prefilled (when received by signatory) according to the mapped field. You cannot change this value.
- To Sync: Select Yes if you want the information provided in the Template to be updated in ICI.
- Checkbox 1: Add the checkbox for specific signatories to agree to certain Terms and Conditions. They can accept or deny by selecting or clearing this option. The checkbox is only visible to the specific signatory for whom it was added. Click checkbox 1. A popup opens where you can add the tag and specify whether the checkbox is conditional or not.
(h) Tagging Template Variables
1. Select the Design Preview checkbox to highlight the Attributes, Clauses, and Signatory elements on the Template indicated by the following color codes:
- Attribute, Association and Template Variable tag (yellow)
- Clause tag (grey)
- Signatory tag (red)
Saving a Template
To save the Template you have just created:
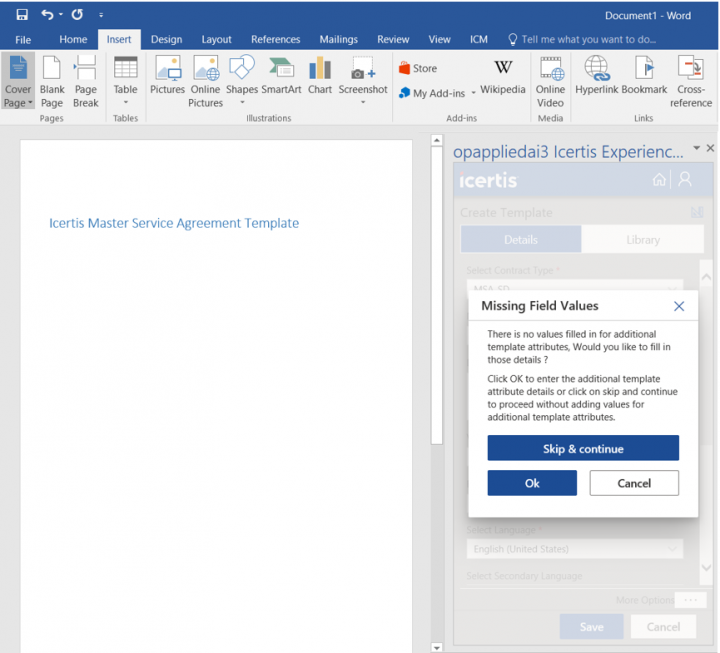
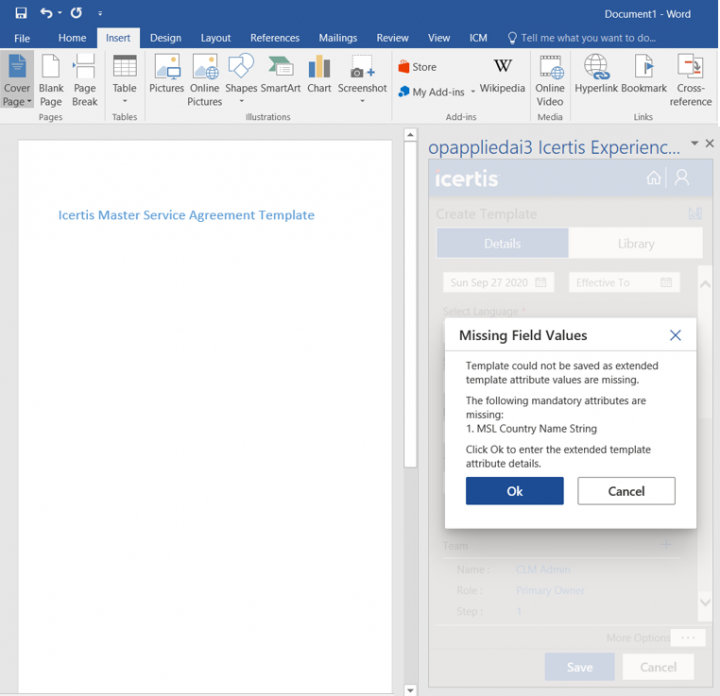
1. Click Save. The Missing Field Values message is displayed if values for template's extended attributes are not entered.
Or
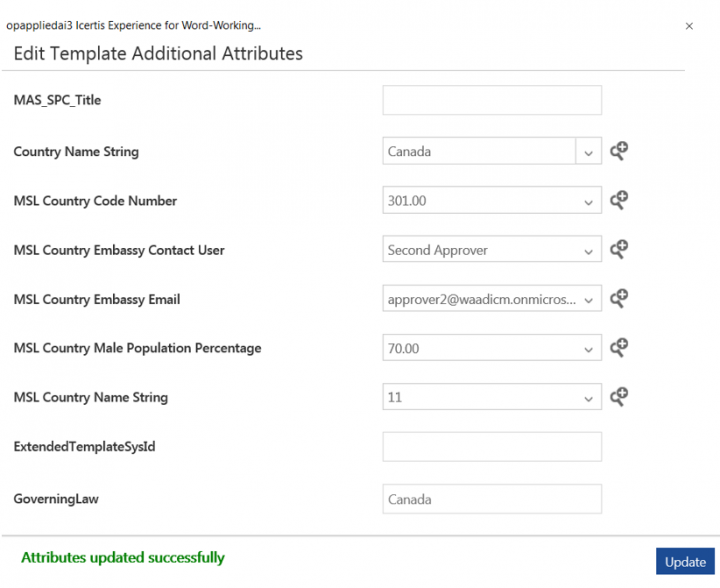
Click Ok to fill the extension attributes. The Edit Template Additional Attributes window opens.
4. Click Update. TheAttributes updated successfully message is displayed.
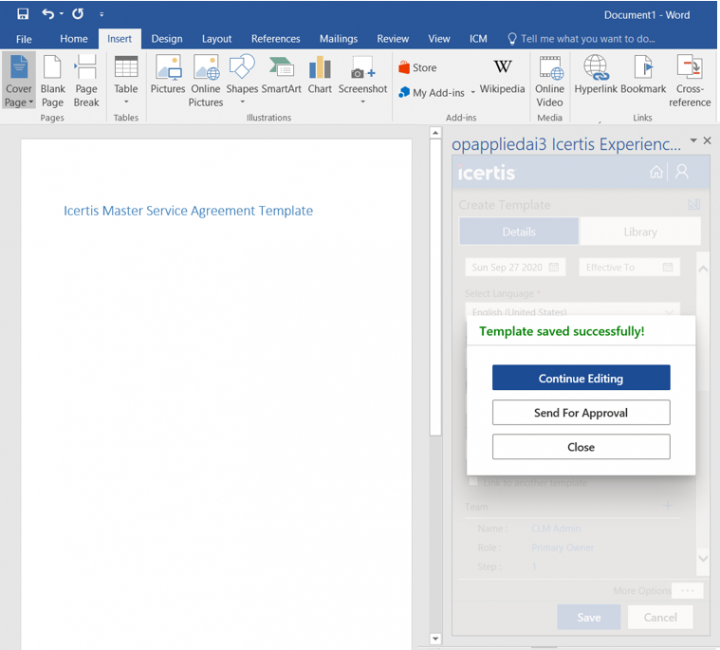
- Continue Editing: Click this option if you want to continue editing the Template. The Edit Template page opens.
- Send for Approval: Redirects to ICI Web UI to send the Template for approval. Refer to the Sending the Template for Approval section for more information.
- Close: Click to go to the Edit Template page.
Sending a Template for Approval
Template Approvals are done on the ICI Web UI.
1. After clicking the Send For Approval button. The Template has been successfully sent for approval message is displayed. A task is assigned to the approver selected in the Team. If you have not entered all the mandatory information details, you will be redirected to the ICI Web UI on the Edit Template page. Unless mandatory information is entered in the Template Additional Attributes section, the Template cannot be sent for approval.
2. Enter all the mandatory details in the Template Additional Attributes section on the Details section of the Edit Template page.
4. Click Next. The Team tab opens.
5. Add the team members if required.
6. Click Update to save the changes. The Template Details page opens.
7. Click Send for Approval.
Viewing Existing Templates
The Edit Template functionality allows you to add or remove Clauses, Attributes, Associations, and Signatories in the Template.
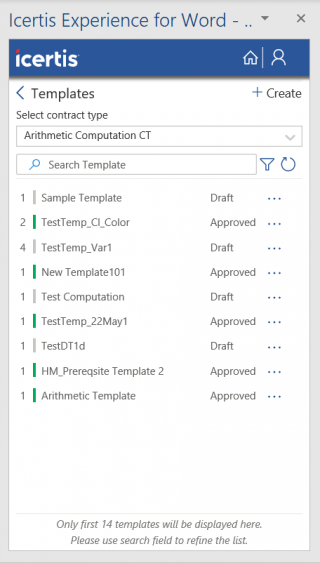
1. Click View Existing Clauses on the Dashboard page. The Templates page opens.
2. Select a Contract Type from the drop-down. A list of all the Templates of the selected Contract Type is displayed. The list includes the top 14 results.
3. Search for a specific Template by typing the first few letters of the Template name or click the Advanced Search Filter icon to find the desired Template.
- Grey: Draft
- Yellow: Waiting For Approval
- Green: Approved
4. Click the corresponding three dots Select Action icon to perform various actions on the Template:
- Edit: Click to edit the Template.
- Remove: Click to delete the Template.
- Preview: Click to preview the Template.
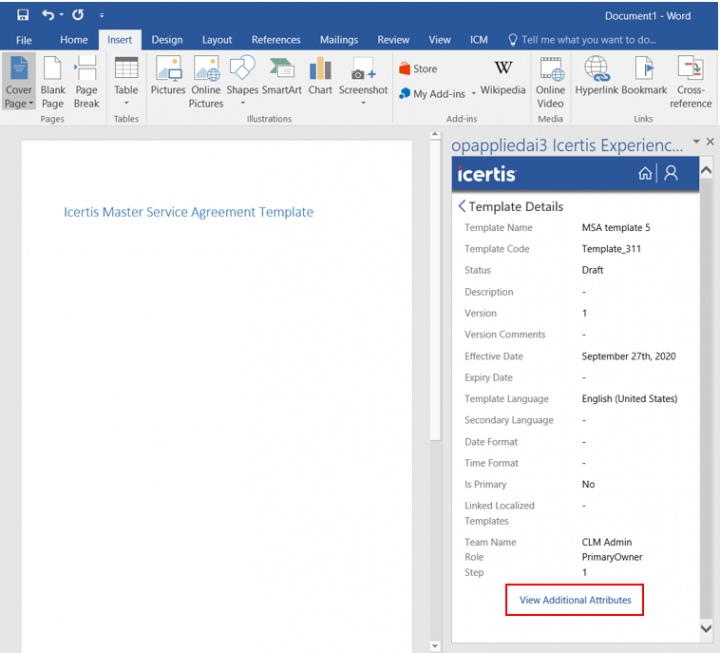
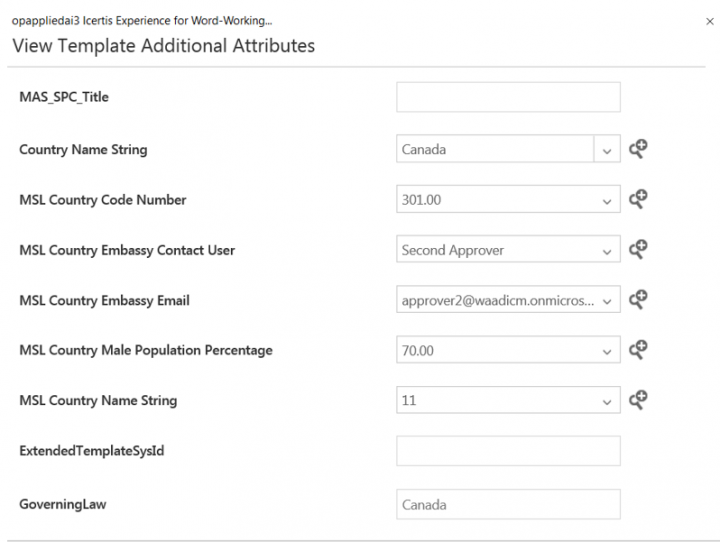
- Details: Click to open the Template Details page. The Details page contains template’s metadata and a link View Additional Attributes.
The link displays template’s extended attributes in a View Template Additional Attribute window upon clicking.
To edit a Template:
1. Click the Edit icon next to the Template you wish to edit. The Edit Template page opens.
2. Edit the basic Template details if required on the Details tab. For example, you may want to change the Effective To date or update Version Comments. You need to change the Effective From date to the present or a future date.
3. Add a User or a User Group to the Team if required.
In the Library section, you can add or remove the Attributes, Clauses, Associations, and Signatories as previously explained in the Library section.
Using More Actions
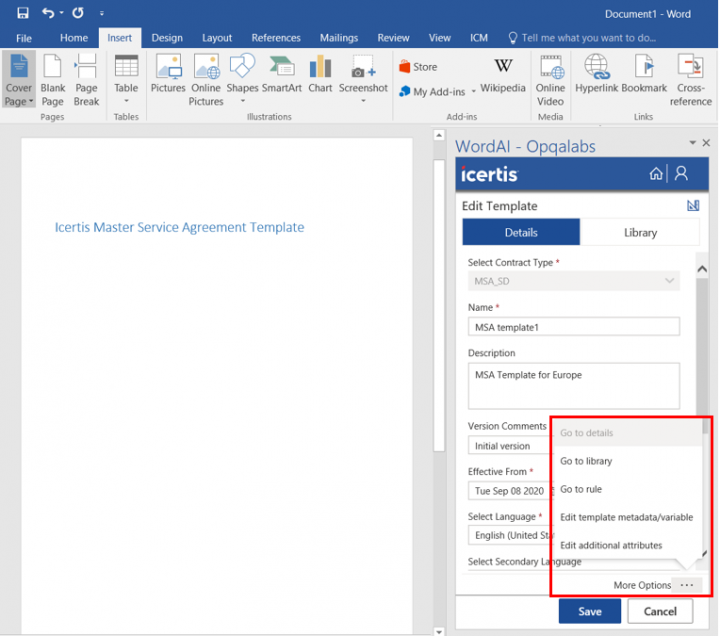
On the More Actions menu of the Edit Template page you can see the following options:
- Go to library: Redirects you to the Library tab
- Go to Template details: Redirects you to the Details tab
- Edit Template metadata/variable: Redirects you to the ICI Web UI Edit/Create Rule page
- Go to Rule: Redirects you to the Rules page of ICI Web. You can create and edit Rules there for the Template
- Edit Additional Attributes: Redirects you to the Edit Additional Attributes window to enter the value for template’s extended attributes
Editing Template Metadata/Variables
Template Variables are the Attributes specific to the Template. To tag Template Variables into the Template, they must first be created and added into the Template only through the ICI Web. The Template Variables can be tagged into a Template using Icertis Experience for Word by accessing the Template Variable menu from the Library section.
If you haven’t already added the Template Variables using the ICI Web you can save the Template, you are creating and open it on ICI Web. Alternatively, you can go to the Edit Template page and be redirected to ICI Web UI.
To edit Template Variables:
1. Open any Template in Edit mode. The Modify Template menu is only available in the Edit Template mode.
2. Scroll down the page and click the More Actions icon.
3. Click Edit Template Metadata/Variable to view a list of all the Template variables for the selected Template. A popup message is displayed denoting that the Template is now saved, and the user will be redirected to ICI Web to create or add Template variables into the Template.
4. Click OK. You will be redirected to the ICI Web to make additional changes to the Template.
5. Type or select the Template details on the Edit Template page of ICI Web.
6. Click Next. The Template Variables section opens. Attributes displayed in Available Attributes section are all the Attributes available in ICI that is. Attributes which are defined as Global or Is Default = Off are displayed here.
7. Click the arrow icon in the Available Attributes section to add an existing Attribute as variables/Attributes to the Template.
8. Edit the selected Attribute. You can change the Display name and Data Type of the Attribute.
9. Click Save to save the changes.
To create a new Template Variable:
1. Click the Add icon Template Variables section. The Add Attribute section opens.
2. Type or select the mandatory details such as Display Name, Data Type. You can define Is Default = On. This means that this Attribute is only available for this Template and cannot be used in other Templates. The Attribute having property as Is Default = true, is not displayed in Available Attribute section.
3. Click Save after defining all the properties. The newly created Template Variable is displayed in the Selected Attribute section.
4. Click Next. The Verify tab opens.
5. Click Update to update the Template with newly created Template Variables.
6. Click the ![]() back icon after selecting the Template variable. The Template Variable is removed from Selected Attribute section.
back icon after selecting the Template variable. The Template Variable is removed from Selected Attribute section.
Working with Clauses
Creating a Clause
You can create Clauses in Icertis Experience for Word and save them in the ICI repository. Any user with Manage access to the Clauses tile in ICI Web can create a Clause in Icertis Experience for Word.
- Details
- Library
(a) Clause Details
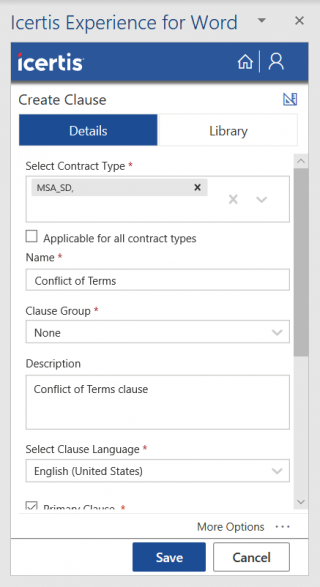
The following fields are displayed on the Details page:
- Select Contract Type: Click the Selected Contract Type drop-down. A list of available contract types appears:
- Click the contract type for which you want to create the clause.
- Click Select All to select all the Contract Types in the list. The clause that you create will be part of all the selected Contract Types.
- Check the Applicable for all contract types check-box if you want the clause to be applicable for all contract types
- Click the cross to remove the selected contract types.
- Name: Enter a name for the Clause, such as Legal Obligation Clause or Termination Clause.
- Clause Group: Select a Clause Group from the available list in the drop-down menu. For example, Legal.
- Description: Enter a description for this Template, such as NDA Template for Europe.
- Clause Language: Select the language for the Clause from the given drop-down list.
- Select the appropriate Clause properties depending on your requirements. The available options are:
- Is Alternate Clause
- Is Mandatory
- Is Editable
- Is Dependent Clause
- Deviation Analysis
- Primary Clause
- Linked Primary Clause: This field is displayed only when the Primary Clause checkbox is unselected. In this case, select a Primary Clause from the drop-down.
(b) Using Library
To navigate to the Library section:
1. Click the Add from library link or click the Library tab.
Viewing Existing Clauses
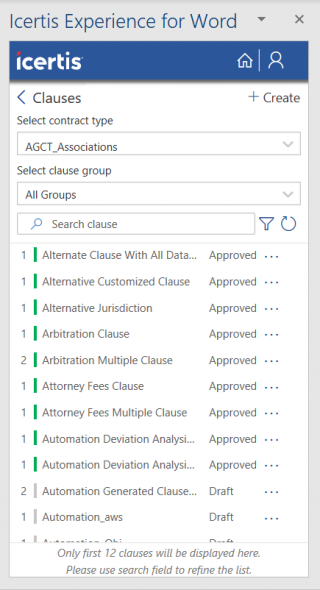
- Click View Existing Clauses on the Dashboard. The Clauses page opens.
- Select the contract type from the Select Contract Type drop-down.
- Select the clause group from the Select clause group drop-down. The clauses that are part of the specific clause group are displayed.
- Click previous and next action arrows to display and navigate through the sets of 30 clauses.
- Select the dots next to the clause and then click Details to view the clause details.
(a) Adding Team Members
To add Team members:
1. Click the plus icon. The Add New Member window opens.
2. Select a Role from the drop-down. For example, Approver.
- Approver: Approves or rejects the Template after reviewing it. These actions are available only through ICI Web and not from Icertis Experience for Word. If approved, the Template is ready to be used in any Agreement. If rejected, the Template returns to the Draft state for the Primary Owner to make the necessary changes and resend it for approval.
- Secondary Owner: Has the same privileges as the Primary Owner
- Contributor: Can make suggestions and review the Template.
4. Type the Step on which the person will approve or reject the Template. Mentioning the step number is important, since there can be multiple approvers and the step number defines the signing sequence. This field is displayed only when you select Approver as the Role.
5. Click Add. The member is added to the team. You can see the name of the person along with the other details under the Team section. Repeat steps 1 to 5 to add more members.
(b) Tagging Attributes
To tag Attributes:
1. Click the Attributes tab in the Library section. You can search for desired Attribute using the Search Attribute by name box. The top 10 results are displayed. The Attributes are grouped under different sections. For example, Basic Information, Legal Assisted Information, etc.
2. Expand the relevant section. A list of Attributes within that section is displayed.
3. Hover over an Attribute to view its tag.
4. Click the Add icon next to the desired Attribute. The Attribute’s tag gets added to the Clause. A number is displayed next to the Attribute when it is tagged. This number denotes the number of times that Attribute has been tagged in the document.
5. Toggle the Show tagged only option to view all the tagged Attributes in the Clause.
6. Click the Delete icon next to the tagged Attribute. The Remove and Remove all options are displayed. If an Attribute is added multiple times in the Clause, the Remove all option removes all the instances of the Attribute from the Clause. However, the Remove option removes a single instance of Attribute tagged in the Clause at a specific position.
7. Click Save to save changes.
(c) Tagging Signatories
You can add, edit, remove and assign a signatory to your Clause depending on your user access.
To tag Signatories:
1. Click the Signatories tab in the Library section. The signatories are grouped as:
- Internal Signatories
- External Signatories
3. Click the corresponding
- Signatory 1: Add the signature location to the Template where the signatory must sign. When you add a signatory, a confirmation message is displayed.
- Date 1: Add the Date box to the Template for the signatory to specify the date of signature.
- Textbox 1: Keep this field optional or mandatory for Internal and External signatory, depending on your organizational preference. Click Textbox. A popup opens where you can specify the following information:
- Tag label: Enter the text for your tooltip, if any.
- Select Attribute: Select the Attribute that you want to map the value of to this text box.
- Is Mandatory: Select Yes if you want the signatory to specify the required information to finish the task.
- Is ReadOnly: Select Yes if you want the value to be prefilled (when received by signatory) according to the mapped field. You cannot change this value.
- To Sync: Select Yes if you want the information provided in the Template to get updated in ICI.
- Checkbox 1: Add the checkbox for specific signatories to agree to certain Terms and Conditions. They can accept or deny by checking or unchecking this option. The checkbox is only visible to the specific signatory for whom it was added.Click Checkbox 1. A popup window opens where you can add the tag and specify whether the checkbox is conditional or not.
(d) Tagging Template Variables
Template Variables are the Attributes specific to the Template.
To tag Template Variables:
1. Click the Template Variables tab in the Library section. The Selected Contract Types in Clause Details are displayed on this page and greyed out, hence you cannot edit them.
2. Since Template Variables are a part of a specific Template, click the Templates drop-down. A list of all the available Templates is displayed. You can select any number of Templates from the available list.
3. Select the Check all checkbox to select all the Templates.
4. Click Uncheck all to unselect all. After you select The Template(s) all the Template Variables associated with the Template are displayed.
5. Enter your search criterion in the Search bar to search a Template Variable.
6. Click the corresponding Add icon to add the Template Variables tag to the Clause. A number is displayed next to the Template Variable when it is tagged. This number denotes the number of times that Template Variable has been tagged in the document.
7. Select the Display Tagged Template Variable checkbox to view all the tagged Attributes in the Template.
8. Click the Delete icon next to the tagged Attribute. The Remove and Remove all options are displayed. If a Template Variable is added multiple times in the Clause, the Remove all option removes all the instances from the Clause. However, the Remove option removes a single instance.
9. Click the tick mark to close the Remove menu.
Editing a Clause
You can edit Clause details, add or remove Attributes, Signatories, and Template Variables.
To edit a Clause:
- Click the View Existing Clauses on the Dashboard page. The Clauses page opens.
- Select the Contract Type from the Select contract type drop-down. A list of all the Clauses of the selected Contract Type is displayed. The list includes the top 12 results.
- Search a specific Clause by typing the first few letters of the Clause name in the Search bar or click the Advanced Search Filter icon to find the desired Clause.
The displayed list of Templates is color coded, the colors denote different states of the Template:
- Grey: Draft
- Yellow: Waiting For Approval
- Green: Approved
Note: The number denotes the Clause version such as version 1, version 8.
- Click the Select Clause group drop-down if you wish to filter the displayed list to a specific Clause group.
- Click the Cross icon to clear the displayed results.
- Click the Refresh icon to get the latest data. For example, if any other user makes changes in the Clauses using Icertis Experience for Word or the Web UI at the same time as you. You would want to refresh the data to see the updated information.
- Click the corresponding icons to perform various actions on the Clause:
- Edit: Click to edit the clause.
- Remove: Click to remove the clause from the document.
- Details: Click to view the Clause Details.
- Preview: Click to open the Clause in PDF version.
- Click the Edit action next to the Clause you want to edit. The Edit Clause page opens.
On the Details tab, edit basic Clause details if required. For example, you may want to change the applicable Clause properties depending on your requirements or change the Clause group.
- Add a User or a User Group to the Team if required.
In the Library section, you can add or remove the Attributes, Signatories, and Template Variables as explained in the Library section.
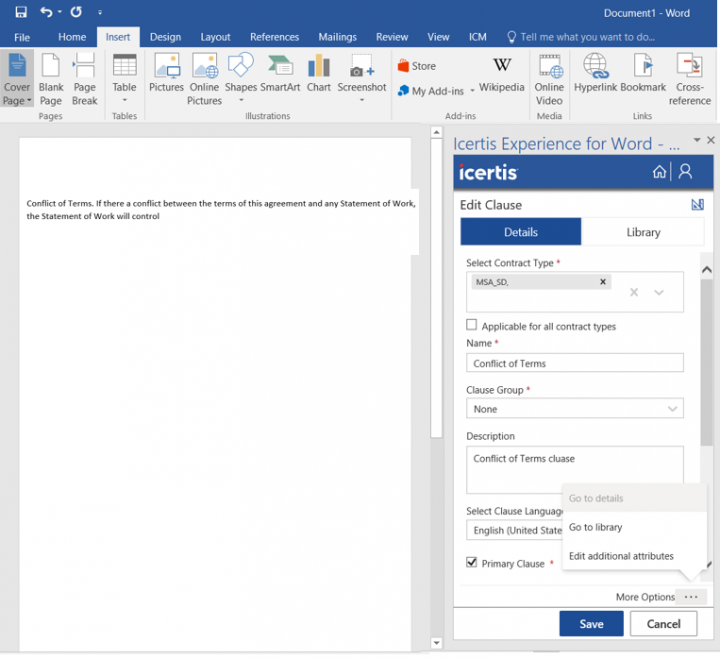
- Click More Options. The options displayed are:
- Go to details: Option disabled on the Details page
- Go to library: Redirects to the Library tab
- Edit additional attributes: Opens theEdit Clause Additional Attributes window to fill in the extended attributes values
- Click Save to save the changes you made. The Clause has been saved successfully message is displayed. Refer to Saving the Template for more details.
Saving a Clause
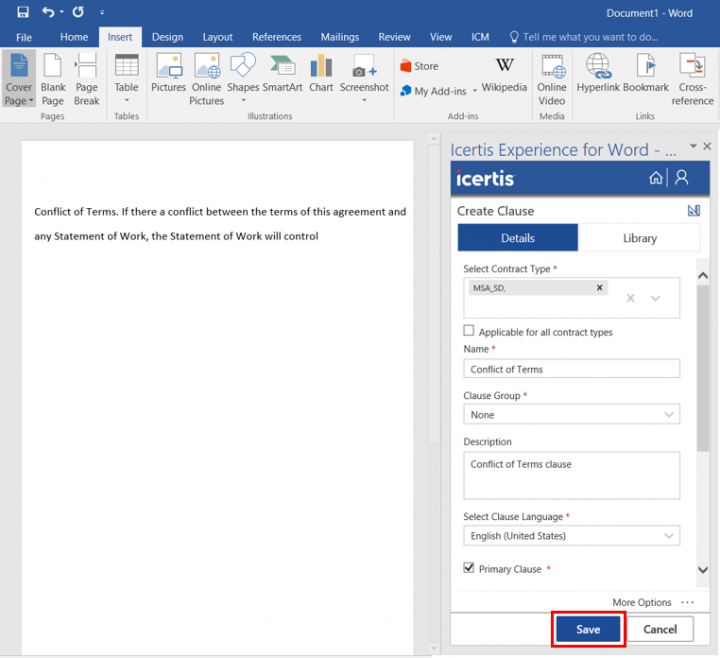
To save a Clause you have created:
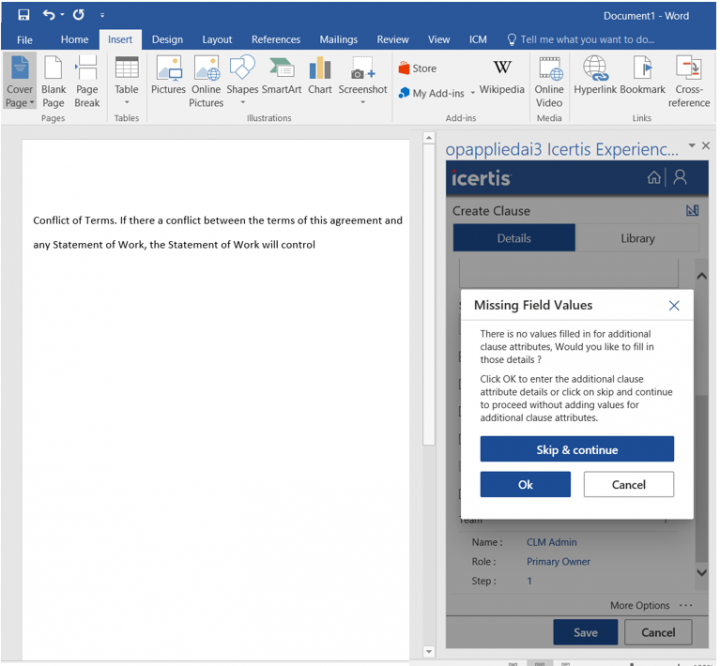
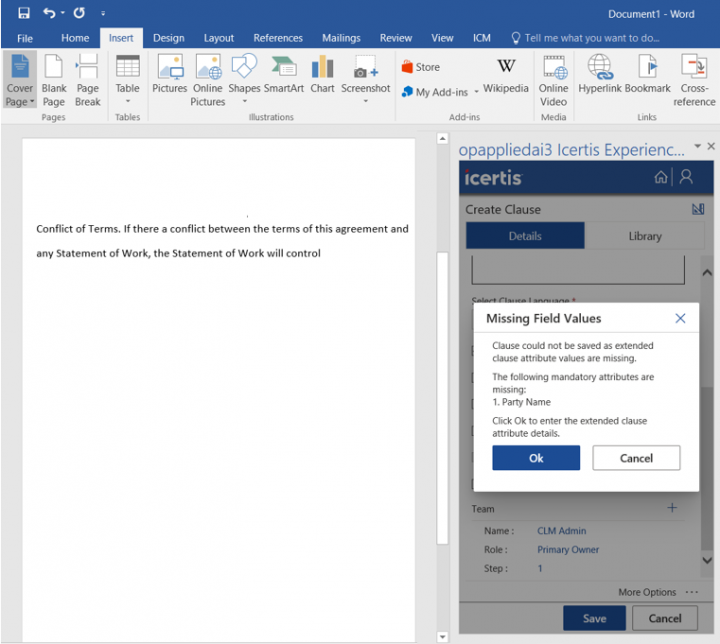
1. Click Save. The Missing Field Values message is displayed if values for clause's extended attributes are not entered.
Or
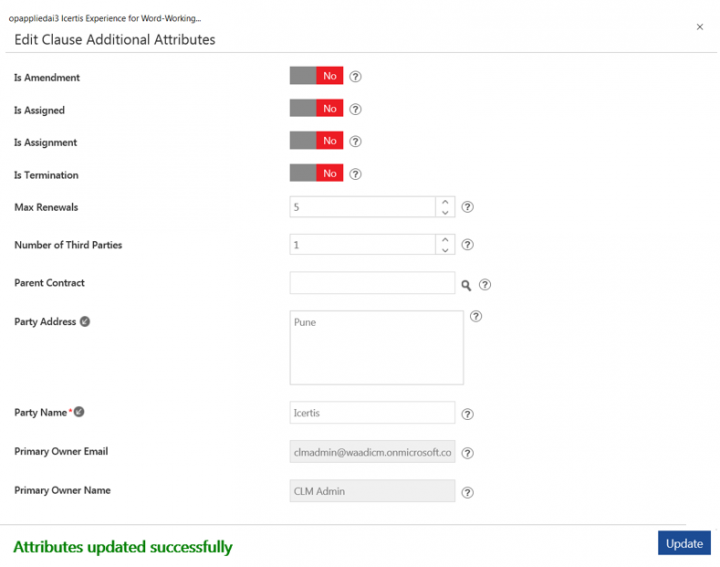
Click Ok to fill the extension attributes. The Edit Clause Additional Attributes window opens.
4. Click Update. The Attributes updated successfully message is displayed.
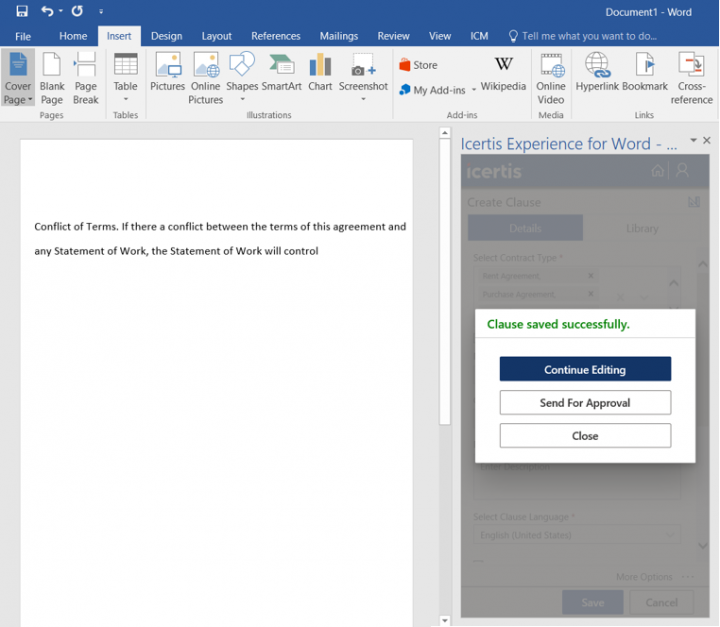
6. Click Save. The Clause has been saved successfully message is displayed along with the options:
- Continue Editing: Click this option if you want to continue editing the Template. The Edit Template page opens.
- Send for Approval: Click this option if the Team is not available, you have the option to move the Clause to the next possible state. Or the Clause has been successfully sent for approval message is displayed. A task is created for the assigned approval to approve the Clause.
- Close: Click to go to the Edit Clause page.
Activity-wise Differentiation of Using Icertis Experience for Word (.JS Word Add-in) and ICI Web
The following table provides activity-wise information on when to use Icertis Experience for Word and when to use ICI Web:
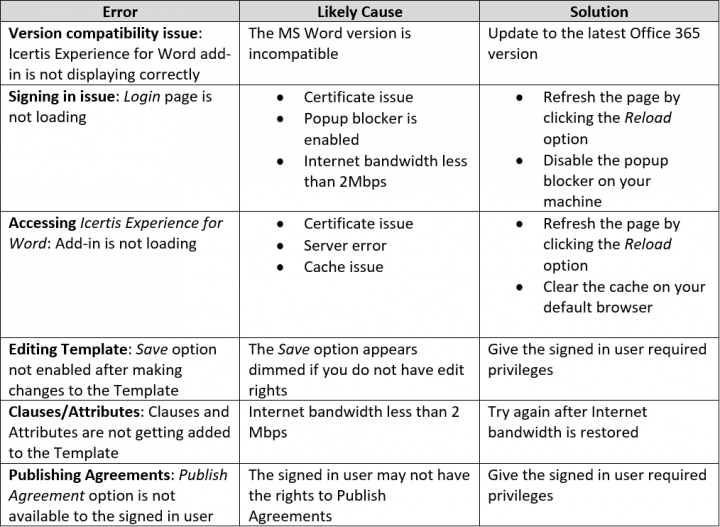
Troubleshooting
Some issues that you are likely to face when working with Icertis Experience for Word, with applicable Causes and Solutions are listed below.
Related Topics: Agreement Management | Association Management | Compliance Management | Template Management | Clause Management | Configuration | Reports| Outlook Add-in | Release Notes |
