

| Line 1: | Line 1: | ||
| − | |||
| − | =Electronic Signature for Third Party Paper= | + | = <font face="Segoe UI">Electronic Signature for Third Party Paper</font> = |
| + | <font face="Segoe UI">Electronic signatures are done through ''EchoSign or DocuSign''. External signatories can choose one of these applications if they wish to do electronic signatures. Refer to </font>[[Sending_an_Agreement_for_Third_Party_Signature|Sending an Agreement for Third Party Signature]] for details on sending the agreement to external signatories<font face="Segoe UI">.</font> | ||
| − | + | <font face="Segoe UI">To sign an agreement electronically:</font> | |
| − | + | ||
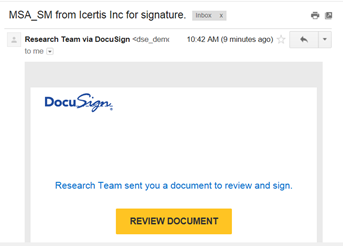
| − | + | #<font face="Segoe UI">Open the e-mail you receive from ''EchoSign or DocuSign''.</font> | |
| + | #<font face="Segoe UI">Click '''Review Document'''. This opens the '''Please review & Act on These Documents''' dialog box.</font><font face="Segoe UI"> [[File:Signature mail.png|RTENOTITLE]]</font> | ||
| + | #<font face="Segoe UI">Select the '''I agree... '''checkbox and click '''Continue'''. This enables the '''Fields''' menu in the left panel.</font><font face="Segoe UI"> [[File:I agree.png|RTENOTITLE]]</font> | ||
| − | + | Note: <font face="Segoe UI">If you are using Internet Explorer, click '''Allow '''at the </font><font face="Segoe UI">'''tracking physical location '''message.</font> | |
| − | + | <font face="Segoe UI">In the '''Fields''' menu, you can use the following options:</font> | |
| − | + | *<font face="Segoe UI">'''Signature''': Drag and drop your signature onto the document.</font> | |
| + | *<font face="Segoe UI">'''Initial''': Drag and drop your initials onto the document.</font> | ||
| + | *<font face="Segoe UI">'''Date Signed''': Drag and drop the Date onto the document. Displays current date by default.</font> | ||
| + | *<font face="Segoe UI">'''Name''': Drag and drop the Name box. Type your name into the box.</font> | ||
| + | *<font face="Segoe UI">'''Company''': Drag and drop the Company box. Type the name of your company into the box.</font> | ||
| + | *<font face="Segoe UI">'''Title''': Drag and drop the Title box. Type the title into the box.</font> | ||
| + | *<font face="Segoe UI">'''Text''': Drag and drop Text box. Type additional text into the box.</font> | ||
| + | *<font face="Segoe UI">'''Checkbox''': Drag and drop Checkbox into the document.</font> | ||
| − | + | <font face="Segoe UI">3. Drag the Signature onto the document. The '''Adopt Your Signature''' dialog box appears. Verify your '''Full Name''', '''Initials''', and '''Signature'''.<br/> Your Full Name and Initials appear as they are entered at the time of your user creation process.</font> | |
| − | [[File: | + | <font face="Segoe UI"> [[File:Adopt your signature.png|RTENOTITLE]]</font> |
| − | + | <font face="Segoe UI">4. On the '''Select Style''' tab, verify your signature.</font> | |
| − | + | ||
| − | + | ||
| − | + | <font face="Segoe UI">5. Click '''Change Style''' to change the style of your signature and initials. A list of alternate styles appear. Use scroll arrows to scroll through the signatures.<br/> You can select from the list of styles.</font> | |
| − | + | <font face="Segoe UI">6. Alternatively, click the '''Draw''' tab to draw your own signature. Click '''Clear''' to clear the signature.</font> | |
| − | + | ||
| − | + | ||
| − | + | ||
| − | + | ||
| − | + | ||
| − | + | ||
| − | + | ||
| − | + | <font face="Segoe UI">7. Click '''Adopt And Sign'''. The Signature and Initials appear onto the document.</font> | |
| − | + | {| class="wikitable" | |
| − | + | |- | |
| − | + | | <font face="Segoe UI">'''Note''': Once the signature appears onto the document, you cannot go back and change the style of the signature.</font> | |
| + | |} | ||
| − | + | | |
| − | + | <font face="Segoe UI">8. Click the '''Other Actions''' menu.</font> | |
| − | + | | |
| − | + | ||
| − | + | ||
| − | + | ||
| − | + | <font face="Segoe UI"> [[File:Other actions.png|RTENOTITLE]]</font> | |
| − | + | <font face="Segoe UI">In the dialog box that appears, select from the following options:</font> | |
| − | + | :<font face="Segoe UI">A. Click '''FINISH LATER''' to save the document in its current state, and finish the signing process at a later time.</font> | |
| + | :<font face="Segoe UI">B. Click '''PRINT & SIGN''' to print the document, and sign it in ink. You can scan and upload, or fax the document.</font> | ||
| + | :<font face="Segoe UI">C. Click '''ASSIGN TO SOMEONE ELSE''' to assign a third person as a signatory.</font> | ||
| − | + | <font face="Segoe UI"> [[File:Assign someone else.png|RTENOTITLE]]</font> | |
| − | + | ||
| − | : | + | |
| − | + | <font face="Segoe UI">In the '''Assign to Someone Else''' dialog box, fill in the following:</font> | |
| − | + | : | |
| − | ::1. In the '''Email Address for the New Signer''' box, type the email address of the person you want to assign the envelope. < | + | ::<font face="Segoe UI">1. In the '''Email Address for the New Signer''' box, type the email address of the person you want to assign the envelope.</font> |
| − | ::2. In the '''New Signer's Name''' box, type the name of the new signor.< | + | ::<font face="Segoe UI">2. In the '''New Signer's Name''' box, type the name of the new signor.</font> |
| − | ::3. In the '''Please provide a reason to Research Team for changing signing responsibility ''' box, type the reason for changing the signing responsibility.< | + | ::<font face="Segoe UI">3. In the '''Please provide a reason to Research Team for changing signing responsibility ''' box, type the reason for changing the signing responsibility.</font> |
| − | ::4. Click '''ASSIGN TO SOMEONE ELSE'''. The new signor and the original sender receives a notification with you as a Carbon Copy (CC) recipient.< | + | ::<font face="Segoe UI">4. Click '''ASSIGN TO SOMEONE ELSE'''. The new signor and the original sender receives a notification with you as a Carbon Copy (CC) recipient.</font> |
| − | :D. Click '''DECLINE TO SIGN''' to notify the sender that you refuse to sign the document and put in the reason for declining it in the '''Comment''' box. The comments can be seen on [[Agreement Details]] page in '''Notes''' tab.< | + | :<font face="Segoe UI">D. Click '''DECLINE TO SIGN''' to notify the sender that you refuse to sign the document and put in the reason for declining it in the '''Comment''' box. The comments can be seen on [[Agreement_Details|Agreement Details]] page in '''Notes''' tab.</font> |
| − | 9. Click '''FINISH''' to | + | <font face="Segoe UI">9. Click '''FINISH''' to complete the signature process. You receive a notification stating your signature process is completed. The status of the agreement changes to '''Waiting For Internal Signature'''. An email is sent to the internal signatory.</font> |
| − | The status of the agreement changes to '''Waiting For Internal Signature'''. An email is sent to the internal signatory. < | + | |
| − | Internal Signatory follows steps 1 to 9 to electronically sign the agreement. Once an Internal Signatory signs the agreement, the status of the agreement changes to '''Executed'''. <br/>A notification email is sent to the primary owner, internal signatory, and external signatory. < | + | <font face="Segoe UI">Internal Signatory follows steps 1 to 9 to electronically sign the agreement. Once an Internal Signatory signs the agreement, the status of the agreement changes to '''Executed'''.<br/> A notification email is sent to the primary owner, internal signatory, and external signatory.</font> |
| − | + | <link-page pageafter="Manual_Signature |Manual Signature" pagebefore="Electronic_Signature_for_Own_Paper|Electronic Signature for Own Paper"></link-page> | |
| − | <link-page pagebefore="Electronic_Signature_for_Own_Paper|Electronic Signature for Own Paper" | + | |
Revision as of 17:05, 4 March 2017
Electronic Signature for Third Party Paper
Electronic signatures are done through EchoSign or DocuSign. External signatories can choose one of these applications if they wish to do electronic signatures. Refer to Sending an Agreement for Third Party Signature for details on sending the agreement to external signatories.
To sign an agreement electronically:
- Open the e-mail you receive from EchoSign or DocuSign.
- Click Review Document. This opens the Please review & Act on These Documents dialog box.
- Select the I agree... checkbox and click Continue. This enables the Fields menu in the left panel.
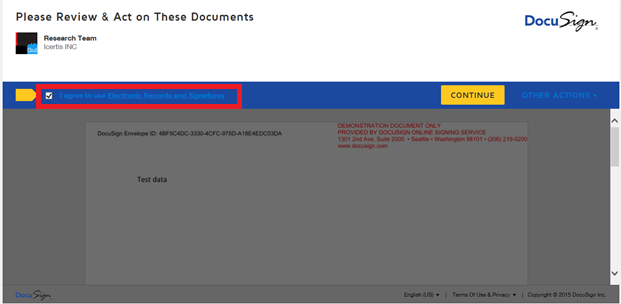
Note: If you are using Internet Explorer, click Allow at the tracking physical location message.
In the Fields menu, you can use the following options:
- Signature: Drag and drop your signature onto the document.
- Initial: Drag and drop your initials onto the document.
- Date Signed: Drag and drop the Date onto the document. Displays current date by default.
- Name: Drag and drop the Name box. Type your name into the box.
- Company: Drag and drop the Company box. Type the name of your company into the box.
- Title: Drag and drop the Title box. Type the title into the box.
- Text: Drag and drop Text box. Type additional text into the box.
- Checkbox: Drag and drop Checkbox into the document.
3. Drag the Signature onto the document. The Adopt Your Signature dialog box appears. Verify your Full Name, Initials, and Signature.
Your Full Name and Initials appear as they are entered at the time of your user creation process.

4. On the Select Style tab, verify your signature.
5. Click Change Style to change the style of your signature and initials. A list of alternate styles appear. Use scroll arrows to scroll through the signatures.
You can select from the list of styles.
6. Alternatively, click the Draw tab to draw your own signature. Click Clear to clear the signature.
7. Click Adopt And Sign. The Signature and Initials appear onto the document.
| Note: Once the signature appears onto the document, you cannot go back and change the style of the signature. |
8. Click the Other Actions menu.

In the dialog box that appears, select from the following options:
- A. Click FINISH LATER to save the document in its current state, and finish the signing process at a later time.
- B. Click PRINT & SIGN to print the document, and sign it in ink. You can scan and upload, or fax the document.
- C. Click ASSIGN TO SOMEONE ELSE to assign a third person as a signatory.

In the Assign to Someone Else dialog box, fill in the following:
-
- 1. In the Email Address for the New Signer box, type the email address of the person you want to assign the envelope.
- 2. In the New Signer's Name box, type the name of the new signor.
- 3. In the Please provide a reason to Research Team for changing signing responsibility box, type the reason for changing the signing responsibility.
- 4. Click ASSIGN TO SOMEONE ELSE. The new signor and the original sender receives a notification with you as a Carbon Copy (CC) recipient.
- D. Click DECLINE TO SIGN to notify the sender that you refuse to sign the document and put in the reason for declining it in the Comment box. The comments can be seen on Agreement Details page in Notes tab.
9. Click FINISH to complete the signature process. You receive a notification stating your signature process is completed. The status of the agreement changes to Waiting For Internal Signature. An email is sent to the internal signatory.
Internal Signatory follows steps 1 to 9 to electronically sign the agreement. Once an Internal Signatory signs the agreement, the status of the agreement changes to Executed.
A notification email is sent to the primary owner, internal signatory, and external signatory.