From ICIHelp7.15
| Line 3: | Line 3: | ||
A user role defines controls or permissions given to a user. ICM has the following three predefined user roles for the '''Requests''' feature: | A user role defines controls or permissions given to a user. ICM has the following three predefined user roles for the '''Requests''' feature: | ||
| − | + | ||
*Requester: The person who generates the request (primary owner). | *Requester: The person who generates the request (primary owner). | ||
| − | *Approver: The person who approves the request. | + | *Approver: The person who approves the request. |
| − | *Reviewer: The person who reviews the request. | + | *Reviewer: The person who reviews the request. |
| − | + | An approver can approve a request from these two locations: | |
| − | *from Notifications Dashboard | + | *from Notifications Dashboard |
| − | *from your Tasks Dashboard | + | *from your Tasks Dashboard |
| | ||
| Line 17: | Line 17: | ||
=== To approve a request from Notifications Dashboard: === | === To approve a request from Notifications Dashboard: === | ||
| − | #Click the '''Alerts '''tile on [[My_Dashboard|My Dashboard]]. This opens the [[View_Notifications|Notifications Dashboard]] page. | + | #Click the '''Alerts '''tile on [[My_Dashboard|My Dashboard]]. This opens the [[View_Notifications|Notifications Dashboard]] page. |
| − | #<div class="image-green-border">Click '''Contract Request Notifications''' category. This displays a list of all Contract Request notifications | + | #<div class="image-green-border">Click the '''Contract Request Notifications''' category. This displays a list of all Contract Request notifications.[[File:NotificationsDashboard.JPG]]</div> |
| − | + | <ol start="3"> | |
| − | + | <li><div class="image-green-border">Click '''Contract Request Sent for Approval''' and view the automated message displayed on the right side of the page with a link to that particular request page.</div> </li> | |
| − | <div class="image-green-border"> </div> | + | <li><div class="image-green-border">Click '''Approve''' to approve the request. This opens the '''Add Note''' dialog box.</div> </li> |
| + | <li><div class="image-green-border">Type an appropriate note and click '''Add'''. The status of the '''Request''' changes to '''Approved.'''</div> </li> | ||
| + | </ol> | ||
| + | <div class="note-box">'''Note: '''When the approver rejects the request, the status of the request changes to '''Draft''' and the request has to go through the approval process again.</div> | ||
| + | | ||
| + | |||
=== To approve a request from Tasks Dashboard: === | === To approve a request from Tasks Dashboard: === | ||
| Line 33: | Line 38: | ||
<li>Request Review</li> | <li>Request Review</li> | ||
</ul> | </ul> | ||
| − | |||
| − | |||
| − | |||
| − | |||
| − | |||
| − | |||
| − | |||
| − | |||
| | ||
| Line 46: | Line 43: | ||
| | ||
| − | '''Related Topics:''' [[Create_Request_Page|Create a new Request]] | | + | '''Related Topics:''' [[Create_Request_Page|Create a new Request]] | '''Approve a Request''' | [[Cancel_a_Request|Cancel a Request]] | [[Create_a_Structure_of_a_Contract_Request|Create a Structure of a Request]] |
| | ||
Revision as of 06:04, 20 March 2017
Approving a Request
A user role defines controls or permissions given to a user. ICM has the following three predefined user roles for the Requests feature:
- Requester: The person who generates the request (primary owner).
- Approver: The person who approves the request.
- Reviewer: The person who reviews the request.
An approver can approve a request from these two locations:
- from Notifications Dashboard
- from your Tasks Dashboard
To approve a request from Notifications Dashboard:
- Click the Alerts tile on My Dashboard. This opens the Notifications Dashboard page.
- Click the Contract Request Notifications category. This displays a list of all Contract Request notifications.
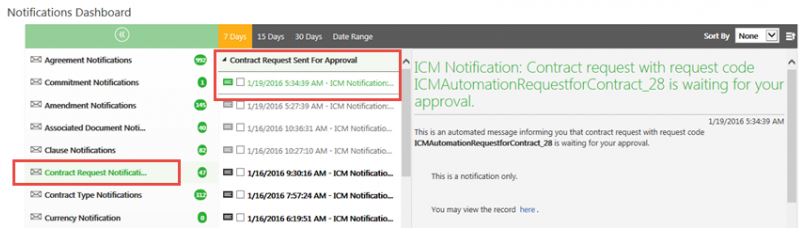

- Click Contract Request Sent for Approval and view the automated message displayed on the right side of the page with a link to that particular request page.
- Click Approve to approve the request. This opens the Add Note dialog box.
- Type an appropriate note and click Add. The status of the Request changes to Approved.
Note: When the approver rejects the request, the status of the request changes to Draft and the request has to go through the approval process again.
To approve a request from Tasks Dashboard:
- Click on the Tasks tile on My Dashboard. This opens the Tasks Dashboard with a list of all you tasks.
- Click the task link This opens the Contract Request page.
- Click the buttons as appropriate:
- Edit
- Approve
- Reject
- Request Review
Related Topics: Create a new Request | Approve a Request | Cancel a Request | Create a Structure of a Request