Agreement Management
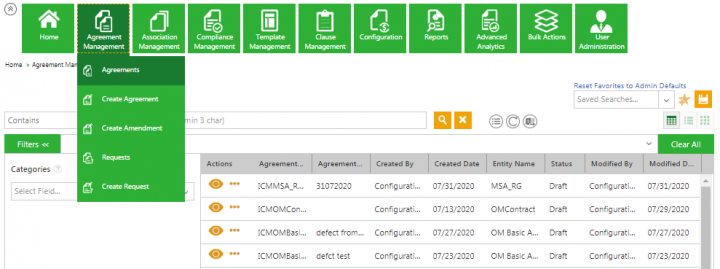
The Agreement Management section enables you to manage all aspects of creating and editing Agreements from a single page. From this page, you can do the following tasks:
- View and manage all your Agreements on the Agreements page.
- Create new Agreements on the Creating an Agreement.
- Search, view, and manage all your existing requests on the Requests page.
- Create new Requests on the Create Request page.
In ICI, the terms Agreement and Contract are used interchangeably and mean the same thing. In this Help, we will use the word Agreement when discussing Agreements, whereas Contracts will be discussed with reference to Contract Types.
While the actual workflow of an Agreement in ICI can be quite complex and involved, it is summarized in these five steps:
1. Create Contract Request: When someone in your organization, such as a department manager wants to engage a vendor for certain services over a length of time, the individual can raise that request with the procurement department that can then work on that Agreement. Depending on the workflow adopted, your organization may:
- Enforce this step so that all contracts are initiated and drafted only by one department, or
- Make this step completely optional, so it can be skipped by someone who is an expert at contracting and its process.
2. Create Agreement: In this step, the primary owner or the creator of the agreement select the contract type, selects attributes and template, and verifies the details that you entered in the agreement. See Create Agreement Page for complete details.
3. Review Agreement: After the primary owner has created an internal draft of the agreement, it is published. The published draft can be sent for reviews (optional, if decided by the Primary Owner of the Agreement) .
4. Approve Agreement: Once the Agreement is reviewed, it can be sent for approvals to the team of people that are working on this Agreement in various roles.
5. Execute Agreement: Several people can review and approve the Agreement before it is ready to be signed. After all approvals are obtained, the Agreement is sent to be signed by both the parties. With both parties signing (known as internal and external signatories in ICI), the Agreement is said to be executed and is now in force.
Notes:
If an incorrect document was initially uploaded by a signatory, a user with the appropriate privilege can upload the correct document even after the agreement is executed. The uploaded document must be a PDF. The Executed state of the Agreement remains unchanged. Only the following roles have this privilege:
* Primary Owner
* Secondary Owner
* Contributor
If changes are required in the Agreement that is in an Executed state, the Primary Owner of the Agreement can add an Amendment. Changes may be required due to any of the following business reasons:
* The payment terms of the Agreement have changed.
* The Statement of Work (SOW) in the Agreement has changed.
* The terms and conditions of the Agreement have changed due to the introduction of a new regulation.
6. Support Multi-party Agreements: ICI offers full platform support for multi-party Agreements. You can now use a single system for managing all your Agreements and capture multiple other parties and divisions on an Agreement seamlessly. It allows you to search only metadata instead of searching multiple attributes, thus making it user-friendly. There is no limit on the number of parties that can be added. All parties can sign the Agreements either manually or electronically, based on the signing sequence set in ICI. It also supports parallel signatures independent of the status of either party.
Such Agreements include Non-Disclosure Agreements, Sell Agreements or business-specific Agreements. For example, A healthcare business group needs Contract Types for managing their contracts, but the Mergers and Acquisitions department needs their own Contract Types.
Key capabilities of Multi-Party:
- Captures multiple values of Attributes and/or Masterdata
- Tags these multiple instances in the Template
- Supports the signature workflow with these multiple instances of customer data
- Supports multiple Rules (say for approval workflow) based on the individual values selected. For example, in an Agreement, if 3 Divisions are selected, the approval process should support approvals from all 3 divisions.
- Supports visibility in such a one-to-many environment; For example, in the multi-division scenario, the Agreement visibility too should be enabled for multiple divisions.
Upfront chevron view of agreement journey
In ICI, as per the contracting business paradigm, an agreement entity goes through different workflows and stages starting from authoring to execution, and expiration or termination.
Users can view the current status of an agreement on the Agreement Index or Details page, a generic progress view on the Team tab, and logged audit details on the History tab. To understand the progress of the agreement and find relevant information, the user needs to navigate through multiple tabs.
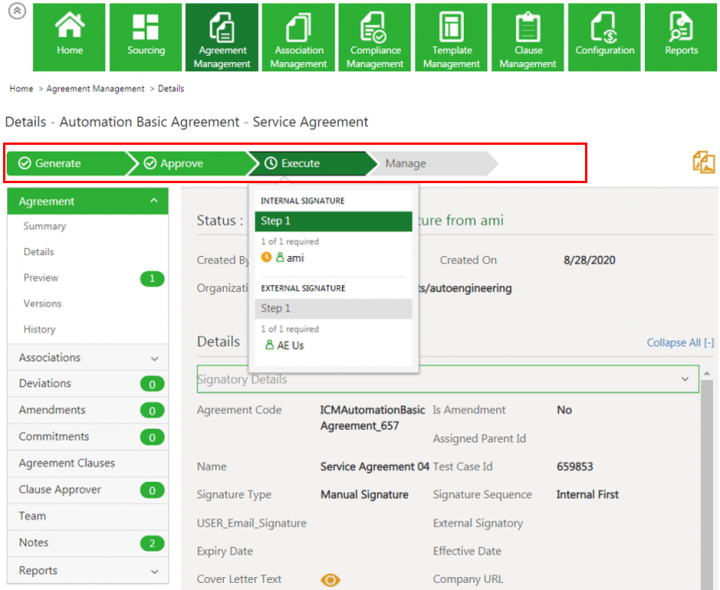
With this release, a horizontal chevron has been introduced, which is a visual depiction of the agreement’s journey that provides a simple, upfront and consolidated view of the agreement’s lifespan. The 4 stages of the chevron prominently communicate an entity’s journey including the previous, current and possible future states of the agreement. This considerably improves usability for new and existing users as they can now find information easily and with minimum clicks.
The colors of the chevron are indicative of the stage of the agreement. For example, if the theme color as per user preferences is green, then the previous stage is displayed in a light green color, the current stage is displayed in a dark green color, and the future stages are displayed in grey color.
The chevron displays the following 4 tabs corresponding to the various stages of the agreement’s journey:
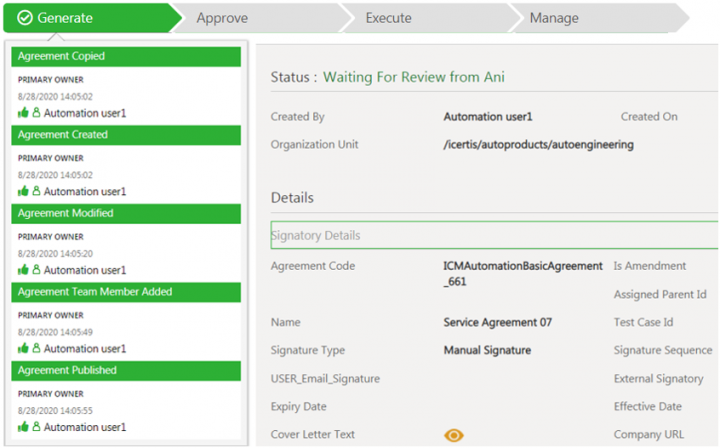
1.Generate: Displays list of actions taken by the user on the agreement before it is published. It includes the 5 most recent logs of the actions taken (such as Agreement Copied, Agreement Published) including details such as role of the user who performed the task, date and time of the action, and user name. The icons displayed next to the user name are similar to those in the agreement’s History log (such as green thumb icon for actions completed).
2. Approve: Displays the list of approvers as per the defined steps in the agreement, users that have approved the agreement, users with pending approval actions and for how long it has been pending with them. The icons and information in this tab are similar to those displayed in the agreement’s Progress view.
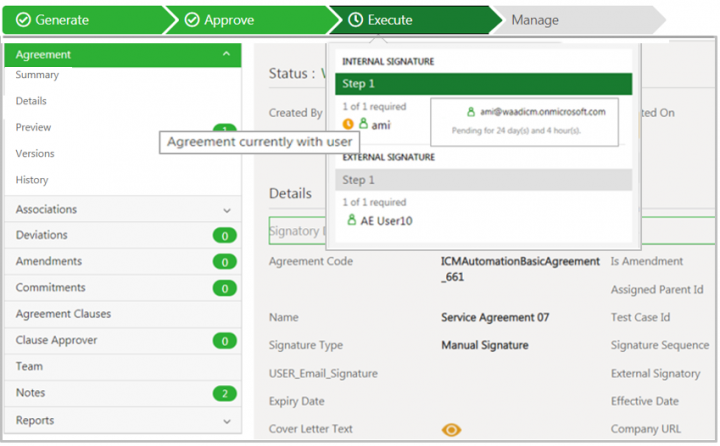
3. Execute: Displays details such as internal/external signatories that have either signed the agreement or whose signatures are pending. By default, the external signatory details are displayed first. The icons and information in this tab are similar to those displayed in the agreement’s Progress view.
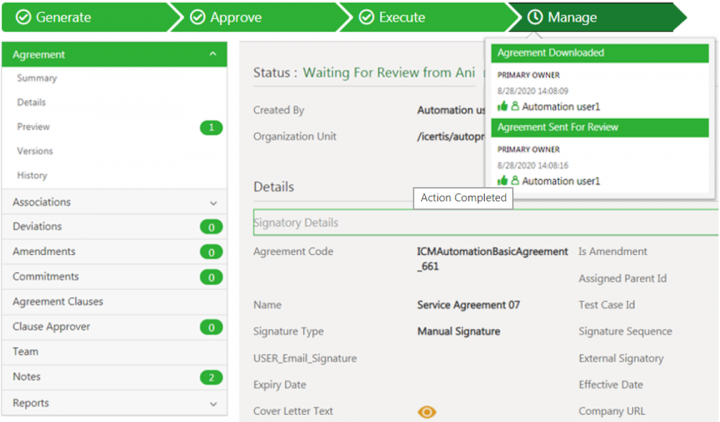
4. Manage: Displays the 5 most recent logs of the actions taken by the user to manage the agreement post-execution. (such as Agreement Terminated, Agreement Superseded). The icons displayed next to the user name are similar to those in the agreement’s History log.
The icons displayed on the chevron include:
Note:
- The chevron view is only applicable to agreement contract type (agreements and amendments).
- By default, the chevron is disabled; it can be enabled for selected contract types.
- The chevron labels support localization.
Let’s consider an example of an agreement named Automation Basic Agreement and view its journey through the 4 stages of the chevron.
1.Generate: Displays the following details:
- List of 5 most recent logs of the actions taken by the user who created the agreement – e.g. Agreement Copied, Agreement Created, Agreement Modified, Agreement Team Member Added, and finally Agreement Published.
- User details – e.g. user name Automation user1 and user role Primary Owner.
- Time stamp – e.g. the agreement was copied on 8/28/2020 at 14:05:02.
- Icons next to the user name – similar to those in the agreement’s History log, e.g. green thumb icon for actions completed.
2. Approve: Displays the following details:
- List of approvers as per the defined steps in the agreement, users that have approved the agreement, users with pending approval actions and for how long it has been pending with them. The list of approvers is similar to those mentioned in the Team tab.
- Number of approvers required for agreement approval – e.g. 1 of 2 required. If no approvers are added, then a message will be displayed that no approvers are added to the team and the agreement is directly approved.
- Approver details – e.g. approver 1 - AE User13, approver 2 – AE User11.
- Hovering over the user names opens a box displaying the user (approver) email and Notes added by the user, if any.
- The icons and information in this tab are similar to those displayed in the agreement’s Progress view.
- Internal/ external signatories that have either signed the agreement or whose signatures are pending e.g. Internal Signature by ami and External Signature by AE User 10.
- Minimum number of external and internal signatures required at each step e.g. 1 of 1 required external signature at Step 1 by external signatory AE User 10.
- Hovering over the user names opens a box displaying the user (approver) email, with whom the agreement currently is, and for how long it has been pending with the user.
- By default, the external signatory details are displayed first. The icons and information in this tab are similar to those displayed in the agreement’s Team tab. If no signatories are part of the team, then a message will be displayed indicating that and the agreement will directly move to the Executed state.
- The 5 most recent logs of the actions taken by the user to manage the agreement post-execution e.g. Agreement Downloaded, Agreement Sent For Review.
- The icons displayed next to the user name are similar to those in the agreement’s History log.
- User details – e.g. user name Automation user1 and user role Primary Owner.
- Time stamp – e.g. the agreement was copied on 8/28/2020 at 14:08:09.
- Icons next to the user name – similar to those in the agreement’s History log, e.g. green thumb icon for actions completed.
- The clock icon on the Manage tab indicates the stage that is in progress e.g. the user has to take actions on the agreement and is currently in the Agreement Sent For Review state, whereas the tick mark icon on the Generate, Approve and Execute tabs indicate that these stages of the agreement’s journey are complete.
Contract Lifecycle Management, Artificial Intelligence, and Bulk Upload
For organizations looking to optimize their contract lifecycle management processes and digital transformation, this release includes capabilities to manage the bulk upload of larger volumes of legacy contracts, and Artificial Intelligence (AI) driven enhancements to improve discovery, identification, and digitization of third-party, legacy and federal contracts.
Using ICI, you have the:
- Ability to create US Federal Acquisition Regulations clause repository and to manage US Federal Contracts using ICI.
- Accelerate contract digitalization and management by quickly converting legacy contracts into live contracts with AI-enhanced contract digitization capabilities which also help in AI-powered clause and attribute discovery. Excel based bulk upload capability to do so at scale.
- Upload legacy Agreements in bulk supporting a larger volume of agreements and other entities using Excel utility.
