Contents
- 1 Negotiate AI
- 1.1 Prerequisites
- 1.2 Agreement Clauses
- 1.3 Agreement Attributes
- 1.4 Similar Agreements
- 1.5 Agreement Similarity
- 1.6 Discovering Attributes and Clauses using Icertis Experience for Word
- 1.7 AI powered playbook in WordAI
Negotiate AI
As Legal people are more comfortable using MS Word to make and edit Agreements as compared to ICI, the Negotiate AI feature has been added in this release to help bridge this gap. This enables real-time negotiation and provides assistance at the time of the Agreement review by looking up similar Agreements or similar Clause text. This feature is available in ICI through a technical configuration.
You can now use Negotiate AI to work with Own Paper, Third Party and Legacy Contracts by:
- Selecting a Discovered Clause text and Attributes in the opened MS Word document of the Agreements and finding similar Clause text in ICI.
- Updating the Discovered Clause text and Attributes in the opened Word document of the Agreements and saving them to ICI.
Note:
- NegotiateAI supports the following versions:
- Microsoft Office 2016 Desktop for Windows (versions higher than build 16.0.4390.1000 (64-bit))
- Microsoft Office on Windows (connected to Office 365 version): Version 1602 (Build 6741.0000) or later
- ICI supports discovery of String, Number, Boolean, Text Area, Currency, Choice, Email, Lookup Cascade, Date, Percentage and User attributes as well as validations for mandatory and invalid attribute values for all the supported data types, eligibility of contract types for AI discovery, etc. In this release, we have extended the discovery support to URL datatype and provided support for multi-choice, multi-choice lookup datatypes on the Attributes Discovery page. We have also added an option in the discovered clauses menu of NegotiateAI to find clauses similar to discovered clauses in the ICI repository.
Prerequisites
- The plugin Icertis Experience for Word must be installed.
- All the Discovery features should be present in the plugin Icertis Experience for Word when authoring an agreement, either using own or third party paper.
To use Negotiate AI:
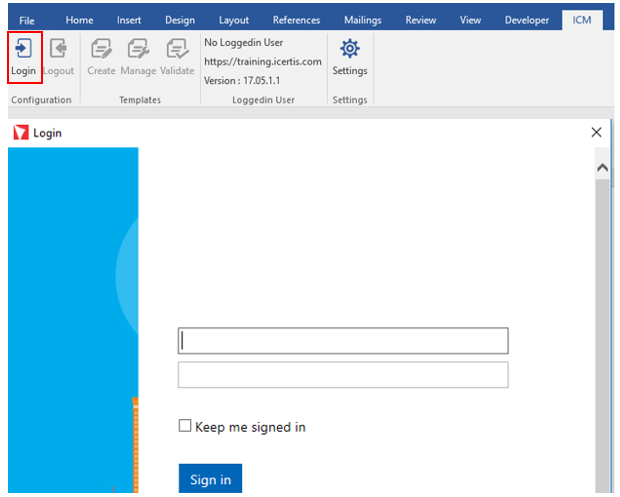
1. Login to ICI.
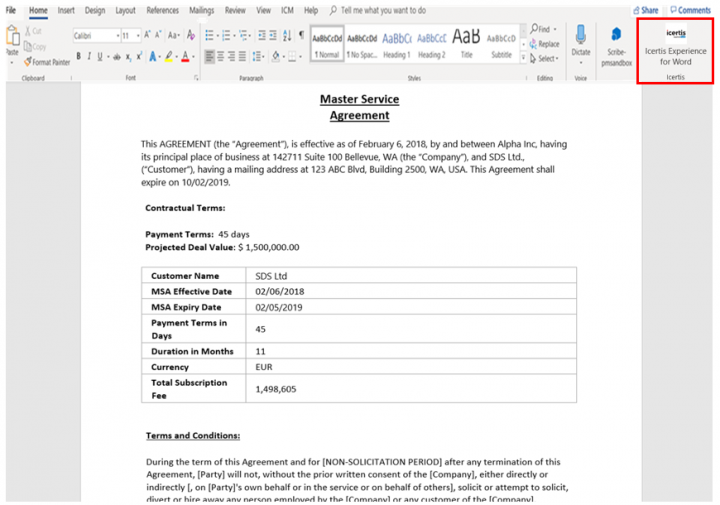
2. Open the agreement document.
3. Click Icertis Experience for Word.
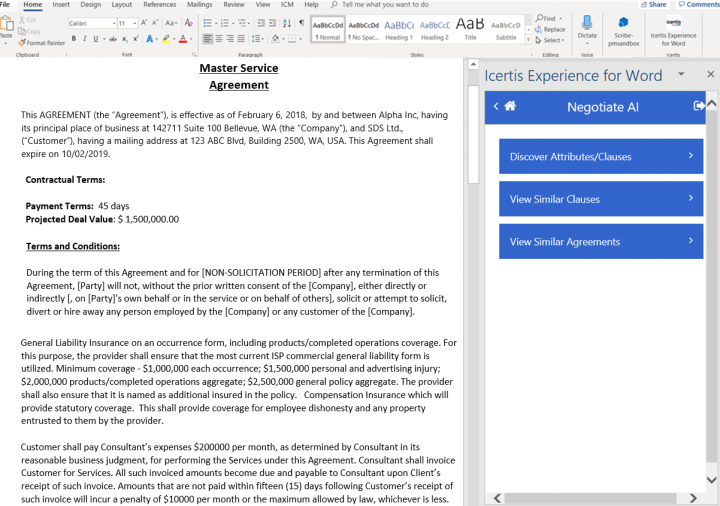
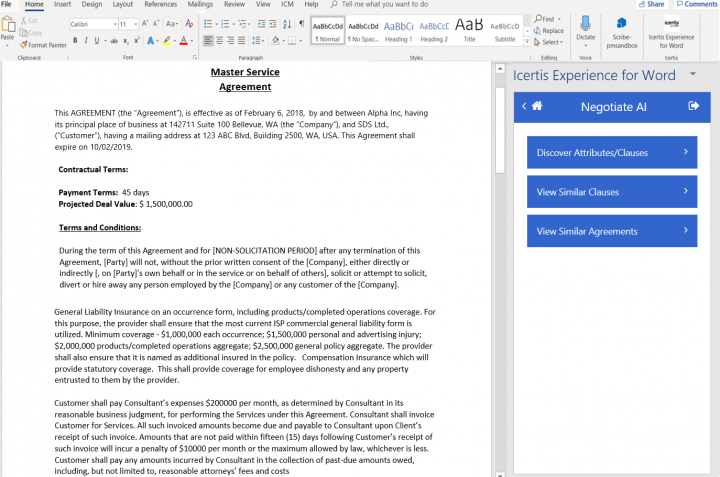
4. The Negotiate AI in the Icertis Experience for Word opens.
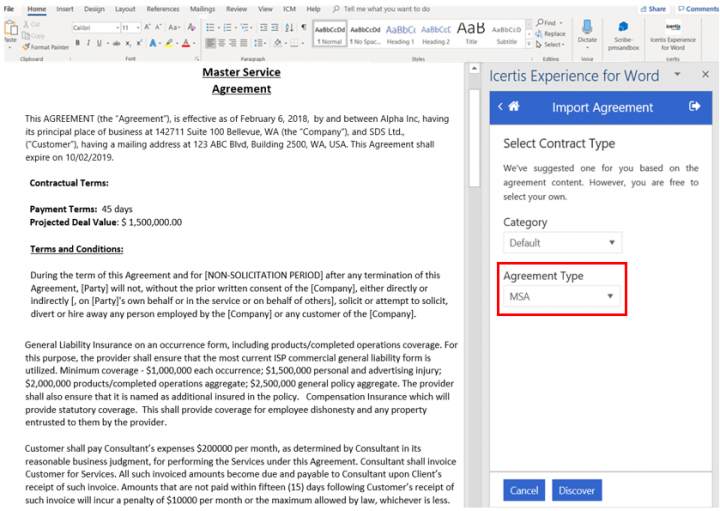
6. Select the Category and Agreement Type.
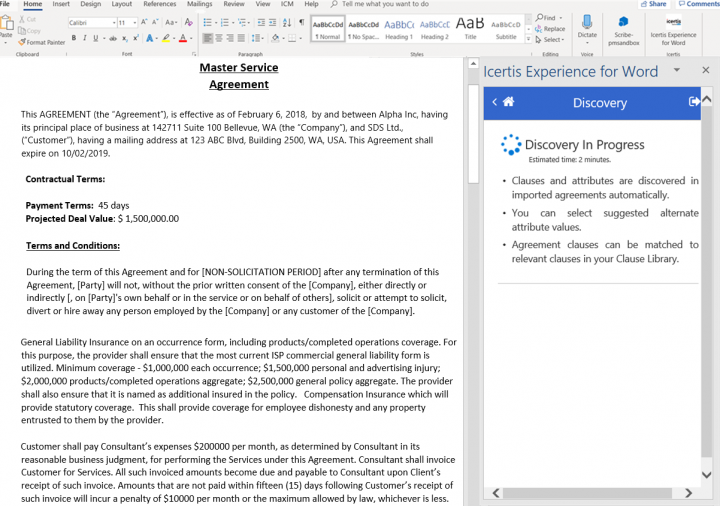
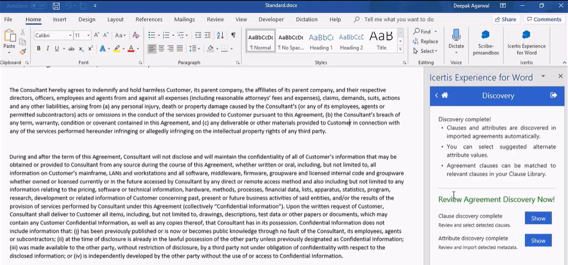
7. Click Discover. The Discovery in Progress message is displayed while the Clauses are being discovered from the Clause Library and the Attributes are being identified to tag them to the Imported Agreements automatically.
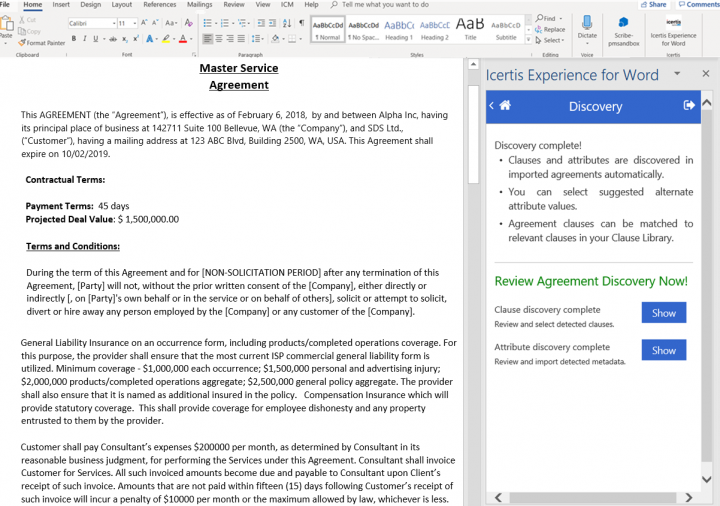
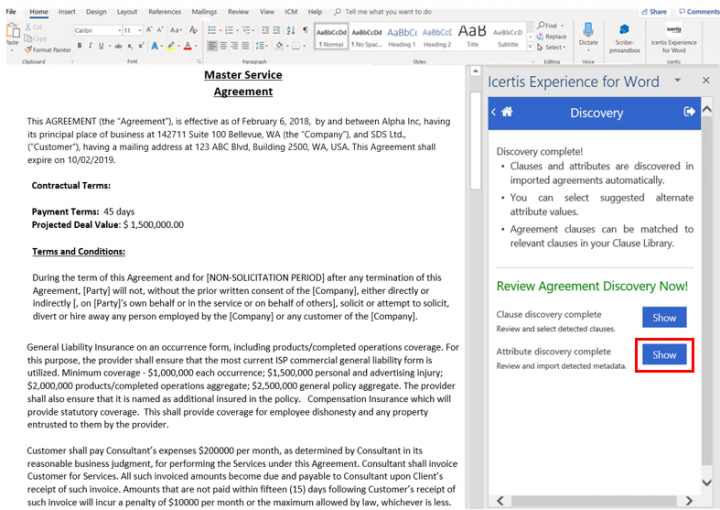
8. The Review Agreement Discovery Now message appears.
Agreement Clauses
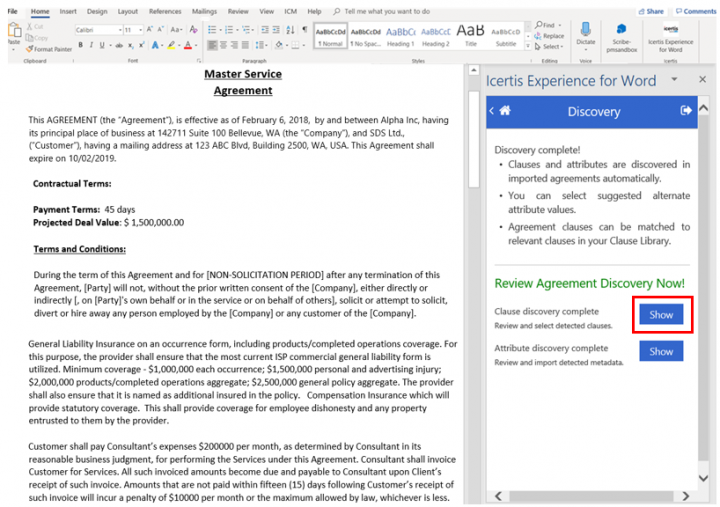
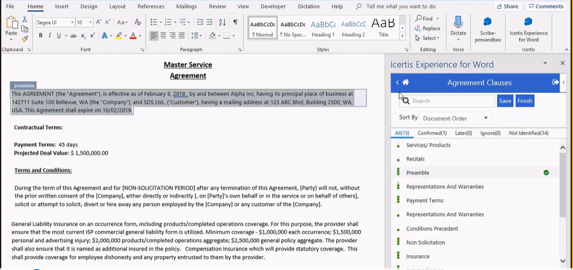
9. Click the Show button to review and select from the detected clauses.
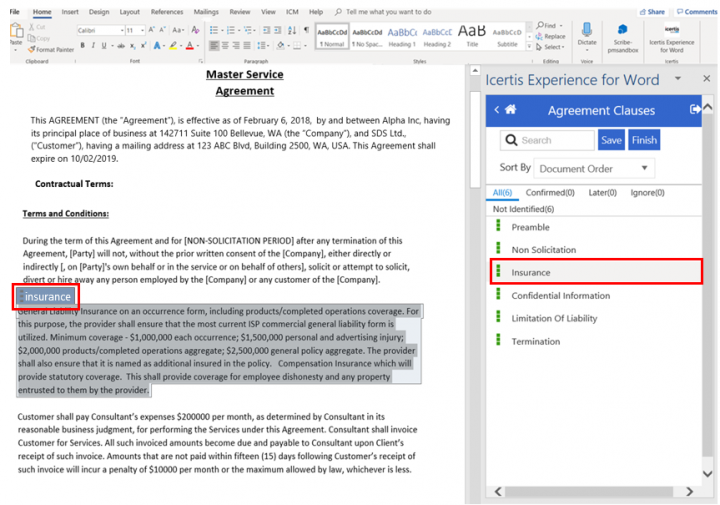
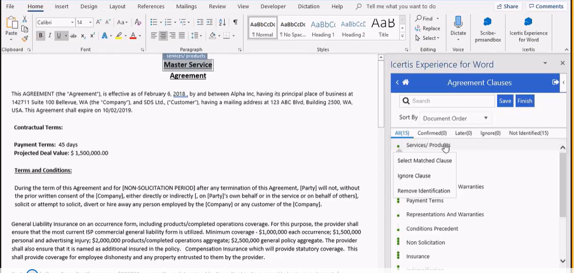
- The green color dots on the left-hand side indicate the confidence level of the match based on the clauses present in the Clause Library.
- Click the green dots to display the actions that can be taken on the clauses, such as Select Matched Clause, Ignore Clause and Remove Identification.
10. Click the clause to see the location on the document.
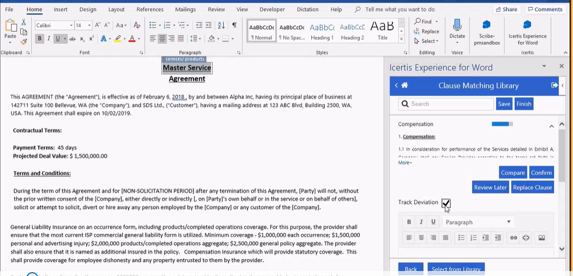
- Click Confirm to confirm that the clause matches with what is available in the Clause Library. This Clause then appears under the Confirm tab.
- Click Review Later if you are unsure and want to review a clause later.
- Click Replace Clause if you want to replace the clause with another one.
- Click Compare to compare the clause based on the match from the Clause Library.
- Check the Track Deviation box if you want to track the deviations.
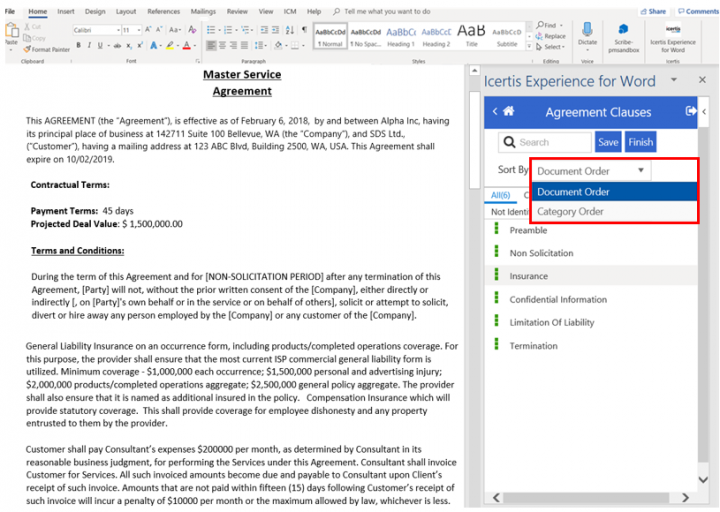
- Sort the Search by:
- Document Order
- Category Order
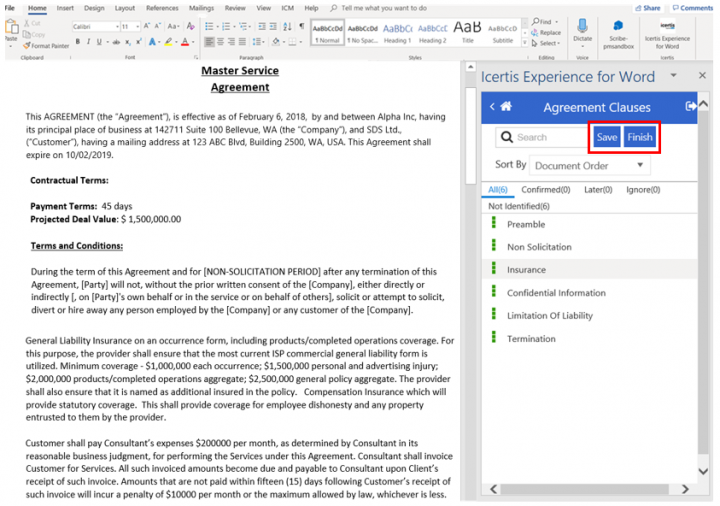
12. Click Save to save your work in the Draft status. The same changes will reflect on the ICI UI. A new agreement is created, and the clauses will be displayed on the Clauses tab on the agreement Details page.
13. Click Finish. The remaining workflow continues as expected.
Agreement Attributes
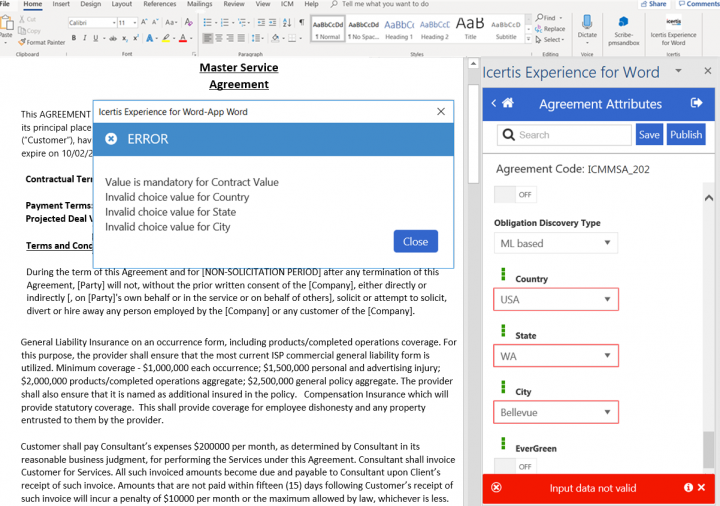
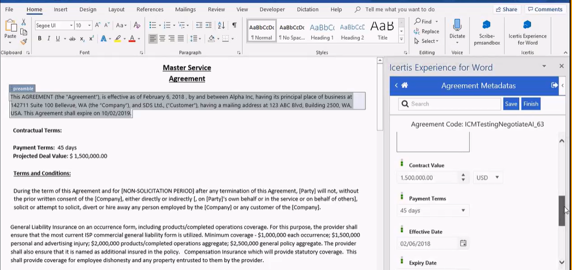
14. Click the Show button to review and select from the detected attributes.
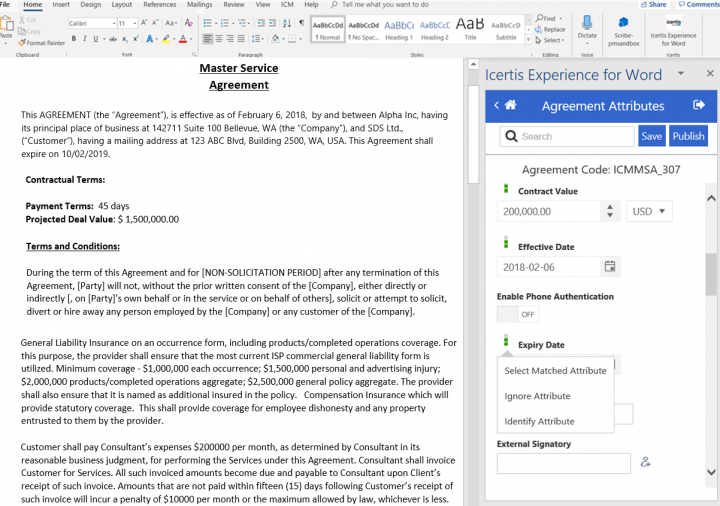
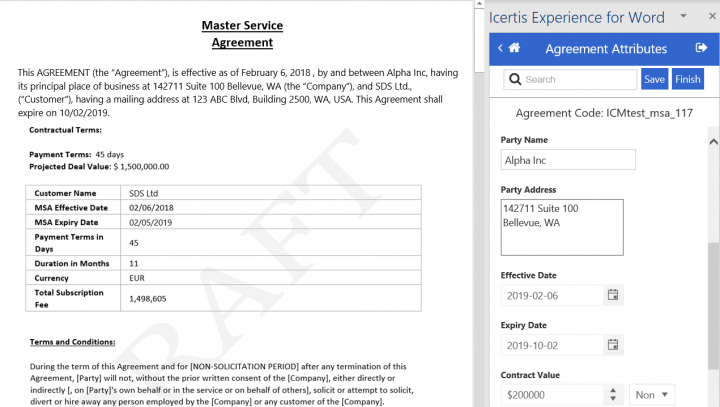
All the discovered attributes (such as Contract Value, Effective Date, Expiry Date and so on) are displayed as shown in the screenshot below. The Contract Value is present with the supported currencies. The grouping of attributes is based on the grouping preferences applied at the time of Contract Type creation.
- The green color dots on the left-hand side indicate the confidence level of each attribute.
- Click the green dots to display the actions that can be taken, such as Select Matched Attribute, Ignore Attribute and Identify Attribute.
15. Edit the attributes as required. For example, you can select an External Eignatory or change the Effective Date/Expiry Date.
17. Click Finish. All the confirmed attribute values are saved and tagged in ICI format in the agreement document, and the latest version of the agreement is created in ICI in the Versions tab.
Similar Agreements
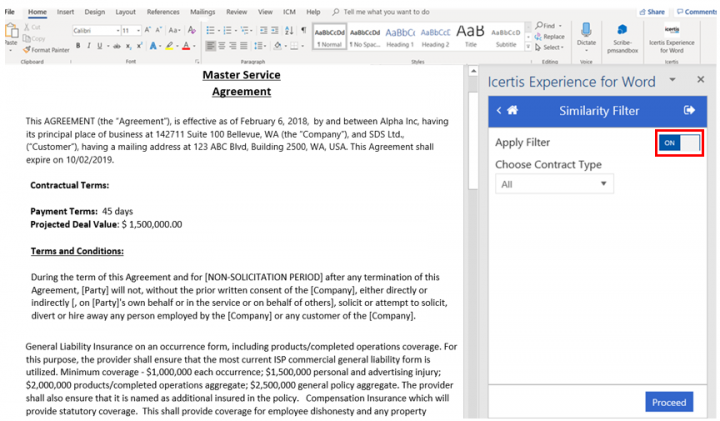
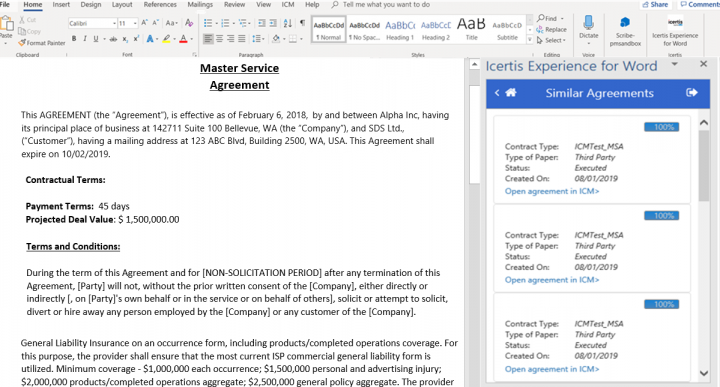
18. Click View Similar Agreements if you want to view similar Agreements from ICI that may have been created for other customers or that are of the same Contract Value.
21. Click Proceed if you want to find similar Agreements.
Agreement Similarity
While negotiating a particular Clause, the contract negotiator would like to quickly find similar Clauses in contracts that have already been executed to be able to make informed decisions. This also applies to the Agreement as a whole where the negotiator can refer to historical data from similar Agreements.
The following options are provided within the Add-in so that the user can:
- Select a Clause/text and find similar Clauses from the ICI repository and compare them with the selected one
- Select similar Agreements present in the ICI repository
- Choose a filter to narrow down the Similarity search (for Clauses and Agreements) within particular type of Agreements
Creating a Rule and building your own repository
To create a Rule and build your own repository of ICI contracts within which similar Clauses (or Agreements) can be extracted:
- Click the Configuration tile on the Dashboard.
- Click theRules tile.
- Click Select Contract Type. For example, Testing Negotiate AI.
- Select the Rule that you want to edit.
- Enter the Rule Name. For example, Rule to index similarity.
- Enter the Rule Description. The Contract Type, Rule Type and Event are auto populated.
- Click Next. The Edit Rule page opens.
- Click Update.
- The Rule updated successfully message is displayed. Click OK.
Finding Similar Clauses (or Agreements)
Let’s consider an example of finding similar Clauses. You can follow the same method to find similar Agreements.
1. Open the Agreement Document. The Negotiate AI in the Icertis Experience for Word opens.
2. Click View Similar Clauses.
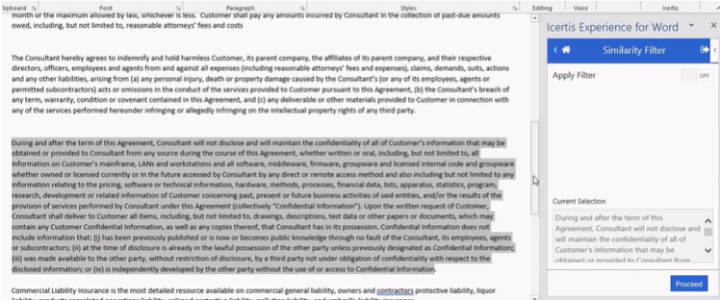
3. Select a Clause in the Agreement Document and apply the Similarity Filter to search for similar Clauses in it.
4. It will be displayed in the Current Selection section.
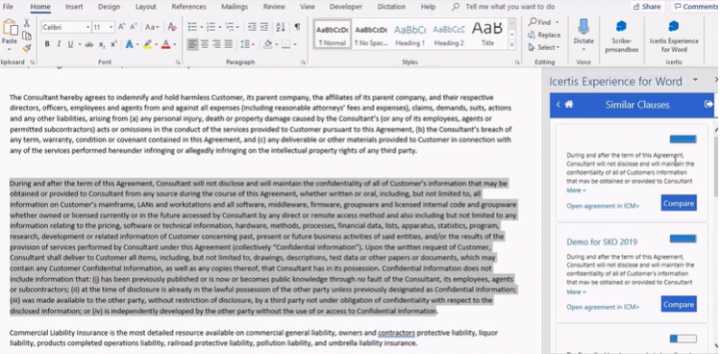
5. Click Proceed. Clauses that are similar to the selected one will be displayed.
6. Click Compare to get a comparison of the Clauses.
7. The Discovery complete message is displayed when similar Clauses are discovered.
8. Click Show to view the discovered Clauses in the Review Agreement Discovery Now section. A list of all discovered Clauses will be displayed in the All tab of the Agreement Clauses pane.
9. Click Sort By if you want to sort the Clauses by Document Order or Category Order.
10. Select a Clause and click Select Matched Clause if it matches your search criteria. For example.Preamble The selected Clauses will then appear in the Confirmed tab. You can ignore a Clause or Remove Identification if it does not match your search criteria. These will then be displayed in the respective tabs.
11. Click Save. The Clause Matching Library pane opens.
You can compare, confirm, replace or review Clauses later. You can also track deviation on the Clauses.
12. Click Select from Library if you want to select the Clause from the ICI repository.
13. You can edit the Attributes here from the Agreement Metadata pane.
Discovering Attributes and Clauses using Icertis Experience for Word
When you initiate the discovery process using the Icertis Experience for Word, the system triggers the discovery of attributes and clauses for both - own and third party type of paper. However, only non-tagged attributes and clauses are discovered.
To discover attributes and clauses:
1. Download the latest agreement in Word format from the Versions tab on the agreement Details page.
2. Open the agreement using the Icertis Experience for Word.
3. Click the Discovered Attributes/Clauses button.
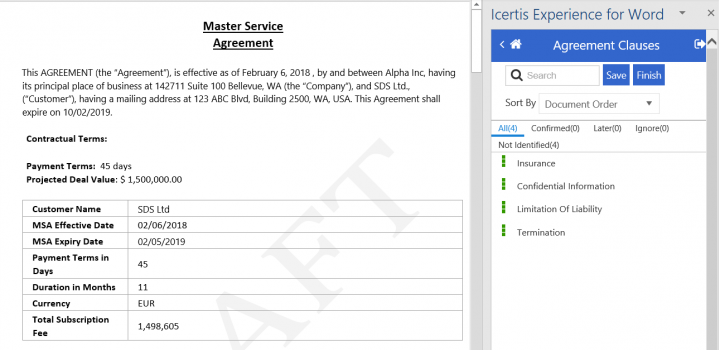
The discovery is triggered but ICI-tagged attributes and clauses are not discovered. All other attributes and clauses are discovered and displayed, as shown in the screenshots for Clauses and Attributes below:
Clauses:
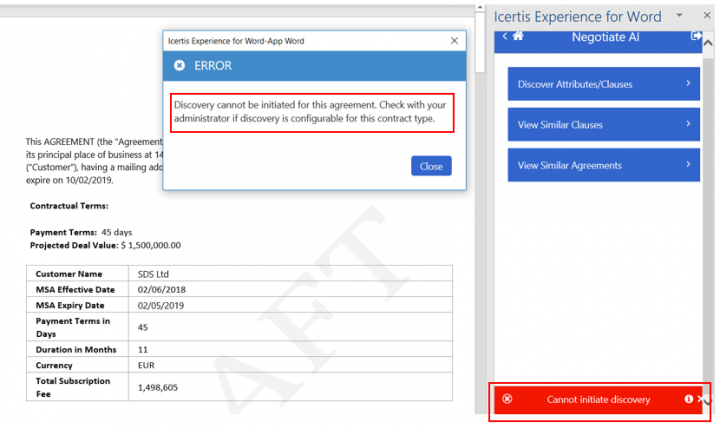
- If you create an agreement that does not have the Clause Discovery Type attribute, an error message is displayed as shown in the screenshot below:
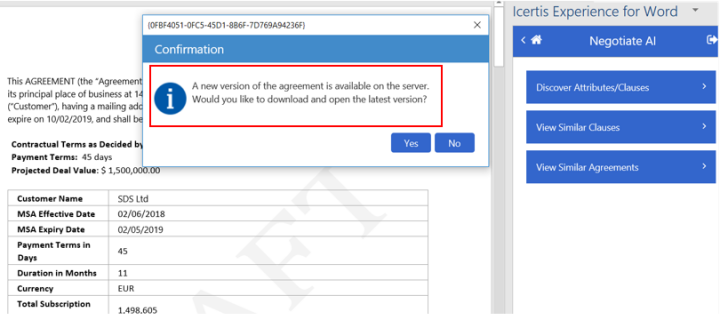
- If a latest agreement version is present in ICI, but you open the previous version using Icertis Experience for Word, ICI automatically detects the latest version, as shown in the screenshot below:
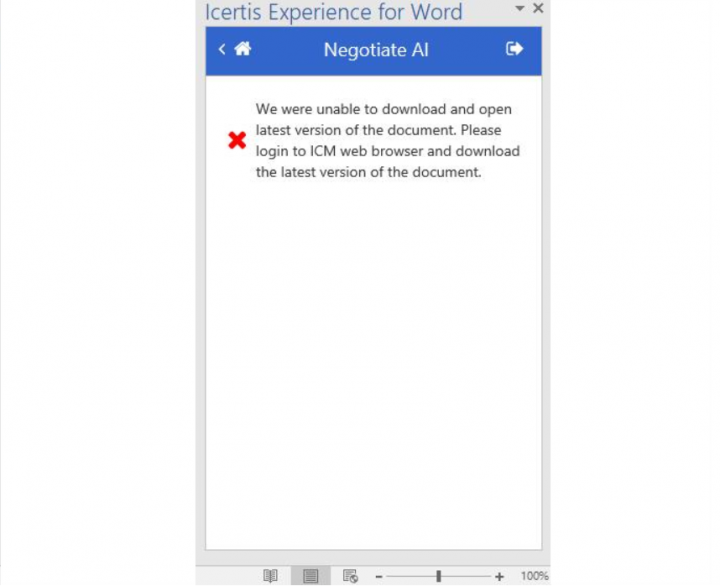
- Clicking Yes will automatically download and open the latest version.
- Clicking No will let you continue working on the previous version. After you confirm the attributes and clauses and click Finish, this version will be saved as the latest one in ICI.
AI powered playbook in WordAI
With this release, ICI is introducing a legal playbook in the WordAI app that uses artificial intelligence to identify exceptions in the contract and actions taken on them, as well as assess the risk when these exceptions are accepted by the negotiators to be able to take corrective actions and mitigate risks.
Earlier, negotiators had to manually review each clause to find deviations or track how the negotiations have proceeded through multiple exchanges over a period of time and detect the risks of the agreement.
Now, ICI supports digitization of the legal playbook using masterdata that allows users to define and parameterize multiple playbook positions (data types) for standard library clauses or contract types, define rules for playbook exceptions, and assign risk scores for each playbook exception.
The exceptions are identified by the WordAI app using the discovery process allowing users to review and take corrective actions. Based on the actions taken, a risk assessment is done and a risk report is then available which displays the cumulative risk scores across different versions.
Negotiators can now:
- Define the structure and setup the playbook by configuring a masterdata in ICI.
- Define the parameters and rules to raise playbook exceptions for supported datatypes (number, currency, percentage and string). For example, define the range for limitation of liability and raise an exception if it is out of range.
- Use Artificial Inteligence to identify and highlight the playbook exceptions in the document.
- Review all discovered exceptions that are listed down on the page and take corrective actions as required.
- Assess the risk for each revised contract version when exceptions are accepted using risk assessment scores.
- Review the version-wise cumulative risk using a risk report.
By default, the playbook is disabled and can be enabled by setting parameters in configuration key.
Digitization of legal playbook in ICI using masterdata
The playbook masterdata is the repository where users can define the clause wise playbook exceptions and their defining parameters.
Users can configure a masterdata and define multiple playbook positions for a standard library clause in context of the contract type in which the clause is used. Users can also specify parameters and criteria for playbook positions to raise exceptions.
The Legal playbook masterdata can include details about:
- Sections or clause
- Context: what to look for in the document
- Standard position: position of the exception in a document
- Rationale: the rational reasoning for exception
- Alternate languages
- Walk away position
- Escalations
Seeded playbook Attributes
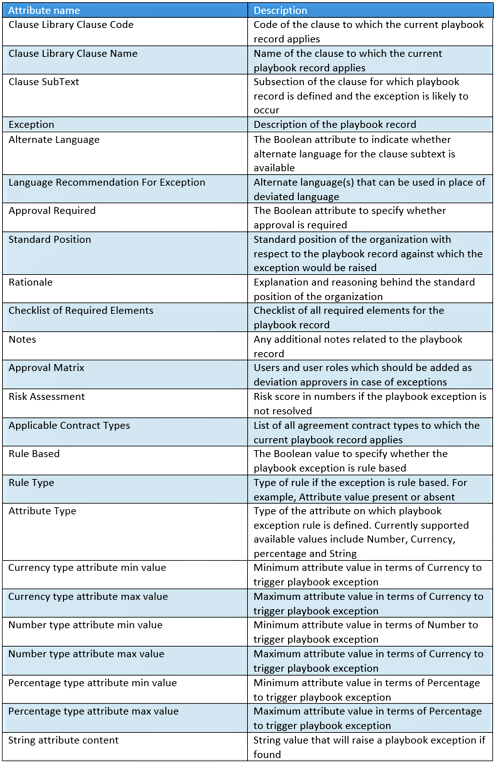
ICI provides set of seeded global attributes using which users can create and execute legal playbook exceptions on ICM clauses.
The attributes are:
Configuring playbook Masterdata contract types
Users can configure a playbook masterdata with the seeded global attributes to define criteria to capture exceptions in the document.
To create masterdata:
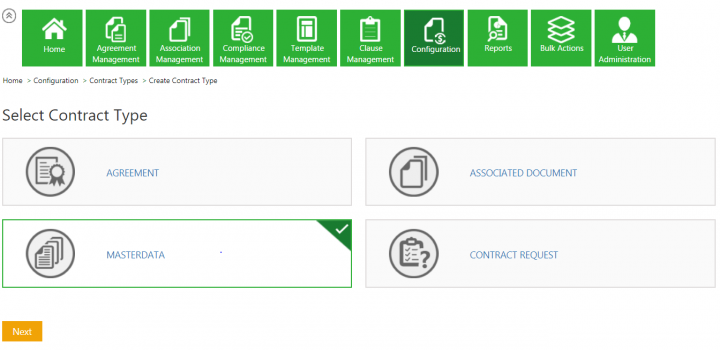
1. Click Configuration > Create Contract Type on the Home page. The Select Contract Type page opens.
2. Select Masterdata.
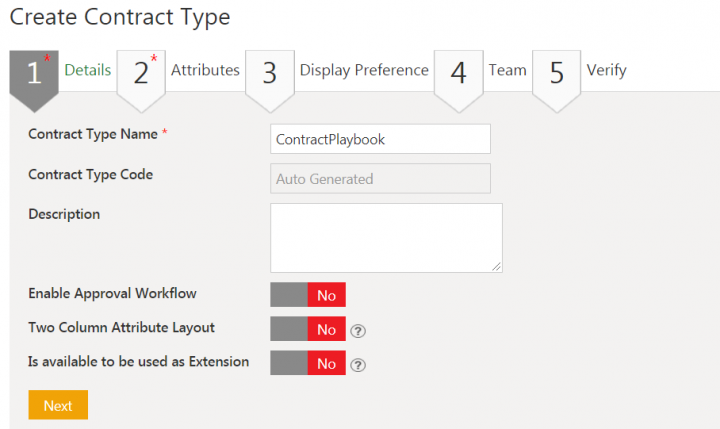
3. Click Next. The Create Contract Type page opens.
4. Enter Contract Type Name. For example, ContractPlayBook.
5. Enter Description.
6. Click Next. The Attributes page opens.
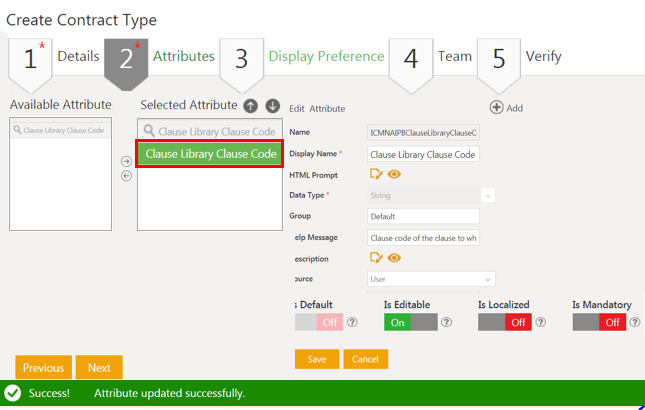
7. Select a seeded playbook attribute in the Available Attribute column. For example, Clause Library Clause Code.
8. Move the attribute to the Selected Attribute column using action arrows.
9. Edit attribute properties as required.
10. Click Save. The Attribute updated successfully message is displayed.
11. Add all the mandatory attributes for legal playbook following steps from number 7 to 10.
12. Click Next. The Display Preference tab opens.
13. Enter the details on the Display Preference and Team tab.
14. Click Next. The Verify page opens.
15. Verify the details and click Create. The masterdata is created.
16. Approve the masterdata following the ICI approval workflow.
Creating masterdata instance
Users can add multiple playbook exceptions by creating playbook masterdata instances. Users can associate the playbook exception with the standard library clause.
To create masterdata instance:
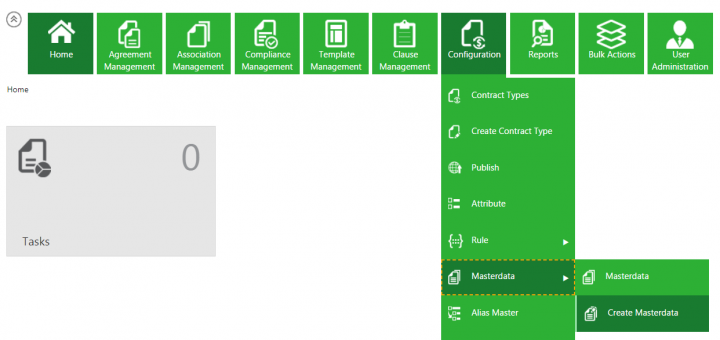
1. Click Configuration > Masterdata > Create Masterdata on the Home page. The Create Masterdata page opens.
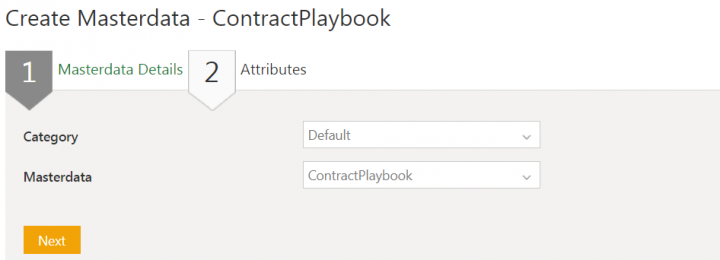
2. Select the Masterdata. For example, ContractPlayBook.
3. Click Next. The Attributes page opens.
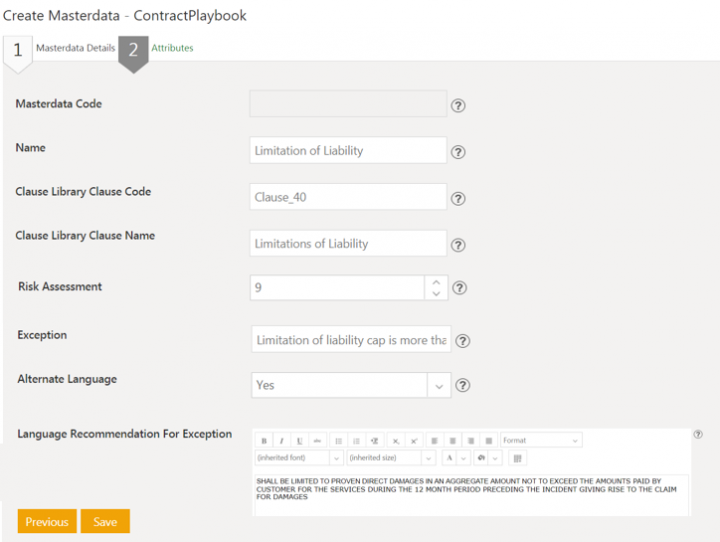
4. Enter the details in the configured attributes.
5. Click Save. The masterdata instance is created.
Accessing playbook from within the clause on ICI instance
Users can access the playbook and view all exception details related to a clause on the ICI instance when the playbook is enable on the instance through technical configuration and the clause is associated with the masterdata instance.
To view a clause:
1. Click Clause Management > Clauses on the Home page. The Clause index page opens.
2. Click View Record icon corresponding the clause you want to access. The clause Details page opens.
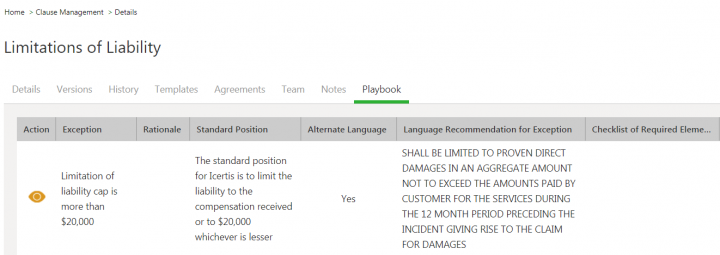
3. Select Playbook tab. the overview of the exception opens.
4. Click View Record icon corresponding to the exception to view its masterdata instance.
Users can create and associate multiple exceptions (masterdata instances) with a clause.
Configuring risk associations for playbook exceptions
The risk assessment is performed for the agreement by assessing playbook exceptions and risk scores of those exceptions in the agreement whenever a new version is uploaded in ICI. The risk association will be created for each agreement version for every playbook exception. The risk associations are created for the agreement by configuring the event rule.
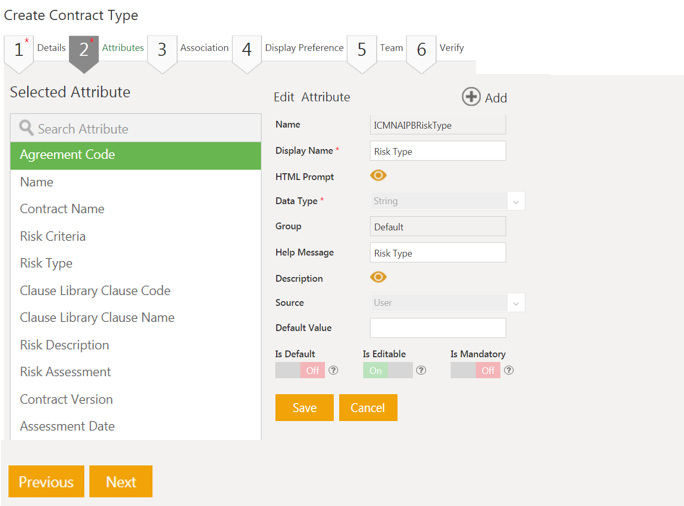
Risk Assessment contract type is an associated document contract type. Users should configure the risk Assessment with the set of required attributes as:
- Agreement Code
- Name
- Contract Name
- Risk Criteria
- Risk Type
- Clause Library Clause Code
- Clause Library Clause Name
- Risk Description
- Risk Assessment
- Contract Version
- Assessment Date
To add the association to the contract type:
1. Click Configuration > Create Contract Type on the Home page. The Select Contract Type page opens.
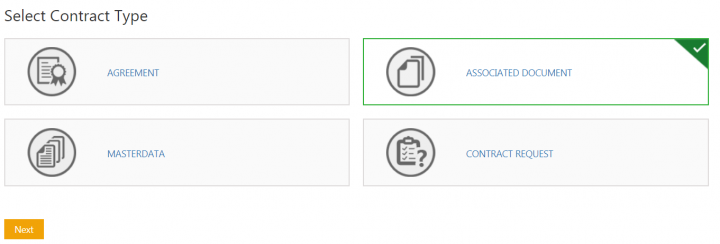
2. Click Associated Document.
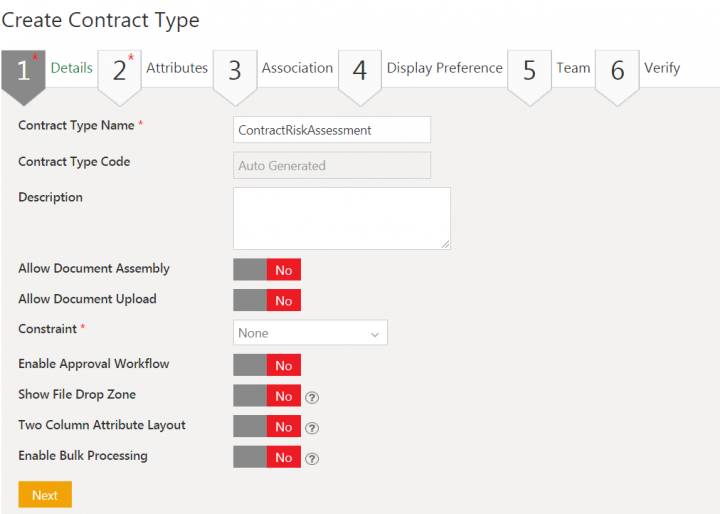
3. Click Next. The Create Contract Type page opens.
4. Enter Contract Type Name. For example, ContractRiskAssessment.
5. Enter Description.
6. Set Yes/No for remaining fields as per requirements.
7. Click Next. The Attributes page opens.
8. Search for the seeded global attributes configured for playbook in the Available Attribute pane. For example, Clause Library Clause Code.
9. Add the attribute to the Selected Attribute pane using action arrows.
10. Edit the Attribute properties if required.
11. Click Save. The Attribute updated successfully message is displayed.
12. Add all the required attributes following steps from number 7 to 10.
13. Click Next. The Display Preference tab opens.
14. Enter the details on the Display Preference and Team tab.
15. Click Next. The Verify page opens.
16. Verify the details and click Create. The associated document contract type is created.
17. Approve the contract type following the ICM approval workflow.
|
