Contents
Legacy Upload
Organizations may have a large number of existing Agreements that are created outside of ICM platform. These are henceforth referred to as Legacy Agreements. Organizations may want to import these Agreements to ICM to leverage its vast capabilities and manage all Agreements within a single platform.
The Legacy Upload feature enables ICM Administrator to easily upload in bulk the legacy agreements that were created outside of ICM. This feature enhances productivity by allowing you to upload a large volume of existing Agreements and other entities using Excel.
The highlights of this feature are :
- Uploading Agreements, Teams, Notes and Commitments in bulk.
- Uploading Associations, Masterdata, User Information and Amendments in bulk.
- Scheduled batch processing for improved performance.
- Enhanced validations, including the ability to exclude the specified attributes from being validated.
- Ability to view logs and reporting of success and failure statuses for validations and uploads.
You can use the utility to upload the following entities:
- Agreements
- Amendments
- Associated Documents (with or without workflow)
- Masterdata (with or without workflow)
- Team, Notes, and Commitment
- User details
Important Considerations
- Only an Administrator can perform Legacy Upload of the entities.
- The absolute path where the Agreements and other entities documents are saved must be accessible by the task service of the ICM instance. This must be ensured while configuring the ICM instance.
- The mapping and data files created in Excel can only have an .xlsx extension.
- For Agreements, only PDF files are supported. For Associations, several file formats such as Pdf, docx, doc, xls, jpeg, png, zip are supported.
- Contract Types for the Agreements and other entities that you are trying to upload must be present in Published state in ICM.
- To upload any Associations, ensure that the relevant Contract Type has been added in the Associations tab in the parent Contract Type.
- An attribute which will always have unique value must be present in ICM so that the relevant value can be used as a Primary Key to map other entities with that Agreement. If such an attribute does not already exist, you must create it. The unique value attribute can be a backend attribute which may not be visible on the UI. Also, Agreement Code attribute which contains a system-generated value only AFTER an Agreement has been created, cannot be used as a Primary Key for the Contract Type.
- When adding batches for uploading, it is advisable not to schedule too many batches at close intervals and configure schedules to line-up batches to be uploaded at different times to optimize the processing speed.
- Since this is a provisioning tool, any sort of updates to uploaded records are not supported.
Uploading Agreements
This section demonstrates with an example how to upload plain Agreements for a particular Contract Type.
1. Search or Create a Contract Type for the Agreements with Workflow
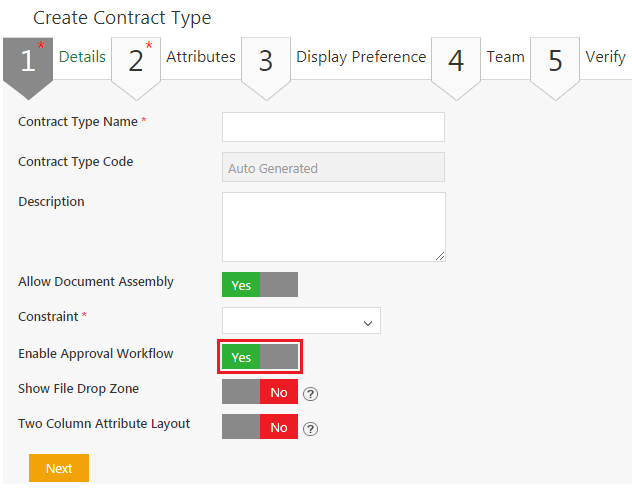
Identify an existing Contract Type in ICM for which to upload the Agreements. If that Contract Type does not exist, you need to create it using Create Contract Type on Configuration page in ICM. If the Enable Approval Workflow flag is set to Yes, it means that the workflow is enabled for that Contract Type.
- Create a Contract Type named as Legacy Contract with the attributes as can be seen under the Selected Attribute tab in the screenshot. The ICM name for this Contract Type is ICMLegacyContract.Create a Legacy Ref Id attribute which will be used as a Primary Key in the metadata file for this Contract Type.
- Copy the Agreement PDF at the location accessible by the task server.
2. Create Metadata File for Agreements
Important things to note for the metadata file:
- The metadata file must contain the display names of the attributes spelled exactly as they are present in ICM. The display names are case-sensitive.
- It is not necessary to include all the ICM attributes in the metadata file. However, the following attributes and their values must be provided in the data file- Name, File Path, Business Status, and Type of Paper. Some of these may be backend attributes that are not visible on the UI.
To create the metadata file for ICMLegacyContract Contract Type:
1. Create an Excel file with .xlsx extension and save it with the appropriate name, for example ICMLegacy_Contract_single .
2. Edit the same file to create columns that are essentially the ICM attributes for ICMLegacyContract Contract Type, and enter their values for the legacy Agreement that you want to upload. To ensure that you use the attributes correctly, switch to ICM and navigate to Configurations and then to Contract Types, and Click View Record to view the details of ICMLegacyContract. Then go to Attributes tab to see all the Selected Attributes for that CT.
3. In the metadata file the first row is a header row wherein you need to provide the exact Display Names of all or the desired attributes from ICM in consecutive columns.
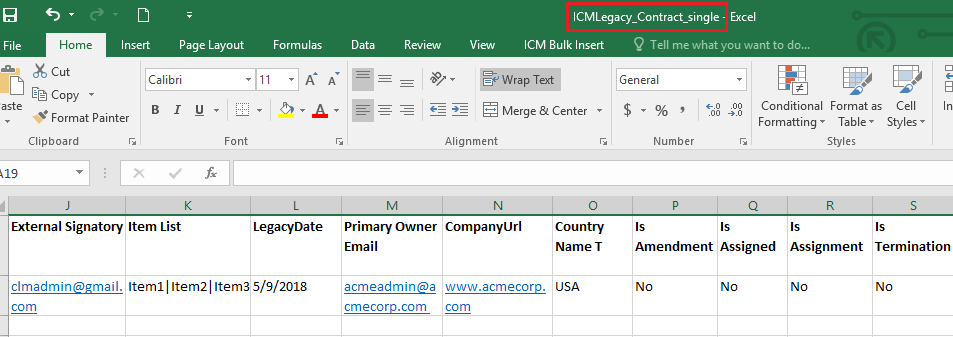
The following screenshots are of the same metadata file ICMLegacy_Contract_single, broken down into 2 images to capture all the columns:
- Name: String data type, provide name of the Agreement. For example, Acme Corp Legacy Contract.
- File Path: FileSelection data type, provide exact file name of the document that you copied to the accessible location after creating the Contract Type, append the file name with .PDF. For example, test.pdf.
- Legacy Ref Id: String data type, user-defined value, must be unique, used as a Primary Key that you created while creating the Contract Type ICMLegacyContract.
- Contract Value: Currency data type, value of the contract in USD for this example, accepts value up to 2 decimals as configured for the data type. For example, 1000.
- Effective Date:Date data type in MM/DD/YY, format depends upon how it is configured for the ICM instance, invalid format will not be accepted while uploading the metadata file. For example, 3/9/2018.
- Signature Type: Choice data type, another choice for this example is Electronic Signature. For example, Manual Signature.
- External Signatory: Email data type, enter valid email ID with FQDN only. For example,clmadmin@gmail.com.
- Item List: MultiSelectChoice data type, provide list of multiple values separated by ‘|’ without any spaces. For example, Item1|Item2|Item3.
- LegacyDate:Date data type in MM/DD/YY, format depends upon how it is configured for the ICM instance, invalid format will not be accepted while uploading the metadata file. For example, 5/9/2018.
- Primary Owner Email : Email data type, enter valid email ID with FQDN only. For example, acmeadmin@acmecorp.com.
- CompanyUrl: URL data type, enter a valid URL exactly in the same format as shown. For example, <a target="_blank"href="http://acmecorp.com/">http://acmecorp.com</a>.
- Country Name :Lookup field, case-sensitive, enter the exact value. For example, USA.
- Is Amendment: Boolean data type, values Yes/No. For example, No.
- Is Assigned: Boolean data type, values Yes/No. For example, No.
- Is Assignment: Boolean data type, values Yes/No. For example, No.
- Is Termination: Boolean data type, values Yes/No. For example, No.
- Type of Paper: Not visible on UI, value must always be Third Party, case-sensitive. For example, Third Party.
- Business Status: Not visible on UI, value can optionally be Executed, case-sensitive. For example, Draft.
Uploading Agreements with Team, Notes and Commitments
You can add Team members, Notes, and Commitments along with the legacy Agreements from within the same metadata file.
3. Create Metadata File with Team, Notes, and Commitments
Edit the same Agreements metadata file ICMLegacy_Contract_single to add more sheets for Team, Notes, and Commitments.
To create the Team metadata:
- Add a sheet and name it as AgreementTeamMember.
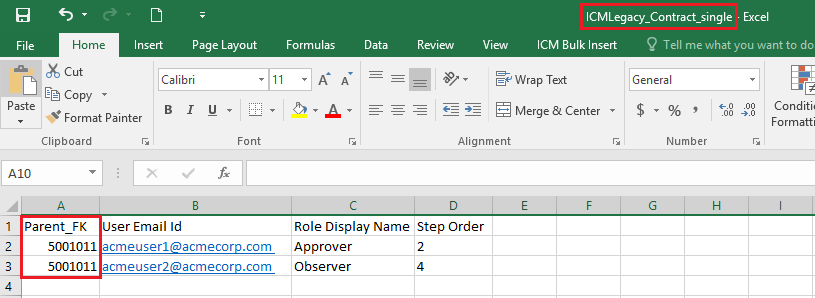
- Edit the sheet to create columns as below and provide their values as appropriate:
The following screenshot of the ICMLegacy_Contract_single shows the Team sheet and the columns.
To create the Notes metadata:
- Add a sheet and name it as – AgreementNote.
- Edit the sheet to create columns as below and provide their values as appropriate:
The following screenshot of the ICMLegacy_Contract_single shows the Note sheet and the columns.
- Add a sheet and name it as – AgreementCommitment.
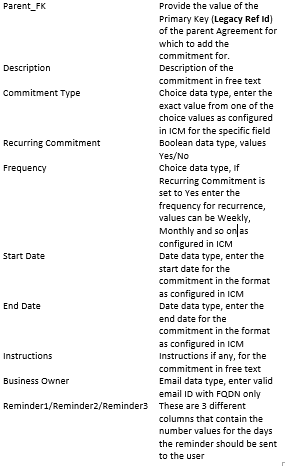
- Edit the sheet to create columns as below and provide their values as appropriate:
- Create an additional column named Parent_FK and provide the value of the Primary Key (Legacy Ref Id) of the parent Agreement.
The following screenshot of the ICMLegacy_Contract_single shows the Commitment sheet and the data.
4. Create Mapping File
Important things to note for the mapping file:
- Mapping file must contain the ICM names (not display names) of the attributes spelled exactly as they are present in ICM. The ICM names are case-sensitive.
- You can bypass validations for mandatory attributes in the mapping file by providing their ICM names in the Exclude Mandatory Validations column. However, it cannot skip generic validations for data types.
To create the mapping file:
- Create an Excel file with .xlsx extension and save it with the name, Mappings_Acme_agreements.
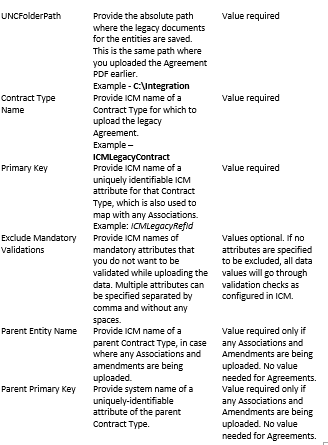
- Edit the file to create columns and provide their details/values as specified below:
- C:\Integration is the UNCFolderpath where you uploaded the legacy agreement PDF.
- ICMLegacyContract is the Contract Type Name.
- ICMLegacyRefId under the Primary Key column is the unique attribute that you created in for ICMLegacyContract Contract Type.
5. Upload the Legacy Agreements
Now that the metadata and mapping files are created for ICMLegacyContract Contract Type, the relevant Agreements can be uploaded using the Legacy Upload feature on the ICM UI.
To upload the Agreements:
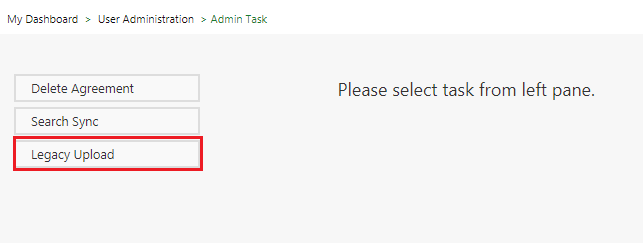
- Click the User Administration tile on the Dashboard.
- Click the Admin Task tile.
- Click Legacy Upload.
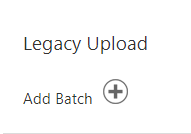
- Click Add Batch and provide details of the batch on the next screen that opens.
- Batch/API Name: Provide unique name for the Batch as AcmeCorp_legacy_agreements .
- Integration Type: Select Legacy Contract Management.
- Contract Type Name: Select the Contract Type as ICMLegacyContract.
- Use mapping from: Select None since you are uploading a new mapping file.
- Optionally, select from the list if using mappings from any previously uploaded batch for ICMLegacyContract Contract Type.
- Defer Workflow: Leave this checkbox unselected for the current example.
Select Defer Workflow checkbox only if you need to add any pre-requisite Associations for the Legacy Agreement. See uploading Agreements with mandatory Associations.
- A row with your newly created batch will be added to the list with Draft status.
- Click Upload Integration Files icon and provide the details of the mapping file on the next screen that opens.
- File Type: Select MappingFile option from the drop-down.
- File Path: Click Choose File to browse and select the mappings file Mappings_Acme_agreements that was created earlier.
- Click Upload to upload the mapping file.
- After the mapping file is uploaded successfully, click Upload Integration Files icon again to upload the metadata file. Select DataFile option to browse and upload the batch file saved locally, and click Upload.
- File Type: Select DataFile option from the drop-down.
- File Path: Click Choose File to browse and select the metadata file ICMLegacy_Contract_single that was created earlier.
- Click Upload to upload the metadata file.
- After the metadata file is successfully uploaded, click New Validate and Initiate icon to validate the data and initiate the batch upload.
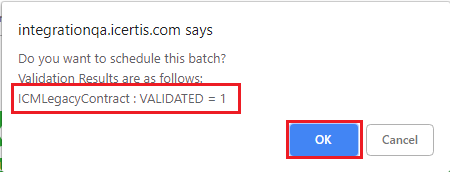
A pop-up window shows the status of validation, and count or summary of errors or warnings, if any.
The message in the above screen is interpreted as 1 agreement record is successfully validated for ICMLegacyContract Contract Type.
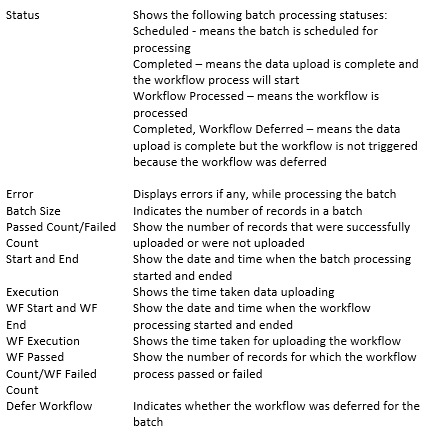
You can upload a large number of agreement records using the same metadata file. Once all the records are validated without any errors, click OK to schedule the batch for processing. Then the batch is lined up for processing and the Status changes to Scheduled. Finally, the Status changes to Workflow Processed indicating that the batch is successfully uploaded and the workflow is triggered.
The following screenshot, broken down in 2 images, is of the same screen that displays overall status and progress of the batches.
6. Viewing the status and error files
When the batch processing is complete a third icon ![]() called Download Integration Files appears under the Actions column. Click on the icon to download the Status and/or Error files. If there are any errors, correct those in the metadata file and try uploading the batch again.
called Download Integration Files appears under the Actions column. Click on the icon to download the Status and/or Error files. If there are any errors, correct those in the metadata file and try uploading the batch again.
In the following screenshot, the Status File shows that there were no errors or warnings for AcmeCorplegacyagreements batch that was uploaded.
7. Viewing the uploaded Agreements in ICM
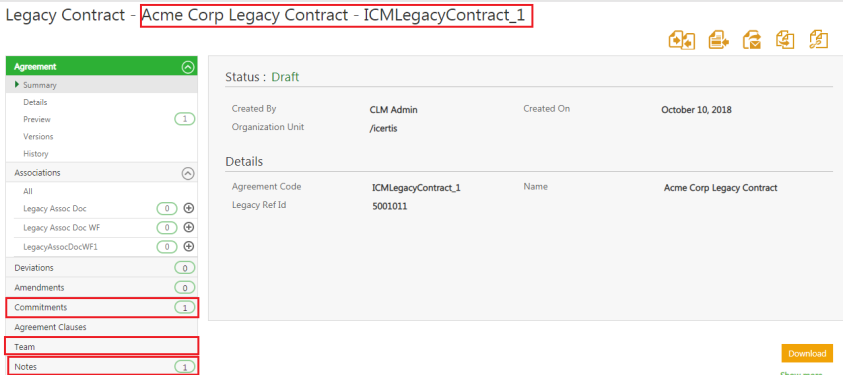
To view the uploaded Agreements in ICM, go to Agreement Management in ICM and Click on View Record icon to open the recently added legacy Agreement.
If you have added any Notes, Team, or Commitments, they will be displayed under the respective tabs in the Agreement Summary.
Upload Agreements with mandatory Associations
There may be cases where any associated documents are required before an Agreement can move to the Executed state. In that case, you can defer the workflow for the Agreement while uploading, then upload the required Association with workflow attached, and then enable the workflow for the Agreement when needed.
Whether an Association is mandatory or not can be seen in ICM in the following 2 ways:
If Is Mandatory flag is set to Yes while adding an Association for a particular Agreement Contract Type, an Association is mandatory. See the screenshot below:
- Follow the same steps to create metadata and mapping file for the Agreement as described in the Uploading Agreements section.
- While creating the batch for uploading the Agreement, select the Defer Workflow check box so that the workflow is not attached to the Agreements while uploading. This check box controls the attachment of approval workflow to a particular batch.
- Proceed with uploading the mapping and metadata files.
- Initiate the batch processing by clicking New Validate and Initiate icon.
- After the batch processing is successful and the Agreement is uploaded, the Status of the batch shows as Completed, WF Deferred. This indicates that the Agreement will not follow the workflow automatically.
- Follow the steps to upload the required Associations as described in the relevant section.
- After the Association’s workflow is successfully processed, you can click on the Enable Workflow icon for the Agreement batch to attach the approval workflow.
In the following sections for uploading other entities, the same notes and considerations for the Metadata and Mapping Files, and data validations apply as detailed in the above section for uploading the Agreements.
Uploading Associations
Before uploading the Associations, the parent Agreement must be uploaded first.
You need to create separate metadata file for Associations, and one such file can contain Associations for one Association Contract type. This section demonstrates with an example how to upload an Association for the previously uploaded Agreement that is seen in ICM as Acme Corp Legacy Contract – ICMLegacyContract_1.
There can be 2 scenarios for uploading Associations – With Workflow and Without Workflow.
1. Search or Create a Contract Type for Associations with Workflow
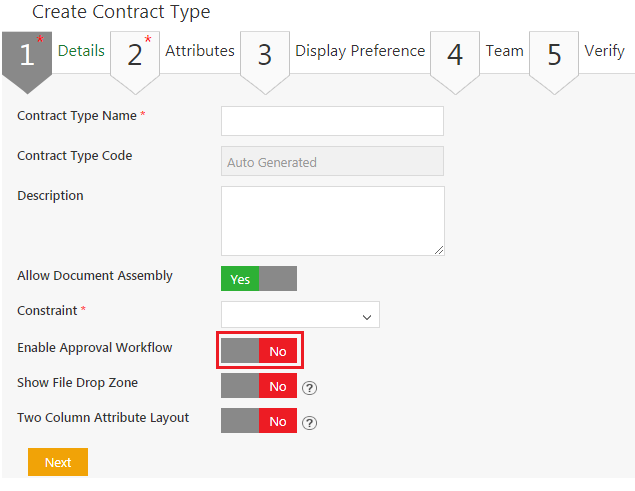
Search an existing Associated Document Contract Type in ICM for which to upload the Associations. If that Contract Type does not exist, you need to create it using Create Contract Type on Configuration page in ICM. If the Enable Approval Workflow flag is set to Yes, it means that the workflow is enabled for that Contract Type.
2. Create Metadata File for Associations
To create the metadata file for ICMLegacyAssocDocWF1 Contract Type:
- Create an Excel file with .xlsx extension and save it with the name ICMLegacy_AcmeAssociation.
- Edit the same file to create columns that are essentially the ICM attributes for ICMLegacyAssocDocWF1 Contract Type, and enter their values for the associated document that you want to upload.
- Create an additional column named ParentInstance_PK and provide the value of the Primary Key of the parent Agreement (Legacy Ref Id for ICMLegacyContract Contract Type).
The following screenshot of the Association’s metadata file ICMLegacy_AcmeAssociation shows the attributes and highlights the Primary Key of the parent Agreement.
3. Changes to the mapping file for Associations
Open the same mapping file (Mappings_Acme_agreements) created while uploading the Agreement, and edit it to provide details for binding the Associated Document Contract Type with the parent Contract Type.
Add another row as highlighted in the above screenshot:
- ICMLegacyAssocDocWF1 is the Contract Type Name for the Associated Document Contract Type.
- ICMLegacyRefId under the Primary Key column is the mapping attribute for ICMLegacyAssocDocWF1 Contract Type.
- ICMLegacyContract under the Parent Entity Name is the parent Contract Type name.
- ICMLegacyRefId under the Parent Primary Key column is the mapping attribute for ICMLegacyContract Contract Type (parent).
4. Upload the Associations and view in ICM
Follow the same steps on the UI for uploading the associations as they are for uploading the agreements.
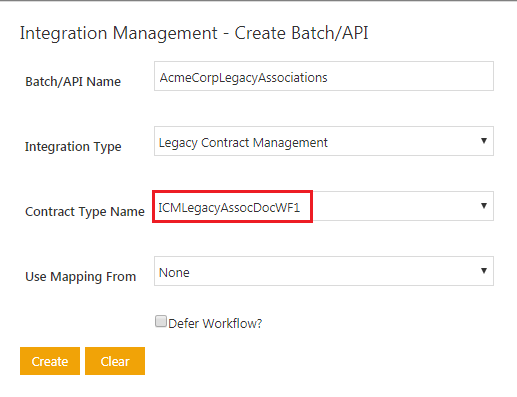
Only, ensure that you select the Associated Document Contract Type while creating the batch and do not select the check box for Defer Workflow. In the current example, select the Contract Type Name as ICMLegacyAssocDocWF1.
Upload Associations without Workflow
You can create the Associations for which the approval workflow is not enabled in ICM. This is configured in ICM by setting the Enable Approval Workflow flag to No for the relevant Contract Type. It means that the Associations for that Contract Type will not follow the approval workflow automatically.
- Create the metadata file for an Association as described in the respective section.
- Begin upload by creating a batch using the utility. At this point, it does not matter if you select the Defer Workflow check box or not, because the workflow is not enabled to begin with.
- Proceed to upload the mapping file and metadata file.
- Initiate the batch processing by clicking New Initiate and Validate icon.
- After the batch processing is successful and the data is uploaded, the Status of the batch shows as Completed, WF Deferred.
- Then you can click on the Enable Workflow icon anytime to attach the approval workflow. See the screenshot below:
Uploading Amendments
The process to upload the Amendments for an Agreement is the same as for uploading the Associations.
Except that you do not need to create the Contract Type for the Amendments as it is automatically created when you create the Contract Type for Agreements.
1. Create Metadata File for Amendments
To create the metadata file for ICMLegacyContractAmendment Contract Type:
- Create an Excel file with .xlsx extension and save it with the name – ICMLegacy_AcmeAmendment.
- Edit the same file to create columns that are essentially the ICM attributes for ICMLegacyContract (parent) Contract Type, and enter their values as required.
You may refer to the metadata file for the parent Agreement to create the Amendments metadata file, and add/remove columns or change their values as required. Name, File Path, Legacy Ref Id (or any other existing unique attribute), Business Status, and Type of Paper are mandatory attributes for Amendments as well.
- Ensure that the Amendment has a unique Primary Key. If not, create it as an ICM attribute (for example, Legacy Ref Id).
- Create an additional column named ParentInstance_PK and provide the value of the Primary Key of the parent Agreement (previously uploaded for ICMLegacyContract Contract Type).
The following screenshot of the Amendment metadata file ICMLegacy_AcmeAmendment shows the attributes and highlights the Primary Key of the parent Agreement (ParentInstance_PK), and of the Amendment (Legacy Ref Id) that is being uploaded. The Primary Key of the Amendment (Legacy Ref Id) can be used as a mapping attribute for the relevant associations, and other entities that may be dependent upon the Amendment.
2. Changes to the mapping file for Amendments
Open the same mapping file (Mappings_Acme_agreements) created while uploading the Agreement, and edit it to provide details for binding the Amendment Contract Type with the parent Agreement Contract Type.
Add another row as described below:
- ICMLegacyContractAmendment is the Contract Type Name for the Amendment.
- ICMLegacyRefId under the Primary Key column is the unique attribute for ICMLegacyContractAmendment Contract Type.
- ICMLegacyContract under the Parent Entity Name is the parent Contract Type name.
- ICMLegacyRefId under the Parent Primary Key column is the unique attribute for ICMLegacyContract Contract Type (parent).
3. Upload the Amendments and view in ICM
Follow the same steps on the UI for uploading the associations as they are for uploading the agreements.
Only, ensure that you select the Amendment Contract Type while creating the batch. In the current example, select the Contract Type Name as ICMLegacyContractAmendment.
Uploading Masterdata
This section demonstrates with an example how to upload the Masterdata. Masterdata is uploaded independently as it is not related to any other entities. So there is no need for the mapping file.
There can be 2 scenarios for uploading Masterdata – With Workflow and Without Workflow.
1. Search or Create a Contract Type for the Masterdata with workflow
Search an existing Masterdata Contract Type in ICM for which to upload the data. If that Contract Type does not exist, you need to create it using Create Contract Type on Configuration page in ICM. If the Enable Approval Workflow flag is set to Yes, it means that the workflow is enabled for that Contract Type.
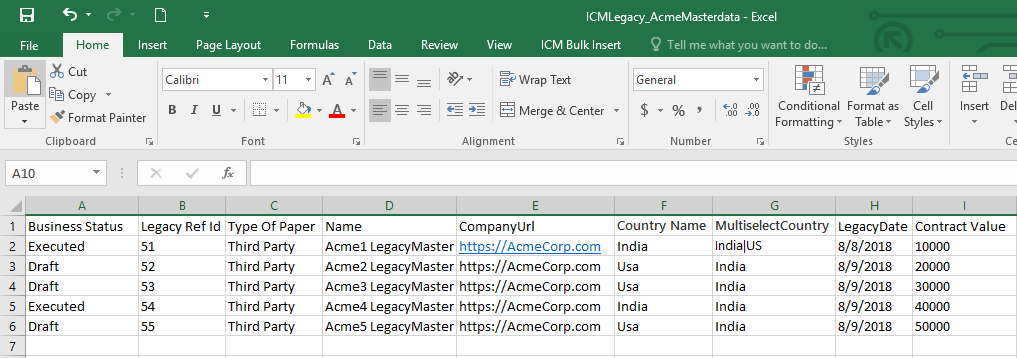
2. Create Metadata file for Masterdata
To create the metadata file for ICMLegacyMasterData Contract Type:
- Create an Excel file with .xlsx extension and save it with the name ICMLegacy_AcmeMasterdata.
- Edit the same file to create columns that are essentially the ICM attributes for ICMLegacyMasterData Contract Type, and enter their values for the master data that you want to upload.
3. Upload Masterdata and view in ICM
Follow the same steps on the UI for uploading the Masterdata as they are for uploading the agreements.
Only, ensure that you select the relevant Masterdata Contract Type while creating the batch and do not select the check box for Defer Workflow. In the current example, select the Contract Type Name as ICMLegacyMasterData.
Upload Masterdata without Workflow
You can create the Masterdata for which the approval workflow is not enabled in ICM. This is configured in ICM by setting the Enable Approval Workflow flag to No for the relevant Masterdata Contract Type. It means that the Masterdata for that Contract Type will not follow the approval workflow automatically.
- Create the metadata file for the Masterdata as described in the respective section.
- Begin upload by creating a batch using the utility. At this point, it does not matter if you select the Defer Workflow check box or not, because the workflow is not enabled to begin with.
- Proceed to upload the metadata file.
- Initiate the batch processing by clicking New Initiate and Validate icon.
- After the batch processing is successful and the data is uploaded, the Status of the batch shows as Completed, WFDeffered.
- Then you can click on the Enable Workflow icon anytime to attach the approval workflow.
When the Masterdata uploaded without workflow is viewed in ICM, it will not have any buttons visible on the UI.
User Provisioning
This section demonstrates with an example how to provision the users in ICM using the utility. User information is uploaded independently as it is not related to any other entities. The relevant Contract Type UserInformation is created when ICM is configured.
You can also upload additional user information by uploading a separate metadata file with the relevant data, after a user is provisioned.
1. Create Metadata file for User Information
To create the metadata file for UserInformation Contract Type:
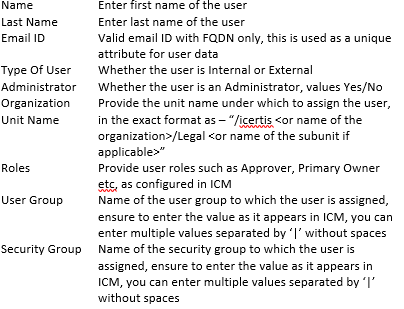
- Create an Excel file with .xlsx extension and save it with the name ICMLegacy_AcmeUserInformation .
- Edit the same file to create columns as below:
2. Upload the User Information
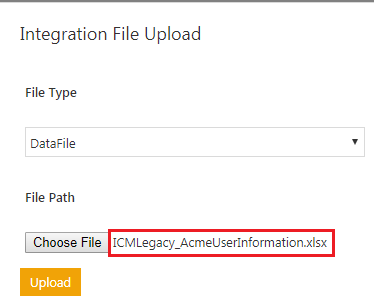
Follow the same steps on the UI for uploading the user information as they are for uploading the agreements, except for uploading the mapping file.
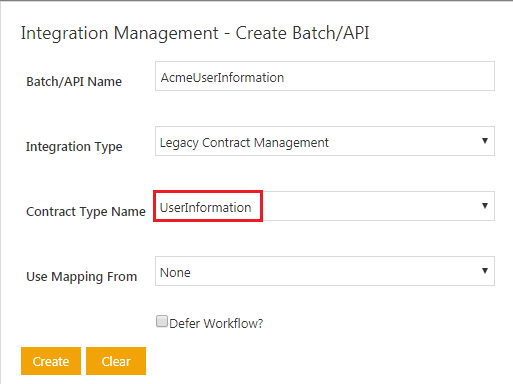
Ensure that you select the UserInformation Contract Type while creating the batch.
After the user information is successfully uploaded, you can view it under the Users tab in User Administration.
3. Create Metadata File for extended user information and upload
The relevant Contract Type needs to be created in ICM. For the current example, create a Contract Type named ExtendedUserInformation with the required attributes.
To create the metadata file for ExtendedUserInformation Contract Type:
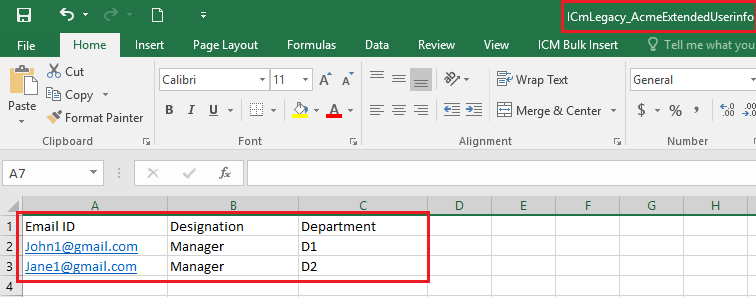
- Create an Excel file with .xlsx extension and save it with the name – ICMLegacy_AcmeExtendedUserInfo.
- Edit the same file to create columns as below:
- Follow the same steps on the UI for uploading the extended user information as they are for uploading the user information. Only, ensure that you select the ExtendedUserInformation Contract Type while creating the batch.
