Contents
[hide]- 1 Icertis Experience for Workday
- 1.1 ICI Side Configuration
- 1.2 Creating Masterdata records for mapping entities
- 1.3 Creating Client App Masterdata Sync
- 1.4 Creating a Supplier Contract in ICI
- 1.5 Sending an Agreement Document from ICI to Workday
- 1.6 Viewing the Supplier Contract in Workday
- 1.7 Workday Side Configuration
- 1.8 ICI-Workday adapter support for amendments and Supplier contract termination
- 1.9 Sending Amendments from ICI to Workday
- 1.10 Creating Supplier Contract Amendments in ICI
- 1.11 Viewing Supplier Contract Amendments in Workday
- 1.12 Synchronizing Supplier Contracts Terminated in ICI with Workday
- 1.13 Terminating Supplier Contracts in ICI
- 1.14 Viewing Terminated Supplier Contracts in Workday
- 1.15 ICI-Workday Adapter support for resetting expiry date and auto-renewal of Supplier contracts
- 1.16 ICI-Workday Adapter support for mapping of multi-level array type attributes
- 1.17 Mapping Multi-level Array Attributes from Workday to ICI
- 1.18 Mapping Multi-level Array Attributes from ICI to Workday
Icertis Experience for Workday
Icertis Experience for Workday is a highly configurable and comprehensive solution that enables data synchronizing capabilities for mapping business objects between ICI and Workday. ICI integration with Workday provides a seamless user experience to work with the business data from both ICI and Workday.
This integration gives ICI the capabilities to tag Worker Data (for example, Employee ID, Employee Name, etc.) and Worker Role, and map them to the relevant ICI user attributes which can be referred and used across application as required.
Icertis Experience for Workday supports following sample use cases:
- Create Supplier Contracts in ICI that allows negotiating and managing the Contract through ICI, but only tracking the status in Workday
- Synchronize the amended and renewed Supplier Contracts from Icertis to Workday
Icertis Experience for Workday offers many benefits:
- Measure supplier performance with access to more detailed information
- Manage the entire process throughout the entire life-cycle of the Agreement
ICI Side Configuration
Use the Configuration tile in the ICI application to specify the mapping details between Workday and ICI by creating Masterdata records for mapping entities. Data Mapping involves the following two primary tasks:
- Creating Masterdata Contract Type
- Creating Masterdata records for mapping entities
Creating a Masterdata Contract Type
Masterdata Contract Type is the core data that changes less frequently and has a unique ID associated with it. For example, Employee Records can be a Masterdata Contract Type and Employee ID can be an attribute associated to that Masterdata Contract Type.
1. Log on to the ICI application.
2. Click Configuration > Create Contract Type on Dashboard.

The Select Contract Type page opens and shows the following options:
- Agreement
- Associated Document
- Masterdata
- Contract Request
4. Select Masterdata on the Select Contract Type page and click Next. The Create Contract Type page opens, which consists of these five sections:
- Details
- Attributes
- Display Preference
- Team
- Verify
Each of these sections is described in detail below.
Details
Enter the following basic details of the Masterdata in this section:
- Contract Type Name: Type the name in this field as Client App Cross Reference Mapping. Note that Client App Cross Reference Mapping is an example provided here for the list of Masterdata you need to create. This Contract Type is used for mapping entities between ICI and Workday.
- Contract Type Code: Every Contract Type is assigned a unique ID known as Contract Type Code. The Contract Type Code is generated automatically when you create the Contract Type.
- Enable Approval Workflow: Select Yes to enable the approval workflow.
- Two Column Attribute Layout: Select Yes to enable a two-column attribute layout
Attributes
This section captures important details of the Masterdata you are creating. The integration between ICI and Workday is restricted to the attributes listed below.
Click the plus icon to create them:
- Name
- Client Name
- ICI Entity Name
- Client Entity Name
- ICI Attribute Name
- ICI Relationship Key
- Client Reference Key

- Data Type: String
- Is Default: Off
- Is Editable: On
- Is Mandatory: Select Off
- Tracking Attribute: Off
- Is Unique: Off
- Defined by Rule: Off
- Is Inherit: Off
- Is Searchable: On
- Is Conditional: Off
- Is Lookup: Off
- Is Localized: Off
Display Preference
Select any four attributes that you want to display on the agreement tile view and agreement details view and click Next. The Team section is displayed.

Team
This section shows the existing team members along with their roles for the Masterdata Contract Type.
Click the plus icon to add a user with the Approver role to the Contract Type Masterdata team.
This is the final section for creating the Contract Type Masterdata. It displays only the sections and attributes that you used to create this Masterdata Contract Type.
1.Verify the information you entered in the previous sections. You can go back and make changes or click Create.
2. Send the Contract Type for approval.
3. After Masterdata is approved, publish the Masterdata Contract Type to make it available for Agreement creation.
Creating Masterdata records for mapping entities
ICI integrates with Workday and provides capability of synchronizing important Masterdata from Workday to ICI through a technical configuration. This list of Masterdata includes:
• Supplier
• Payment Terms
• Payment Type
• Purchase Items
The synchronized Masterdata can be used and referred across ICI application as required. For example, Supplier Masterdata can be used while creating supplier type contracts in ICI.
You can create Masterdata records for mapping the entities between ICI and Workday.
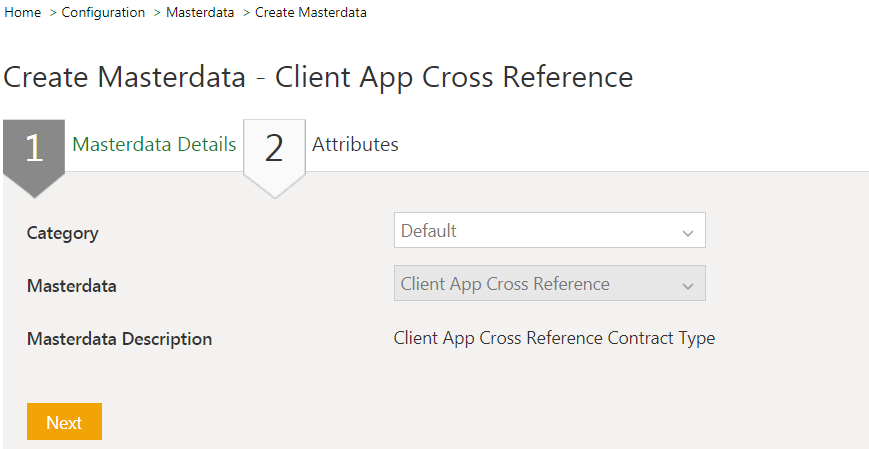
Creating Client App Cross Reference Mapping
1. Log on to the ICI application.
2. Click Configuration > Masterdata > Create Masterdata on ICI Dashboard. The Create Masterdata page opens.

- Category: Select Default from this drop-down.
- Masterdata: Select Client App Cross Reference from this drop-down.
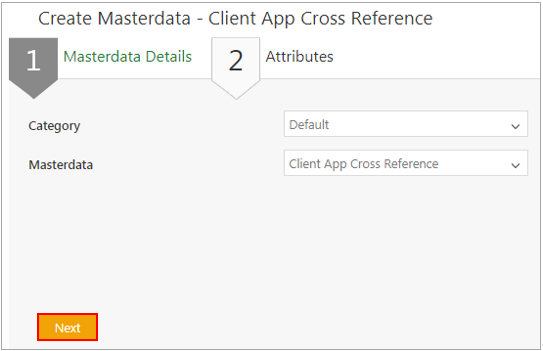
3. Click Next. The Attributes page opens.
- Client Name: Select Workday from the drop-down.
- Name: Type the name of the Masterdata.
- ICI Entity Name: Type the name of the Agreement for which you are creating the Masterdata. For example, ICISupplierMaster
- Client Entity Name: Type the name of the Entity of Workday. For example, Supplier.
- ICI Reference Key: Type the ICI Reference Key value in this field. This is used to track the Masterdata in Workday that was created in ICI. For example, ICIExtSupplierId
- Client Reference Key: Type the Reference attribute to be entered from Workday. For example, Supplier_Reference_ID.
- External Contract Creation Criteria: Type the ICI entity metadata value that evaluates the value and creates the Contract Type. You can type @true to create the Contract Type Masterdata record and make it visible in Workday.
- External Contract Creation Event: Select the appropriate event from this drop-down to enable create object in in Workday.
- External Contract Update Event: Select the appropriate event from this drop-down
8. Click Save after entering the details.
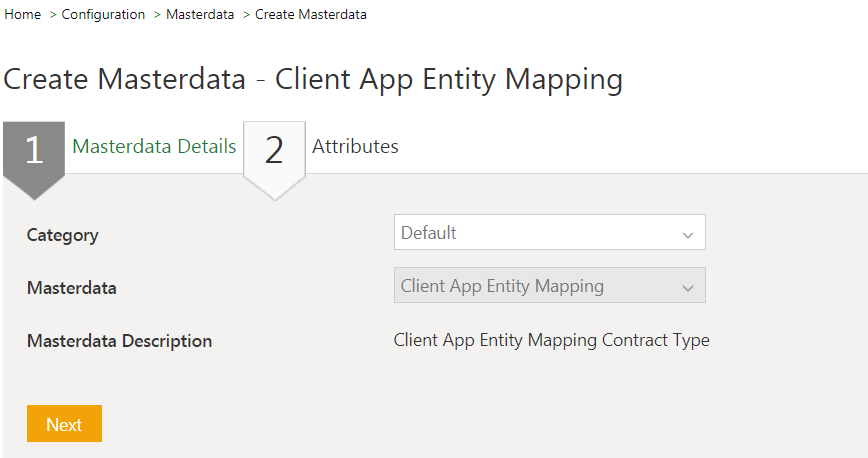
Creating Client App Entity Mapping
You can create a Masterdata record for the Contract Type Masterdata that you created earlier. This helps in mapping the entities between ICI and Workday.
To create a Masterdata record:
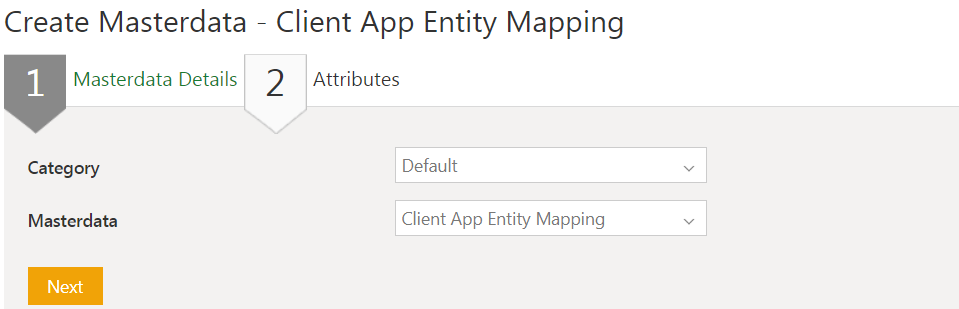
1.Click Configuration > Masterdata > Create Masterdata on the Dashboard. The Create Masterdata page opens.
- Masterdata Details
- Attributes
3. Click Next at the end of Masterdata Details section to go to the Attributes section and complete creating the Masterdata record.
Masterdata Details
This section displays the categories you can select and the Masterdata Contract Type for creating the Masterdata record.
1. Select the category from the drop-down list.
2. Select the Contract Type Masterdata that you created earlier. For mapping the data between ICI and Workday, select Client App Entity Mapping.
3. Click Next. The Attributes page opens.

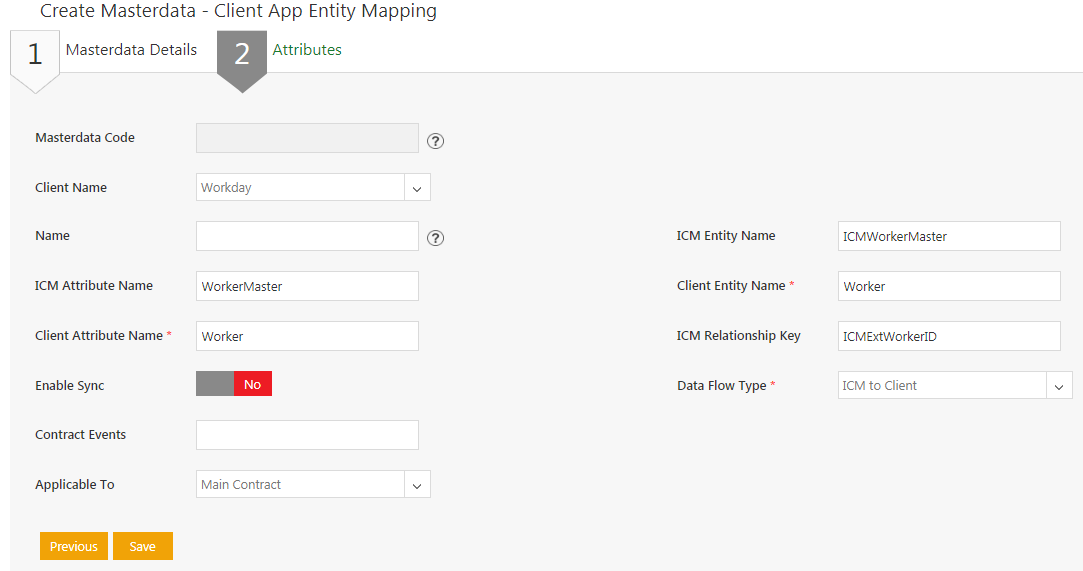
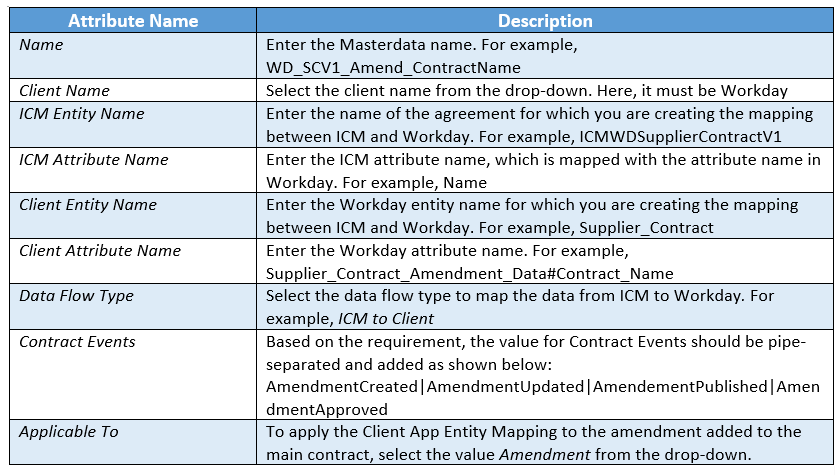
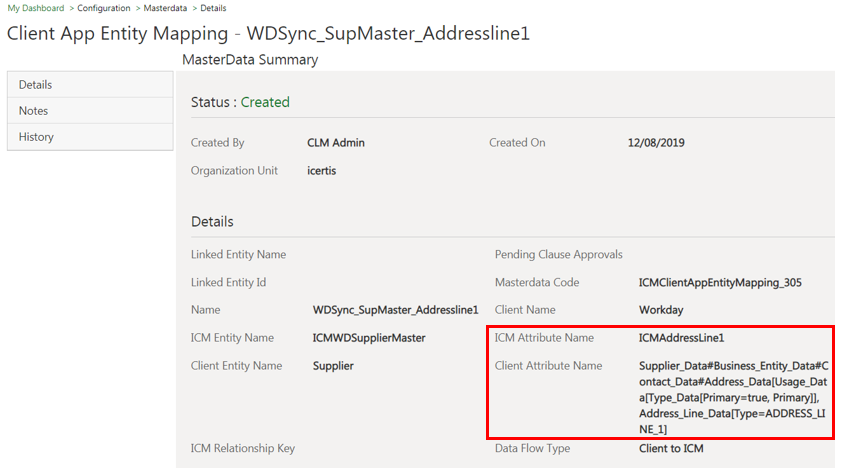
4. Enter the following details in appropriate fields
- Masterdata Code: Every Masterdata record you create is assigned a unique ID. It is generated automatically when you create the Masterdata.
- Client Name: This helps in defining the mapping with the external system. For example, select Workday from the Client Name drop-down to define the mapping between ICI and Workday
- ICI Entity Name: Type the ICI Agreement Contract Type for which you are creating the mapping between ICI and Workday.
- ICI Attribute Name: Type the ICI Attribute Name of the Contract Type Masterdata.
- Client Entity Name: Workday entity name for which you are defining the mapping between ICI and Workday.
- Client Attribute Name: Type the Workday side attribute name for the client entity name that you mapped.
- Data Flow Type: Defines the direction of mapping for the data flow. You can select the following data flow type.
- ICI to Client: Select this option if you intend to map the data from ICI to Workday.
- Contract Events: It is used to synchronize data from ICI to Workday. You can enter the events that happen in the Contract life cycle. For example, Created, Approved and so on. If you want to send the Agreement document in .docx format, set the value as Created/Published, else set the value as Created/Published/Updated to send the Agreement document in .pdf format.
- Applicable to: Select one of the following from this drop-down to make this Masterdata record applicable to the Main Contract and Amendment or both:
- Main Contract: Select this if you want to make the Client App Entity Mapping Masterdata applicable to the main Contract.
- Amendment: Select this if you want to make the Client App Entity Mapping Masterdata applicable to the Amendment added to the main Contract.
- Both: Select this if you want to make the Client App Entity Mapping Masterdata applicable to the main contract and the Amendment added to it.
5. Click Save to save the Masterdata record and enable mapping between ICI and Workday.
Creating Client App Masterdata Sync
You can create a Masterdata record for the Contract Type Masterdata that you created earlier. This helps synchronize the Masterdata between Workday and ICI.
To create a Masterdata record:
1.Click Configuration > Masterdata > Create Masterdata on the Dashboard. The Create Masterdata page opens.
- Masterdata Details
- Attributes
1. Select the category from the drop-down list.

3. Click Next. The Attributes section is displayed.

4. Enter the following details in the following fields.
- Masterdata Code: Every Masterdata record you create is assigned a unique ID. It is generated automatically when you create the Masterdata.
- Name: Type the name of the Masterdata record you are creating for mapping with Workday. Ensure that the name you give to the Masterdata record is unique and can be identified easily. For example, you can use WD_Supplier_Name for mapping:
- Client Name: Defines the mapping with the external system. For example, select Workday from the Client Name drop-down to define the mapping between ICI and Workday.
- ICI Entity Name: Type the ICI Agreement Contract Type for which you are creating the mapping between ICI and Workday.
- Client Entity Name: This is the Workday side entity name for which you are defining the mapping between ICI and Workday.
- ICI Reference Key: Type the ICI Reference Key value in this field. This is used to track the Masterdata in Workday that was created in ICI.
- Client Reference Key: Type the Reference attribute to be entered from Workday.
- Data Retrieval Filter Criteria: Select from one of the following options:
- From Date: Select this option to map the data with Workday from a specific date.
- From Last Run: Select this option to synchronize the data with Workday since the time this operation was last performed.
- Data Retrieval Filter Criteria: Select from one of the following options:
- From Date: Select this option to map the data with Workday from a specific date.
- From Last Run: Select this option to synchronize the data with Workday since the time this operation was last performed.
- Effective Date: Select the date using the calendar control from which the data should be mapped with Workday.
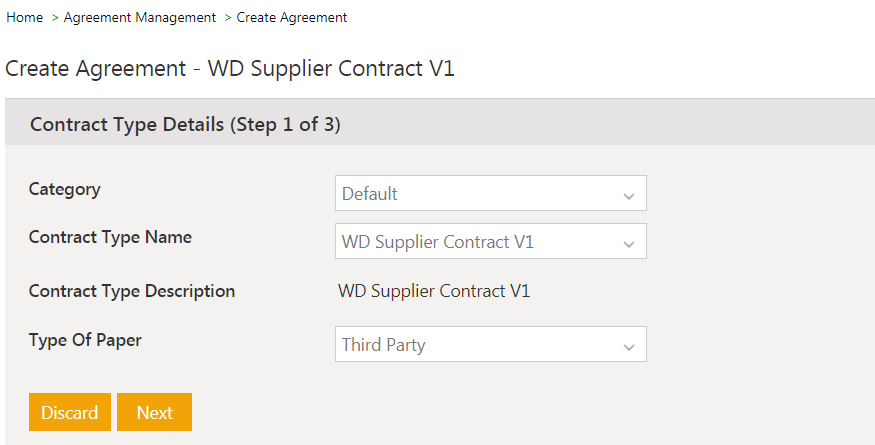
Creating a Supplier Contract in ICI
Supplier Contract is an Agreement in which the seller promises to provide the specified goods or services to the buyer on an agreed date at the agreed price.
The exact process of creating a Supplier Contract in ICI depends on how the workflow is implemented in your organization.
To create a Supplier Contract in ICI:
1.Click Agreement Management > Create Agreement on the Dashboard. The Create Agreement page opens.

- Contract Type Details
- Attributes
- Select Template
- Verify
Provide the following basic details of the Agreement in this section.
- Category: These are used for organizing the Agreements and are created by the administrator. The drop-down shows all the categories created while creating the Contract Type. Select the desired category from this drop-down.
- Contract Type Name: This shows the list of Contract Types that were created for the selected Category in the earlier step.
- Type of Paper: Select either Own or Third party Template for creating the Agreement. Provide your own Template if you select Own type of paper. Select Third Party option when you want to create the Agreement by uploading the Template provided by the vendor.
Of the four sections mentioned above, the Select Template section only appears for Own type of paper. The two options for Type of Paper are:
- Own: If you select Own type of paper, the Select Template section is displayed with the list of Templates available for the selected Contract Type. Note that, selecting Own Type of Paper provides you with the option to use either Own or Third Party paper for the Agreement you are creating.
- Third: If you select Third Party type of paper, the Select Template section is not displayed and you will have to upload the Template provided by the vendor manually.
3. Click Next. The Attributes section is displayed.

Attributes
This section captures the important details of the Agreement you are creating. The attributes appearing on this page vary according to the Contract Type you select. Following is an explanation of some of the less obvious attributes:
- Organization Unit: Select the organization unit in which you want to create this Agreement. Users within an organization unit must have specific privileges to take any action on the Agreement. For example, users with View privilege can only view the Agreement whereas users with Manage privilege can perform actions on the Agreement.
- Contract Name: Specify a name for the Agreement you are creating. Note that the name must be unique and easily identifiable. This helps in tracking the Agreement easily.
- Agreement Code: Each Agreement is assigned a unique ID known as its Agreement Code. It is generated automatically on clicking the Create button to create the Agreement
4. Click Next. The Select Template section is displayed.
Select Template
This section displays the Templates that are available for the selected Contract Type. This section is available only if you select Own Type of Paper while creating the agreement. Select the appropriate Template in this section and click Next. The Verify section is displayed.

Verify
This is the final step for creating the Agreement. It displays only the sections and attributes that you have used for creating this Agreement. Verify all the details you have entered. On this page, you can:
- Click Previous to go back and make changes to the Agreement. Click Next to return to this section after making the required changes and create the Agreement.
- Click Create to create the Agreement. The Agreement will not be visible to anyone except the user who created it, until it is published.
- Click Create and Publish to create and publish the Agreement. After publishing, other users with adequate access can search, view and take actions on the Agreement. After publishing, a Draft watermark appears on the Agreement until it is approved.
- Click Create and Send for Approval to create and send the Agreement for approval. The Agreement is sent for approval to the approvers that are set by a rule on the Contract Type selected for this Agreement and the status changes to Waiting for Approval. If no rules are defined and no approvers are set, the Agreement status automatically changes to Approved.
- Click Discard to delete the Agreement you are creating.
Sending an Agreement Document from ICI to Workday
ICI provides the ability to send Agreement documents from ICI to Workday. You can create an Agreement using Own and Third Party Type of Paper to send the Agreement document in .docx and .pdf format from ICI to Workday.
Sending the .docx version of Agreement from ICI to Workday
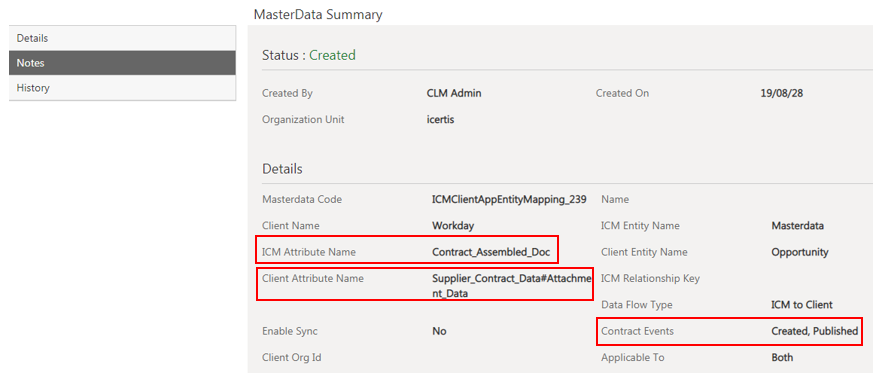
If you have already configured sending an Agreement document in .docx or .pdf format, modify the Contract events and also the document format , else you must create the Client App Entity Mapping Masterdata using the steps mentioned in the Creating Client App Entity Mapping section.
1. Click Configuration > Masterdata on the Dashboard. The Masterdata page opens.
3.Click the icon next to the Client App Entity Mapping Masterdata. The Client App Entity Mapping page opens.

4.Set the value of ICI Attribute Name Attribute as Contract_Assembled_Doc and the value of Client Attribute Name as Supplier_Contract_Data#Attachment_Data and the value of Contract Events as Created/ Published to send the Agreement document in .docx format from ICI to Workday.
Sending the .pdf version of Agreement from ICI to Workday
If you have already configured sending an Agreement document in .docx or .pdf format, modify the Contract events and also the document format , else you must create the Client App Entity Mapping Masterdata using the steps mentioned in the Creating Client App Entity Mapping section.
To send the .pdf version of Agreement to Workday:
1. Repeat steps 1-3 from the Sending the .docx version of Agreement from ICI to Workday section and then perform the below step.
2. Set the value of ICI Attribute Name attribute as $Contract_Assembled_Pdf and the value of Client Attribute Name as Supplier_Contract_Data#Attachment_Data and the value of Contract Events as Created|Published| Updated to send the Agreement document in .pdf format from ICI to Workday.

Viewing the Supplier Contract in Workday
ICI integrates with Workday and provides capability of viewing and updating the Supplier Contracts in Workday that are originally created in ICI. When a Supplier Contract is created in ICI, it is synchronized in Workday. Any updates and amendments made to the ICI Contract are auto-synchronized and get reflected in Workday.
ICI integration with Workday allows you to only view the Contract in Workday. After you create a Supplier Contract in ICI, you can view it in Workday using the following process:
1. Log on to Workday as an Integration System user provisioned in ICI and Workday.
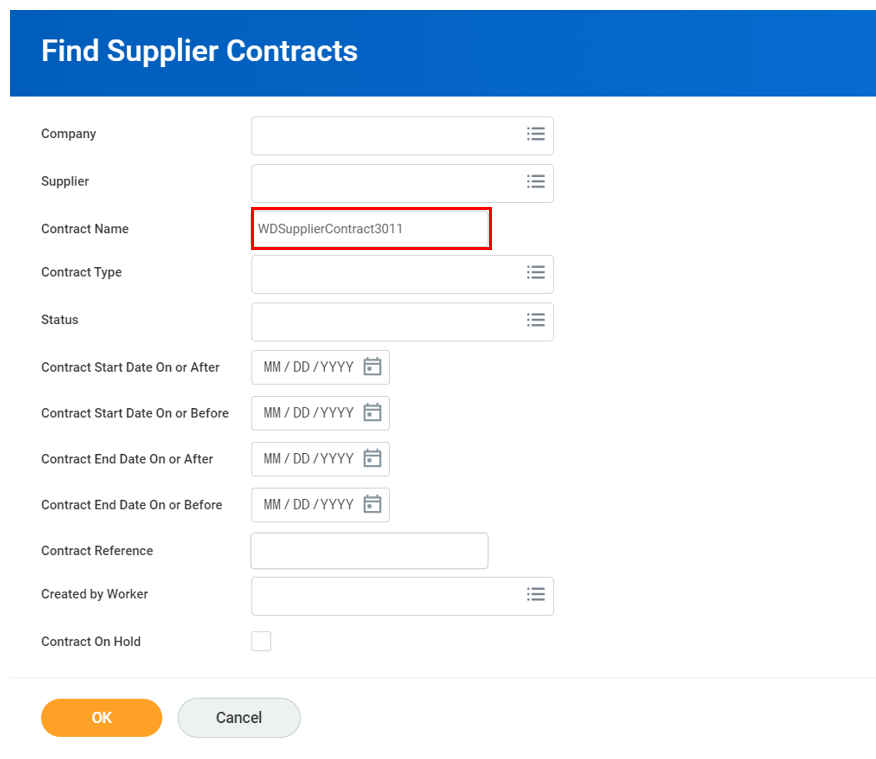
2. Type Find Supplier Contract in the text box on the Welcome page. The Find Supplier Contracts page opens.

3.Type the Contract name you entered in ICI in the Contract Name field on Find Supplier Contract page.
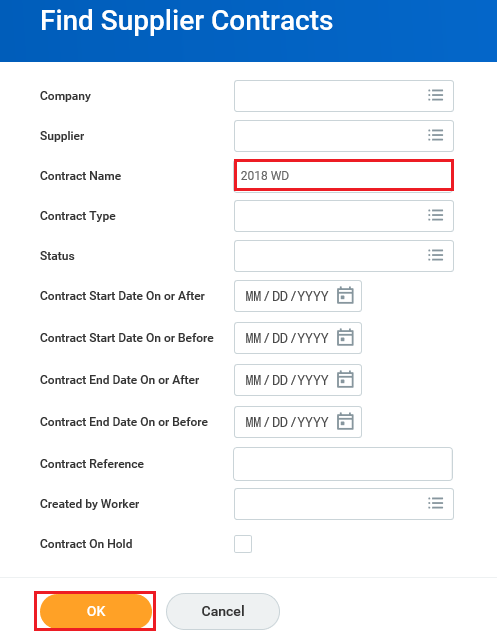
4. Click OK. The Report Criteria page opens showing the list of relevant Contracts.

5. Click the magnifying glass icon under Supplier Contract. The Contract Information page opens showing the details of the Contract created in ICI.
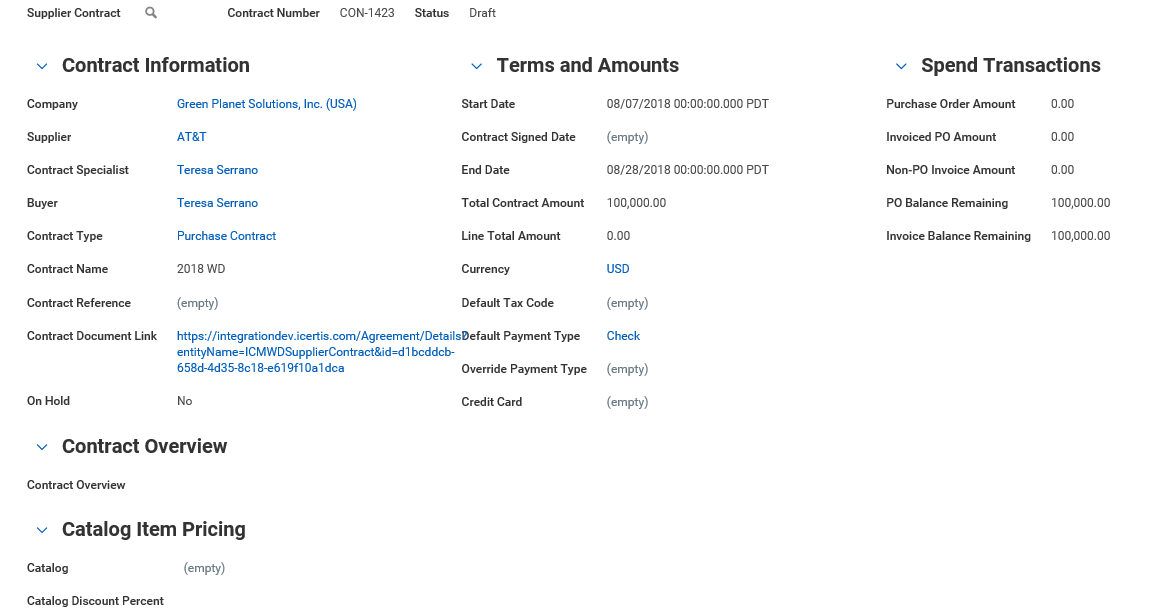
Viewing the Agreement document in Workday
The .docx and .pdf are displayed under the Contract record on the View Supplier Contract page under Catalog Item Pricing section.
Workday Side Configuration
Administrator from Workday end must create the following domain security policy permissions for creating Workday Integration security groups.
Note that, the domain security policy permissions provided below are just an example of the various security policies the Workday administrator will have to create.

ICI-Workday adapter support for amendments and Supplier contract termination
Previously, the ICI-Workday integration supported only creation of Supplier contract agreements.
With this release, the ICI-Workday adapter has been enhanced to support:
- Termination of Supplier contracts
- Creation and updation of amendments for Supplier contracts
These enhancements save time and avoid data duplication, as the updates made on the ICI side are reflected in Workday.
Sending Amendments from ICI to Workday
The ICI-Workday integration provides the ability to automatically synchronize amendments in Workday that are created or updated in ICI.
To enable mapping between ICI and Workday, the following Masterdata Contract Types should be configured in ICI:
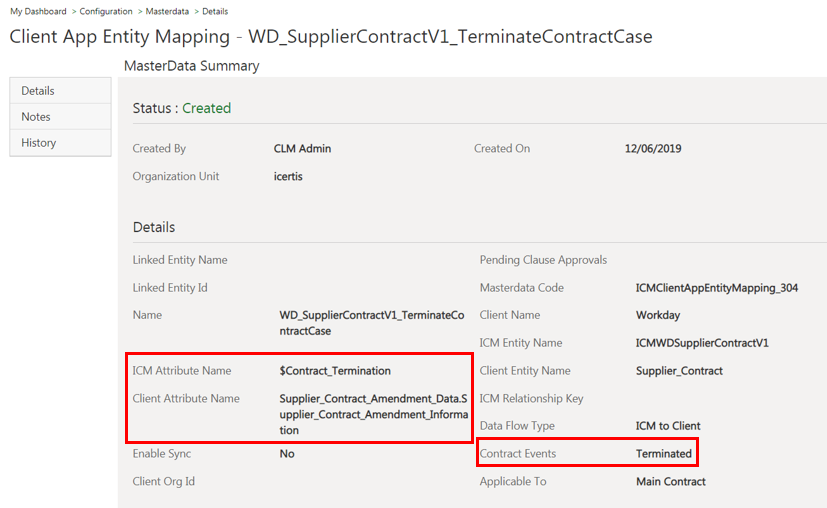
Client App Cross Reference
This maps ICI Supplier Contract amendments with Workday Supplier Contract entities.
To create Client App Cross Reference:
1. Click the Configuration tile. The Configuration page opens.
2. Click the Masterdata tile. The Masterdata page opens.
3. Click the Create Masterdata tile. The Create Masterdata page opens.
This page contains the following tabs:

Masterdata Details
1. Select the Category from the drop-down. For example, Default.
2. Select the Masterdata Contract Type.
3. Click Next. The Attributes page opens.
Attributes
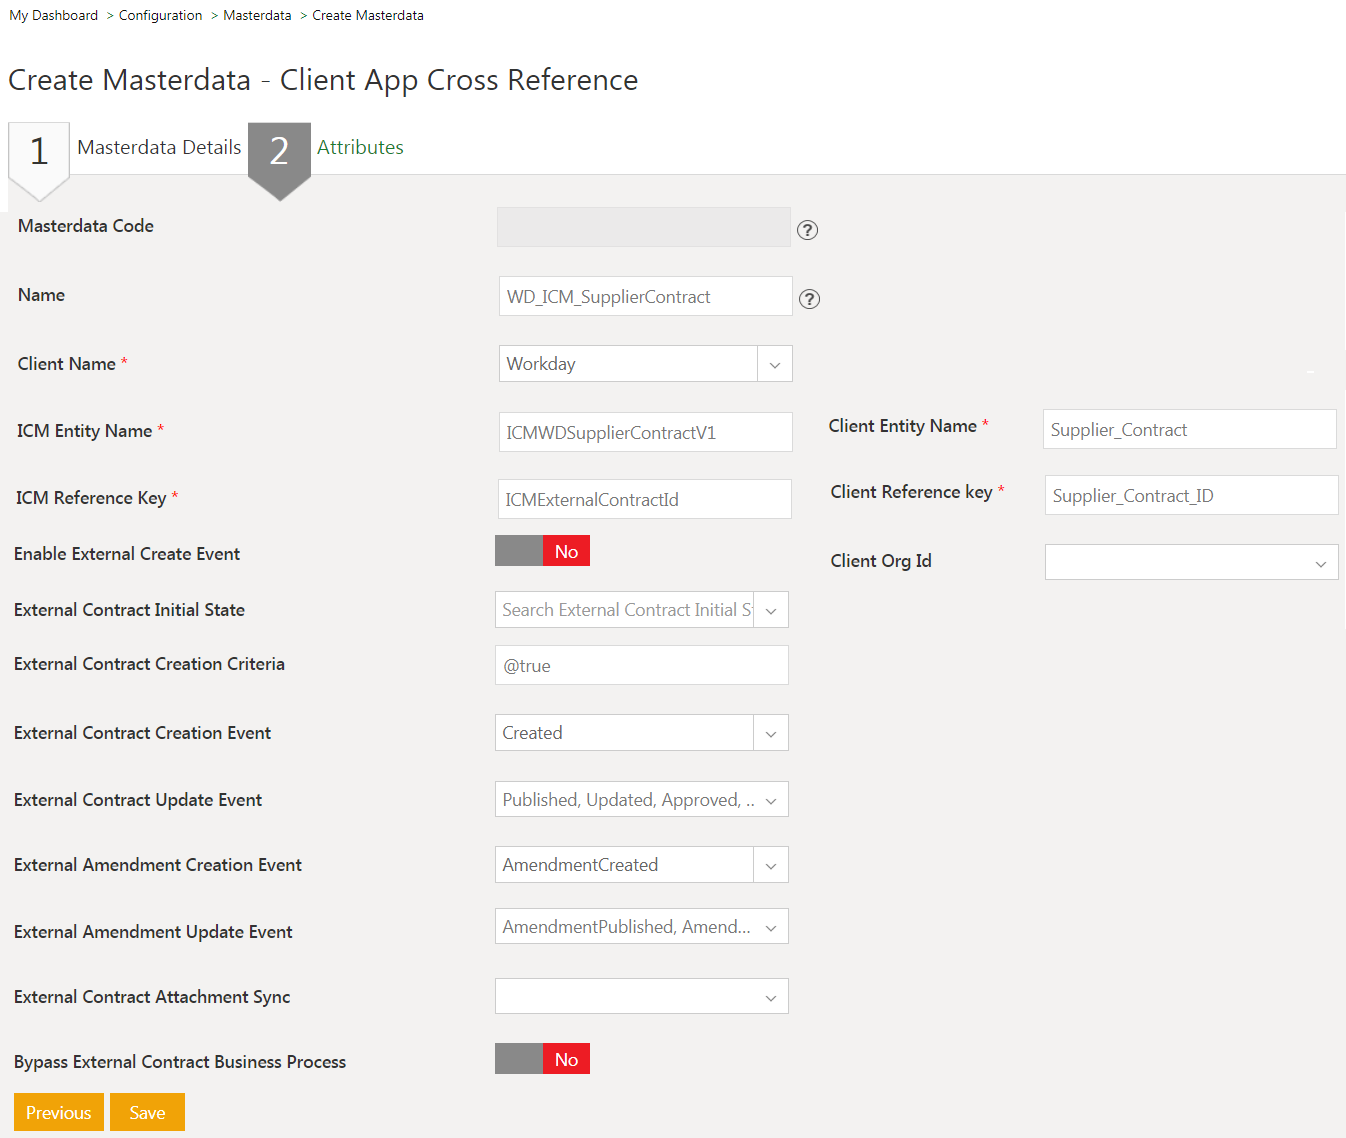
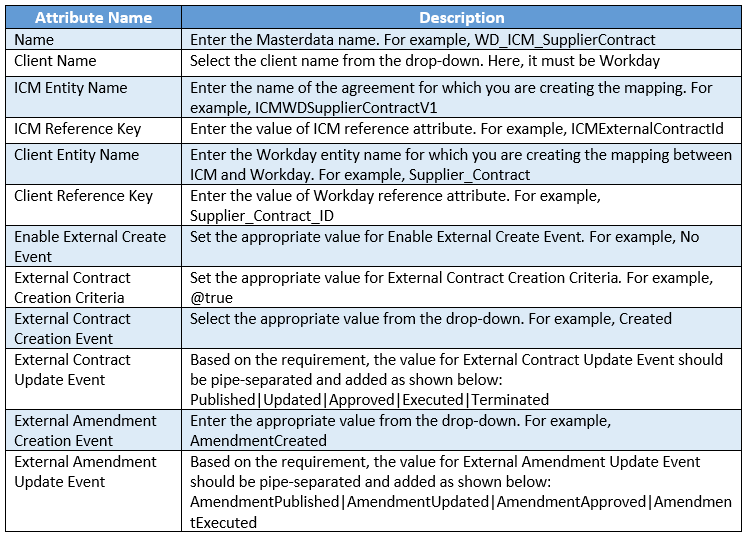
Provide relevant attribute values in the respective fields:
The Client App Cross Reference created is displayed as shown in the screenshot below:
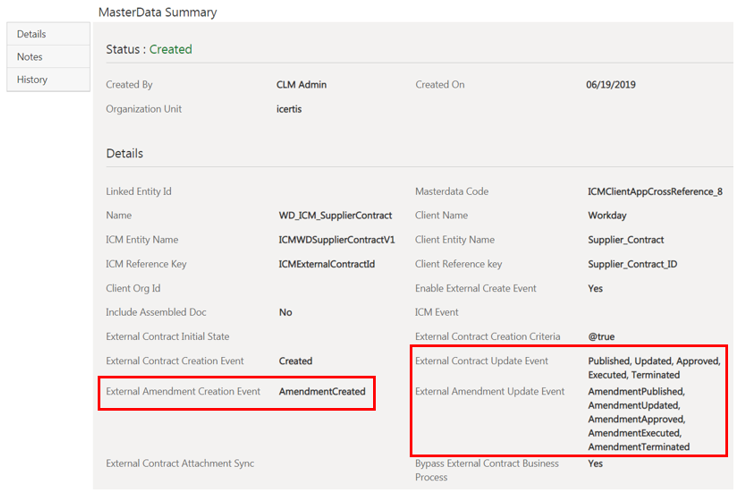
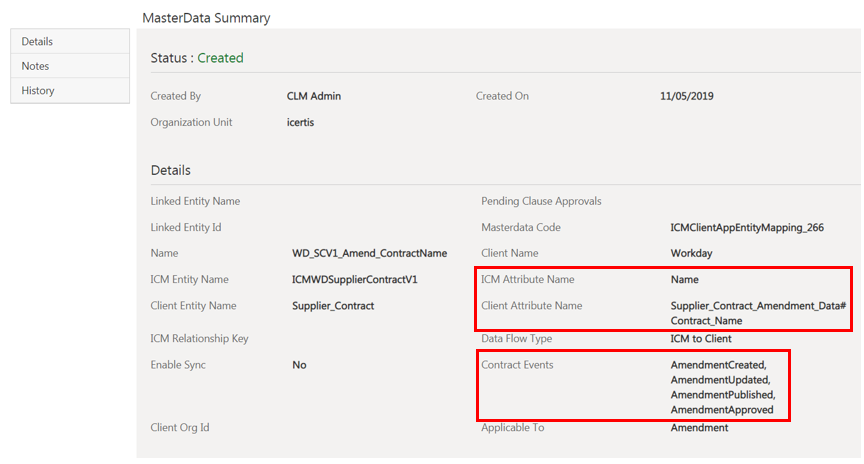
Setting the value of the attribute External Amendment Creation Event to AmendmentCreated will automatically synchronize any amendment created in ICI with Workday. Similarly, setting the value of the attribute External Amendment Update Event to AmendmentPublished, AmendmentUpdated, AmendmentApproved or AmendmentExecuted will automatically synchronize any amendment published, updated, approved or executed respectively in ICI with Workday.
Client App Entity Mapping
This maps ICI Supplier Contract amendment attributes with Workday Supplier Contract amendment attributes. Therefore, when an amendment is created or updated in ICI, all Supplier contract amendment attributes are automatically synchronized with Workday. For example, to map the attribute Name between ICI and Workday, you must create the Client App Entity mapping.
1. Click the Configuration tile. The Configuration page opens.
2. Click the Masterdata tile. The Masterdata page opens.
3. Click the Create Masterdata tile. The Create Masterdata page opens.
This page contains the following tabs:
Masterdata Details
1. Select the Category from the drop-down. For example, Default.
2. Select the Masterdata Contract Type.
3. Click Next. The Attributes page opens.
Attributes
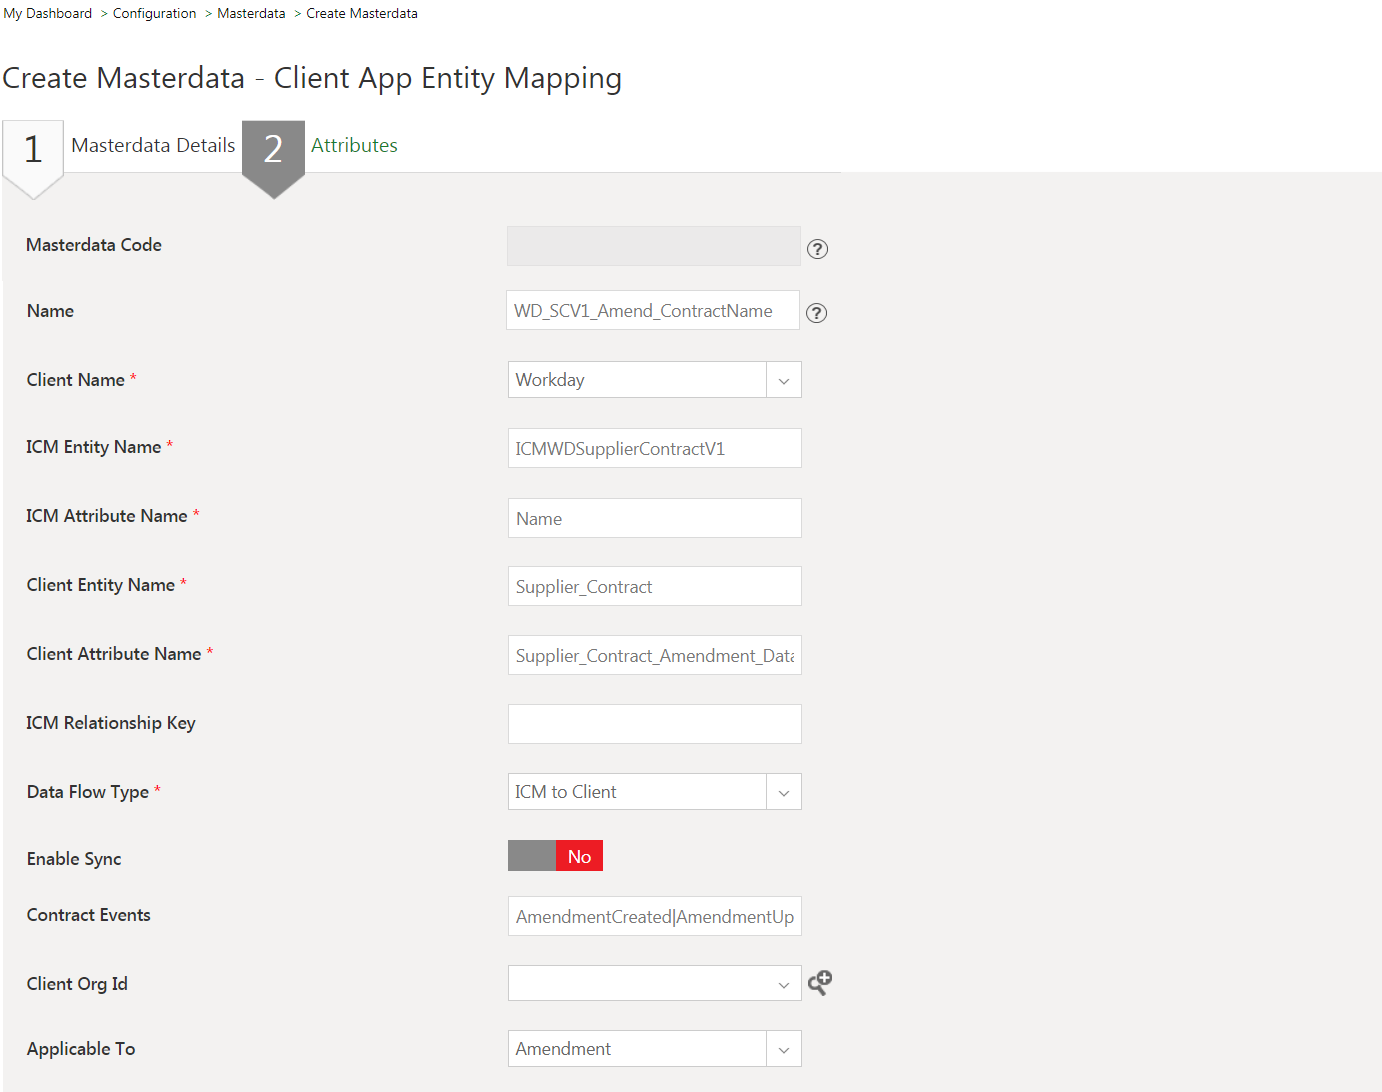
Provide relevant attribute values in the respective fields:
The Client App Entity Mapping created is displayed as shown in the screenshot below:
Creating Supplier Contract Amendments in ICI
1. Click Add Amendment on the agreement Details page.
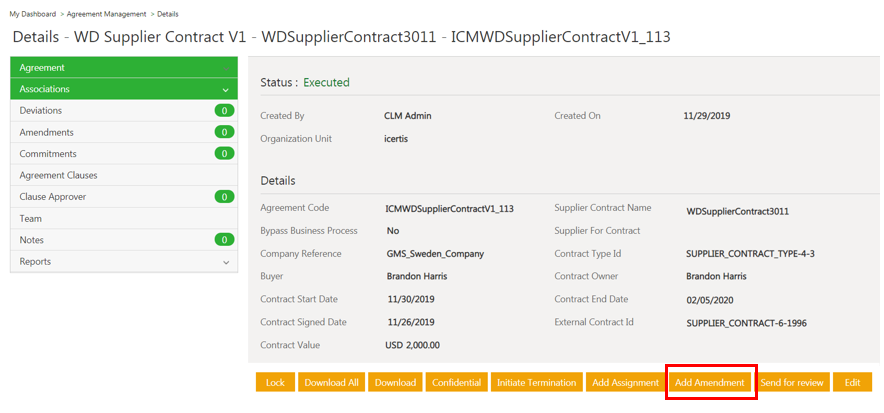
2. Modify the Contract Start Date, Contract End Date and the Contract Value to make amends to the original agreement.
3. Create the amendment.

Viewing Supplier Contract Amendments in Workday
1. Log on to Workday.
2. Type Find Supplier Contract in the textbox on the Welcome page. The Find Supplier Contracts page opens.

3. Type the Contract Name you entered in ICI in the Supplier Contract Name field.
4. Click OK. The Report Criteria page opens.

3. Click the ![]() icon under Supplier Contract. The Contract Information page opens. The amendment created in ICI is automatically updated in Workday as shown in the screenshot below:
icon under Supplier Contract. The Contract Information page opens. The amendment created in ICI is automatically updated in Workday as shown in the screenshot below:
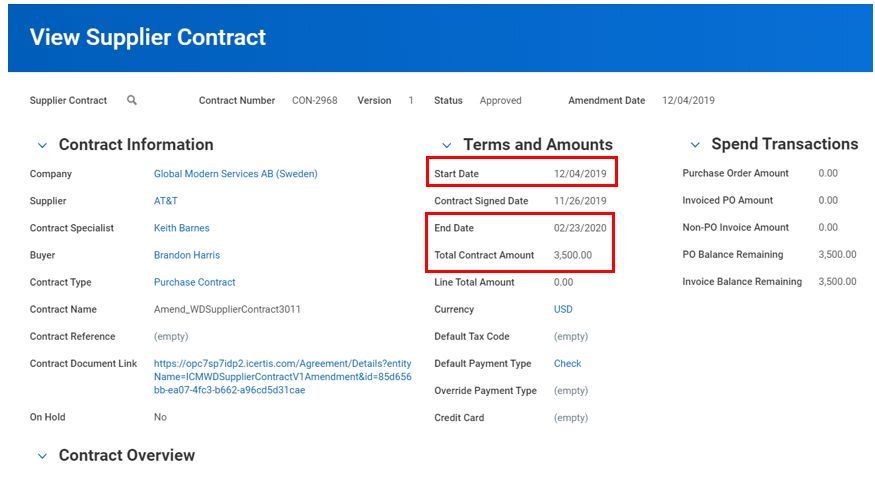
- In ICI when an amendment is added, a new agreement gets created with a link to its parent agreement. However, in Workday, when an amendment is created, it updates the underlying contract and maintains a history of the changes being done.
- If the status of an amendment is Draft in ICI, its status in Workday is Amendment In Process. Similarly, if the status is Approved or Executed in ICI, the status in Workday is Approved.
- ICI allows an Approved amendment to be updated. However, in Workday, amendments with the status In Progress or Draft can only be updated.
Synchronizing Supplier Contracts Terminated in ICI with Workday
The ICI-Workday integration provides the ability to automatically synchronize Supplier contracts in Workday that are terminated in ICI.
To enable mapping between ICI and Workday, the following Masterdata Contract Types should be configured in ICI:
a. Client App Cross Reference
The Client App Cross Reference Mapping is same as the one mentioned in the section Sending Amendments from ICI to Workday.
b. Client App Entity Mapping
Follow the steps under Client App Entity Mapping mentioned in the section Sending Amendments from ICI to Workday to map ICI Supplier contracts with Workday Supplier contracts. The Client App Entity Mapping created is displayed as shown in the screenshot below:
Terminating Supplier Contracts in ICI
1. Create and execute the Supplier contract.
2. Click the Send for review button.

After the contract is reviewed, the status changes to Reviewed.
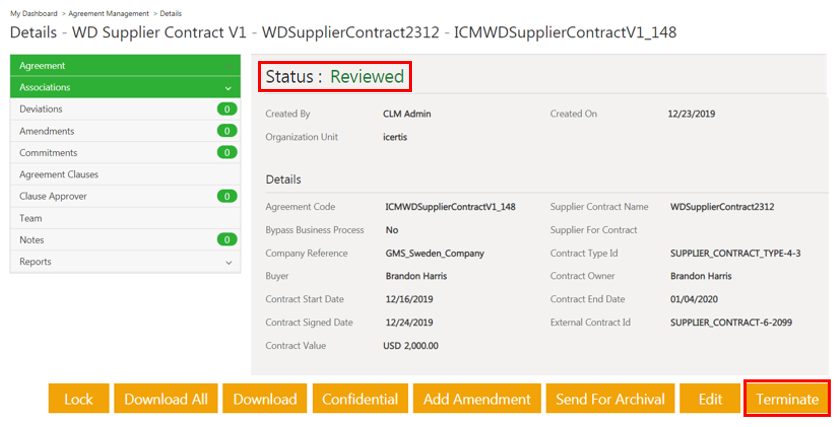
3. Click the Terminate button.
After the contract is terminated, the status changes to Terminated.
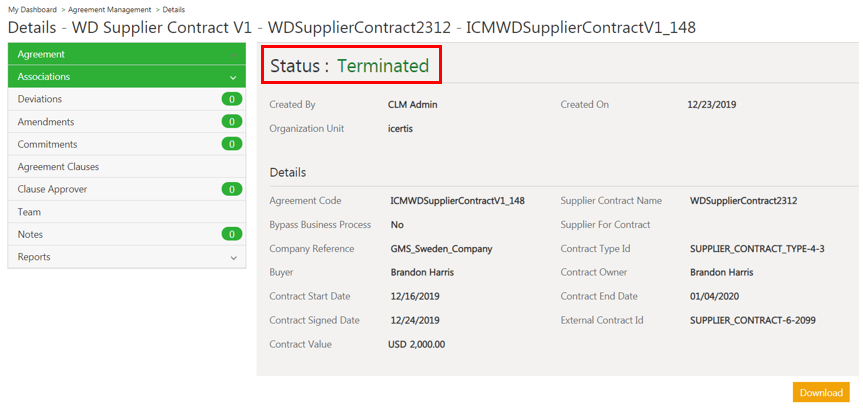
Viewing Terminated Supplier Contracts in Workday
1. Log on to Workday.
2.Type Find Supplier Contract in the textbox on the Welcome page. The Find Supplier Contracts page opens.
3. Type the Supplier Contract Name you entered in ICI in the Supplier Contract Name field.
4. Click OK. The Report Criteria page opens.
5. Click the Search icon below Supplier Contract. The Contract Information page opens.
The contract that has been terminated in ICI is terminated in Workday as well.

ICI-Workday Adapter support for resetting expiry date and auto-renewal of Supplier contracts
The Icertis Experience for Workday supports Create and Update events for agreements and amendments. With this release, users will be able to set auto renewal and/or reset the expiry date for a contract, when the corresponding contract type is enabled for Workday. In both cases, an amendment record with a revised expiry date gets created for the main agreement in Workday.
These enhancements save time and avoid data duplication, as the updates made on the ICI side are also reflected in Workday.
ICI-side Configuration
To enable auto-renewal of contracts between ICI and Workday, the following Masterdata Contract Types should be configured in ICI:
Client App Cross Reference
1. Click Home > Configuration > Masterdata > Create Masterdata. The Create Masterdata page opens.
2. Select Client App Cross Reference.
3. Click Next. The Details tab opens.
4. Select the Category from the drop-down. For example, Default.
5. Select the Masterdata Contract Type.
6. Click Next. The Attributes tab opens.
7. Enter relevant attribute values in the respective fields.


8. Click Save. The cross reference mapping will be created.

Client App Entity Mapping
This maps ICI attributes with Workday attributes. Therefore, when an amendment is set for auto-renewal or to reset the expiry date in ICI, all attributes are automatically synchronized with Workday. For example, to map the attribute Name between ICI and Workday, you must create the Client App Entity mapping.
1. Click Home > Configuration > Masterdata > Create Masterdata. The Create Masterdata page opens.
2. Select Client App Entity Mapping.
3. Click Next. The Details tab opens.
4. Select the Category from the drop-down. For example, Default.
5. Select the Masterdata Contract Type.
6. Click Next. The Attributes tab opens.
7. Enter relevant attribute values in the respective fields.

8. Click Save. The client app entity mapping will be created.

Resetting the expiry date for supplier contracts
To renew a supplier contract that has expired:
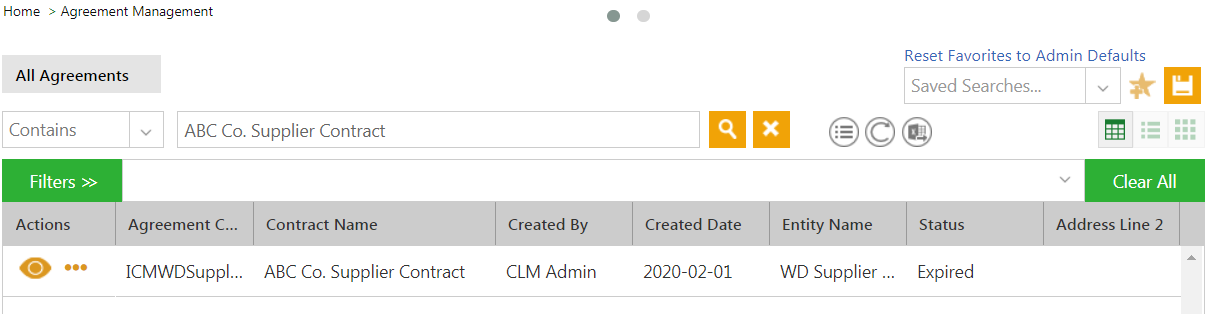
1. Go to the Agreement Details page of the expired contract in ICI. In this example, the agreement has expired on 2020-09-09.
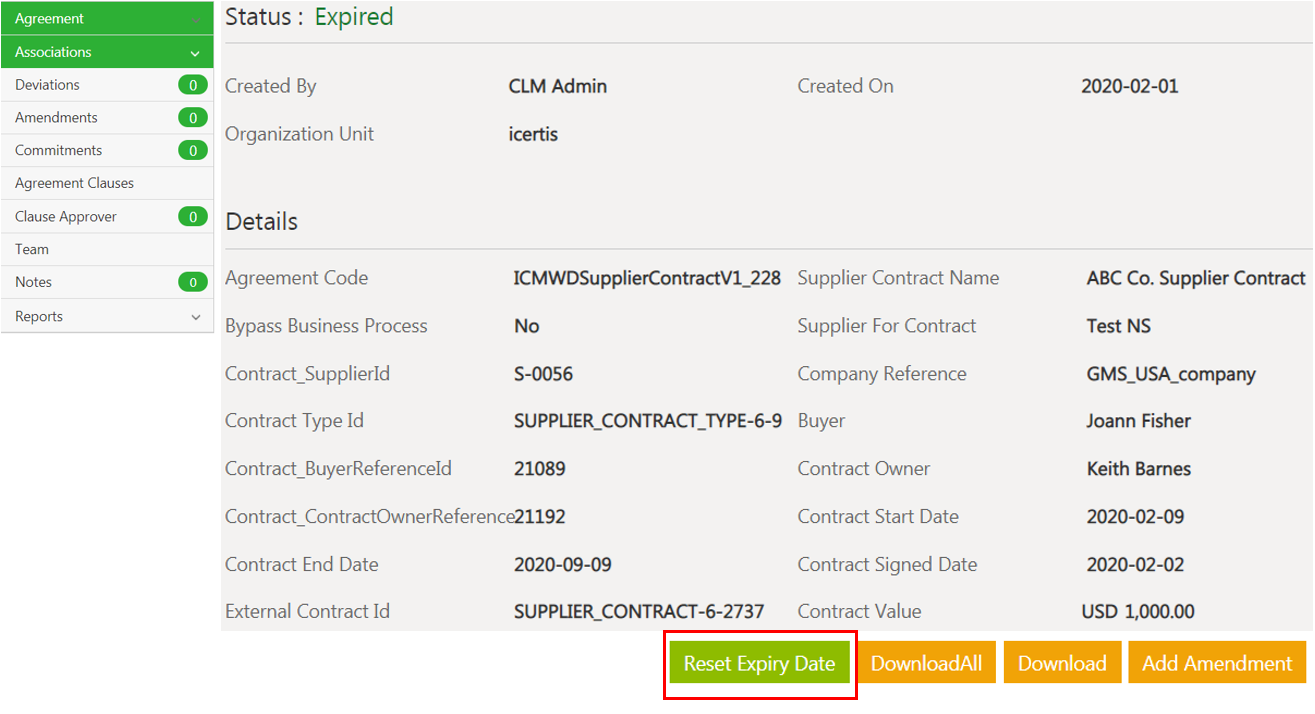
2. Click Reset Expiry Date. The Reset Agreement Expiry Date pop up opens.
3. Select the New Expiry Date, for example 2020-10-10.

The agreement status changes to Executed and a success notification message is displayed on the Notifications Dashboard.

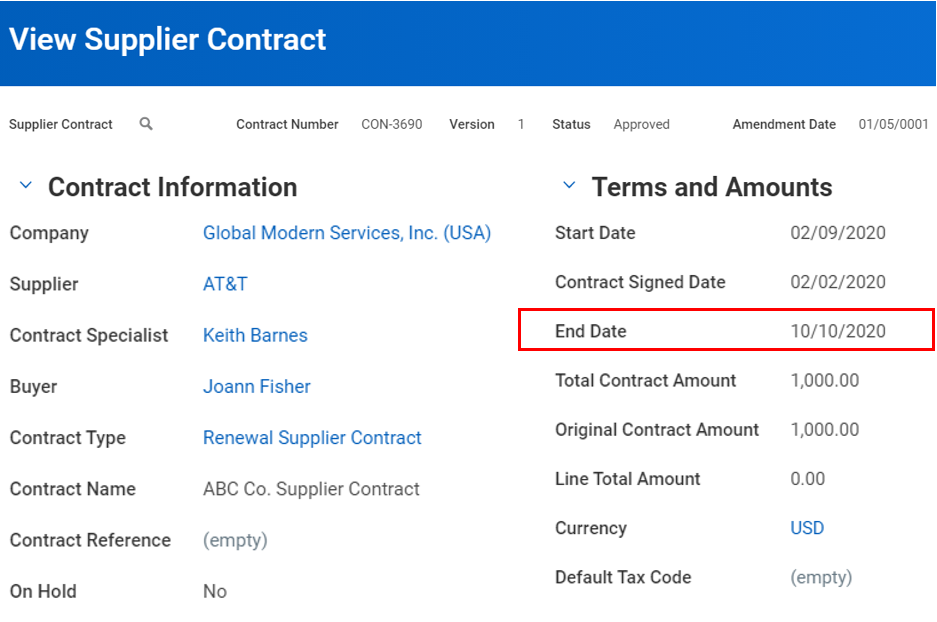
4. Go to the View Supplier Contract page for the renewed contract in Workday, for example ABC Co. Supplier Contract. The End Date will be updated to the date entered in Step 3.
5. Scroll to the Contract Overview section at the bottom of the View Supplier Contract page. The contract will be updated with a new amendment.
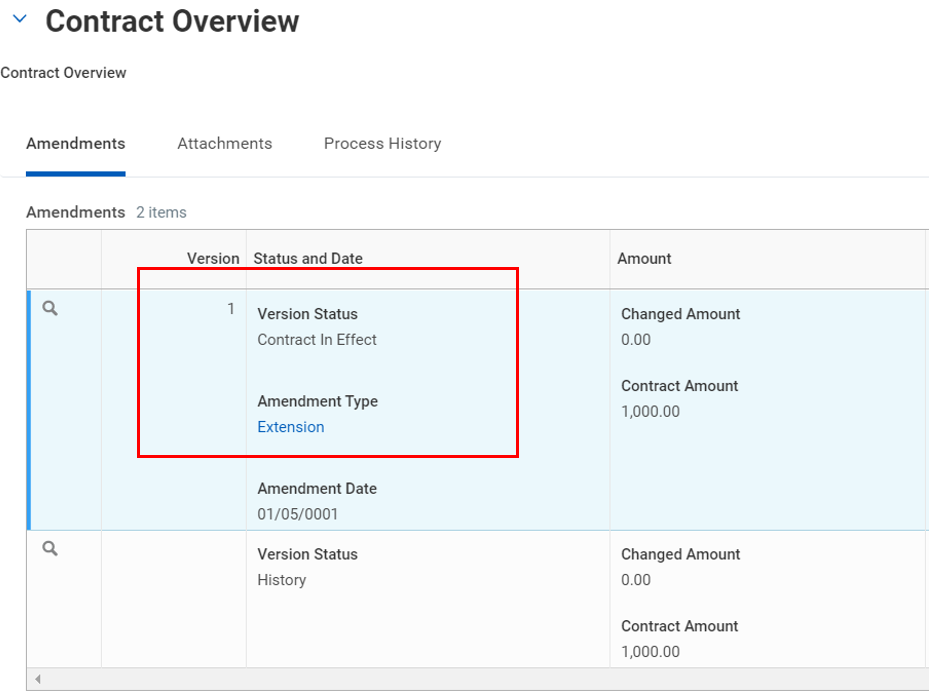
A success notification message is displayed on the Notifications Dashboard.

Setting auto-renewal for supplier contracts
To configure auto-renewal of supplier contracts:
1. Click Home > Agreement Management > Create Agreement. The Create Agreement page opens.
2. Select the Category, Contract Type Name and Type of Paper.
3. Click Next. The Attributes page opens.
4. Enter the appropriate values.


5. Toggle the Renewal flag to Yes. The Number of Renewals, Max Renewals and Renewal Period attributes are displayed.
6. Enter the values for the Renewal attributes:
- Number of Renewals: Indicates the number of renewals of an agreement. While creating an agreement this number will always be 0.
- Max Renewals: Enter the number of iterations of renewal. For example, if you want the agreement to be renewed twice, enter 2.
- Renewal Period: Enter the duration of renewal in number of months. For example, if you want to renew the agreement for 1 year, enter 12 to denote 12 months.
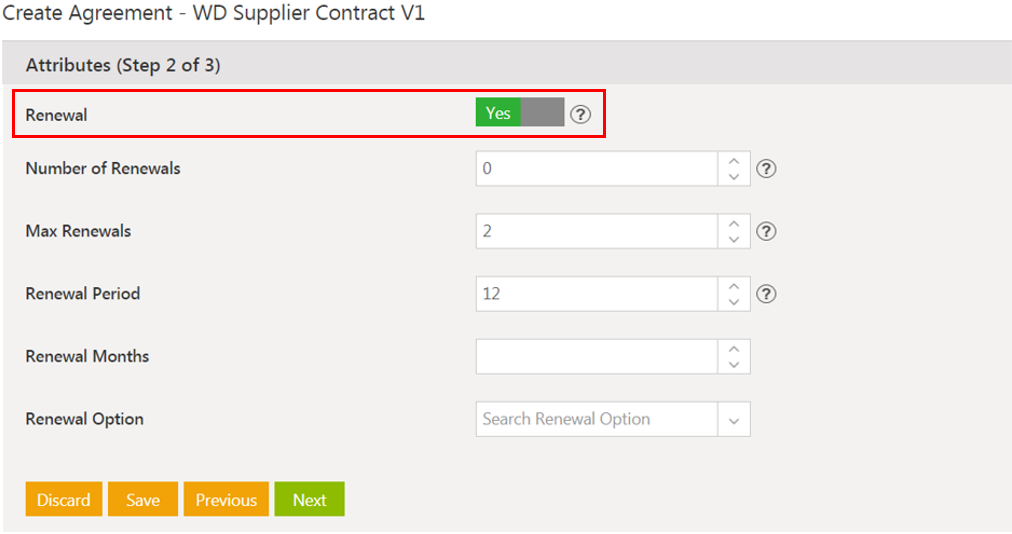
7. Click Next. The Verify page opens.
8. Click Create and Publish. The agreement is created and published.
Once the agreement expiry date has passed, the agreement will be auto-renewed for the period specified in Renewal Period in Step 6. In this example, the Expiry Date has been updated to 2021-09-09 and the Number of Renewals is updated to 1.
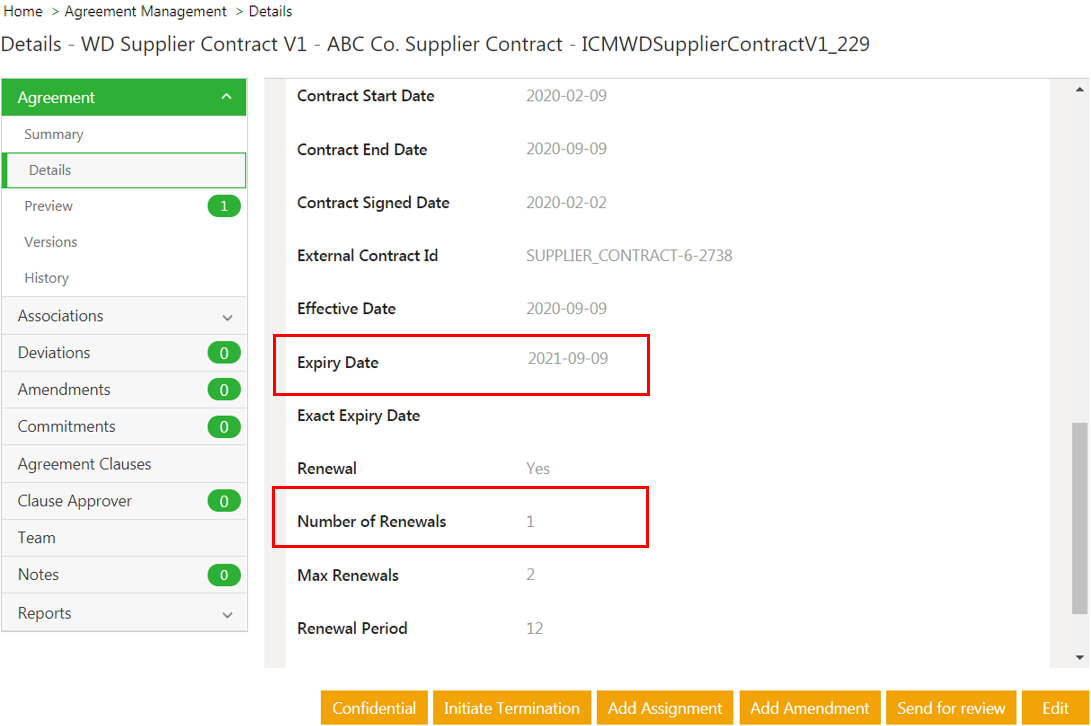
A success notification is displayed in the Notifications Dashboard, similar to the one for Resetting the expiry date for Supplier Contracts section above.
9. Go to the View Supplier Contract page for the same contract in Workday, in this example ABC Co. Supplier Contract. The End Date will be updated to the date entered in Step 3.

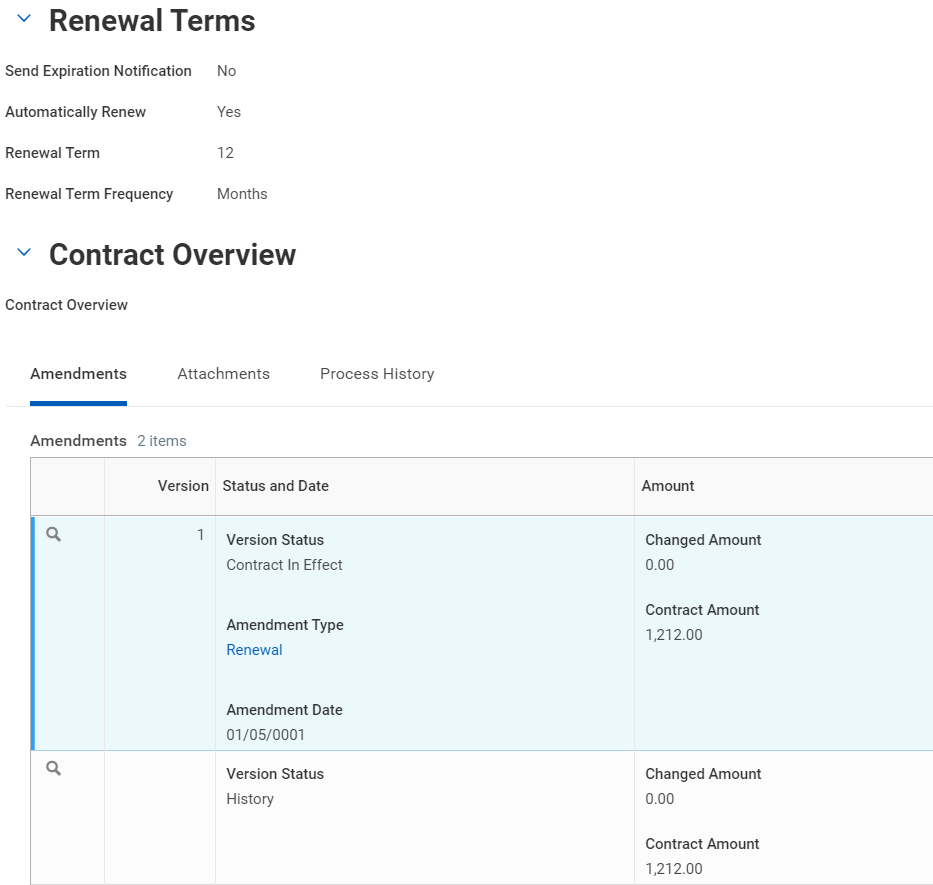
10. Scroll to the Renewal Terms and Contract Overview sections at the bottom of the View Supplier Contract page.
- Renewal Terms: Displays details on Send Expiration Notification, Automatically Renew, Renewal Term and Renewal Term Frequency.
- Contract Overview: A new amendment is added with Amendment Type Renewal.
ICI-Workday Adapter support for mapping of multi-level array type attributes
Workday has many multi-level array type attributes; however, the existing ICI-Workday adapter supports mapping of only single-level attributes with ICI.
Now, the ICI-Workday adapter extends support to allow mapping of multi-level array type attributes from Workday to ICI and vice versa.
Administrators can now:
- Map multi-level array attributes from Workday to ICI such as multi-line addresses (for example, address line 1, address line 2, zip code, city, etc.) for a specific address type (for example, business address, correspondence address, and so on), and spend categories (for example, printing, supplies and consumables, services, and so on) so that it synchronizes with ICI Supplier Masterdata.
- Add or select multi-level attributes such as spend category, department, work tags and cost center data as part of Supplier Contract Types and Associated Documents, so that when an agreement is created or updated in ICI, it automatically synchronizes with Workday.
Mapping Multi-level Array Attributes from Workday to ICI
The multi-level array attributes mapping from Workday to ICI provides the ability to map Workday Supplier address line attributes (for a specific address type) and spend categories with ICI Supplier Masterdata so that they synchronize with ICI Supplier Master attributes.
For example, to map the attribute Address Line 1 from Workday to ICI, you must create the Client App Entity Mapping.
Client App Entity Mapping
1. Click the Configuration tile. The Configuration page opens.
2. Click the Masterdata tile. The Masterdata page opens.
3. Click the Create Masterdata tile. The Create Masterdata page opens.
The Create Masterdata page contains the following tabs:
- Masterdata Details
- Attributes
Masterdata Details
1. Select the Category from the drop-down. For example, Default.
2. Select the Masterdata Contract Type.
3. Click Next. The Attributes page opens.
Attributes

Provide relevant attribute values in the respective fields:

The Client App Entity Mapping created is displayed as shown in the screenshot below:
Synchronizing Multi-level Array Attributes from Workday to ICI
1. Log on to Workday.
2. Type Find Supplier in the textbox on the Welcome page. The Find Suppliers page opens.
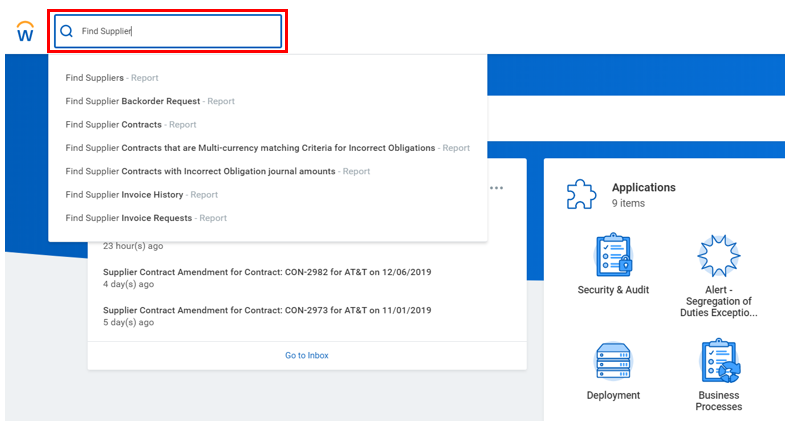
3. Type the Supplier ID that is mapped between Workday and ICI.
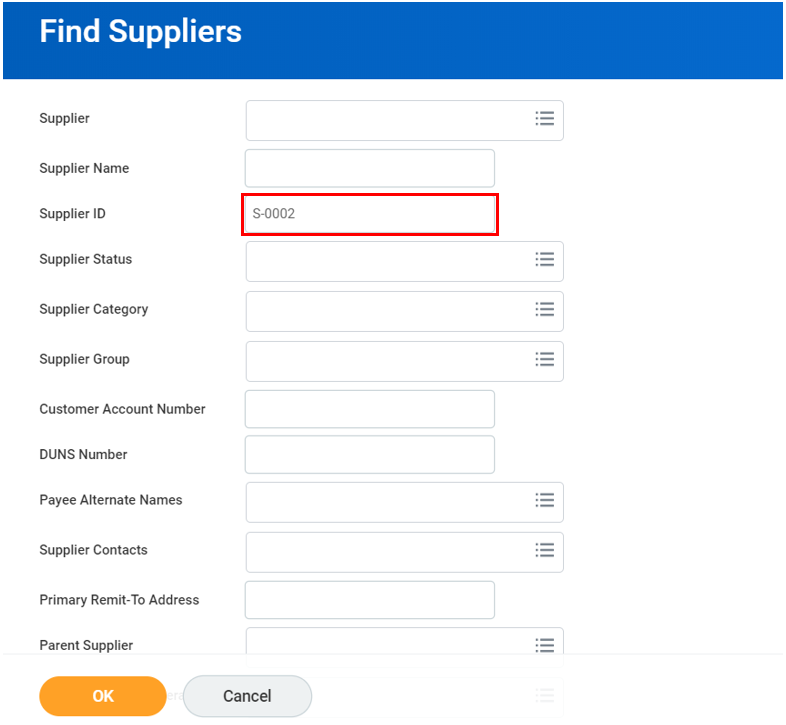
4. Click OK. The Find Suppliers page opens.
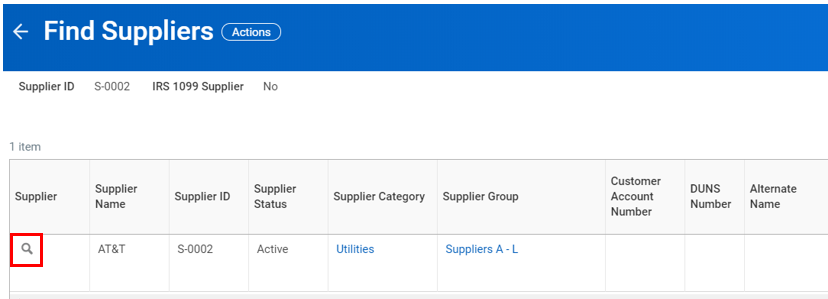
5. Click the Search icon below Supplier. The page related to the Supplier ID that you entered in Step 3 opens.
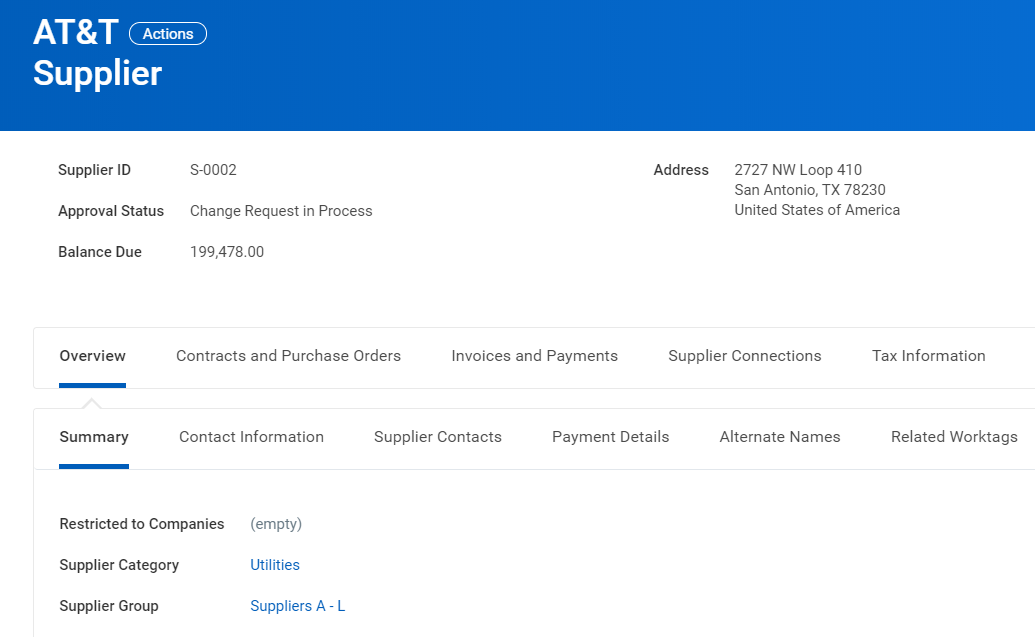
6. Click Contact Information.
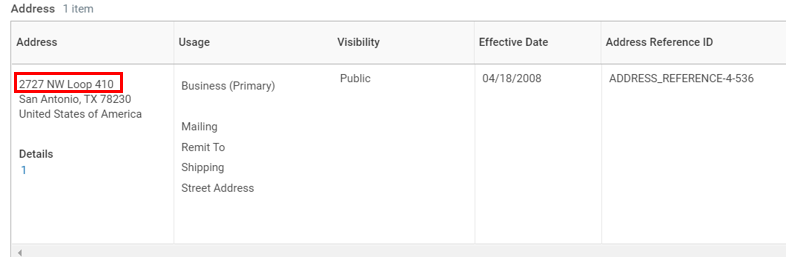
The Address Line 1 in Workday highlighted in the above screenshot is synchronized with the ICI Supplier Master attribute Address Line 1, as shown in the screenshot below:

Mapping Multi-level Array Attributes from ICI to Workday
The multi-level array attributes mapping from ICI to Workday provides the ability to add or select multi-level attributes such as spend category, department, work tags and cost center data as part of Supplier Contract Types and Associated Documents, so that when an agreement is created or updated in ICI, it automatically synchronizes with Workday goods lines items.
For example, to map attributes such as spend category and work tag cost center from ICI to Workday, you must create the Client App Entity Mapping.
Client App Entity Mapping
1. Click the Configuration tile. The Configuration page opens.
2. Click the Masterdata tile. The Masterdata page opens.
3. Click the Create Masterdata tile. The Create Masterdata page opens.
The Create Masterdata page contains the following tabs:
- Masterdata Details
- Attributes
Masterdata Details
1. Select the Category from the drop-down. For example, Default.
2. Select the Masterdata Contract Type.
3. Click Next. The Attributes page opens.
Attributes

Provide relevant attribute values in the respective fields:

The Client App Entity Mapping created is displayed as shown in the screenshot below:

Creating Goods Line Items in ICI
1. Create a Goods Line Item as a part of the associated document for the agreement you have created in ICI. For example, Work Tag Cost Center.

- Enter relevant attribute values in the respective fields.
- To configure the Work Tag Cost Center lookup, you will need to manually create the Masterdata for this in ICI.
- Workday does not support multiple work tags of the same type. For example, you cannot have multiple cost centers, regions, organizations, etc.
- You can add multiple lookups for work tags such as region reference, department, and so on.
The Goods Line Item created is displayed as shown in the screenshot below:

2. Edit and update the parent agreement in ICI after creating the Goods Line Item.
Synchronizing Multi-level Array Attributes from ICI to Workday
1. Log on to Workday.
2. Type Find Supplier Contracts in the textbox on the Welcome page. The Find Supplier Contracts page opens.
3. Type the Contract Name you entered in ICI in the Supplier Contract Name field. For example, Supplier Contract, as shown in the above screenshot.
4. Click OK. The Report Criteria page opens.
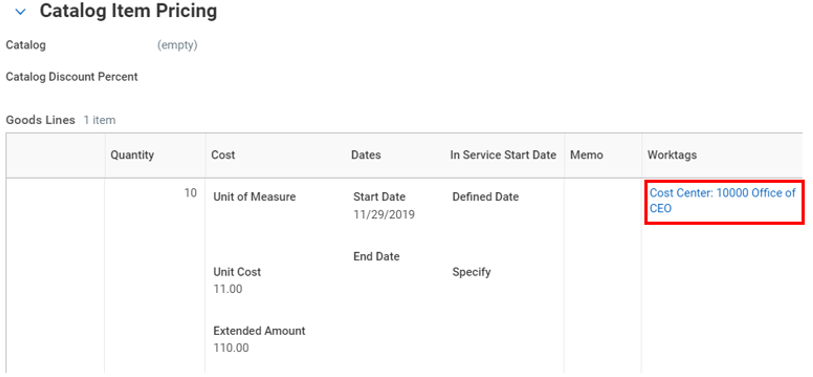
5. Click the Search icon under Supplier Contract. The Contract Information page opens.
The Goods Line Item created in ICI is automatically synchronized with Workday Goods Lines as shown in the screenshot below:
Related Topics: Agreement Management