Contents
[hide]- 1 Localizing ICI
- 1.1 Assumptions/Restrictions
- 1.2 Important Points
- 1.3 Rules implementation for localized masterdata attributes
- 1.3.1 Localizing Masterdata Attributes
- 1.3.2 Creating Masterdata instances
- 1.3.3 Referencing localized masterdata attribute in lookup attribute on Agreement Contract Type
- 1.3.4 Configuring Rule referencing localized masterdata attributes
- 1.3.5 Rule implementation for localized masterdata attributes for an Agreement
- 1.4 Localization of content in the agreement
Localizing ICI
This topic discusses the scope for localization built as part of ICI. Goal is to enable localization for all English text seen across ICI, for some there are technical challenges and hence are kept out of scope. This document calls out both in-scope and out-off scope areas to ensure there are no gaps.
Garbage in Garbage out (GIGO): User input in any language will be accepted, stored and displayed as entered/stored.
Assumptions/Restrictions
Localization currently supports these languages out of the box:
- Brazilian pt-BR
- Chinese (Simplified/Mandarin) zh-CHS
- Chinese (Traditional) zh-CHT
- Croatian
- Czech cs-CS
- Danish
- Dutch nl-NL
- English en-US
- Finnish
- French fr-FR
- German de-DE
- Hungarian
- Italian it-IT
- Japanese ja-JP
- Korean
- Norwegian
- Polish pl-PL
- Portuguese pt-PT
- Russian
- Spanish es-ES
- Spanish (Lat Am)
- Slovak (Slovakia)
- Slovenian
- Swedish
- Turkish tr-TR
Important Points
- Customers have the ability to add support for additional languages. Translations for a new language provided by the customer, will be uploaded from the backend.
- ICI configurations should happen in English only.
- For user-defined fields, localized strings will be added from the backend after configuration is completed. Subsequent additions and changes to these fields may require additional changes to the localized strings in the Database.
Rules implementation for localized masterdata attributes
User can localize masterdata attribute values and further refer its values in lookup across ICI. If there is any rule configured for such lookup, changing lookup value will evaluate the rule. The rule configured in English will be evaluated upon changing its lookup values also in languages other than English.
Localizing Masterdata Attributes
Users can localize masterdata attribute and further refer its values across ICI.
To localize masterdata attribute:
Let us consider an example where Chemical Product Master is a masterdata contract type with attributes such as Chemical Name, Chemical Usage Details which has localized values.
- Click Configuration > Create Contract Type > Masterdata on the Home page. The Select Contract Type page opens.
- Click Next. The Create Contract Type page opens.
- Enter name in Contract Type Name. For example, Chemical Product Master.
- Enter remaining details on Details tab.
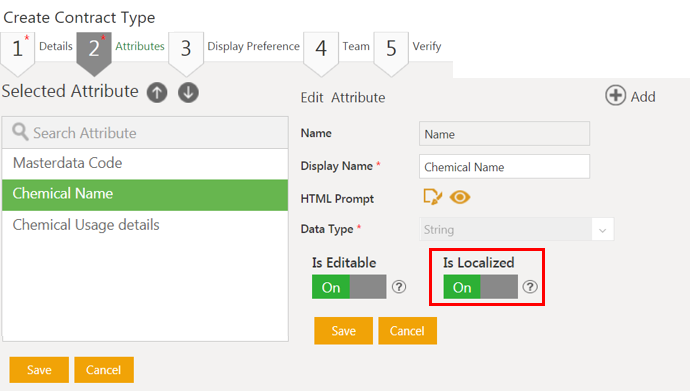
- Select the attribute you want to localize. For example, Chemical Name.
- Toggle On the Is_Localised field.
- Click Save. The Attribute updated successfully message is dispalyed.
- Enter the details in the remaining Display Preference and Team tabs.
- Verify and click Create. The masterdata contract type is created.
You can edit existing masterdata contract type to configure the attribute as localized.
Creating Masterdata instances
- Click Configuration > Masterdata > Create Masterdata on the Home page. The Create Masterdata page opens.
- Select Masterdata. For example, Chemcial Product Masterdata.
- Click Next. The Attributes page opens.
- Enter Chemical Name. Fo example, Boron Nitride Powder.
- Enter Chemical Usage Details. For example, Disinfectant.
- Click Save. The masterdata instance is created.
Referencing localized masterdata attribute in lookup attribute on Agreement Contract Type
To reference localized masterdata attribute in lookup attribute:
- Click Configuration > Create Contract Type > Agreement on the Home page. The Select Contract Type page opens.
- Click Next. The Create Contract Type page opens.
- Enter name in Contract Type Name. For example, Saas Agreement.
- Enter remaining details on Details tab.
- Click Next. The Attributes tab opens.
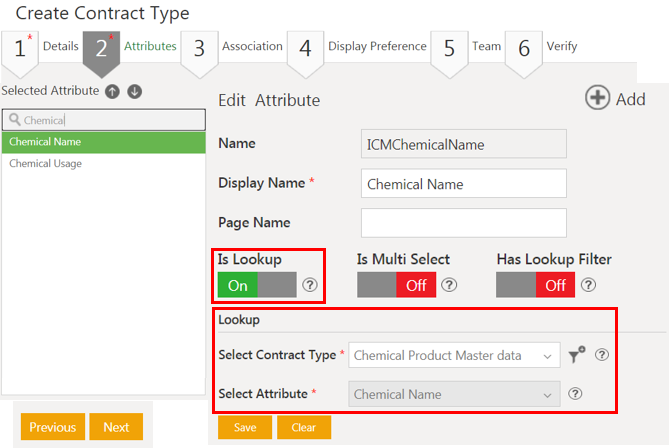
- Select the attribute you want to add lookup for. For example, Chemical Name.
- Toggle On for the Is_Lookup field.
- Select masterdata contract type in Lookup section. For example, Chemical Product Masterdata.
- Select the attribute, where the look up value will be picked up from. For example,Chemical Name.
- Click Save. The Attribute updated successfully message is displayed.
- Enter the details in the remaining Association, Display Preference and Team tabs.
- Verify and click Create. The agreement contract type is created.
You can edit existing agreement contract type and configure a lookup type attribute to reference localized masterdata attribute.
Configuring Rule referencing localized masterdata attributes
You can configure any type of rule for lookup attribute that references localized masterdata attribute.
For example, configure an event rule for Saas Agreement contract tyep lookup attribute which references localized masterdata attribute Chemical Name.
To configure an event rule with localized masterdata attribute:
- Click Configuration > Rule > Create Rule on the Home page. The Create Rules page opens.
- Select the contract type for which you want to create a rule on the Setup tab. For example, Saas Agreement.
- Enter a name in the Rule Name field. For example, Approval - RG.
- Select the Rule Type. For example, Approval Rule.
- Select Team Role. For example, Approver.
- Click Next. The Build tab opens.
- Click Add Rule under Builder tab. The Add Rule section opens.
- Enter Condition. For example, Chemical Name Has a Value.
- Select Actions. For example, Require Approval From Any.
- Add users from Search User window. For example, John Doe.
- Select Minimun Approvers and Step Number.
- Select No in Stop Processing More Rules field. The further evaluation of rules within a ruleset continues.
- Click Validate. The page to validate the rule by entering attributes values of the selected contract type opens.
- Click Next. The rule Summary tab opens.
- Click Create. The Rule created successfully message appears. The rule is displayed in the list of rules of the selected contract type.
Refer to Rules for details on configuring other types of rules.
Rule implementation for localized masterdata attributes for an Agreement
Users can create the agreement instance for the contract type which has a lookup attribute referencing localized masterdata attribute. The rule configured in English for such lookup will get evaluated upon changing its lookup values in languages other than English. Localization of rule implementation will work with the languages set through Locale Settings in Preferences.
For example, create a new agreement instance in French language for Saas Agreement contract type :
- Click Agreement Management > Create Agreement on the Home page. The Create Agreement page opens.
- Select Contract Type Name. For example, Saas Agreement.
- Click Next. The Attributes page opens.
- Select Chemical name. for example,Boron Nitride Powder.
- Enter remaining details on Attributes and Select Template tab.
- Verify and click Create and Publish. The agreement is created.
Chemical Name lookup references localized masterdata attribute Chemical Name. Changing its value evalutes the Approver rule (Approver – RG) and adds the approvers to the agreement’s team.
Localization of content in the agreement
The masterdata Agreement Language Master defines the attributes to store languages that will be used to create the localized agreement. Users can create instances of the Agreement Language Master contract type to add new languages.
Creation of Agreement Language Masterdata instance
- Click Configuration > Masterdata > Create Masterdata on the Home page. The Create Masterdata page opens.
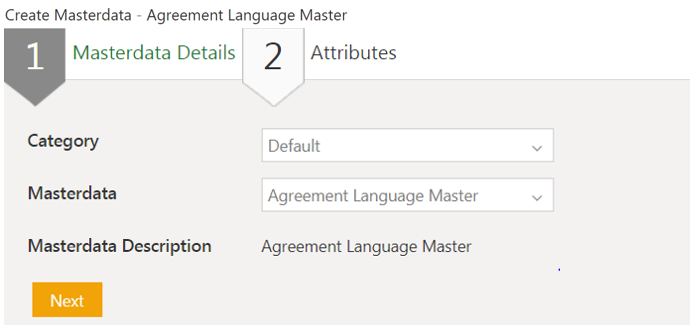
- Select Agreement Language Master in Masterdata field on Masterdata Details tab.
- Click Next. The Attributes tab opens.
- Enter language description in Description field. For example, Français (French).
- Enter remaining details and click Save. The masterdata instance is created.
Addition of Agreement Language attribute to the Contract type
The Agreement Language attribute is added to the contract type to enable the localization support for agreements. The localized agreement is displayed in a language selected in the Agreement Language attribute during agreement instance creation.
To add the agreement language attribute to the contract type to enable the clauses localization in a template:
- Click Configuration > Create Contract Type > Agreement on the Home page. The Select Contract Type page opens.
- Click Next. The Create Contract Type page opens.
- Enter a name in Contract Type Name. For example, ClauseLocalizationCT.
- Enter the remaining details on the Details tab.
- Click Next. The Attributes tab opens.
- Select the attribute Agreement Language.
- Toggle On the Is_Lookup field.
- Select Agreement Language Master in Select Contract Type field in Lookup section.
- Select Description in the Select Attribute field.
- Click Save. The Attribute updated successfully message is displayed.
- Enter the details in the remaining Association, Display Preference and Team tabs.
- Verify the details and click Create and Publish. The agreement contract type is created with agreement language attribute.
You can edit existing contract type to add agreement language attribute and enable the clauses localization into template for that contract type.
Localization support for Clauses into Templates
Previously in ICI, there was no provision to have localization of clauses that could be used to create agreements in different languages. Hence, the users had to create multiple templates to be able to create agreements in different languages.
With this release, users can create secondary clauses as the localized versions of a primary clause and enable them through configured template and rules. The corresponding clauses get assembled in the agreement as per the language selected in the Agreement Language attribute during the agreement instance creation. This considerably reduces the efforts of creating and managing multiple templates to support different languages.
Create localized clauses
Users can create secondary clauses in different languages as the localized versions of a primary clause in a parent-child relationship. Then a template can be configured with the primary clause that will be replaced with secondary clauses as per the selected agreement language and the configured rule to create localized agreements. This reduces the efforts to create and maintain many localized templates.
To create a primary clause:
- Click Clause Management > Create Clause on the Home page. The Create Clause page opens.
- Select Contract Type for which you want to localize the clauses. For example, ClauseLocalizationCT.
- Enter a name in Name field. For example, Primary Clause 1_SD.
- Select a language in the Clause Language field. For example, English.
- Toggle Primary Clause field to Yes.
- Enter Clause Text in English language.
- Enter remaining details on the Details and Team tab.
- Verify and click Create. The Primary Clause is created.
- Click Clause Management > Create Clause on the Home page. The Create Clause page opens.
- Select Contract Type for which you want to localize the clauses. For example, ClauseLocalizationCT.
- Enter a name in Name field. For example, Secondary Italian Clause.
- Select language in Clause Language field. For example, Italian.
- Toggle Primary Clause field to No.
- Select the primary clause in Linked Primary Clause. For example, Primary Clause 1_SD.
- Enter Clause Text in Italian language.
- Enter remaining details on the Details and Team tab.
- Verify and click Create. The Secondary Clause is created.
Create the Template
Users can create a template in which the localized clauses can be tagged and assembled as per the configured rules. With this, only one template with primary clause needs to be created which saves efforts to create and maintain number of localized templates.
To create a template through Icertis Experience for Word:
- Click ICI tab on Icertis Experience for Word and log in to the ICI UI instance.
- Click Create in Template ribbon. The Create Template window opens.
- Select the Contract Type for which you have enabled the localization for clauses into template. For example, ClauseLocalizationCT.
- Enter the name in Name field. For example, Template with multiple Primary Clauses.
- Select English in Template Language field.
- Click the checkbox next to Primary Template.
- Select Library Clauses. The list of all clauses for the contract type selected opens.
- Select a clause and right click. For example, Primary Clause 1_SD.
- Click Add > Rule Based Clause. The clause is added to the template.
- Click Save and approve the template.
You can create clauses and the template with tagged localized clauses also through Icertis Experience for Word.
Configure Template Rules
Users can configure a rule to select the template that has tagged localized clauses while authoring and executing an agreement.
Configure the Template Selection rule
To configure the Template Selection rule to select the template with tagged localized clauses:
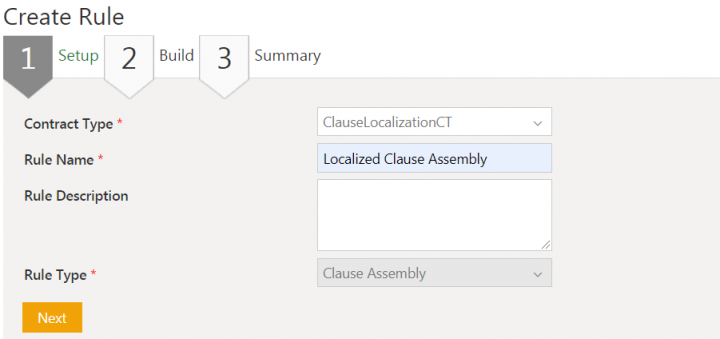
- Click Configuration > Rule > Create Rule on the Home page. The Create Rules page opens.
- Select the Contract Type for which you want to create a rule on the Setup tab. For example, ClauseLocalizationCT.
- Enter a name in the Rule Name field. For example, Localized Clauses Template Assembly.
- Select Template Selection in the Rule Type.
- Click Next. The Build tab opens.
- Click Add Rule on the Builder tab. The Add Rule section opens.
- Enter Conditions. For example, Name contains Localized Clauses Assembly.
- Select option Select Template in the Actions section.
- Select the template from the Select Templates window in the Template field. For example, Template with multiple Primary Clauses.
- Select No in Stop Processing More Rules field. The further evaluation of rules within a ruleset continues.
- Click Validate. The page to validate the rule by entering attributes values of the selected contract type opens.
- Click Next. The rule Summary tab opens.
- Click Create. The Rule created successfully message appears. The rule is displayed in the list of Rules of the selected contract type.
Configure a Clause Assembly rule
Users need to configure a Clause Assembly rule on a primary clause to assemble the localized secondary clauses in the template while authoring and executing an agreement.
To configure a rule:
- Click Configuration > Rule > Create Rule on the Home page. The Create Rules page opens.
- Select the Contract Type for which you want to create a rule on the Setup tab. For example, ClauseLocalizationCT.
- Enter a name in the Rule Name field. For example, Localized Clause Assembly Rule.
- Select Clause Assembly in the Rule Type.
- Click Next. The Build tab opens.
- Click Add Rule on the Builder tab. The Add Rule section opens.
- Enter Conditions. For example, Name Contains Localized Clauses Assembly.
- Select option Select Clause in the Actions section.
- Select clauses from Select Clause window. For example, Primary Clause 1_SD.
- Select No in Stop Processing More Rules field. The further evaluation of rules within a ruleset continues.
- Click Validate. The page to validate the rule by entering attributes values of the selected contract type opens.
- Click Next. The rule Summary tab opens.
- Click Create. The Rule created successfully message appears. The rule is displayed in the list of Rules of the selected contract type.
Create the agreement with localized clauses
Users can create localized agreement instances from contract type which has enabled the clause localization on templates.
To create an agreement instance:
- Click Agreement Management > Create Agreement on the Home page. The Create Agreement page opens.
- Select contract type that has clause localization enabled in Contract Type Name. For example, ClauseLocalizationCT.
- Click Next. The Attributes page opens.
- Select the language in Agreement Language field. For example, Italian.
- Enter remaining details and click Next. The Template Selection page opens.
- Select the Template and click Next. For example,Template with Multiple Primary Clauses.
- Verify the details and click Create and Publish. The agreement is created using the template with available secondary Italian clauses for the tagged primary clause.
To edit the agreement and change the agreement language:
- Click Edit on agreement details page. The Edit Agreement page opens.
- Select the language in Agreement Language field. For example, French.
- Click Next. The Template Selection page opens.
- Select the Template and click Next. For example, Template with Multiple Primary Clauses.
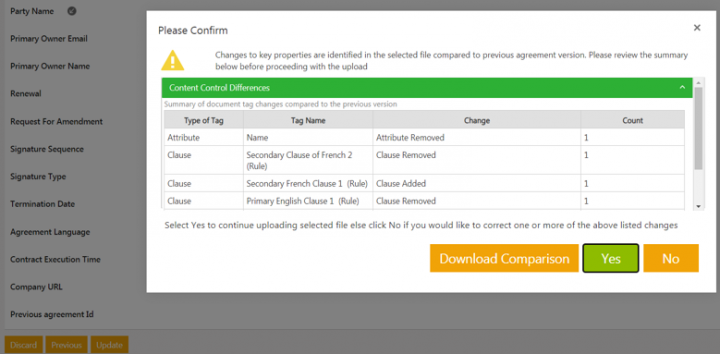
- Verify the details and click Update. The confirmation window with the edited field’s details opens.
- Click Yes. The agreement is updated.
The agreement is now created using the template with available secondary French clauses for the tagged primary clauses.
Localization of Associated document content in the agreement
Earlier in ICI, if the language preference was English and the user created an agreement using a French language template that had an association as a table, then the buyer could create the association instance and assemble the contract. However, the language for the entire assembled document would be French, but the association table header (title) would be in English.
This functionality has been improved so that the table header also appears in the same language as the remaining text in the template. In the example above, the entire assembled document as well as the association table header would be in French.
Creating a Saved search on associations
Users can create a saved search on associations to tag in a template using the Saved Search functionality. The search is saved as a global search.
For example, the SavedSearchwithculturecode_Annexure1 is created for associated documents Automation Annexure Assembly.
Creating the Template with Associations
User can create a Template with associations tagged as a table or as a saved search.
To create a template with associations:
- Click Insert > Add-ins > My Add-ins > See All > Shared Folder in MS Word. The list of ICI shared Add-ins opens.
- Select the instance. The Icertis Experience for Word opens.
- Click Create Template. The Details tab opens.
- Select Contract Type. For example, MDL Agreement.
- Enter a Name. For example, Template with Associations.
- Select the primary language in Select Language. For example, French.
- Select Secondary Language. For example, German.
- Click Library tab.
- Click Associations icon. The list of available associations open.
- Click checkbox for Display Locale for Associations. The selected languages are displayed in Select Localized Language field.
- Select a language in Select Localized Language field. For example, French.
- Select the association you want to tag in the template. For example, Automation Annexure Assembly.
- Select one of the options:
- Select Add as table. The associations are tagged in a template as a table in French language.
- Select Add with Saved Search. The Select Saved Search and Tag window opens.
- Select the saved search in drop-down. For example, SavedSearchwithculturecode_Annexure1.
- Click Add as table or Add as table with page break.
- Enter remaining details for creating a template.
- Click Save. The Template has been saved successfully message is displayed. The template is created with tagged associations.
- Click Send For Approval. The template is send for approval.
Similarly, create a template with the tagged associations without language (without culture code) through Icertis Experience for Word. For example, the MDL Agreement Basic Template.
Configure the Template Selection Rule
Users can configure a rule to select the template during agreement creation that has tagged associations.
To configure a rule:
- Click Configuration > Rule > Create Rule on the Home page. The Create Rules page opens.
- Select the Contract Type for which you want to create a rule on the Setup tab. For example, MDL Agreement.
- Enter a name in the Rule Name field. For example, MDL Template selection.
- Select Template Selections in the Rule Type.
- Click Next. The Build tab opens.
- Click Add Rule on the Builder tab. The Add Rule section opens.
- Enter Condition. For example, Type Of Paper Contains Own.
- Select option Select Template in the Actions section.
- Select the template from Select Template window. For example, Template with Associations (with culture code) and MDL Agreement with Template Selection (without culture code).
- Select No in Stop Processing More Rules field. The further evaluation of rules within a ruleset continues.
- Click Validate. The page to validate the rule by entering attributes values of the selected contract type opens.
- Click Next. The rule Summary tab opens.
- Click Create. The Rule created successfully message appears. The rule is displayed in the list of Rules of the selected contract type.
Creating an agreement with associations added as table
Users can add the associations in the agreement as a table. The association table headers will be displayed in localized language if the respective localized values have been uploaded in the database through technical configuration or the Translation Tool in Admin Task.
The language of the association table headers is based on the following conditions:
- If the template has the associations tagged with localized language (with culture code), the table headers are displayed in that selected language.
- If the template has the associations tagged without language (without culture code), the table headers are displayed in the language selected in the Agreement Language attribute during agreement creation. If there is no language selected, the table headers are displayed in default language.
To create the agreement:
- Click Agreement Management > Create Agreement on the Home page. The Create Agreement page opens.
- Select Contract Type Name. For example, MDL Agreement.
- Click Next. The Attributes page opens.
- Select the language in the Agreement Language attribute. For example, Spanish.
- Enter the remaining details.
- Click Next. The Select Template page opens. The templates will be available as per the configured rule.
- Select the Template. For example, Template with Association.
- Click Next.
- Verify the details and click Create. The agreement is created.
As the Template with Associations has the associations tagged with French language (with culture code), the association’s table headers are displayed in French language.
- Click Edit on the agreement Details page.
- Select the template MDL Agreement Basic Template on the Select Template page.
- Click Update. The agreement is updated.
Now, as the MDL Agreement Basic Template has the associations tagged without language (without culture code), the association table headers are displayed in Spanish, language selected in Agreement Language attribute.
Related Topic: Agreement Management | Rule
